


ansible aws
Let’s say you are a deep learning practitioner, but you don’t have an in-house GPU cluster or a machine learning platform at your disposal. Nobody trains their models on a CPU for almost a decade. Even worse, with models and datasets getting bigger, you have to deal with distributed deep learning and scale your training either in a model-parallel and/or data-parallel regimes. What can we do about it?
假设您是一名深度学习从业者,但您没有内部GPU集群或机器学习平台。 近十年来,没有人在CPU上训练他们的模型。 更糟糕的是,随着模型和数据集变得越来越大,您必须应对分布式深度学习并在模型并行和/或数据并行机制中扩展培训规模。 我们对于它可以做些什么呢?
We can follow the modern cloud paradigm and utilize some GPU-as-a-service. It will allow you to allocate the necessary infrastructure dynamically on demand and release it once you have finished. It works well, but this is where the main complexity lies. Modern deep learning frameworks like PyTorch Lightning or Horovod make data-parallel distributed learning easy nowadays. The most annoying and time-consuming thing is creating a proper environment because often we have to do it manually. Even for services that hide a lot of infrastructure complexity from you — like Google Collab or Paperscape — some manual work still needs to be done.
我们可以遵循现代的云范例,并利用一些GPU即服务。 它将允许您按需动态分配必要的基础结构,并在完成后将其释放。 它运作良好,但这是主要的复杂性所在。 如今,PyTorch Lightning或Horovod等现代深度学习框架使数据并行分布式学习变得容易。 最烦人,最耗时的事情是创建一个适当的环境,因为我们经常必须手动进行操作。 即使对于那些隐藏了许多基础架构复杂性的服务(例如Google Collab或Paperscape) ,仍然需要完成一些手动工作。
I’m a strong believer in that repetitive routine work is your enemy. Why? Here is my list of personal concerns:
我坚信重复性的日常工作是您的敌人。 为什么? 这是我个人关注的列表:
Reproducibility of results. Have you ever heard of a so-called human factor? We are very error-prone creatures and we are not good at memorizing something in great detail. The more human work some process involves the harder it will be to reproduce it in the future.
结果的重现性 。 您听说过所谓的人为因素吗? 我们是容易出错的生物,我们不擅长详细地记忆某些东西。 某个过程涉及的人力越多,将来复制它的难度就越大。
Mental distractions. Deep learning is an empirical endeavor and your progress in it relies deeply on your ability to iterate quickly and test as many hypotheses as you can. And due to that fact, anything that distracts you from your main task, — training and evaluating your models or analyzing the data, — negatively affects the success of an overall process.
精神分心 。 深度学习是一项经验性的工作,您在其中的进步在很大程度上取决于您能否快速迭代并测试尽可能多的假设。 因此,任何使您分心的事情(培训和评估模型或分析数据)都会对整个流程的成功产生负面影响。
Effectiveness. Computers do many things a lot faster than we, humans, do. When you have to repeat the same slow procedure over and over it all adds up.
效力。 计算机做很多事情的速度比人类快得多。 一遍又一遍地重复相同的缓慢过程时,所有这些都会加起来。
Routine is your enemy
例行公事是你的敌人
In this article, I’ll describe how you can automate the way you conduct your deep learning experiments.
在本文中,我将描述如何自动化进行深度学习实验的方式。
自动化您的深度学习实验 (Automate your Deep Learning experiments)
The following are three main ideas of this article:
以下是本文的三个主要思想:
- Utilize cloud-based infrastructure to dynamically allocate resources for your training purposes; 利用基于云的基础架构为培训目的动态分配资源;
- Use DevOps automation toolset to manage all manual work on the experiment environment setup; 使用DevOps自动化工具集来管理有关实验环境设置的所有手动工作;
- Write your training procedure in a modern deep learning framework that makes it capable of data-parallel distributed learning effortlessly. 在现代化的深度学习框架中编写您的培训程序,使其能够轻松地进行数据并行的分布式学习。

To actually implement these ideas we will utilize AWS cloud infrastructure, Ansible automation tool, and PyTorch Lightning deep learning library.
为了实际实施这些想法,我们将利用AWS云基础架构,Ansible自动化工具和PyTorch Lightning深度学习库。
Our work will be divided into two parts. In this article we will provide a minimal working example which:
我们的工作将分为两个部分。 在本文中,我们将提供一个最小的工作示例,该示例:
- Automatically creates and destroys EC2 instances for our deep learning cluster; 为我们的深度学习集群自动创建和销毁EC2实例;
- Establishes connectivity between them necessary for Pytorch and Pytorch Lightning distributed training; 在Pytorch和Pytorch Lightning分布式培训中建立必要的连接;
- Creates a local ssh config file to enable connection to the cluster; 创建本地ssh配置文件以启用与集群的连接;
- Creates a Python virtual environment and installs all library dependencies for the experiment; 创建一个Python虚拟环境并安装该实验的所有库依赖项;
- Provides a submit script to run distributed data-parallel workloads on the created cluster. 提供提交脚本以在创建的集群上运行分布式并行数据工作负载。
In the next article, we will add additional features and build a fully automated environment for distributed learning experiments.
在下一篇文章中,我们将添加其他功能并构建用于分布式学习实验的全自动环境。
Now, let’s take a brief overview of the chosen technology stack.
现在,让我们简要概述所选的技术堆栈。
什么是AWS EC2? (What is AWS EC2?)

AWS Elastic Compute Cloud (EC2) is a core AWS service that allows you to manage virtual machines in Amazon data centers. With this service you can dynamically create and destroy your machines either manually via AWS Console or via API provided by AWS SDK.
AWS Elastic Compute Cloud(EC2)是一项核心AWS服务,可让您管理Amazon数据中心中的虚拟机。 使用此服务,您可以通过AWS控制台或AWS SDK提供的API手动动态创建和销毁计算机。
As of today, AWS provides a range of GPU-enabled instances for our purposes with one or multiple GPUs per instance and different choices of NVIDIA GPUs: Tesla GRID K520, M60, K80, T4, V100. See the official site for a full list.
截至今天,AWS为我们的目的提供了一系列支持GPU的实例,每个实例一个或多个GPU以及NVIDIA GPU的不同选择:Tesla GRID K520,M60,K80,T4,V100。 有关完整列表,请参见官方网站 。
什么是Ansible? (What is Ansible?)

Ansible is a tool for software and infrastructure provisioning and configuration management. With Ansible you can remotely provision a whole cluster of remote servers, provision software on them, and monitor them.
Ansible是用于软件和基础结构预配以及配置管理的工具。 使用Ansible,您可以远程配置整个群集的远程服务器,在其上配置软件并对其进行监视。
It is an open-source project written in Python. It uses a declarative approach: you define a desired system state, and Ansible executes necessary actions. To do that you use ordinary YAML files. Declarative nature of Ansible also means that most of the instructions you define for it are idempotent: if you run it more than once it would not cause any undesirable side effects.
这是一个用Python编写的开源项目。 它使用声明式方法:定义所需的系统状态,然后Ansible执行必要的操作。 为此,您可以使用普通的YAML文件。 Ansible的声明性性质还意味着您为其定义的大多数指令都是幂等的:如果多次运行它,不会造成任何不良影响。
One of the distinctive features of Ansible is that it is agent-less, i.e. it doesn’t require any agent software to be installed on the manageable nodes. It operates solely via SSH protocol. So the only thing you need to ensure is the SSH connectivity between the control host on which you run Ansible commands and the inventory hosts you want to manage.
Ansible的显着特征之一是它不需要代理,即不需要在可管理节点上安装任何代理软件。 它仅通过SSH协议运行。 因此,您唯一需要确保的是运行Ansible命令的控制主机与要管理的清单主机之间的SSH连接。
Ansible核心概念 (Ansible core concepts)
Let’s dive a bit into the core concepts of Ansible. There are not many of those, so you can quickly get your head around them and start playing with this brilliant tool.
让我们深入探讨Ansible的核心概念。 这些工具并不多,因此您可以快速了解它们并开始使用这个出色的工具。
Inventory
库存
Inventory is simply a list of hosts you want to manage with Ansible. They are organized into named groups. You can define inventory in an INI-formatted file if you have a static predefined infrastructure. Another way — use inventory plugins that will tell Ansible which hosts to operate on if your infrastructure is not known in advance or may change dynamically (like in our case here).
清单只是您要使用Ansible管理的主机列表。 它们分为命名组。 如果您具有静态的预定义基础结构,则可以以INI格式的文件定义清单。 另一种方法-使用清单插件,如果您的基础架构事先未知或可能动态更改(例如此处的情况),则可以告诉Ansible要在哪个主机上进行操作。
Modules
模组
A module is the unit of work that you can perform in Ansible. There is a massive library of modules you can use in Ansible. And it constitutes an extremely extensible architecture. See the module index.
模块是您可以在Ansible中执行的工作单元。 您可以在Ansible中使用大量的模块库。 并且它构成了极其可扩展的体系结构。 请参阅模块索引 。
Variables
变数
Nothing fancy here. You can define variables like in any programming language either to separate your logic from the data or to pass information between parts of your system. Ansible collects a lot of system information and stores them in predefined variables — facts. You can read more about variables in the official documentation.
这里没什么好看的。 您可以像使用任何编程语言一样定义变量,以将逻辑与数据分离或在系统各部分之间传递信息。 Ansible收集了大量系统信息,并将它们存储在预定义的变量(事实)中。 您可以在官方文档中阅读有关变量的更多信息。
Tasks
任务
A task is a module invocation with some parameters. You can also define a name, variable to store the result, conditional and loop expressions for the task. Here is an example of a task that copies some local file into a remote computer’s file system when some_variable variable is defined:
任务是带有某些参数的模块调用。 您还可以定义名称,变量以存储结果,任务的条件表达式和循环表达式。 这是一个任务示例,当定义some_variable变量时,该任务将一些本地文件复制到远程计算机的文件系统中:

Plays
播放
A play in Ansible is a way to apply a list of tasks to a group of hosts from inventory. You define a play as a dictionary in YAML. hosts parameter specifies an inventory group and tasks parameter contains a list of tasks.
Ansible中的游戏是一种将任务列表从清单中应用到一组主机的方法。 您在YAML中将戏剧定义为字典。 hosts参数指定库存组和tasks参数 包含任务列表。
Playbooks
剧本
A playbook is just a YAML file that contains a list of plays to run. The way to run a playbook is to pass it to ansible-playbook CLI that comes with Ansible installation.
剧本只是一个YAML文件,其中包含要运行的播放列表。 运行剧本的方法是将其传递给Ansible安装随附的ansible -playbook CLI。
Here’s a diagram to illustrate how these concepts interplay with each other:
这是说明这些概念如何相互作用的图表:

There are also more advanced concepts in Ansible that allow you to write more modular code for complex scenarios. We’ll use some of them in Part 2 of the article.
Ansible中还有更高级的概念,可让您为复杂的场景编写更多的模块化代码。 我们将在本文的第2部分中使用其中的一些。
什么是Pytorch Lightning? (What is Pytorch Lightning?)

Pytorch Lightning is a high-level library on top of PyTorch. You can think of it as a Keras for PyTorch. There are a couple of features that make it stand out from the crowd of other PyTorch-based deep learning libraries:
Pytorch Lightning是PyTorch之上的高级库。 您可以将其视为PyTorch的Keras。 有许多功能使其在其他基于PyTorch的深度学习库中脱颖而出:
It is transparent. As authors have written in the documentation, it is more a convention to write a Pytorch code than a separate framework. You don’t need to learn another library and you don’t need to make a huge effort to convert your ordinary PyTorch code to use it with Pytorch-Lightning. Your PyTorch Lightning code is actually your PyTorch code.
它是透明的 。 正如作者在文档中所写的那样,编写Pytorch代码比单独的框架更像是一种约定。 您无需学习其他库,也无需付出巨大的努力即可将普通的PyTorch代码转换为可与Pytorch-Lightning一起使用。 您的PyTorch Lightning代码实际上就是您的PyTorch代码。
It hides a lot of boilerplate engineering code. Pytorch is a brilliant framework but when it comes to conducting full-featured experiments with it, you quickly end up with a lot of code that is not particularly related to the actual research you are doing. And you have to repeat this work every time. Pytorch Lighting provides this functionality for you. Specifically, it adds distributed data-parallel learning capability to your model with no modifications to the code required from you at all!
它隐藏了许多样板工程代码 。 Pytorch是一个出色的框架,但是在使用它进行功能齐全的实验时,您很快就会得到很多与您实际研究无关的代码。 而且您每次都必须重复这项工作。 Pytorch Lighting为您提供此功能。 具体来说,它为您的模型增加了分布式并行数据学习功能,而根本不需要您修改任何代码!
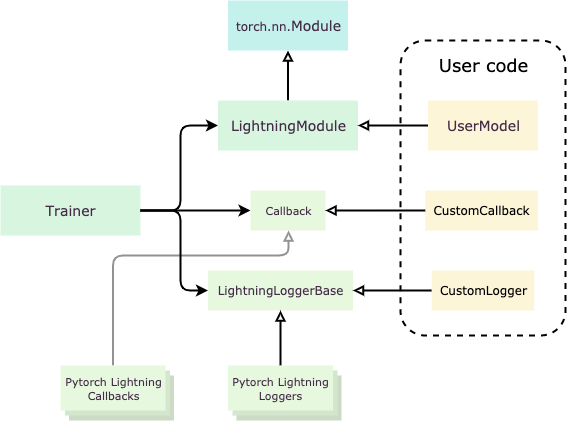
It is simple. All PyTorch Lightning code base revolves around a few number of abstractions:
很简单 。 所有PyTorch Lightning代码库都围绕以下几种抽象:
LightningModuleis a class that organizes your PyTorch code. The way you use PyTorch Lightning is by creating a custom class that is inherited fromLightningModuleand implementing its virtual methods.LightningModuleitself is inherited from PyTorch Module.LightningModule是组织您的PyTorch代码的类。 使用PyTorch Lightning的方式是创建一个自LightningModule继承的自定义类,并实现其虚拟方法。LightningModule本身是从PyTorch模块继承的。Trainerautomates your training procedure. Once you’ve organized your PyTorch code into a LightningModule, you pass its instance to aTrainerand it does the actual heavy lifting of training.Trainer自动执行您的培训程序。 将PyTorch代码组织到LightningModule中后,您将其实例传递给Trainer,它会进行繁重的培训。Callbacks,LoggersandHooksare the means to customize theTrainer’s behavior.Callbacks,Loggers和Hooks是自定义Trainer行为的方式。
For more information read the official documentation.
有关更多信息,请阅读官方文档 。
Okay, enough talking, let’s start building.
好吧,足够多的谈话,让我们开始吧。

建立实验工具集 (Building the experimentation toolset)
In the rest of the article I’ll walk you through a step-by-step process of building our experimentation environment. Here is a link to a GitHub repo if you are interested in the final result. Also, look at part 2 where we’ll add additional features to our toolset.
在本文的其余部分,我将引导您逐步构建我们的实验环境。 如果您对最终结果感兴趣,这是指向GitHub存储库的链接 。 另外,请看第2部分,我们将在工具集中添加其他功能。
设置AWS账户和Ansible (Setup AWS Account and Ansible)
Let’s install Ansible and configure it to work with AWS.
让我们安装Ansible并将其配置为与AWS一起使用。
Setup AWS account and configure AWS SDK
设置AWS账户并配置AWS开发工具包
If you don’t have an AWS account the first thing you need to do is to set up one. To do that go to Create New Account link from the official documentation and follow the instructions.
如果您没有AWS账户,那么您要做的第一件事就是设置一个。 为此,请转到官方文档中的“ 创建新帐户”链接,然后按照说明进行操作。
Next, let’s install AWS SDK to get an API access to AWS required by Ansible:
接下来,让我们安装AWS开发工具包以获取Ansible所需的对AWS的API访问:
pip install botoWe need credentials for AWS API. To obtain them log in to your AWS console and follow the instructions. Choose a programmatic access option and apply the AdministratorAccess policy to give administrative access to your API. Yes, this is not a good practice in general, so you should change this in the future to more restrictive privileges.
我们需要AWS API的凭证。 要获取它们,请登录到您的AWS控制台并按照说明进行操作 。 选择一个编程访问选项,然后应用AdministratorAccess策略来授予对您的API的管理访问权限。 是的,通常这不是一个好习惯,因此您应该在将来将其更改为更具限制性的特权。
Put your newly created user credentials to your .bashrc file:
将新创建的用户凭据放入.bashrc文件中:
echo "export AWS_ACCESS_KEY_ID=<your key id>" >> ~/.bashrc
echo "export AWS_SECRET_ACCESS_KEY=<your secret key>" >> ~/.bashrc
source ~/.bashrc
Setup SSH keys and get default VPC ID
设置SSH密钥并获取默认的VPC ID
We’ll be using the default SSH key pair (~/.ssh/id_rsa and ~/.ssh/id_rsa.pub) to connect to EC2 instances. If you don’t already have one on your system you should generate it with the ssh-keygen tool. Once generated, register it in the AWS EC2 service. You can do it under the Key Pairs menu options in the EC2 service of the AWS console. Please note, that keys are region-specific, so you need to register them under the same region you plan to create your EC2 instances in.
我们将使用默认的SSH密钥对( ~/.ssh/id_rsa和~/.ssh/id_rsa.pub )连接到EC2实例。 如果您的系统上还没有,请使用ssh-keygen工具生成它。 生成后,将其注册到AWS EC2服务中。 您可以在AWS控制台的EC2服务中的“ 密钥对”菜单选项下执行此操作。 请注意,密钥是特定于区域的,因此您需要在计划在其中创建EC2实例的区域内注册它们。
Next, we need to copy the ID of the default VPC. VPC (Virtual Private Network) is a virtual network in the AWS cloud where you connect your EC2 instances and other AWS services. We’ll be using default VPC for our experiments. Go to the VPC service in AWS console and open the list of all VPCs in a region. Find the one where the Default VPC column value is set to Yes.
接下来,我们需要复制默认VPC的ID。 VPC(虚拟专用网络)是AWS云中的虚拟网络,您可以在其中连接EC2实例和其他AWS服务。 我们将使用默认的VPC进行实验。 转到AWS控制台中的VPC服务,然后打开区域中所有VPC的列表。 找到默认VPC列值设置为Yes的那个。
Finally, create a config.yaml file and write the registered SSH pair name and VPC ID to it:
最后,创建一个config.yaml文件,并向其中写入注册的SSH对名称和VPC ID:
aws_ssh_key: <your registered ssh key pair name here>
vpc_id: <ID of your default VPC>
We will import this file later in our Ansible playbooks.
我们稍后将在Ansible剧本中导入此文件。
Setup Ansible
设置Ansible
Ansible is written in Python and so can be easily installed with a single command:
Ansible用Python编写,因此可以通过一个命令轻松安装:
pip install ansible==2.9.9You can install the latest version or the one I was using while writing this article.
您可以安装最新版本,也可以安装我在撰写本文时使用的版本。
Disable Ansible host key checking
禁用Ansible主机密钥检查
Since we won’t have a predefined static infrastructure it’s more convenient to disable host key check by Ansible. You can do it globally for all users in /etc/ansible/ansible.cfg, globally for the specific user in ~/.ansible.cfg, or locally for the given project in ./ansible.cfg. Either way create a file with the following contents:
由于我们没有预定义的静态基础结构,因此更方便地禁用Ansible的主机密钥检查。 您可以在/etc/ansible/ansible.cfg为所有用户全局执行此操作,在~/.ansible.cfg为特定用户全局执行此操作,或在./ansible.cfg为给定项目本地./ansible.cfg 。 不管哪种方式,创建一个具有以下内容的文件:
[defaults]
host_key_checking = False
Configure Ansible AWS EC2 dynamic inventory plugin
配置Ansible AWS EC2动态清单插件
Remember Ansible inventory plugins? Because we create our EC2 instances dynamically and don’t assign any predefined DNS names to them, we don’t know their addresses in advance. AWS EC2 inventory plugin will help us here and provide them for our playbooks. We need to create the following configuration file for it:
还记得Ansible库存插件吗? 因为我们是动态创建EC2实例的,并且没有为它们分配任何预定义的DNS名称,所以我们事先不知道它们的地址。 AWS EC2库存插件将在这里为我们提供帮助,并为我们的剧本提供它们。 我们需要为其创建以下配置文件:
plugin: aws_ec2
regions:
  - eu-central-1
filters:
  tag:managed_by: ansible
Here you define where and how the plugin will look for instances. regions field contains the AWS regions list. filters field defines metadata attributes by which to filter the instances of interest. We use a managed_by tag to identify them. Later we will assign this tag to the instances that we create with our toolset.
在这里,您可以定义插件在何处以及如何查找实例。 regions字段包含AWS区域列表。 filters字段定义元数据属性,通过这些元数据属性可以过滤感兴趣的实例。 我们使用managed_by标记来识别它们。 稍后,我们将此标签分配给我们使用工具集创建的实例。
Install additional dependencies for submit script
安装其他依赖项以提交脚本
Our submit script will require a couple of additional Python packages installed on our local workstation:
我们的提交脚本将需要在本地工作站上安装另外两个Python软件包:
pip install Click==7.0 fabric==2.5.0 patchwork==1.0.1我们解决方案的总体描述 (Overall description of our solution)
We will use the following Ansible modules and plugins to get the job done:
我们将使用以下Ansible模块和插件来完成工作:
ec2module to create EC2 instances;ec2模块创建EC2实例;ec2_groupmodule to create a security group for our EC2 instances;ec2_group模块为我们的EC2实例创建一个安全组;ec2_placement_groupmodule to create a cluster placement group for EC2 instances;ec2_placement_group模块为EC2实例创建集群放置组;aws_ec2inventory plugin to discover created EC2 instances and add them to the inventory;aws_ec2清单插件可发现创建的EC2实例并将其添加到清单中;ec2_instancemodule to terminate our instances.ec2_instance模块终止我们的实例。
To submit our training scripts to the cluster we’ll use the fabric python package.
要将训练脚本提交到集群,我们将使用fabric python包。
The code will be divided into the following files:
该代码将分为以下文件:
setup-play.yml: playbook that creates EC2 infrastructure for the experiment. Additionally, it imports the environment playbook;setup-play.yml:为实验创建EC2基础结构的剧本。 此外,它还导入环境手册。environment-play.yml: playbook that provisions the environment needed for the experiment on EC2 instances;environment-play.yml:提供在EC2实例上进行实验所需的环境的剧本;cleanup-play.yml: playbook that destroys EC2 instances and releases resources;cleanup-play.yml:破坏EC2实例并释放资源的剧本;config.yml: variables file that contains all configuration for the experiment environment;config.yml:变量文件,其中包含实验环境的所有配置;aws_ec2.yml: configuration file for AWS EC2 dynamic inventory plugin;aws_ec2.yml:AWS EC2动态清单插件的配置文件;submit.py: CLI to submit training scripts to run on the cluster.submit.py提交培训脚本以在集群上运行。
Setup infrastructure playbook
设置基础设施手册
- hosts: localhost
  name: Setup Infrastructure and Provision Environment
  remote_user: ubuntu
  gather_facts: False


  tasks:
    - include_vars: config.yaml


    - name: Create placement group
      ec2_placement_group:
        name: dl-cluster-pg
        region: "{{ region }}"
        strategy: cluster


    - name: Create Security Group
      ec2_group:
        name: dl-cluster-sg
        description: security group for deep learning cluster
        vpc_id: "{{ vpc_id }}"
        region: "{{ region }}"
        rules:
          - proto: all
            group_name: dl-cluster-sg
          - proto: tcp
            ports:
              - 22
            cidr_ip: 0.0.0.0/0


    - name: Create ec2 instances
      ec2:
        key_name: "{{ aws_ssh_key }}"
        group: dl-cluster-sg
        placement_group: dl-cluster-pg
        instance_type: "{{ instance_type }}"
        image: "{{ ami_id }}"
        wait: true
        exact_count: "{{ instance_count }}"
        region: "{{ region }}"
        zone: "{{ zone }}"
        count_tag:
          managed_by: ansible
          name: "{{ instance_tag }}"
        instance_tags:
          managed_by: ansible
          name: "{{ instance_tag }}"
      register: ec2


    - name: Get master node private ip
      set_fact:
        master_node: "{{ ec2.instances.0.private_ip }}"


    - name: Write SSH config file
      shell: |
        echo "Host worker{{ item_idx }}" >> ssh_config
        echo "   User ubuntu" >> ssh_config
        echo "   Hostname {{ item.public_ip }} " >> ssh_config
        echo >> ssh_config
      loop: "{{ ec2.instances }}"
      loop_control:
        index_var: item_idx


    - name: Add all instance public IPs to host group
      add_host: hostname={{ item.public_dns_name }} groups=aws_ec2
      loop: "{{ ec2.instances }}"


    - name: Wait for SSH to come up
      delegate_to: "{{ item.public_dns_name }}"
      wait_for_connection:
        delay: 60
        timeout: 320
      loop: "{{ ec2.instances }}"


- hosts: aws_ec2
  name: Configure connectivity
  remote_user: ubuntu
  gather_facts: true


  tasks:
    - name: Setup environment for PyTorch connectivity
      shell: |
        echo "export NODE_RANK={{ groups['aws_ec2'].index(inventory_hostname) }}" >> /home/ubuntu/.bash_profile
        echo "export WORLD_SIZE={{ groups['aws_ec2']|length }}" >> /home/ubuntu/.bash_profile
        echo "export MASTER_ADDR={{ hostvars['localhost']['master_node'] }}" >> /home/ubuntu/.bash_profile
        echo "export MASTER_PORT=33333" >> /home/ubuntu/.bash_profile

- import_playbook: environment-play.yml
This playbook contains two plays. The first one is executed on the control node (i.e. on our local workstation), and its job is to create the EC2 infrastructure for our cluster. Let’s walk through its tasks:
这本剧本包含两个剧本。 第一个在控制节点(即我们的本地工作站)上执行,其工作是为我们的集群创建EC2基础架构。 让我们看一下它的任务:
- create a cluster placement group. We will provide it later to our EC2 instances to suggest AWS to place them close to each other and reduce the latency of network communication; 创建一个集群放置组。 我们将在稍后将其提供给EC2实例,以建议AWS将它们彼此靠近放置并减少网络通信的延迟。
- create a security group to configure instances’ firewall rules. We allow all traffic between instances and SSH traffic to them from the Internet. Note that we pass variables defined in config.yml; 创建一个安全组来配置实例的防火墙规则。 我们允许实例之间的所有流量以及从Internet到实例的SSH流量。 注意,我们传递了在config.yml中定义的变量。
create EC2 instances with the
ec2module. We tag them so that theaws_ec2dynamic inventory plugin will be able to find them later. We register the result of this task into theec2variable;使用
ec2模块创建EC2实例。 我们对其进行标记,以便aws_ec2动态广告资源插件可以在以后找到它们。 我们将该任务的结果注册到ec2变量中;- store the local IP address of the first created instance to make it a master node in our deep learning cluster; 存储第一个创建的实例的本地IP地址,使其成为我们的深度学习集群中的主节点;
- create an SSH config file to be able to connect to the instances outside of Ansible; 创建一个SSH配置文件以能够连接到Ansible之外的实例;
- add created instances to a new host group into the hosts' inventory so that the second play will be able to operate on them; 将创建的实例添加到主机清单中的新主机组中,以便第二轮操作可以在它们上进行;
- wait until created instances will be ready to accept SSH traffic 等待创建的实例准备好接受SSH流量
The second play contains a single task and its goal is to define environment variables necessary for PyTorch Lightning.
第二幕包含一个任务,其目标是定义PyTorch Lightning所需的环境变量。
And, finally, we import the environment playbook.
最后,我们导入环境手册。
Provision environment playbook
供应环境剧本
- name: Setup environment for experiment
  hosts: aws_ec2
  remote_user: ubuntu


  tasks:
    - include_vars: config.yaml


    - name: Install virtualenv
      pip:
        executable: "pip{{python.version}}"
        name: virtualenv
      become: true


    - name: Copy requirements.txt
      copy:
        src: ddp_train_example.requirements.txt
        dest: /home/ubuntu/requirements.txt


    - name: Install experiment python dependencies
      pip:
        virtualenv_python: "python{{python.version}}"
        virtualenv: "{{ python.virtualenv }}"
        requirements: /home/ubuntu/requirements.txt
With this playbook, we deploy an environment (and changes to it) to the instances. It is relatively simple and contains only 3 steps:
借助此剧本,我们将环境(及其更改)部署到实例。 它相对简单,仅包含3个步骤:
- create Python virtualenv for the experiment 为实验创建Python virtualenv
- copy requirements.txt file with all third party dependencies 复制所有第三方依赖项的requirements.txt文件
- install them 安装它们
Clean up playbook
清理剧本
- name: Upload results
  hosts: aws_ec2
  remote_user: ubuntu


  tasks:
    - include_vars: config.yaml


    - name: Terminate ec2 instances
      ec2_instance:
        state: absent
        region: "{{ region }}"
        filters:
          tag:name: "{{ instance_tag }}"
      delegate_to: localhost
      run_once: true


    - name: Cleanup ssh config file
      file:
        state: absent
        path: ssh_config
      delegate_to: localhost
      run_once: true
This playbook allows you to terminate your EC2 instances and delete the SSH config file.
此剧本可让您终止EC2实例并删除SSH配置文件。
And finally, let's look at the configuration file that you should customize for each experiment’s needs.
最后,让我们看一下您应该针对每个实验的需求自定义的配置文件。
Configuration file
配置文件
We have already created this file in the preparation section. Here is a final version with some additional parameters added:
我们已经在准备部分中创建了此文件。 这是最终版本,其中添加了一些其他参数:
# registered ssh key to use. Use you default id_rsa.pub or modify the code
aws_ssh_key: < your registered ssh key pair name here >


ami_id: ami-0163b0951ed4a6b22 # Deep Learning Base AMI (Ubuntu 18.04) Version 23.0


instance_count: 2


instance_type: g4dn.xlarge


region: eu-central-1


zone: eu-central-1b


# VPC to run EC2 instances in (most of the time fill id of default VPC here)
vpc_id: < id of your default VPC >


# tag to identify instances for cleanup
instance_tag: dl-experiment


python:
  version: 3.6
  virtualenv: /home/ubuntu/.venv
Okay, so what do we have at the moment?
好吧,那我们现在有什么?
We can provide kind and number instances we want to create in our configuration file and specify libraries we want to install on them in requirements.txt file, and then run a single command:
我们可以在配置文件中提供要创建的种类和数字实例,并在requirements.txt文件中指定要安装在它们上的库,然后运行一个命令:
ansible-playbook setup-play.yml
ansible-playbook setup-play.yml
After a couple of minutes, a ready-to-use cluster will be at our disposal. We can SSH to its instances via:
几分钟后,即可使用现成的集群。 我们可以通过以下方式SSH到其实例:
ssh -i ssh_config worker[x]
ssh -i ssh_config worker[x]
When we are done, we can destroy it with:
完成后,可以使用以下方法销毁它:
ansible-playbook -i aws_ec2.yaml cleanup-play.yml
ansible-playbook -i aws_ec2.yaml cleanup-play.yml
Now let’s streamline code deployment and actual running of the training procedure on our new shiny deep learning cluster.
现在,让我们在新的闪亮的深度学习集群上简化代码部署和培训过程的实际运行。
向集群部署培训过程 (Deploy a training procedure to the cluster)
First, let’s create an example model and a training procedure.
首先,让我们创建一个示例模型和训练过程。
Training procedure example
培训程序示例
To make things simple and concentrate on the topic of the article I’ve picked the deep learning “Hello, world!” example. Let’s take a simple 3-layer fully-connected network and train it on the MNIST dataset. The code is pretty self-explanatory and consists of a simple lightning model and the main procedure that fits this model with a Trainer.
为了使事情变得简单并集中于本文的主题,我选择了深度学习的“ Hello,world!”。 例。 让我们采用一个简单的3层全连接网络并将其训练在MNIST数据集上。 该代码是不言自明的,由一个简单的闪电模型和将该模型与Trainer配合的main过程组成。
#!/usr/bin/env python3
"""
example training on MNIST dataset
"""


import os
import pathlib
from typing import Any, Dict, List


import hydra
import pytorch_lightning as pl
import torch
from omegaconf import OmegaConf
from torch.nn import functional as F
from torch.optim import Adam
from torch.utils.data import DataLoader
from torchvision import datasets, transforms


# pylint: disable=no-member


class SimpleMnistExample(pl.LightningModule):
    """
    Simple pytorch-lightning system: FFNN on MNIST dataset to
    show pytorch-lightning distributed learning capabilities.
    """


    def __init__(self):
        super().__init__()
        self.layer_1 = torch.nn.Linear(28 * 28, 128)
        self.layer_2 = torch.nn.Linear(128, 256)
        self.layer_3 = torch.nn.Linear(256, 10)


        self.train_dataset = None
        self.valid_dataset = None


    def forward(self, x: torch.Tensor) -> torch.Tensor:
        batch_size, channels, width, height = x.size()
        x = x.view(batch_size, -1)
        x = self.layer_1(x)
        x = F.relu(x)
        x = self.layer_2(x)
        x = F.relu(x)
        x = self.layer_3(x)
        x = F.log_softmax(x, dim=1)
        return x


    def prepare_data(self):


        transform = transforms.Compose([
            transforms.ToTensor(),
            transforms.Normalize((0.1307,), (0.3081,))
        ])


        data_dir = pathlib.Path.home() / 'data'
        train_set = datasets.MNIST(data_dir, train=True,
                                   download=True, transform=transform)
        valid_set = datasets.MNIST(data_dir, train=False,
                                   download=True, transform=transform)


        self.train_dataset = train_set
        self.valid_dataset = valid_set


    def train_dataloader(self) -> DataLoader:
        return DataLoader(self.train_dataset, batch_size=64)


    def val_dataloader(self) -> DataLoader:
        return DataLoader(self.valid_dataset, batch_size=64)


    def configure_optimizers(self):
        return Adam(self.parameters(), lr=1e-3)


    def training_step(self,
                      batch: Dict[str, Any],
                      batch_idx: int) -> Dict[str, Any]:
        x, y = batch
        predict = self(x)
        loss = F.nll_loss(predict, y)


        logs = {'loss': loss}
        return {'loss': loss, 'log': logs}


    def validation_step(self,
                        batch: Dict[str, Any],
                        batch_idx: int) -> Dict[str, Any]:
        x, y = batch
        predict = self(x)
        loss = F.nll_loss(predict, y)


        predict = torch.argmax(predict, dim=1)
        correct = (predict == y).sum()


        return {'val_loss': loss, 'correct': correct, 'size': y.numel()}


    def validation_epoch_end(self,
                             outputs: List[Any]) -> Dict[str, Any]:


        avg_loss = torch.stack([x['val_loss'] for x in outputs]).mean()


        correct = torch.stack([x['correct'] for x in outputs]).sum().float()
        overall = torch.FloatTensor([x['size'] for x in outputs]).sum()
        val_accuracy = correct / overall


        tensorboard_logs = {
            'val_loss': avg_loss,
            'val_acc': val_accuracy
        }


        print(f"\n\nValidation epoch results:\n{tensorboard_logs}\n")


        return {'avg_val_loss': avg_loss, 'val_acc': val_accuracy, 'log': tensorboard_logs}


@hydra.main(config_path='ddp_train_example.yaml')
def main(conf: OmegaConf):


    if 'RANK' in os.environ:
        os.environ['NODE_RANK'] = os.environ['RANK']


    model = SimpleMnistExample()


    trainer = pl.Trainer(gpus=conf.gpus,
                         num_nodes=conf.num_nodes,
                         distributed_backend=conf.distributed_backend,
                         max_epochs=conf.max_epochs)
    trainer.fit(model)


if __name__ == '__main__':
    main()  # pylint: disable=no-value-for-parameter
It uses the awesome hydra library for parameterization. Here’s a YAML file with parameters:
它使用很棒的hydra库进行参数化。 这是带有参数的YAML文件:
gpus: 0
num_nodes: 1
distributed_backend: null
max_epochs: 30
The default parameters in the file allow us to run the script on a local laptop without any GPU in a single-node mode. Let’s run the script locally and make sure it works:
该文件中的默认参数使我们可以在本地笔记本电脑上运行脚本,而无需在单节点模式下使用任何GPU。 让我们在本地运行脚本,并确保它可以运行:
python ddp_train_example.py max_epochs=5Now, as I said earlier, the great feature of PyTorch Lightning is that you literally don’t have to change anything in the code to run it in a data-parallel distributed mode on the cluster. The only thing we need to change is a couple of parameters passed to the Trainer instance which we defined in our hydra configuration. To run our script on two nodes with one GPU on each we should invoke it the following way:
现在,正如我之前说的,PyTorch Lightning的强大功能在于,您实际上无需更改代码中的任何内容即可在集群上以数据并行分布式模式运行它。 我们唯一需要更改的是将几个参数传递给我们在hydra配置中定义的Trainer实例。 要在两个节点上运行我们的脚本,每个节点上都有一个GPU,我们应该通过以下方式调用它:
python ddp_train_example.py gpus=1 num_nodes=2 \ distributed_backend=ddpThe only thing left to be done is to implement a reusable CLI to submit our training script to the cluster.
剩下要做的唯一事情就是实现可重用的CLI,以将我们的训练脚本提交给集群。
Submit script
提交脚本
The submit CLI will take any Python script with its arguments as parameters. It will sync all files within the current working directory and run the given script on all cluster nodes. With fabric Python library we can do it with a few lines of code:
提交CLI将采用其参数作为参数的任何Python脚本。 它将同步当前工作目录中的所有文件,并在所有群集节点上运行给定脚本。 使用Fabric Python库,我们可以用几行代码来做到这一点:
#!/usr/bin/env python3
"""
CLI to submit commands on remote nodes
"""


import pathlib
from typing import List, Union


import click
import yaml
from fabric import Config, Connection
from patchwork.transfers import rsync


class RunConfig:
    """
    Parser of environment config file
    """


    _shared = {}


    def __init__(self, config: str = './config.yaml'):
        self.__dict__ = self._shared
        if not hasattr(self, 'config'):
            with open(config) as rf:
                self.config = yaml.safe_load(rf)


    @property
    def python(self) -> str:
        return str(pathlib.Path(self.config['python']['virtualenv']) / 'bin' / 'python')


    @property
    def pip(self) -> str:
        return str(pathlib.Path(self.config['python']['virtualenv']) / 'bin' / 'pip')


@click.command()
@click.argument('command', type=str)
@click.argument('params', nargs=-1, type=str)
def main(command: str, params: List[str]):
    config = Config(runtime_ssh_path='./ssh_config')
    hosts = config.base_ssh_config.get_hostnames()
    workers = [x for x in hosts if x.startswith('worker') and x != 'worker0']
    master = 'worker0'


    results = [run(Connection(host, config=config), command, params, asynchronous=True)
               for host in workers]


    run(Connection(master, config=config), command, params)


    for result in results:
        result.join()


def run(con: Connection,
        command: str,
        params: List[str],
        asynchronous: bool = False) -> Union['Result', 'Promise']:


    cfg = RunConfig()


    src = pathlib.Path().absolute() / '*'
    dst = 'experiment'
    rsync(con, str(src), dst, exclude=['.git', '__pycache__', 'outputs'])


    command = command + ' ' + ' '.join(params)
    command = f"source ~/.bash_profile; cd {dst}; {cfg.python} {command}"
    result = con.run(command, asynchronous=asynchronous)


    return result


if __name__ == '__main__':
    main()  # pylint: disable=no-value-for-parameter
The actual submit logic resides inside the run function. The main function invokes it on all cluster nodes: asynchronously on worker nodes and synchronously on a master node. All standard output from the script running on the master node is automatically printed to stdout on your workstation.
实际的提交逻辑位于run函数内部。 main函数在所有群集节点上调用它:在工作节点上异步调用,在主节点上同步调用。 主节点上运行的脚本的所有标准输出将自动打印到工作站上的stdout。
Finally, let’s submit our training script to the cluster:
最后,让我们将训练脚本提交到集群:
./submit.py -- ddp_train_example.py \
   gpus=<number of GPUs per instance> \
   num_nodes=<number of nodes in our cluster> \
   distributed_backend=ddp
And that’s it. Our model is trained just like it would be on a local machine but with utilizing Pytorch and PyTorch Lighting distributed learning capabilities.
就是这样。 我们的模型像在本地机器上一样经过训练,但是利用了Pytorch和PyTorch Lighting分布式学习功能。
结论 (Conclusion)
So what do we have in the end? With just three commands you can dynamically create a deep learning cluster in AWS, submit training jobs on it and delete it once you have finished with your experiments:
那么我们到底有什么呢? 仅需三个命令,您就可以在AWS中动态创建一个深度学习集群,在其上提交训练作业,并在完成实验后将其删除:
# create our deep learning cluster
ansible-playbook setup-play.yml# submit training job to it
./submit.py -- ddp_train_example.py \
   gpus=<number of GPUs per instance> \
   num_nodes=<number of nodes in our cluster> \
   distributed_backend=ddp# terminate the cluster
ansible-playbook -i aws_ec2.yaml cleanup-play.yml
You can make this functionality reusable or just copy it into all of your experiment directories.
您可以使此功能可重复使用,也可以将其复制到所有实验目录中。
Now you can take your experimentation to the next level, be much more agile, and not afraid of the scary beasts of distributed deep learning.
现在,您可以将实验提升到一个新的水平,变得更加敏捷,并且不用担心分布式深度学习的可怕野兽。
But that’s not the end of this story. In part 2, we will add additional features to our toolset providing us with the ability to do interactive work on the cluster with Jupyter Notebook, monitor the training process with Tensorboard, and store experiments’ results to persistent storage.
但这还不是故事的结局。 在第2部分中,我们将向工具集中添加其他功能,使我们能够使用Jupyter Notebook在集群上进行交互式工作,使用Tensorboard监视培训过程并将实验结果存储到持久存储中。
Stay tuned!
敬请关注!
ansible aws


 999
999

 被折叠的 条评论
为什么被折叠?
被折叠的 条评论
为什么被折叠?
 到【灌水乐园】发言


