


介绍 (Introduction)
In a recent post published on ITNEXT, LoRa and LoRaWAN for IoT: Getting Started with LoRa and LoRaWAN Protocols for Low Power, Wide Area Networking of IoT, we explored the use of the LoRa (Long Range) and LoRaWAN protocols to transmit and receive sensor data, over a substantial distance, between an IoT device, containing several embedded sensors, and an IoT gateway. In this post, we will extend that architecture to the Cloud, using AWS IoT, a broad and deep set of IoT services, from the edge to the Cloud. We will securely collect, transmit, and analyze IoT data using the AWS cloud platform.
在最近关于ITNEXT,出版后劳拉和LoRaWAN为物联网:入门劳拉和LoRaWAN协议低功耗,物联网的广域网 ,我们探讨了使用的LORA (LO NG 镭 NGE)和LoRaWAN协议来发送和在包含多个嵌入式传感器的IoT设备与IoT网关之间的相当长的距离内接收传感器数据。 在本文中,我们将使用AWS IoT(从边缘到云的广泛而深入的IoT服务集)将该架构扩展到云。 我们将使用AWS云平台安全地收集,传输和分析IoT数据。

LoRa和LoRaWAN (LoRa and LoRaWAN)
According to the LoRa Alliance, Low-Power, Wide-Area Networks (LPWAN) are projected to support a major portion of the billions of devices forecasted for the Internet of Things (IoT). LoRaWAN is designed from the bottom up to optimize LPWANs for battery lifetime, capacity, range, and cost. LoRa and LoRaWAN permit long-range connectivity for IoT devices in different types of industries. According to Wikipedia, LoRaWAN defines the communication protocol and system architecture for the network, while the LoRa physical layer enables the long-range communication link.
根据LoRa联盟的说法 ,低功耗,广域网(LPWAN)预计将支持预计用于物联网(IoT)的数十亿设备的很大一部分。 LoRaWAN从下至上进行设计,以针对电池寿命,容量,范围和成本优化LPWAN。 LoRa和LoRaWAN允许在不同类型的行业中为IoT设备提供远程连接。 根据Wikipedia的介绍 ,LoRaWAN定义了网络的通信协议和系统架构,而LoRa物理层实现了远程通信链接。
AWS IoT (AWS IoT)
AWS describes AWS IoT as a set of managed services that enable ‘internet-connected devices to connect to the AWS Cloud and lets applications in the cloud interact with internet-connected devices.’ AWS IoT services span three categories: Device Software, Connectivity and Control, and Analytics.
AWS将AWS IoT描述为一组托管服务,这些服务使“与Internet相连的设备能够连接到AWS Cloud,并使云中的应用程序与与Internet相连的设备进行交互”。 AWS IoT服务涵盖三类:设备软件,连接和控制以及分析。
In this post, we will focus on three AWS IOT services, one from each category, including AWS IoT Device SDKs, AWS IoT Core, and AWS IoT Analytics. According to AWS, the AWS IoT Device SDKs include open-source libraries and developer and porting guides with samples to help you build innovative IoT products or solutions on your choice of hardware platforms. AWS IoT Core is a managed cloud service that lets connected devices easily and securely interact with cloud applications and other devices. AWS IoT Core can process and route messages to AWS endpoints and other devices reliably and securely. Finally, AWS IoT Analytics is a fully-managed IoT analytics service, designed specifically for IoT, which collects, pre-processes, enriches, stores, and analyzes IoT device data at scale.
在本文中,我们将重点介绍三项AWS IOT服务,每种类别中的一项,包括AWS IoT设备SDK,AWS IoT Core和AWS IoT Analytics。 根据AWS的说法, AWS IoT设备SDK包括开源库以及带有示例的开发人员和移植指南,可帮助您在所选的硬件平台上构建创新的IoT产品或解决方案。 AWS IoT Core是一项托管的云服务,可让连接的设备轻松,安全地与云应用程序和其他设备交互。 AWS IoT Core可以可靠,安全地处理消息并将消息路由到AWS终端节点和其他设备。 最后, AWS IoT Analytics是一项完全托管的IoT分析服务,专门为IoT设计,可大规模收集,预处理,充实,存储和分析IoT设备数据。
To learn more about AWS IoT, specifically the AWS IoT services we will be exploring within this post, I recommend reading my recent post published on Towards Data Science, Getting Started with IoT Analytics on AWS.
要了解有关AWS IoT的更多信息,特别是我们将在本文中探索的AWS IoT服务,我建议阅读我最近发表于Towards Data Science, AWS IoT Analytics入门的文章 。
硬件选择 (Hardware Selection)
In this post, we will use the following hardware.
在本文中,我们将使用以下硬件。
带有嵌入式传感器的物联网设备 (IoT Device with Embedded Sensors)
An Arduino single-board microcontroller will serve as our IoT device. The 3.3V AI-enabled Arduino Nano 33 BLE Sense board (Amazon: USD 36.00), released in August 2019, comes with the powerful nRF52840 processor from Nordic Semiconductors, a 32-bit ARM Cortex-M4 CPU running at 64 MHz, 1MB of CPU Flash Memory, 256KB of SRAM, and a NINA-B306 stand-alone Bluetooth 5 low energy (BLE) module.
Arduino单板微控制器将用作我们的物联网设备。 于2019年8月发布的具有3.3V AI功能的Arduino Nano 33 BLE Sense板( 亚马逊 :36.00美元)配备了Nordic Semiconductors的功能强大的nRF52840处理器,运行于64 MHz的32位ARM Cortex-M4 CPU,1MB CPU闪存,256KB SRAM和NINA-B306独立式Bluetooth 5低功耗(BLE)模块。
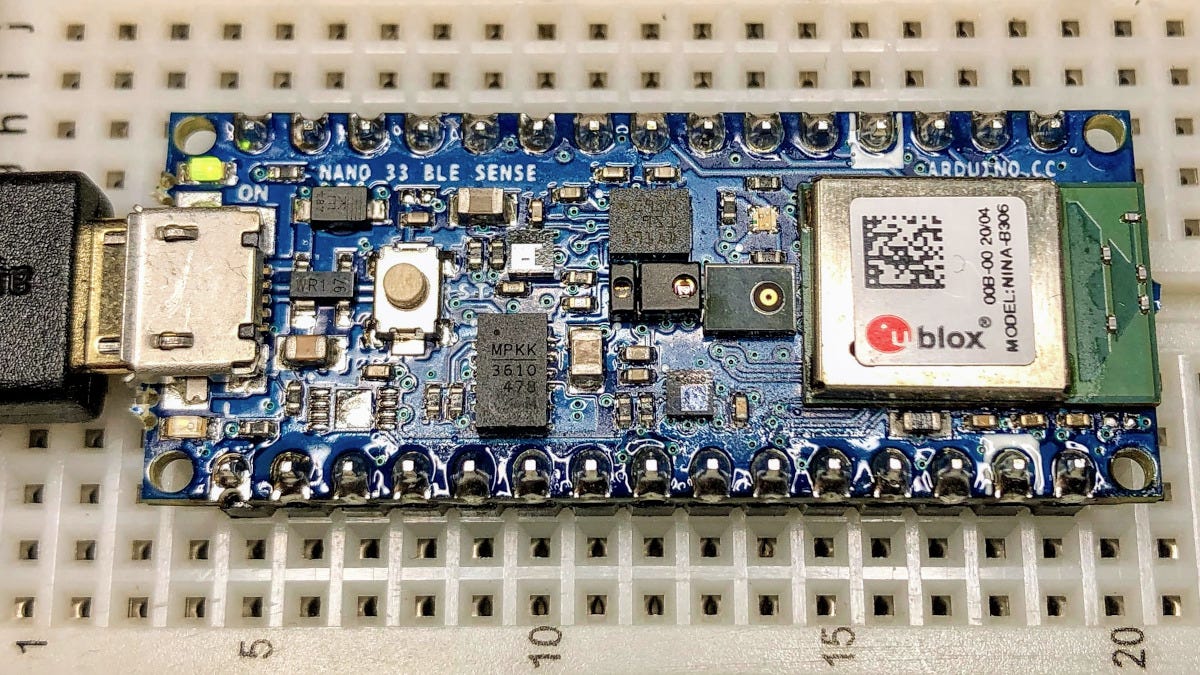
The Sense contains an impressive array of embedded sensors:
Sense包含一系列令人印象深刻的嵌入式传感器:
9-axis Inertial Sensor (LSM9DS1): 3D digital linear acceleration sensor, a 3D digital
9轴惯性传感器( LSM9DS1 ):3D数字线性加速度传感器,3D数字
angular rate sensor, and a 3D digital magnetic sensor
角速率传感器和3D数字磁传感器
Humidity and Temperature Sensor (HTS221): Capacitive digital sensor for relative humidity and temperature
湿度和温度传感器( HTS221 ):用于相对湿度和温度的电容式数字传感器
Barometric Sensor (LPS22HB): MEMS nano pressure sensor: 260–1260 hectopascal (hPa) absolute digital output barometer
气压传感器( LPS22HB ):MEMS纳米压力传感器:260–1260百帕斯卡(hPa)绝对数字输出气压计
Microphone (MP34DT05): MEMS audio sensor omnidirectional digital microphone
麦克风( MP34DT05 ):MEMS音频传感器全向数字麦克风
Gesture, Proximity, Light Color, and Light Intensity Sensor (APDS9960): Advanced Gesture detection, Proximity detection, Digital Ambient Light Sense (ALS), and Color Sense (RGBC).
手势,接近度,光色和光强度传感器( APDS9960 ):高级手势检测,接近度检测,数字环境光感(ALS)和色彩感(RGBC)。
The Arduino Sense is an excellent, low-cost single-board microcontroller for learning about the collection and transmission of IoT sensor data.
Arduino Sense是一款出色的低成本单板微控制器,可用于学习有关IoT传感器数据的收集和传输。
物联网网关 (IoT Gateway)
An IoT Gateway, according to TechTarget, is a physical device or software program that serves as the connection point between the Cloud and controllers, sensors, and intelligent devices. All data moving to the Cloud, or vice versa, goes through the gateway, which can be either a dedicated hardware appliance or software program.
根据TechTarget的说法,IoT网关是一种物理设备或软件程序,充当Cloud与控制器,传感器和智能设备之间的连接点。 所有移至云的数据(反之亦然)都通过网关,网关可以是专用硬件设备或软件程序。
LoRa Gateways, to paraphrase The Things Network, form the bridge between devices and the Cloud. Devices use low power networks like LoRaWAN to connect to the Gateway, while the Gateway uses high bandwidth networks like WiFi, Ethernet, or Cellular to connect to the Cloud.
解释物联网的 LoRa网关构成了设备与云之间的桥梁。 设备使用LoRaWAN等低功耗网络连接至网关,而网关使用WiFi,以太网或蜂窝网络等高带宽网络连接至云。

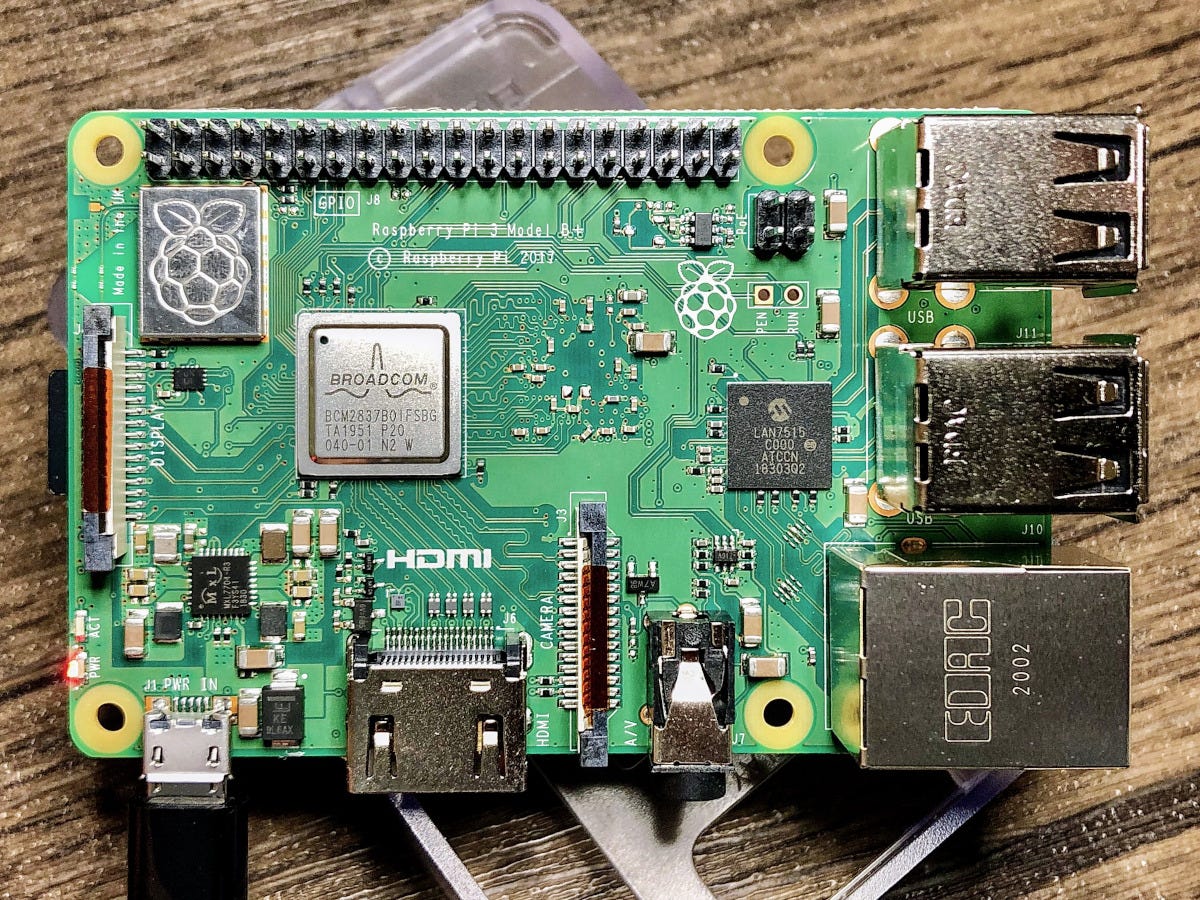
A third-generation Raspberry Pi 3 Model B+ single-board computer (SBC) will serve as our LoRa IoT Gateway. This Raspberry Pi model features a 1.4GHz Cortex-A53 (ARMv8) 64-bit quad-core processor System on a Chip (SoC), 1GB LPDDR2 SDRAM, dual-band wireless LAN, Bluetooth 4.2 BLE, and Gigabit Ethernet (Amazon: USD 42.99).
第三代Raspberry Pi 3 Model B +单板计算机(SBC)将用作我们的LoRa IoT网关。 此Raspberry Pi型号具有1.4GHz的Cortex-A53(ARMv8)64位四核处理器片上系统(SoC),1GB LPDDR2 SDRAM,双频无线LAN,蓝牙4.2 BLE和千兆位以太网( Amazon :USD 42.99)。
LoRa收发器模块 (LoRa Transceiver Modules)
To transmit the IoT sensor data between the IoT device, containing the embedded sensors, and the IoT gateway, I have used the REYAX RYLR896 LoRa transceiver module (Amazon: USD 19.50 x 2). The transceiver modules are commonly referred to as a universal asynchronous receiver-transmitter (UART). A UART is a computer hardware device for asynchronous serial communication in which the data format and transmission speeds are configurable.
为了在包含嵌入式传感器的IoT设备和IoT网关之间传输IoT传感器数据,我使用了REYAX RYLR896 LoRa收发器模块( 亚马逊 :USD 19.50 x 2)。 收发器模块通常称为通用异步收发器 (UART)。 UART是用于异步串行通信的计算机硬件设备,其中数据格式和传输速度是可配置的。
According to the manufacturer, REYAX, the RYLR896 contains the Semtech SX1276 long-range, low power transceiver. The RYLR896 module provides ultra-long range spread spectrum communication and high interference immunity while minimizing current consumption. Each RYLR896 module contains a small, PCB integrated, helical antenna. This transceiver operates at both the 868 and 915 MHz frequency ranges. In this demonstration, we will be transmitting at 915 MHz for North America.
根据制造商REYAX的说法, RYLR896包含Semtech SX1276远程低功耗收发器。 RYLR896模块提供超远距离扩频通信和高抗干扰性,同时将电流消耗降至最低。 每个RYLR896模块都包含一个小的PCB集成螺旋天线。 该收发器在868和915 MHz频率范围内均可工作。 在此演示中,我们将以915 MHz的速度向北美传输。
The Arduino Sense (IoT device) transmits data, using one of the RYLR896 modules (shown below front). The Raspberry Pi (IoT Gateway), connected to the other RYLR896 module (shown below rear), receives the data.
Arduino Sense( 物联网设备 )使用RYLR896模块之一传输数据( 如下图所示 )。 连接到另一个RYLR896模块( 背面下方显示 )的Raspberry Pi( 物联网网关 )接收数据。

LoRaWAN安全性 (LoRaWAN Security)
The RYLR896 is capable of AES 128-bit data encryption. Using the Advanced Encryption Standard (AES), we will encrypt the data sent from the IoT device to the IoT gateway, using a 32 hex digit password (128 bits / 4 bits/hex digit).
RYLR896能够进行AES 128位数据加密。 使用高级加密标准 (AES),我们将使用32位十六进制数字密码(128位/ 4位/十六进制数字)对从IoT设备发送到IoT网关的数据进行加密。
调配AWS资源 (Provisioning AWS Resources)
To start, we will create the necessary AWS IoT and associated resources on the AWS cloud platform. Once these resources are in place, we can then proceed to configure the IoT device and IoT gateway to securely transmit the sensor data to the Cloud.
首先,我们将在AWS云平台上创建必要的AWS IoT和相关资源。 一旦这些资源到位,我们就可以继续配置IoT设备和IoT网关,以将传感器数据安全地传输到Cloud。
All the source code for this post is on GitHub. Use the following command to git clone a local copy of the project.
这篇文章的所有源代码都在GitHub上 。 使用以下命令git clone项目的本地副本。
git clone \
  –branch master –single-branch –depth 1 –no-tags \https://github.com/garystafford/aws-iot-analytics-demo.git
AWS CloudFormation (AWS CloudFormation)
The CloudFormation template, iot-analytics.yaml, will create an AWS IoT CloudFormation stack containing the following resources.
CloudFormation模板iot-analytics.yaml将创建一个包含以下资源的AWS IoT CloudFormation堆栈。
- AWS IoT Thing AWS IoT事物
- AWS IoT Thing Policy AWS IoT物联网政策
- AWS IoT Core Topic Rule AWS IoT核心主题规则
- AWS IoT Analytics Channel, Pipeline, Data store, and Data set AWS IoT Analytics通道,管道,数据存储和数据集
- AWS Lambda and Lambda Permission AWS Lambda和Lambda权限
- Amazon S3 Bucket 亚马逊S3桶
- Amazon SageMaker Notebook Instance Amazon SageMaker笔记本实例
- AWS IAM Roles AWS IAM角色
Please be aware of the costs involved with the AWS resources used in the CloudFormation template before continuing. To create the AWS CloudFormation stack from the included CloudFormation template, execute the following AWS CLI command.
在继续之前,请注意CloudFormation模板中使用的AWS资源涉及的成本。 要从随附的CloudFormation模板创建AWS CloudFormation堆栈,请执行以下AWS CLI命令。
aws cloudformation create-stack \
  --stack-name lora-iot-demo \
  --template-body file://cloudformation/iot-analytics.yaml \
  --parameters ParameterKey=ProjectName,ParameterValue=lora-iot-demo \
               ParameterKey=IoTTopicName,ParameterValue=lora-iot-demo \
  --capabilities CAPABILITY_NAMED_IAM
The resulting CloudFormation stack should contain 16 AWS resources.
生成的CloudFormation堆栈应包含16个AWS资源。

其他资源 (Additional Resources)
Unfortunately, AWS CloudFormation cannot create all the AWS IoT resources we require for this demonstration. To complete the AWS provisioning process, execute the following series of AWS CLI commands, aws_cli_commands.md. These commands will create the remaining resources, including an AWS IoT Thing Type, Thing Group, Thing Billing Group, and an X.509 Certificate.
不幸的是,AWS CloudFormation无法创建此演示所需的所有AWS IoT资源。 要完成AWS设置过程,请执行以下一系列AWS CLI命令aws_cli_commands.md 。 这些命令将创建剩余资源,包括AWS IoT物联网类型,物联网组,物联网计费组和X.509证书。
# LoRaWAN / AWS IoT Demo
# Author: Gary Stafford
# Run AWS CLI commands after CloudFormation stack completes successfully


# variables
thingName=lora-iot-gateway-01
thingPolicy=LoRaDevicePolicy
thingType=LoRaIoTGateway
thingGroup=LoRaIoTGateways
thingBillingGroup=LoRaIoTGateways


mkdir ${thingName}


aws iot create-keys-and-certificate \
    --certificate-pem-outfile "${thingName}/${thingName}.cert.pem" \
    --public-key-outfile "${thingName}/${thingName}.public.key" \
    --private-key-outfile "${thingName}/${thingName}.private.key" \
    --set-as-active


# assuming you only have one certificate registered
certificate=$(aws iot list-certificates | jq '.[][] | .certificateArn')


## alternately, for a specific certificate if you have more than one
# aws iot list-certificates
## then change the value below
# certificate=arn:aws:iot:us-east-1:123456789012:cert/<certificate>


aws iot attach-policy \
    --policy-name $thingPolicy \
    --target $certificate


aws iot attach-thing-principal \
    --thing-name $thingName \
    --principal $certificate


aws iot create-thing-type \
    --thing-type-name $thingType \
    --thing-type-properties "thingTypeDescription=LoRaWAN IoT Gateway"


aws iot create-thing-group \
    --thing-group-name $thingGroup \
    --thing-group-properties "thingGroupDescription=\"LoRaWAN IoT Gateway Thing Group\", attributePayload={attributes={Manufacturer=RaspberryPiFoundation}}"


aws iot add-thing-to-thing-group \
    --thing-name $thingName \
    --thing-group-name $thingGroup


aws iot create-billing-group \
    --billing-group-name $thingBillingGroup \
    --billing-group-properties "billingGroupDescription=\"Gateway Billing Group\""


aws iot add-thing-to-billing-group \
    --thing-name $thingName \
    --billing-group-name $thingBillingGroup


aws iot update-thing \
    --thing-name $thingName \
    --thing-type-name $thingType \
    --attribute-payload "{\"attributes\": {\"GatewayMfr\":\"RaspberryPiFoundation\", \"LoRaMfr\":\"REYAX\", \"LoRaModel\":\"RYLR896\"}}"


aws iot describe-thing \
    --thing-name $thingName
物联网设备配置 (IoT Device Configuration)
With the AWS resources deployed, we can configure the IoT device and IoT Gateway.
部署了AWS资源后,我们可以配置IoT设备和IoT网关。
Arduino素描 (Arduino Sketch)
For those not familiar with Arduino, a sketch is the name that Arduino uses for a program. It is the unit of code that is uploaded into non-volatile flash memory and runs on an Arduino board. The Arduino language is a set of C and C++ functions. All standard C and C++ constructs supported by the avr-g++ compiler should work in Arduino.
对于不熟悉Arduino的人, 草图是Arduino在程序中使用的名称。 它是代码单元,已上传到非易失性闪存中并在Arduino板上运行。 Arduino语言是一组C和C ++函数。 avr-g ++编译器支持的所有标准C和C ++结构都应在Arduino中工作。
For this post, the sketch, lora_iot_demo_aws.ino, contains the code necessary to collect and securely transmit the environmental sensor data, including temperature, relative humidity, barometric pressure, Red, Green, and Blue (RGB) color, and ambient light intensity, using the LoRaWAN protocol.
对于此帖子,草图lora_iot_demo_aws.ino包含收集和安全传输环境传感器数据(包括温度,相对湿度,大气压力,红色,绿色和蓝色(RGB)颜色以及环境光强度)所必需的代码,使用LoRaWAN协议。
/*
  Description: Transmits Arduino Nano 33 BLE Sense sensor telemetry over LoRaWAN,
               including temperature, humidity, barometric pressure, and color,
               using REYAX RYLR896 transceiver modules
               http://reyax.com/wp-content/uploads/2020/01/Lora-AT-Command-RYLR40x_RYLR89x_EN.pdf
  Author: Gary Stafford
*/


#include <Arduino_HTS221.h>
#include <Arduino_LPS22HB.h>
#include <Arduino_APDS9960.h>


const int UPDATE_FREQUENCY = 5000;     // update frequency in ms
const float CALIBRATION_FACTOR = -4.0; // temperature calibration factor (Celsius)
const int ADDRESS = 116;
const int NETWORK_ID = 6;
const String PASSWORD = "92A0ECEC9000DA0DCF0CAAB0ABA2E0EF";
const String DELIMITER = "|";


String uid = "";


void setup()
{
  Serial.begin(9600);


  Serial1.begin(115200); // default baud rate of module is 115200
  delay(1000);           // wait for LoRa module to be ready


  // get unique transceiver id to identify iot device on network
  Serial1.print((String)"AT+UID?\r\n");
  uid = Serial1.readString();
  uid.replace("+UID=", ""); // trim off '+UID=' at start of line
  uid.replace("\r\n", ""); // trim off CR/LF at end of line


  // needs all need to be same for receiver and transmitter
  Serial1.print((String)"AT+ADDRESS=" + ADDRESS + "\r\n");
  delay(200);
  Serial1.print((String)"AT+NETWORKID=" + NETWORK_ID + "\r\n");
  delay(200);
  Serial1.print("AT+CPIN=" + PASSWORD + "\r\n");
  delay(200);
  Serial1.print("AT+CPIN?\r\n"); // confirm password is set


  if (!HTS.begin())
  { // initialize HTS221 sensor
    Serial.println("Failed to initialize humidity temperature sensor!");
    while (1);
  }


  if (!BARO.begin())
  { // initialize LPS22HB sensor
    Serial.println("Failed to initialize pressure sensor!");
    while (1);
  }


  // avoid bad readings to start bug
  // https://forum.arduino.cc/index.php?topic=660360.0
  BARO.readPressure();
  delay(1000);


  if (!APDS.begin())
  { // initialize APDS9960 sensor
    Serial.println("Failed to initialize color sensor!");
    while (1);
  }
}


void loop()
{
  updateReadings();
  delay(UPDATE_FREQUENCY);
}


void updateReadings()
{
  float temperature = getTemperature(CALIBRATION_FACTOR);
  float humidity = getHumidity();
  float pressure = getPressure();
  int colors[4];
  getColor(colors);


  String payload = buildPayload(temperature, humidity, pressure, colors);
  Serial.println("Payload: " + payload); // display the payload for debugging


  Serial1.print(payload); // send the payload over LoRaWAN WiFi


  displayResults(temperature, humidity, pressure, colors); // display the results for debugging
}


float getTemperature(float calibration)
{
  return HTS.readTemperature() + calibration;
}


float getHumidity()
{
  return HTS.readHumidity();
}


float getPressure()
{
  return BARO.readPressure();
}


void getColor(int c[])
{
  // check if a color reading is available
  while (!APDS.colorAvailable())
  {
    delay(5);
  }


  int r, g, b, a;
  APDS.readColor(r, g, b, a);
  c[0] = r;
  c[1] = g;
  c[2] = b;
  c[3] = a;
}


// display for debugging purposes
void displayResults(float t, float h, float p, int c[])
{
  Serial.println((String)"UID: " + uid);
  Serial.print("Temperature: ");
  Serial.println(t);
  Serial.print("Humidity: ");
  Serial.println(h);
  Serial.print("Pressure: ");
  Serial.println(p);
  Serial.print("Color (r, g, b, a): ");
  Serial.print(c[0]);
  Serial.print(", ");
  Serial.print(c[1]);
  Serial.print(", ");
  Serial.print(c[2]);
  Serial.print(", ");
  Serial.println(c[3]);
  Serial.println("----------");
}


String buildPayload(float t, float h, float p, int c[])
{
  String readings = "";
  readings += uid;
  readings += DELIMITER;
  readings += t;
  readings += DELIMITER;
  readings += h;
  readings += DELIMITER;
  readings += p;
  readings += DELIMITER;
  readings += c[0];
  readings += DELIMITER;
  readings += c[1];
  readings += DELIMITER;
  readings += c[2];
  readings += DELIMITER;
  readings += c[3];


  String payload = "";
  payload += "AT+SEND=";
  payload += ADDRESS;
  payload += ",";
  payload += readings.length();
  payload += ",";
  payload += readings;
  payload += "\r\n";


  return payload;
}
AT指令 (AT Commands)
Communications with the RYLR896’s long-range modem is done using AT commands. AT commands are instructions used to control a modem. AT is the abbreviation of ATtention. Every command line starts with AT. That is why modem commands are called AT commands, according to Developer’s Home. A complete list of AT commands can be downloaded as a PDF from the RYLR896 product page.
使用AT命令与RYLR896的远程调制解调器进行通信。 AT命令是用于控制调制解调器的指令。 AT是AT张力的缩写。 每个命令行都以AT开头。 根据开发人员之家的说法,这就是为什么将调制解调器命令称为AT命令的原因 。 可以从RYLR896产品页面以PDF格式下载AT命令的完整列表。
To efficiently transmit the environmental sensor data from the IoT sensor to the IoT gateway, the sketch concatenates the sensor ID and the sensor values together in a single string. The string will be incorporated into an AT command, sent to the RYLR896 LoRa transceiver module. To make it easier to parse the sensor data on the IoT gateway, we will delimit the sensor values with a pipe (|), as opposed to a comma. According to REYAX, the maximum length of the LoRa payload is approximately 330 bytes.
为了有效地将环境传感器数据从IoT传感器传输到IoT网关,草图将传感器ID和传感器值连接在一个字符串中。 该字符串将被合并到一个AT命令中,并发送到RYLR896 LoRa收发器模块。 为了更轻松地解析IoT网关上的传感器数据,我们将使用管道(|)(而不是逗号)来分隔传感器值。 根据REYAX,LoRa有效负载的最大长度约为330字节。
Below, we see an example of an AT command used to send the sensor data from the IoT sensor and the corresponding unencrypted data received by the IoT gateway. Both contain the LoRa transmitter Address ID, payload length (62 bytes in the example), and the payload. The data received by the IoT gateway also has the Received signal strength indicator (RSSI), and Signal-to-noise ratio (SNR).
在下面,我们看到一个AT命令的示例,该命令用于从IoT传感器发送传感器数据以及IoT网关接收的相应未加密数据。 两者都包含LoRa发送器地址ID,有效载荷长度( 在示例中为62个字节 )和有效载荷。 物联网网关接收的数据还具有接收信号强度指示器 (RSSI)和信噪比 (SNR)。
在IoT网关上接收数据 (Receiving Data on IoT Gateway)
The Raspberry Pi will act as a LoRa IoT gateway, receiving the environmental sensor data from the IoT device, the Arduino, and sending the data to AWS. The Raspberry Pi runs a Python script, rasppi_lora_receiver_aws.py, which will receive the data from the Arduino Sense, decrypt the data, parse the sensor values, and serialize the data to a JSON payload, and finally, transmit the payload in an MQTT-protocol message to AWS. The script uses the pyserial, the Python Serial Port Extension, which encapsulates the access for the serial port for communication with the RYLR896 module. The script uses the AWS IoT Device SDK for Python v2 to communicate with AWS.
Raspberry Pi将充当LoRa IoT网关,从IoT设备,Arduino接收环境传感器数据,并将数据发送到AWS。 Raspberry Pi运行Python脚本rasppi_lora_receiver_aws.py ,它将从Arduino Sense接收数据,解密数据,解析传感器值,并将数据序列化为JSON有效负载,最后,在MQTT-中传输有效负载。发送给AWS的协议消息。 该脚本使用pyserial (Python串行端口扩展名),它封装了与RYLR896模块进行通信的串行端口访问权限。 该脚本使用适用于Python v2的AWS IoT设备SDK与AWS进行通信。
import json
import logging
import sys
import threading
import time
from argparse import ArgumentParser


import serial
from awscrt import io, mqtt, auth, http, exceptions
from awsiot import mqtt_connection_builder


# LoRaWAN IoT Sensor Demo
# Using REYAX RYLR896 transceiver modules
# http://reyax.com/wp-content/uploads/2020/01/Lora-AT-Command-RYLR40x_RYLR89x_EN.pdf
# Author: Gary Stafford
# Requirements: python3 -m pip install --user -r requirements.txt
# Usage:
# sh ./rasppi_lora_receiver_aws.sh  \
#     a1d0wxnxn1hs7m-ats.iot.us-east-1.amazonaws.com


# constants
ADDRESS = 116
NETWORK_ID = 6
PASSWORD = "92A0ECEC9000DA0DCF0CAAB0ABA2E0EF"


# global variables
count = 0  # from args
received_count = 0
received_all_event = threading.Event()


def main():
    # get args
    logging.basicConfig(filename='output.log',
                        filemode='w', level=logging.DEBUG)
    args = get_args()  # get args
    payload = ""
    lora_payload = {}


    # set log level
    io.init_logging(getattr(io.LogLevel, args.verbosity), 'stderr')


    # spin up resources
    event_loop_group = io.EventLoopGroup(1)
    host_resolver = io.DefaultHostResolver(event_loop_group)
    client_bootstrap = io.ClientBootstrap(event_loop_group, host_resolver)


    # set MQTT connection
    mqtt_connection = set_mqtt_connection(args, client_bootstrap)


    logging.debug("Connecting to {} with client ID '{}'...".format(
        args.endpoint, args.client_id))


    connect_future = mqtt_connection.connect()


    # future.result() waits until a result is available
    connect_future.result()


    logging.debug("Connecting to REYAX RYLR896 transceiver module...")
    serial_conn = serial.Serial(
        port=args.tty,
        baudrate=int(args.baud_rate),
        timeout=5,
        parity=serial.PARITY_NONE,
        stopbits=serial.STOPBITS_ONE,
        bytesize=serial.EIGHTBITS
    )


    if serial_conn.isOpen():
        logging.debug("Connected!")
        set_lora_config(serial_conn)
        check_lora_config(serial_conn)


        while True:
            # read data from serial port
            serial_payload = serial_conn.readline()
            logging.debug(serial_payload)


            if len(serial_payload) >= 1:
                payload = serial_payload.decode(encoding="utf-8")
                payload = payload[:-2]
                try:
                    data = parse_payload(payload)
                    lora_payload = {
                        "ts": time.time(),
                        "data": {
                            "device_id": str(data[0]),
                            "gateway_id": str(args.gateway_id),
                            "temperature": float(data[1]),
                            "humidity": float(data[2]),
                            "pressure": float(data[3]),
                            "color": {
                                "red": float(data[4]),
                                "green": float(data[5]),
                                "blue": float(data[6]),
                                "ambient": float(data[7])
                            }
                        }
                    }
                    logging.debug(lora_payload)
                except IndexError:
                    logging.error("IndexError: {}".format(payload))
                except ValueError:
                    logging.error("ValueError: {}".format(payload))


                # publish mqtt message
                message_json = json.dumps(
                    lora_payload,
                    sort_keys=True,
                    indent=None,
                    separators=(',', ':'))


                try:
                    mqtt_connection.publish(
                        topic=args.topic,
                        payload=message_json,
                        qos=mqtt.QoS.AT_LEAST_ONCE)
                except mqtt.SubscribeError as err:
                    logging.error(".SubscribeError: {}".format(err))
                except exceptions.AwsCrtError as err:
                    logging.error("AwsCrtError: {}".format(err))


def set_mqtt_connection(args, client_bootstrap):
    if args.use_websocket:
        proxy_options = None
        if args.proxy_host:
            proxy_options = http.HttpProxyOptions(
                host_name=args.proxy_host, port=args.proxy_port)


        credentials_provider = auth.AwsCredentialsProvider.new_default_chain(
            client_bootstrap)
        mqtt_connection = mqtt_connection_builder.websockets_with_default_aws_signing(
            endpoint=args.endpoint,
            client_bootstrap=client_bootstrap,
            region=args.signing_region,
            credentials_provider=credentials_provider,
            websocket_proxy_options=proxy_options,
            ca_filepath=args.root_ca,
            on_connection_interrupted=on_connection_interrupted,
            on_connection_resumed=on_connection_resumed,
            client_id=args.client_id,
            clean_session=False,
            keep_alive_secs=6)


    else:
        mqtt_connection = mqtt_connection_builder.mtls_from_path(
            endpoint=args.endpoint,
            cert_filepath=args.cert,
            pri_key_filepath=args.key,
            client_bootstrap=client_bootstrap,
            ca_filepath=args.root_ca,
            on_connection_interrupted=on_connection_interrupted,
            on_connection_resumed=on_connection_resumed,
            client_id=args.client_id,
            clean_session=False,
            keep_alive_secs=6)


    return mqtt_connection


def get_args():
    parser = ArgumentParser(
        description="Send and receive messages through and MQTT connection.")
    parser.add_argument("--tty", required=True,
                        help="serial tty", default="/dev/ttyAMA0")
    parser.add_argument("--baud-rate", required=True,
                        help="serial baud rate", default=1152000)
    parser.add_argument('--endpoint', required=True, help="Your AWS IoT custom endpoint, not including a port. " +
                                                          "Ex: \"abcd123456wxyz-ats.iot.us-east-1.amazonaws.com\"")
    parser.add_argument('--cert', help="File path to your client certificate, in PEM format.")
    parser.add_argument('--key', help="File path to your private key, in PEM format.")
    parser.add_argument('--root-ca', help="File path to root certificate authority, in PEM format. " +
                                          "Necessary if MQTT server uses a certificate that's not already in " +
                                          "your trust store.")
    parser.add_argument('--client-id', default='samples-client-id',
                        help="Client ID for MQTT connection.")
    parser.add_argument('--topic', default="samples/test",
                        help="Topic to subscribe to, and publish messages to.")
    parser.add_argument('--message', default="Hello World!", help="Message to publish. " +
                                                                  "Specify empty string to publish nothing.")
    parser.add_argument('--count', default=0, type=int, help="Number of messages to publish/receive before exiting. " +
                                                             "Specify 0 to run forever.")
    parser.add_argument('--use-websocket', default=False, action='store_true',
                        help="To use a websocket instead of raw mqtt. If you specify this option you must "
                             "specify a region for signing, you can also enable proxy mode.")
    parser.add_argument('--signing-region', default='us-east-1',
                        help="If you specify --use-web-socket, this is the region that will be used for computing "
                             "the Sigv4 signature")
    parser.add_argument('--proxy-host', help="Hostname for proxy to connect to. Note: if you use this feature, " +
                                             "you will likely need to set --root-ca to the ca for your proxy.")
    parser.add_argument('--proxy-port', type=int, default=8080,
                        help="Port for proxy to connect to.")
    parser.add_argument('--verbosity', choices=[x.name for x in io.LogLevel], default=io.LogLevel.NoLogs.name,
                        help='Logging level')
    parser.add_argument("--gateway-id", help="IoT Gateway serial number")
    args = parser.parse_args()
    return args


def parse_payload(payload):
    # input: +RCV=116,29,0447383033363932003C0034|23.94|37.71|99.89|16|38|53|80,-61,56
    # output: [0447383033363932003C0034, 23.94, 37.71, 99.89, 16.0, 38.0, 53.0, 80.0]


    payload = payload.split(",")
    payload = payload[2].split("|")
    payload = [i for i in payload]
    return payload


def set_lora_config(serial_conn):
    # configures the REYAX RYLR896 transceiver module


    serial_conn.write(str.encode("AT+ADDRESS=" + str(ADDRESS) + "\r\n"))
    serial_payload = (serial_conn.readline())[:-2]
    logging.debug("Address set? {}".format(serial_payload.decode(encoding="utf-8")))


    serial_conn.write(str.encode("AT+NETWORKID=" + str(NETWORK_ID) + "\r\n"))
    serial_payload = (serial_conn.readline())[:-2]
    logging.debug("Network Id set? {}".format(serial_payload.decode(encoding="utf-8")))


    serial_conn.write(str.encode("AT+CPIN=" + PASSWORD + "\r\n"))
    time.sleep(1)
    serial_payload = (serial_conn.readline())[:-2]
    logging.debug("AES-128 password set? {}".format(serial_payload.decode(encoding="utf-8")))


def check_lora_config(serial_conn):
    serial_conn.write(str.encode("AT?\r\n"))
    serial_payload = (serial_conn.readline())[:-2]
    logging.debug("Module responding? {}".format(serial_payload.decode(encoding="utf-8")))


    serial_conn.write(str.encode("AT+ADDRESS?\r\n"))
    serial_payload = (serial_conn.readline())[:-2]
    logging.debug("Address: {}".format(serial_payload.decode(encoding="utf-8")))


    serial_conn.write(str.encode("AT+NETWORKID?\r\n"))
    serial_payload = (serial_conn.readline())[:-2]
    logging.debug("Network id: {}".format(serial_payload.decode(encoding="utf-8")))


    serial_conn.write(str.encode("AT+IPR?\r\n"))
    serial_payload = (serial_conn.readline())[:-2]
    logging.debug("UART baud rate: {}".format(serial_payload.decode(encoding="utf-8")))


    serial_conn.write(str.encode("AT+BAND?\r\n"))
    serial_payload = (serial_conn.readline())[:-2]
    logging.debug("RF frequency: {}".format(serial_payload.decode(encoding="utf-8")))


    serial_conn.write(str.encode("AT+CRFOP?\r\n"))
    serial_payload = (serial_conn.readline())[:-2]
    logging.debug("RF output power: {}".format(serial_payload.decode(encoding="utf-8")))


    serial_conn.write(str.encode("AT+MODE?\r\n"))
    serial_payload = (serial_conn.readline())[:-2]
    logging.debug("Work mode: {}".format(serial_payload.decode(encoding="utf-8")))


    serial_conn.write(str.encode("AT+PARAMETER?\r\n"))
    serial_payload = (serial_conn.readline())[:-2]
    logging.debug("RF parameters: {}".format(serial_payload.decode(encoding="utf-8")))


    serial_conn.write(str.encode("AT+CPIN?\r\n"))
    serial_payload = (serial_conn.readline())[:-2]
    logging.debug("AES128 password of the network: {}".format(serial_payload.decode(encoding="utf-8")))


# Callback when connection is accidentally lost.
def on_connection_interrupted(connection, error, **kwargs):
    logging.error("Connection interrupted. error: {}".format(error))


# Callback when an interrupted connection is re-established.
def on_connection_resumed(connection, return_code, session_present, **kwargs):
    logging.warning("Connection resumed. return_code: {} session_present: {}".format(
        return_code, session_present))


    if return_code == mqtt.ConnectReturnCode.ACCEPTED and not session_present:
        logging.warning("Session did not persist. Resubscribing to existing topics...")
        resubscribe_future, _ = connection.resubscribe_existing_topics()


        # Cannot synchronously wait for resubscribe result because we're on the connection's event-loop thread,
        # evaluate result with a callback instead.
        resubscribe_future.add_done_callback(on_resubscribe_complete)


def on_resubscribe_complete(resubscribe_future):
    resubscribe_results = resubscribe_future.result()
    logging.warning("Resubscribe results: {}".format(resubscribe_results))


    for topic, qos in resubscribe_results['topics']:
        if qos is None:
            sys.exit("Server rejected resubscribe to topic: {}".format(topic))


# Callback when the subscribed topic receives a message
def on_message_received(topic, payload, **kwargs):
    logging.debug("Received message from topic '{}': {}".format(topic, payload))
    global received_count
    received_count += 1
    if received_count == count:
        received_all_event.set()


if __name__ == "__main__":
    sys.exit(main())
运行IoT网关Python脚本 (Running the IoT Gateway Python Script)
To run the Python script on the Raspberry Pi, we will use a helper shell script, rasppi_lora_receiver_aws.sh. The shell script helps construct the arguments required to execute the Python script.
要在Raspberry Pi上运行Python脚本,我们将使用帮助程序外壳脚本rasppi_lora_receiver_aws.sh 。 Shell脚本有助于构造执行Python脚本所需的参数。
#!/bin/bash


# Author: Gary A. Stafford
# Start IoT data collector script and tails output
# Usage:
# sh ./rasppi_lora_receiver_aws.sh  \
#     a1b2c3d4e5678f-ats.iot.us-east-1.amazonaws.com


if [[ $# -ne 1 ]]; then
  echo "Script requires 1 parameter!"
  exit 1
fi


# input parameters
ENDPOINT=$1  # e.g. a1b2c3d4e5678f-ats.iot.us-east-1.amazonaws.com
DEVICE="lora-iot-gateway-01" # matches CloudFormation thing name
CERTIFICATE="${DEVICE}-certificate.pem.crt"  # e.g. lora-iot-gateway-01-certificate.pem.crt
KEY="${DEVICE}-private.pem.key"  # e.g. lora-iot-gateway-01-private.pem.key
GATEWAY_ID=$(< /proc/cpuinfo grep Serial | grep -oh "[a-z0-9]*$") # e.g. 00000000f62051ce


# output for debugging
echo "DEVICE: ${DEVICE}"
echo "ENDPOINT: ${ENDPOINT}"
echo "CERTIFICATE: ${CERTIFICATE}"
echo "KEY: ${KEY}"
echo "GATEWAY_ID: ${GATEWAY_ID}"


# call the python script
nohup python3 rasppi_lora_receiver_aws.py \
  --endpoint "${ENDPOINT}" \
  --cert "${DEVICE}-creds/${CERTIFICATE}" \
  --key "${DEVICE}-creds/${KEY}" \
  --root-ca "${DEVICE}-creds/AmazonRootCA1.pem" \
  --client-id "${DEVICE}" \
  --topic "lora-iot-demo" \
  --gateway-id "${GATEWAY_ID}" \
  --verbosity "Info" \
  --tty "/dev/ttyAMA0" \
  --baud-rate 115200 \
  >collector.log 2>&1 </dev/null &


sleep 2


# tail the log (Control-C to exit)
tail -f collector.log
To run the helper script, we execute the following command, substituting the input parameter, the AWS IoT endpoint, with your endpoint.
要运行帮助程序脚本,我们执行以下命令,将输入参数AWS IoT终端节点替换为您的终端节点。
sh ./rasppi_lora_receiver_aws.sh \
  a1b2c3d4e5678f-ats.iot.us-east-1.amazonaws.com
You should see the console output, similar to the following.
您应该看到控制台输出,类似于以下内容。

The script starts by configuring the RYLR896 module and outputting that configuration to a log file, output.log. If successful, we should see the following debug information logged.
该脚本首先配置RYLR896模块并将该配置输出到日志文件output.log 。 如果成功,我们应该看到记录以下调试信息。
DEBUG:root:Connecting to a1b2c3d4e5f6-ats.iot.us-east-1.amazonaws.com with client ID 'lora-iot-gateway-01'…
DEBUG:root:Connecting to REYAX RYLR896 transceiver module…
DEBUG:root:Connected!
DEBUG:root:Address set? +OK
DEBUG:root:Network Id set? +OK
DEBUG:root:AES-128 password set? +OK
DEBUG:root:Module responding? +OK
DEBUG:root:Address: +ADDRESS=116
DEBUG:root:Network id: +NETWORKID=6
DEBUG:root:UART baud rate: +IPR=115200
DEBUG:root:RF frequency: +BAND=915000000
DEBUG:root:RF output power: +CRFOP=15
DEBUG:root:Work mode: +MODE=0
DEBUG:root:RF parameters: +PARAMETER=12,7,1,4
DEBUG:root:AES128 password of the network: +CPIN=92A0ECEC9000DA0DCF0CAAB0ABA2E0EF
That sensor data is also written to the log file for debugging purposes. This first line in the log (shown below) is the raw decrypted data received from the IoT device via LoRaWAN. The second line is the JSON-serialized payload, sent securely to AWS, using the MQTT protocol.
该传感器数据也被写入日志文件以进行调试。 日志中的第一行( 如下所示 )是通过LoRaWAN从IoT设备接收的原始解密数据。 第二行是使用MQTT协议安全地发送到AWS的JSON序列化有效负载。
DEBUG:root:b'+RCV=116,59,0447383033363932003C0034|23.46|41.89|99.38|230|692|833|1116,-48,39\r\n'DEBUG:root:{'ts': 1598305503.7041512, 'data': {'humidity': 41.89, 'temperature': 23.46, 'device_id': '0447383033363932003C0034', 'gateway_id': '00000000f62051ce', 'pressure': 99.38, 'color': {'red': 230.0, 'blue': 833.0, 'ambient': 1116.0, 'green': 692.0}}}DEBUG:root:b'+RCV=116,59,0447383033363932003C0034|23.46|41.63|99.38|236|696|837|1127,-49,35\r\n'DEBUG:root:{'ts': 1598305513.7918658, 'data': {'humidity': 41.63, 'temperature': 23.46, 'device_id': '0447383033363932003C0034', 'gateway_id': '00000000f62051ce', 'pressure': 99.38, 'color': {'red': 236.0, 'blue': 837.0, 'ambient': 1127.0, 'green': 696.0}}}DEBUG:root:b'+RCV=116,59,0447383033363932003C0034|23.44|41.57|99.38|232|686|830|1113,-48,32\r\n'DEBUG:root:{'ts': 1598305523.8556132, 'data': {'humidity': 41.57, 'temperature': 23.44, 'device_id': '0447383033363932003C0034', 'gateway_id': '00000000f62051ce', 'pressure': 99.38, 'color': {'red': 232.0, 'blue': 830.0, 'ambient': 1113.0, 'green': 686.0}}}DEBUG:root:b'+RCV=116,59,0447383033363932003C0034|23.51|41.44|99.38|205|658|802|1040,-48,36\r\n'DEBUG:root:{'ts': 1598305528.8890748, 'data': {'humidity': 41.44, 'temperature': 23.51, 'device_id': '0447383033363932003C0034', 'gateway_id': '00000000f62051ce', 'pressure': 99.38, 'color': {'red': 205.0, 'blue': 802.0, 'ambient': 1040.0, 'green': 658.0}}}AWS IoT核心 (AWS IoT Core)
The Raspberry Pi-based IoT gateway will be registered with AWS IoT Core. IoT Core allows users to connect devices quickly and securely to AWS.
基于Raspberry Pi的IoT网关将在AWS IoT Core中注册。 IoT Core允许用户将设备快速安全地连接到AWS。
东西 (Things)
According to AWS, IoT Core can reliably scale to billions of devices and trillions of messages. Registered devices are referred to as things in AWS IoT Core. A thing is a representation of a specific device or logical entity. Information about a thing is stored in the registry as JSON data.
根据AWS的说法,IoT Core可以可靠地扩展到数十亿个设备和数万亿条消息。 已注册的设备在AWS IoT Core中称为事物 。 事物是特定设备或逻辑实体的表示。 有关事物的信息作为JSON数据存储在注册表中。
Below, we see an example of the Thing created by CloudFormation. The Thing, lora-iot-gateway-01, represents the physical IoT gateway. We have assigned the IoT gateway a Thing Type, LoRaIoTGateway, a Thing Group, LoRaIoTGateways, and a Thing Billing Group, IoTGateways.
在下面,我们看到了CloudFormation创建的事物的示例。 lora-iot-gateway-01代表物理物联网网关。 我们已为IoT网关分配了Thing类型, LoRaIoTGateway ,Thing组, LoRaIoTGateways和Thing计费组IoTGateways 。

In a real IoT environment, containing hundreds, thousands, even millions of IoT devices, gateways, and sensors, these classification mechanisms, Thing Type, Thing Group, and Thing Billing Group, will help to organize IoT assets.
在包含数百,数千,甚至数百万IoT设备,网关和传感器的真实IoT环境中,这些分类机制(Thing Type,Thing Group和Thing Billing Group)将有助于组织IoT资产。

设备网关和消息代理 (Device Gateway and Message Broker)
IoT Core provides a Device Gateway, which manages all active device connections. The Gateway currently supports MQTT, WebSockets, and HTTP 1.1 protocols. Behind the Message Gateway is a high-throughput pub/sub Message Broker, which securely transmits messages to and from all IoT devices and applications with low latency. Below, we see a typical AWS IoT Core architecture containing multiple Topics, Rules, and Actions.
IoT Core提供了一个设备网关 ,该网关管理所有活动的设备连接。 网关当前支持MQTT,WebSocket和HTTP 1.1协议。 Message Gateway的背后是高吞吐量的pub / sub Message Broker ,它以低延迟安全地与所有IoT设备和应用程序之间来回传输消息。 在下面,我们看到了一个典型的AWS IoT Core架构,其中包含多个主题,规则和操作。

AWS IoT安全性 (AWS IoT Security)
AWS IoT Core provides mutual authentication and encryption, ensuring all data is exchanged between AWS and the devices are secure by default. In the demonstration, all data is sent securely using Transport Layer Security (TLS) 1.2 with X.509 digital certificates on port 443. Below, we see an example of an X.509 certificate assigned to the Thing, lora-iot-gateway-01, which represents the physical IoT gateway. The X.509 certificate and the private key, generated using the AWS CLI, previously, are installed on the IoT gateway.
AWS IoT Core提供了相互身份验证和加密,确保默认情况下在AWS之间交换所有数据并且设备是安全的 。 在演示中,所有数据都使用传输层安全性 (TLS)1.2通过端口443上的X.509数字证书安全地发送。下面,我们看到一个分配给Thing, lora-iot-gateway-01的X.509证书的示例。 lora-iot-gateway-01 ,代表物理物联网网关。 以前使用AWS CLI生成的X.509证书和私钥已安装在IoT网关上。

Authorization of the device to access any resource on AWS is controlled by AWS IoT Core Policies. These policies are similar to AWS IAM Policies. Below, we see an example of an AWS IoT Core Policy, LoRaDevicePolicy, which is assigned to the IoT gateway.
设备访问AWS上任何资源的授权由AWS IoT核心策略控制 。 这些策略类似于AWS IAM策略。 下面,我们看到一个分配给物联网网关的AWS IoT核心策略LoRaDevicePolicy的示例。

AWS IoT核心规则 (AWS IoT Core Rules)
Once an MQTT message is received from the IoT gateway (a thing), we use AWS IoT Rules to send message data to an AWS IoT Analytics Channel. Rules give your devices the ability to interact with AWS services. Rules are analyzed, and Actions are performed based on the MQTT topic stream. Below, we see an example rule that forwards our messages to an IoT Analytics Channel.
从IoT网关( 事物 )接收到MQTT消息后,我们将使用AWS IoT规则将消息数据发送到AWS IoT Analytics Channel 。 规则使您的设备能够与AWS服务进行交互。 分析规则,并根据MQTT主题流执行操作 。 在下面,我们看到了一个示例规则,该规则将我们的消息转发到IoT分析频道。

Rule query statements are written in standard Structured Query Language (SQL). The datasource for the Rule query is an IoT Topic.
规则查询语句以标准结构化查询语言(SQL)编写。 规则查询的数据源是IoT主题。
SELECT
    data.device_id,
    data.gateway_id,
    data.temperature,
    data.humidity,
    data.pressure,
    data.color.red,
    data.color.green,
    data.color.blue,
    data.color.ambient,
    ts,
    Clientid () AS device,
    parse_time ("yyyy-MM-dd'T'HH:mm:ss.SSSZ", timestamp(), "UTC") AS msg_received
FROM
    "${IoTTopicName}"
AWS IoT分析 (AWS IoT Analytics)
AWS IoT Analytics is composed of five primary components: Channels, Pipelines, Data stores, Data sets, and Notebooks. These components enable you to collect, prepare, store, analyze, and visualize your IoT data.
AWS IoT Analytics由五个主要组件组成:通道,管道,数据存储,数据集和笔记本。 这些组件使您可以收集,准备,存储,分析和可视化IoT数据。

Below, we see a typical AWS IoT Analytics architecture. IoT messages are received from AWS IoT Core, thought a Rule Action. Amazon QuickSight provides business intelligence, visualization. Amazon QuickSight ML Insights adds anomaly detection and forecasting.
在下面,我们看到了典型的AWS IoT Analytics架构。 IoT消息是从AWS IoT Core接收的,被认为是规则操作。 Amazon QuickSight提供商业智能,可视化。 Amazon QuickSight ML Insights添加了异常检测和预测。

物联网分析频道 (IoT Analytics Channel)
An AWS IoT Analytics Channel pulls messages or data into IoT Analytics from other AWS sources, such as Amazon S3, Amazon Kinesis, or Amazon IoT Core. Channels store data for IoT Analytics Pipelines. Both Channels and Data store support storing data in your own Amazon S3 bucket or an IoT Analytics service-managed S3 bucket. In the demonstration, we are using a service managed S3 bucket.
AWS IoT Analytics Channel将消息或数据从其他AWS来源(例如Amazon S3,Amazon Kinesis或Amazon IoT Core)拉入IoT Analytics。 通道存储物联网分析管道的数据。 渠道和数据存储都支持将数据存储在您自己的Amazon S3存储桶或IoT Analytics服务管理的S3存储桶中。 在演示中,我们使用服务管理的S3存储桶。
When creating a Channel, you also decide how long to retain the data. For the demonstration, we have set the data retention period for 21 days. Channels are generally not used for long term storage of data. Typically, you would only retain data in the Channel for the period you need to analyze. For long term storage of IoT message data, I recommend using an AWS IoT Core Rule to send a copy of the raw IoT data to Amazon S3, using a service such as Amazon Kinesis Data Firehose.
创建通道时,您还可以决定将数据保留多长时间。 对于演示,我们将数据保留期设置为21天。 通道通常不用于长期存储数据。 通常,您只会在需要分析的时间段内保留通道中的数据。 对于IoT消息数据的长期存储,我建议使用AWS IoT核心规则,通过Amazon Kinesis Data Firehose之类的服务将原始IoT数据的副本发送到Amazon S3。

物联网分析管道 (IoT Analytics Pipeline)
An AWS IoT Analytics Pipeline consumes messages from one or more Channels. Pipelines transform, filter, and enrich the messages before storing them in IoT Analytics Data stores. A Pipeline is composed of an ordered list of activities. Logically, you must specify both a Channel (source) and a Datastore (destination) activity. Optionally, you may choose as many as 23 additional activities in the pipelineActivities array.
AWS IoT Analytics Pipeline使用来自一个或多个渠道的消息。 在将消息存储在IoT Analytics数据存储中之前,管道会对其进行转换,过滤和丰富。 管道由活动的有序列表组成。 从逻辑上讲,您必须同时指定Channel ( 源 )和Datastore ( 目的地 )活动。 (可选)您可以在pipelineActivities数组中选择多达23个其他活动。
In our demonstration’s Pipeline, iot_analytics_pipeline, we have specified three additional activities, including DeviceRegistryEnrich, Filter, and Lambda. Other activity types include Math, SelectAttributes, RemoveAttributes, and AddAttributes.
在演示的管道iot_analytics_pipeline ,我们指定了三个附加活动,包括DeviceRegistryEnrich , Filter和Lambda 。 其他活动类型包括Math , SelectAttributes , RemoveAttributes ,和AddAttributes 。

The Filter activity ensures the sensor values are not Null or otherwise erroneous; if true, the message is dropped. The Lambda Pipeline activity executes an AWS Lambda function to transform the messages in the pipeline. Messages are sent in an event object to the Lambda. The message is modified, and the event object is returned to the activity.
Filter活动可确保传感器值不为Null或其他错误; 如果为true,则丢弃该消息。 Lambda Pipeline活动执行AWS Lambda函数以转换管道中的消息。 消息在事件对象中发送到Lambda。 消息已修改,事件对象返回到活动。

The Python-based Lambda function easily handles typical IoT data transformation tasks, including converting the temperature from Celsius to Fahrenheit, pressure from kilopascals (kPa) to inches of Mercury (inHg), and 12-bit RGBA values to 8-bit color values (0–255). The Lambda function also rounds down all the values to between 0 and 2 decimal places of precision.
基于Python的Lambda函数可轻松处理典型的IoT数据转换任务,包括将temperature从摄氏temperature转换为华氏度,将pressure从千帕(kPa)转换为水银(inHg)英寸,并将12位RGBA值转换为8位色值( 0–255)。 Lambda函数还将所有值四舍五入到0到2个小数位精度之间。
def lambda_handler(event, context):
    for e in event:
        e['temperature'] = round((e['temperature'] * 1.8) + 32, 2)
        e['humidity'] = round(e['humidity'], 2)
        e['pressure'] = round((e['pressure'] / 3.3864), 2)
        e['red'] = int(round(e['red'] / (4097 / 255), 0))
        e['green'] = int(round(e['green'] / (4097 / 255), 0))
        e['blue'] = int(round(e['blue'] / (4097 / 255), 0))
        e['ambient'] = int(round(e['ambient'] / (4097 / 255), 0))
    return event
The demonstration’s Pipeline also enriches the IoT data with metadata from the IoT device’s AWS IoT Core Registry. The metadata includes additional information about the device that generated the IoT data, including the custom attributes such as LoRa transceiver manufacturer and model, and the IoT gateway manufacturer.
演示的管道还通过IoT设备的AWS IoT Core Registry中的元数据丰富了IoT数据。 元数据包括有关生成IoT数据的设备的其他信息,包括LoRa收发器制造商和模型以及IoT网关制造商等自定义属性。
A notable feature of Pipelines is the ability to reprocess messages. If you make changes to the Pipeline, which often happens during the data preparation stage, you can reprocess any or all the IoT data in the associated Channel, and overwrite the IoT data in the Data set.
管道的显着特征是能够重新处理消息。 如果对管道进行更改(这通常在数据准备阶段发生),则可以重新处理关联通道中的任何或所有IoT数据,并覆盖数据集中的IoT数据。
物联网分析数据存储 (IoT Analytics Data store)
An AWS IoT Analytics Data store stores prepared data from an AWS IoT Analytics Pipeline, in a fully-managed database. Both Channels and Data store support storing IoT data in your own Amazon S3 bucket or an IoT Analytics managed S3 bucket. In the demonstration, we are using a service-managed S3 bucket to store the IoT data in our Data store, iot_analytics_data_store.
AWS IoT Analytics数据存储区将来自AWS IoT Analytics Pipeline的准备数据存储在完全托管的数据库中。 渠道和数据存储都支持将IoT数据存储在您自己的Amazon S3存储桶或IoT Analytics管理的S3存储桶中。 在演示中,我们使用服务管理的S3存储桶将IoT数据存储在数据存储区iot_analytics_data_store 。

物联网分析数据集 (IoT Analytics Data set)
An AWS IoT Analytics Data set automatically provides regular, up-to-date insights for data analysts by querying a Data store using standard SQL. Periodic updates are implemented using a cron expression. For the demonstration, we are updating our Data set, iot_analytics_data_set, at a 15-minute interval. The time interval can be increased or reduced, depending on the desired ‘near real-time’ nature of the IoT data being analyzed.
通过使用标准SQL查询数据存储,AWS IoT Analytics数据集自动为数据分析人员提供常规的最新见解。 定期更新是使用cron表达式实现的。 为了演示,我们将每隔15分钟更新一次数据集iot_analytics_data_set 。 时间间隔可以增加或减少,这取决于所分析的IoT数据的所需“近实时”性质。
Below, we see messages in the Result preview pane of the Data set. Note the SQL query used to obtain the messages, which queries the Data store. The Data store, as you will recall, contains the transformed messages from the Pipeline.
在下面,我们在数据集的结果预览窗格中看到消息。 请注意用于获取消息SQL查询,该查询查询数据存储。 您会记得,数据存储包含来自管道的转换后的消息。

IoT Analytics Data sets also support sending content results, which are materialized views of your IoT Analytics data, to an Amazon S3 bucket.
IoT Analytics数据集还支持将内容结果(是IoT Analytics数据的物化视图)发送到Amazon S3存储桶。
The CloudFormation stack created an encrypted Amazon S3 Bucket. This bucket receives a copy of the messages from the IoT Analytics Data set whenever the cron expression runs the scheduled update.
CloudFormation堆栈创建了一个加密的Amazon S3存储桶。 每当cron表达式运行计划的更新时,此存储桶就会从IoT Analytics数据集中接收消息的副本。

物联网分析笔记本 (IoT Analytics Notebook)
An AWS IoT Analytics Notebook allows users to perform statistical analysis and machine learning on IoT Analytics Data sets using Jupyter Notebooks. The IoT Analytics Notebook service includes a set of notebook templates that contain AWS-authored machine learning models and visualizations. Notebook Instances can be linked to a GitHub or other source code repository. Notebooks created with IoT Analytics Notebook can also be accessed directly through Amazon SageMaker. For the demonstration, the Notebooks Instance is cloned from our project’s GitHub repository.
AWS IoT Analytics Notebook允许用户使用Jupyter Notebook对IoT Analytics数据集执行统计分析和机器学习。 IoT Analytics Notebook服务包括一组笔记本模板,其中包含AWS授权的机器学习模型和可视化。 笔记本实例可以链接到GitHub或其他源代码存储库。 也可以通过Amazon SageMaker直接访问使用IoT Analytics Notebook创建的笔记本。 为了演示,从我们项目的GitHub存储库中克隆了Notebooks实例。

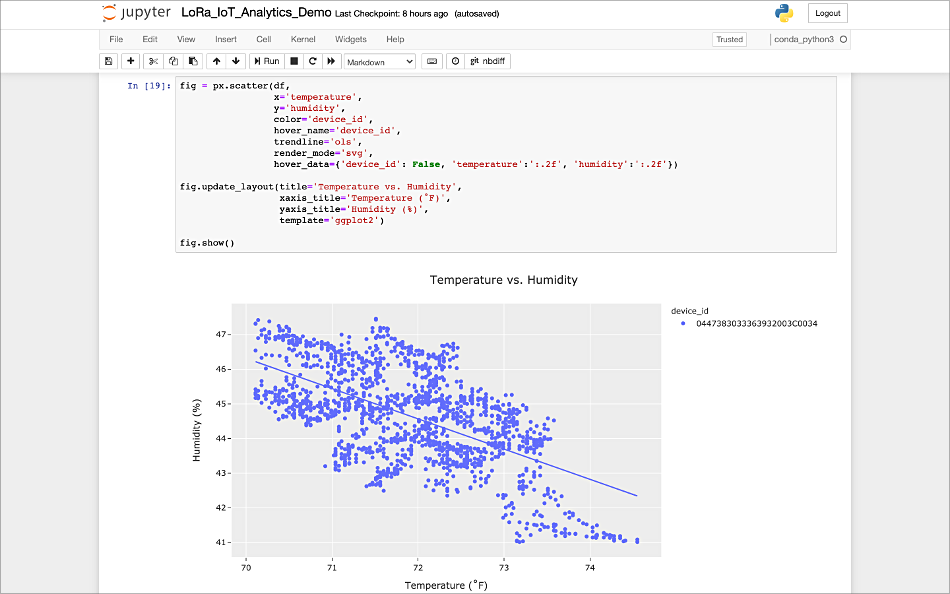
The repository contains a sample Jupyter Notebook, LoRa_IoT_Analytics_Demo.ipynb, based on the conda_python3 kernel. This preinstalled environment includes the default Anaconda installation and Python 3.
该库包含样本Jupyter笔记本, LoRa_IoT_Analytics_Demo.ipynb的基础上, conda_python3内核。 这个预安装的环境包括默认的Anaconda安装和Python 3。

The Notebook uses pandas, matplotlib, and plotly to manipulate and visualize the sample IoT data stored in the IoT Analytics Data set.
Notebook使用pandas , matplotlib和plotly操作并可视化存储在IoT Analytics数据集中的示例IoT数据。


The Notebook can be modified, and the changes pushed back to GitHub. You could easily fork the demonstration’s GitHub repository and modify the CloudFormation template to point to your source code repository.
可以修改Notebook,并将更改推回GitHub。 您可以轻松派生演示的GitHub存储库,并修改CloudFormation模板以指向您的源代码存储库。

亚马逊QuickSight (Amazon QuickSight)
Amazon QuickSight provides business intelligence (BI) and visualization. Amazon QuickSight ML Insights adds anomaly detection and forecasting. We can use Amazon QuickSight to visualize the IoT message data, stored in the IoT Analytics Data set.
Amazon QuickSight提供商业智能(BI)和可视化。 Amazon QuickSight ML Insights添加了异常检测和预测。 我们可以使用Amazon QuickSight可视化存储在IoT Analytics数据集中的IoT消息数据。
Amazon QuickSight has both a Standard and an Enterprise Edition. AWS provides a detailed product comparison of each edition. For the post, I am demonstrating the Enterprise Edition, which includes additional features, such as ML Insights, hourly refreshes of SPICE (super-fast, parallel, in-memory, calculation engine), and theme customization.
Amazon QuickSight具有标准版和企业版。 AWS提供了每个版本的详细产品比较 。 在这篇文章中,我将演示企业版,其中包括其他功能 ,例如ML Insights,每小时更新一次SPICE (超快速,并行,内存中,计算引擎)以及主题自定义。
Please be aware of the costs of Amazon QuickSight if you choose to follow along with this part of the demo. Although there is an Amazon QuickSight API, Amazon QuickSight is not automatically enabled or configured with CloudFormation or using the AWS CLI in this demonstration.
如果您选择跟随演示的此部分,请注意Amazon QuickSight的费用。 尽管存在Amazon QuickSight API,但在此演示中,不会自动使用CloudFormation或使用AWS CLI自动启用或配置Amazon QuickSight。
QuickSight数据集 (QuickSight Data Sets)
Amazon QuickSight has a wide variety of data source options for creating Amazon QuickSight Data sets, including the ones shown below. Do not confuse Amazon QuickSight Data sets with IoT Analytics Data sets; they are two different service features.
Amazon QuickSight具有用于创建Amazon QuickSight数据集的多种数据源选项,包括以下所示的那些。 不要将Amazon QuickSight数据集与IoT Analytics数据集混淆; 它们是两种不同的服务功能。

For the demonstration, we will create an Amazon QuickSight Data set that will use our IoT Analytics Data set, iot_analytics_data_set.
在演示中,我们将创建一个Amazon QuickSight数据集,该数据集将使用我们的IoT Analytics数据集iot_analytics_data_set 。

Amazon QuickSight gives you the ability to view and modify QuickSight Data sets before visualizing. QuickSight even provides a wide variety of functions, enabling us to perform dynamic calculations on the field values. For this demonstration, we will leave the data unchanged since all transformations were already completed in the IoT Analytics Pipeline.
Amazon QuickSight使您能够在可视化之前查看和修改QuickSight数据集。 QuickSight甚至提供了多种功能,使我们能够对字段值执行动态计算。 对于此演示,由于所有转换已在IoT Analytics管道中完成,因此我们将数据保持不变。

QuickSight分析 (QuickSight Analysis)
Using the QuickSight Data set, built from the IoT Analytics Data set as a data source, we create a QuickSight Analysis. The QuickSight Analysis console is shown below. An Analysis is primarily a collection of Visuals (aka Visual types). QuickSight provides several Visual types. Each visual is associated with a Data set. Data for the QuickSight Analysis or each visual within the Analysis can be filtered. For the demo, I have created a simple QuickSight Analysis, including a few typical QuickSight visuals.
使用从IoT分析数据集构建的QuickSight数据集作为数据源,我们创建了QuickSight分析 。 QuickSight Analysis控制台如下所示。 分析主要是视觉(即视觉类型)的集合。 QuickSight提供了几种可视类型 。 每个视觉都与一个数据集相关联。 可以过滤QuickSight分析或分析中每个可视化的数据。 对于该演示,我创建了一个简单的QuickSight分析,包括一些典型的QuickSight视觉效果。

QuickSight仪表板 (QuickSight Dashboards)
To share a QuickSight Analysis, we can create a QuickSight Dashboard. Below, we see a few views of the QuickSight Analysis, shown above, as a Dashboard. Although viewers of the Dashboard cannot edit the visuals, they can apply filtering and interactively drill-down into data in the Visuals.
要共享QuickSight分析,我们可以创建一个QuickSight仪表板 。 在下面,我们以仪表板的形式显示了QuickSight分析的一些视图,如上所示。 尽管仪表板的查看器无法编辑视觉效果,但他们可以应用过滤并以交互方式向下钻取视觉效果中的数据。


Amazon QuickSight ML见解 (Amazon QuickSight ML Insights)
According to Amazon, ML Insights leverages AWS’s machine learning (ML) and natural language capabilities to gain deeper insights from data. QuickSight’s ML-powered Anomaly Detection continuously analyze data to discover anomalies and variations inside of the aggregates, giving you the insights to act when business changes occur. QuickSight’s ML-powered Forecasting can be used to predict your business metrics accurately, and perform interactive what-if analysis with point-and-click simplicity. QuickSight’s built-in algorithms make it easy for anyone to use ML that learns from your data patterns to provide you with accurate predictions based on historical trends.
根据Amazon的说法,ML Insights利用AWS的机器学习(ML)和自然语言功能从数据中获得更深入的见解。 QuickSight的基于ML的异常检测功能不断分析数据,以发现聚合中的异常和变化,从而使您获得洞察力,以在业务发生变化时采取行动。 QuickSight的基于ML的预测功能可用于准确预测业务指标,并通过简单的点击操作即可进行交互式假设分析。 QuickSight的内置算法使任何人都可以轻松使用从您的数据模式中学习的ML,从而根据历史趋势为您提供准确的预测。
Below, we see the ML Insights tab (left) in the demonstration’s QuickSight Analysis. Individually detected anomalies can be added to the QuickSight Analysis, like Visuals, and configured to tune the detection parameters. Observe the temperature, humidity, and barometric pressure anomalies, identified by ML Insights, based on their Anomaly Score, which is higher or lower, given a minimum delta of five percent. These anomalies accurately reflected an actual failure of the IoT device, caused by overheated during testing, which resulted in abnormal sensor readings.
下面,我们在演示的QuickSight分析中看到ML Insights选项卡( 左 )。 可以将单独检测到的异常添加到QuickSight Analysis(如Visuals)中,并配置为调整检测参数。 观察ML Insights根据其异常分数确定的温度,湿度和大气压力异常,异常分数较高或较低,且最小增量为5%。 这些异常准确地反映了物联网设备的实际故障,该故障是由于测试过程中的过热导致的,从而导致传感器读数异常。

在AWS上接收消息 (Receiving the Messages on AWS)
To confirm the IoT gateway is sending messages, we can use a packet analyzer, like tcpdump, on the IoT gateway. Running tcpdump on the IoT gateway, below, we see outbound encrypted MQTT messages being sent to AWS on port 443.
为了确认IoT网关正在发送消息,我们可以在IoT网关上使用数据包分析器,例如tcpdump 。 在下面的IoT网关上运行tcpdump ,我们看到出站加密的MQTT消息已通过端口443发送到AWS。

To confirm those messages are being received from the IoT gateway on AWS, we can use the AWS IoT Core Test feature and subscribe to the lora-iot-demo topic. We should see messages flowing in from the IoT gateway at approximately 5-second intervals.
为了确认正在从AWS上的IoT网关接收到这些消息,我们可以使用AWS IoT Core Test功能并订阅lora-iot-demo主题。 我们应该看到消息以大约5秒的间隔从IoT网关流入。

The JSON payload structure of the incoming MQTT messages will look similar to the below example. The device_id is the unique id of the IoT device that transmitted the message using LoRaWAN. The gateway_id is the unique id of the IoT gateway that received the message using LoRaWAN and sent it to AWS. A single IoT gateway would usually manage messages from multiple IoT devices, each with a unique id.
传入的MQTT消息的JSON有效负载结构将类似于以下示例。 device_id是使用LoRaWAN传输消息的IoT设备的唯一ID。 gateway_id是物联网网关的唯一ID,该物联网网关使用LoRaWAN接收消息并将其发送到AWS。 单个IoT网关通常将管理来自多个IoT设备的消息,每个设备都有唯一的ID。
{
    "data": {
        "color": {
            "ambient": 1057,
            "blue": 650,
            "green": 667,
            "red": 281
        },
        "device_id": "0447383033363932003C0034",
        "gateway_id": "00000000f62051ce",
        "humidity": 45.73,
        "pressure": 98.65,
        "temperature": 23.6
    },
    "ts": 1598543131.9861386
}
The SQL query used by the AWS IoT Rule described earlier, transforms and flattens the nested JSON payload structure, before passing it to the AWS IoT Analytics Channel, as shown below.
前面所述的AWS IoT规则使用SQL查询在将嵌套的JSON有效负载结构传递到AWS IoT Analytics Channel之前,对其进行了转换和展平,如下所示。
{
    "ambient": 1057,
    "blue": 650,
    "green": 667,
    "red": 281,
    "device_id": "0447383033363932003C0034",
    "gateway_id": "00000000f62051ce",
    "humidity": 45.73,
    "pressure": 98.65,
    "temperature": 23.6,
    "ts": 1598543131.9861386,
    "msg_received": "2020-08-27T11:45:32.074+0000",
    "device": "lora-iot-gateway-01"
}
We can measure the near real-time nature of the IoT data using the ts and msg_received data fields. The ts data field is date and time when the sensor reading occurred on the IoT device, while the msg_received data field is the date and time when the message was received on AWS. The delta between the two values is a measure of how near real-time the sensor readings are being streamed to the AWS IoT Analytics Channel. In the below example, the difference between ts (2020–08–27T11:45:31.986) and msg_received (2020–08–27T11:45:32.074) is 88 ms.
我们可以使用ts和msg_received数据字段来测量IoT数据的近实时性。 ts数据字段是在IoT设备上发生传感器读取的日期和时间,而msg_received数据字段是在AWS上接收消息的日期和时间。 两个值之间的差异是衡量传感器读数流到AWS IoT Analytics Channel的接近实时程度的度量。 在以下示例中, ts (2020-08-0827T11:45:31.986)与msg_received (2020-08-0827T11:45:32.074)之间的差为88 ms。
最终物联网数据消息结构 (Final IoT Data Message Structure)
Once the message payload passes through the AWS IoT Analytics Pipeline and lands in the AWS IoT Analytics Data set, its final data structure looks as follows. Note that the device’s attribute metadata has been added from the AWS IoT Core device registry. Regrettably, the metadata is not well-formatted JSON and will require additional transformation to be usable.
消息有效负载通过AWS IoT Analytics管道并到达AWS IoT Analytics数据集后,其最终数据结构如下所示。 请注意,设备的属性元数据已从AWS IoT Core设备注册表添加。 遗憾的是,元数据不是格式正确的JSON,因此需要进行其他转换才能使用。
{
	"device_id": "0447383033363932003C0034",
	"gateway_id": "00000000f62051ce",
	"temperature": 74.48,
	"humidity": 45.73,
	"pressure": 29.13,
	"red": 17,
	"green": 42,
	"blue": 40,
	"ambient": 66,
	"ts": 1598543131.9861386,
	"device": "lora-iot-gateway-01",
	"msg_received": "2020-08-27T15:45:32.024+0000",
	"metadata": {
		"defaultclientid": "lora-iot-gateway-01",
		"thingname": "lora-iot-gateway-01",
		"thingid": "017db4b8-7fca-4617-aa58-7125dd94ab36",
		"thingarn": "arn:aws:iot:us-east-1:123456789012:thing/lora-iot-gateway-01",
		"thingtypename": "LoRaIoTGateway",
		"attributes": {
			"loramfr": "REYAX",
			"gatewaymfr": "RaspberryPiFoundation",
			"loramodel": "RYLR896"
		},
		"version": "2",
		"billinggroupname": "LoRaIoTGateways"
	},
	"__dt": "2020-08-27 00:00:00.000"
}
A set of sample messages is included in the GitHub project’s sample_messages directory.
一组示例消息包含在GitHub项目的sample_messages目录中。
结论 (Conclusion)
In this post, we explored the use of the LoRa and LoRaWAN protocols to transmit environmental sensor data from an IoT device to an IoT gateway. Given its low energy consumption, long-distance transmission capabilities, and well-developed protocols, LoRaWAN is an ideal long-range wireless protocol for IoT devices. We then demonstrated how to use AWS IoT Device SDKs, AWS IoT Core, and AWS IoT Analytics to securely collect, analyze, and visualize streaming messages from the IoT device, in near real-time.
在本文中,我们探讨了使用LoRa和LoRaWAN协议将环境传感器数据从IoT设备传输到IoT网关。 鉴于其低能耗,远距离传输能力和完善的协议,LoRaWAN是物联网设备的理想远程无线协议。 然后,我们演示了如何使用AWS IoT设备SDK,AWS IoT Core和AWS IoT Analytics来近实时地安全地收集,分析和可视化来自IoT设备的流消息。
This blog represents my own viewpoints and not of my employer, Amazon Web Services.
该博客代表了我自己的观点,而不代表我的雇主Amazon Web Services。
翻译自: https://itnext.io/aws-iot-lora-and-lorawan-ec073d7bdfa5


 1459
1459

 被折叠的 条评论
为什么被折叠?
被折叠的 条评论
为什么被折叠?
 到【灌水乐园】发言


