


A quick example using OAuthSwift library to authenticate with the Ravelry API for use in a Swift iOS application.
一个使用OAuthSwift库通过Ravelry API进行身份验证以在Swift iOS应用程序中使用的快速示例。
First of all you might be wondering: What is Ravelry? I personally call it the wikipedia for knitters. It’s basically a database of yarns, knitting/crochet patterns and community forums, the social network for fiber crafters, site of which I’m a proud member of (find me as lanaquellama)
首先,您可能想知道:什么是Ravelry ? 我个人称它为编织者维基百科 。 它基本上是纱线,编织/钩针图案和社区论坛的数据库,是纤维制作者的社交网络,我是其中一个很自豪的网站(找到我为lanaquellama )
As a free resource, the site creators have made an API available and this tutorial will shed light on how to quickly setup OAuthSwift library and the OAuth2.0 credentials to get started using Ravelry API in an iOS application.
作为免费资源,网站创建者已经提供了API,并且本教程将阐明如何快速设置OAuthSwift库和OAuth2.0凭据,以开始在iOS应用程序中使用Ravelry API。
配置 (Setting up)
After setting up a Ravelry Pro account, create a new app with OAuth 2.0 credentials.
设置Ravelry Pro帐户后,请使用OAuth 2.0凭据创建一个新应用。

Add an application name and because this is a mobile app we want the redirect URI to be handled internally using url-scheme. To do so we can type an URI that has the following format:
添加一个应用程序名称,由于这是一个移动应用程序,我们希望使用url-scheme在内部处理重定向URI。 为此,我们可以输入具有以下格式的URI:
appname://oauth-callback/ravelry
Remember the appname you choose we will use it soon. For example purposes, mine will be called ‘ewe finder’.
记住,你选择我们很快就会使用它的程序的名字 。 例如,我的被称为“母羊发现者”。
Note: I will assume you are familiar with installing and using Cocoapods, so go ahead and add OAuthSwift to your project and comeback to this point.
注意:我假设您已经熟悉安装和使用Cocoapods,因此请继续将OAuthSwift添加到您的项目中,然后回到这一点。
For demo purposes, I’ve setup a new Swift project using Storyboards and will use the default ViewController to add our code (this is not proper architecture so I suggest creating separate manager classes to handle this)
出于演示目的,我使用情节提要板设置了一个新的Swift项目,并将使用默认的ViewController添加我们的代码(这不是正确的体系结构,因此我建议创建单独的管理器类来处理此问题)
步骤1:添加URL方案 (Step 1: Adding an URL Scheme)
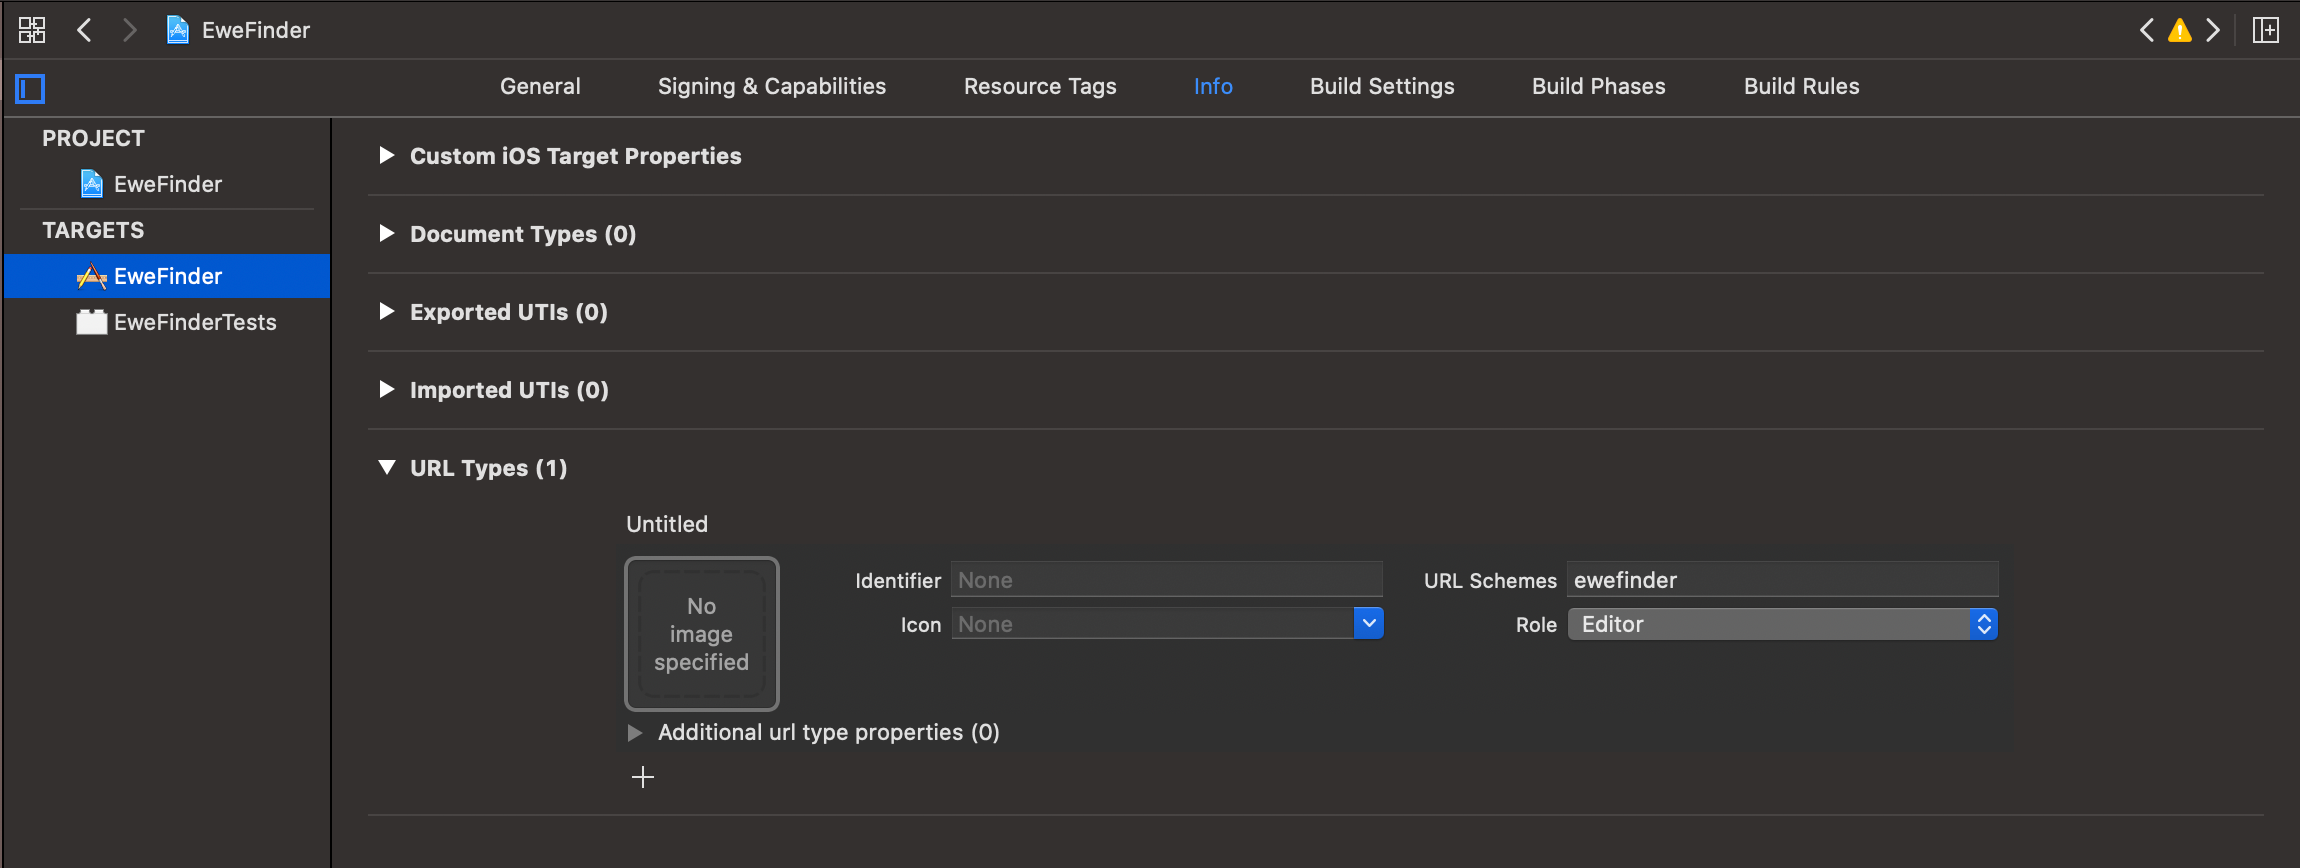
In Xcode, go to the Info tab for your app target and add (+) a new URL Type, type in the appname you setup in Ravelry (don’t type ://) in my case it’s ewefinder.
在Xcode中,转至信息选项卡为您的应用程序的目标,并添加(+)新的URL类型,在Ravelry类型的应用程序的名字 ,你的设置(不要输入://)在我的情况下,它的ewefinder。
步骤2:设置ViewController和IBAction (Step 2: Setup ViewController and IBAction)
In your viewcontroller screen create an UIButton and an @IBaction for it called authenticateToRavelry() .
在@IBaction屏幕中,为其创建一个UIButton和一个@IBaction ,它们称为authenticateToRavelry() 。

Now inside your view controller class, import the the following libraries:
现在,在您的视图控制器类中,导入以下库:
import OAuthSwift
import WebKit
Now, create an enum to handle two important pieces of information, the consumerKey and consumerSecret, these correspond to the ClientId and Secretkey of the Ravelry App you created before; this was where some of the confusion came in as you will see below because Ravelry uses the correct terms for OAuth1.0 but different naming for 2.0:
现在,创建一个枚举来处理两条重要的信息,消费者密钥和消费者秘密 ,它们对应于您之前创建的Ravelry App的ClientId和Secretkey 。 这是一些混乱的原因,您将在下面看到,因为Ravelry对OAuth1.0使用正确的术语,但对2.0使用不同的命名:
enum RavelryOAuth: String {
    case consumerKey = "[consumerkey]"
    case consumerSecret = "[consumersecret]"
}
Find those values here:
在这里找到这些值:

Now lets create an instance of Oauthswift inside the ViewController class, notice we are using OAuth2Swift initializer, important thing here is to use the URLs for authorizeURL and accessTokenURL provided in the OAuth 2.0 documentation on Ravelry API Documentation.
现在,让我们在ViewController类中创建Oauthswift的实例,注意我们正在使用OAuth2Swift初始化程序,这里重要的是使用Ravelry API文档中 OAuth 2.0文档中提供的authorizeURL和accessTokenURL URL。
class ViewController: UIViewController {

    let oauthswift = OAuth2Swift(
    consumerKey: RavelryOAuth.consumerKey.rawValue,
    consumerSecret: RavelryOAuth.consumerSecret.rawValue,
    authorizeUrl: "https://www.ravelry.com/oauth2/auth",
    accessTokenUrl: "https://www.ravelry.com/oauth2/token",
    responseType: "token"
    )
}
步骤3:将授权代码添加到IBAction方法 (Step 3: Add authorize code to IBAction method)
Notice we again refer to that redirect URI we setup above as the withCallbackURL:
请注意,我们再次将上面设置的重定向URI称为withCallbackURL:
@IBAction func authenticateToRavelry() {
        oauthswift.authorizeURLHandler = SafariURLHandler(viewController: self, oauthSwift: oauthswift)
        let _ = oauthswift.authorize(
            withCallbackURL: "ewefinder://oauth-callback/ravelry",
            scope: "offline", state:"RAVELRYAUTH") { result in
                switch result {
                case .success(let (credential, response, parameters)):
                    print(credential.oauthToken)
                // Do your request
                case .failure(let error):
                    print(error.localizedDescription)
                }
        }
    }
Other key items here was choosing the scope, in my case I chose offline, refer to the Ravelry API documentation for more scope permissions here. Also the state value I set to a custom string text ‘RAVELRYAUTH’ (there was no documentation on what to use here); I found out this can also be a random generated string but make sure it is bigger than 8 characters, if not you will get the following error message:
其它主要项目在这里被选择的范围,在我的情况,我选择离线,请参阅Ravelry API文档以获得更多的权限范围在这里 。 我也将状态值设置为自定义字符串文本“ RAVELRYAUTH”(这里没有关于使用什么的文档); 我发现这也可以是随机生成的字符串,但是请确保它大于8个字符,否则,您将收到以下错误消息:

步骤4:回调处理 (Step 4: Callback handling)
Now that we’ve setup everything to make the call to authenticate, what happens next? We want Ravelry to redirect back to our app when it’s done authorizing, right.
现在,我们已经设置了所有要进行身份验证的呼叫,接下来会发生什么? 授权完成后,我们希望Ravelry重定向回我们的应用程序。
On iOS 13 we must add the following method in SceneDelegate.swift, the reason being that UIKit will notify UISceneDelegate instead of UIApplicationDelegate .
在iOS 13上,我们必须在SceneDelegate.swift添加以下方法,原因是UIKit将通知UISceneDelegate而不是UIApplicationDelegate 。
On iOS 13:
在iOS 13上:
// MARK: Handle OAuth Callback
func scene(_ scene: UIScene, openURLContexts URLContexts: Set<UIOpenURLContext>) {
        guard let url = URLContexts.first?.url else {
            return
        }
        if (url.host == "oauth-callback") {
            OAuthSwift.handle(url: url)
            print(url)
        }
    }
iOS 12 or below
iOS 12以下
Add this in AppDelegate.swift
在AppDelegate.swift添加它
// MARK: Handle OAuth Callback
 func application(_ app: UIApplication, open url: URL, options: [UIApplication.OpenURLOptionsKey : Any] = [:]) -> Bool {
 if url.host == “oauth-callback” {
 print(“callback hit”)
 OAuthSwift.handle(url: url)
 }
 return true
 }
步骤5:运行您的代码并测试登录 (Step 5: Run your code and test login)
Now you can run and test out the app, tap on the Login to Ravelry button, this should prompt a Safari page to open up the Ravelry login page, type in your credentials and you should be getting the “Allow ‘Your App’ to view and update your Ravelry notebook?” prompt. Tap authorize and that should bring you back to the app.
现在,您可以运行并测试该应用程序,点击“登录到Ravelry”按钮,这将提示一个Safari页面打开Ravelry登录页面,输入您的凭据,您将获得“允许您的应用程序”进行查看并更新您的Ravelry笔记本?” 提示。 点按授权,这将带您回到应用程序。

Now your ready to query and fetch data and use the Ravelry API for whatever you need. Happy coding!
现在,您可以查询和获取数据,并根据需要使用Ravelry API 。 编码愉快!
翻译自: https://medium.com/swlh/authenticating-ravelry-api-using-oauthswift-43e62a5e45db


 571
571

 被折叠的 条评论
为什么被折叠?
被折叠的 条评论
为什么被折叠?
 到【灌水乐园】发言


