


高安全性同态加密算法
I was looking for the latest UI and UX design trends in dribble, and I heard of a concept often called neumorphism.
我一直在寻找运球的最新UI和UX设计趋势,并且听说过一个通常称为“同态 ”的概念。
Design communities believe it to be 2020’s design trend, one which mimics a real-world feel in UI components. You can get plenty of design templates and references on dribble.
设计社区认为这是2020年的设计趋势,它模仿了UI组件的真实感。 您可以获得关于运球的大量设计模板和参考。
Explaining what neumorphism is and its history is beyond the scope of this article. You can learn more about neumorphism in “Neumorphism in User Interfaces,” “Skeuomorphism / Neumorphism UI Trend,” and “Neumorphism. The Next Big Thing In UI Design?”
解释什么是同态及其历史已超出本文的范围。 您可以在“ 用户界面中的同态性”,“ Skeuomorphism / Neumorphism UI趋势 ”和“ Neumorphism ”中详细了解同态。 UI设计的下一件大事 ?”
Okay, let’s get started and see how you can implement neumorphism in your next iOS app using SwiftUI. As you might aware, SwiftUI enables us to implement any sort of complex UI and UX with minimum efforts, no matter whether it’s the trend of the year or not.
好的,让我们开始吧,看看如何使用SwiftUI在下一个iOS应用程序中实现神经进化。 如您所知,SwiftUI使我们能够以最少的努力实现各种复杂的UI和UX,无论这是否是一年中的趋势。
Check out the image above to see what we’re going to implement before proceeding further. As you might have guessed, we are going to use default solid shapes provided by SwiftUI with default modifiers like fill(), frame(), shadow(), blur(), opacity() and mask().
在继续之前,请查看上面的图片以了解我们将要实现的内容。 您可能已经猜到了,我们将使用SwiftUI提供的默认实体形状以及默认修饰符,例如fill() , frame() , shadow() , blur() , opacity()和mask() 。
颜色问题 (Color Matters)
I found color is the main player here, so choosing the right colors is important. If you don’t choose the right shades of color, you will waste a lot of time, just like I did.
我发现颜色是这里的主要角色,因此选择正确的颜色很重要。 如果您没有选择正确的颜色阴影,就像我一样,您将浪费大量时间。
We need three shades of the same color: one for the main background and the other two for light and dark shadows. Open the Assets.xcassets file and add the below colors (use the same name for brevity).
我们需要三种颜色相同的阴影:一种用于主背景,另外两种用于明暗阴影。 打开Assets.xcassets文件并添加以下颜色(为简便起见,使用相同的名称)。
Background color: #DFE4EB (name it
kMainBg)背景颜色: # DFE4EB(将其命名为
kMainBg)Light shadow color: #FFFFFF (name it
kLightShadow)浅阴影颜色:#FFFFFF(将其命名为
kLightShadow)Dark shadow color: #A2B0C5 (name it
kDarkShadow)Undertow颜色:#A2B0C5 (将其命名为
kDarkShadow)
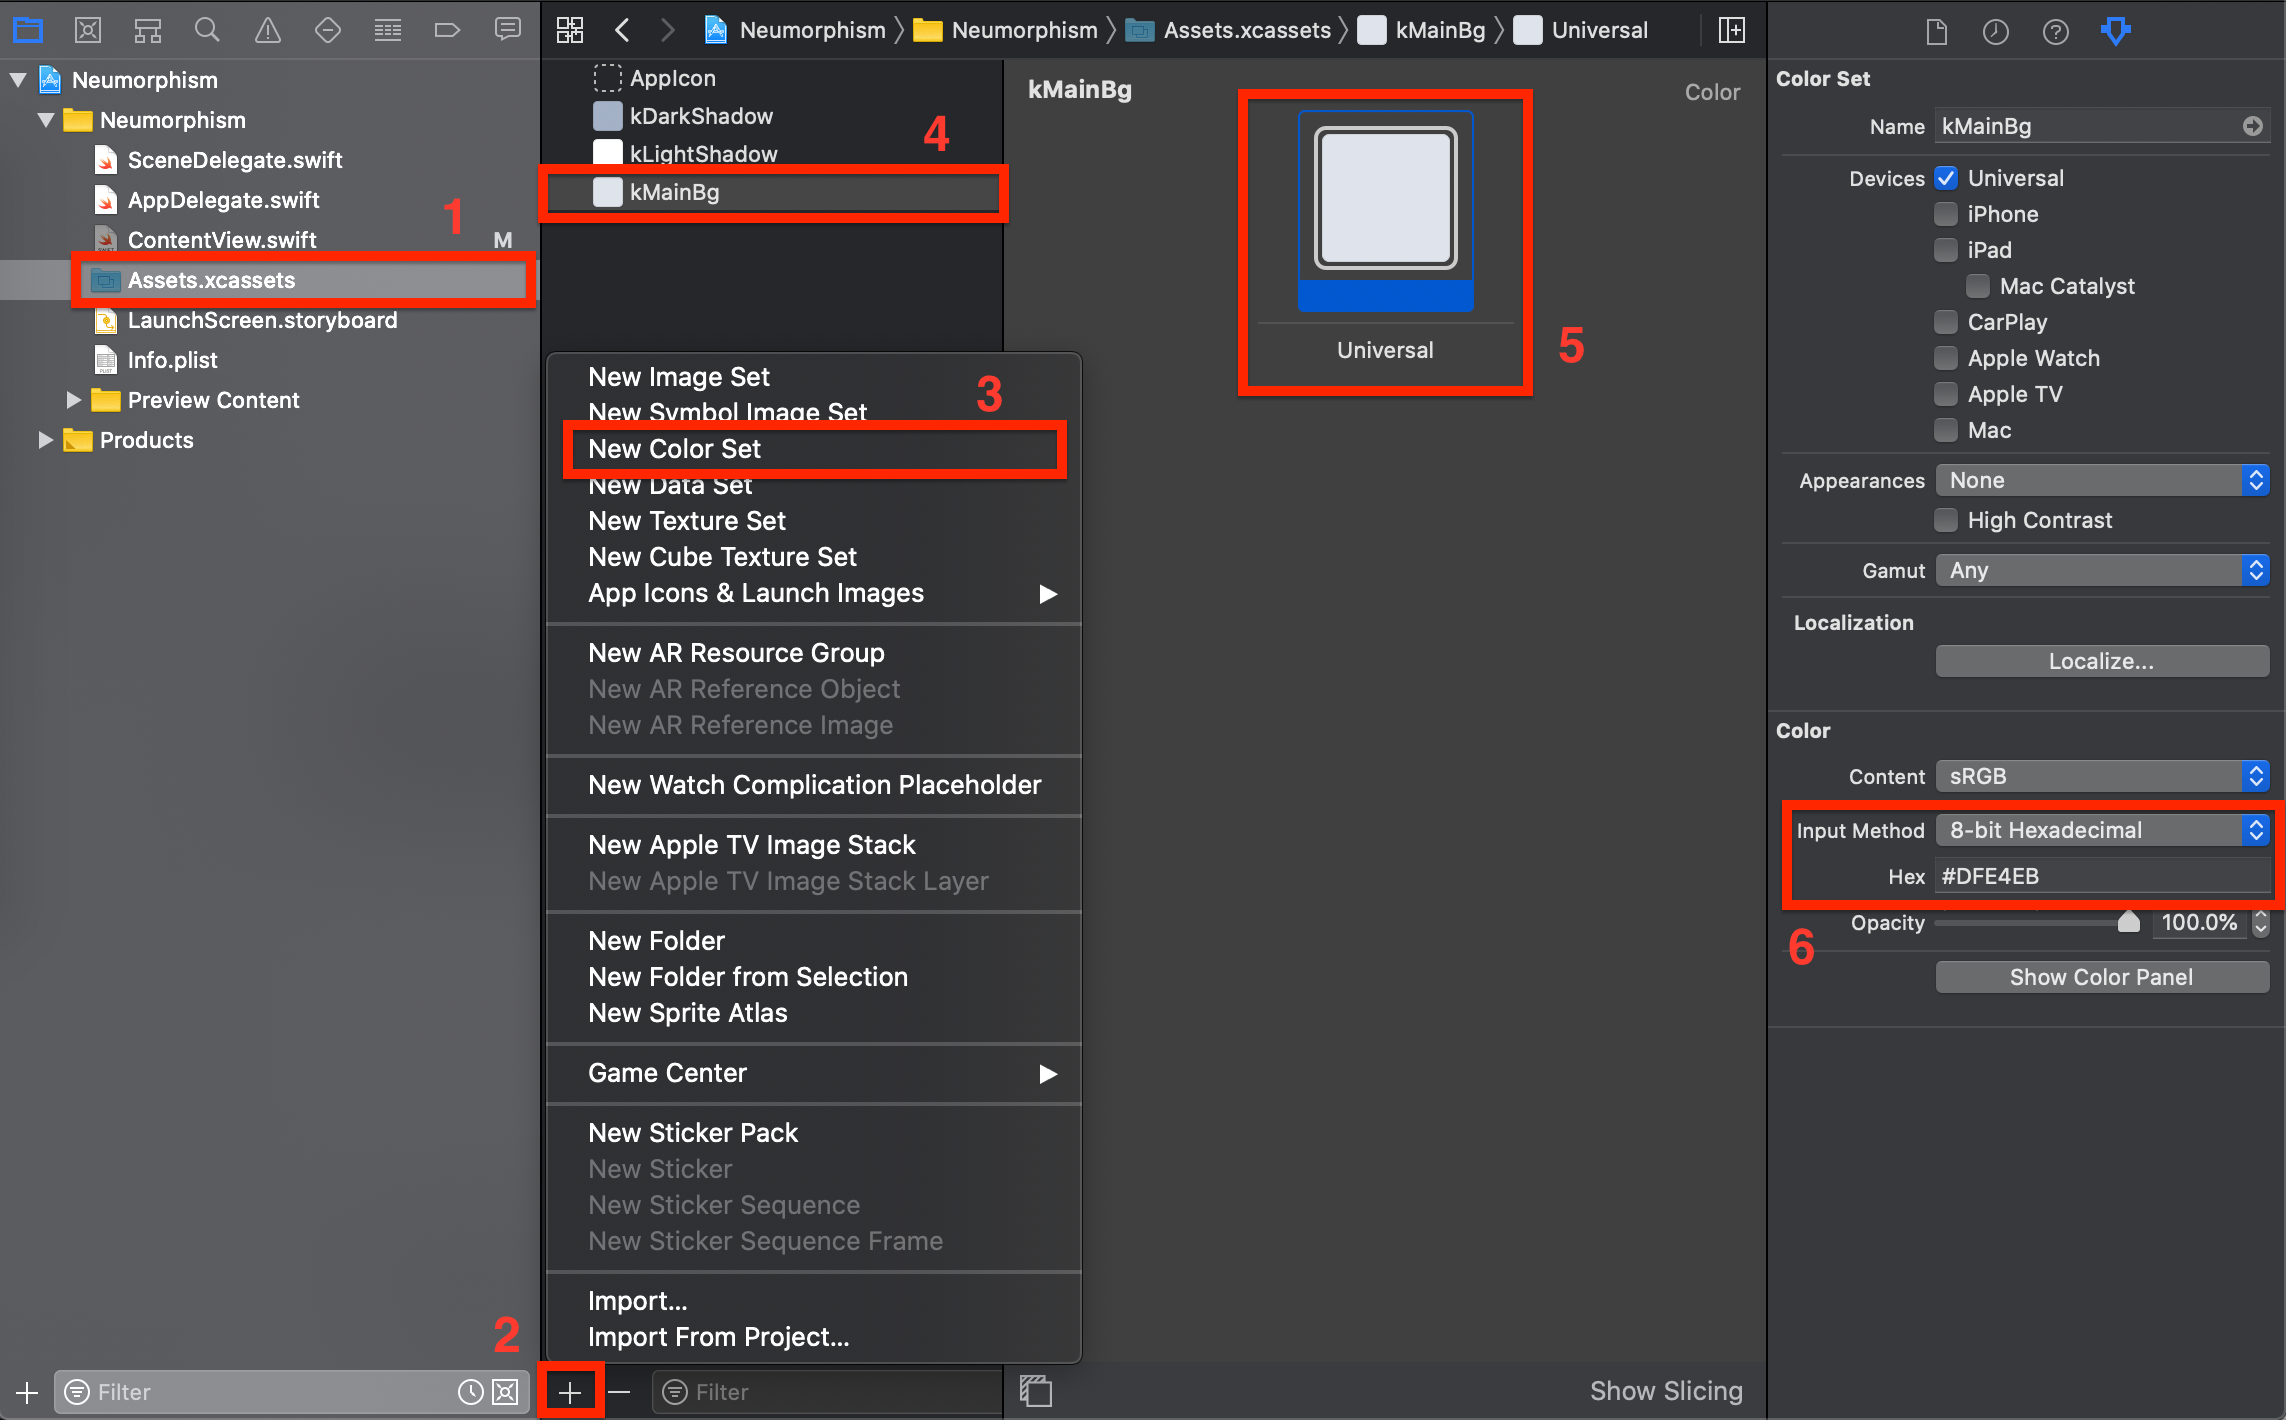
Select
Assets.xcassetsfile.选择
Assets.xcassets文件。- Click + button at the bottom left corner. 单击左下角的+按钮。
- Select the New Color Set option from the menus. On clicking, the new color set will be added and the popover will be dismissed automatically. 从菜单中选择“新颜色设置”选项。 单击后,将添加新的颜色集,并且弹出框将自动关闭。
- Select the newly added color, which will be named ‘Color’ by default. I have chosen the name which I have added already for the demo. 选择新添加的颜色,默认情况下将命名为“颜色”。 我选择了已经为演示添加的名称。
- Select the color shade that is added for a universal device. 选择为通用设备添加的色度。
- Change the Input Method to 8-bit Hexadecimal from the dropdown, enter the color Hex value provided above, and hit Enter. 从下拉列表中将输入法更改为8位十六进制,输入上面提供的彩色十六进制值,然后按Enter键。
You’re done. Add all three color shades by following the above steps.
你完成了。 请按照上述步骤添加所有三种颜色阴影。
效果1。 (Effect 1.)

We are going to use the default RoundedRectangle shape to get this effect. This is the simple one among the remaining three.
我们将使用默认的RoundedRectangle 形状以获得此效果。 这是其余三个中的简单一个。
First, add a
VStackas the container of our actual content and set the frame to go edge-to-edge across the screen. Then set theVStackbackground color asColor(“kMainBg”)using thebackground()modifier.首先,添加一个
VStack作为我们实际内容的容器,并将框架设置为跨屏幕边缘。 然后使用background()修饰符将VStack背景颜色设置为Color(“kMainBg”)。Create a
RoundedRectangleshape insideVStackwithcornerRadius = 20.创建
RoundedRectangle内侧形状VStack与cornerRadius = 20。Apply the main background color (
Color(“kMainBg”)) of the rectangle using thefill()modifier.使用
fill()修饰符应用矩形的主要背景颜色(Color(“kMainBg”))。Set the size of the rectangle as
150 X 150using theframe()modifier. (I hear you, yes, it’s a rounded square now, not a rectangle. You can choose a different width to get the rectangle, or you can use any size, based on your need.)使用
frame()修饰符将矩形的大小设置为150 X 150。 (我听到了,是的,它现在是一个圆角正方形,而不是矩形。您可以选择其他宽度来获取矩形,也可以根据需要使用任何大小。)Add the shadow using the dark color (
“kDarkShadow”) that we added in asset withradius = 5and offsetsx = -10andy = -10. Radius defines the shadow’s size and offset defines the position of the shadow relative to the view (a rectangular shape, in our case). This adds a dark shadow at the left and top sides of the rectangle.使用我们在
radius = 5且偏移量x = -10和y = -10添加到资产中的深色(“kDarkShadow”)添加阴影。 半径定义阴影的大小,偏移量定义阴影相对于视图的位置(在本例中为矩形)。 这会在矩形的左侧和顶部添加深色阴影。Add another shadow using the light color (
“kLightShadow”) that we added in asset withradius = 5and offsetsx = 10andy = 10. This adds a dark shadow at the right and bottom sides of the rectangle.使用我们在资产中添加的
radius = 5且偏移量x = 10和y = 10的浅色(“kLightShadow”)添加另一个阴影。 这会在矩形的右侧和底部添加Undertow。Optionally, you can add an
overlayto the rectangle using theoverlay()modifier if you would like to have any content above the rectangle. I have added anImageview as overlay.或者,您可以添加一个
overlay使用,以矩形overlay()修改器,如果你想有矩形上方的任何内容。 我已经添加了一个Image视图作为覆盖。- You’re done with your Effect 1. Enable preview or run the app in a simulator or device to check the result. 效果已完成。1.启用预览或在模拟器或设备中运行应用程序以检查结果。
效果2。 (Effect 2.)

We are going to use the default RoundedRectangle shape to get this effect. This is very similar to Effect 1.
我们将使用默认的RoundedRectangle 形状以获得此效果。 这与效果1非常相似。
- Follow steps 1 to 6 in Effect 1. 请按照效果1中的步骤1至6。
Apply
blurwithradius = 5. Radius defines the radial size of the blur, and blur is more spread out when its radius is large.应用
radius = 5blur。 半径定义模糊的径向尺寸,并且当模糊的半径较大时,模糊会更加分散。Optionally, you can add an
overlayto the rectangle using theoverlay()modifier if you would like to have any content above the rectangle. I have added anImageview as overlay.或者,您可以添加一个
overlay使用,以矩形overlay()修改器,如果你想有矩形上方的任何内容。 我已经添加了一个Image视图作为覆盖。- You’re done with your Effect 2. Enable preview or run the app in a simulator or device to check the result. 您已经完成了效果2。启用预览功能或在模拟器或设备中运行应用程序以检查结果。
效果3。 (Effect 3.)

We are going to use three RoundedRectangle shapes, one over the other and with different sizes, along with the mask RoundedRectangle.
我们将使用三个RoundedRectangle 形状,一个在另一个上并且具有不同的大小,以及遮罩RoundedRectangle 。
First, add a
VStackas the container of our actual content and set the frame to go edge-to-edge across the screen. Then set theVStackbackground color asColor(“kMainBg”)using thebackground()modifier.首先,添加一个
VStack作为我们实际内容的容器,并将框架设置为在屏幕上边缘到边缘。 然后使用background()修饰符将VStack背景颜色设置为Color(“kMainBg”)。Add the
ZStackcontainer to maintain threeRoundedRectangles, one over the other.添加
ZStack容器以维护三个RoundedRectangle,一个在另一个之上。Add the first layer of
RoundedRectanglewithradius = 20. Set the fill usingColor(“kMainBg”)and set theframe = 150 x 150. This is going to act as the base layer for your remaining two rectangles.添加第一层
RoundedRectangle,radius = 20。 使用Color(“kMainBg”)设置填充并设置frame = 150 x 150。 这将用作其余两个矩形的基础层。Add the second layer of
RoundedRectanglewithradius = 20. Set the fill usingColor(“kMainBg”)and set theframe = 135 x 135. We set the frame smaller than the first rectangle to allow the shadow to move from the second layer to the first layer. The shadow will fill the gap between the two layers.添加第二层
RoundedRectangle,radius = 20。 使用Color(“kMainBg”)设置填充并设置frame = 135 x 135。 我们将框架设置为小于第一个矩形,以允许阴影从第二层移动到第一层。 阴影将填充两层之间的间隙。Add the third layer of
RoundedRectanglewithradius = 20. Set the fill usingColor(“kMainBg”)and set theframe = 150 x 150, just like the second layer.添加第三层
RoundedRectangle,radius = 20。 就像第二层一样,使用Color(“kMainBg”)设置填充并设置frame = 150 x 150。Apply the blur with
radius = 15andopacity = 0.7to both the second and third layers ofRoundedRectangle. This time we need to apply blur and opacity before applying shadow. The order of the modifiers is important.将
RoundedRectangleopacity = 0.7的第二层和第三层的radius = 15opacity = 0.7的模糊应用。 这次我们需要在应用阴影之前应用模糊和不透明度。 修饰符的顺序很重要。Apply the dark color (
“kDarkShadow”) shadow to the second layer withradius = 5and offsetsx = -10andy = -10. This adds a shadow to the left and top sides of the rectangle.将深色(
“kDarkShadow”)阴影应用于radius = 5且偏移x = -10和y = -10的第二层。 这会在矩形的左侧和顶部添加阴影。Apply the light color (
“kLightShadow”) shadow to the third layer withradius = 5and offsetsx = 10andy = 10. This adds a shadow to the right and bottom sides of the rectangle.将浅色(
“kLightShadow”)阴影应用于radius = 5且偏移量x = 10和y = 10的第三层。 这会在矩形的右侧和底部添加阴影。Finally, you need to add a
RoundedRectanglewithradius = 20mask toZStackusing themask()modifier. (This is important.)最后,您需要使用
mask()修饰符将radius = 20的RoundedRectangle添加到ZStack。 (这个很重要。)You will get Effect 2’s look and feel if you don’t add the mask. But if you add a mask to Effect 2, you won’t get Effect 3 since we have played with different layers of
RoundedRectangles with different frames.如果不添加遮罩,您将获得效果2的外观。 但是,如果您向效果2添加蒙版,则将无法获得效果3,因为我们在不同图层的
RoundedRectangle播放了不同的帧。Optionally, you can add an overlay to the rectangle using the
overlay()modifier if you would like to have any content above the rectangle. I have added anImageview as an overlay.(可选
overlay()如果您希望矩形上方有任何内容,则可以使用overlay()修饰符将overlay()添加到矩形。 我添加了一个Image视图作为覆盖。- You’re done with your Effect 3. Enable preview or run the app in a simulator or device to check the result. 您已经完成了效果3。启用预览功能或在模拟器或设备中运行应用程序以检查结果。
效果4 (Effect 4)
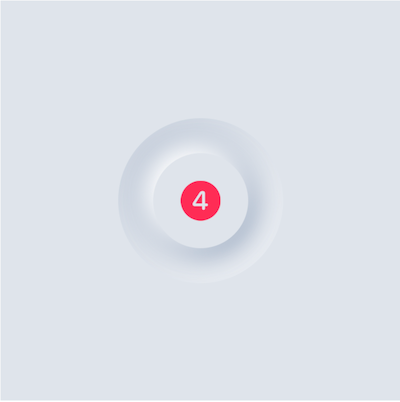
We are going to use three Circle shapes one, over the other with different sizes, along with the mask Circle.
我们将使用三种Circle形状,以及其他具有不同大小的Circle形状以及遮罩Circle 。
First, add a
VStackas the container of our actual content and set the frame to go edge-to-edge across the screen. Then set theVStackbackground color asColor(“kMainBg”)using thebackground()modifier.首先,添加一个
VStack作为我们实际内容的容器,并将框架设置为在屏幕上边缘到边缘。 然后使用background()修饰符将VStack背景颜色设置为Color(“kMainBg”)。Add the
ZStackcontainer to maintain threeCircles, one over the other.添加
ZStack容器以维护三个Circle,一个在另一个之上。Add the first layer of
CirclewithColor(“kMainBg”)fill and setframe = 150 x 150. This is going to act as the base layer for your remaining twoCircles.添加第一层用
Color(“kMainBg”)填充的Circle并将frame = 150 x 150设置frame = 150 x 150。 这将用作其余两个Circle的基础层。Add the second layer of
CirclewithColor(“kMainBg”)fill and setframe = 100 x 100. We are giving a smaller size to this circle for the same reason as in Effect 3.添加第二个带有
Color(“kMainBg”)填充的Circle层,并将frame = 100 x 100设置frame = 100 x 100。 出于与效果3中相同的原因,我们为该圆提供了较小的尺寸。Add the third layer of
CirclewithColor(“kMainBg”)fill and setframe = 80 x 80.添加带有
Color(“kMainBg”)填充的Circle的第三层,并将frame = 80 x 80设置frame = 80 x 80。Add blur to the second layer with
radius = 20. We want to hide the layer, but we need it shadowed. No need to add blur to the third layer as we need it to be visible.向
radius = 20的第二层添加模糊。 我们想隐藏该图层,但需要对其进行阴影处理。 无需在第三层添加模糊,因为我们需要使其可见。Add a
kDarkShadowcolor shadow(radius = 40,x = -18,y = -18) to the second layer to the left and top sides of the circle and addkLightShadowcolor shadow(radius = 40,x = 18,y = 18) to the bottom and right sides of the circle.将
kDarkShadow颜色阴影(radius = 40,x = -18,y = -18)添加到圆的左侧和顶部的第二层,并添加kLightShadow颜色阴影(radius = 40,x = 18,y = 18)到圆的底部和右侧。Add a
kLightShadowcolor shadow(radius = 12,x = -7,y = -7) to the third layer, to the left and top sides of the circle and add thekDarkShadowcolor shadow (radius = 12,x = 7,y = 7) to the bottom and right sides of the circle.在圆的左侧和顶部的第三层中添加一个
kLightShadow颜色阴影(radius = 12,x = -7,y = -7),然后添加kDarkShadow颜色阴影(radius = 12,x = 7,y = 7)到圆的底部和右侧。Finally, you need to add a
Circlemask toZStackusing themask()modifier. (This is important.)最后,您需要使用
mask()修饰符向ZStack添加一个Circle蒙mask()。 (这个很重要。)Optionally, you can add an overlay to the rectangle using the
overlay()modifier if you would like to have any content above the rectangle. I have added anImageview as an overlay.(可选
overlay()如果您希望矩形上方有任何内容,则可以使用overlay()修饰符将overlay()添加到矩形。 我已经添加了一个Image视图作为覆盖。- You’re done with your Effect 4. Enable preview or run the app in a simulator or device to check the result. 您已经完成了效果4。启用预览功能或在模拟器或设备中运行应用程序以检查结果。
结论 (Conclusion)
You can implement a neumorphism effect on any sort of shape or view by playing with modifiers like shadow(), fill(), blur(), opacity(), frame(), and mask(). Take this as an idea and implement your UI / UX based on your need.
通过使用诸如shadow() , fill() , blur() , opacity() , frame()和mask()修饰符,您可以在任何形状或视图上实现同态效果。 以此为想法,并根据需要实现UI / UX。
You can find complete code here.
Thanks!
谢谢!
翻译自: https://medium.com/better-programming/getting-started-with-neumorphism-in-swiftui-459843ad05a6
高安全性同态加密算法


 1343
1343

 被折叠的 条评论
为什么被折叠?
被折叠的 条评论
为什么被折叠?
 到【灌水乐园】发言


