


React Native 0.60 introduced a number of changes, one of which integrating CocoaPods by default.
React Native 0.60引入了许多更改 ,其中默认情况下集成了CocoaPods。
This tutorial will help you migrate your project to use pods. I’ll also guide you into setting up an environment that is team-friendly by using a Ruby version manager and the Bundler package manager to install your pods.
本教程将帮助您迁移项目以使用Pod。 我还将指导您使用Ruby版本管理器和Bundler程序包管理器来安装您的Pod,从而建立一个对团队友好的环境。
You can use this tutorial for any version of React Native that you are using. However, if you are on React Native 0.60 or higher, I will show you how to set up autolinking as well (no more react-native link <library-name> commands!). 🔗
您可以将本教程用于所使用的任何版本的React Native。 但是,如果您使用的是React Native 0.60或更高版本,我还将向您展示如何设置自动react-native link <library-name> (不再需要react-native link <library-name>命令!)。 🔗
什么是CocoaPods,为什么我需要它们? 📦 (What is CocoaPods and Why Do I Need Them? 📦)
According to cocoapods.org:
根据cocoapods.org :
CocoaPods is a dependency manager for Swift and Objective-C Cocoa projects.
CocoaPods是Swift和Objective-C Cocoa项目的依赖项管理器。
Basically, it’s npm or yarn, but for macOS and iOS modules.
基本上是npm或yarn ,但是对于macOS和iOS模块。
It’s not absolutely necessary to migrate for your 0.60 project to work. Manual BUT support for xcodeproject files is removed in 0.61. Completing this migration will let you use the new xcodeworkspace model. And migration is easy! 🎉
为使0.60项目正常工作,迁移不是绝对必要的 。 0.61删除了对xcodeproject文件的手动BUT支持。 完成此迁移将使您可以使用新的xcodeworkspace模型。 而且迁移很容易! 🎉
步骤1:设置Ruby环境💎 (Step 1: Set Up a Ruby Environment 💎)
CocoaPods is built with Ruby and can be installed via the RubyGems package manager. So we will need Ruby to start the process.
CocoaPods是使用Ruby构建的,可以通过RubyGems软件包管理器进行安装。 因此,我们将需要Ruby来启动该过程。
Good News: Ruby comes pre-installed on a Mac!
好消息 :Ruby已预装在Mac上!
Bad News: It’s probably not what we should use.
坏消息 :这可能不是我们应该使用的。
Why?
为什么?
You will need to use
sudoto install Ruby packages (also knowns as “gems”). You start installing things at a system level. It can mess with other programs. It can mess with other users. Be smart. Don’t usesudo. 🙅🏻♀️您将需要使用
sudo安装Ruby软件包(也称为“宝石”)。 您开始在系统级别安装东西。 它可能会与其他程序混淆。 它可能会与其他用户混淆。 放聪明点。 不要使用sudo。 ♀♀️- Different machines come with different versions of Ruby installed. We should be consistent in how we install our dependencies. 不同的机器安装了不同版本的Ruby。 我们应该在如何安装依赖项方面保持一致。
Instead, let’s install Ruby via a version manager called rbenv. It’s like nvm, but for Ruby.
相反,让我们通过名为rbenv的版本管理器安装Ruby。 就像nvm一样,但是对于Ruby。
Before we install rbenv, find out which version of Ruby you would like to work with. Head over to ruby-lang.org where you can out what the latest stable version is.
在安装rbenv之前,请rbenv您要使用的Ruby版本。 转到ruby-lang.org ,在这里您可以了解最新的稳定版本。
Next, in the root of your project, create a .ruby-version file and type that number in.
接下来,在项目的根目录中,创建一个.ruby-version文件,然后输入该数字。
// .ruby-version
2.7.1
This will be your project’s required version of Ruby.
这将是您项目所需的Ruby版本。
For the purposes of this tutorial, I will be using version 2.7.1. You can use whichever version you please.
就本教程而言,我将使用2.7.1版。 您可以使用任何版本。
步骤2:安装rbenv ⬇️ (Step 2: Install rbenv ⬇️)
rbenv can be installed via Homebrew. We will use this to install our desired version of Ruby.
可以通过Homebrew安装rbenv 。 我们将使用它来安装所需的Ruby版本。
To install rbenv:
要安装rbenv :
$ brew install rbenvThen, run:
然后,运行:
rbenv init…and follow the instructions to finish the installation. You will probably be asked to update your .bash_profile or .zshrc with a new PATH variable.
…并按照说明完成安装。 可能会要求您使用新的PATH变量更新.bash_profile或.zshrc 。
When done, restart Terminal to apply your changes.
完成后,重新启动终端以应用更改。
步骤3:安装Ruby⬇️ (Step 3: Install Ruby ⬇️)
Use rbenv to install your desired version of Ruby:
使用rbenv安装所需的Ruby版本:
$ rbenv install 2.7.1Once installed, you’ll need to boot it up:
安装完成后,您需要启动它:
$ rbenv global 2.7.1This command sets your global version of Ruby.
此命令设置Ruby的全局版本。
🙋🏿♂️ Question: “Will my global version of Ruby apply to all projects on my machine?”
Question♂️问题:“我的Ruby全局版本是否适用于我的计算机上的所有项目?”
👩🏻🏫 Answer: “Nope. If you have a .ruby-version file in a project, that specified local version will be used instead.”
回答:“不。 如果项目中有.ruby-version文件,则将使用该指定的本地版本。”
Next, run the following command to update your shims and allow your version of Ruby to be used properly on your system:
接下来,运行以下命令以更新垫片,并允许在系统上正确使用Ruby版本:
$ rbenv rehashYou’re done! You now have a sudo-less, version-specified copy of Ruby installed on your machine.
你完成了! 现在,您已在计算机上安装了sudo -less,版本指定的Ruby副本。
第4步:创建Gemfile 💎 (Step 4: Create a Gemfile 💎)
All set with Ruby. Now it’s time to install CocoaPods.
全部用Ruby设置。 现在该安装CocoaPods了。
First, check which version of CocoaPods you wish to install. I went with the latest release listed.
首先,检查您想安装哪个版本的CocoaPods 。 我选择了列出的最新版本。
Next, create a file called Gemfile in the root of your directory, and add the following, including the version of CocoaPods you wish to install:
接下来,在目录的根目录中创建一个名为Gemfile的文件,并添加以下内容,包括您要安装的CocoaPods的版本:
# Gemfile
source "https://rubygems.org"
gem "cocoapods", '1.9.1'
步骤5:安装Bundler📦 (Step 5: Install Bundler 📦)
To install the version of CocoaPods listed in your Gemfile, we will use a tool called Bundler. Bundler will help us install gems and will produce a lock file (similar to package-lock.json or yarn.lock), that will keep our dependencies in check.
要安装Gemfile中列出的Gemfile ,我们将使用一个名为Bundler的工具。 Bundler将帮助我们安装gems并生成一个锁定文件(类似于package-lock.json或yarn.lock ),这将使我们的依赖项得到检查。
To install Bundler, run:
要安装Bundler,请运行:
$ gem install bundler步骤6:安装CocoaPods🍎 (Step 6: Install CocoaPods 🍎)
Finally! To install CocoaPods, run the following in the root of your project:
最后! 要安装CocoaPods,请在项目的根目录中运行以下命令:
bundle installThis creates a Gemfile.lock as well. Please always commit your lock files!
这Gemfile.lock创建一个Gemfile.lock 。 请始终提交您的锁定文件!
第7步:创建一个Podfile 🍎 (Step 7: Create a Podfile 🍎)
We will need to create a Podfile that Xcode will use to install the necessary iOS dependencies.
我们将需要创建一个Podfile ,Xcode将使用该Podfile安装必要的iOS依赖项。
cd into tour ios directory, and create a new file called Podfile
cd进入tour ios目录,并创建一个名为Podfile的新文件
The contents of this file will be specific to the version of React Native that you are using. This tutorial shows a migration to CocoaPods on a React Native 0.60.6 project. Other versions of React Native will have different dependencies listed in their Podfiles.
该文件的内容将特定于您所使用的React Native的版本。 本教程显示了在React Native 0.60.6项目上向CocoaPods的迁移。 其他版本的React Native将在其Podfile中列出不同的依赖项。
So, if you are upgrading to a different version of React Native, I suggest you start a new temporary project in the version of React Native you wish to use (e.g. npx react-native init YourProjectName --version X.XX.X), and copy the contents of the Podfile in the new project, instead of what I provide below.
因此,如果您要升级到其他版本的React Native,建议您在要使用的React Native版本中启动一个新的临时项目(例如npx react-native init YourProjectName --version X.XX.X ),并在新项目中复制Podfile的内容,而不是我在下面提供的内容。
In a React Native 0.60.6 project, add the following to your Podfile and change all instances of <target-name> to the target name of your app.
在React Native 0.60.6项目中,将以下内容添加到Podfile ,并将<target-name>所有实例更改为应用程序的目标名称。
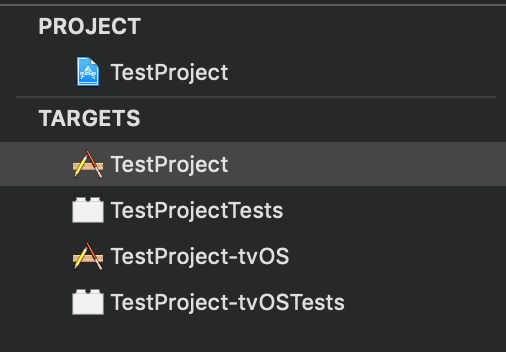
🙋🏾♀️ Question: “How do I find the target name?”
Question♀️问题:“我如何找到目标名称?”
👩🏻🏫 Answer: “Open up your project in Xcode. Select the project in the top left corner and look at the list of TARGETS. Here’s a screenshot:”
答:“在Xcode中打开您的项目。 选择左上角的项目,然后查看TARGETS列表。 这是屏幕截图:”
My 0.60.6 Podfile:
我的0.60.6 Podfile :
# ios/Podfile
platform :ios, '9.0'
require_relative '../node_modules/@react-native-community/cli-platform-ios/native_modules'
target '<target-name>' do
	# Pods for <target-name>
	pod 'React', :path => '../node_modules/react-native/'
	pod 'React-Core', :path => '../node_modules/react-native/React'
	pod 'React-DevSupport', :path => '../node_modules/react-native/React'
	pod 'React-RCTActionSheet', :path => '../node_modules/react-native/Libraries/ActionSheetIOS'
	pod 'React-RCTAnimation', :path => '../node_modules/react-native/Libraries/NativeAnimation'
	pod 'React-RCTBlob', :path => '../node_modules/react-native/Libraries/Blob'
	pod 'React-RCTImage', :path => '../node_modules/react-native/Libraries/Image'
	pod 'React-RCTLinking', :path => '../node_modules/react-native/Libraries/LinkingIOS'
	pod 'React-RCTNetwork', :path => '../node_modules/react-native/Libraries/Network'
	pod 'React-RCTSettings', :path => '../node_modules/react-native/Libraries/Settings'
	pod 'React-RCTText', :path => '../node_modules/react-native/Libraries/Text'
	pod 'React-RCTVibration', :path => '../node_modules/react-native/Libraries/Vibration'
	pod 'React-RCTWebSocket', :path => '../node_modules/react-native/Libraries/WebSocket'
	pod 'React-cxxreact', :path => '../node_modules/react-native/ReactCommon/cxxreact'
	pod 'React-jsi', :path => '../node_modules/react-native/ReactCommon/jsi'
	pod 'React-jsiexecutor', :path => '../node_modules/react-native/ReactCommon/jsiexecutor'
	pod 'React-jsinspector', :path => '../node_modules/react-native/ReactCommon/jsinspector'
	pod 'yoga', :path => '../node_modules/react-native/ReactCommon/yoga'
	pod 'DoubleConversion', :podspec => '../node_modules/react-native/third-party-podspecs/DoubleConversion.podspec'
	pod 'glog', :podspec => '../node_modules/react-native/third-party-podspecs/glog.podspec'
	pod 'Folly', :podspec => '../node_modules/react-native/third-party-podspecs/Folly.podspec'
	target '<target-name>Tests' do
		inherit! :search_paths
		# Pods for testing
	end
	use_native_modules!
end
target '<target-name>-tvOS' do
	# Pods for <target-name>-tvOS
	target '<target-name>-tvOSTests' do
		inherit! :search_paths
		# Pods for testing
	end
end
步骤8:安装Pod📦 (Step 8: Install Pods 📦)
cd into your ios directory. Now run:
cd进入ios目录。 现在运行:
$ bundle exec pod installIn your ios directory, this command creates:
在您的ios目录中,此命令创建:
A
Podfile.lockfilePodfile.lock文件A
<app-name>.xcworkspacedirectory<app-name>.xcworkspace目录A
PodsdirectoryPods目录
‼️ From this point on, always use your new .xcworkspace directory when opening the project in Xcode. Do not use the old .xcodeproj. ‼️
From️ 从现在开始, 在Xcode中打开项目时 ,请始终使用新的 .xcworkspace 目录。 不要使用旧的 .xcodeproj 。 !️
The script you just ran will be the new script you will need to use every time you want to install a new pod. Often times, you’ll see the documentation of a library instruct you to run a pod install command. Don’t do this. Run bundle exec pod install instead.
您刚运行的脚本将是您每次要安装新Pod时都需要使用的新脚本。 通常,您会看到库的文档指示您运行pod install命令。 不要这样 而是运行bundle exec pod install 。
🙋🏼♀️ Question: “Why do I need to use the bundle exec prefix?”
Question♀️问题:“为什么需要使用bundle exec前缀?”
👩🏻🏫 Answer: “Not using bundle exec will skip the version of CocoaPods you are requiring with your Gemfile. Your Gemfile is there to prevent problems. Let’s not ignore it.”
回答:“不使用bundle exec将跳过Gemfile所需的Gemfile 。 您的Gemfile在那里可以防止出现问题。 我们不要忽略它。”
Do yourself a favor and create a script in your package.jsonto help you out:
帮个忙,在package.json创建一个脚本来帮助您:
// package.json
{
	...
	"scripts": {
		"podInstall": "cd ios && bundle exec pod install",
	}
}
Now every time you add a new dependency with native iOS modules, just run npm run podInstall or yarn run podInstall to install the pod.
现在,每次使用本地iOS模块添加新的依赖项时,只需运行npm run podInstall或yarn run podInstall即可安装pod。
第9步:忽略您的Pods目录🙅🏻♀️ (Step 9: Ignore your Pods directory 🙅🏻♀️)
Pods are essentially node_modules. Don’t commit them. They can be easily reinstalled.
Pods基本上node_modules 。 不要犯他们。 他们可以很容易地重新安装。
Update your .gitignore to ignore these files:
更新您的.gitignore以忽略以下文件:
// .gitignore
# CocoaPods
/ios/Pods/
第10步:更新您的依赖性⬆️(使用自动链接!) (Step 10: Update Your Dependencies ⬆️ (with Autolinking!))
对于使用React Native 0.60或更高版本的用户 (For those using React Native 0.60 or higher)
If you are using React Native 0.60 or higher, the coolest part of the Podfile is that use_native_modules! function at the end. This is the autolinking bit. Once you install your library via npm or yarn, you are done with the iOS install. This works for almost all libraries. Almost all…
如果您使用的是React Native 0.60或更高版本,那么Podfile最酷的部分是use_native_modules! 最后的功能。 这是自动链接位。 通过npm或yarn安装库之后,即可完成iOS安装。 这几乎适用于所有库。 大概全部…
Go through the installation instructions of each dependency you have and see if there are any additional podspecs that you need to add. (You can also just try to run your project and see if anything breaks and take it from there. 🤠)
仔细阅读每个依赖项的安装说明,看看是否需要添加其他附加podspec。 (您也可以尝试运行您的项目,看看是否有任何问题,然后从那里拿走。)
Some libraries will still require you to adjust your Podfile. Here is an example of something I had to do:
某些库仍会要求您调整Podfile 。 这是我必须做的事的一个例子:
# Example v0.60 Podfile using libraries that still require some podspecs.
# Do not add to your project.
...
# Patch for react-native-push-notification install error
pod 'React-RCTPushNotification', :path => '../node_modules/react-native/Libraries/PushNotificationIOS'
# Patch for react-native-image-crop-picker dark mode bugs
pod 'QBImagePickerController', :path => '../node_modules/react-native-image-crop-picker/ios/QBImagePicker/QBImagePickerController.podspec'
...
With any adjustments you make, make sure the use_native_modules! function lives at the end of your file.
进行任何调整后,请确保use_native_modules! 函数位于文件末尾。
对于使用React Native <0.60的用户 (For those using React Native < 0.60)
If you are using a version of React Native lower than 0.60, you will need to find the installation instructions for each dependency you are using, and manually add any necessary podspecs to your Podfile.
如果您使用的React Native版本低于0.60 ,则需要查找所使用的每个依赖项的安装说明,并手动将任何必要的podspec添加到Podfile 。
For example, if you are on React Native 0.59 and are using the react-native-maps library, you would need to add something like the following:
例如,如果您使用React Native 0.59并且正在使用react-native-maps库,则需要添加类似以下内容:
# Example v0.59 Podfile adjustments if using react-native-maps
# Do not add to your project.
...
	# react-native-maps dependencies
	pod 'react-native-maps', path: rn_maps_path
	pod 'react-native-google-maps', path: rn_maps_path
	pod 'GoogleMaps'
	pod 'Google-Maps-iOS-Utils'
end
post_install do |installer|
  installer.pods_project.targets.each do |target|
    if target.name == 'react-native-google-maps'
      target.build_configurations.each do |config|
        config.build_settings['CLANG_ENABLE_MODULES'] = 'No'
      end
    end
  end
end
步骤11:安装新的Pod⬇️ (Step 11: Install Your New Pods ⬇️)
If you have updated any libraries to newer versions, or have made changes to your Podfile you will need to run bundle exec pod install once again in your iOS directory.
如果您已将任何库更新为较新的版本,或者对Podfile进行了更改,则需要在iOS目录中再次运行bundle exec pod install 。
Or, if you have added it in Step 8, run your podInstall script instead.
或者,如果您已在步骤8中添加了它,请改为运行podInstall脚本。
Changing the Podfile is just like changing a package.json file. It’s a set of instructions indicating which dependencies should be installed.
更改Podfile就像更改package.json文件一样。 这是一组指示,指示应该安装哪些依赖项。
步骤12:删除旧链接🧹 (Step 12: Delete Your Old Links 🧹)
The only thing I like more than writing code is deleting code. 😍
除了编写代码之外,我唯一喜欢的就是删除代码。 😍
Your old react-native link commands have created a lot of unnecessary links that need to be removed.
您以前的react-native link命令创建了许多不必要的链接,需要将其删除。
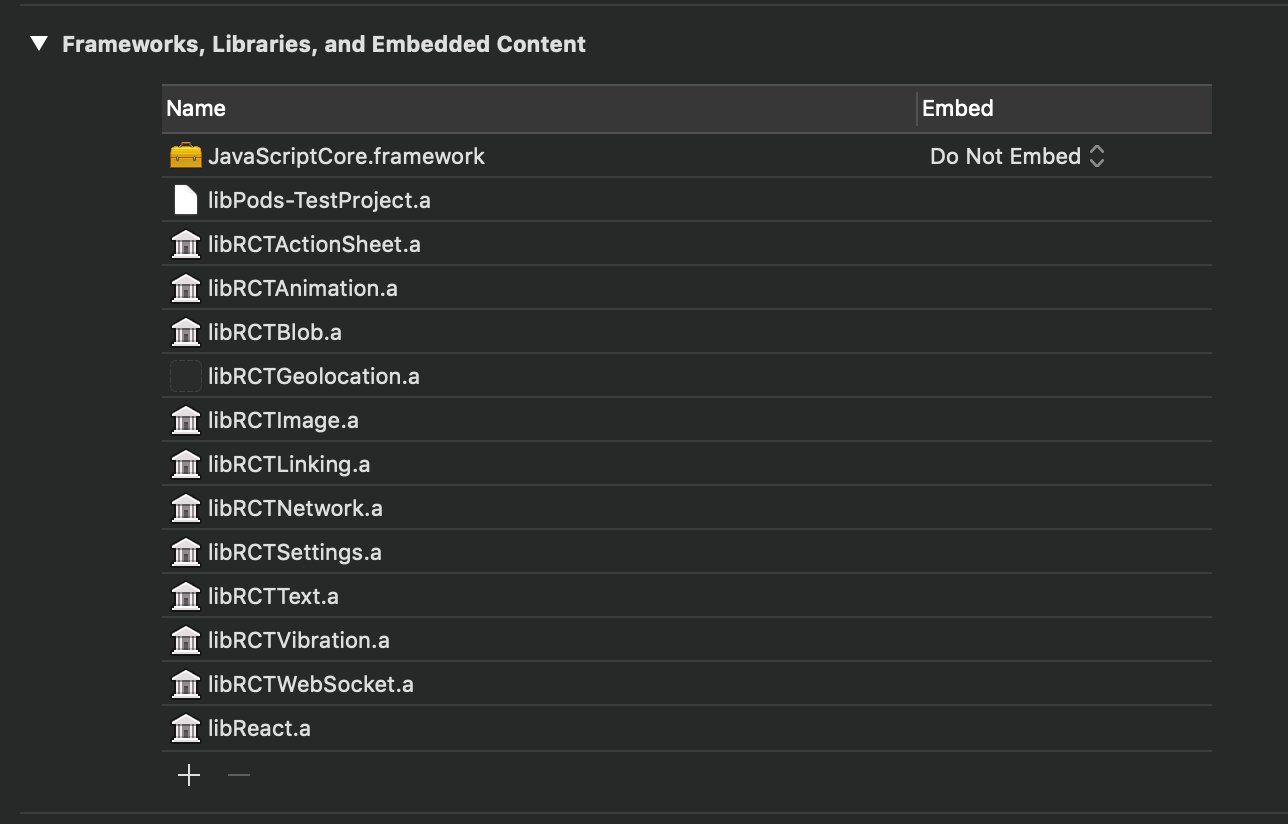
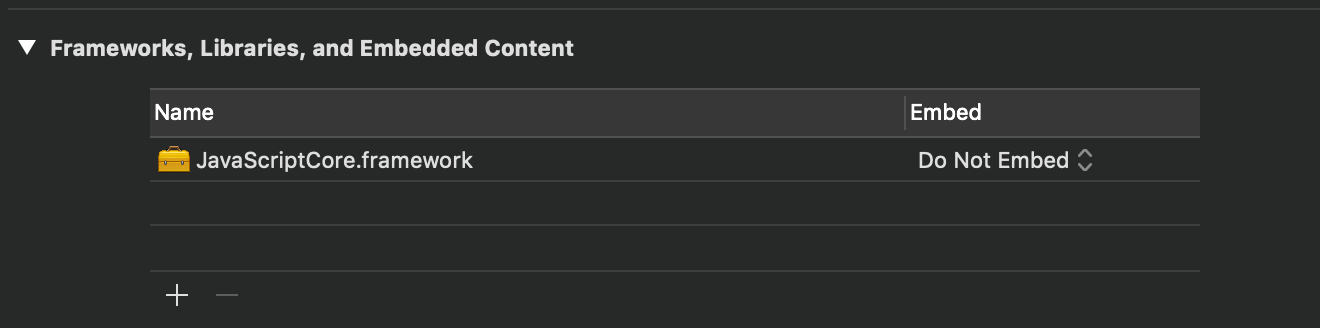
Open up your new <app-name>.xcworkspace directory in Xcode. Pick your Target and under the General tab you will see a “Frameworks, Libraries, and embedded Content” section. Delete everything except for the JavaScriptCore.framework.
在Xcode中打开新的<app-name>.xcworkspace目录。 选择目标,在“常规”选项卡下,您将看到“框架,库和嵌入式内容”部分。 删除除JavaScriptCore.framework之外的所有内容。
You will see a heck of a lot of code deleted from your old project.pbxproj file. Doesn’t that feel great?!
您会看到大量代码从旧的project.pbxproj文件中删除。 感觉不舒服吗?
步骤13:构建和测试! 🧪 (Step 13: Build and Test! 🧪)
Go ahead and run your project! Make sure you give your app a full test. If any errors come up, they are very likely dependency errors, so head over to those repos and see if there are any additional steps that have been missed.
继续运行您的项目! 确保您对应用程序进行了完整的测试。 如果出现任何错误,则很可能是依赖错误,因此请转至那些存储库,看看是否还有其他遗漏的步骤。
Congrats on your migration! 🎉 🎉 🎉
恭喜您的迁移! 🎉
Metro Bundler无法启动? (Metro Bundler Won’t Start?)
When I first upgraded to 0.60, I had an issue where Metro Bundler would not automatically start when running my app.
首次升级到0.60 ,我遇到一个问题,即运行我的应用程序时Metro Bundler无法自动启动。
I had to add a Run Script, which can be found under the Build Phases tab in your Target.
我必须添加一个运行脚本,可以在“目标”的“构建阶段”选项卡下找到该脚本。
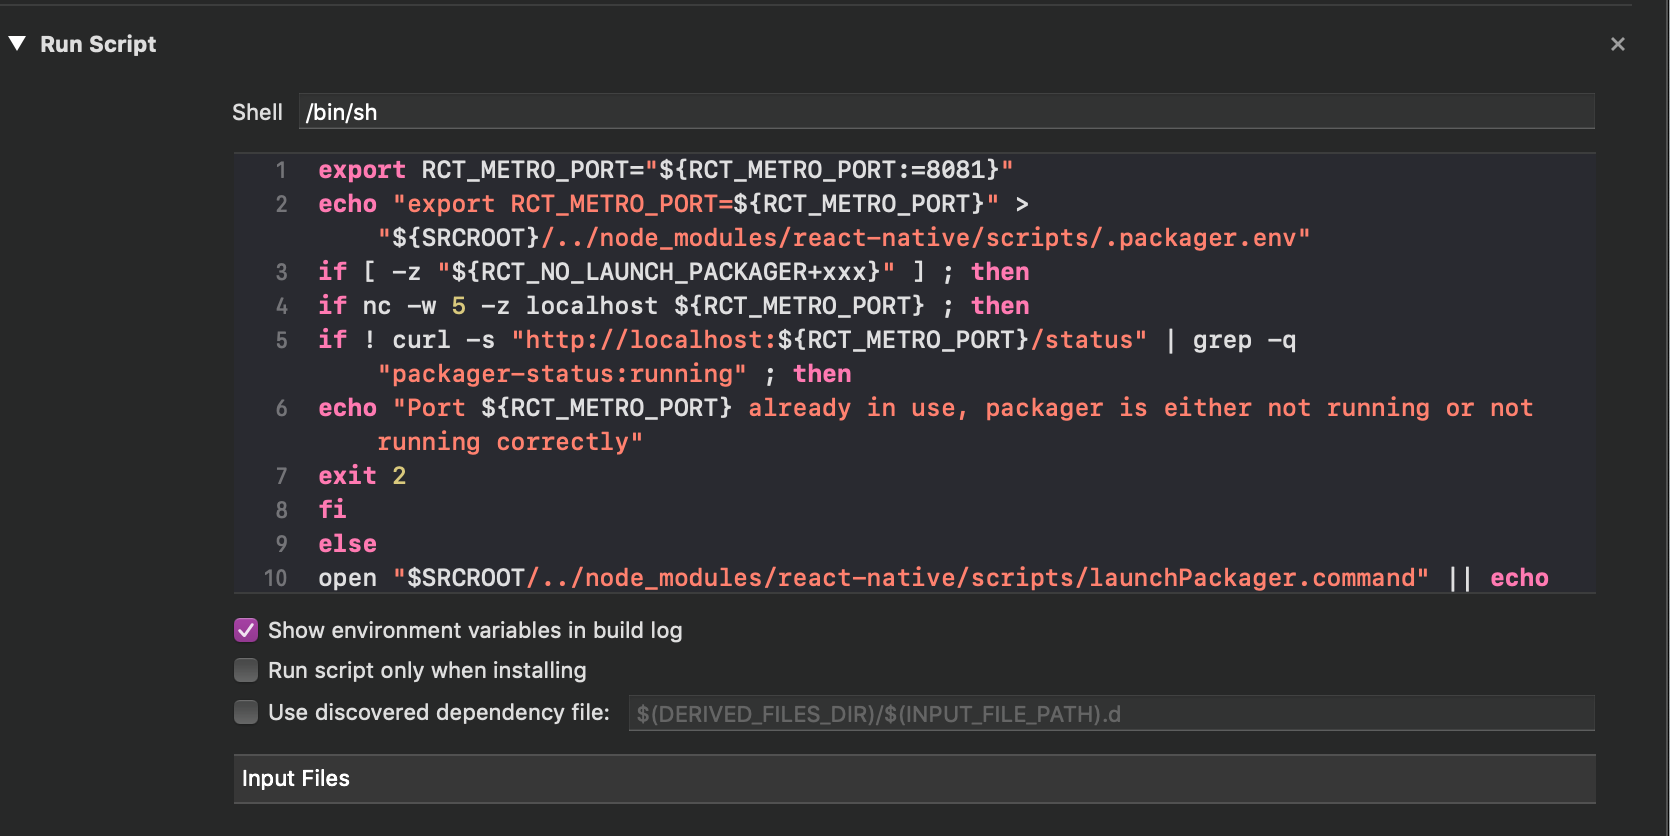
Here is the script:
这是脚本:
export RCT_METRO_PORT="${RCT_METRO_PORT:=8081}"
echo "export RCT_METRO_PORT=${RCT_METRO_PORT}" > "${SRCROOT}/../node_modules/react-native/scripts/.packager.env"
if [ -z "${RCT_NO_LAUNCH_PACKAGER+xxx}" ] ; then
	if nc -w 5 -z localhost ${RCT_METRO_PORT} ; then
		if ! curl -s "http://localhost:${RCT_METRO_PORT}/status" | grep -q "packager-status:running" ; then
		echo "Port ${RCT_METRO_PORT} already in use, packager is either not running or not running correctly"
		exit 2
		fi
	else
		open "$SRCROOT/../node_modules/react-native/scripts/launchPackager.command" || echo "Can't start packager automatically"
	fi
fi
Once this script was in, I no longer had to manually launch the bundler with npx react-native start.
输入此脚本后,我不再需要使用npx react-native start手动启动捆绑程序。

翻译自: https://medium.com/@jrapala/migrating-your-react-native-ios-project-to-use-cocoapods-6feaca235d7e


 1万+
1万+

 被折叠的 条评论
为什么被折叠?
被折叠的 条评论
为什么被折叠?
 到【灌水乐园】发言


