


mvvm核心
iOS App开发 (iOS App Development)
In this tutorial we’ll add Core Data as a persistent storage to our To-do list app. You’ll see how easy it is to add a database to your app using Apple’s framework CoreData. Also, since we were using Protocols and hid all the logic behind them in our app, it should be pretty easy to add Core Data and replace the current temporary data storage layer in the app.
在本教程中,我们将“核心数据”作为持久性存储添加到“待办事项”列表应用中。 您将看到使用Apple的CoreData框架向应用程序添加数据库有多么容易。 另外,由于我们使用协议并将其背后的所有逻辑隐藏在我们的应用程序中,因此添加核心数据并替换应用程序中当前的临时数据存储层应该非常容易。
In the tutorial, we use the latest version of Xcode (11.5) and macOS Catalina (10.15.4) for the moment of writing.
在本教程中,在撰写本文时,我们使用最新版本的Xcode(11.5)和macOS Catalina(10.15.4)。
You can use this tutorial on its own, yet we’re going to work with the app that is created in the previous parts of the series of tutorials, so I recommend to take a look at the previous parts where we created the app. Also, the app uses SwiftUI and Combine, frameworks introduced by Apple in 2019, so if you have no prior experience working with these frameworks, it’s good to take a look at the previous parts as well.
您可以单独使用本教程,但是我们将使用在该系列教程的前几部分中创建的应用程序,因此,我建议您看一下创建该应用程序的前几部分。 此外,该应用程序使用Apple在2019年推出的SwiftUI和Combine框架,因此如果您没有使用这些框架的经验,那么也可以参考前面的部分。
To check the other parts, use the following links:
要检查其他部分,请使用以下链接:
Getting Started with SwiftUI and Combine Using MVVM and Protocols for iOS.
Creating an iOS App With SwiftUI and Combine Using MVVM and Protocols.
Creating an iOS App With SwiftUI, Combine, MVVM, and Protocols [Part 3].
Using Core Data in Your SwiftUI App with Combine, MVVM and Protocols (this tutorial).
我们将学到什么 (What We will Learn)
In the beginning, we have an app written with SwiftUI and Combine. It uses Protocols and MVVM. The issue is that the app doesn’t have a persistent storage for its data. But, fortunately, we created a protocol for our DataManager there that stores all the data in an array, so we can replace it with another one and implement a persistent storage touching no other parts of the project.
首先,我们有一个使用SwiftUI和Combine编写的应用程序。 它使用协议和MVVM 。 问题是该应用程序没有用于其数据的持久存储。 但是,幸运的是,我们在那里为DataManager创建了一个协议,该协议将所有数据存储在一个数组中,因此我们可以将其替换为另一个协议,并实现一个持久性存储,而不涉及项目的其他部分。
By the end of this tutorial we will learn:
在本教程结束时,我们将学习:
- How to add Core Data to an app; 如何向应用添加核心数据;
- How to create Entities in it; 如何在其中创建实体;
- How to connect them to Swift classes; 如何将它们连接到Swift类;
- How to initialize Core Data; 如何初始化核心数据;
- How to use Core Data in an iOS app. 如何在iOS应用中使用Core Data。
入门 (Getting Started)
Open the project created in the previous parts or downloaded from here in Xcode. Your app is a To-do list app, you can build and run it and add new tasks there and mark them as completed. Also, you can toggle between showing or hiding completed tasks.
打开在前面的部分中创建的项目,或者从Xcode中从此处下载的项目。 您的应用程序是一个待办事项列表应用程序,您可以构建并运行该应用程序,并在其中添加新任务并将其标记为已完成。 另外,您可以在显示或隐藏完成的任务之间切换。
CoreDataHelper (CoreDataHelper)
First, let’s create a helper class for Core Data. As we created a generic protocol DataHelperProtocol in the previous part, we can now create a custom helper that conforms to this protocol and connect it to our DataManager. In the future, if we decide to migrate to Realm or anything else, we must create another helper and just replace our old one in DataManager. Also, it is helpful if we decide to add tests to our app (and we should do it in a real project), since we’ll be able to substitute our data helper with a mock one for our unit tests.
首先,让我们为Core Data创建一个帮助器类。 在上一部分中创建通用协议DataHelperProtocol时,我们现在可以创建符合该协议的自定义帮助程序并将其连接到我们的DataManager 。 将来,如果我们决定迁移到Realm或其他任何东西,我们必须创建另一个帮助程序,而只需在DataManager替换旧的帮助程序。 另外,如果我们决定将测试添加到我们的应用程序(这应该在真实的项目中进行),这将很有帮助,因为我们可以用模拟助手替代数据助手来进行单元测试。
Now, create a new Swift file, name it CoreDataHelper. First, import CoreData adding import CoreData. Also, import our DBHelper adding import DBHelper below.
现在,创建一个新的Swift文件,将其命名为CoreDataHelper 。 首先,导入CoreData并添加import CoreData 。 此外,导入我们DBHelper增加import DBHelper以下。
Now, we’re good to start implementing our helper! Define a class CoreDataHelper and add a conformance to DBHelperProtocol. When you see an error message, click it and add protocol stubs. After that, assign NSManagerObject to the ObjectType typealias and NSPredicate to PredicateType.
现在,我们很高兴开始实施我们的助手! 定义一个类CoreDataHelper和一致性添加到DBHelperProtocol 。 当您看到错误消息时,请单击它并添加协议存根。 之后,将NSManagerObject分配给ObjectType别名,将NSPredicate NSPredicate给PredicateType 。
After that, you should see the error again, and add protocol stubs again. After doing so, you’ll see our protocol methods there with correct types. Awesome! By the way, we could also remove the typealiases now, since the class can inherit types implicitly from the methods.
之后,您应该再次看到该错误,并再次添加协议存根。 这样做之后,您将在此处看到具有正确类型的协议方法。 太棒了! 顺便说一下,由于类可以从方法隐式继承类型,因此我们现在也可以删除类型别名。
Your file should look as follows:
您的文件应如下所示:
Don’t forget to add
fetchby yourself, Xcode thinks you added a default implementation to this method while creating an extension with default values for the parameters, so it doesn’t add that method automatically.别忘了自己添加
fetch,Xcode认为您在创建带有参数默认值的扩展时已向该方法添加了默认实现,因此它不会自动添加该方法。
核心日期模型文件 (Core Date Model File)
Next step is to create a model file for our database. Click File — New — File…, find the Core Data section, choose Data Model. Choose any name you want, in my case, I named it as my project’s name: DemoToDoList. Now, you should see your database file.
下一步是为我们的数据库创建一个模型文件。 单击文件—新建—文件… ,找到“ Core Data部分,选择“ Data Model 。 选择您想要的任何名称,在我的情况下,我将其命名为项目的名称: DemoToDoList 。 现在,您应该看到您的数据库文件。
Now, we need to let the app know that it needs to use the data model. We’ll create a persistent container and a method for saving the context. You can just copy the following code and insert it in the end of CodeDataHelper:
现在,我们需要让应用程序知道它需要使用数据模型。 我们将创建一个持久性容器和一种保存上下文的方法。 您可以复制以下代码并将其插入CodeDataHelper :
Don’t forget to choose an appropriate name for the container if it differs.
如果容器不同,请不要忘记为其选择合适的名称。
Also, add a method shared in the beginning of CoreDataHelper to implement a singleton for the class: static let shared = CoreDataHelper().
另外,在CoreDataHelper的开头添加一个shared方法,以实现该类的单例: static let shared = CoreDataHelper() 。
Now, open SceneDelegate.swift and edit it as follows:
现在,打开SceneDelegate.swift并按如下所示进行编辑:
Add the
contextvariable into the first method (func scene(:willConnectTo:options));将
context变量添加到第一个方法中(func scene(:willConnectTo:options));- And pass it as an environment object into our main view; 并将其作为环境对象传递到我们的主视图中;
Add
saveContext()intosceneDidEnterBackground.将
saveContext()添加到sceneDidEnterBackground。
Great job. Now, our app knows about the database. As the next step, we’ll create a new entity in our Core Data model. To do so, open your data model file. Click Add Entity in the bottom. Now, you have an entity called “Entity”. Rename it to TodoMO (“MO” — means “Managed Object).
很好。 现在,我们的应用程序知道了数据库。 下一步,我们将在核心数据模型中创建一个新实体。 为此,请打开数据模型文件。 单击底部的添加实体 。 现在,您有了一个称为“实体”的实体。 将其重命名为TodoMO (“ MO”-表示“被管理对象”)。
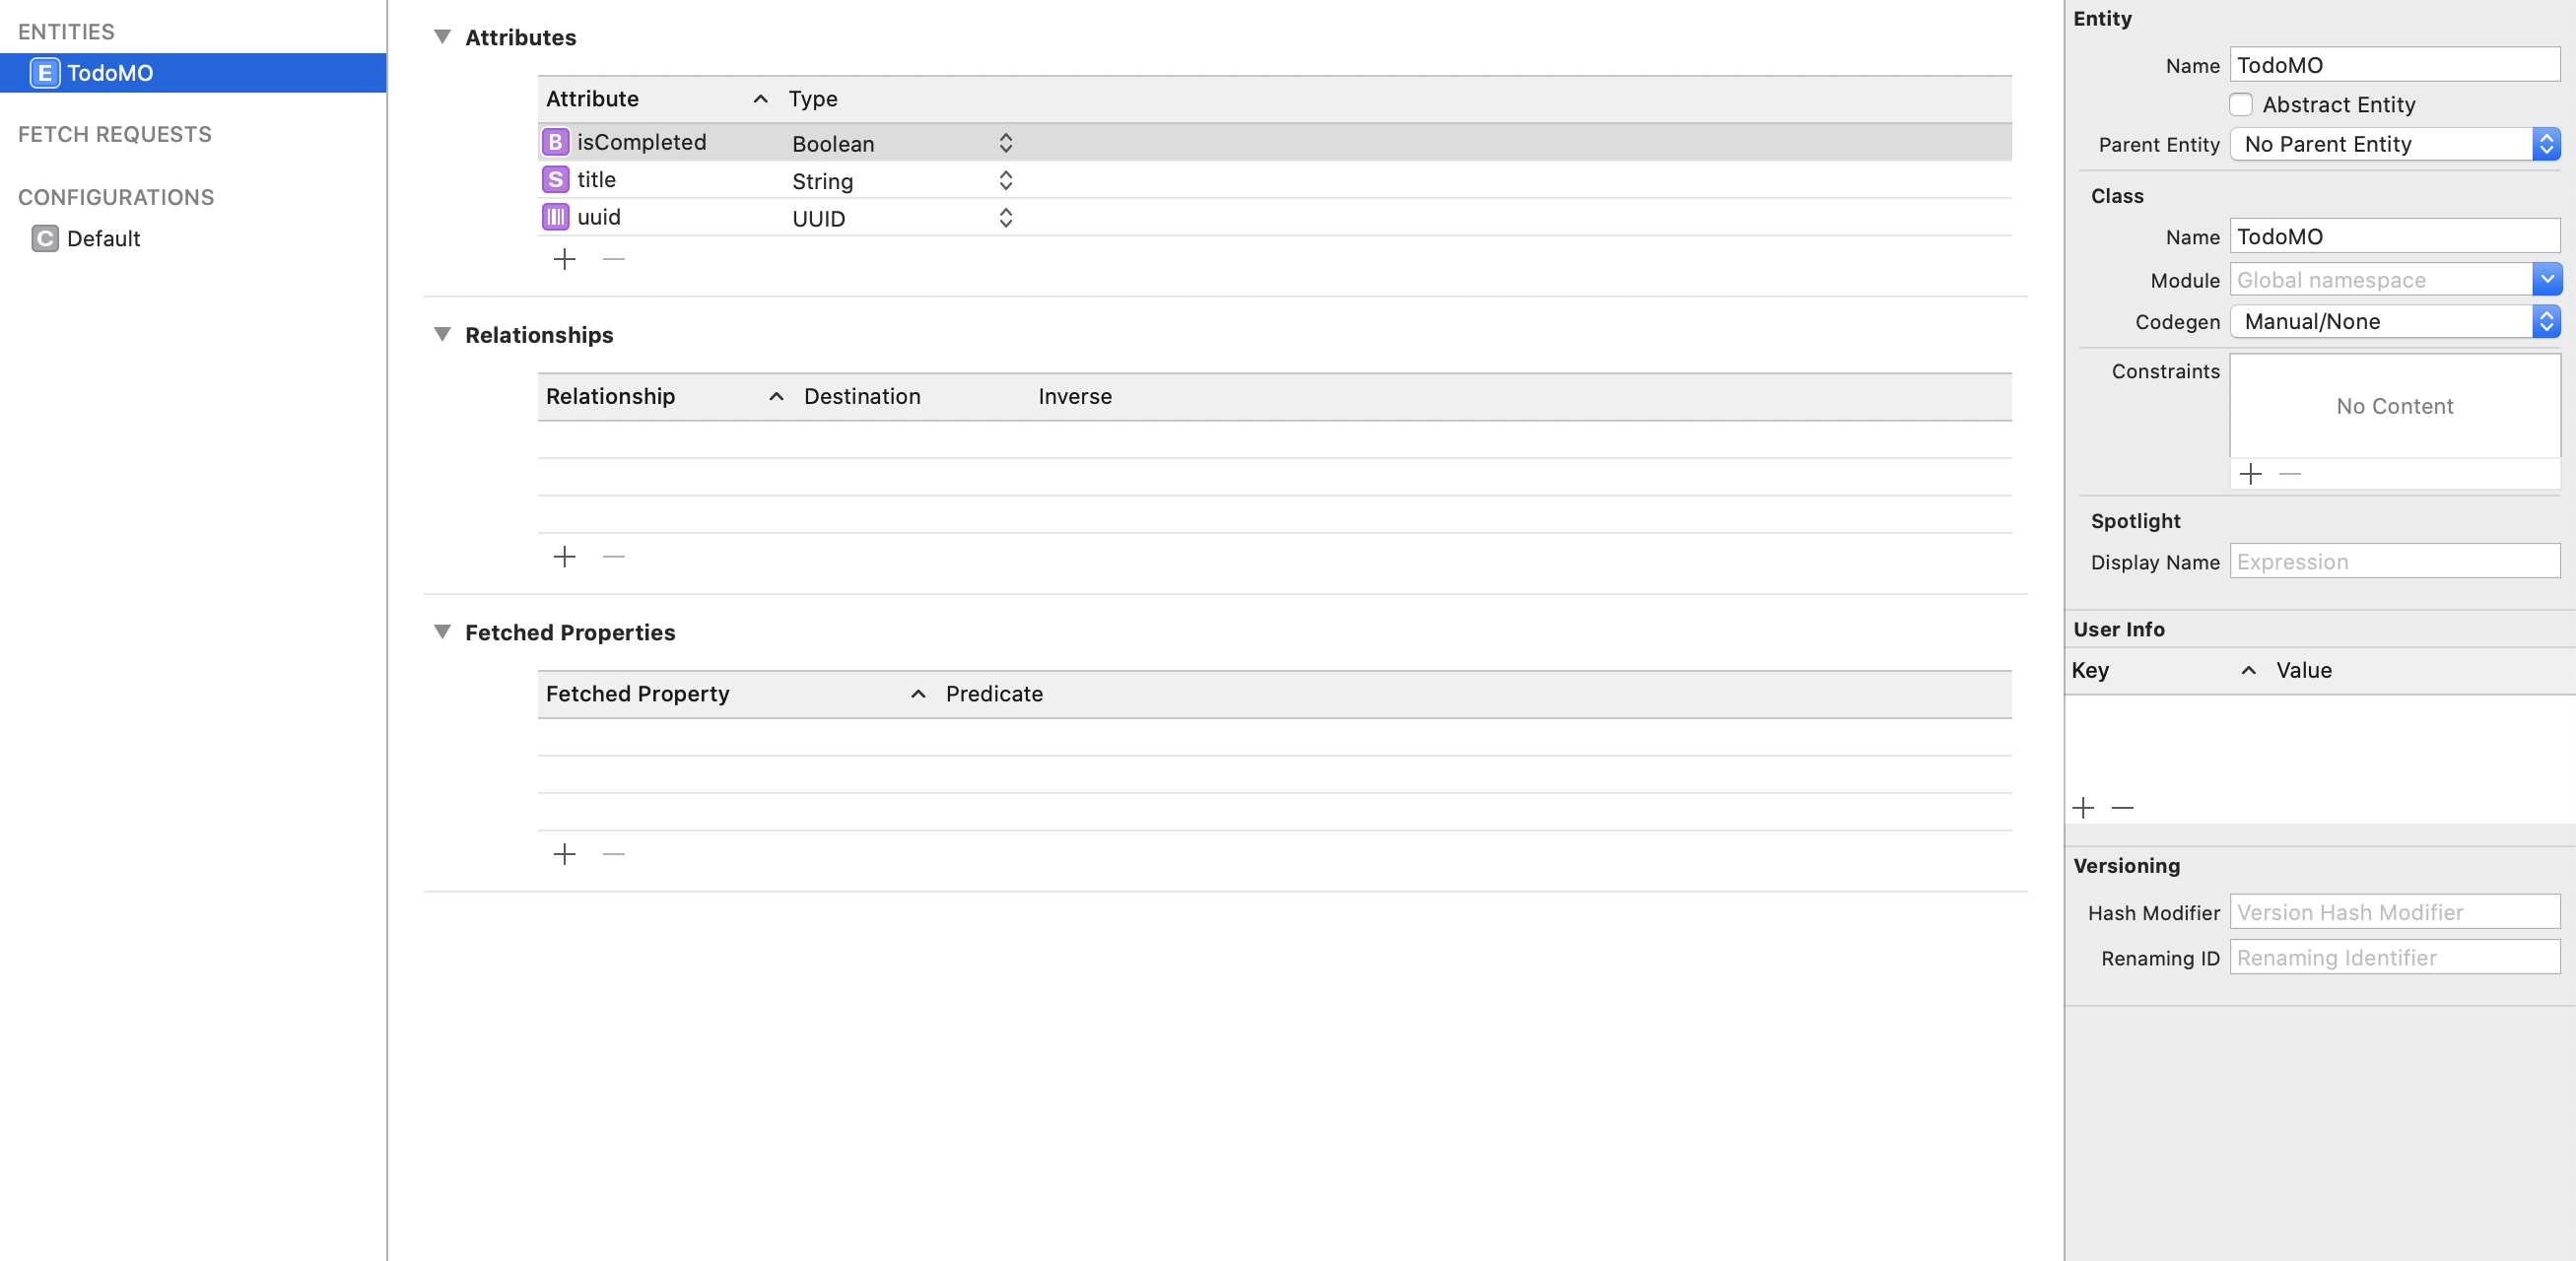
In Attributes, let’s add three attributes: uuid, title and isCompleted with types UUID, String, Bool accordingly. Now, select the title attribute and, in the right panel (if it’s hidden, show it by clicking the button in the top right corner), uncheck Optional and check Default String. Make sure the string is empty. Then select isCompleted and uncheck Optional and set NO (it’s basically false) as a default value.
在Attributes中 ,让我们添加三个属性: uuid , title和isCompleted ,其类型分别为UUID , String和Bool 。 现在,选择title属性,然后在右面板中(如果隐藏了该属性,请单击右上角的按钮显示它),取消选中Optional并选中Default String 。 确保字符串为空。 然后选择isCompleted并取消选中Optional ,并将NO (基本上为false )设置为默认值。
One last step here. Select TodoMO in the list of Entities, click Show the Data Model inspector in the top-right panel (4th button in the top of the panel) and change Codegen in the Class section to Manual/None. That tells the Core Data to use a user-generated class called TodoMO. We’ll create that class in a moment.
最后一步。 在“实体”列表中选择TodoMO ,单击右上角的面板中的“ 显示数据模型”检查器 (面板顶部的第4个按钮),然后将“ Class部分中的Codegen更改为Manual/None 。 这告诉Core Data使用用户生成的类TodoMO 。 稍后我们将创建该类。
Now, your entity should look like that:
现在,您的实体应如下所示:
TodoMO类 (TodoMO class)
Create a new Swift file called TodoMO.swift. In this file, we need to define all the properties of our Core Data object. Let’s do that:
创建一个名为TodoMO.swift的新Swift文件。 在此文件中,我们需要定义核心数据对象的所有属性。 让我们这样做:
We import
CoreDataas we’re going to work with that framework in the file;我们将在文件中使用该框架时导入
CoreData。We add
@objc(TodoMO), since it’s implemented in Objective-C and we need to let Core Data know about that class;我们添加
@objc(TodoMO),因为它是在Objective-C中实现的,我们需要让Core Data知道该类。We need to add a conformance to
NSManagedObject;我们需要为
NSManagedObject添加一个一致性;We add all the attributes with the
@NSManagedmodifier.我们使用
@NSManaged修饰符添加所有属性。
Awesome! Now, we can use our Core Data object in the app.
太棒了! 现在,我们可以在应用程序中使用我们的核心数据对象。
But let’s add one simple method to our Core Data model:
但是,让我们向核心数据模型添加一种简单的方法:
We create a func convertToTodo() to convert our Core Data object to our app’s regular object Todo.
我们创建一个func convertToTodo()函数,以将我们的Core Data对象转换为应用程序的常规对象Todo 。
That’s it. Now, it’s time to implement Core Data methods in CoreDataHelper. We’re getting closer!
而已。 现在,是时候在CoreDataHelper实现Core Data方法了。 我们越来越近了!
CoreDataHelper实现 (CoreDataHelper implementation)
Go back to CoreDataHelper. We need to add implementation to our protocol stubs. Let’s do that:
返回CoreDataHelper 。 我们需要将实现添加到协议存根中。 让我们这样做:
We create a calculated property
contextfor convenience;为了方便起见,我们创建了一个计算的属性
context;Methods
createandupdateare the same — we just need to save the context;create和update方法相同-我们只需要保存上下文即可;Method
fetchcreates arequest, setspredicateandlimitto therequest, tries to receive an array of genericT(that will beTodoMOin our case) and returns it;方法
fetch创建一个request,为该request设置predicate和limit,尝试接收一个通用T数组(在我们的例子中为TodoMO)并返回它;Method
fetchFirstjust callsfetchwithlimit = 1and returns the first object or nil;方法
fetchFirst只是调用limit = 1fetch并返回第一个对象或nil;Method
deletesimply deletes the object from Core Data.方法
delete只是从Core Data中删除对象。
Yeah, there are a lot of fatalError methods here, it’s fine while developing but it’s good to replace it in the future. And overall, I totally agree that the implementation of CoreDataHelper might seem a bit weird, especially create and update methods but it’s fine for the purpose of this tutorial.
是的,这里有很多fatalError方法,虽然可以很好地进行开发,但是将来最好替换它。 总的来说,我完全同意CoreDataHelper的实现可能看起来有些怪异,特别是create和update方法,但这对于本教程来说是很好的。
连接到应用程序 (Connecting to the app)
Okay, now let’s try to connect CoreDataHelper to DataManager. Hope everything will work! Open DataManager.swift and change it as follows:
好的,现在让我们尝试将CoreDataHelper连接到DataManager 。 希望一切都会成功! 打开DataManager.swift并进行如下更改:
Import
DBHelperandCoreData. We need ourDataManagerto know about these frameworks;导入
DBHelper和CoreData。 我们需要我们的DataManager来了解这些框架。Add a variable
dbHelperof theCoreDataHelpertype. Assign the singleton there. You can also inject that dependency ininitbut we’ll leave it for now;添加
CoreDataHelper类型的变量dbHelper。 在此处分配单例。 您也可以在init注入该依赖关系,但我们现在将其保留;Implement the method
getTodoMOthat returns aTodoMOobject that has theuuidof theTodoprovided;实现
getTodoMO方法,该方法返回一个TodoMO对象,该对象具有所提供Todo的uuid;Change
fetchTodoListto make it usedbHelper. We fetch a list ofTodoMOobjects stored in the database and convert them toTodousingmap {...}.更改
fetchTodoList使其使用dbHelper。 我们获取存储在数据库中的TodoMO对象的列表,并使用map {...}将它们转换为Todo。Change
addTodo. This method now simply creates a newTodoMOobject, assign a uniqueUUIDand thetitleprovided and askdbHelperto save this object;更改
addTodo。 现在,此方法仅创建一个新的TodoMO对象,分配一个唯一的UUID和提供的title,并要求dbHelper保存该对象。Finally, change
toggleIsCompleted. We use thegetTodoMOmethod we just created to get theTodoMOobject related to theTodoprovided, toggle itsisCompletedvalue and askdbHelperto update it in the database.最后,更改
toggleIsCompleted。 我们使用刚刚创建的getTodoMO方法来获取与所提供的Todo相关的TodoMO对象,切换其isCompleted值,并要求dbHelper在数据库中dbHelper进行更新。
We touched no classes in the app but DataManager, so the rest of the app knows nothing about CoreData and the fact we changed something. Let’s check if it works. Build and run the app.
除了DataManager ,我们没有触摸应用程序中的任何类,因此应用程序的其余部分对CoreData以及我们更改了某些内容一无所知。 让我们检查一下是否可行。 生成并运行该应用程序。
You should see an empty list. Let’s add some Todos there.
您应该看到一个空列表。 让我们在其中添加一些Todos 。
There is an issue with the plus button that doesn’t work again after adding a Todo. Just simply scroll the List a bit and it’ll work again. I know it’s irritating but let it leave as it is for now.
加号Todo后,加号按钮不起作用。 只需滚动列表一点,它就会再次起作用。 我知道这很烦人,但现在就让它离开。
Now, try to check a couple Todos as completed. Show/hide the completed ones by tapping the button in the top-left corner.
现在,尝试检查几个待办事项是否已完成。 通过点击左上角的按钮来显示/隐藏已完成的任务。
Finally, try to restart the app. Hooray, the Todos are still there. Now, we have a persistent database in our app. The basic app is now complete. Great job!
最后,尝试重新启动应用程序。 哇,托多人还在那里。 现在,我们的应用程序中有一个持久数据库。 基本应用程序现已完成。 很好!
It’s worth mentioning that you can implement this in many different ways. You can create a separate framework for
CoreDataHelperor you can use the@FetchRequestproperty wrapper and show your Core Data objects in a SwiftUI view.值得一提的是,您可以通过许多不同的方式来实现此目标。 您可以为
CoreDataHelper创建单独的框架,也可以使用@FetchRequest属性包装器,并在SwiftUI视图中显示Core Data对象。
下一步是什么 (What’s Next)
Congratulations. You finished the project. Although it’s a very simple app, but I hope this work helps you get some initial understanding of SwiftUI and Combine along with how to work with these new frameworks using MVVM and Protocols. Also, keep in mind that Apple recently introduced many new cool improvements in SwiftUI and now you can build a SwiftUI-only app.
恭喜你 您完成了项目。 尽管它是一个非常简单的应用程序,但是我希望这项工作可以帮助您初步了解SwiftUI和Combine,以及如何使用MVVM和协议使用这些新框架。 另外,请记住,Apple最近在SwiftUI中引入了许多新的改进,现在您可以构建仅SwiftUI的应用程序。
It’s still going to be a long way to make SwiftUI fully capable of all the features we’re used to in UIKit, however, it’s a good idea to keep up with the changes and be ready to start using it whenever you can (for instance, when you decide to drop the support of iOS 12 and below, when you see you can use it and the today’s limitations don’t bother you). And I hope we’ll see many apps written in SwiftUI soon.
使SwiftUI完全具备我们在UIKit中惯用的所有功能仍然有很长的路要走,但是,保持变化并准备随时开始使用它是一个好主意(例如,当您决定放弃对iOS 12及以下版本的支持时,看到您可以使用它,并且今天的限制不再困扰您)。 我希望我们很快会看到许多用SwiftUI编写的应用程序。
This tutorial is the 5th part of the series of the creation of a To-do list app. To check the other parts, use the following links:
本教程是创建待办事项列表应用程序系列的第5部分。 要检查其他部分,请使用以下链接:
Getting Started with SwiftUI and Combine Using MVVM and Protocols for iOS.
Creating an iOS App With SwiftUI and Combine Using MVVM and Protocols.
Creating an iOS App With SwiftUI, Combine, MVVM, and Protocols [Part 3].
Using Core Data in Your SwiftUI App with Combine, MVVM and Protocols (this tutorial).
mvvm核心


 863
863

 被折叠的 条评论
为什么被折叠?
被折叠的 条评论
为什么被折叠?
 到【灌水乐园】发言


