


令人敬畏的泰格伍兹 万维钢
Creating an intuitive animation is very simple and efficient in Apple’s brand new framework, SwiftUI. Before getting started, check out the video below to get to know what we are about to discuss.
在Apple的全新框架SwiftUI中 ,创建直观的动画非常简单且高效。 在开始之前,请查看下面的视频以了解我们将要讨论的内容。
In the above video, you saw five simple activity animations using different inbuilt solid shapes in SwiftUI.
在上面的视频中,您看到了五个简单的活动动画,它们在SwiftUI中使用了不同的内置实体形状 。
In SwiftUI, we can add animation to view animatable properties using .animation() modifier. There are the list of animatable properties in a view, like:
在SwiftUI中,我们可以使用.animation()修饰符添加动画以查看可设置动画的属性。 视图中有可设置动画的属性的列表,例如:
- Opacity 不透明度
- Offset 抵消
- Scale 规模
- Frame 帧
- etc… 等等…
You should apply any one of the animatable properties to your view to get an animation effect using the .animation() modifier. A view with the .animation() modifier without any animatable property does nothing. Being this said, let’s get started.
您应该将任何可设置动画的属性应用于视图,以使用.animation()修饰符获得动画效果。 带有.animation()修饰符的视图没有任何可设置动画的属性,则不执行任何操作。 话虽如此,让我们开始吧。
Note: The animation GIFs are just for reference. Run the code in Xcode or check the above video to get actual animation smoothness.
注意:动画GIF仅作为参考。 运行Xcode中的代码或查看上面的视频以获取实际的动画平滑度。
3个滑动圈 (3 Sliding Circles)

Create three circles using Circle shape in SwiftUI with 20x20 width and height.
使用SwiftUI中的Circle形状(宽度和高度为20x20)创建三个圆形。
Here, we are animating the offset of the circles, which makes circles move from left to right(➡️) and from right to left(⬅️).
在这里,我们为圆的偏移设置了动画,使圆从左向右移动(➡️),从右向左移动(⬅️)。
We have added a Timer which will trigger every 1.6 seconds to swap the offset value. Initially, offset will be at 100 (leftOffset), which makes circles move from left to right; after 1.6 seconds, leftOffset will be swapped as -100, which makes circles to move from right to left.
我们添加了一个计时器 ,它将每1.6秒触发一次以交换偏移值。 最初,偏移将为100 (leftOffset),这将使圆从左移到右; 1.6秒后,leftOffset将交换为-100 ,这使圆从右向左移动。
Why a 1.6-second timer? 1.6 seconds = 1 circle animation duration (1) + 2nd circle delay (0.2) + 3rd circle delay (0.4).
为什么要使用1.6秒计时器? 1.6 秒= 1圈动画持续时间( 1 )+ 2圈延迟( 0.2 )+ 3圈延迟( 0.4 )。
- We have reduced the opacity of the circles to add a nice feel when moving from one side to another. 从一侧移到另一侧时,我们降低了圆的不透明度,以增加良好的感觉。
Did you notice a delay in the second and third circles? Yes, delay helps to start the animation after waiting for the mentioned delay. In our case, delay helps us to move circles one by one. If we didn’t mention delay, all circles would move at the same time.
您是否注意到第二个和第三个圈子有所延迟 ? 是的,延迟有助于在等待上述延迟后启动动画。 就我们而言,延迟有助于我们一圈一圈地移动。 如果我们不提延误,那么所有圈子都会在同一时间移动。
We have used default easeInOut animation with a one-second duration. There are plenty of animations available by default, like easeIn, easeOut, spring, etc… go ahead and play with it.
我们使用了默认的easyInOut动画,持续时间为一秒 。 默认情况下,有很多动画可用,例如easyIn,easyOut,spring等,请继续播放。
水平滑杆 (Horizontal Sliding Bar)

Create a RoundedRectangle shape with cornerRadius as 10 and frame of 80x20.
创建一个RoundedRectangle形状,将cornerRadius设置为10并 80x20的帧。
Here we are animating the offSet of the view. But this time, we have achieved the animation without the Timer. We have added shouldAnimate @State variable instead.
在这里,我们为视图的偏移量设置了动画。 但是这次,我们实现了没有计时器的动画。 我们添加了shouldAnimate @State变量。
Whenever we change the shouldAnimate value, SwiftUI will re-render the view’s body property again. Initially, we have set it as false and .onAppear() we have set it as true, which triggers the animation.
每当我们更改shouldAnimate值时,SwiftUI都会再次重新渲染视图的body属性。 最初,我们将其设置为false,并将.onAppear()设置为true,这将触发动画。
How view comes back without swapping offset? 🤔 It might be because of .repeatForever(autoreverses: true) (🔁). This makes the view to animate continue forever with nice reverse animation.
如何在不交换偏移的情况下返回视图? might可能是因为.repeatForever(autoreverses:true) (🔁)。 这使带有动画的视图通过漂亮的反向动画永远持续下去。
Try changing autoreverses as false, and see what happens. 😅
尝试将autoreverses更改为false ,然后看看会发生什么。 😅
We have used default easeInOut animation with a 1-second duration.
我们使用了默认的easyInOut动画,持续时间为1秒 。
5个垂直条 (5 Vertical Bars)

Create a Capsule shape with style as continuous and frame of 10x50.
创建一个胶囊形状,其样式为连续且 10x50的帧。
Here, we are animating container view HStack instead of a capsule by changing its width and spacing based on shouldAnimate state variable.
在这里,我们通过基于shouldAnimate状态变量更改其宽度和间距,来对容器视图HStack而不是胶囊进行动画处理。
- Look how child views are animated nicely when we change the container view’s width and spacing. 看看当我们更改容器视图的宽度和间距时,子视图的动画效果如何。
Using easeInOut animation with .repeatForever(autoreverses: true) to get a nice reverse animation with a 1-second duration.
与一起使用easyInOut动画。 repeatForever(autoreverses:true)获得持续时间为1秒的漂亮反向动画。
3个缩放圈 (3 Scaling Circles)

Create three circles using Circle shape in SwiftUI with a 20x20 width and height.
使用SwiftUI中的Circle形状(宽度和高度为20x20)创建三个圆形。
Here we are animating the scale property of the circle using .scaleEffect() modifier based on shouldAnimate state variable
在这里,我们使用基于shouldAnimate状态变量的.scaleEffect()修饰符来动画圆的缩放属性。
- The delay in the second and third circles avoids all circles scaling up and down at the same time. 第二和第三圈的延迟避免了所有圈同时放大和缩小。
Use easeInOut animation with .repeatForever(autoreverses: true) to get a nice reverse animation with a 0.5 second duration.
配合使用easyInOut动画。 repeatForever(autoreverses:true)获得持续时间为0.5秒的精美反向动画。
波浪圈 (Circle with Waves)
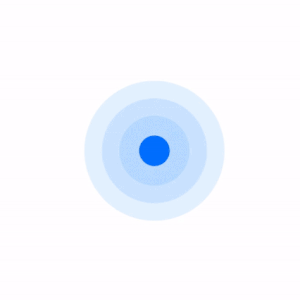
Create a base circle using the Circle shape in SwiftUI with a 30x30 width and height.
使用SwiftUI中的Circle形状(宽度和高度为30x30)创建基圆。
Here we are animating scale property of the overlay circles using .scaleEffect() modifier based on shouldAnimate state variable.
在这里,我们使用基于shouldAnimate状态变量的.scaleEffect()修饰符来动画覆盖圆的比例属性。
- We have added different scale values for overlay circles to get a wave effect. 我们为叠加圆添加了不同的比例值以获得波浪效果。
stroke() is like a border, which is recommended for shapes. stroke() applies the border half inside and half outside of the shape.
stroke()就像一个边框,建议用于形状。 stroke()将边界应用于形状的一半内侧和一半外侧。
Use easeInOut animation with .repeatForever(autoreverses: false) to get one-way animation with a 1 second duration.
配合使用easyInOut动画。 repeatForever(autoreverses:false)以获取持续时间为1秒的单向动画。
结论 (Conclusion)
We can create any complex animations with less code and effort using SwiftUI. We have seen the basics level of it. Play with default animation provided by SwiftUI to craft your animation using the .animation() modifier as you need it.
我们可以使用SwiftUI以更少的代码和精力来创建任何复杂的动画。 我们已经看到了它的基本水平。 使用SwiftUI提供的默认动画播放,以根据需要使用.animation()修饰符来制作动画。
The complete code is available here.
完整的代码在这里 。
Thanks 👨🏻💻
谢谢👨🏻
翻译自: https://medium.com/better-programming/create-an-awesome-loading-state-using-swiftui-9815ff6abb80
令人敬畏的泰格伍兹 万维钢


 被折叠的 条评论
为什么被折叠?
被折叠的 条评论
为什么被折叠?
 到【灌水乐园】发言


