


aws terraform
What’s better than Serverless? Serverless is all the buzz these days and for good reason. Serverless is a simple, yet powerful cloud resource to execute function calls without worrying about the underlying infrastructure. But every superhero has their kryptonite and recently, I’ve ran into a few issues with AWS Lambda Serverless Functions:
有什么比无服务器更好? 毫无疑问,无服务器是当今的热门话题。 无服务器是一种简单而强大的云资源,可以执行功能调用而无需担心基础架构。 但是每个超级英雄都有其k粉,最近,我遇到了AWS Lambda无服务器功能的一些问题:
Package Size Limitation: My Python dependencies are larger than the 50 MB compressed (and 250 uncompressed) size limits.
软件包大小限制:我的Python依赖项大于50 MB压缩(和250未压缩)的大小限制。
Execution Time Limitation: My Python function takes longer than the 15 minute limit.
执行时间限制:我的Python函数花费的时间超过15分钟的限制。
Lack of Portability: AWS Lambda functions aren’t easily portable to other cloud vendors.
缺乏可移植性: AWS Lambda功能不容易移植到其他云供应商。
The obvious alternative is provisioning an EC2 instance to install the dependencies and execute the function, but I don’t want the server to be on all the time. Time is money, and EC2 instances running 24/7 cost money. I don’t want to manage the deployment, manually turning on and off the instance and executing the function. I also want to have function portability in case I want to deploy this function in a different cloud.
显而易见的替代方案是配置EC2实例以安装依赖项并执行功能,但是我不希望服务器一直处于运行状态。 时间就是金钱,运行24/7的EC2实例会花费金钱。 我不想管理部署,手动打开和关闭实例并执行功能。 我还希望具有功能可移植性,以防我想将此功能部署在其他云中。
Ultimately, I want to automate the process of provisioning an EC2 instance, executing the Python function, then destroying the EC2 instance and all underlying infrastructure. (If you simply turn-off the EC2 instance, you will continue to pay for the volume). Enter Terraform and Github Workflow.
最终,我想自动化配置EC2实例,执行Python函数,然后销毁EC2实例和所有基础基础结构的过程。 (如果您仅关闭EC2实例,则将继续为该卷付费)。 输入Terraform和Github工作流程。
Terraform and Github Workflow are tools any modern DevOps or Cloud engineer need to build and deploy applications. Terraform quickly provisions cloud infrastructure to execute the function. Terraform scripts are also easily portable to other cloud vendors with changes to the services used. Github Workflow manages the deployment. We are also using a Github repository to hold all the Terraform and Python code used by Github Workflow.
Terraform和Github Workflow是任何现代DevOps或云工程师构建和部署应用程序所需的工具。 Terraform快速调配云基础架构来执行功能。 通过更改使用的服务,Terraform脚本也可以轻松移植到其他云供应商。 Github Workflow管理部署。 我们还使用Github存储库来保存Github Workflow使用的所有Terraform和Python代码。
Here is a video of me running the Github Actions showing how the function is executed and Terraform makes changes in the the AWS console:
这是我运行Github Actions的视频,展示了该函数的执行方式以及Terraform在AWS控制台中进行的更改:
大纲:(Outline:)
- AWS Setup AWS设置
- Terraform ScriptTerraform脚本
- Github SecretsGithub的秘密
- Github Workflow YAML SetupGithub工作流程YAML设置
- Executing Python Function执行Python函数
- Conclusion结论
AWS设置(AWS Setup)
The first step is to setup AWS so we have the right user permissions and key pairs to use for the Terraform scripting later. I won’t delve too deeply into user permissions here. For this tutorial, I simply created a new user in IAM and gave my user administrative access (I don’t recommend this; you should always provide a user the least amount of access required for the user to accomplish tasks). Copy the access and secret key somewhere to be used later in this tutorial.
第一步是设置AWS,以便我们拥有正确的用户权限和密钥对,以便稍后用于Terraform脚本编写。 在这里,我不会深入探讨用户权限。 在本教程中,我只是在IAM中创建了一个新用户,并为我的用户提供了管理访问权限(我不建议这样做;您应始终为该用户提供该用户完成任务所需的最少访问权限)。 将访问和密钥复制到某个地方,以供本教程稍后使用。
Next, you want to create a PEM key to use in the terraform scripting and for Github Workflow to access AWS. While on the AWS services homepage, select “EC2”. On the left side of the console, select the “Key Pairs”. On the top right of the screen, there is a button which states “Create Key Pair”. Enter the name of the key, and select “PEM” as the file format. Finally, hit the “Create Key Pair” button to create the PEM key. Your browser should automatically download the private key. Place this key somewhere accessible since it is integral to the entire process.
接下来,您要创建一个PEM密钥以在terraform脚本中使用,并让Github Workflow访问AWS。 在AWS服务主页上,选择“ EC2”。 在控制台的左侧,选择“密钥对”。 在屏幕的右上方,有一个按钮,指出“创建密钥对”。 输入密钥名称,然后选择“ PEM”作为文件格式。 最后,点击“创建密钥对”按钮以创建PEM密钥。 您的浏览器应自动下载私钥。 将此密钥放在整个过程中不可或缺的位置。
You will also need the public key that corresponds to your private key. To get this, open terminal, change directory (cd) to the location of the private key, and run the following script:
您还将需要与私钥相对应的公钥。 为此,请打开终端,将目录(cd)更改为私钥的位置,然后运行以下脚本:
ssh-keygen -e -f aws_private_key.pem > aws_public_key.pemThe result of this script should output the corresponding public key. You can copy this to your favorite code text editor. This public key will be important later.
该脚本的结果应输出相应的公共密钥。 您可以将其复制到您喜欢的代码文本编辑器中。 此公钥在以后将很重要。
Note: I recommend testing the keys before running Terraform scripts by creating an EC2 instance and trying to SSH into the instance with the PEM key that we just created in AWS.
注意:建议您在运行Terraform脚本之前通过创建EC2实例并尝试使用刚刚在AWS中创建的PEM密钥SSH进入实例来测试这些密钥。
Terraform脚本 (Terraform Script)
Now that we have AWS properly configured, we can create Terraform scripts to provision the resources needed to execute the Python function:
现在我们已经正确配置了AWS,现在我们可以创建Terraform脚本来提供执行Python函数所需的资源:
#provider is the final entity that receives the terraform plan for resource deployment/destruction
provider "aws" {
  access_key = "<your access key>"
  secret_key = "<your secret key>"
  profile = "default"
  region  = "<your AWS region>"
}


resource "aws_key_pair" "deployer" {
  key_name   = "<name of your EC2 key pair>"
  public_key = "ssh-rsa <the rest of your public key>
}

#name of the aws specific resource followed by a name of the resource with respect to TF
resource "aws_s3_bucket" "tf_tutorial" {
  #parameters/arguments for the resource and unique name for bucket
  bucket = "unique bucket name"
  acl	 = "private"
}

resource "aws_default_vpc" "default" {}

resource "aws_security_group" "prod_web"{
  name 		= "prod_web"
  description 	= "Allow standard http and https ports inbound and everything outbound"

  ingress {
    from_port 	= 22
    to_port 	= 22
    protocol 	= "tcp"
    cidr_blocks	= ["0.0.0.0/0"]
  }

  egress {
    from_port = 0
    to_port = 0
    protocol = "-1"
    cidr_blocks = ["0.0.0.0/0"]
  }

  tags = {
    "Terraform" : "true"
  }
}

resource "aws_instance" "prod_web" {
  ami 		= "ami-0c94855ba95c71c99"
  instance_type = "t2.nano"
  key_name	= aws_key_pair.deployer.<name of your EC2 key pair>

  vpc_security_group_ids = [
    aws_security_group.prod_web.id
  ]

  tags = {
    "Terraform" : "true"
  }
}
Notice that we included an S3 bucket which isn’t really needed, but I wanted to provide some additional scripts just in case this resource is applicable for your project. Also notice that the public key we created in the previous step can be entered into “<the rest of your public key>”. The egress and ingress rules are not secure, they allow anyone with valid credentials to connect to the instance. But since the purpose of this tutorial is to provide an example, I haven’t configured security properly. I selected a random AMI, but makes sure to find the right image for your workload.
请注意,我们包含了一个并非真正需要的S3存储桶,但我想提供一些其他脚本,以防万一此资源适用于您的项目。 还要注意,我们在上一步中创建的公钥可以输入到“ <其余的公钥>”中。 出口和入口规则并不安全,它们允许具有有效凭据的任何人连接到实例。 但是由于本教程的目的是提供示例,所以我没有正确配置安全性。 我选择了随机AMI,但要确保找到适合您工作负载的图像。
export PATH=/path/to/terraform/executable:$PATHNote: if you are completely new to Terraform I recommend this LinkedIn Learning Course on Terraform.
注意:如果您不熟悉Terraform,我建议您在Terraform上使用此LinkedIn学习课程。
Github的秘密 (Github Secrets)
Before using the Github Workflow to run the terraform script, we need to setup Github secrets with a few keys related to AWS and Terraform. Here is a screenshot of my secrets:
在使用Github工作流运行terraform脚本之前,我们需要使用一些与AWS和Terraform相关的密钥来设置Github机密。 这是我的秘密的屏幕截图:
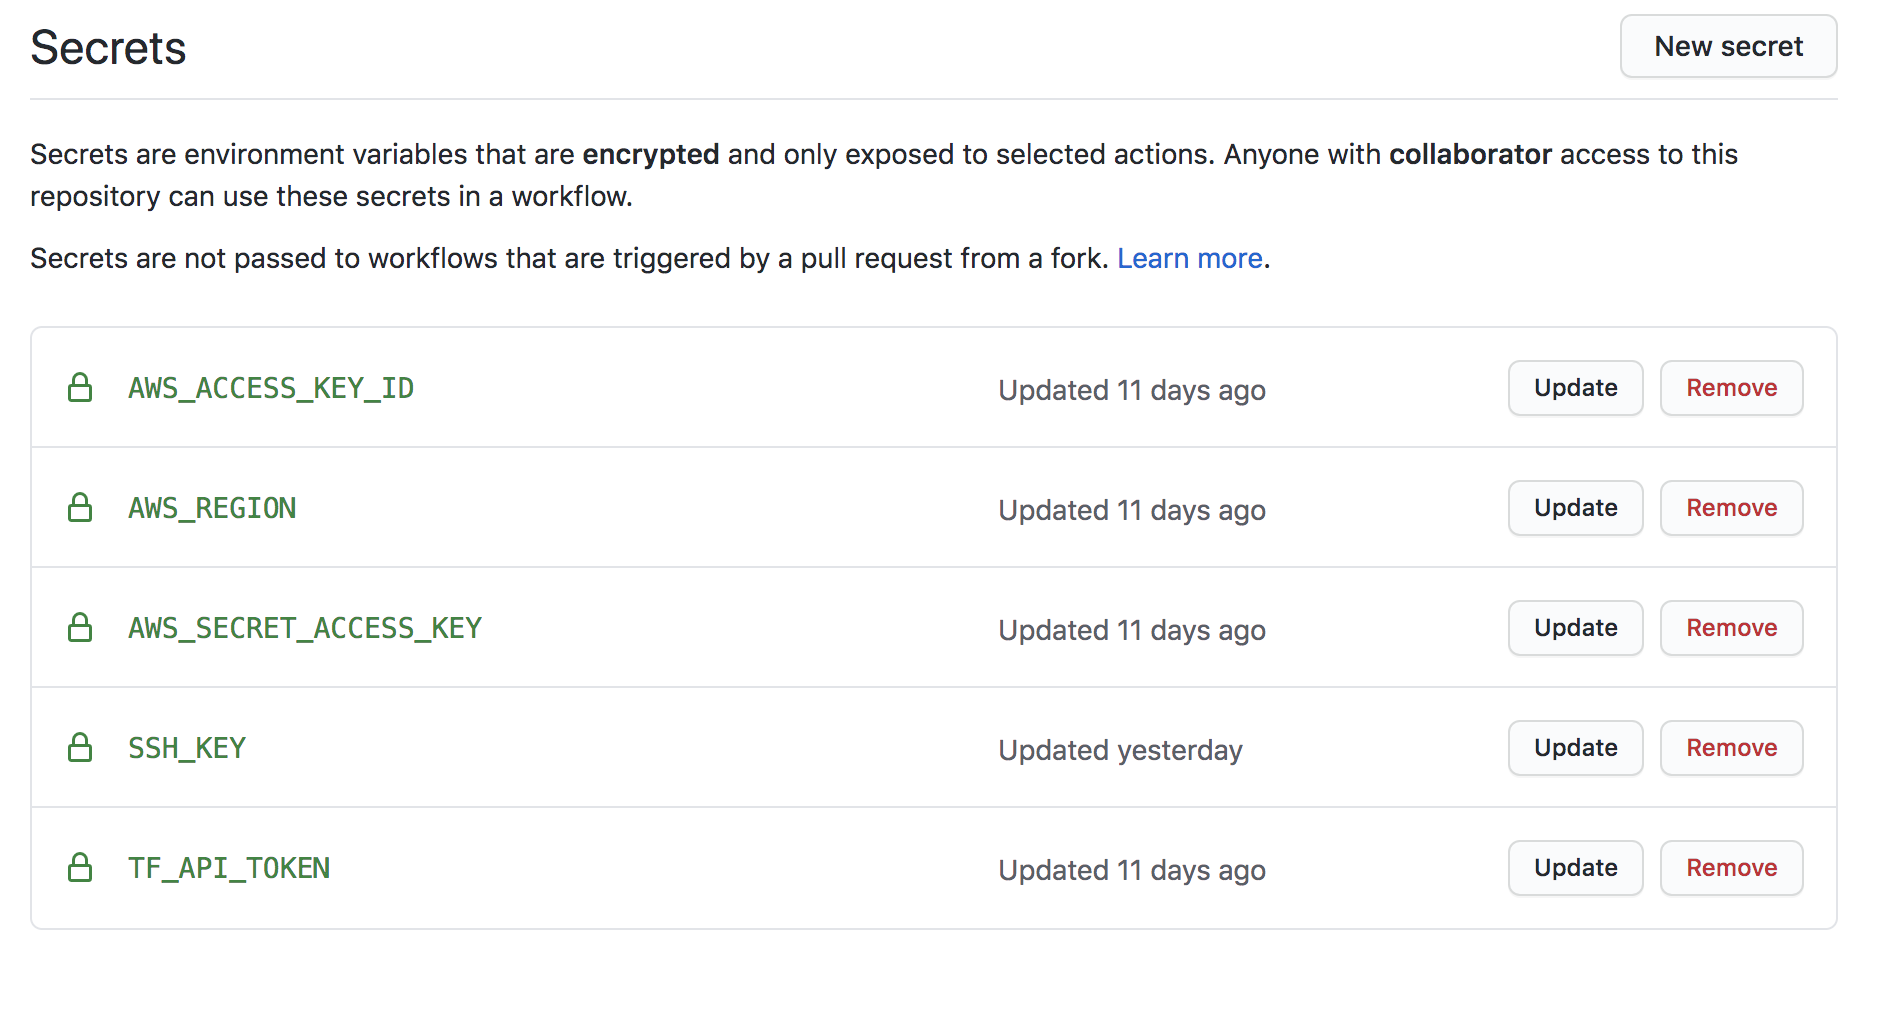
The “SSH_KEY” secret contains the private AWS Key automatically download when creating a key pair on the EC2 console. You can output the private key value by entering this command:
“ SSH_KEY”密钥包含在EC2控制台上创建密钥对时自动下载的私有AWS密钥。 您可以通过输入以下命令来输出私钥值:
cat aws_private_key.pemThe “TF_API_TOKEN” key needed is for the Terraform API that Github Workflow will use to execute the scripts. Use this link to gain access to the Hashicorp Terraform API token (you may need to create an account).
所需的“ TF_API_TOKEN”键用于Github Workflow将用于执行脚本的Terraform API。 使用此链接可以访问Hashicorp Terraform API令牌(您可能需要创建一个帐户)。
Github工作流程YAML设置 (Github Workflow YAML Setup)
Now that our Github secrets are properly configured, we can create the YAML file in Github Workflow:
现在我们的Github机密已正确配置,我们可以在Github工作流中创建YAML文件:
# This is a basic workflow to help you get started with Actions


name: TF_AWS_Dep


# Controls when the action will run. Triggers the workflow on push or pull request
# events but only for the master branch
on:
  push:
    branches: [ master ]
  pull_request:
    branches: [ master ]


# A workflow run is made up of one or more jobs that can run sequentially or in parallel
jobs:
  # This workflow contains a single job called "build"
  build:
    # The type of runner that the job will run on
    runs-on: ubuntu-latest


    # Steps represent a sequence of tasks that will be executed as part of the job
    steps:
      # Checks-out your repository under $GITHUB_WORKSPACE, so your job can access it
      - name: Gives runner access to this github repo
        uses: actions/checkout@v2

      - name: Setup Python 3.7
        uses: actions/setup-python@v2
        with:
          python-version: '3.7'

      - name: Display Python Version
        run: python -c "import sys; print(sys.version)"

      - name: Config AWS Credentials
        uses: aws-actions/configure-aws-credentials@v1
        with:
          aws-access-key-id: ${{ secrets.AWS_ACCESS_KEY_ID }}
          aws-secret-access-key: ${{ secrets.AWS_SECRET_ACCESS_KEY }}
          aws-region: ${{secrets.AWS_REGION}}

      - name: Change Key Permissions for SSH use
        run: chmod 400 aws_key_pair6.pem

      - name: Setup Terraform
        uses: hashicorp/setup-terraform@v1
        with:
         cli_config_credentials_token: ${{ secrets.TF_API_TOKEN }}

      - name: Terraform Init
        run: terraform init

      - name: Terraform Import Keys
        run: terraform import aws_key_pair.deployer aws_key_pair6


      - name: Terraform Plan
        run: terraform plan

      - name: Create Infrastructure
        run: terraform apply -auto-approve


      - name: Get Terraform Struct in JSON used in tf_parse.py script
        run: echo ::set-env name=var::$(terraform show -json)

      - name: Get EC2 Public IP variable
        run: echo ::set-env name=aws_compute_public_ip::$(python tf_parse.py)

      - name: Validate Public IP used for Connection
        run: echo $aws_compute_public_ip

      - name: Allows EC2 Instance to Initialize Before Attempting Connection
        run: sleep 20

      - name: Copy File to EC2 Instance, Connect, and Run Python Function
        uses: webfactory/ssh-agent@v0.1.1
        with:
          ssh-private-key: ${{ secrets.SSH_KEY }}
      - run: |
          scp -T -o "ConnectTimeout 10" -o "StrictHostKeyChecking no" -o "UserKnownHostsFile /dev/null" -r -i aws_key_pair6.pem my_py_func.py ec2-user@ec2-${{ env.aws_compute_public_ip }}.compute-1.amazonaws.com
          ssh -T -o "ConnectTimeout 10" -o "StrictHostKeyChecking no" -o "UserKnownHostsFile /dev/null" -i aws_key_pair6.pem ec2-user@ec2-${{ env.aws_compute_public_ip }}.compute-1.amazonaws.com
          python my_py_func.py

      - name: Prevent Terraform to Destroy AWS Pair Key
        run: terraform state rm aws_key_pair.deployer

      - name: Automatically Destroy Infrastructure
        run: terraform destroy -auto-approve
At a high level, when this YAML executes upon a new push to the Github Repository, a new “runner” is created, which is a newly created virtual environment on a Github host which “runs-on” the operating system you define. Then it seeks to complete all the “jobs” defined in parallel. In this case, I only have 1 job and thus all the “steps” (consisting of “actions”) are completed sequentially. Each “step” builds upon one another which means that any changes made in previous steps is accessible to future steps. Now some of the “actions” completed in each “step” “uses” pre-defined actions, these are actions created by others that can be imported. In this tutorial I am using 4 actions. The Github Workflow syntax is confusing. I recommend spending some understanding the key terms I put in quotes.
在较高级别上,当此YAML在新推送到Github存储库后执行时,会创建一个新的“运行程序”,它是Github主机上新创建的虚拟环境,该环境“运行”您定义的操作系统。 然后,它试图完成所有并行定义的“工作”。 在这种情况下,我只有一份工作,因此所有“步骤”(由“动作”组成)都是按顺序完成的。 每个“步骤”都是相互依存的,这意味着以后的步骤可以访问先前步骤中所做的任何更改。 现在,在每个“步骤”中完成的某些“动作”“使用”了预定义的动作,这些动作是其他可以创建的动作,可以导入。 在本教程中,我将使用4个动作。 Github工作流程语法令人困惑。 我建议您花一些时间理解我在引号中使用的关键术语。
NGithub Actions. I also recommend this Github Actions course on LinkedIn Learning.
The YAML file commands are dense so I will focus on some of nuances and peculiarities of the code starting from the top and working down:
YAML文件命令很密集,因此我将从上到下依次关注代码的一些细微差别和特殊之处:
- On line 42, we must change permissions for the key in order to use them for SCP and SSH later. 在第42行,我们必须更改密钥的权限,以便以后将其用于SCP和SSH。
- On line 53, we must import the private key to Terraform before being able to provision infrastructure on AWS. 在第53行,我们必须先将私钥导入Terraform,然后才能在AWS上配置基础架构。
- On line 59, I am using “auto-approve” to automatically create the infrastructure. If you try to run this command without “auto-approve” the terminal requires a “yes” to create the infrastructure creation. 在第59行,我使用“自动批准”来自动创建基础结构。 如果您尝试在没有“自动批准”的情况下运行此命令,则终端需要“是”来创建基础架构。
- On line 62 and 65, we are setting environment variables that are needed in future steps. The command on line 62 stores the infrastructure created by Terraform in a JSON format. Then the Python script on line 65 iterates through the JSON text and creates a variable for the EC2 public ip address that we SSH into later. Each time we run this workflow, a new EC2 instance with a different Public IP address is created. Thus, we need a script to get the Public IP address that we SSH and SCP to later. 在第62和65行上,我们正在设置将来步骤中需要的环境变量。 第62行的命令以JSON格式存储Terraform创建的基础架构。 然后,第65行的Python脚本会遍历JSON文本,并为我们稍后通过SSH进入的EC2公共IP地址创建一个变量。 每次我们运行此工作流程时,都会创建一个具有不同公共IP地址的新EC2实例。 因此,我们需要一个脚本来获取我们稍后通过SSH和SCP获得的公共IP地址。
Here is the Python Script which I call “tf_parse.py” in the YAML:
这是我在YAML中称为“ tf_parse.py”的Python脚本:
import os
os.environ['var']
mystr = os.environ['var']
mylist = mystr.split(',')
for vals in mylist:
	if "public_ip" in vals and "_public_ip" not in vals:
		splitvals = vals.split(':')
		maxlen = len(splitvals[1])-1
		aws_compute_public_ip = splitvals[1][1:maxlen]
		aws_compute_public_ip = aws_compute_public_ip.replace(".", "-")
		print(str(aws_compute_public_ip))
		exit()
There is probably a lot of head-scratching on line 71. Why would anyone add time to the workflow? This took me the longest to debug. My assumption was that once Terraform completes the infrastructure, I can SSH and SCP to the instance. I was wrong. You need some time for the EC2 instance to initialize before running the subsequent commands. I’ve added 20 seconds, but it may take more or less time depending on the type of instance you’ve provisioned.
第71行可能有很多令人头疼的问题。为什么有人会在工作流程中增加时间? 这花费了我最长的调试时间。 我的假设是,一旦Terraform完善了基础架构,就可以对实例进行SSH和SCP了。 我错了。 在运行后续命令之前,需要一些时间来初始化EC2实例。 我增加了20秒,但可能需要花费更多或更少的时间,具体取决于您配置的实例类型。
- On lines 78 and 79 I’ve added some additional parameters to prevent the terminal requesting authorization to add the host name. Here are the functions you can use if you prefer greater readability: 在第78和79行上,我添加了一些其他参数来防止终端请求授权添加主机名。 如果您希望提高可读性,可以使用以下功能:
function scptmp
{
     scp -o "ConnectTimeout 3" \
         -o "StrictHostKeyChecking no" \
         -o "UserKnownHostsFile /dev/null" \
         "$@"
 }


function sshtmp
 {
     ssh -o "ConnectTimeout 3" \
         -o "StrictHostKeyChecking no" \
         -o "UserKnownHostsFile /dev/null" \
              "$@"
 }
Note: Use the functions above by entering the following command in the YAML file:
注意:通过在YAML文件中输入以下命令来使用上述功能:
sshtmp -i aws_key_pair.pem ec2-user@ec2-$aws_compute_public_ip.compute-1.amazonaws.comFinally, the command on line 83 prevents Terraform from destroying the aws_key_pair in the next step. Here is a useful resource to output all the Terraform states in case you want to prevent the destruction of other resources.
最后,第83行上的命令可防止Terraform在下一步中破坏aws_key_pair。 如果您想防止破坏其他资源,这是输出所有Terraform状态的有用资源。
执行Python函数 (Executing Python Function)
The Python function is being executed on line 80 on the AWS EC2 instance. For this tutorial, I am executing a basic Python function, but the sky is the limit. If you want to install some dependencies before running the script, check out line 50 and beyond in the YAML file from my previous article on creating a CI/CD pipelines on AWS.
Python函数在AWS EC2实例的第80行上执行。 对于本教程,我正在执行一个基本的Python函数,但是天空是极限。 如果您想在运行脚本之前安装一些依赖项,请查阅上一篇关于在AWS上创建CI / CD管道的文章中的YAML文件中的第50行及以后的内容。
Note that the dependencies need to be installed on the EC2 instance and not the Github Workflow “runner”.
请注意,依赖项需要安装在EC2实例上,而不是Github Workflow“运行器”上。
结论 (Conclusion)
This tutorial showcases how to automate the deployment and execution of a Python function using AWS, Terraform, and Github Workflow. We highlighted some the problems with Serverless functions and how this workflow can be a reasonable substitute or replacement. However, its important to remember that we pay for the time that the Terraform initiated EC2 instance is running. It also takes much longer to use Terraform to provision the instances and run the function when compared to simply executing a Serverless function. Remember, we have to provision the underlying infrastructure every time we want to execute the function.
本教程展示了如何使用AWS,Terraform和Github Workflow自动执行Python函数的部署和执行。 我们重点介绍了无服务器功能的一些问题以及该工作流程如何合理替代或替换。 但是,重要的是要记住,我们要为Terraform初始化的EC2实例运行所花费的时间付费。 与仅执行无服务器功能相比,使用Terraform来供应实例和运行功能还需要更长的时间。 请记住,每次我们要执行功能时,我们都必须提供基础架构。
Another reason I prefer Terraform and Github Worflow is because AWS Lambda functions lack portability. Once Lambda Functions are used, its difficult to transport that function elsewhere. This is due, in part, to the syntax restrictions for Lambda Function returns, Lambda Handlers, Layers, and other configurations. Also leveraging AWS API Gateway to invoke the function further prevents portability to another cloud vendor. Terraform makes it easier to find the corresponding services in another cloud vendor and deploying the workflow. Serverless functions remain powerful tools for creating scalable services in the cloud but there are significant flaws and disadvantages.
我更喜欢Terraform和Github Worflow的另一个原因是因为AWS Lambda函数缺乏可移植性。 使用Lambda函数后,很难将该函数传输到其他地方。 这部分是由于Lambda函数返回,Lambda处理程序,层和其他配置的语法限制。 此外,利用AWS API Gateway调用该功能还进一步阻止了向其他云供应商的移植。 Terraform使在其他云供应商中查找相应的服务和部署工作流变得更加容易。 无服务器功能仍然是在云中创建可扩展服务的强大工具,但是存在明显的缺陷和缺点。
What other possibilities are enabled by this structure of infrastructure creation and deployment? How about managing infrequent, time-insensitive services with this workflow? With some changes to this tutorial, we create and deploy the underlying infrastructure for the application servers, load balancers, S3 Bucket, and then destroy those instances when the services are completed. This might be crucial for any startup with large data-intensive applications seeking an effective way to mitigate costs for their DEV and TEST environments or even PROD.
这种基础架构创建和部署结构还带来了哪些其他可能性? 如何使用此工作流程管理不频繁,时间不敏感的服务? 通过对本教程进行一些更改,我们为应用程序服务器,负载平衡器,S3存储桶创建并部署了基础架构,然后在服务完成时销毁这些实例。 对于任何拥有大量数据密集型应用程序的初创企业,寻求有效的方法来降低其DEV和TEST环境甚至PROD的成本,这可能至关重要。
aws terraform


 427
427


 被折叠的 条评论
为什么被折叠?
被折叠的 条评论
为什么被折叠?
 到【灌水乐园】发言


