


Custom loading animation for you apps
为您的应用程序自定义加载动画
总览 (Overview)
In this tutorial we will be building a shimmer animation which can be used as a placeholder view for time when your app is busy fetching data through API or some background process.
在本教程中,我们将构建一个淡淡的动画,当您的应用程序正忙于通过API或某些后台进程获取数据时,可以用作占位符视图。
This type of loading was introduced by Facebook and now commonly seen in apps like Youtube and Instagram as well.
这种加载类型是Facebook引入的,现在在YouTube和Instagram等应用中也很常见。
If you want your app to stand out, this is the new normal.
如果您希望您的应用脱颖而出,这就是新常态。
我们正在建设什么? (What are we building ?)
A custom animation view, which can act like a placeholder till the time API returns response.
自定义动画视图,可以充当占位符,直到API返回响应为止。
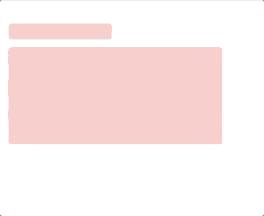
Our final product will look something like this:
我们的最终产品将如下所示:
入门 (Getting Started)
Download the Final Project from here.
从此处下载最终项目。
Let’s look into the project. For creating shimmer effect we will be working with GradientLayer and CABasicAnimation
让我们看一下该项目。 为了创建闪光效果,我们将使用GradientLayer和CABasicAnimation
Extend UIView and add the below code:
扩展UIView并添加以下代码:
extension UIView {
func applyShimmerEffect() {//1let light = backgroundColor?.withAlphaComponent(0.5).cgColor ?? UIColor(red: 0, green: 0, blue: 0, alpha: 0.1).cgColorlet dark = UIColor.clear.cgColorlet shimmerGradientLayer = CAGradientLayer()shimmerGradientLayer.colors = [light, dark]shimmerGradientLayer.frame = CGRect(
x: -bounds.width,
y: 0,
width: 50 * bounds.size.width,
height: bounds.size.height
)shimmerGradientLayer.startPoint = CGPoint(x: 0.0, y: 0)
shimmerGradientLayer.endPoint = CGPoint(x: 1.0, y: 0)
shimmerGradientLayer.locations = [0.0, 0.1]
layer.mask = shimmerGradientLayer//2let animation = CABasicAnimation(keyPath: "locations")animation.fromValue = [0.0, 0.1]animation.toValue = [0.1, 0.2]animation.duration = 0.7animation.repeatCount = Float.infinityanimation.autoreverses = trueshimmerGradientLayer.add(animation, forKey: "shimmer")}}
//1 We will start with creating two colours for our gradient layer. First one is Light which has colour of view with alpha of 0.5, second is a clear colour.
//1我们将从为渐变图层创建两种颜色开始。 第一个是Light ,其具有视用α的颜色0.5 ,第二个是一个clear的颜色。
Create a gradient layer, add the above colours to it. Set the frame of gradient to something bigger in larger in width and placed at the a position -bounds.width .This is done to give a pulse effect when we animate the layer.
创建一个渐变层,向其中添加以上颜色。 将渐变框架设置为更大的宽度,然后将其放置在一个位置-bounds.width 。这样做可以在为图层设置动画时产生脉冲效果。
Our gradient should animate along xaxis so the start and end points are given accordingly.
我们的渐变应沿xaxis动画xaxis因此start和end将相应地给出。
location property of the gradient is animatable. We will be changing the location property to produce animation.
渐变的location属性是可动画的。 我们将更改location属性以生成动画。
//2 Create a CABasicAnimation instance. We will provide toValue and fromValue to the instance, toValue should be the location property set by our gradient layer and fromValue can be according to our animation.
//2创建一个CABasicAnimation实例。 我们将提供toValue和fromValue到该实例, toValue应该由我们梯度层的位置属性集和fromValue可以根据我们的动画中。
We are setting the repeat count to infinity as our motive is to show the animation until API returns the response. Also, to make the animation smooth and have a pulse effect, we will set autoreverses = true .
我们将重复计数设置为infinity因为我们的动机是显示动画,直到API返回响应。 另外,为使动画平滑并具有脉冲效果,我们将设置autoreverses = true 。
This is all we need to create a shimmer effect. Next step. Creating shimmer Cards.
这就是创建微光效果的全部。 下一步。 创建shimer卡。
卡视图: (Card View:)
We will need a protocol Shimmerable for creating shimmer cards, add the following code —
我们需要一个Shimmerable协议来创建闪光卡,并添加以下代码-
protocol Shimmerable: UIView {var shimmerViews: [UIView] { get }}extension Shimmerable {func loadShimmer() {shimmerViews.forEach { $0.applyShimmerEffect() }}Our card view will conform to this protocol, and will provide it the views on which shimmer needs to be applied.
我们的卡片视图将符合此协议,并向其提供需要应用微光的视图。
Note: Our shimmer card is something which will be shown during API call. It is a placeholder which will be displayed till the time data is fetched.
注意 :我们的微光卡将在API调用期间显示。 它是一个占位符,它将一直显示到获取时间数据为止。
Let’s create a shimmer view card, Add the following class and we will go step by step to understand it.
让我们创建一个微光视图卡,添加以下课程,我们将逐步了解它。
final class ShimmerView: UIView {override init(frame: CGRect) {
super.init(frame: frame)
commonInit()
backgroundColor = .clear
}required init?(coder: NSCoder) {
fatalError("init(coder:) has not been implemented")}//1
private let titleView: UIView = {
let view = UIView()
view.layer.cornerRadius = 5
view.width(160)
view.height(25)
view.backgroundColor = .lightGray
return view
}()private let descriptionView: UIView = {
let view = UIView()
view.layer.cornerRadius = 5
view.width(UIScreen.main.bounds.width * 0.80)
view.height(150)
view.backgroundColor = UIColor.red.withAlphaComponent(0.5)
return view
}()}//2
extension ShimmerView {func commonInit() {
setupUI()
setConstraints()
}func setupUI() {
addSubview(titleView)
addSubview(descriptionView)
}func setConstraints() {
titleView.leadingToSuperview(offset: 15)
titleView.topToSuperview(offset: 15)
descriptionView.leadingToSuperview(offset: 15)
titleView.bottomToTop(of: descriptionView, offset: -12)
}
}//3
extension ShimmerView: Shimmerable {
  public var shimmerViews: [UIView] {
    return [titleView, descriptionView]
   }
}
//1 We have created a ShimmerView class which is subclasses of UIView . We have add two views, title and description , on which we will be applying the shimmer effect.
//1我们创建了一个ShimmerView类,它是UIView子类。 我们添加了两个视图, title和description ,我们将在它们上应用闪光效果。
//2 this extension just adds the view to superView and align them one below the other.
//2此扩展名仅将视图添加到superView并将它们彼此对齐。
//3 We will now conform to protocol Shimmerable and provide the views to which we will be adding shimmer effect, in our case, title and description view.
//3现在,我们将遵循协议Shimmerable并在我们的案例, title和description视图中提供将添加闪烁效果的视图。
Let’s add and connect this view to our ViewController . Open ViewController.swift and add the following code in viewDidLoad method—
让我们添加该视图并将其连接到我们的ViewController 。 打开ViewController.swift并在viewDidLoad方法中添加以下代码-
override func viewDidLoad() {super.viewDidLoad()view.addSubview(shimmerView)
shimmerView.topToSuperview(offset: 20, usingSafeArea: true)
shimmerView.width(UIScreen.main.bounds.width)
shimmerView.centerXToSuperview()DispatchQueue.main.asyncAfter(deadline: .now() + 0.1) {
self.shimmerView.loadShimmer()
   }
}
Build and Run ! Also, let’s see how it looks in Dark Mode.
编译并运行! 另外,让我们看看它在黑暗模式下的外观。
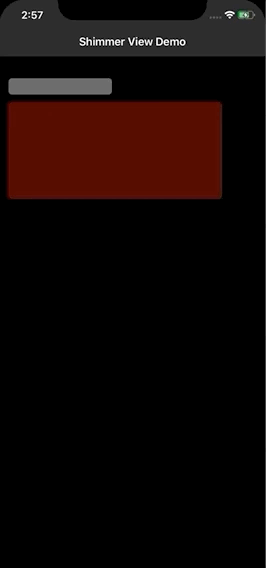
Awesome !! We have a placeholder for our content now and we got rid of our traditional loading style. Do you know, SwiftUI has an in-build placeholder for its properties ? well that’s a good topic for another animation tutorial.
太棒了!! 现在,我们为内容提供了一个占位符,并且摆脱了传统的加载方式。 您知道吗,SwiftUI的属性具有内置占位符? 嗯,这是另一个动画教程的好话题。
翻译自: https://medium.com/@arjun.baru2/creating-youtube-style-loading-animation-d30b465ce0ca


 452
452

 被折叠的 条评论
为什么被折叠?
被折叠的 条评论
为什么被折叠?
 到【灌水乐园】发言


