


page 分页
介绍: (Intro:)
Paging3 is one of the new Jetpack libraries for managing and loading a large chunk of the dataset from various data sources efficiently. It allows us to load pages of data from the network or local database with ease and saves our development time. Paging3 is designed to follow the Android app architecture and coordinates with other Jetpack components. It is Kotlin first and works with some of the new async threading solutions like Coroutines and Flow and of course, it has the support for RxJava & LiveData users as well.
Paging3是新的Jetpack库之一,用于高效地管理和加载来自各种数据源的大量数据集。 它使我们能够轻松地从网络或本地数据库加载数据页面,并节省了开发时间。 Paging3旨在遵循Android应用程序架构,并与其他Jetpack组件进行协调。 首先是Kotlin ,它与一些新的异步线程解决方案(例如协程和Flow)一起使用,当然,它也支持RxJava和LiveData用户。
有何不同: (How it’s different:)
- It caches the paged data in-memory for better usage of the system resources which not only gives fast response but also helps in data loading without hiccups. 它在内存中缓存分页的数据,以更好地利用系统资源,这不仅可以提供快速响应,还可以帮助数据加载而不会出现打ic的情况。
- It handles the network request duplication very elegantly hence saving the user’s bandwidth and system resources. 它非常优雅地处理网络请求重复,从而节省了用户的带宽和系统资源。
- A much flexible Recyclerview Adapter which requests & loads the data gracefully whenever the user reaches near the end of the page, yes now adapter is controlling when and what to load with a one-time setup. 灵活得多的Recyclerview适配器,每当用户到达页面末尾时,它都会优雅地请求和加载数据,是的,现在,适配器通过一次性设置来控制加载时间和加载内容。
- It is Kotlin first means the whole library is written in Kotlin and works very well with other offerings of the Kotlin like Coroutines and Flow. Also, it supports the much-used libraries like RxJava and LiveData as well. 首先是Kotlin,这意味着整个库都是用Kotlin编写的,并且与Kotlin的其他产品(如协程和Flow)配合得很好。 此外,它还支持RxJava和LiveData等常用的库。
- It has inbuilt support for error handling, retry and refresh use cases. 它具有对错误处理,重试和刷新用例的内置支持。
Paging3和应用程序体系结构: (Paging3 & Application Architecture:)
When I say Paging3 works and integrates well with our application architecture is means that it sits in all the basic layers of our application like Repository -> ViewModel -> UI and makes it very easy to understand and include in our existing flow. Have a look below to understand it visually.
当我说Paging3可以正常工作并与我们的应用程序体系结构很好地集成时,意味着它位于我们应用程序的所有基本层中,例如Repository-> ViewModel-> UI,并使其非常易于理解并包含在我们现有的流程中。 请看下面以直观地了解它。
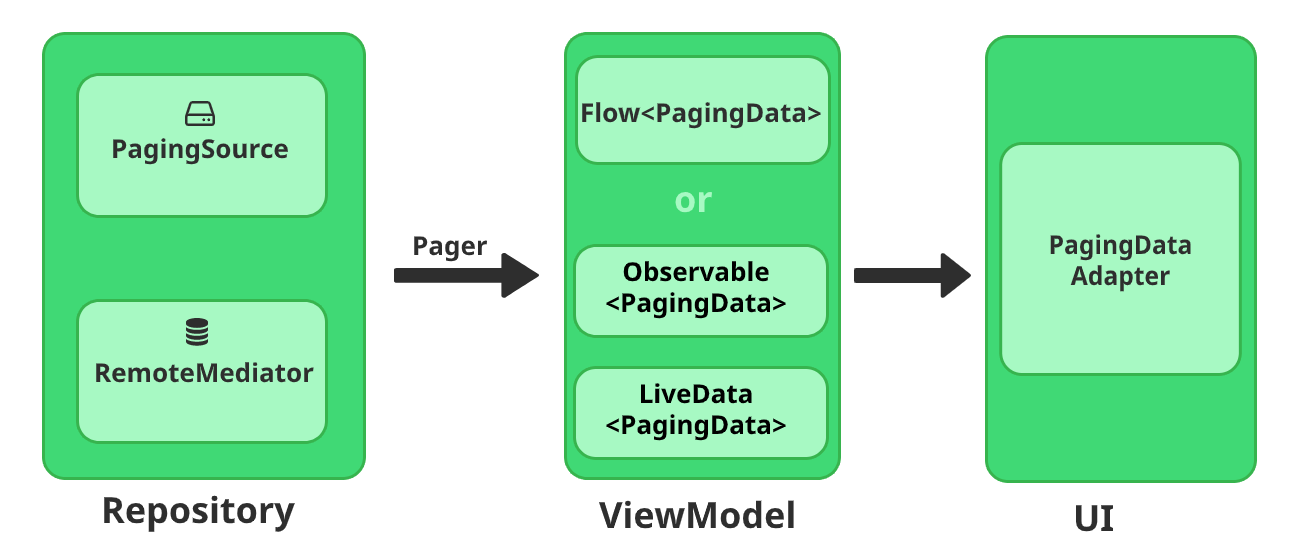
PagingSource: It is a generic abstract class that is responsible for loading the paging data from the network. To implement PagingSource we need to define the Page Key type in our case it will be of type Int and the response data type from API in our case it will be DoggoImageModel.
PagingSource :它是一个通用抽象类,负责从网络加载寻呼数据。 为了实现PagingSource,我们需要定义Page Key类型(在本例中为Int类型),而来自API的响应数据类型在本例中为DoggoImageModel 。
RemoteMediator: It is responsible for loading the paging data from the network and local DB. This is a good way to implement paging since in this case, our local DB is the main source of data for the paging adapter. This method is much more reliable and less error-prone.
RemoteMediator :它负责从网络和本地数据库加载分页数据。 这是实现分页的一种好方法,因为在这种情况下,我们的本地数据库是分页适配器的主要数据源。 这种方法更加可靠,并且不易出错。
Pager: This API consumes whatever the RemoteMediator or PagingSource returns as a data source to it and returns a reactive stream of PagingData. It can be returned as a Flow, Observable, LiveData as shown in the above diagram.
Pager :此API会使用RemoteMediator或PagingSource返回的任何内容作为其数据源,并返回PagingData的响应流。 如上图所示,它可以作为Flow,Observable,LiveData返回。
PagingData: This is the final return type and something that PagingDataAdapter understands and has the original data type inside it. It acts as a paging data container.
PagingData :这是最终的返回类型,也是PagingDataAdapter可以理解的类型,并且内部具有原始数据类型。 它充当页面数据容器。
PagingConfig: This is our paging configuration class here you can define how the PagingSource should be constructed means you can define how much data should be there on each page and many more options are there to customize our PagingSource.
PagingConfig :这是我们的分页配置类,您可以在其中定义如何构造PagingSource ,这意味着您可以定义每页上应该有多少数据,还有更多选项可以自定义我们的PagingSource。
PagingDataAdapter: This is the primary UI component that is responsible for presenting the data in the RecyclerView. It consumes the PagingData as the input type and listens to its internal loading events. It loads data after fine graining using DiffUtil on a background thread, so expect no hiccups while adding new items on the UI thread.
PagingDataAdapter :这是主要的UI组件,负责在RecyclerView中显示数据。 它使用PagingData作为输入类型,并侦听其内部加载事件。 它在后台线程上使用DiffUtil细粒度加载后加载数据,因此在UI线程上添加新项目时不会出现打h 。
那有什么计划? (So what’s the plan?)
We will be creating a small Doggo android application to exploit 😄 the new Paging3 library different use cases and see how different implementations of data source works with newly introduced Coroutines and Flow as well as RxJava and LiveData. We will try loading data from local Room DB as well as hot network calls. I know we have covered a lot of heavy definitions and terms but as we go ahead and implement them it will start to make sense and looks easy once we implement them so bear with me a bit longer 🙇.
我们将创建一个小型Doggo android应用程序,以利用新的Paging3库的不同用例,并查看数据源的不同实现如何与新引入的Coroutines和Flow以及RxJava和LiveData一起使用。 我们将尝试从本地Room DB以及热网络调用中加载数据。 我知道我们已经涵盖了很多繁琐的定义和术语,但是随着我们继续执行它们,它将变得很有意义,并且一旦实现它们就看起来很容易,所以请耐心等待一段时间。
在开始之前: (Before we start:)
We need to add this compulsory dependency of Paging3 available in google maven.
我们需要添加Google Maven中提供的Paging3的这种强制依赖性。
//paging3
implementation "androidx.paging:paging-runtime:3.0.0-alpha03"//optional dependency for RxJava support
implementation "androidx.paging:paging-rxjava2-ktx:3.0.0-alpha03"//optional room db
implementation "androidx.room:room-runtime:2.3.0-alpha02"implementation "androidx.room:room-ktx:2.3.0-alpha02"kapt "androidx.room:room-compiler:2.3.0-alpha02"
I have added those above along with few other dependencies like Retrofit, Coil, Navigation, Lifecycle LiveData, ViewModel have a look here at the full dependencies snapshot. Ok now dependencies are in place let’s start with the implementation of the Paging3
我在上面添加了这些内容以及其他一些依赖项,例如Retrofit , Coil,Navigation,Lifecycle LiveData,ViewModel, 这里有完整的依赖项快照。 好了,现在已经有了依赖项,让我们从Paging3的实现开始
网络作为数据源🌐: (Network as a Data Source 🌐:)
In our 🐶 application, we will be fetching the list of all the cute dogs from the remote network using the TheDogApi API service. It seems my love for dogs is now showing into my medium articles as well 🤷♂️, you can create an application for cats 😻 if you want. Let’s define our API service endpoint as we do use a retrofit.
在我们的应用程序中,我们将使用TheDogApi API服务从远程网络中获取所有可爱的狗的列表。 似乎我对狗的爱现在也出现在我的中篇文章中(🤷♂️,如果需要,您可以为猫创建一个应用程序)。 让我们定义一下我们的API服务端点,因为我们确实使用了改造。
interface DoggoApiService {
    @GET("v1/images/search")suspend fun getDoggoImages(@Query("page") page: Int, @Query("limit") size: Int): List<DoggoImageModel>
}
Please note the important thing here, the page & limit which is important for our Pagination /Endless scrolling /Lazy Loading. The param page is here to keep track of the current page for which we will be requesting new data similarly the limit defines how much data we need per page. These keys might be different for your API so add them accordingly to the definition.
请注意这里重要的事情, 页面和限制对我们的分页/无休止滚动/延迟加载很重要。 这里的param 页面跟踪我们将要为其请求新数据的当前页面,该限制定义了每页需要多少数据。 这些密钥对于您的API可能会有所不同,因此请将它们相应地添加到定义中。
We have completed the first part of our API call now let’s see how Paging3 helps us automate this process of pagination. PagingSource is the way to go here since we are going to use remote network API as the data source. so let’s create a class DoggoImagePagingSource and implement PagingSource like below. Here I have passed the DoggoApiService which we have created earlier so that our PagingSource can call our doggo API and get results. Apart from this while inheriting from PagingSource we need to define the type of paging our API supports in our case it is simple Int based number paging and the return type of the API response that is DoggoImageModel. Now we have implemented the PagingSource let’s dig and get familiar with the load function.
现在,我们已经完成了API调用的第一部分,现在让我们看看Paging3如何帮助我们使分页过程自动化。 因为我们将使用远程网络API作为数据源,所以PagingSource是到达此处的方法。 因此,让我们创建一个DoggoImagePagingSource类并实现PagingSource,如下所示。 在这里,我传递了我们之前创建的DoggoApiService ,以便PagingSource可以调用doggo API并获取结果。 除此之外,在从PagingSource继承时,我们需要定义API支持的分页类型,在这种情况下,这是基于Int的简单数字分页,而API响应的返回类型为DoggoImageModel 。 现在,我们已经实现了PagingSource,让我们深入了解并熟悉load函数。
class DoggoImagePagingSource(val doggoApiService: DoggoApiService) :
    PagingSource<Int, DoggoImageModel>() {


    override suspend fun load(params: LoadParams<Int>): LoadResult<Int, DoggoImageModel> {
        //for first case it will be null, then we can pass some default value, in our case it's 1
        val page = params.key ?: DEFAULT_PAGE_INDEX
        return try {
            val response = doggoApiService.getDoggoImages(page, params.loadSize)
            LoadResult.Page(
                response, prevKey = if (page == DEFAULT_PAGE_INDEX) null else page - 1,
                nextKey = if (response.isEmpty()) null else page + 1
            )
        } catch (exception: IOException) {
            return LoadResult.Error(exception)
        } catch (exception: HttpException) {
            return LoadResult.Error(exception)
        }
    }
}
— params: Keeps the basic information related to the current page for which API needs to be called and the page size.
— params :保留与需要调用API的当前页面有关的基本信息以及页面大小。
— LoadResult: It’s a Kotlin Sealed class and we can return LoadResult.Error(exception) in case of exception or some error and in case of success we will return LoadResult.Page from load() function. If for some reason data is not available and might have reached the end of the list then pass null as the value for prevKey or nextKey to indicate the end of the list condition.
— LoadResult :这是一个Kotlin Sealed类,如果发生异常或某些错误,我们可以返回LoadResult.Error(exception) ;如果成功,我们将从load()函数返回LoadResult.Page 。 如果由于某种原因数据不可用并且可能已到达列表末尾,则将null作为prevKey或nextKey的值传递以指示列表条件的末尾。
Inside the load() function we call the doggo API service to get the data from the network passing the current page and page loadSize. The current page can be retrieved from params.key which is null on start so we will assign a default value in that case. Click to see full DoggoImagePagingSource class implementation.
在load()函数内部,我们调用doggo API服务,以通过当前页面和页面loadSize从网络获取数据。 可以从params.key检索当前页面,该页面在开始时为null,因此在这种情况下我们将分配一个默认值。 单击以查看完整的DoggoImagePagingSource类实现。
We have just completed our first phase according to the app architecture diagram defined above. Now we need to configure and return PagingData with the help of Pager class. To do it let’s create a DoggoImagesRepository class. Inside this class let’s define a function that returns the reactive stream of PagingData<DoggoImageModel> using Pager class.
我们已经按照上面定义的应用程序架构图完成了第一阶段。 现在,我们需要在Pager类的帮助下配置并返回PagingData 。 为此,我们创建一个DoggoImagesRepository类。 在此类内部,我们定义一个函数,该函数使用Pager类返回PagingData <DoggoImageModel>的React式流。
fun letDoggoImagesFlow(pagingConfig: PagingConfig = getDefaultPageConfig()): Flow<PagingData<DoggoImageModel>>{           //TODO
}
now to construct Pager we need PagingConfig first. This allows you to change various configurations related to the paging like page size, enable placeholders, etc. Here we are just returning a very basic PagingConfig instance.
现在要构造Pager,我们首先需要PagingConfig。 这允许您更改与分页相关的各种配置,例如页面大小,启用占位符等。在这里,我们仅返回一个非常基本的PagingConfig实例。
fun getDefaultPageConfig(): PagingConfig {return PagingConfig(pageSize = DEFAULT_PAGE_SIZE, enablePlaceholders = false)
}
Now the second thing that Pager needs is the PagingSource which we have created earlier i.e DoggoImagePagingSource. Let’s assemble these two to return a reactive PagingData<DoggoImageModel> like below. Click to see full DoggoImagesRepository.kt
现在,Pager需要的第二件事是我们之前创建的PagingSource,即DoggoImagePagingSource。 让我们组合这两个代码,以返回一个React性PagingData <DoggoImageModel>,如下所示。 单击以查看完整的DoggoImagesRepository.kt
fun letDoggoImagesFlow(pagingConfig: PagingConfig = getDefaultPageConfig()): Flow<PagingData<DoggoImageModel>> {
    return Pager(
        config = pagingConfig,
        pagingSourceFactory = { DoggoImagePagingSource(doggoApiService) }
    ).flow
}


/**
 * let's define page size, page size is the only required param, rest is optional
 */
fun getDefaultPageConfig(): PagingConfig {
    return PagingConfig(pageSize = DEFAULT_PAGE_SIZE, enablePlaceholders = false)
}
Now, this almost completes the second phase we just need to call this from ViewModel class where we can modify the returned PagingData or perform some collection actions like mapping or filtering if needed and many more Flow related operations can be done which is a quite interesting addition. If you are working with RxJava then just call .observable or .liveData on Pager() if you are working with LiveData.
现在,这几乎完成了第二阶段,我们只需要从ViewModel类中调用它即可,我们可以在其中修改返回的PagingData或执行一些收集操作,如需要的话进行映射或过滤,并且可以执行更多与流相关的操作,这是一个非常有趣的补充。 如果您正在使用RxJava工作则只需拨打寻呼机().observable或.liveData如果您正在使用LiveData工作。
Let’s create RemoteViewModel class and expose the data from the repository to the UI components by adding the following methods in our ViewModel. See full RemoteViewModel here.
让我们创建RemoteViewModel类,并通过在ViewModel中添加以下方法,将存储库中的数据公开给UI组件。 在此处查看完整的RemoteViewModel 。
fun fetchDoggoImages(): Flow<PagingData<String>> {
        return repository.letDoggoImagesFlow()
            .map { it.map { it.url } }
            .cachedIn(viewModelScope)
    }


    //rxjava use case
    fun fetchDoggoImagesObservable(): Observable<PagingData<String>> {
        return repository.letDoggoImagesObservable()
            .map { it.map { it.url } }
            .cachedIn(viewModelScope)
    }


    //live data use case
    fun fetchDoggoImagesLiveData(): LiveData<PagingData<String>> {
        return repository.letDoggoImagesLiveData()
            .map { it.map { it.url } }
            .cachedIn(viewModelScope)
    }
for showing the mapping operation on Flow we have here tweaked the data type from Flow<PagingData<DoggoImageModel>> and mapped it to Flow<PagingData<String>> you can always return whatever you want.
为了显示Flow上的映射操作,我们在这里调整了Flow <PagingData <DoggoImageModel >>的数据类型,并将其映射到Flow <PagingData <String >>,您始终可以返回所需的任何内容。
Note: If you’re doing any operations on the Flow, like map or filter, make sure you call cachedIn after you execute these operations to ensure you don't need to trigger them again.
注意 :如果您要在Flow上执行任何操作(例如map或filter ,请确保在执行这些操作后调用cachedIn ,以确保无需再次触发它们。
Let’s move to our final stage of implementing paging with the network as the data source. We are going to club the data returned from RemoteViewModel functions to our customized PagingDataAdapter in the fragment. We have created a basic RecyclerviewAdapter extending the PagingDataAdapter have a look here 👇. The only difference you might have noticed here is that in this new adapter we are passing implementation of the DiffUtil to the PagingDataAdapter constructor, I guess the rest is quite understandable and is regular Recyclerview adapter implementation.
让我们进入以网络作为数据源实现分页的最后阶段。 我们将把从RemoteViewModel函数返回的数据合并到片段中的自定义PagingDataAdapter中。 我们创建了一个基本的RecyclerviewAdapter,扩展了PagingDataAdapter,在这里here。 您可能在这里注意到的唯一区别是,在这个新适配器中,我们将DiffUtil的实现传递给PagingDataAdapter构造函数,我想其余的是可以理解的,并且是常规的Recyclerview适配器实现。
package com.vikas.paging3.view.remote.adapter


import android.view.LayoutInflater
import android.view.View
import android.view.ViewGroup
import android.widget.ImageView
import androidx.paging.PagingDataAdapter
import androidx.recyclerview.widget.DiffUtil
import androidx.recyclerview.widget.RecyclerView
import coil.api.load
import com.vikas.paging3.R


class RemoteDoggoImageAdapter :
    PagingDataAdapter<String, RecyclerView.ViewHolder>(REPO_COMPARATOR) {


    companion object {
        private val REPO_COMPARATOR = object : DiffUtil.ItemCallback<String>() {
            override fun areItemsTheSame(oldItem: String, newItem: String): Boolean =
                oldItem == newItem


            override fun areContentsTheSame(oldItem: String, newItem: String): Boolean =
                oldItem == newItem
        }
    }


    override fun onBindViewHolder(holder: RecyclerView.ViewHolder, position: Int) {
        (holder as? DoggoImageViewHolder)?.bind(item = getItem(position))
    }


    override fun onCreateViewHolder(parent: ViewGroup, viewType: Int): RecyclerView.ViewHolder {
        return DoggoImageViewHolder.getInstance(parent)
    }


    /**
     * view holder class
     */
    class DoggoImageViewHolder(view: View) : RecyclerView.ViewHolder(view) {


        companion object {
            //get instance of the DoggoImageViewHolder
            fun getInstance(parent: ViewGroup): DoggoImageViewHolder {
                val inflater = LayoutInflater.from(parent.context)
                val view = inflater.inflate(R.layout.item_doggo_image_view, parent, false)
                return DoggoImageViewHolder(view)
            }
        }


        var ivDoggoMain: ImageView = view.findViewById(R.id.ivDoggoMain)


        fun bind(item: String?) {
            //loads image from network using coil extension function
            ivDoggoMain.load(item) {
                placeholder(R.drawable.doggo_placeholder)
            }
        }


    }


}
let’s see how we can pass the data to this adapter from UI. Just call this function from your activity or fragment life cycle methods like onCreate() or onViewCreated() to collect the created flow in the view model. You can subscribe to the Rxjava Observables or Observe the LiveData if you are returning the same from view model class functions. See here the full implementation of our RemoteFragment class.
让我们看看如何将数据从UI传递到此适配器。 只需从您的活动或片段生命周期方法(例如onCreate()或onViewCreated())中调用此函数,即可在视图模型中收集创建的流。 如果要从视图模型类函数返回相同的内容,则可以订阅Rxjava Observable或Observ the LiveData。 在这里看到我们RemoteFragment类的完整实现。
private fun fetchDoggoImages() {
        lifecycleScope.launch {
            remoteViewModel.fetchDoggoImages().distinctUntilChanged().collectLatest {
                adapter.submitData(it)
            }
        }
    }
That’s it if you run this setup now it will produce the following output 👏.
就这样,如果您现在运行此安装程序,它将产生以下输出👏。

I hope some of you are still with me to see this 😄. Now, this completes our basic Paging3 implementation. Next, we will see how to add a progress loader to this adapter for automatically handling the error cases and will add a try button to fetch again.
我希望你们中的一些人仍然陪着我看这个this。 现在,这完成了我们基本的Paging3实现。 接下来,我们将看到如何向该适配器添加进度加载器以自动处理错误情况,并将添加一个try按钮以再次获取。
具有加载状态的PagingDataAdapter: (PagingDataAdapter with loading states:)
This enables our adapter to have the additional capability of handling the error cases automatically and loads the right state accordingly.
这使我们的适配器具有自动处理错误情况并相应地加载正确状态的附加功能。

To leverage this feature Paging3 comes with additional LoadStateAdapter just create an adapter and extend to it. This is again no different than our regular Recyclerview adapter the only difference is that it gives LoadState as the data type then our regular data model. This is quite helpful in knowing in which state is the paging adapter right now. Here is our implementation of the LoadStateAdapter.
为了利用此功能,Paging3附带了其他LoadStateAdapter,只需创建一个适配器并将其扩展即可。 同样,这与我们的常规Recyclerview适配器没有什么不同,唯一的区别是,它给LoadState作为数据类型,然后给与我们的常规数据模型。 这对于知道当前页面适配器处于哪种状态非常有帮助。 这是我们对LoadStateAdapter的实现。
package com.vikas.paging3.view.loader.adapter


import android.view.LayoutInflater
import android.view.View
import android.view.ViewGroup
import android.widget.Button
import androidx.constraintlayout.motion.widget.MotionLayout
import androidx.paging.LoadState
import androidx.paging.LoadStateAdapter
import androidx.recyclerview.widget.RecyclerView
import com.vikas.paging3.R


class LoaderStateAdapter(private val retry: () -> Unit) :
    LoadStateAdapter<LoaderStateAdapter.LoaderViewHolder>() {


    override fun onBindViewHolder(holder: LoaderViewHolder, loadState: LoadState) {
        holder.bind(loadState)
    }


    override fun onCreateViewHolder(parent: ViewGroup, loadState: LoadState): LoaderViewHolder {
        return LoaderViewHolder.getInstance(parent, retry)
    }


    /**
     * view holder class for footer loader and error state handling
     */
    class LoaderViewHolder(view: View, retry: () -> Unit) : RecyclerView.ViewHolder(view) {


        companion object {
            //get instance of the DoggoImageViewHolder
            fun getInstance(parent: ViewGroup, retry: () -> Unit): LoaderViewHolder {
                val inflater = LayoutInflater.from(parent.context)
                val view = inflater.inflate(R.layout.item_doggo_loader, parent, false)
                return LoaderViewHolder(view, retry)
            }
        }


        val motionLayout: MotionLayout = view.findViewById(R.id.mlLoader)


        init {
            view.findViewById<Button>(R.id.btnRetry).setOnClickListener {
                retry()
            }
        }


        fun bind(loadState: LoadState) {
            if (loadState is LoadState.Loading) {
                motionLayout.transitionToEnd()
            } else {
                motionLayout.transitionToStart()
            }
        }
    }
}
we can use this LoadState sealed class to react accordingly. It returns three states Loading, Error, NotLoading. We are hiding the retry button in case the adapter returns LoadState as Loading and showing a progress bar. Now let’s see how we can use this newly created adapter with our existing created RemoteDoggoImageAdapter.
我们可以使用此LoadState密封类做出相应的React。 它返回三种状态Loading , Error和NotLoading。 如果适配器返回LoadState作为Loading并显示进度条,我们将隐藏重试按钮。 现在,让我们看看如何将这个新创建的适配器与我们现有的已创建的RemoteDoggoImageAdapter一起使用。
private fun setUpViews(view: View) {
        rvDoggoRemote = view.findViewById(R.id.rvDoggoRemote)
        rvDoggoRemote.layoutManager = GridLayoutManager(context, 2)
        //adapter setup
        adapter = RemoteDoggoImageAdapter()
        loaderStateAdapter = LoaderStateAdapter { adapter.retry() }
        rvDoggoRemote.adapter = adapter.withLoadStateFooter(loaderStateAdapter)
    }
noting much here, we have just created an instance passing a higher-order function in the constructor which calls adapter.retry() function on RemoteDoggoImageAdapter and second thing we did is we called withLoadStateFooter(loaderStateAdapter) function on the RemoteDoggoImageAdapter passing our newly created loaderStateAdapter. Let’s run to see this in action.
这里要注意的是,我们刚刚创建了一个在构造函数中传递高阶函数的实例,该实例在RemoteDoggoImageAdapter上调用adapter.retry()函数,而我们要做的第二件事是在RemoteDoggoImageAdapter上调用了withLoadStateFooter(loaderStateAdapter)函数,并传递了我们新创建的loaderStateAdapter 。 让我们来看看实际情况。

房间作为数据源: (Room as a data source:)
We can use local DB for pagination as well and it’s good to provide offline support as well. If you do offline content support and don’t know how to leverage local DB for your paging use case then this feature is made for you 😎. In this case, the local Db will be the only source of data and whenever needed it will get new data from the network. So it handles both the cases where we need to fetch the new data from the network and save it to the local DB and UI will observe this to reflect new changes.
我们也可以使用本地数据库进行分页,并且最好提供脱机支持。 如果您提供离线内容支持,并且不知道如何在分页用例中利用本地数据库,那么将为您提供此功能。 在这种情况下,本地Db将是唯一的数据源,并且在需要时会从网络获取新数据。 因此,它处理了我们需要从网络中获取新数据并将其保存到本地数据库的两种情况,UI会观察到这以反映新的更改。
To support this type of paging first we need to create some local DB. Here we are using Room as our local DB. Let’s create some entities quickly to save our API response model as well as paging related info Entity. We have converted our existing data class DoggoImageModel to a Room Entity.
为了首先支持这种分页,我们需要创建一些本地数据库。 在这里,我们使用Room作为本地数据库。 让我们快速创建一些实体以保存我们的API响应模型以及与分页相关的信息实体。 我们已经将现有的数据类DoggoImageModel转换为Room Entity 。
@Entitydata class DoggoImageModel(@PrimaryKey val id: String, val url: String)Our model is quite simple since we are just taking a URL to show images from API. Next, we need some Dao as well for this newly created Entity. So do something like below.
我们的模型非常简单,因为我们只是采用一个URL来显示来自API的图像。 接下来,对于这个新创建的实体,我们还需要一些Dao 。 因此,请执行以下操作。
@Daointerface DoggoImageModelDao {
    @Insert(onConflict = OnConflictStrategy.REPLACE)suspend fun insertAll(doggoModel: List<DoggoImageModel>)
    @Query("SELECT * FROM doggoimagemodel")fun getAllDoggoModel(): PagingSource<Int, DoggoImageModel>
    @Query("DELETE FROM doggoimagemodel")suspend fun clearAllDoggos()
}
Next, create an Entity to store the paging information for offline paging which Paging3 needs while making paging assumptions.
接下来,创建一个实体以存储用于进行分页假设时Paging3需要的用于脱机分页的分页信息。
@Entitydata class RemoteKeys(@PrimaryKey val repoId: String, val prevKey: Int?, val nextKey: Int?)Dao for RemoteKeys
Dao for RemoteKeys
@Daointerface RemoteKeysDao {
    @Insert(onConflict = OnConflictStrategy.REPLACE)suspend fun insertAll(remoteKey: List<RemoteKeys>)
    @Query("SELECT * FROM remotekeys WHERE repoId = :id")suspend fun remoteKeysDoggoId(id: String): RemoteKeys?
    @Query("DELETE FROM remotekeys")suspend fun clearRemoteKeys()
}
Now we are ready with our Entities and Dao’s let’s assemble them in one place and create an AppDatabase class to provide the room database object for use.
现在我们已经准备好实体,Dao让我们在一个地方组装它们,并创建一个AppDatabase类以提供供房间数据库使用的对象。
package com.vikas.paging3.repository.local


import android.content.Context
import androidx.room.Database
import androidx.room.Room
import androidx.room.RoomDatabase
import com.vikas.paging3.model.DoggoImageModel


@Database(version = 1, entities = [DoggoImageModel::class, RemoteKeys::class], exportSchema = false)
abstract class AppDatabase : RoomDatabase() {


    abstract fun getRepoDao(): RemoteKeysDao
    abstract fun getDoggoImageModelDao(): DoggoImageModelDao


    companion object {


        val DOGGO_DB = "doggo.db"


        @Volatile
        private var INSTANCE: AppDatabase? = null


        fun getInstance(context: Context): AppDatabase =
            INSTANCE ?: synchronized(this) {
                INSTANCE
                    ?: buildDatabase(context).also { INSTANCE = it }
            }


        private fun buildDatabase(context: Context) =
            Room.databaseBuilder(context.applicationContext, AppDatabase::class.java, DOGGO_DB)
                .build()
    }


}
This is the same thing we do while creating regular Room DB nothing special but here comes the complicated part of this article 😬. Let me now introduce you guys to RemoteMediator this class is responsible for getting the results from the Db for pagination and whenever needed it gets the fresh data from the network as well and saves it to the local DB. This manages both the network and local DB and coordinates with both of them to perform the pagination.
这是我们在创建常规Room DB时所做的相同的事情,没什么特别的,但这是本文the的复杂部分。 现在让我向大家介绍RemoteMediator,该类负责从Db获取分页的结果,并在需要时也从网络获取新数据并将其保存到本地DB。 这将管理网络和本地DB,并与它们两者协调以执行分页。
We gonna create a class DoggoMediator to implement the RemoteMediator.
我们将创建一个DoggoMediator类来实现RemoteMediator。
@ExperimentalPagingApiclass DoggoMediator(doggoApiService: DoggoApiService, appDatabase: AppDatabase) :
    RemoteMediator<Int, DoggoImageModel>() {override suspend fun load(
        loadType: LoadType, state: PagingState<Int, DoggoImageModel>
    ): MediatorResult {
       //TODO
    }
}
here we are passing DoggoApiService and AppDatabase for performing network and DB related operations. RemoteMediator is quite the same as PagingSource where we defined the page type as Int and passed DoggoImageModel as the data model the same thing we need to do here as well. Let’s dig and understand the load() function here:
在这里,我们传递DoggoApiService和AppDatabase来执行与网络和数据库相关的操作。 RemoteMediator与PagingSource完全相同,我们将页面类型定义为Int并将DoggoImageModel传递为数据模型,这也是我们在此需要做的事情。 让我们在这里挖掘和了解load()函数:
MediatorResult: As we can see it’s a return type of this function and it can be MediatorResult.Success for success case and MediatorResult.Error for error cases.
MediatorResult :如我们所见,它是此函数的返回类型,成功案例可以是MediatorResult.Success ,错误案例可以是MediatorResult.Error 。
LoadType: This tells us where we need to append the data in the page. It can be of the following types.
LoadType :这告诉我们需要在页面中附加数据的位置。 它可以是以下类型。
—
-
LoadType.APPEND: Means we need to load the new data at the end of the page.
LoadType.APPEND:意味着我们需要在页面末尾加载新数据。
—
-
LoadType.PREPEND: Means we need to load the data at the beginning of the previously loaded data.
LoadType.PREPEND :意味着我们需要在先前加载的数据的开头加载数据。
—
-
LoadType.REFRESH: Means this is the first time we are loading data for pagination.
LoadType.REFRESH :表示这是我们第一次加载分页数据。
PagingState: It holds the information related to the recently accessed index in the list and some information related to the pages which have been loaded earlier. This gives information about the paging configuration which we add while returning Pager.
PagingState :它包含与列表中最近访问的索引有关的信息以及与先前已加载的页面有关的一些信息。 这提供了有关我们在返回Pager时添加的分页配置的信息。
We need to do the following to complete the load() function for the mediator.
我们需要执行以下操作来完成中介程序的load()函数。
Find out what page we need to load from the network, based on the
LoadType.根据
LoadType找出我们需要从网络加载的LoadType。- Trigger the network request. 触发网络请求。
- Once the network request completes, if the received list of repositories is not empty, then do the following: 网络请求完成后,如果收到的存储库列表不为空,请执行以下操作:
We compute the
RemoteKeysfor everyDoggoImageModel.我们计算
RemoteKeys为每DoggoImageModel。If this a new query (
loadType = REFRESH) then we clear the database.如果这是一个新查询(
loadType = REFRESH),那么我们将清除数据库。Save the
RemoteKeysandDoggoImageModelin the database.将
RemoteKeys和DoggoImageModel保存在数据库中。Return
MediatorResult.Success(endOfPaginationReached = false).返回
MediatorResult.Success(endOfPaginationReached = false)。If the list of DoggoImageModel was empty then we return
MediatorResult.Success(endOfPaginationReached = true). If we get an error requesting data we returnMediatorResult.Error.如果DoggoImageModel的列表为空,则返回
MediatorResult.Success(endOfPaginationReached = true)。 如果在请求数据时遇到错误,则返回MediatorResult.Error。
Let’s distribute the work into functions for more clarity on what is going on.
让我们将工作分配到函数中,以更清楚地了解正在发生的事情。
Create a function called getFirstRemoteKey() which returns RemoteKeys for the loadType=LoadType.PREPEND. It basically gets the first page from PagingState and queries the database with the id of the DoggoImageModel.
创建一个名为getFirstRemoteKey()的函数,该函数返回loadType = LoadType.PREPEND的RemoteKeys。 它基本上从PagingState获取第一页,并使用DoggoImageModel的ID查询数据库。
/**
 * get the first remote key inserted which had the data
 */private suspend fun getFirstRemoteKey(state: PagingState<Int, DoggoImageModel>): RemoteKeys? {return state.pages.firstOrNull() { it.data.isNotEmpty() }?.data?.firstOrNull()
        ?.let { doggo -> appDatabase.getRepoDao().remoteKeysDoggoId(doggo.id) }}
now let’s create function getLastRemoteKey() for the loadType=LoadType.APPEND and return the RemoteKeys as below. This queries the last page from PagingState and queries the database for RemoteKeys.
现在让我们为loadType = LoadType创建函数getLastRemoteKey() 。 追加并返回如下的RemoteKeys。 这将从PagingState查询最后一页,并在数据库中查询RemoteKeys。
/**
 * get the last remote key inserted which had the data
 */private suspend fun getLastRemoteKey(state: PagingState<Int, DoggoImageModel>): RemoteKeys? {return state.pages.lastOrNull { it.data.isNotEmpty() }?.data?.lastOrNull()
        ?.let { doggo -> appDatabase.getRepoDao().remoteKeysDoggoId(doggo.id) }}
create last function getClosestRemoteKey() for the loadType=LoadType.REFRESH in case of first time data loading or we have called PagingDataAdapter.refresh() from UI.
为loadType = LoadType创建最后一个函数getClosestRemoteKey() 。 在首次加载数据时刷新 ,或者我们已经从UI调用PagingDataAdapter.refresh() 。
/**
 * get the closest remote key inserted which had the data
 */private suspend fun getClosestRemoteKey(state: PagingState<Int, DoggoImageModel>): RemoteKeys? {return state.anchorPosition?.let { position ->state.closestItemToPosition(position)?.id?.let { repoId ->
            appDatabase.getRepoDao().remoteKeysDoggoId(repoId)}
    }}
The point of reference for loading our data is the state.anchorPosition. If this is the first load, then the anchorPosition is null. When PagingDataAdapter.refresh() is called, the anchorPosition is the first visible position in the displayed list. So the above function calls state.closestItemToPosition() to get the closest DoggoImageModel.
加载数据的参考点是state.anchorPosition 。 如果这是第一次加载,则anchorPosition为null 。 调用PagingDataAdapter.refresh() , anchorPosition是显示列表中的第一个可见位置。 因此,上面的函数调用state.closestItemToPosition()以获取最接近的DoggoImageModel。
Let’s club these functions into one function and return a result based on LoadType.
让我们将这些函数合并为一个函数,并基于LoadType返回结果。
/**
 * this returns the page key or the final end of list success result
 */suspend fun getKeyPageData(loadType: LoadType, state: PagingState<Int, DoggoImageModel>): Any? {return when (loadType) {
        LoadType.REFRESH -> {val remoteKeys = getClosestRemoteKey(state)
            remoteKeys?.nextKey?.minus(1) ?: DEFAULT_PAGE_INDEX}
        LoadType.APPEND -> {val remoteKeys = getLastRemoteKey(state)
                ?: throw InvalidObjectException("Remote key should not be null for $loadType")
            remoteKeys.nextKey}
        LoadType.PREPEND -> {val remoteKeys = getFirstRemoteKey(state)
                ?: throw InvalidObjectException("Invalid state, key should not be null")//end of list condition reachedremoteKeys.prevKey ?: return MediatorResult.Success(endOfPaginationReached = true)
            remoteKeys.prevKey}
    }
}
The first point for loading page type is now done now fill the rest of the load() function as per given points which is easy to follow. Here is a full implementation of the load() function after fill up.
现在已经完成了加载页面类型的第一点,现在按照给定的点填充了load()函数的其余部分,这很容易理解。 这是填满后load()函数的完整实现。
package com.vikas.paging3.data


import androidx.paging.ExperimentalPagingApi
import androidx.paging.LoadType
import androidx.paging.PagingState
import androidx.paging.RemoteMediator
import androidx.room.withTransaction
import com.vikas.paging3.data.DoggoImagesRepository.Companion.DEFAULT_PAGE_INDEX
import com.vikas.paging3.model.DoggoImageModel
import com.vikas.paging3.repository.local.AppDatabase
import com.vikas.paging3.repository.local.RemoteKeys
import com.vikas.paging3.repository.remote.DoggoApiService
import retrofit2.HttpException
import java.io.IOException
import java.io.InvalidObjectException


@ExperimentalPagingApi
class DoggoMediator(val doggoApiService: DoggoApiService, val appDatabase: AppDatabase) :
    RemoteMediator<Int, DoggoImageModel>() {


    override suspend fun load(
        loadType: LoadType, state: PagingState<Int, DoggoImageModel>
    ): MediatorResult {


        val pageKeyData = getKeyPageData(loadType, state)
        val page = when (pageKeyData) {
            is MediatorResult.Success -> {
                return pageKeyData
            }
            else -> {
                pageKeyData as Int
            }
        }


        try {
            val response = doggoApiService.getDoggoImages(page, state.config.pageSize)
            val isEndOfList = response.isEmpty()
            appDatabase.withTransaction {
                // clear all tables in the database
                if (loadType == LoadType.REFRESH) {
                    appDatabase.getRepoDao().clearRemoteKeys()
                    appDatabase.getDoggoImageModelDao().clearAllDoggos()
                }
                val prevKey = if (page == DEFAULT_PAGE_INDEX) null else page - 1
                val nextKey = if (isEndOfList) null else page + 1
                val keys = response.map {
                    RemoteKeys(repoId = it.id, prevKey = prevKey, nextKey = nextKey)
                }
                appDatabase.getRepoDao().insertAll(keys)
                appDatabase.getDoggoImageModelDao().insertAll(response)
            }
            return MediatorResult.Success(endOfPaginationReached = isEndOfList)
        } catch (exception: IOException) {
            return MediatorResult.Error(exception)
        } catch (exception: HttpException) {
            return MediatorResult.Error(exception)
        }
    }


    /**
     * this returns the page key or the final end of list success result
     */
    suspend fun getKeyPageData(loadType: LoadType, state: PagingState<Int, DoggoImageModel>): Any? {
        return when (loadType) {
            LoadType.REFRESH -> {
                val remoteKeys = getClosestRemoteKey(state)
                remoteKeys?.nextKey?.minus(1) ?: DEFAULT_PAGE_INDEX
            }
            LoadType.APPEND -> {
                val remoteKeys = getLastRemoteKey(state)
                    ?: throw InvalidObjectException("Remote key should not be null for $loadType")
                remoteKeys.nextKey
            }
            LoadType.PREPEND -> {
                val remoteKeys = getFirstRemoteKey(state)
                    ?: throw InvalidObjectException("Invalid state, key should not be null")
                //end of list condition reached
                remoteKeys.prevKey ?: return MediatorResult.Success(endOfPaginationReached = true)
                remoteKeys.prevKey
            }
        }
    }


    /**
     * get the last remote key inserted which had the data
     */
    private suspend fun getLastRemoteKey(state: PagingState<Int, DoggoImageModel>): RemoteKeys? {
        return state.pages
            .lastOrNull { it.data.isNotEmpty() }
            ?.data?.lastOrNull()
            ?.let { doggo -> appDatabase.getRepoDao().remoteKeysDoggoId(doggo.id) }
    }


    /**
     * get the first remote key inserted which had the data
     */
    private suspend fun getFirstRemoteKey(state: PagingState<Int, DoggoImageModel>): RemoteKeys? {
        return state.pages
            .firstOrNull() { it.data.isNotEmpty() }
            ?.data?.firstOrNull()
            ?.let { doggo -> appDatabase.getRepoDao().remoteKeysDoggoId(doggo.id) }
    }


    /**
     * get the closest remote key inserted which had the data
     */
    private suspend fun getClosestRemoteKey(state: PagingState<Int, DoggoImageModel>): RemoteKeys? {
        return state.anchorPosition?.let { position ->
            state.closestItemToPosition(position)?.id?.let { repoId ->
                appDatabase.getRepoDao().remoteKeysDoggoId(repoId)
            }
        }
    }


}
This completes the DoggoMediator. Now let’s see how we can call this mediator from the repository to get the reactive PagingData. Add the following function in the DoggoImagesRepository class.
这样就完成了DoggoMediator。 现在,让我们看看如何从存储库中调用此调解器以获取React性PagingData。 在DoggoImagesRepository类中添加以下函数。
fun letDoggoImagesFlowDb(pagingConfig: PagingConfig = getDefaultPageConfig()): Flow<PagingData<DoggoImageModel>> {if (appDatabase == null) throw IllegalStateException("Database is not initialized")val pagingSourceFactory = { appDatabase.getDoggoImageModelDao().getAllDoggoModel() }
    return Pager(
        config = pagingConfig,
        pagingSourceFactory = pagingSourceFactory,
        remoteMediator = DoggoMediator(doggoApiService, appDatabase)
    ).flow}
again you can return Observable and LiveData which is the same as we have done for PagingSource implementation. Calling this from ViewModel is the same nothing changed except the function name.
同样,您可以返回Observable和LiveData,这与我们为PagingSource实现所做的相同。 从ViewModel调用此函数除了函数名之外没有什么变化。
fun fetchDoggoImages(): Flow<PagingData<DoggoImageModel>> {return repository.letDoggoImagesFlowDb().cachedIn(viewModelScope)
}
If we tie this up with our UI PagingDataAdapter then it will produce some output like below.
如果我们将其与我们的UI PagingDataAdapter绑定在一起,那么它将产生一些如下所示的输出。

There are more cool features in the Paging3 Jetpack library and is under active development. Here is the full repository for this article feel free to fork or pull to see the implementation in details.
Paging3 Jetpack库中还有更多很酷的功能,并且正在积极开发中。 这是本文的完整存储库,您可以随意进行分叉或拉取,以详细了解实现。
Note: Paging3 Jetpack library is under Alpha and was recently launched in June 2020.
注意 :Paging3 Jetpack库位于Alpha下,最近于2020年6月启动。
For more in-depth explanation and reasoning behind the new Paging3, check out this awesome youtube video by Florina Muntenescu. This video is the inspiration behind this article 😄.
有关新的Paging3背后的更深入的解释和推理,请观看Florina Muntenescu的这则很棒的youtube视频。 该视频是本文😄的灵感来源。
翻译自: https://medium.com/swlh/paging3-recyclerview-pagination-made-easy-333c7dfa8797
page 分页


 2212
2212

 被折叠的 条评论
为什么被折叠?
被折叠的 条评论
为什么被折叠?
 到【灌水乐园】发言


