


在这里期待什么。 (What to expect here.)
If you’re a curious guy like me, you’ve probably wondered how an operating system works. Here, I’ll share some research and practical experiments I’ve done to understand computing and operating systems better. After reading, you will create your bootable program that works in any virtual machine application like Virtual Box.
如果您是一个像我一样好奇的人,您可能想知道操作系统是如何工作的。 在这里,我将分享一些为更好地了解计算和操作系统而进行的研究和实践实验。 阅读后,您将创建可在任何虚拟机应用程序(例如Virtual Box)中使用的可启动程序。
重要的提示 (Important note)
This article is not intended to explain everything about the boot loader with its complexities. This example is just a starting point based on the x86 architecture. It must be difficult reading for most people, which requires basic knowledge of microprocessors and computer programming.
本文无意于解释有关引导加载程序及其复杂性的所有内容。 该示例只是基于x86架构的起点。 对于大多数人来说,阅读起来一定很困难,这需要微处理器和计算机编程的基础知识。
什么是引导加载程序? (What is a bootloader?)
In simple words, a boot-loader is a piece of software loaded into a computer’s working memory after booting.
简单来说,引导加载程序是在引导后加载到计算机工作内存中的软件。
In more detail, after pressing the start button on a computer, many things must be done. Then, a firmware called BIOS (Basic Input Output System) kicks in and does its job. After that, the BIOS gives control to the boot loader installed on any available media, that is, USB, hard drive, CD drive, etc. The BIOS goes through the data media found in sequence, checking for a unique signature — the so-called boot signature (or ‘boot record’). When the boot record is found and loaded into the computer’s memory, the processor starts to function from that point. To be more precise, at address 0x7C00, save this memory address; this is important in building the boot loader.
更详细地,在按下计算机上的“开始”按钮后,必须完成许多事情。 然后,称为BIOS(基本输入输出系统)的固件开始运行。 之后,BIOS会控制安装在任何可用介质(即USB,硬盘驱动器,CD驱动器等)上的引导加载程序。BIOS会依次搜索找到的数据介质,并检查唯一签名-这样,称为启动签名(或“启动记录”)。 找到引导记录并将其加载到计算机的内存中后,处理器将从该点开始运行。 更准确地说,在地址0x7C00处,保存该内存地址;否则,保存为0。 这对于构建引导加载程序很重要。
在只有512个字节的第一个扇区内工作。 (Work inside of the first sector with only 512 bytes.)

During the BIOS initialization process, the BIOS looks in the bootable devices’ first sector for a single signature, as mentioned before. This unique value is 0xAA55 and must be in the last two bytes of the first sector. Despite 512 bytes available in the master boot record, we cannot use all of them; we need to subtract the partition table schema and signature, and only 440 bytes remain. It doesn’t seem like good memory space, but you can write code to load more data from other sectors into memory and solve the problem
如前所述,在BIOS初始化过程中,BIOS在可启动设备的第一个扇区中查找单个签名。 该唯一值是0xAA55,并且必须位于第一个扇区的最后两个字节中。 尽管主引导记录中有512字节可用,但我们不能全部使用它们。 我们需要减去分区表的架构和签名,仅剩下440个字节。 看起来好像没有足够的内存空间,但是您可以编写代码以将更多数据从其他扇区加载到内存中并解决问题
初始化步骤简化了 (The initialization steps in a simplified way)
- The BIOS boots computers and their peripherals; BIOS引导计算机及其外围设备;
- The BIOS searches for bootable devices; BIOS搜索可引导设备;
- When the BIOS finds the signature 0xAA55 in the MBR (master boot record), it loads that sector into memory at position 0x7C00 and gives control to this entry point, that is, it starts executing instructions from this point 0x7C00 in memory ; 当BIOS在MBR(主引导记录)中找到签名0xAA55时,它将扇区加载到内存中的位置0x7C00,并控制该入口点,即从内存中的该点0x7C00开始执行指令;
让我们开始编码 (Let’s start coding)
bits 16
org 0x7c00
boot:
mov si, message
mov ah,0x0e
.loop:
lodsb
or al,al
jz halt
int 0x10
jmp .loop
halt:
cli
hlt
message: db "Hey! This code is my boot loader operating.",0
times 510 - ($-$$) db 0
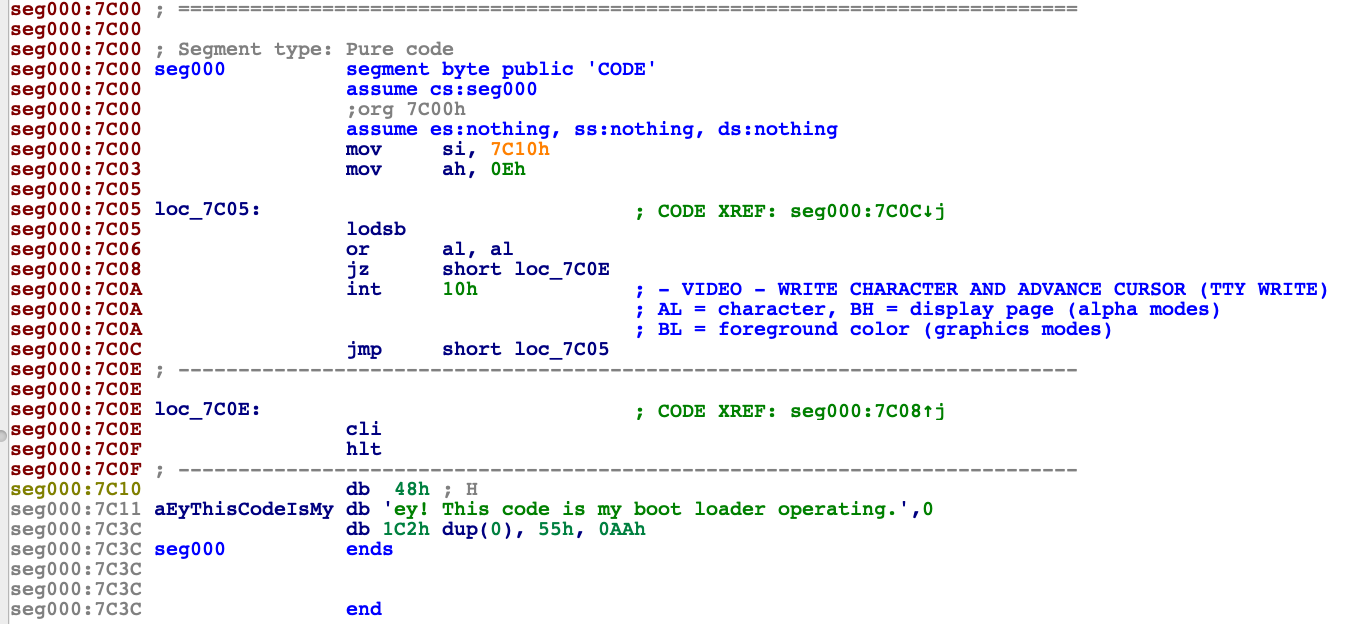
dw 0xaa55As you can imagine, this is assembly language and needs to be compiled into machine code with an assembly compiler to generate machine code, as you can see in the next block of code. Note that 512 in hexadecimal notation is 0x200 and the last two bytes are 0x55 and 0xAA; it is inverted compared to the assembly code above; this is related to the storage ordering system known as endianness. For example, in a big-endian system, the two bytes required for the hexadecimal number 0x55AA would be stored as 0x55AA in storage (if 55 is kept at storage address 0x1FE, AA will be at address 0x1FF). On a little endian system, it would be stored as 0xAA55 (AA at address 0x1FE, 55 at 0x1FF).
您可以想象,这是汇编语言,需要使用汇编编译器将其编译为机器代码以生成机器代码,如您在下一段代码中所看到的。 请注意,十六进制表示法的512为0x200,最后两个字节为0x55和0xAA; 与上面的汇编代码相比,它是相反的; 这与被称为字节序的存储排序系统有关。 例如,在big-endian系统中,十六进制数字0x55AA所需的两个字节将作为0x55AA存储在存储器中(如果将55保留在存储地址0x1FE,AA将位于地址0x1FF)。 在小端系统上,它将存储为0xAA55(地址为0x1FE的AA,地址为0x1FF的55)。
0000000 be 10 7c b4 0e ac 08 c0 74 04 cd 10 eb f7 fa f4
0000010 48 65 79 21 20 54 68 69 73 20 63 6f 64 65 20 69
0000020 73 20 6d 79 20 62 6f 6f 74 20 6c 6f 61 64 65 72
0000030 20 6f 70 65 72 61 74 69 6e 67 2e 00 00 00 00 00
0000040 00 00 00 00 00 00 00 00 00 00 00 00 00 00 00 00
*
00001f0 00 00 00 00 00 00 00 00 00 00 00 00 00 00 55 aa
0000200
该代码如何工作 (How this code works)
I will explain this code line by line in case you are not familiar with assembly language.
如果您不熟悉汇编语言,我将逐行解释此代码。
1-) Specifying target processor mode, this BITS directive specifies whether NASM should generate code designed to run on a processor operating in 16-bit mode, 32-bit mode, or 64-bit mode. The syntax is BITS XX, where XX is 16, 32, or 64.
1-)指定目标处理器模式,此BITS指令指定NASM是否应生成旨在在以16位模式,32位模式或64位模式运行的处理器上运行的代码。 语法为BITS XX,其中XX为16、32或64。
2-) Specifying the binary file program origin, this ORG directive is to specify the origin address, which NASM will assume the program begins at when it is loaded into memory. When this code is translated to machine code, the compiler and linker will determine and organize all data structures needed by the program; this reference address will be used for this purpose.
2-)指定二进制文件程序的原点,此ORG指令用于指定原点地址,NASM将假定该原点地址在程序加载到内存时开始。 当将此代码转换为机器代码时,编译器和链接器将确定并组织程序所需的所有数据结构; 该参考地址将用于此目的。
3-) This is just a label; when defined in code, it refers to a memory position you can point to; it is used together with jump instructions to control the application’s flow; This idea will make more sense in the next line.After explaining the fourth line, we need to describe the concept of registers:
3-)这只是一个标签; 在代码中定义时,它指的是您可以指向的内存位置; 它与跳转指令一起用于控制应用程序的流程; 在下一行中将更有意义。在解释了第四行之后,我们需要描述寄存器的概念:
A processor register is a quickly accessible location available to a computer’s processor. Registers usually consist of a small amount of fast storage, although some registers have specific hardware functions and may be read-only or write-only. In computer architecture, registers are typically addressed by mechanisms other than main memory but may, in some cases, be assigned a memory address. This definition was extracted from Wikipedia.
处理器 寄存器 是计算机处理器可用的快速访问位置。 寄存器 通常由少量快速存储组成,尽管某些寄存器具有特定的硬件功能,并且可能是只读或只写的。 在计算机体系结构中,寄存器通常通过除主存储器之外的其他机制来寻址,但是在某些情况下,可能会被分配一个存储器地址。 该定义摘自Wikipedia。
4-) Assigning data with MOV instruction, this instruction is used to move data; in this case, we are moving the value of the memory address of the label message to the SI register; Which will point to the text “Hey! This code is my boot loader operating.”. If you look in the image below, you will see that this text is stored at poison 0x7C10 when translated to machine code.
4-)用MOV指令分配数据,该指令用于移动数据; 在这种情况下,我们将标签消息的存储器地址的值移至SI寄存器; 指向文本“嘿! 此代码是我的引导加载程序正在运行。” 。 如果您在下面的图片中查看,您会发现该文本在转换为机器代码后存储在中毒0x7C10中 。
5-) We will use the BIOS video services to display the text on the screen, so we are settings how we want this work. It moves the byte 0x0E to the register AH.
5-)我们将使用BIOS视频服务在屏幕上显示文本,因此我们在设置工作方式。 它将字节0x0E移至寄存器AH。
6-) Another label reference that allows controlling the execution flow, later we will use it to create a loop.
6-)另一个标签参考,允许控制执行流程,稍后我们将使用它来创建循环。
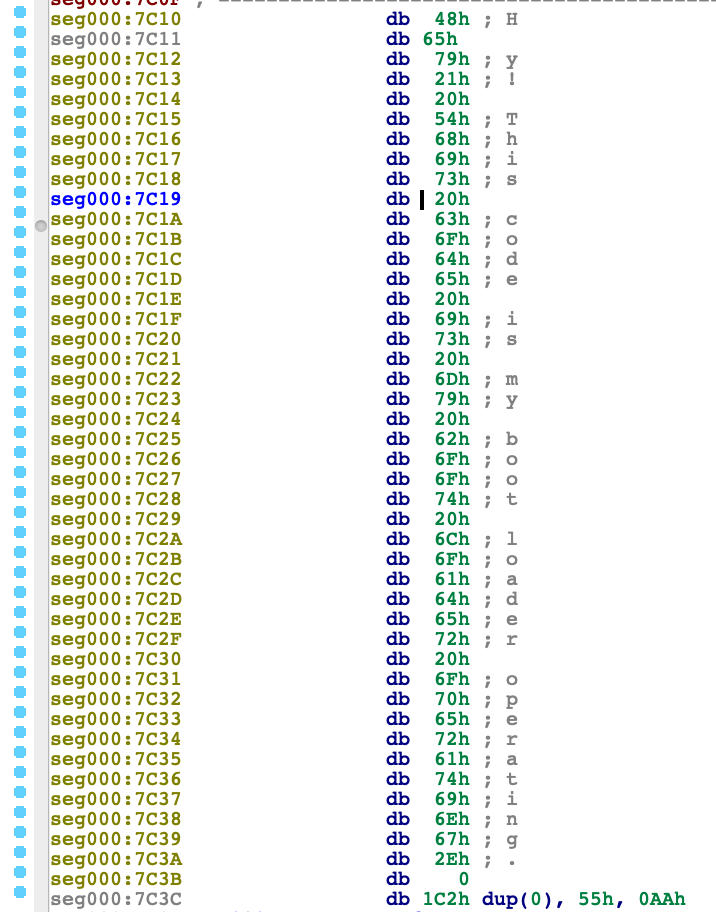
7-) This instruction loads a byte from the source operand into the AL register. Remember the fourth line, in which the SI was set with a text address position; now, this instruction is getting the character stored at memory space 0x7C10. It is vital to notice this is behaving like an array, and we are point to the first position, which contains the character ‘H’; as we can see in figure 03 below. This text presentation will occur in a vertically iterative manner, and each character will be set each time. Besides, the second character was not presented extracted snapshot from the IDA program; 0x65 in ASCII represents the character ‘e’.
7-)该指令将源操作数中的一个字节加载到AL寄存器中。 记住第四行,其中SI设置为文本地址位置; 现在,此指令将字符存储在内存空间0x7C10中。 重要的是要注意到它的行为就像一个数组,我们指向第一个位置,该位置包含字符“ H”; 如下面的图03所示。 此文本演示将以垂直迭代的方式进行,并且每次设置每个字符。 另外,第二个字符没有从IDA程序中提取快照。 ASCII中的0x65表示字符“ e”。
8-) Performing OR boolean operation between (AL | AL), at first glance, it does not seem to make any sense, but it does. We need to check if the result of this operation is zero, based on logic boolean, the result will be the same after this operation, for example, [1 | 1 = 1] or [0 | 0 = 0]. In the next line, you are going to understand why this is necessary.
8-)乍看之下,在( AL | AL )之间执行OR布尔运算似乎没有任何意义,但确实可以。 我们需要检查此操作的结果是否为零,基于逻辑布尔值,此操作后的结果将是相同的,例如[1 | 1 = 1]或[0 | 0 = 0]。 在下一行中,您将了解为什么这样做是必要的。
9-) Jump to halt label (Line 12) if the result of the last OR operation is zero, in the first moment, the value of AL is [0x48 = ‘H’] based in the last LODSB instruction, do you remember that on Line 7? So, it will not jump to halt label in the first moment. Why that? (0x48 OR 0x48) = 0x48, then it will go to the next instruction in the next line. It is important to say that JZ instruction is not related only to OR instruction. There is another register called FLAGS, which is observed during jump operations, i.e., the result of OR operation is stored in this FLAG register and observed by JZ instruction.
9-)如果最后一个OR运算的结果为零,则跳至停止标签 (第12行) ,在第一刻,基于最后一个LODSB指令, AL的值为[0x48 ='H'] ,您还记得吗在7号线? 因此,它不会在第一刻跳到停止标签 。 为什么? (0x48或0x48)= 0x48,则它将转到下一行的下一条指令。 重要的是, JZ指令不仅与OR指令相关。 还有另一个称为FLAGS的寄存器,在跳转操作期间会观察到该寄存器,即, 或操作的结果存储在该FLAG寄存器中,并通过JZ指令进行观察。
10 -) Invoking BIOS interruption, the instruction INT 0x10 displays the value of AL on the screen; remember line 5, we set the value of AH with 0x0E; this is a combination to present the value of AL on the screen.
10-)调用BIOS中断,指令INT 0x10在屏幕上显示AL的值。 记住第5行,我们将AH的值设置为0x0E ; 这是在屏幕上显示AL值的组合。
11-) Jump to .loop label, that’s it without any condition, it is like GOTO instruction compared to a high-level language.
11-)跳转到.loop labe l,就是没有任何条件,就像高级语言相比,它类似于GOTO指令。
12-) We are in line 7 more one time, LODSB will retake action. After the byte is transferred from the memory location into the AL register, the SI register is incremented. The second time, it is pointing to the address 0x7C11 = [0x65 ‘e’], then the character ‘e’ is presented on the screen. This loop will run until it reaches the address 0x7C3B = [0x00 0], and when the JZ is executed again on line 9, the flow will be driven to the halt label.
12-)我们再次进入第7行, LODSB将采取行动。 将字节从存储位置传送到AL寄存器后, SI寄存器将递增。 第二次,它指向地址0x7C11 = [0x65'e'] ,然后在屏幕上显示字符'e'。 该循环将一直运行到到达地址0x7C3B = [0x00 0]为止,并且在第9行再次执行JZ时,流程将被驱动到停止标签 。
13-) Here, we finish our journey. The CLI and HLT instructions halt the execution.
13-)在这里,我们完成了旅程。 CLI和HLT指令停止执行。
14-) At the seventeenth line you see an instruction that pads the remaining 510 bytes with zeroes after that adds the boot record signature 0xAA55.
14-)在第十七行,您看到一条指令,将剩余的510字节填充为零,然后添加了引导记录签名0xAA55。
让我们构建并运行 (Let’s build and run)
In the first step, you must make sure you have installed the NASM compiler and QEMU on your computer, using your favorite dependency manager or downloading it from the internet; QEMU is a virtual machine emulator.
第一步,必须确保使用喜欢的依赖项管理器或从Internet下载了NASM编译器和QEMU。 QEMU是虚拟机仿真器。
If you have Linux, you can type on terminal:
如果您使用Linux,则可以在终端上键入:
sudo apt-get install nasm qemuOn a mac you can use homebrew:
在Mac上,您可以使用自制软件:
brew install nasm qemuAfter accomplishing the first step, you must create a file with the assembly code presented in Code 01 block. Let’s name this file as boot.asm and then run NASM command:
完成第一步后,您必须使用代码01块中显示的汇编代码创建一个文件。 让我们将此文件命名为boot.asm ,然后运行NASM命令:
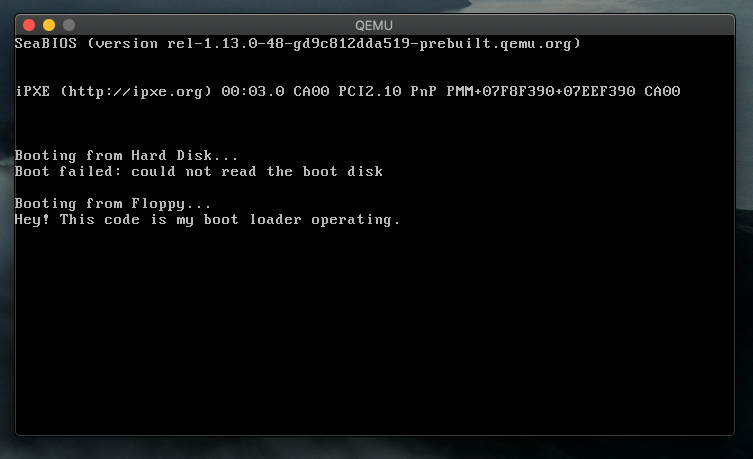
nasm -f bin boot.asm -o boot.binIt will produce the binary file you need to run your virtual machine, let’s run it on QEMU:
它将生成运行虚拟机所需的二进制文件,让我们在QEMU上运行它:
qemu-system-x86_64 -fda boot.binYou should see the following screen:
您应该看到以下屏幕:
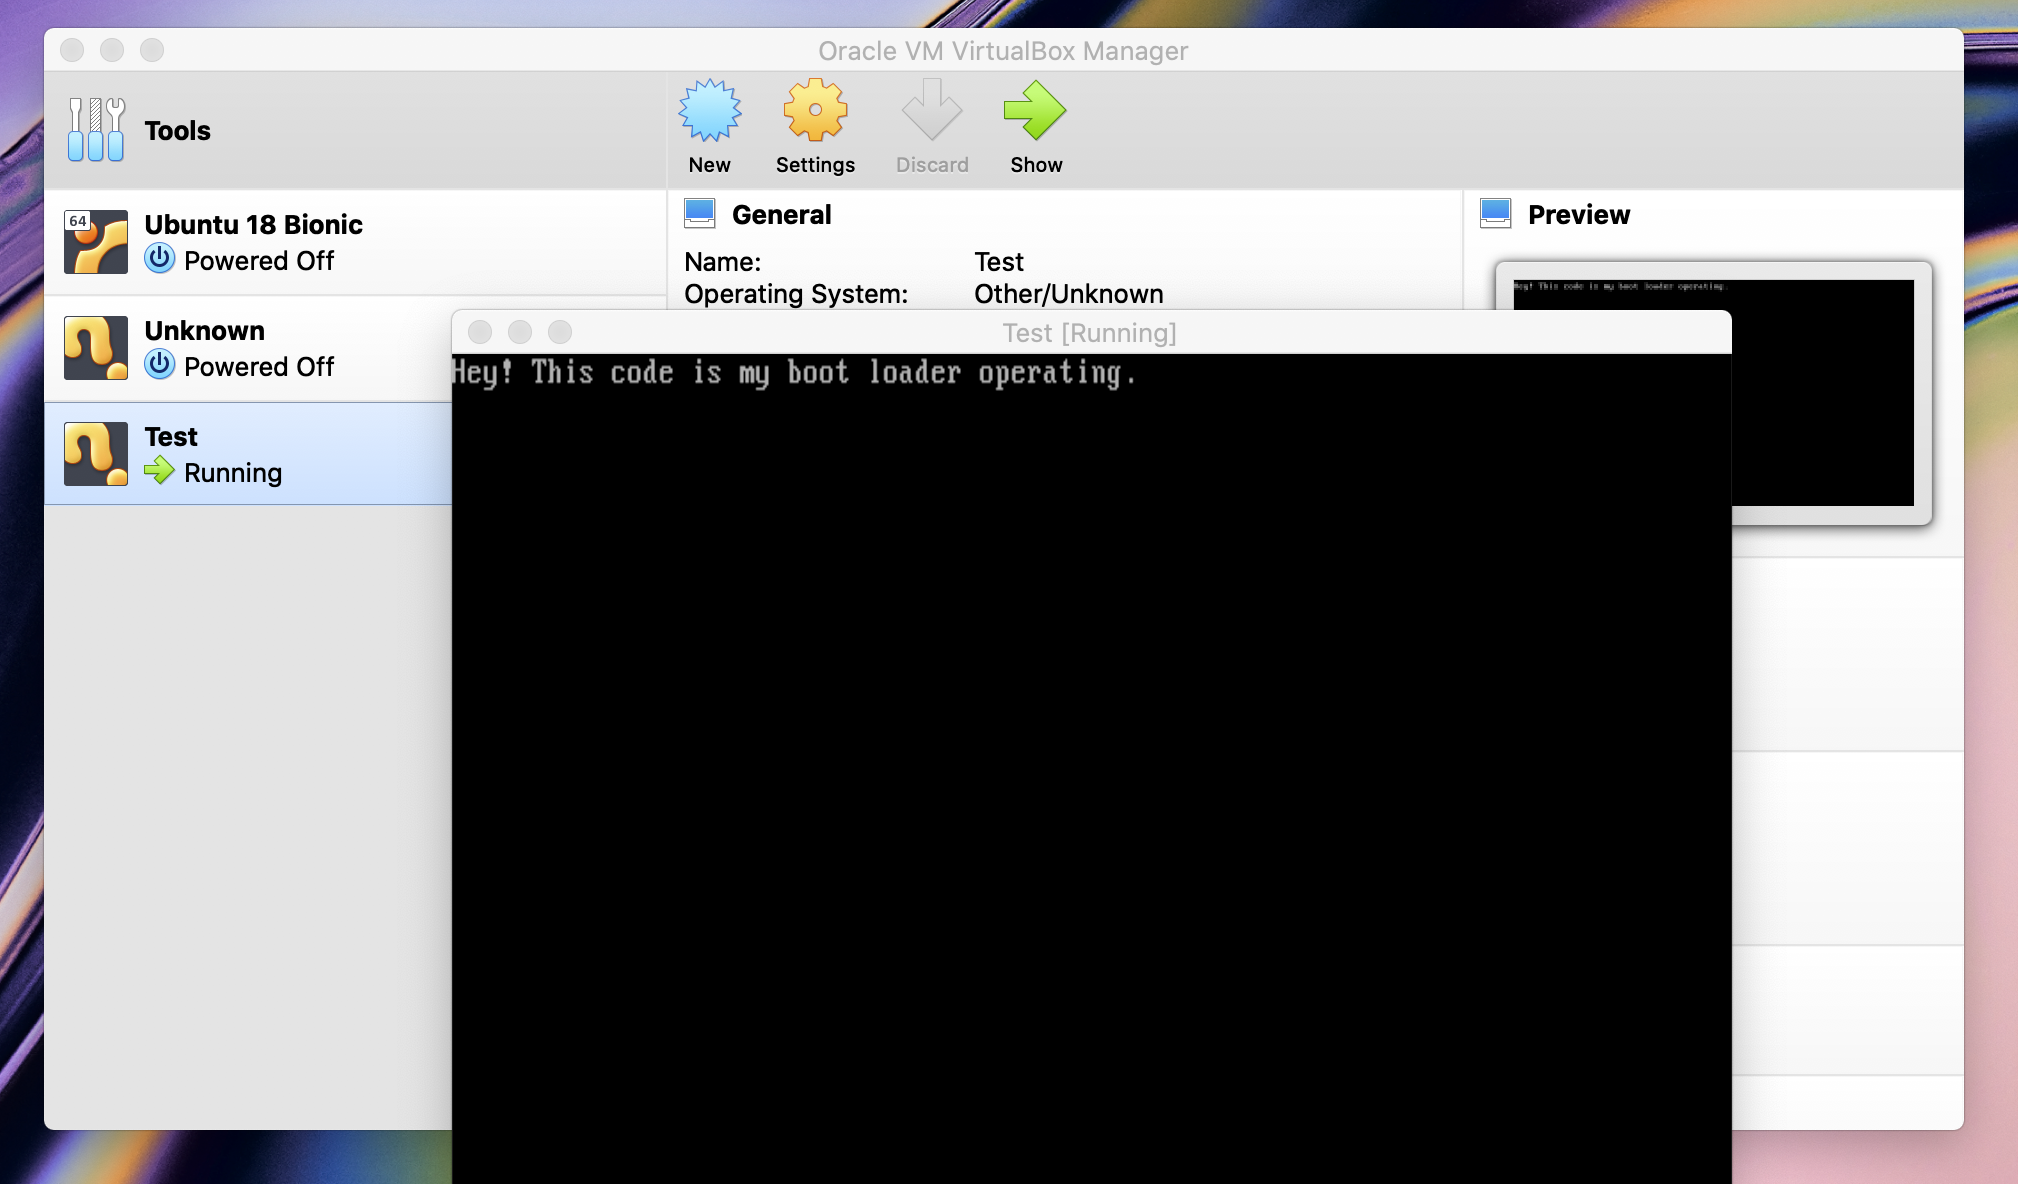
从虚拟盒子运行 (Running it from Virtual box)
Firstly you need to create a virtual an empty floppy disk
首先,您需要创建一个虚拟的空软盘
dd if=/dev/zero bs=1024 count=0 > floppy.imgAnd then append the binary content inside of it:
然后在其中添加二进制内容:
cat boot.bin >> floppy.imgNow you can create a Virtual Box machine and boot it using your image file.
现在,您可以创建Virtual Box计算机并使用映像文件启动它。
I was not able to explain many things here for the sake of brevity; if this is your first time with this type of content, probably many questions have arisen in your head, ok, this is not an easy subject, and I hope it can serve as a starting point for many studies. A book that I recommend is Operating Systems Design and Implementation by Andrew S. Tanenbaum, a useful reference to better understand many principles of computing and operating systems.
为了简洁起见,我在这里无法解释很多事情; 如果这是您第一次使用这种类型的内容,那么您的脑海中可能会出现很多问题,好吧,这不是一个容易的话题,我希望它可以作为许多研究的起点。 我推荐的一本书是安德鲁·S·塔南鲍姆(Andrew S. Tanenbaum)编写的《操作系统设计与实现》,它是一本有用的参考书,可以更好地理解计算和操作系统的许多原理。
翻译自: https://medium.com/@andersongusmao/build-and-run-a-boot-loader-561822fd4299


 960
960

 被折叠的 条评论
为什么被折叠?
被折叠的 条评论
为什么被折叠?
 到【灌水乐园】发言


