


In my previous post, we explored the struggles and triumphs that I undertook while creating a Kubernetes cluster using Raspberry Pi’s. Although there were quite a few issues getting it up and running, the end result was pretty exciting and very workable. In this post, we are going to build upon what I learned and instead of using Raspberry Pi’s, I will be using virtual machines on a server. The goal is to get everything up and running on x64 architecture and see if the cluster is still usable after a power loss.
在我以前的文章中,我们探讨了我在使用Raspberry Pi创建Kubernetes集群时所进行的斗争和取得的成就。 尽管启动和运行有很多问题,但最终结果还是令人兴奋且可行的。 在本文中,我们将以我学到的知识为基础,而不是使用Raspberry Pi,而是在服务器上使用虚拟机。 目的是使所有内容都在x64架构上启动并运行,并查看断电后集群是否仍然可用。
The server I will be working with is a Dell Poweredge R710. It has seventy-two gigabytes of RAM and three terrabytes of storage running in RAID 1. Ubuntu Server 20.04 is running on top of all of this. For the virtual machines, they will be using Ubuntu Server 20.04 as well. I will not go into detail about creating the virtual machines. Just note that like the POC I ran during the semester, we will have one primary node and three worker nodes. In our case here, I am using QEMU/KVM with virt-manager (VMWare and Virtualbox should work just fine as well). It’s also helpful to have SSH installed too.
我将使用的服务器是Dell Poweredge R710。 它在RAID 1中运行有72 GB的RAM和3 TB的存储。UbuntuServer 20.04在所有这些之上运行。 对于虚拟机,他们还将使用Ubuntu Server 20.04。 我不会详细介绍如何创建虚拟机。 请注意,就像我在学期期间运行的POC一样,我们将有一个主节点和三个工作节点。 在这里的例子中,我将QEMU / KVM与virt-manager一起使用(VMWare和Virtualbox应该也可以正常工作)。 也安装SSH也很有帮助。
To start off, it’s important to update the operating system with:
首先,使用以下命令更新操作系统很重要:
sudo apt updateAfter updating the system, Docker can be installed:
更新系统后,可以安装Docker:
sudo apt install docker.ioTo check that Docker did in fact get installed, run:
要检查Docker是否确实已安装,请运行:
docker --versionSet Docker to launch when the system is booted:
将Docker设置为在系统启动时启动:
sudo systemctl enable dockerTo check that Docker is running:
要检查Docker是否正在运行:
sudo systemctl status dockerIn case Docker isn’t running, this command will start it up:
如果Docker未运行,则此命令将启动它:
sudo systemctl start dockerNext, it’s time to get Kubernetes installed. Before that can be done, I have to add the signing keys:
接下来,是时候安装Kubernetes了。 在此之前,我必须添加签名密钥:
curl -s https://packages.cloud.google.com/apt/doc/apt-key.gpg | sudo apt-key addAfter that, the Kubernetes package repository can be added to the software sources:
之后,可以将Kubernetes软件包存储库添加到软件源:
sudo apt-add-repository "deb http://apt.kubernetes.io/ kubernetes-xenial main"Once added, Kubernetes can be installed:
添加后,即可安装Kubernetes:
sudo apt install kubeadm kubelet kubectlNow that all packages are installed, swap has to be disabled before creating the cluster:
现在已经安装了所有软件包,在创建集群之前必须禁用swap:
sudo swapoff -aOne thing I learned the hard way is that this command will not persist when the virtual machine is rebooted. Meaning, when the virtual machine is rebooted, swap will be re-enabled. To make it persist, I commented out the line that began with /swap in the /etc/fstab file using the Nano text editor.
我很难学到的一件事是,重新引导虚拟机时此命令将不会保留。 这意味着,重新引导虚拟机时,将重新启用交换。 为了使其持久,我使用Nano文本编辑器注释了/ etc / fstab文件中以/ swap开头的行。
Now that swap was disabled, I ran the following command to initialize and create the cluster. Note that it did take a few minutes to complete:
现在已禁用交换,我运行以下命令来初始化和创建集群。 请注意,确实花费了几分钟才能完成:
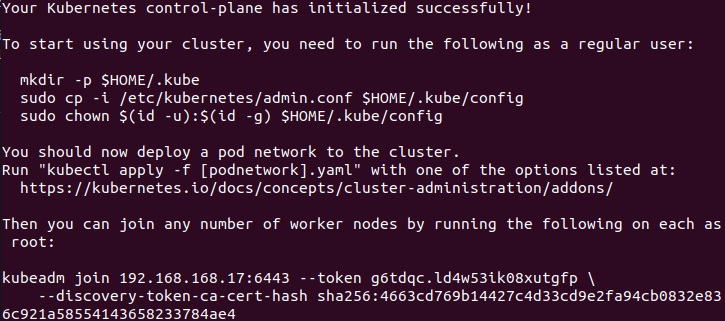
sudo kubeadm init --pod-network-cidr=10.244.0.0/16Output of the cluster being created successfully:
成功创建的集群的输出:
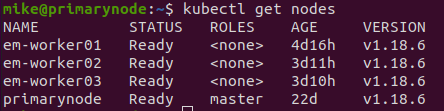
Running this command, will show all nodes on the cluster:
运行此命令,将显示集群上的所有节点:
kubectl get nodesOutput:
输出:

You’ll notice that the STATUS says not ready. This is because the cluster is missing networking software. Before that issue can be tackled, these commands need to be executed to create a directory for the cluster:
您会注意到STATUS尚未准备好。 这是因为群集缺少网络软件。 在解决该问题之前,需要执行以下命令来为集群创建目录:
mkdir -p $HOME/.kube
sudo cp -i /etc/kubernetes/admin.conf $HOME/.kube/config
sudo chown $(id -u):$(id -g) $HOME/.kube/config
With the directory created, Flannel can be installed, adding a network layer to the cluster. This will allow the different nodes to communicate with each other.
创建目录后,就可以安装Flannel,并将网络层添加到群集中。 这将允许不同的节点相互通信。
kubectl apply -f https://github.com/coreos/flannel/raw/master/Documentation/kube-flannel.ymlThe final step is to add the three worker nodes to the cluster. This was accomplished by running the bash script that I created here. Essentially, this script installs Docker, Kubernetes and disables swap (basically, what we did earlier ;)). After logging into the node em-worker01 and running the script, I ran following command to get the node to join the cluster:
最后一步是将三个工作节点添加到集群中。 这是通过运行我在此处创建的bash脚本来完成的。 本质上,该脚本会安装Docker,Kubernetes并禁用交换功能(基本上,是我们之前所做的;))。 登录到节点em-worker01并运行脚本后,我运行以下命令来使节点加入集群:
sudo kubeadm join 192.168.168.17:6443 --token h17syp.f8wwnr9bawpfl4bo --discovery-token-ca-cert-hash sha256:4663cd769b14427c4d33cd9e2fa94cb0832e836c921a58554143658233784ae4After running this command, we get the following output:
运行此命令后,我们得到以下输出:

If you’re like me and you forget to copy the join the command after initializing and creating the cluster, this will show that command:
如果您和我一样,并且在初始化和创建集群后忘记复制join命令,则会显示该命令:
kubeadm token create --print-join-commandFor the remaining two nodes (em-worker02 and em-worker03) the previous steps were utilized. After all three worker nodes had joined the cluster, I went back to the primary node and re-ran the command to get all nodes:
对于其余两个节点(em-worker02和em-worker03),使用了先前的步骤。 在所有三个工作节点都加入集群之后,我回到主节点并重新运行命令以获取所有节点:
kubectl get nodesIt took a couple tries, but eventually the output looked like this:
经过几次尝试,但最终输出看起来像这样:
At this point, the cluster is ready to use. The big perk here is that it is up and running on x64 architecture. Therefore, I shouldn’t have any issues with a lack of Docker images. Also, it’s also worth mentioning that the cluster was able to survive a server restart. This was a relief to see since it was quite annoying having to rebuild everything after a restart on the Raspberry Pi’s. In the next part of this series, I will attempt to get multiple databases deployed to the shiny new cluster. Cheers!
至此,集群已可以使用。 这里最大的好处是它可以在x64架构上运行。 因此,缺少Docker映像应该不会有任何问题。 另外,还值得一提的是,集群能够在服务器重启后幸存下来。 Raspberry Pi重新启动后,必须重新构建所有内容,这真令人烦恼。 在本系列的下一部分中,我将尝试将多个数据库部署到闪亮的新集群中。 干杯!
Special thanks to Kubernetes Documentation and Stackoverflow for helping me figure this out!
特别感谢Kubernetes文档和Stackoverflow帮助我解决了这一问题!


 1141
1141


 被折叠的 条评论
为什么被折叠?
被折叠的 条评论
为什么被折叠?
 到【灌水乐园】发言


