


 这篇博客介绍了如何利用英特尔神经计算棒2 (ncs2) 构建图像分类管道,结合Python和计算机视觉技术,实现人工智能和机器学习的应用。
英特尔 ncs2
Introduction
介绍
What we’ll cover in this story:
我们将在这个故事中介绍:
- Installing OpenVINO toolkit for Ubuntu. 为Ubuntu安装OpenVINO工具包。
- Data preprocessing and model training with Google Colab. 使用Google Colab进行数据预处理和模型培训。
- Saving a TensorFlow model to protocol buffer (pb) format. 将TensorFlow模型保存为协议缓冲区(pb)格式。
- Converting a TensorFlow model to intermediate representation. 将TensorFlow模型转换为中间表示。
- Running a trained model and prediction obtaining with NCS2 device. 使用NCS2设备运行训练有素的模型并获得预测。
In the past few years, there has been an active introduction of machine learning for industrial tasks solvings. Machine learning allows you to solve problems that humans cannot cope with. This can be work in hard-to-reach places, in hazardous chemical production, in conditions of increased radiation, etc. Machine learning is applicable in areas where human intelligence can also be applied, but is ineffective: predicting critical failures, preventing sudden equipment failures, condition-based maintenance, predicting the remaining life of equipment.
在过去的几年中,已经积极引入了机器学习来解决工业任务。 机器学习使您能够解决人类无法应对的问题。 这可以在难以到达的地方,危险的化学产品生产中,在辐射增加的条件下使用。机器学习适用于也可以应用人类智能的领域,但效果不佳:预测关键故障,防止突然出现的设备故障,基于状态的维护,预测设备的剩余寿命。
Often, in industrial enterprises there is no opportunity to use workstations for data analysis and processing. Therefore, special devices that can be easily connected to existing equipment (most often an industrial microcomputer) are in demand. The computational module NCS2 is one of such devices.
在工业企业中,通常没有机会使用工作站进行数据分析和处理。 因此,需要可以容易地连接到现有设备(通常是工业微型计算机)的特殊设备。 计算模块NCS2是这样的设备之一。
Our company AI Labs periodically receives requests for solving some industrial problems related to machine learning. Not so long ago, we had the opportunity to take advantage of the opportunities provided by NCS2. As a result, I developed a pipeline for image classification using NCS2. I would like to share the results of this work with the readers.
我们公司的AI实验室会定期收到解决与机器学习相关的一些工业问题的请求。 不久前,我们有机会利用NCS2提供的机会。 结果,我开发了使用NCS2进行图像分类的管道。 我想与读者分享这项工作的结果。
Installing OpenVINO toolkit for Ubuntu
为Ubuntu安装OpenVINO工具包
First of all, you need to download and install the current version of OpenVINO. You can get OpenVINO from here. You can find a detailed installation guide here. Quick installation guide:
首先,您需要下载并安装当前版本的OpenVINO 。 您可以从这里获取OpenVINO。 您可以在此处找到详细的安装指南。 快速安装指南:
Go to the folder (for example, Downloads) with the downloaded archive:
转到包含已下载存档的文件夹(例如, Downloads ):
cd ~/Downloads/2. Unpack the .tgz file (where <version> is the version of the downloaded archive, you will see it in the file name):
2.解压缩.tgz文件(其中<version>是下载的存档的版本,您将在文件名中看到它):
tar -xvzf l_openvino_toolkit_p_<version>.tgz3. Go to the l_openvino_toolkit_p_<version> directory:
3.转到l_openvino_toolkit_p_ <version>目录:
cd l_openvino_toolkit_p_<version>4. Run the installation script as root:
4.以超级用户身份运行安装脚本:
sudo ./install.sh5. Follow the instructions on your screen.
5.按照屏幕上的说明进行操作。
6. Set environment variables by editing the .bashrc file. Go to the user directory and open .bashrc file for editing (for example, with nano):
6.通过编辑.bashrc文件来设置环境变量。 转到用户目录并打开.bashrc文件进行编辑(例如,使用nano ):
cd ~
nano .bashrc
Add the following line to the end of the .bashrc file, save it and reload:
将以下行添加到.bashrc文件的末尾,保存并重新加载:
source /opt/intel/openvino/bin/setupvars.sh
source .bashrc
That’s all. All the necessary functionality for local work with NCS2 has been prepared. You can perform data preprocessing and model training.
就这样。 已经准备好使用NCS2进行本地工作的所有必要功能。 您可以执行数据预处理和模型训练。
Data preprocessing and model training with Google Colab
使用Google Colab进行数据预处理和模型培训
Animals-10 dataset was used to solve the classification problem. To simplify the problem, 5 classes (species of animals) were selected from Animals-10: cat, dog, chicken, horse, sheep. Images related to each of the classes are grouped into corresponding folders (‘cat’, ‘dog’, ‘chicken’, ‘horse’, ‘sheep’). The model was trained in Google Colab. Let’s take a closer look.
Animals-10数据集用于解决分类问题。 为简化此问题,从Animals-10中选择了5类(动物种类):猫,狗,鸡,马,绵羊。 与每个类别相关的图像都被分组到相应的文件夹(“猫”,“狗”,“鸡”,“马”,“羊”)中。 该模型在Google Colab中进行了训练。 让我们仔细看看。
First of all, you need to install a version of TensorFlow suitable for working with NCS2:
首先,您需要安装适用于NCS2的TensorFlow版本:
!pip install tensorflow==1.15.2Import libraries:
导入库:
import tensorflow.compat.v1 as tf
import tensorflow_hub as hub
import matplotlib.pylab as plt
import numpy as np
Mount the Google Drive (with dataset) to Google Colab:
将Google云端硬盘(带有数据集)安装到Google Colab:
from google.colab import drive
drive.mount(‘/content/drive’)
Go to the directory where the data was uploaded (‘animals’):
转到上传数据的目录(“动物”):
%cd ‘drive/My Drive/animals’The folder structure should be as follows:
文件夹结构应如下所示:

Create a list of classes (labels):
创建一个类列表(标签):
image_dir = 'animals'
import osclass_labels = []
for x in tf.gfile.Walk(image_dir):
    try:
        y = os.path.basename(x[0])
        if y != 'animals':
            class_labels.append(y)
    except:
        pass
print(class_labels)
We get the following list:
我们得到以下列表:
[‘cat’, ‘chicken’, ‘dog’, ‘horse’, ‘sheep’]Based on this list, index ‘0’ corresponds to the image of a cat, ‘1’ — a chicken, ‘2’ — a dog, ‘3’ — a horse, ‘4’ — a sheep.
基于此列表,索引“ 0”对应于猫的图像,“ 1”-鸡,“ 2”-狗,“ 3”-马,“ 4”-绵羊。
Set the size of the images (224 x 224). We use ImageDataGenerator to create a flow of images from folders when training the model.
设置图像尺寸(224 x 224)。 训练模型时,我们使用ImageDataGenerator从文件夹创建图像流。
IMAGE_SIZE = (224,224)image_generator = tf.keras.preprocessing.image.ImageDataGenerator(rescale=1/255, validation_split=0.2)training_set = image_generator.flow_from_directory(str(image_dir), target_size=IMAGE_SIZE, subset='training')validation_set = image_generator.flow_from_directory(str(image_dir), target_size=IMAGE_SIZE, subset='validation')Retrieving pre-trained MobileNet network:
检索经过培训的MobileNet网络:
feature_extractor = tf.keras.applications.MobileNet(weights='imagenet',
                                include_top=False,
                                input_shape=(IMAGE_SIZE+(3,)))
feature_extractor.trainable=False
Build model:
建立模型:
try:
    del model
except:
    passx=feature_extractor.output
x=tf.keras.layers.GlobalAveragePooling2D()(x)classifier=tf.keras.layers.Dense(label_batch.shape[1],activation='softmax')(x)model=tf.keras.Model(inputs=feature_extractor.input,outputs=classifier)model.build((None,)+IMAGE_SIZE+(3,))
model.summary()
Compile the model:
编译模型:
model.compile(
    optimizer=tf.keras.optimizers.Adam(),
    loss=tf.keras.losses.CategoricalCrossentropy(from_logits=True),
    metrics=['acc'])
Callback method for collecting logs:
收集日志的回调方法:
class CollectBatchStats(tf.keras.callbacks.Callback):
  def __init__(self):
    self.batch_losses = []
    self.batch_acc = []
    self.validation_losses = []
    self.validation_acc = []def on_train_batch_end(self, batch, logs=None):
    self.batch_losses.append(logs['loss'])
    self.batch_acc.append(logs['acc'])
    try:
        self.validation_losses.append(logs['val_loss'])
        self.validation_acc.append(logs['val_acc'])
    except:
        self.validation_losses.append(None)
        self.validation_acc.append(None)
    self.model.reset_metrics()
Train the model:
训练模型:
steps_per_epoch = np.ceil(training_set.samples/training_set.batch_size)batch_stats_callback = CollectBatchStats()history = model.fit_generator(training_set, epochs=5,
                              steps_per_epoch=steps_per_epoch,
                              validation_data=validation_set,
                              callbacks = [batch_stats_callback])
Check predictions:
检查预测:
for image_batch, label_batch in validation_set:
    print("Image batch shape: ", image_batch.shape)
    print("Label batch shape: ", label_batch.shape)
    break
We have the following shapes:
我们具有以下形状:
Image batch shape:  (32, 224, 224, 3)
Label batch shape:  (32, 5)
We can get predictions and their classes:
我们可以获得预测及其类别:
predictions = model.predict(image_batch)
predicted_class = np.argmax(predictions, axis=-1)
Visualize the result:
可视化结果:
plt.figure(figsize=(12,10))
plt.subplots_adjust(hspace=0.5)
for n in range(30):
    plt.subplot(6,5,n+1)
    plt.imshow(image_batch[n])
    plt.title(f'pred: {class_labels[predicted_class[n]]}\norig: {class_labels[np.array(label_batch[n]).argmax()]}')
    plt.axis('off')
_ = plt.suptitle("Animals")
Saving a TensorFlow model to protocol buffer (pb) format
将TensorFlow模型保存为协议缓冲区(PB)格式
Freeze and save model:
冻结并保存模型:
from tensorflow.compat.v1.keras import backend as Ksession = K.get_session()
graph = session.graph
with graph.as_default():
    freeze_var_names = list(set(v.op.name for v in tf.global_variables()).difference([]))
    output_names = [out.op.name for out in model.outputs]
    output_names += [v.op.name for v in tf.global_variables()]
    input_graph_def = graph.as_graph_def()
    for node in input_graph_def.node:
        node.device = ""
    frozen_graph = tf.graph_util.convert_variables_to_constants(session, input_graph_def, output_names, freeze_var_names)
tf.train.write_graph(frozen_graph, "animals", "animals.pb", as_text=False)
As a result, the trained model is saved to the animals.pb file.
结果,将训练后的模型保存到animals.pb文件中。
Converting a TensorFlow model to intermediate representation
将TensorFlow模型转换为中间表示
There is a detailed tutorial on converting TensorFlow models. To convert the trained model, you need to perform the operations described below.
有一个有关转换TensorFlow模型的详细教程 。 要转换训练后的模型,您需要执行以下描述的操作。
Go to the model_optimizer folder (you need mo_tf.py):
转到model_optimizer文件夹(您需要mo_tf.py ):
cd ~/intel/openvino/deployment_tools/model_optimizerRun mo_tf.py with following command (please note that you must use a scaling factor of 255, the same as in the image preprocessing stage):
使用以下命令运行mo_tf.py (请注意,您必须使用255的缩放因子,与图像预处理阶段中的缩放因子相同):
python mo_tf.py --input_model <path_to_model>/animals.pb --batch 1 --scale 255If the conversion is successful, you will see the following messages in the console:
如果转换成功,您将在控制台中看到以下消息:
[ SUCCESS ] Generated IR version 10 model.
[ SUCCESS ] XML file: /home/user_name/intel/openvino_2020.4.287/deployment_tools/model_optimizer/./animals.xml
[ SUCCESS ] BIN file: /home/user_name/intel/openvino_2020.4.287/deployment_tools/model_optimizer/./animals.bin
[ SUCCESS ] Total execution time: 31.81 seconds.
[ SUCCESS ] Memory consumed: 370 MB.
Thus, as a result of the conversion, we get 3 files: animals.xml and animals.bin, animals.mapping. It is advisable to copy these files to a separate folder (for example, test_folder).
因此,作为转换的结果,我们得到了3个文件: animals.xml和animals.bin,animals.mapping 。 建议将这些文件复制到单独的文件夹(例如, test_folder )。
Running a trained model and prediction obtaining with NCS2 device
使用NCS2设备运行经过训练的模型并获得预测
To check the performance of the model on NCS2, you can use the classification_sample.py script, which is included in OpenVINO (/home/user_name/intel/openvino/deployment_tools/inference_engine/samples/python/classification_sample/classification_sample.py). Copy this script to the folder with 3 trained model files (animals.xml, animals.bin, animals.mapping). Also, to check the functionality, you can copy several images (for example, 001.jpeg and 002.jpeg) to the same folder.
要检查NCS2模型的性能,可以使用classification_sample.py脚本,它包括在OpenVINO(/home/user_name/intel/openvino/deployment_tools/inference_engine/samples/python/classification_sample/classification_sample.py)。 将此脚本复制到包含3个经过训练的模型文件( animals.xml,animals.bin,animals.mapping )的文件夹中。 另外,要检查功能,您可以将多个图像(例如001.jpeg和002.jpeg )复制到同一文件夹中。
Connect NCS2 to USB, go to the test_folder and run (MYRIAD key to run the model on NCS2):
连接到NCS2 USB,转到test_folder和运行(MYRIAD键运行上NCS2模型):
python classification_sample.py -m animals.xml -i 001.jpeg -d MYRIADTest image and output from NCS2 in console:
在控制台中测试图像和来自NCS2的输出:
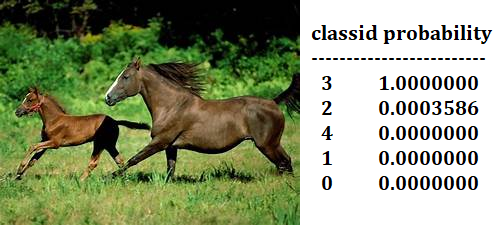
python classification_sample.py -m animals.xml -i 002.jpeg -d MYRIAD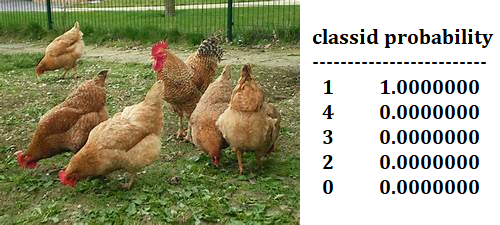
As you can see from the examples presented, the classification is correct. Image 001.jpeg shows a horse (classid=3), and image 002.jpeg shows a chicken (classid=1).
从提供的示例中可以看出,分类是正确的。 图像001.jpeg显示了一匹马(classid = 3),图像002.jpeg显示了一只鸡(classid = 1)。
Conclusion
结论
The presented pipeline allows you to quickly go through all the stages from data preprocessing and model training to its testing based on the NCS2 module. As practice has shown, NCS2 copes well with the task of image classification and can be recommended for solving simple industrial classification tasks.
所展示的管道使您可以快速完成从数据预处理和模型训练到基于NCS2模块的测试的所有阶段。 如实践所示,NCS2非常适合图像分类任务,可推荐用于解决简单的工业分类任务。
MobileNets: Efficient Convolutional Neural Networks for Mobile Vision Applications
英特尔 ncs2


 184
184

 被折叠的 条评论
为什么被折叠?
被折叠的 条评论
为什么被折叠?
 到【灌水乐园】发言


