


AWS is the dominant cloud-based service provider. We don’t endorse the idea that their dominance is a reason to use their services. Instead, we present an AWS solution that will be the easiest to adopt by the largest group of people. We believe that this method will generalize to other cloud-based offerings such as DigitalOcean or Google Cloud Platform provided that the reader has Secure Shell (ssh) access to these systems and that they are running a Linux variant.
AWS是主要的基于云的服务提供商。 我们不赞成他们的优势是使用他们的服务的理由。 相反,我们提出了一种AWS解决方案,该解决方案将被大多数人最容易采用。 我们相信,只要读者具有对这些系统的Secure Shell(ssh)访问权限,并且它们正在运行Linux变体,则该方法将推广到其他基于云的产品,例如DigitalOcean或Google Cloud Platform。
If you are interested in learning more about developing Data Science applications using Docker, Jupyter, and AWS, please have a look at my book, Docker for Data Science.
如果您想了解有关使用Docker,Jupyter和AWS开发数据科学应用程序的更多信息,请阅读我的书Docker for Data Science 。
We present instructions for configuring a system using Elastic Compute Cloud (EC2). New users receive 750 hours of free usage on their T2.micro platform and we believe that this should be more than enough for the typical reader’s journey through this text.
我们介绍了有关使用Elastic Compute Cloud(EC2)配置系统的说明。 新用户可以在其T2.micro平台上获得750小时的免费使用时间,我们认为这对于普通读者阅读本文而言应该绰绰有余。
Let’s outline the process of configuring an AWS EC2 system for the purposes of working through this text. This process consists of:
为了概述本文,我们概述配置AWS EC2系统的过程。 该过程包括:
- Configuring a Key Pair 配置密钥对
- Creating a New Security Group 创建一个新的安全组
- Creating a New EC2 Instance 创建一个新的EC2实例
- Configuring the new Instance to use Docker 配置新实例以使用Docker
设置新的AWS账户 (Set up a New AWS Account)
To begin, set up an AWS account if you do not already have one.
首先,请设置一个AWS账户(如果您尚未拥有)。
🤔 Note: This work can be done in any region, though it is recommended that readers take note of which region they have selected for work. For reasons I have long forgotten, I choose to work in us-west-2.
🤔 注意: 尽管建议读者注意自己选择的工作区域,但可以在任何区域进行此工作。 由于我早已忘记的原因,我选择在us-west-2工作。
配置密钥对 (Configure Key Pair)
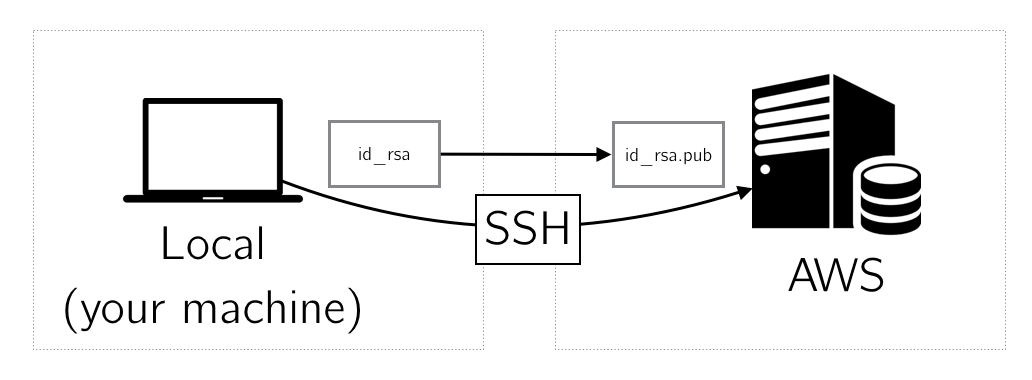
In order to interface with our sandbox system running on AWS EC2, we will need an ssh key pair. Amazon EC2 uses public-key cryptography to facilitate all connections to running EC2 instances. For us, this is a secure connection between our local system and a sandbox system we will configure on an EC2 instance. We will create an ssh key pair locally and import the public component of the key pair into AWS. When we create a new instance, AWS will provision the new instance with the public key and we use our private key to connect.
为了与在AWS EC2上运行的沙盒系统建立接口,我们需要一个ssh密钥对。 Amazon EC2使用公钥加密来促进与正在运行的EC2实例的所有连接。 对于我们来说,这是我们的本地系统和我们将在EC2实例上配置的沙箱系统之间的安全连接。 我们将在本地创建一个ssh密钥对,并将密钥对的公共组件导入到AWS中。 创建新实例时,AWS将为新实例提供公钥,然后使用私钥进行连接。
🤠 Note: Windows users are encouraged to make use of the excellent Git BASH tool available as part of the git for windows package here: https://git-for-windows.github.io. Git BASH will include all of the necessary command line tools that we will be using.
🤠注意: 鼓励Windows用户使用出色的Git BASH工具,该工具是以下git for Windows软件包的一部分: https : //git-for-windows.github.io 。 Git BASH将包括我们将要使用的所有必需的命令行工具。
Next, we use the ssh-keygen tool to create a keypair on our local system. For these purposes — disposable sandbox AWS system — you can leave all fields blank. The location in which you save the key will vary from system to system. The default location on my system is ~/.ssh/id_rsa where ~ signifies the current user’s home directory. This process will create both an id_rsa and id_rsa.pub — a key pair. We will place the id_rsa.pub key into systems we wish to access and thus be able to ssh into these systems using the id_rsa file.
接下来,我们使用ssh-keygen工具在本地系统上创建密钥对。 为此,需要使用一次性沙箱AWS系统,您可以将所有字段保留为空白。 您保存密钥的位置因系统而异。 我系统上的默认位置是~/.ssh/id_rsa ,其中~表示当前用户的主目录。 此过程将同时创建一个id_rsa和id_rsa.pub —一个密钥对。 我们将把id_rsa.pub密钥放置到我们希望访问的系统中,从而能够使用id_rsa文件将其ssh进入这些系统。
Create a New Keypair
创建一个新的密钥对
$ ssh-keygen -t rsa
Generating public/private rsa key pair.
Enter file in which to save the key (/home/ubuntu/.ssh/id_rsa):
Enter passphrase (empty for no passphrase):
Enter same passphrase again:
Your identification has been saved in /home/ubuntu/.ssh/id_rsa.
Your public key has been saved in /home/ubuntu/.ssh/id_rsa.pub.
The key fingerprint is:
SHA256:g5IYNQMf1n1jW5p36Y9I/qSPxnckhT665KtiB06xu2U ubuntu@ip-172-31-43-19
The key's randomart image is:
+---[RSA 2048]----+
|  ..*. .         |
|   + +. . + .    |
|  . .    o *   o |
|   o . .. + . + .|
|  . o . So . + . |
|     .  +.  . = .|
|       o oE+.o.* |
|        =o.o*+o o|
|       ..+.o**o. |
+----[SHA256]-----+
Verify that the contents of the key using the cat tool. We display a public key that was created on a remote ubuntu system, as can be seen at the end of the key (ubuntu@ip-172–31–43–19). This should appear similar on any system.
使用cat工具验证密钥的内容。 我们将显示在远程ubuntu系统上创建的公钥,如在密钥末尾所见(ubuntu @ ip-172–31–43–19)。 这在任何系统上都应该看起来相似。
Verify newly created ssh-key
验证新创建的SSH密钥
$ cat ~/.ssh/id_rsa.pub
ssh-rsa AAAAB3NzaC1yc2EAAAADAQABAAABAQDdnHPEiq1a4OsDDY+g9luWQS8pCjBmR64MmsrQ9MaIaE5shIcFB1Kg3pGwJpypiZjoSh9pS55S9LckNsBfn8Ff42ALLjR8y+WlJKVk/0DvDXgGVcCc0t/uTvxVx0bRruYxLW167J89UnxnJuRZDLeY9fDOfIzSR5eglhCWVqiOzB+OsLqR1W04Xz1oStID78UiY5msW+EFg25Hg1wepYMCJG/Zr43ByOYPGseUrbCqFBS1KlQnzfWRfEKHZbtEe6HbWwz1UDL2NrdFXxZAIXYYoCVtl4WXd/WjDwSjbMmtf3BqenVKZcP2DQ9/W+geIGGjvOTfUdsCHennYIEUfEEP ubuntu@ip-172–31–43–19
在AWS上创建新的密钥对 (Create a New Key Pair on AWS)
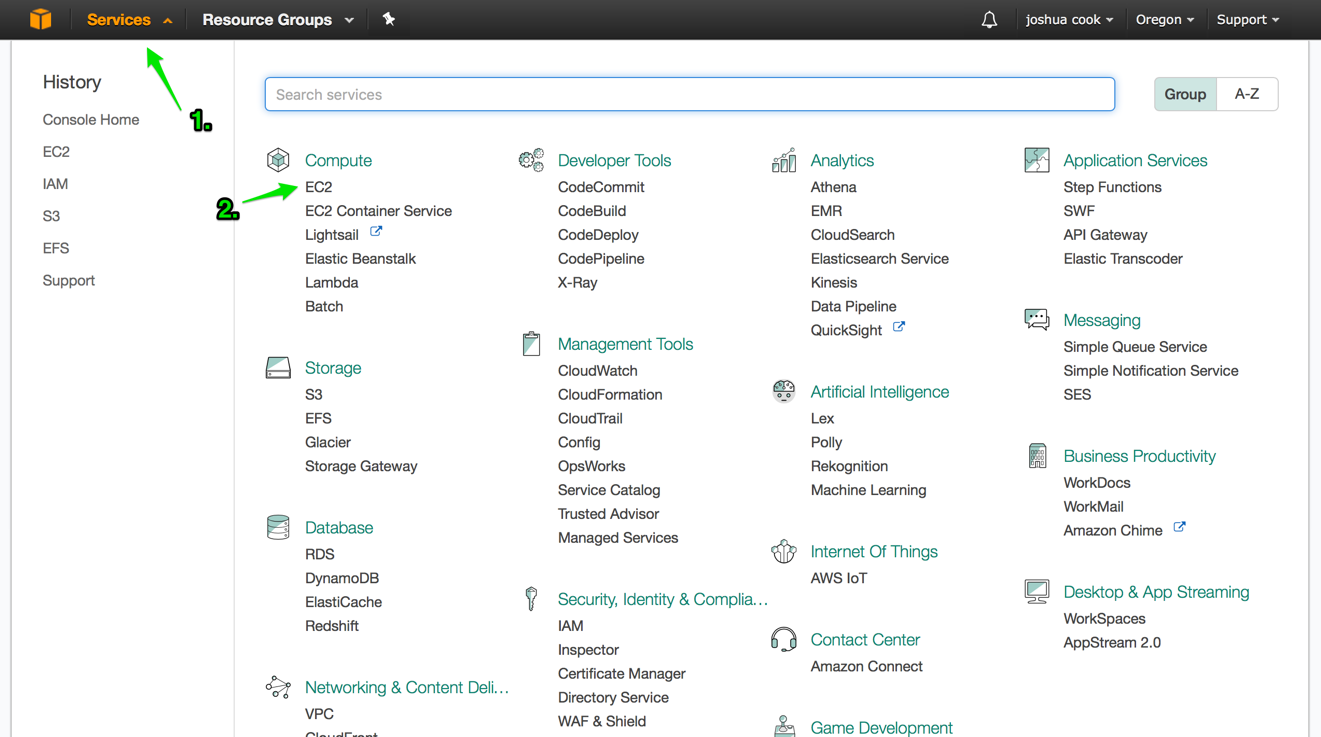
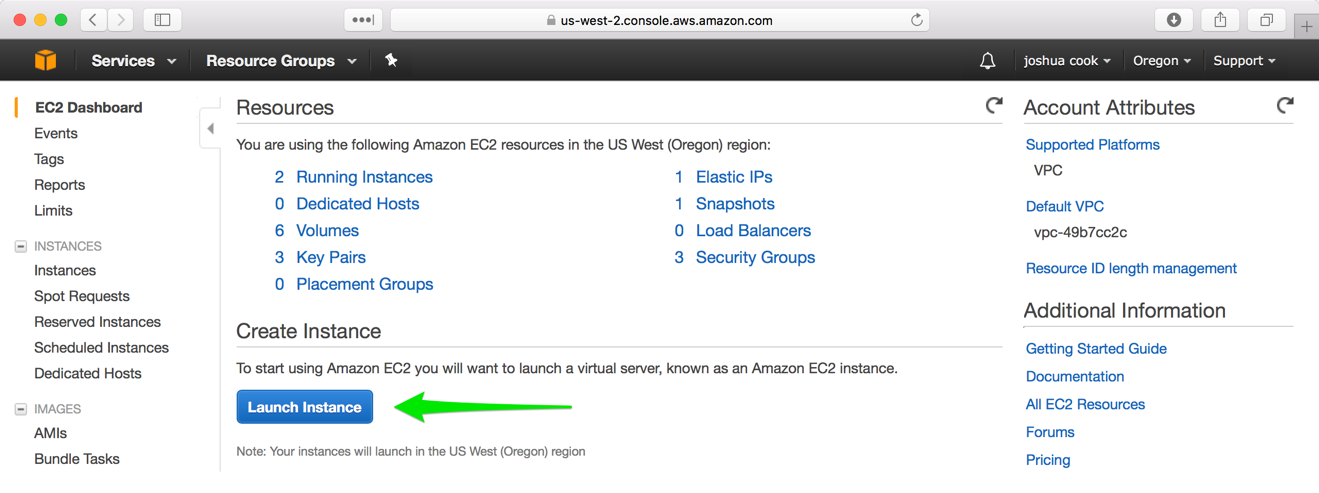
Log in to your AWS control panel and navigate to the EC2 Dashboard, as shown. First, access “Services” (#1) then access “EC2” (#2). The “Services” link can be accessed from any page in the AWS website.
如图所示,登录到AWS控制面板并导航到“ EC2仪表板”。 首先,访问“服务”(#1),然后访问“ EC2”(#2)。 可以从AWS网站上的任何页面访问“服务”链接。
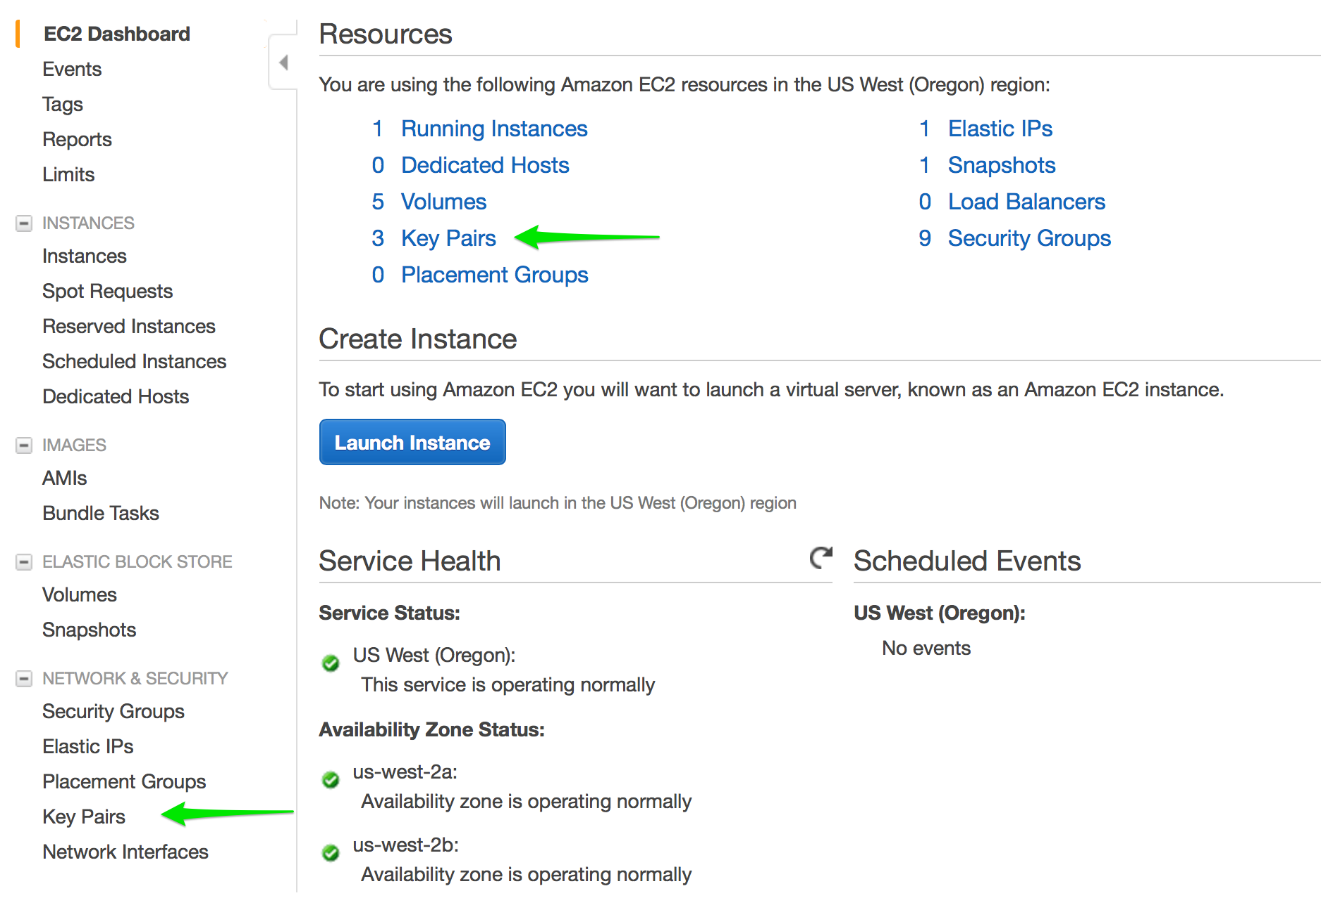
Once at the EC2 control panel access the Key Pairs pane using either link.
进入EC2控制面板后,使用任一链接访问“密钥对”窗格。
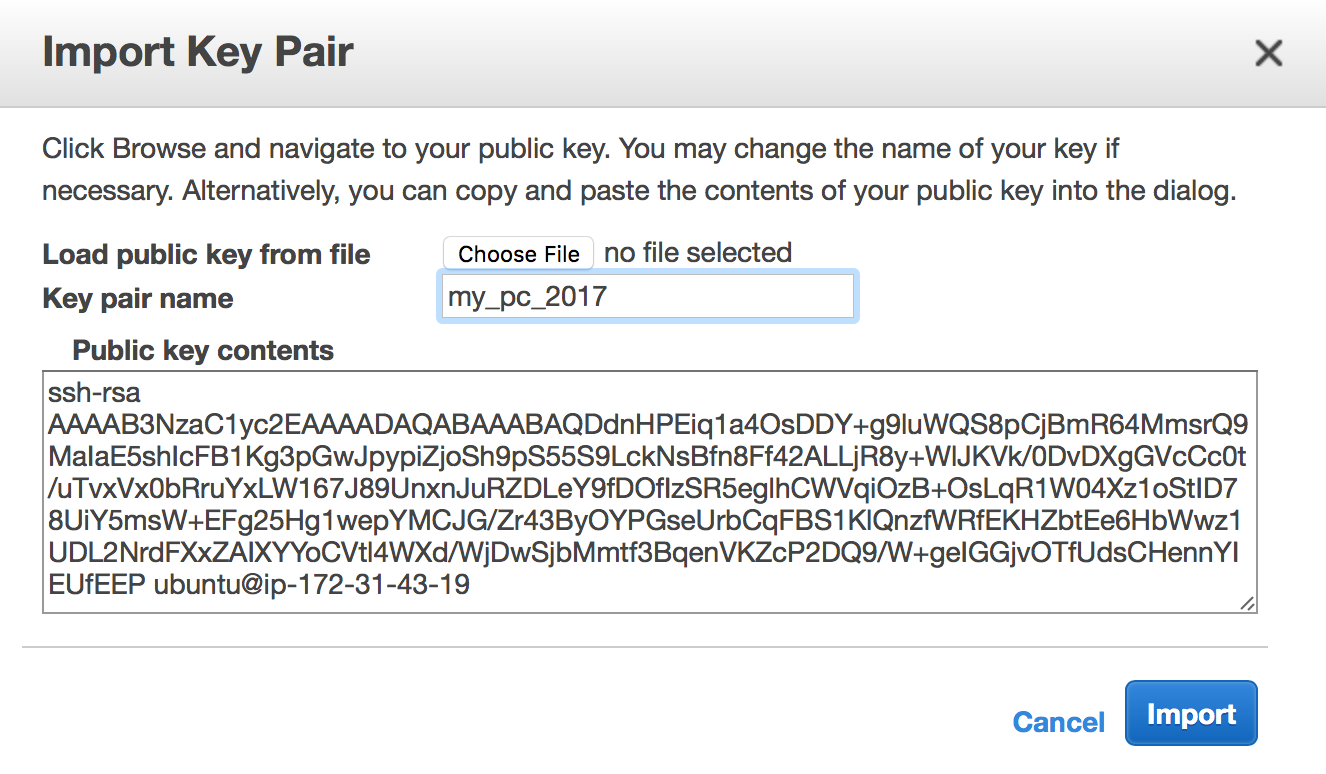
From the Key Pairs pane, choose “Import Key Pair”. This will activate a modal that we can use to create a new Key Pair associated with a region on our AWS account. Make sure to give the Key Pair a computer-friendly name e.g. from-MacBook-2020. Paste the contents of your public key (id_rsa.pub) into Public Key Contents. Prior to clicking Import, your key should appear as below. Click Import to create the new key.
在“密钥对”窗格中,选择“导入密钥对”。 这将激活一个模式,我们可以使用该模式来创建与我们的AWS账户上的区域关联的新密钥对。 确保为“密钥对”提供一个计算机友好的名称,例如from-MacBook-2020 。 将您的公钥( id_rsa.pub )的内容粘贴到“公钥内容”中。 在单击导入之前,您的密钥应显示如下。 单击导入以创建新密钥。
🧐 Note: Many AWS assets are created uniquely by region. Key pairs created in one region will not be available in another.
🧐 注意: 许多AWS资产是按区域唯一创建的。 在一个区域中创建的密钥对将在另一区域中不可用。
We have created a key pair between AWS and our local system. When we create a new instance, we will instruct AWS to provision the instance with this key pair and thus be able to access the cloud-based system from our local system.
我们已经在AWS和本地系统之间创建了一个密钥对。 创建新实例时,我们将指示AWS为实例提供此密钥对,从而能够从本地系统访问基于云的系统。
🙃 Note The terminology can be a bit confusing. AWS refers to an uploaded public key as a “Key Pair”. To be clear, we are uploading the public component of a key pair we have created on our system e.g. id_rsa.pub. The private key will remain on our system e.g. id_rsa.
🙃 注意 术语可能有点混乱。 AWS将上载的公共密钥称为“密钥对”。 明确地说,我们正在上载我们在系统上创建的密钥对的公共组件,例如 id_rsa.pub 。 私钥将保留在我们的系统上,例如 id_rsa 。
创建一个新的安全组 (Create a New Security Group)
From the EC2 Dashboard access the Security Group pane using either link.
从EC2仪表板使用任一链接访问“安全组”窗格。

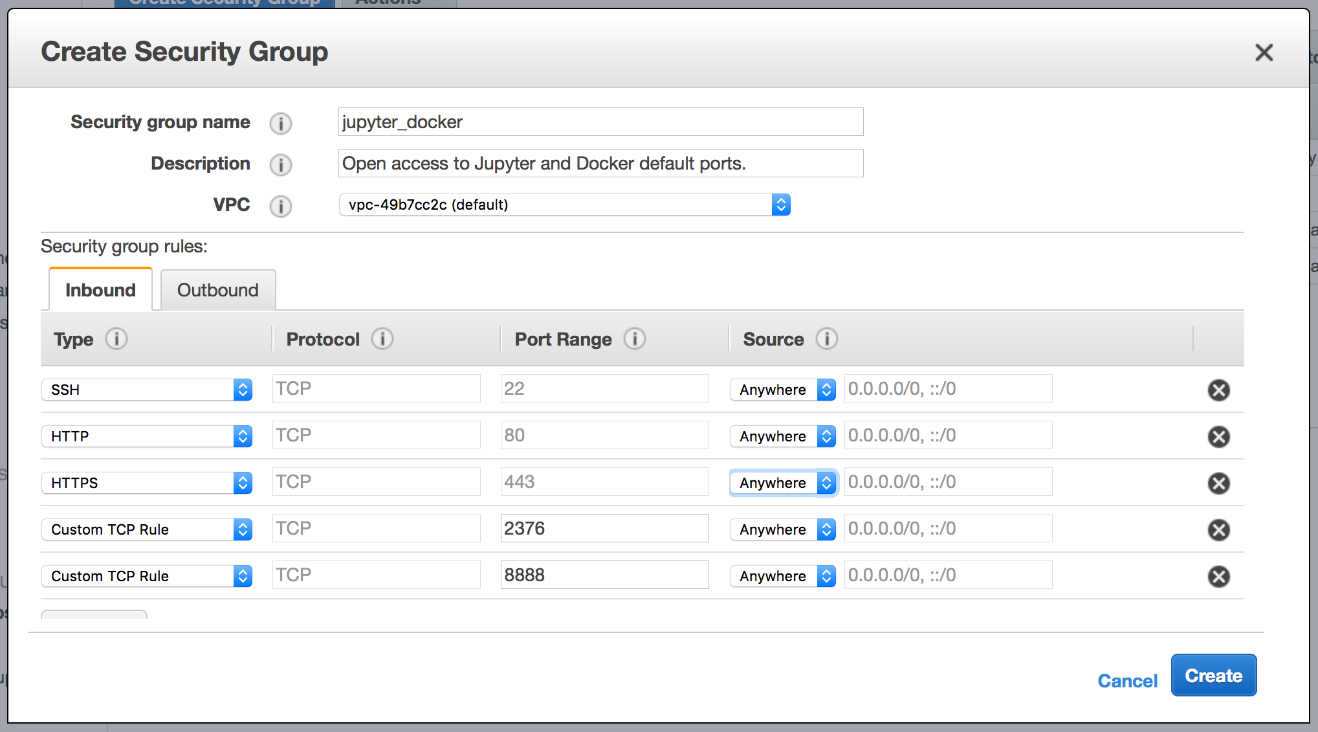
From the Security Group pane, click “Create Security Group”. Give the Security Group a computer friendly Group Name e.g. jupyter_docker. Give the Security Group a Description e.g. Open access to Jupyter and Docker default ports. Use the default VPC. Access the “Inbound” tab and configure the following security rules:
在“安全组”窗格中,单击“创建安全组”。 给安全组一个计算机友好的组名,例如jupyter_docker 。 给安全组一个描述,例如对Jupyter和Docker默认端口的开放访问。 使用默认的VPC。 访问“入站”选项卡并配置以下安全规则:
- SSH i.e. Port Range: 22, Source: Anywhere SSH,即端口范围:22,来源:任何地方
- HTTP i.e. Port Range: 80, Source: Anywhere HTTP,即端口范围:80,来源:任何地方
- HTTPS i.e. Port Range: 443, Source: Anywhere HTTPS,即端口范围:443,来源:任何地方
- Custom TCP Rule, Port Range: 2376, Source: Anywhere 自定义TCP规则,端口范围:2376,来源:Anywhere
- Custom TCP Rule, Port Range: 8888, Source: Anywhere 自定义TCP规则,端口范围:8888,来源:任何地方
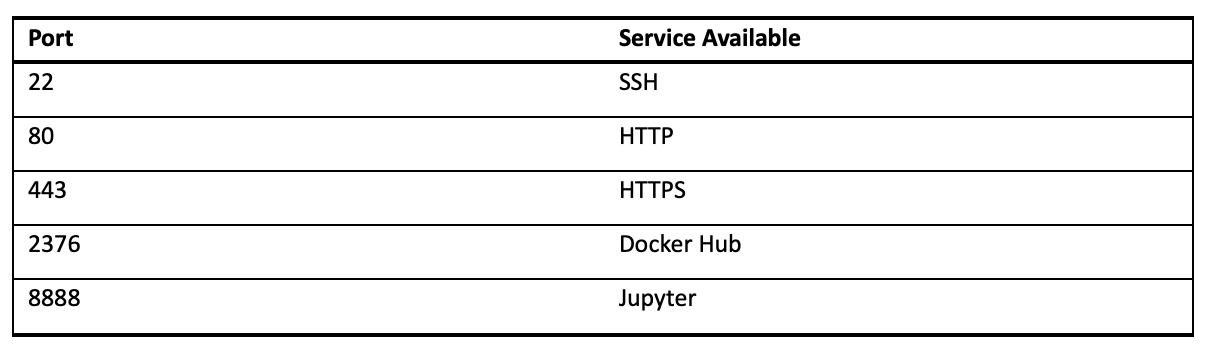
When you have added all of these rules, it should appear as below. The subsequent table shows a list of ports and the services that will be accessible over these ports.
添加所有这些规则后,它应显示如下。 下表列出了端口和可通过这些端口访问的服务的列表。
创建一个新的EC2实例 (Create a New EC2 Instance)
To create a new instance we start from the EC2 Dashboard and click “Launch Instance.”
要创建新实例,我们从EC2仪表板开始,然后单击“启动实例”。
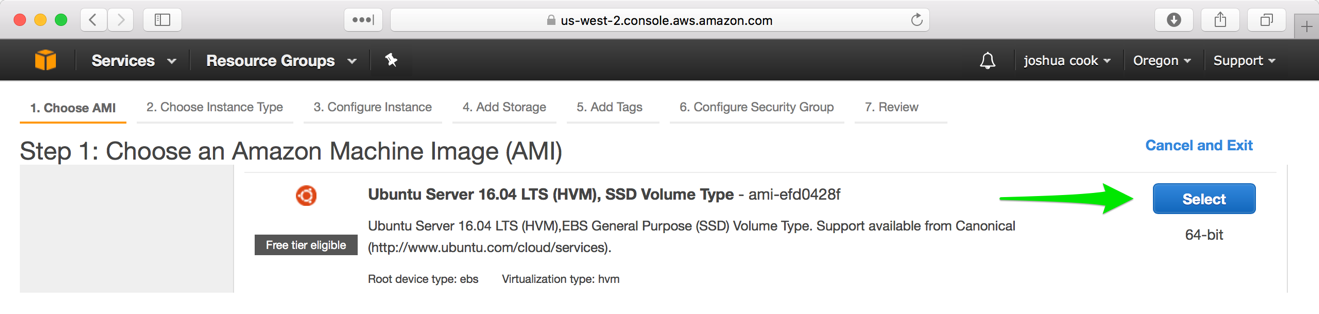
The launching of a new instance is a multi-step process that walks the user through all configurations necessary. The first tab is “Choose AMI”. An AMI is an Amazon Machine Image and contains the software we will need to run our sandbox machine. We recommend choosing the latest stable Ubuntu Server release that is Free Tier Eligible. At the time of writing, this was ami-efd0428f, Ubuntu Server 16.04 LTS (HVM), SSD Volume Type (Figure 1–8).
新实例的启动是一个多步骤过程,可引导用户完成所有必要的配置。 第一个选项卡是“选择AMI”。 AMI是Amazon Machine Image,其中包含运行沙盒机所需的软件。 我们建议选择符合Free Tier资格的最新稳定Ubuntu Server版本。 在撰写本文时,这是ami-efd0428f,Ubuntu Server 16.04 LTS(HVM),SSD卷类型(图1-8)。
The second tab is “Choose Instance Type”. In usage, we have found that the Free Tier, t2.micro, is sufficient for many applications, especially the sort of sandbox-type work that might be done in working through this text. This is to say that while working through the text, you may not be doing extended work on datasets, but rather learning about how to configure different systems. As such, your memory needs may be diminished. The ultimate goal is for the reader to be able to create and destroy machines at will. At this level of mastery, the reader can choose the minimum requirements for any application.
第二个选项卡是“选择实例类型”。 在使用中,我们发现,免费t2.micro对于许多应用程序来说已经足够,尤其是在阅读本文时可能会完成的沙盒式工作。 这就是说,在阅读全文时,您可能没有对数据集进行扩展工作,而是学习了如何配置不同的系统。 因此,您的内存需求可能会减少。 最终目标是使读者能够随意创建和销毁机器。 在这一精通水平上,读者可以为任何应用选择最低要求。
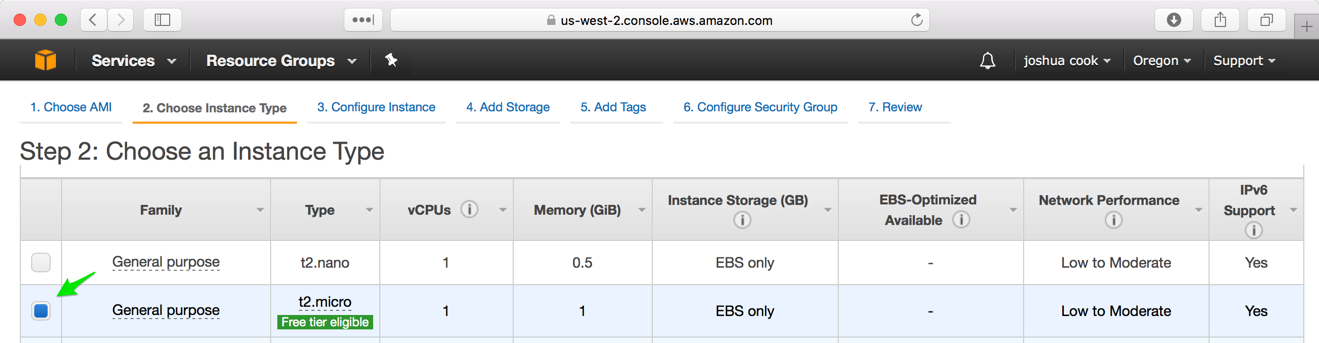
Use the t2.micro.
使用 t2.micro 。
The third tab “Configure Instance” can be safely ignored.
可以安全地忽略第三个选项卡 “配置实例”。
The fourth tab is “Add Storage”. This option is also specific to intended usage. It should be noted that Jupyter Docker images can take up more than 5 GB in disk space in the local image cache. For this reason, it is recommended to raise the value from the default 8 GB to somewhere in the neighborhood of 20 GB.
第四个选项卡是“添加存储”。 此选项还特定于预期用途。 应当注意,Jupyter Docker映像在本地映像缓存中的磁盘空间可能占用5 GB以上。 因此,建议将值从默认的8 GB提高到20 GB附近。
The fifth tab “Add Tags” can be safely ignored.
可以安全地忽略第五个选项卡 “添加标签”。
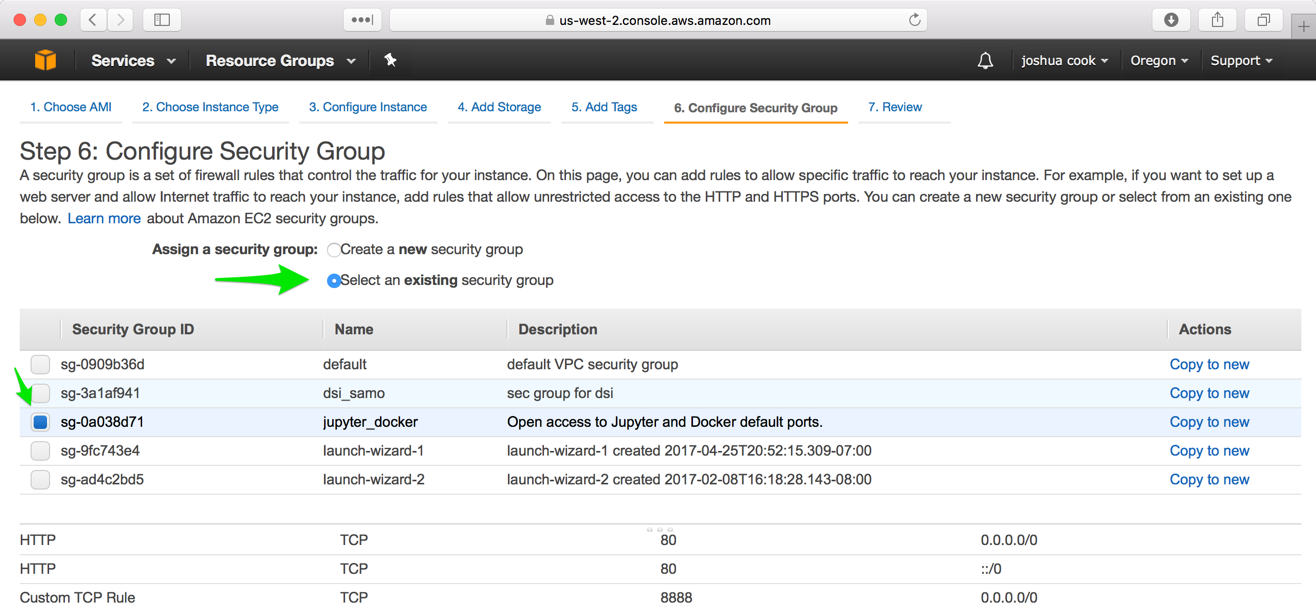
The sixth tab “Configure Security Group” is critical for the proper functioning of our systems. Previously, we configured a new Security Group to be used by our system. We will need to assign the Security Group that we just created, jupyter_docker, to the instance we are configuring. Choose “Select an existing security group”, then select the Security Group you just created. Verify that ports 22, 80, 443, 2376, and 8888 are available in the Inbound Rules at the bottom of the tab.
第六个选项卡 “配置安全组”对于我们系统的正常运行至关重要。 以前,我们配置了一个新的安全组以供我们的系统使用。 我们将需要将刚创建的安全组jupyter_docker分配给我们正在配置的实例。 选择“选择现有安全组”,然后选择刚创建的安全组。 验证选项卡底部的“入站规则”中的端口22、80、443、2376和8888是否可用。
😎Note: Most readers will receive a warning from AWS at this final phase that says something to the effect of “Improve your instances’ security. Your security group, jupyter_docker, is open to the world.” It is the opinion of this author that this warning can be safely ignored. The warning is letting us know that the instance we are preparing to launch can be accessed on the open web. This is intentional and by design. In this first and last conversation about system security, we will wave our hands at the concern and quickly move to the business of developing short-lifespan scalable systems.
😎注: 在此最后阶段,大多数读者将收到来自AWS的警告,其中说出一些“改善实例的安全性”的 含义 。 您的安全组jupyter_docker对世界开放。” 作者认为可以安全地忽略此警告。 警告是让我们知道正在准备启动的实例可以在开放的Web上访问。 这是有意设计的。 在有关系统安全性的第一个和最后一个对话中,我们将就此担忧摆出双手,并Swift转移到开发短寿命可扩展系统的业务。
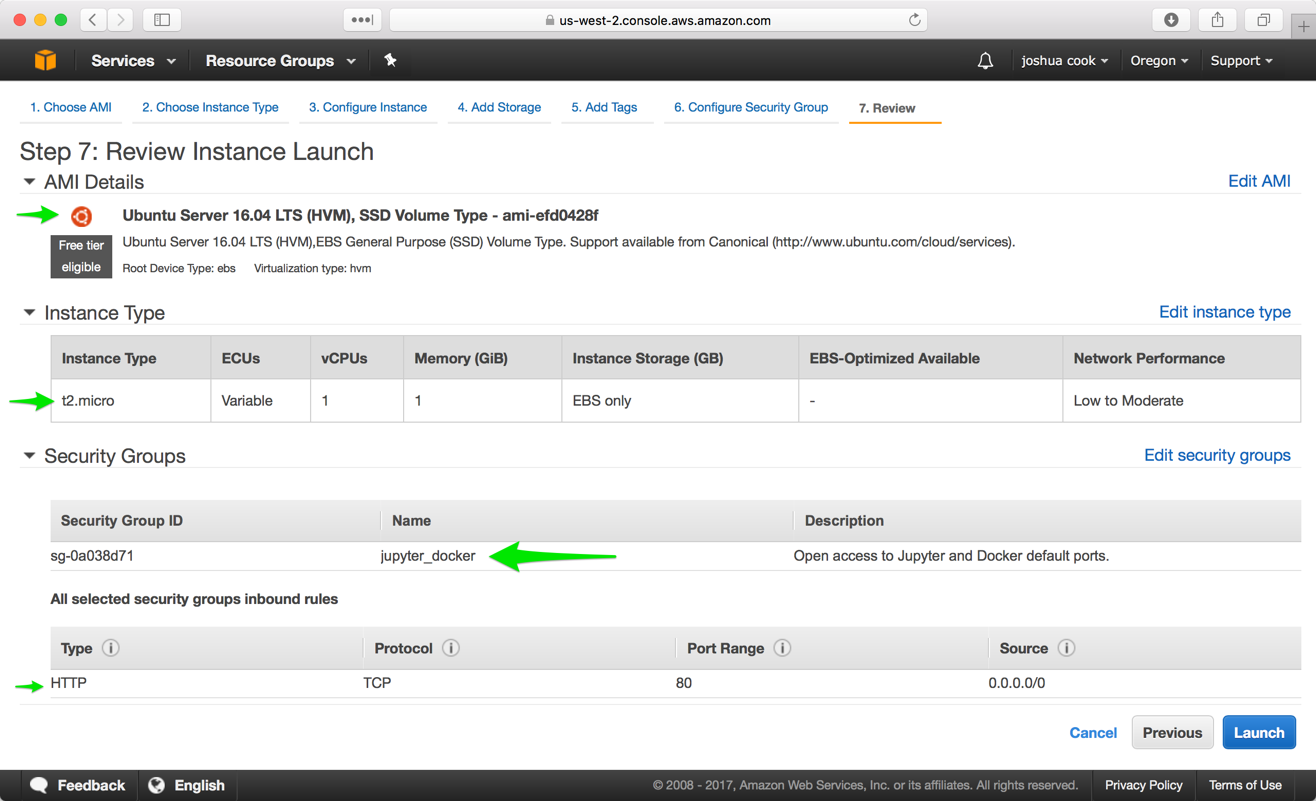
Finally, click “Review and Launch”. Here, we see the specific configuration of the EC2 Instance we will be creating. Verify that we are creating a t2.micro running the latest Free tier eligible version of Ubuntu Server and that it is available to “All Traffic”, then click “Launch.”
最后,单击“查看并启动”。 在这里,我们看到了将要创建的EC2实例的特定配置。 确认我们正在创建一个t2.micro运行的是最新的符合Free层标准的Ubuntu Server,并且对“所有流量”可用,然后单击“启动”。
In a final confirmation step, we will see a modal titled “Select an existing key pair or create a new key pair”. Select the Key Pair we previously created. Check the box acknowledging access to that key pair and launch the instance.
在最后的确认步骤中,我们将看到一个标题为“选择现有密钥对或创建新密钥对”的模式。 选择我们先前创建的密钥对。 选中确认对该密钥对具有访问权限的框,然后启动实例。

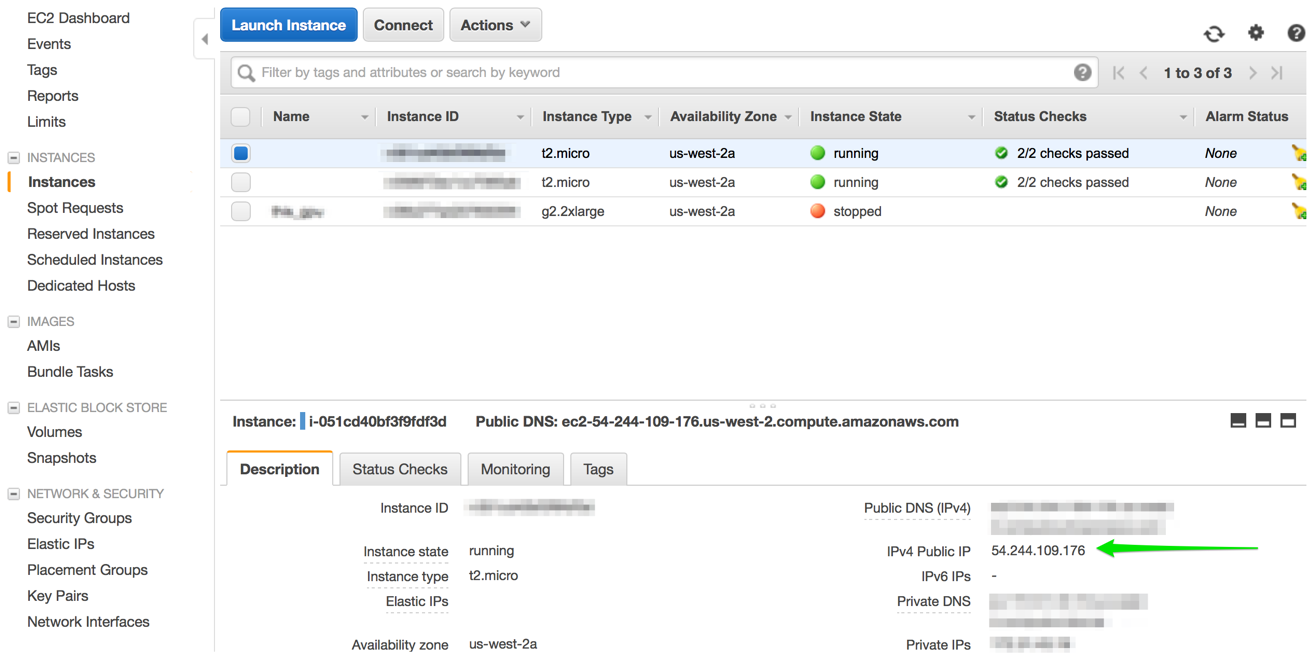
You should see a notification that the instance is now running. Click the “View Instances” tab in the lower right corner to be taken to the EC2 Dashboard Instances pane, where we should see our new instance running.
您应该看到实例正在运行的通知。 单击右下角的“查看实例”选项卡,进入“ EC2仪表板实例”窗格,在该窗格中,我们应看到新实例正在运行。
Make note of the IP address of the new instance.
记下新实例的IP地址。
配置新的EC2实例以使用Docker (Configure the New EC2 Instance for Using Docker)
Having set up an EC2 instance we ssh into the instance using the IP we have just obtained in order to provision the new instance with Docker.
设置了EC2实例后,我们使用刚刚获得的IP将其ssh到实例中,以便为Docker提供新实例。
SSH into EC2 Instance.
SSH进入EC2实例。
$ ssh ubuntu@54.244.109.176
Welcome to Ubuntu 16.04.2 LTS (GNU/Linux 4.4.0–64-generic x86_64)
…❗️Note: The first time you access your EC2 instance, you should see, The authenticity of host ‘54.244.109.176 (54.244.109.176)’ can’t be established … Are you sure you want to continue connecting (yes/no)? This is expected. You should hit <ENTER> to accept or type yes and hit <ENTER>.
Note️ 注意: 首次访问EC2实例时,您应该看到, The authenticity of host '54.244.109.176 (54.244.109.176)' can't be established … Are you sure you want to continue connecting (yes/no)? 这是预期的。 您应该按<ENTER>键接受或键入Yes,然后按<ENTER>键。
Install and configure Docker using a convenient install script provided by the Docker team. The script is obtained from get.docker.com and passed via pipe (|) to a shell (sh).
使用Docker团队提供的便捷安装脚本安装和配置Docker。 该脚本从get.docker.com获得,并通过管道( | )传递到外壳程序( sh )。
Install docker via shell script.
通过shell脚本安装docker。
$ curl -sSL https://get.docker.com/ | sh
apparmor is enabled in the kernel and apparmor utils were already installed
+ sudo -E sh -c sleep 3; apt-get update
…
+ sudo -E sh -c docker version
Client:
Version: 17.04.0-ce
API version: 1.28
Go version: go1.7.5
Git commit: 4845c56
Built: Mon Apr 3 18:07:42 2017
OS/Arch: linux/amd64
Server:
Version: 17.04.0-ce
API version: 1.28 (minimum version 1.12)
Go version: go1.7.5
Git commit: 4845c56
Built: Mon Apr 3 18:07:42 2017
OS/Arch: linux/amd64
Experimental: false
…
In Listing 1–5, we add the ubuntu user to the docker group. By default, the command line docker client will require sudo access in order to issue commands to the docker daemon. We can add the ubuntu user to the docker group in order to allow the ubuntu user to issue commands to docker without sudo.
在清单1-5中,我们将ubuntu用户添加到docker组。 默认情况下,命令行Docker客户端将需要sudo访问权限才能向Docker守护程序发出命令。 我们可以将ubuntu用户添加到docker组中,以允许ubuntu用户在不使用sudo的情况下向docker发出命令。
Add ubuntu user to the docker group.
将ubuntu用户添加到docker组。
$ sudo usermod -aG docker ubuntuFinally, in order to force the changes take effect, we reboot the system. As an alternative to rebooting the system, users can simply disconnect and reconnect to their remote system.
最后,为了使更改生效,我们重新启动系统。 作为重新引导系统的替代方法,用户可以简单地断开连接并重新连接到其远程系统。
Restart the docker daemon.
重新启动Docker守护程序。
$ sudo rebootThe reboot will have the effect of closing the secure shell to our EC2 instance. After waiting a few moments, reconnect to the system. At this point, our system will be ready for use. sudo should no longer required to issue commands to the docker client. We can verify this by connecting to our remote system and checking the dock version.
重新启动将具有关闭安全外壳到我们的EC2实例的作用。 等待片刻后,重新连接系统。 至此,我们的系统就可以使用了。 不再需要sudo向Docker客户端发出命令。 我们可以通过连接到远程系统并检查扩展坞版本来验证这一点。
Log into remote system and check docker version.
登录到远程系统并检查docker版本。
$ ssh ubuntu@54.244.109.176
$ docker -v
Docker version 17.04.0-ce, build 4845c56 拉出jupyter/scipy-notebook图片 (Pull the jupyter/scipy-notebook image)
Next, pull the Docker image with which we wish to work, the jupyter/scipy-notebook. This can be done using the docker pull command. The image is pulled from Project Jupyter’s public Docker Hub account.
接下来,拉出我们要使用的Docker映像jupyter/scipy-notebook 。 这可以使用docker pull命令来完成。 该图像是从Project Jupyter的公共Docker Hub帐户中提取的。
Pull jupyter/scipy-notebook image.
拉出jupyter / scipy-notebook图片。
ubuntu@ip-172–31–6–246:~$ docker pull jupyter/scipy-notebook
Using default tag: latest
latest: Pulling from jupyter/scipy-notebook
693502eb7dfb: Pull complete
a3782c2efb41: Pull complete
…
2fb2abb673ce: Pull complete
Digest: sha256:04ad7bdf5b9b7fe88c3d0f71b91fd5f71fb45277ff7729dbe7ae20160c7a56df
Status: Downloaded newer image for jupyter/scipy-notebook:latest
Once we have pulled the image, it is now present in our docker images cache. Anytime we wish to run a new jupyter container docker will load the container from the image in our cache.
一旦我们提取了图像,它现在就存在于我们的docker图像缓存中。 每当我们希望运行新的jupyter容器时,泊坞窗都会从缓存中的映像加载容器。
运行jupyter / scipy-notebook图像 (Run the jupyter/scipy-notebook image)
Finally, run a Jupyter Notebook server using the minimum viable docker run command. Here, the -p flag serves to link port 8888 on the host machine, our EC2 instance, to the port 8888 on which the Jupyter Notebook Server is running in the Docker container.
最后,使用最小可行的docker docker run命令运行Jupyter Notebook服务器。 在这里, -p标志用于将主机(我们的EC2实例)上的端口8888链接到Docker容器中运行Jupyter Notebook Server的端口8888。
Run Jupyter Notebook Server.
运行Jupyter Notebook服务器。
$ docker run -p 8888:8888 jupyter/scipy-notebook
[I 22:10:01.236 NotebookApp] Writing notebook server cookie secret to /home/jovyan/.local/share/jupyter/runtime/notebook_cookie_secret
[W 22:10:01.326 NotebookApp] WARNING: The notebook server is listening on all IP addresses and not using encryption. This is not recommended.
[I 22:10:01.351 NotebookApp] JupyterLab alpha preview extension loaded from /opt/conda/lib/python3.5/site-packages/jupyterlab
[I 22:10:01.358 NotebookApp] Serving notebooks from local directory: /home/jovyan/work
[I 22:10:01.358 NotebookApp] 0 active kernels
[I 22:10:01.358 NotebookApp] The Jupyter Notebook is running at: http://[all ip addresses on your system]:8888/?token=7b02e3aadb29c42ff066a7290d81dd48e44ce62bd7f2bd0a
[I 22:10:01.359 NotebookApp] Use Control-C to stop this server and shut down all kernels (twice to skip confirmation).
[C 22:10:01.359 NotebookApp]
Copy/paste this URL into your browser when you connect for the first time,
to login with a token:http://localhost:8888/?token=7b02e3aadb29c42ff066a7290d81dd48e44ce62bd7f2bd0a
The output from the running Jupyter Notebook Server provides us with an authentication token (token=7b02e3aadb29c42ff066a7290d81dd48e44ce62bd7f2bd0a) we can use to access the Notebook Server through a browser. We can do this using the url provided with the exception that we will need to replace localhost with the ip address of our EC2 instance.
运行的Jupyter Notebook服务器的输出为我们提供了一个身份验证令牌( token=7b02e3aadb29c42ff066a7290d81dd48e44ce62bd7f2bd0a ),我们可以使用它通过浏览器访问Notebook服务器。 我们可以使用提供的URL进行此操作,但需要将localhost替换为EC2实例的IP地址。
The url of a jupyter instance running on AWS with an access token passed as query parameter.
在AWS上运行的jupyter实例的URL,带有作为查询参数传递的访问令牌。
http://54.244.109.176:8888/?token=1c32913725d84a76e7b3f04c45b91e17b77f3c3574779101.翻译自: https://towardsdatascience.com/zero-to-jupyter-with-docker-on-amazon-web-services-26590d88b2f2


 427
427

 被折叠的 条评论
为什么被折叠?
被折叠的 条评论
为什么被折叠?
 到【灌水乐园】发言


