


In modern day software development, It is a prevalent practice for non-static apps or websites to access content resources over the internet which could be sourced from a third-party company or developed in-house for personal use. One of the most common ways to build such a content service is via the RESTful API, REST stands for Representational state transfer, API means Application Programming Interface, RESTful is just the adjective form of REST.
在现代软件开发中,非静态应用程序或网站通过Internet访问内容资源是一种普遍做法,该资源可能来自第三方公司或内部开发供个人使用。 构建此类内容服务的最常见方法之一是通过RESTful API ,REST代表表示状态传输,API表示应用程序编程接口,RESTful只是REST的形容词形式。
RESTful API is a software architectural style of exposing resources on a computer for accessing and manipulation through some set of stated operations with restrictions, basically it’s a way you can expose some data resources on your computer upon request through some endpoint defined by you.
RESTful API是一种软件体系结构样式,它公开计算机上的资源以通过具有限制的某些既定操作集进行访问和操作,基本上,这是一种可通过您定义的终结点根据请求公开计算机上某些数据资源的方法。
In this write up, we will be building a RESTful API to access and manipulate students data over the network using Spring boot 2, a Java framework and MongoDB, a database system.
在本文中,我们将构建一个RESTful API,以使用Spring Boot 2,Java框架和数据库系统MongoDB通过网络访问和操作学生数据。
Let’s get started
让我们开始吧
什么是Spring Boot? (What is Spring boot?)
Last year, Netflix announced they would be migrating all of their back end services to Spring boot.
去年,Netflix宣布将把所有后端服务迁移到Spring Boot。
Spring boot is a layer built atop Spring, a popular, powerful and robust Java framework used to build Java Enterprise applications. Spring obliviates the quite stressful tasks which could be associated with building large Java applications by letting developers focus more on the business logic of the project they’re working on rather than the core technicalities of the language environment; but it requires some configuration XML files to properly enforce it’s core functionalities such as IoC(inversion of Control), dependency injection and so on. Meanwhile, spring boot removes the process of writing those mandatory configuration XML files, it uses annotations to wire our app components together to speed up development process.
Spring Boot是在Spring之上构建的一层,Spring是一种流行,强大而强大的Java框架,用于构建Java Enterprise应用程序。 通过让开发人员将更多的精力放在他们正在从事的项目的业务逻辑上,而不是语言环境的核心技术上,Spring消除了与构建大型Java应用程序有关的繁琐任务。 但是它需要一些配置XML文件来适当地实现其核心功能,例如IoC(控制反转),依赖项注入等。 同时,spring boot消除了编写那些强制性配置XML文件的过程,它使用批注将我们的应用程序组件连接在一起以加快开发过程。
我们为什么要使用Spring Boot? (Why are we using spring boot?)
- It is lightweight and easy to understand and use. 它轻巧,易于理解和使用。
- It shortens development time as it handles a lot of things for us behind the scene. 它缩短了开发时间,因为它在后台为我们处理了很多事情。
- It lets us build highly secure apps. 它使我们能够构建高度安全的应用程序。
什么是MongoDB? (What is MongoDB?)
MongoDB is an open source, NoSQL database system used for storing data, unlike a relational database, MongoDB stores data as documents in a rich JSON (JavaScript object notation) format which is enveloped as an object in a collection. For this app, we will have a students collection which stores a student document.
MongoDB是一个开放源代码的NoSQL数据库系统,用于存储数据,与关系数据库不同,MongoDB将数据作为文档以丰富的JSON(JavaScript对象表示法)格式存储为文档,并封装为一个对象。 对于此应用程序,我们将有一个学生集合,用于存储学生文档。
为什么选择MongoDB? (Why MongoDB?)
- It has a cloud service we can utilize to store and retrieve our data rather than install and set-up locally on our PC. 它具有云服务,我们可以利用它来存储和检索我们的数据,而不必在PC上本地安装和设置。
- It’s very easy to use and work with for developers. 对于开发人员而言,它非常易于使用和使用。
- we can store high volume of data. 我们可以存储大量数据。
我们将如何准确地实现他们的目标? (How exactly will we achieve our aim with them?)
What we will do is create a server application that lets our computer listen for incoming request from clients over the network and serves resources based upon the parameters of the request made. Spring boot handles our server creation with Apache Tomcat, so we can solely focus on the API logic. In this article, our computer will be connected to a MongoDB database, upon some http request method and perhaps payload, our student database is accessed for some data and modified, then a response is sent to the client (which could be a browser or script sending a request to our server).
我们将要做的是创建一个服务器应用程序,使我们的计算机可以侦听网络上来自客户端的传入请求,并根据发出的请求的参数来提供资源。 Spring boot使用Apache Tomcat处理我们的服务器创建,因此我们可以仅关注API逻辑。 在本文中,我们的计算机将连接到MongoDB数据库,使用某些http请求方法和有效负载,将访问学生数据库以获取一些数据并进行修改,然后将响应发送到客户端(可以是浏览器或脚本)向我们的服务器发送请求)。
我们需要什么工具进行开发? (What tools do we need for development?)
- Java SDK which supports nothing less than Java 8 i.e Java v1.8, Spring boot 2.X would only support Java version above 7. Java SDK仅支持Java 8,即Java v1.8,Spring boot 2.X仅支持7以上的Java版本。
- An IDE (Integrated Development Environment) that supports Java, I will be using IntelliJ IDEA. 一个支持Java的IDE(集成开发环境),我将使用IntelliJ IDEA。
- POSTMAN, Google chrome API testing extension, rest client or any API test tool of your choice. POSTMAN,Google chrome API测试扩展,REST客户端或您选择的任何API测试工具。
让我们建立数据库 (Let’s have our database in place)
For storing students data, we will use the MongoDB cloud version, MongoDB Atlas to skip the process of setting up MongoDB on our computer. You can choose to skip this section if you have MongoDB already setup on your machine or have an existing MongoDB atlas account.
为了存储学生数据,我们将使用MongoDB云版本MongoDB Atlas跳过在计算机上设置MongoDB的过程。 如果您已经在计算机上设置了MongoDB或已有MongoDB Atlas帐户,则可以选择跳过此部分。
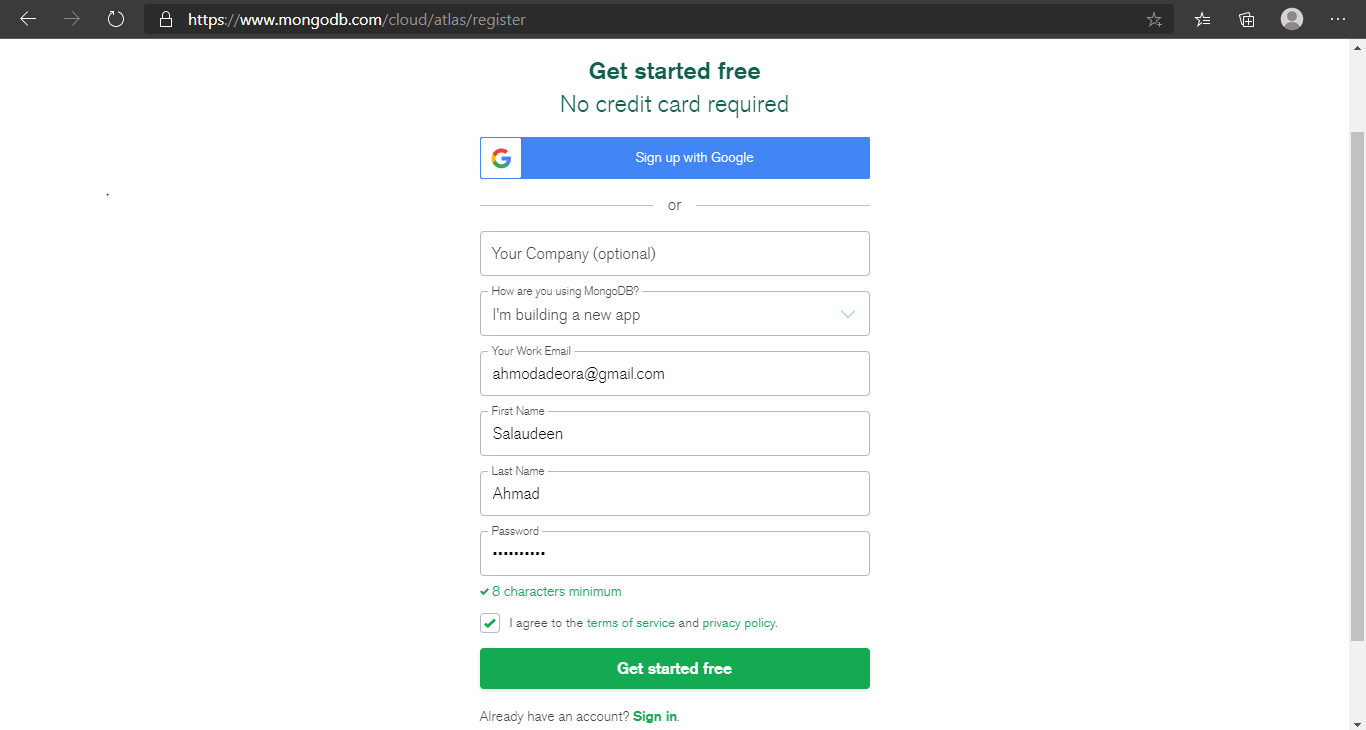
So let’s create an account and have our DB up and running at https://www.mongodb.com/cloud/atlas/register.
因此,让我们创建一个帐户并在https://www.mongodb.com/cloud/atlas/register上运行数据库。
Fill in your details as shown above and click on the “Get started free” button.
如上所示,填写您的详细信息,然后单击“免费入门”按钮。
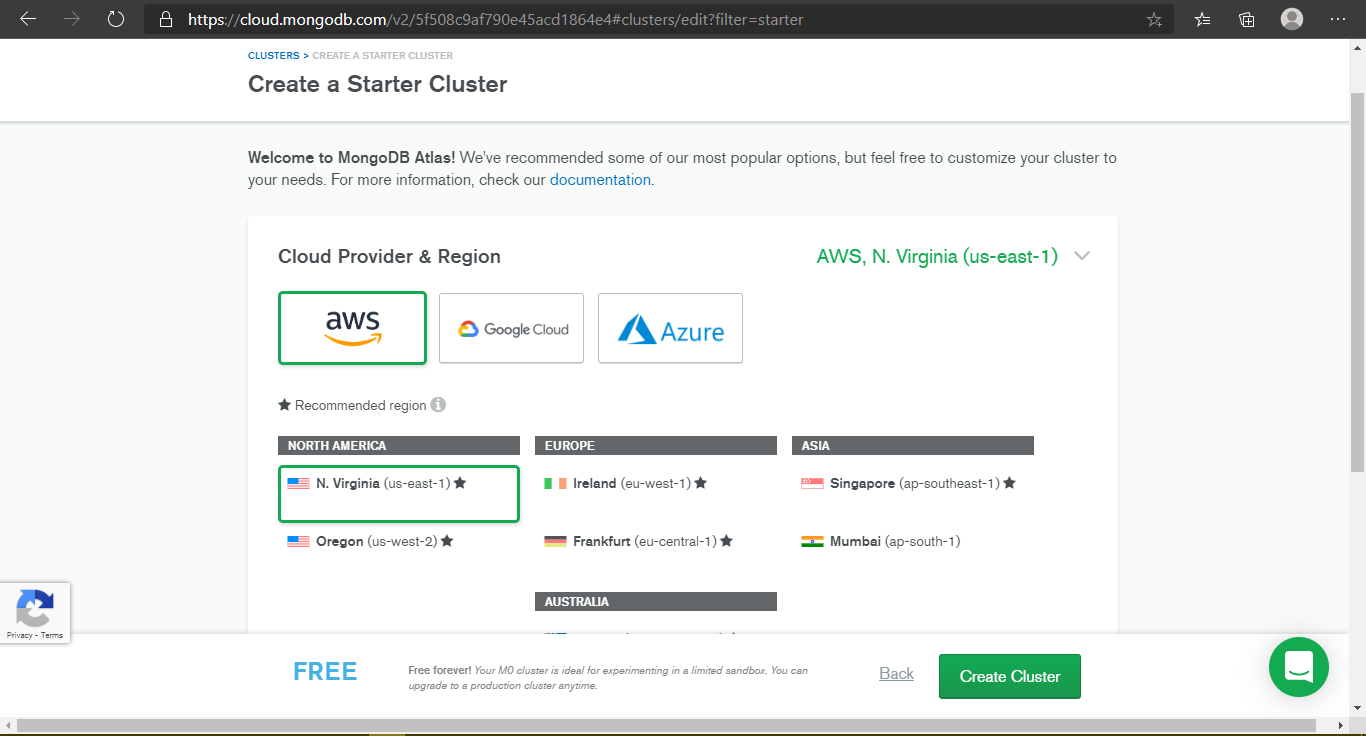
The next page displays info about the cluster plans MongoDB Atlas offers, since we want to build a trivial app, choose the free shared cluster option and proceed.
下一页显示有关MongoDB Atlas提供的群集计划的信息,因为我们要构建一个简单的应用程序,请选择免费的共享群集选项并继续。

Afterward, you will have to configure your cluster with respect to your location, but I will just move on with the default options.
之后,您将必须根据您的位置配置集群,但是我将继续使用默认选项。
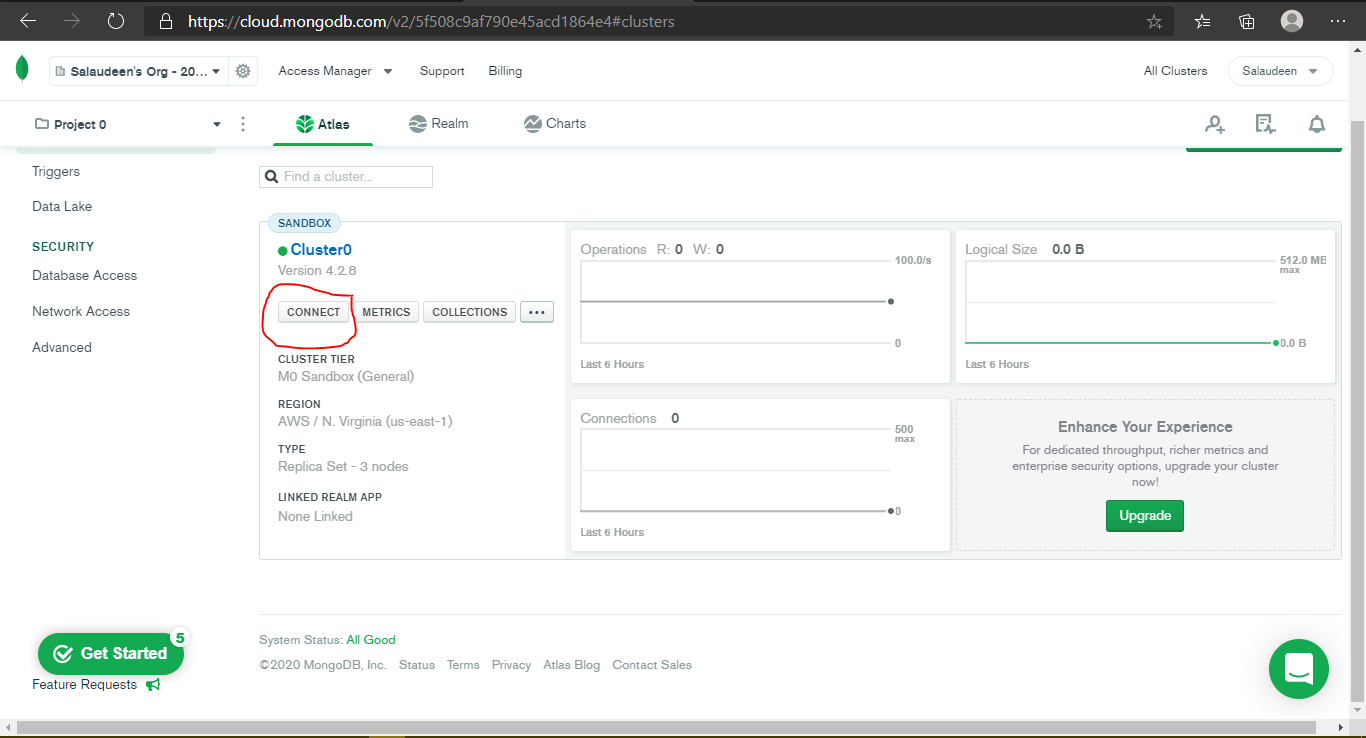
After creating your cluster, you should see a cluster dashboard where you can setup connection to start using the database, click on the connect tab as shown below
创建集群后,您应该会看到一个集群仪表板,您可以在其中设置连接以开始使用数据库,单击“连接”选项卡,如下所示
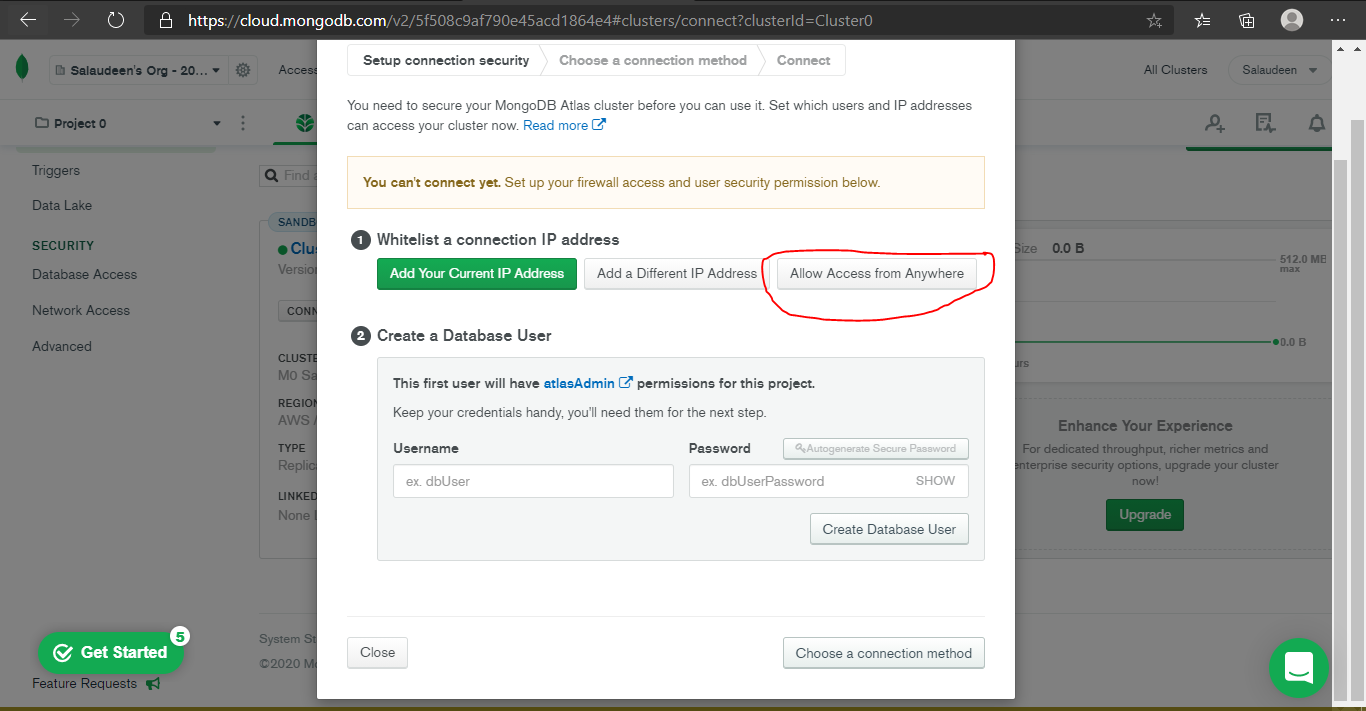
Then an overlay displays with some connection configuration options, select the “Allow Access From Anywhere” option, then enter a username and password to create a MongoDB user for your database, then click on “Choose Connection Method”.
然后将显示一个带有一些连接配置选项的覆盖图,选择“允许从任何地方访问”选项,然后输入用户名和密码为数据库创建MongoDB用户,然后单击“选择连接方法”。
Moving on, select the option to use MongoDB from your application, then proceed to the “Connect” tab where you will be asked to select your driver and version, you can choose to leave the values as it is, we are more interested in the connection string, so copy and save it somewhere, we will make use of it to setup our spring boot database connection soon.
继续,从您的应用程序中选择使用MongoDB的选项,然后进入“连接”选项卡,在该选项卡中将要求您选择驱动程序和版本,您可以选择保留原样的值,我们对连接字符串,因此将其复制并保存到某个位置,我们将很快使用它来设置我们的spring boot数据库连接。
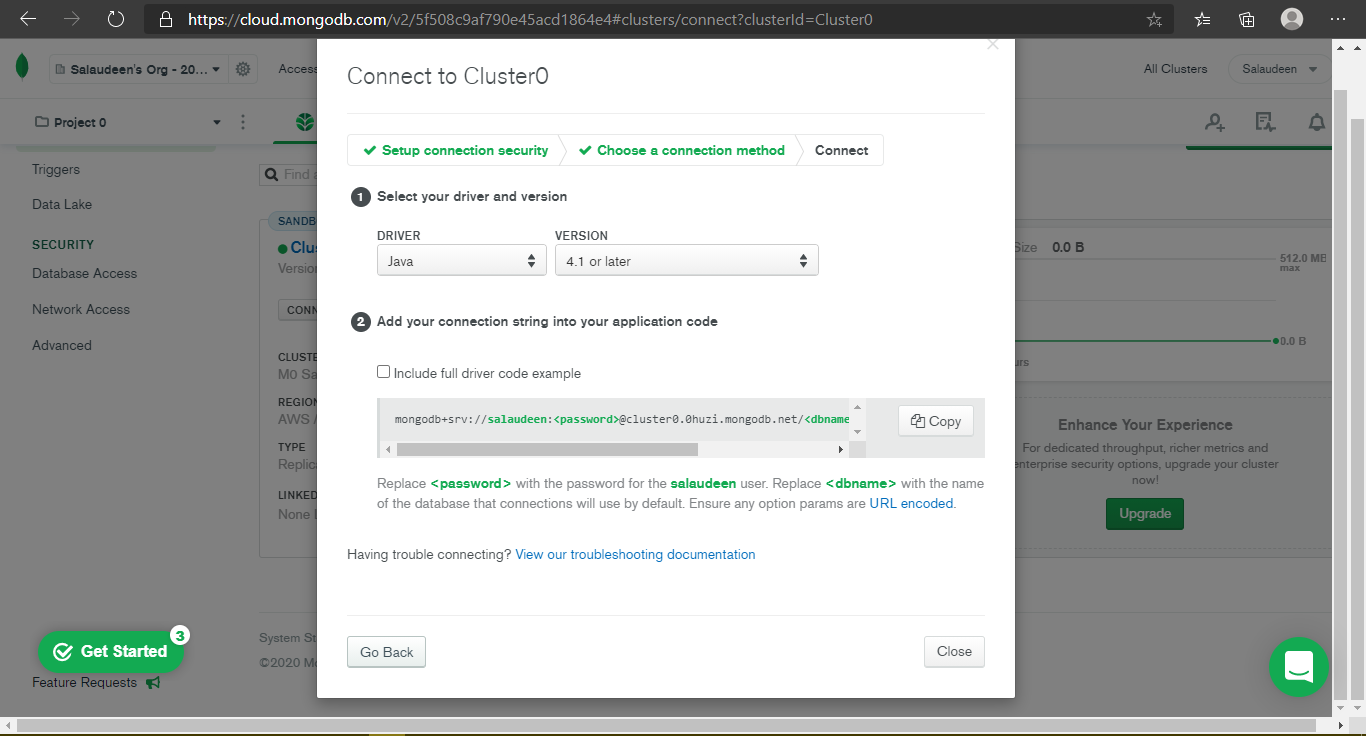
Once you’re done saving the connection string somewhere, we can move on with working with on the main app with Spring Boot.
将连接字符串保存到某个位置后,我们可以继续使用Spring Boot在主应用程序上进行操作。
完善我们的RESTful API (Getting Our RESTful API In Shape)
To get started with Spring Boot, We need to use the Spring initializr to bootstrap our app dependencies and others, so navigate to https://start.spring.io.
要开始使用Spring Boot,我们需要使用Spring initializr来引导我们的应用程序依赖项和其他依赖项,因此请导航至https://start.spring.io。
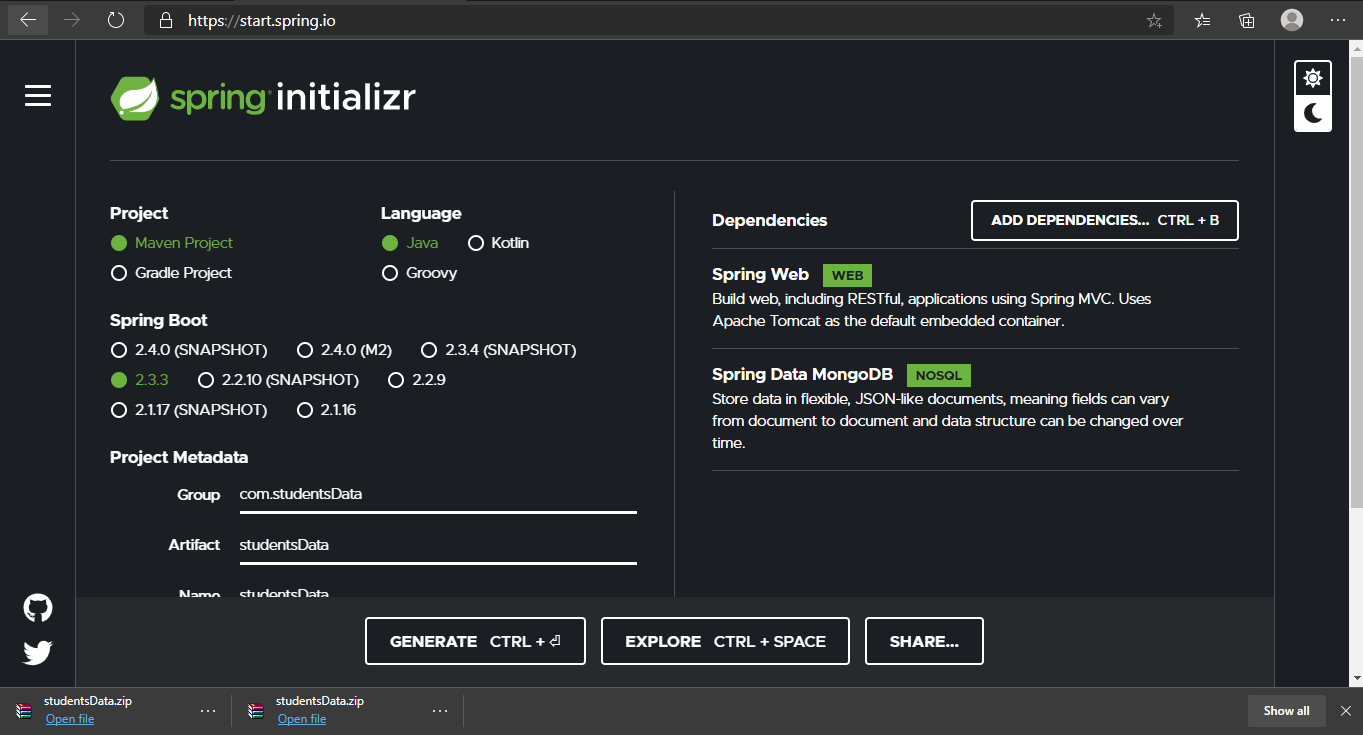
The page contains multiple config options to select from,then a zip file containing a starting template with respect to the options chosen will be generated when we’re done.
该页面包含多个配置选项供您选择,然后在完成后将生成一个zip文件,其中包含有关所选选项的起始模板。
⦁ We will use maven as our project’s build tool and Spring Boot v2.3.3
⦁我们将使用maven作为项目的构建工具和Spring Boot v2.3.3
⦁ fill the project metadata with whatever values you feel like using but maintain consistency just as I have done above.
with使用您想要使用的任何值填充项目元数据,但保持一致性,就像我上面所做的那样。
⦁ Select JAR for packaging
⦁选择JAR进行包装
⦁ I will use Java 8, so as to stick with the minimum Java functionalities Spring Boot requires.
⦁我将使用Java 8,以便坚持使用Spring Boot所需的最低Java功能。
⦁ For dependencies, search and select Spring WEB and Spring Data MongoDB
⦁对于依赖项,搜索并选择Spring WEB和Spring Data MongoDB
⦁ Click on Generate, you should have the studentsData zip file downloaded on your machine.
Generate单击生成,您应该在计算机上下载了studentsData zip文件。
Proceed to opening the project folder with IntelliJ IDEA, your project should have its dependencies resolving which means our app’s required resources are being made available by maven, You can see the message at the mid bottom of IntelliJ. Open the studentsData\pom.xml and you should find all of the projects dependencies.
继续使用IntelliJ IDEA打开项目文件夹后,您的项目应已解析其依赖项,这意味着maven将提供我们应用程序所需的资源。您可以在IntelliJ的中下部看到该消息。 打开studentsData \ pom.xml,您应该找到所有项目依赖项。
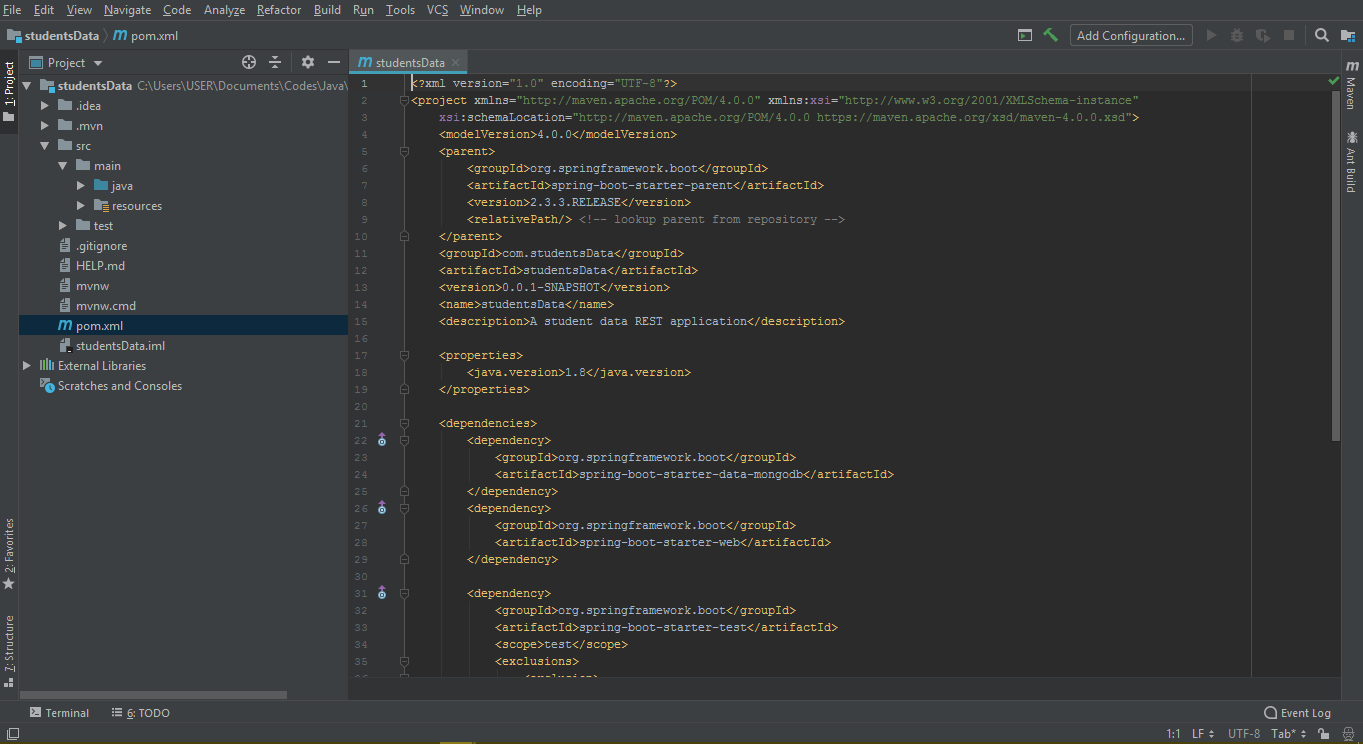
If intelliJ underlines some part of the xml file in red, it means the project’s dependencies weren’t resolved successfully, so right click on the “studentsData” folder under project at the left corner, find and click on maven, then click on “Generate Sources and Update Folders”, your project errors should be fixed some while after doing that.
如果intelliJ在xml文件中用红色下划线,则表示该项目的依赖项未成功解决,因此,右键单击项目左下角的“ studentsData”文件夹,找到并单击maven,然后单击“生成”。源和更新文件夹”中,您的项目错误应在此之后的一段时间内得到修复。
让我们设置应用程序以使用MongoDB (Let’s setup our app to use MongoDB)
If you have MongoDB installed on your machine and won’t be using MongoDB atlas, feel free to skip this part because Spring boot will automatically try to connect to MongoDB server at mongodb://localhost/test, just make sure you launch mongod on your terminal to start a MongoDB server on your machine.
如果您的计算机上安装了MongoDB,并且不会使用MongoDB地图集,请跳过这一部分,因为Spring Boot会自动尝试通过mongodb:// localhost / test连接到MongoDB服务器,只需确保在以下位置启动mongod您的终端以在计算机上启动MongoDB服务器。
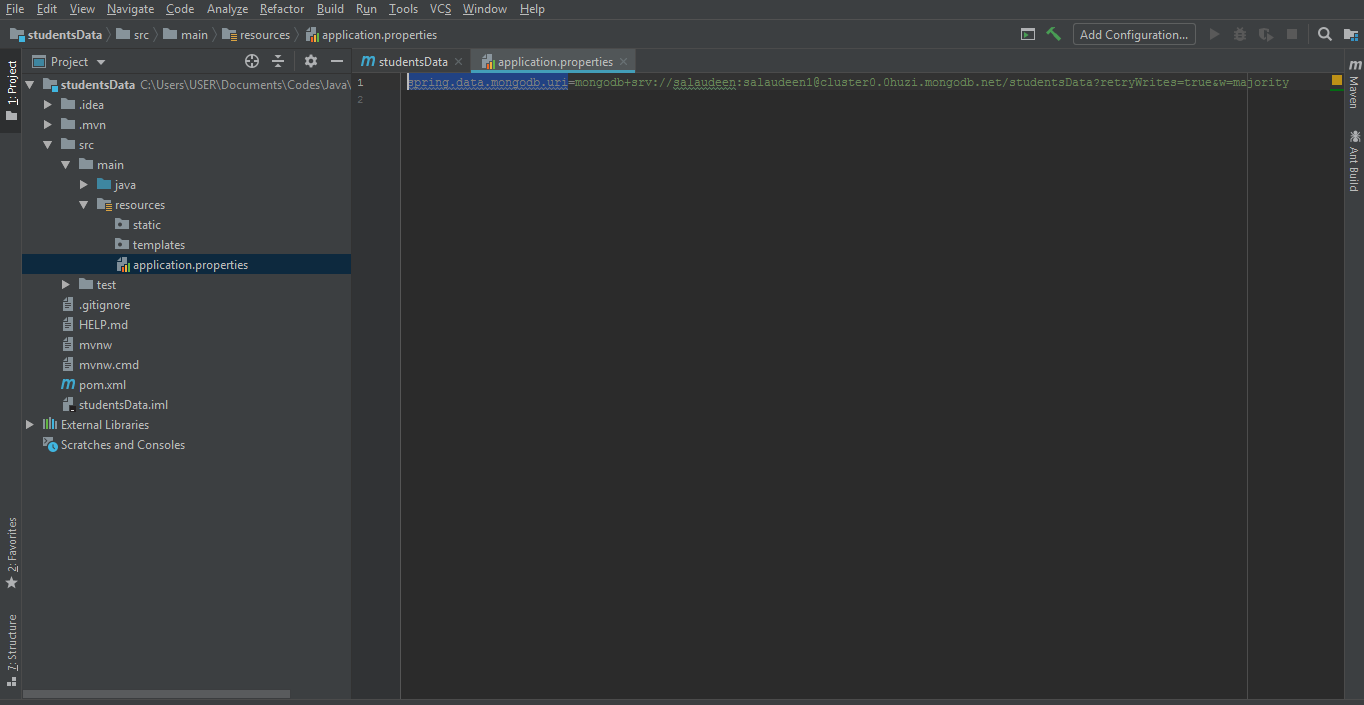
Now, open src\main\resources\application.properties and set spring.data.mongodb.uri to the connection string you had saved earlier from MongoDB atlas, replace “<password>” in the connection string with your password, and set “<dbname>” to “studentsData”
现在,打开src \ main \ resources \ application.properties,并将spring.data.mongodb.uri设置为您先前从MongoDB Atlas保存的连接字符串,用密码替换连接字符串中的“ <password>”,然后设置“ <dbname>”改为“ studentsData”
Structuring Our Project
构建我们的项目
Spring Boot has several conventions for structuring projects, we will make use of the DAO pattern. We will structure our code into 4 packages inside the com.studentsData.students package and our entry java class, studentsDataApplication.java will remain directly within the com.studentsData.students package.
Spring Boot有几个用于构造项目的约定,我们将使用DAO模式。 我们会将代码结构化为com.studentsData.students包中的4个包,而我们的输入Java类studentsDataApplication.java将直接保留在com.studentsData.students包中。
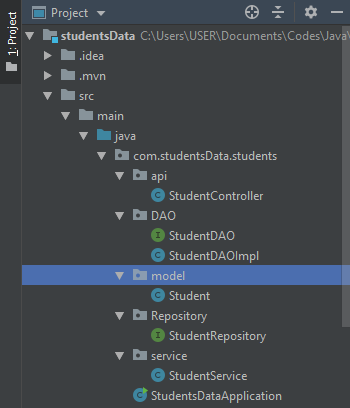
Understanding Our Project Structure
了解我们的项目结构
⦁ studentsDataApplication.java is our app’s entry class, it gets launched immediately we run our app.
⦁studentsDataApplication.java是我们应用程序的入口类,运行我们的应用程序后它将立即启动。
⦁ The service package contains java class(es) related to the business logic of our application and calls the DAO to perform it’s function.
service服务包包含与我们的应用程序的业务逻辑有关的Java类,并调用DAO来执行其功能。
⦁ model defines the structure of data to be stored in our database.
⦁模型定义了要存储在我们数据库中的数据的结构。
⦁ DAO(Direct Access Object) defines and performs raw database operations
AO DAO(直接访问对象)定义并执行原始数据库操作
⦁ Repository contains an interface which helps with creation of custom database queries in addition to the already available ones.
posit存储库包含一个接口,该接口除了可以使用现有接口外,还可以帮助创建自定义数据库查询。
⦁ api package contains REST Controller class that handles http requests made by clients and sends response.
⦁api包包含REST Controller类,该类处理客户端发出的http请求并发送响应。
Go ahead to create the Student.java class in the model package,
继续在模型包中创建Student.java类,
and type in the following lines of code
并输入以下代码行
public class Student {
    private final String name;
    private final String department;
    @Id
    private String id;
    public Student(@JsonProperty("name") String name, @JsonProperty("department") String department) {
        this.name = name;
        this.department = department;
    }
    public String getName() {
        return name;
    }
    public String getDepartment() {
        return department;
    }
    public String getId() {
        return id;
    }
}
The class defines the Student model, it contains the name, department and id fields to store the corresponding info about the student, notice the “@id” annotation before the id field, this informs spring boot to map the MongoDB auto-generated id to this field, @JSONProperty(“name”) and @JSONProperty(“department”) maps “name” and “department” keys of the JSON included as body of a post request to the name and department parameters of our Student constructor. We then defined getter methods to be used by Spring Boot to populate the Student object.
该类定义了Student模型,它包含名称,部门和id字段以存储有关学生的相应信息,请在id字段之前注意“ @id”注释,这将通知Spring Boot将MongoDB自动生成的ID映射到在此字段中,@JSONProperty(“ name”)和@JSONProperty(“ department”)将JSON的“ name”和“ department”键作为发布请求的主体映射到我们的Student构造函数的名称和部门参数。 然后,我们定义了Spring Boot使用的getter方法来填充Student对象。
Now, move on to create the studentRepository interface inside the repository package, then type in the following code
现在,继续在存储库包中创建studentRepository接口,然后键入以下代码
public interface StudentRepository extends MongoRepository<Student, String> {
    public Student findByName(String name);
}
This interface extends the MongoRepository class provided by Spring Data MongoDB, it let’s us create custom queries on our database in addition to the ones already provided by MongoDB such as findAll(), insert(), e.t.c. In this class, we declared a custom query method to find student by name, MongoDB will create the implementation of the class at runtime.
该接口扩展了Spring Data MongoDB提供的MongoRepository类,让我们除了MongoDB已提供的查询(例如findAll(),insert()等)之外,还在数据库上创建自定义查询。在此类中,我们声明了一个自定义查询通过名称查找学生的方法,MongoDB将在运行时创建该类的实现。
Moving forward, create StudentDAO.java interface inside the DAO package with the following code
继续,使用以下代码在DAO包中创建StudentDAO.java接口
public interface StudentDAO{
    public List<Student> getAllStudents();
    public Student getStudentById(String id);
    public  Student getStudentByName(String name);
    public Student addStudent(Student student);
    public Student updateStudent(Student student);
    public void deleteStudent(Student student);
}
The DAO will be used to make transactions with MongoDB, so we created an interface that contained all methods that we will make use of to access and manipulate our database, you can add more if you want. Before we can make use of it, it’s implementation is crucial, still inside the DAO package, create StudentDAOImpl.java then type in the following code
DAO将用于与MongoDB进行事务,因此我们创建了一个接口,其中包含将用于访问和操作数据库的所有方法,您可以根据需要添加更多方法。 在使用它之前,它的实现至关重要,仍然在DAO包中,创建StudentDAOImpl.java,然后键入以下代码
@Repository
public class StudentDAOImpl implements StudentDAO{
    @Autowired
    private final StudentRepository studentRepository;
    public StudentDAOImpl(StudentRepository studentRepository){
        this.studentRepository = studentRepository;
    }
    @Override
    public List<Student> getAllStudents() {
        return studentRepository.findAll();
    }
    @Override
    public Student addStudent(Student student) {
        return studentRepository.insert(student);
    }
    @Override
    public Student getStudentById(String id) {
        Optional<Student> student = studentRepository.findById(id);
        return student.get();
    }
    @Override
    public Student getStudentByName(String name) {
        return studentRepository.findByName(name);
    }
    @Override
    public Student updateStudent(Student newStudent) {
        return studentRepository.save(newStudent);
    }
    @Override
    public void deleteStudent(Student student) {
        studentRepository.delete(student);
    }
}
The @Repository annotation informs Spring Boot that this class is a repository and the necessary attachments should be made. @Autowired helped us create object instance of StudentRepository (i.e the studentRepository data field) without making an explicit instance creation, this is handled by Spring Boot using dependency injection. So we’ve implemented all the methods declared in the StudentDAO interface by invoking methods of studentRepository.
@Repository批注通知Spring Boot此类是一个存储库,应该进行必要的附件。 @Autowired帮助我们创建了StudentRepository的对象实例(即studentRepository数据字段),而无需进行显式实例创建,这由Spring Boot使用依赖注入来处理。 因此,我们已经通过调用StudentRepository的方法实现了在StudentDAO接口中声明的所有方法。
Going further, we can now create the StudentService class which will mediate between StudentController and StudentDAO, create StudentService class inside the service package, then enter the following lines
更进一步,我们现在可以创建将在StudentController和StudentDAO之间进行中介的StudentService类,在服务包中创建StudentService类,然后输入以下行
@Service
public class StudentService {
    private final StudentDAOImpl studentDAO;
    @Autowired
    public StudentService(StudentDAOImpl studentDAO) {
        this.studentDAO = studentDAO;
    }
    public List<Student> getAllStudents(){
        return studentDAO.getAllStudents();
    }
    public Student getStudent(String id){
        return studentDAO.getStudentById(id);
    }
    public Student getStudentByName(String name){
        return studentDAO.getStudentByName(name);
    }
    public Student addStudent(Student student){
        return studentDAO.addStudent(student);
    }
    public Student updateStudent(Student student){
        return studentDAO.updateStudent(student);
    }
    public void removeStudent(String id){
        Student student = studentDAO.getStudentById(id);
        studentDAO.deleteStudent(student);
    }
}
This class uses the studentDAOImpl class methods to carry out operations on our database, dependency injection is also carried out here as indicated by @Autowired, we then created methods to create, get student(s) and update student data by calling the required studentDAOImpl methods. All that is left to do is to make use of this service in our REST controller class.
此类使用studentDAOImpl类方法对我们的数据库进行操作,在这里也进行依赖注入,如@Autowired所示,然后我们通过调用所需的studentDAOImpl方法来创建用于创建,获取学生和更新学生数据的方法。 剩下要做的就是在我们的REST控制器类中使用此服务。
Create the StudentController.java class inside the api package, then input the following lines of code
在api包内创建StudentController.java类,然后输入以下代码
@RequestMapping("api/v1/student")
@RestController
public class StudentController {
    @Autowired
    private final StudentService studentService;
    public StudentController(StudentService studentService) {
        this.studentService = studentService;
    }    @GetMapping
    public List<Student> getAll(){
     return studentService.getAllStudents();
    }
    @GetMapping(value = "{id}")
    public Student getById(@PathVariable("id") String id){
        return studentService.getStudent(id);
    }
    @PostMapping
    public Student addStudent(@RequestBody Student student){
        return studentService.addStudent(student);
    }
    @DeleteMapping(value = "{id}")
    public void removeStudent(@PathVariable String id){
        studentService.removeStudent(id);
    }
}
@RestController and @RequestMapping(“api/v1/student”) annotate that this class is used to handle http requests, serves JSON, XML and custom response, and declares the request URI used to access our service which is “api/v1/student”, our app will only handle requests made to localhost:8080/api/v1/student.
@RestController和@RequestMapping(“ api / v1 / student”)注释该类用于处理http请求,提供JSON,XML和自定义响应,并声明用于访问我们的服务的请求URI,即“ api / v1 /学生”,我们的应用将仅处理对localhost:8080 / api / v1 / student的请求。
As usual, the studentService field is auto-wired to create it’s instance implicitly, @GetMapping indicates the method will be used to handle a GET http request, getAll() returns all the students data in our database when a GET request is sent to localhost:8080/api/v1/student, @GetMapping(value=”{id}”) will handle request with dynamic URI that includes an id, the request URI will be localhost/api/v1/{id} where id is the id of the student we want to fetch from the database and the @PathVariable injects the id in the URI as argument for the method.
和往常一样,studentService字段会自动连接以隐式创建它的实例,@GetMapping表示该方法将用于处理GET http请求,当GET请求发送到本地主机时,getAll()返回数据库中的所有学生数据。 :8080 / api / v1 / student,@ GetMapping(value =“ {id}”)将处理带有包含ID的动态URI的请求,请求URI将为localhost / api / v1 / {id},其中id为ID我们要从数据库中获取的学生中,@ PathVariable将URI中的ID注入为方法的参数。
@PostMapping handles POST request, @RequestBody tells that the request requires a body whose values are used to create the student object which will be the argument for the addStudent method. @DeleteMapping handles the request to delete student specified by id in our database.
@PostMapping处理POST请求,@ RequestBody告知该请求需要一个正文,该正文的值用于创建学生对象,该对象将作为addStudent方法的参数。 @DeleteMapping处理删除数据库中id指定的学生的请求。
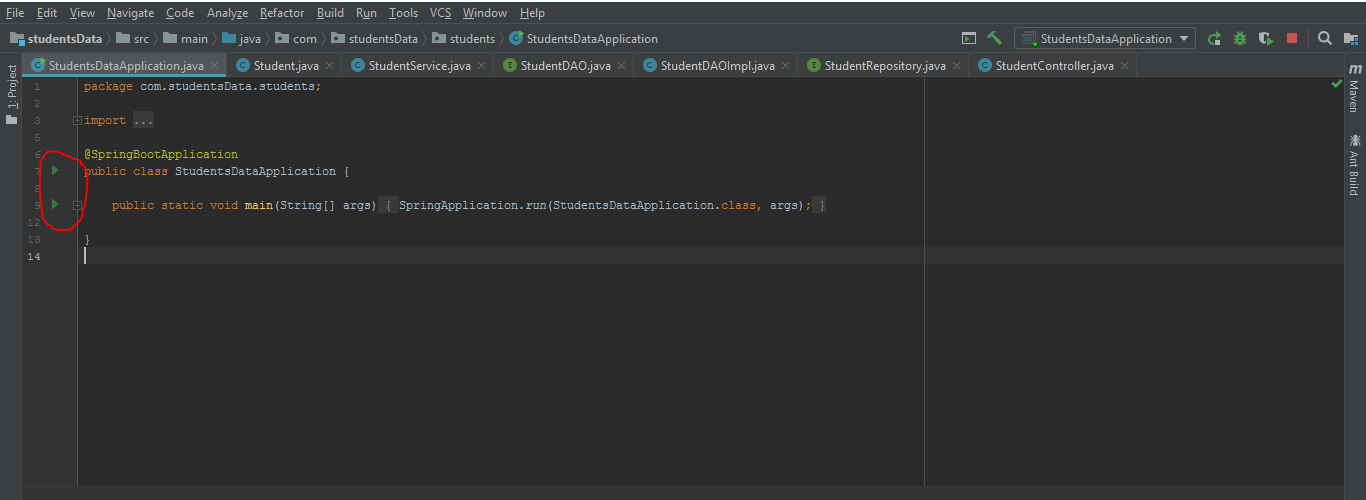
All of our project classes have been created and populated, let’s run our code by launching the app from studentsDataApplication.java.
我们所有的项目类均已创建并填充,让我们通过从studentsDataApplication.java启动应用程序来运行代码。
If everything is properly set in your project files, you should have some messages logged in your console that looks like this
如果在项目文件中正确设置了所有内容,则应该在控制台中记录一些如下所示的消息
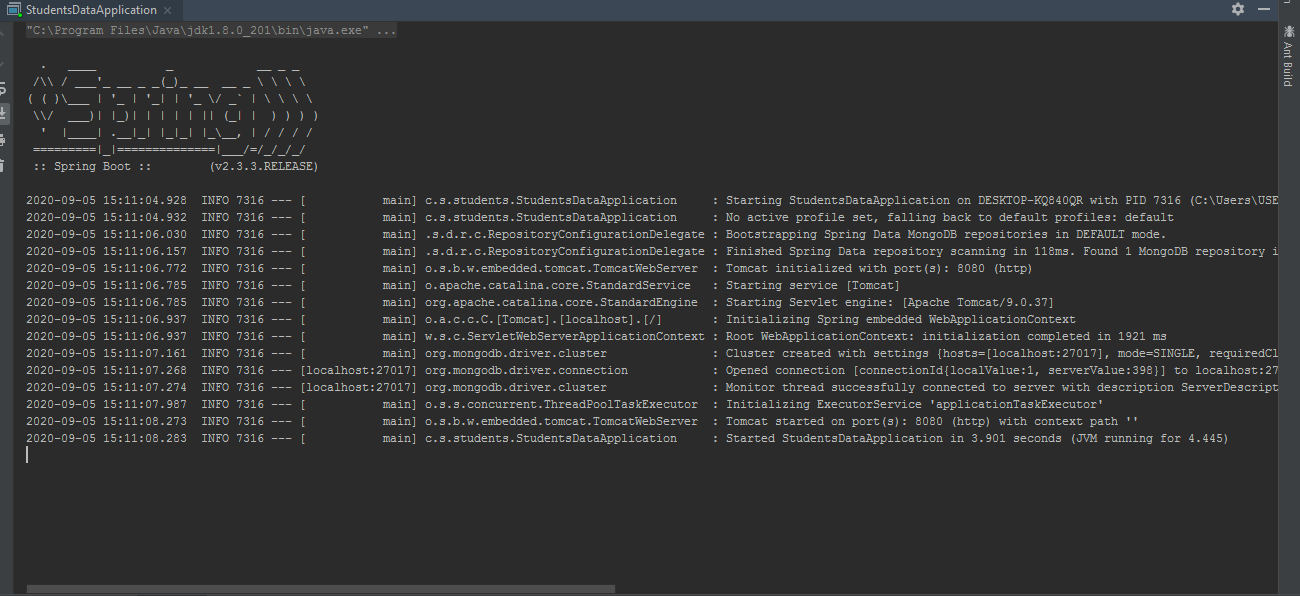
So Spring Boot has started a Tomcat server to listen for http requests, let’s proceed with testing our RESTful API.
因此,Spring Boot已经启动了Tomcat服务器来侦听http请求,让我们继续测试RESTful API。
测试我们的REST API (Testing our REST API)
I will use Postman for making http requests, you can use any API testing tool you feel comfortable using.
我将使用Postman发出http请求,您可以使用任何感到满意的API测试工具。
Launch Postman, open the build view, if you have another view opened, you can switch to build view by clicking on build at the bottom right of the app window.
启动Postman,打开构建视图,如果您打开了另一个视图,则可以通过单击应用程序窗口右下角的build切换到构建视图。
Enter the REST API URI, localhost:8080/api/v1/student, using the GET method option, hit send
使用GET方法选项输入REST API URI,localhost:8080 / api / v1 / student,点击send
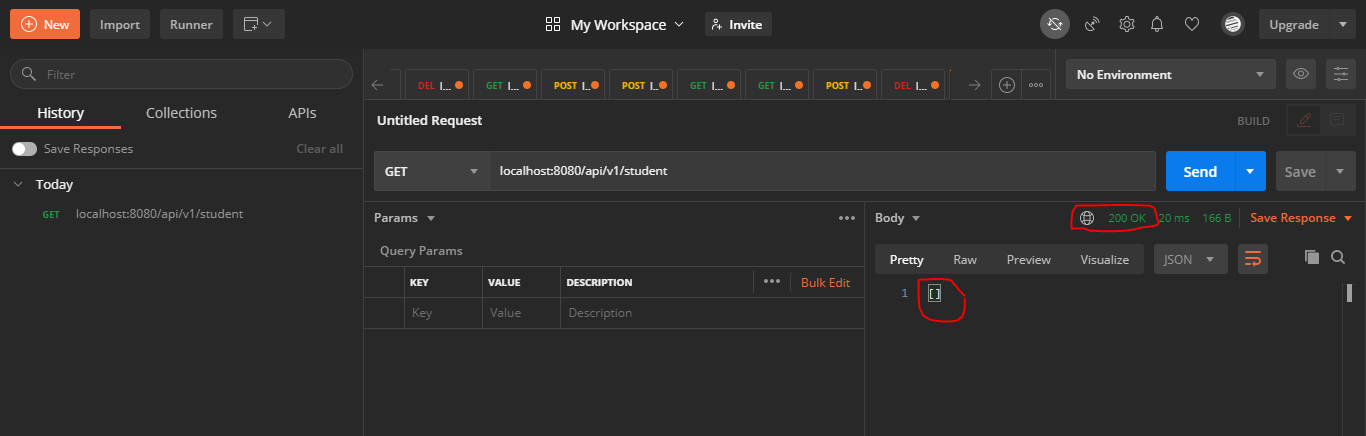
Notice the “200 ok” text on the right, this is an http status code which indicates that our http request was a success. The response is the empty square brackets which should contain students info saved in our database but is empty since we haven’t added any student to our database, let’s populate our database next.
注意右侧的“ 200 ok”文本,这是一个http状态代码,表示我们的http请求成功。 响应是空方括号,其中应包含保存在数据库中的学生信息,但由于未将任何学生添加到数据库中,因此该信息是空的,接下来填充数据库。
Now, change the request method from “GET” to “POST”, and change the option in the Params dropdown directly below the “POST” dropdown from Params to Body, then create a JSON with the student’s name and department then hit send.
现在,将请求方法从“ GET”更改为“ POST”,然后将“ Params”下拉列表中的选项直接从“ Params”更改为“ Param”,然后使用学生的姓名和部门创建一个JSON,然后单击send。
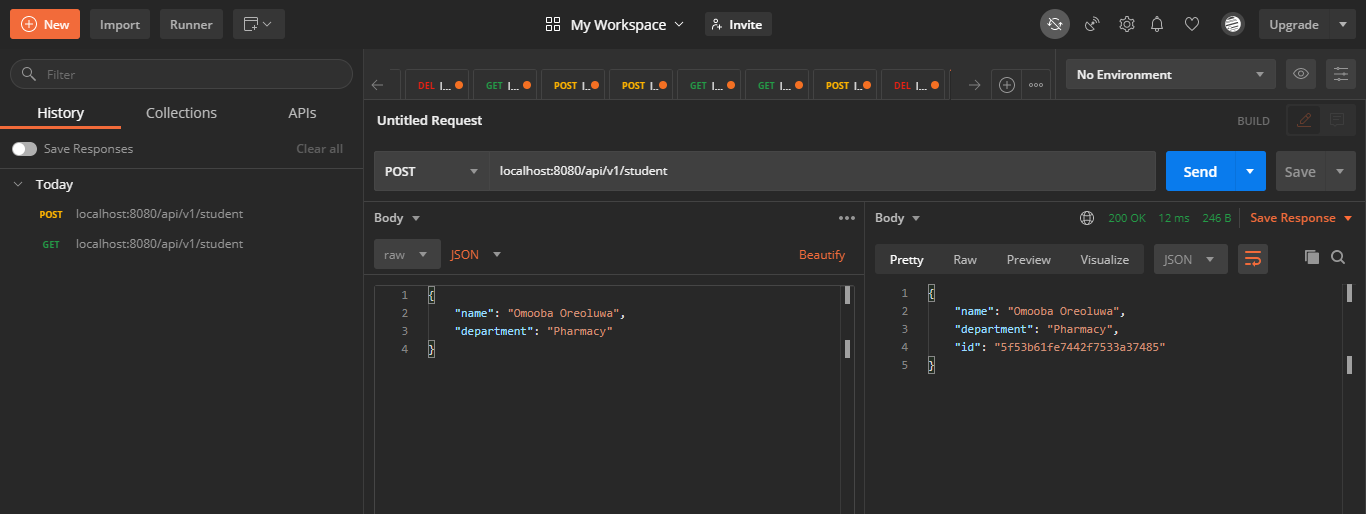
At the response section on the right side of the window, you can see we got a 200 status code and also, we got a JSON response containing our student’s info with an id attached, go on to add more students, then make a GET request to localhost:8080/api/v1/student to fetch all students info.
在窗口右侧的响应部分,您可以看到我们获得了200个状态代码,并且还获得了一个JSON响应,其中包含带有附加ID的学生信息,接着添加更多学生,然后发出GET请求到localhost:8080 / api / v1 / student以获取所有学生信息。
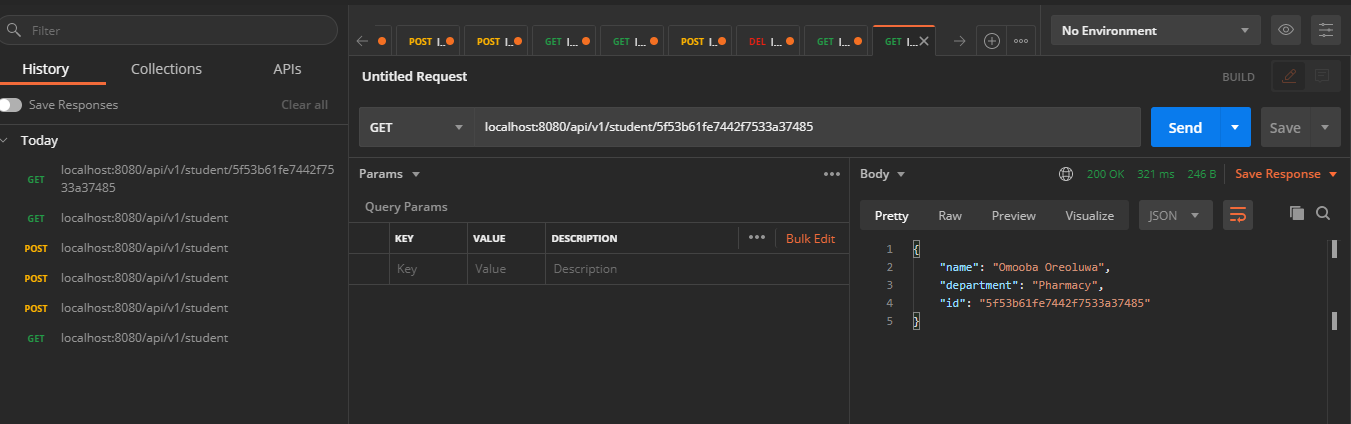
Now let’s fetch a student’s info with id, to do that, we will extend our request’s URI with the specific id and change the request method to GET, so let’s get Omooba Oreoluwa’s details using id.
现在,让我们获取带有id的学生的信息,为此,我们将使用特定的id扩展请求的URI,并将请求方法更改为GET,因此让我们使用id来获取Omooba Oreoluwa的详细信息。
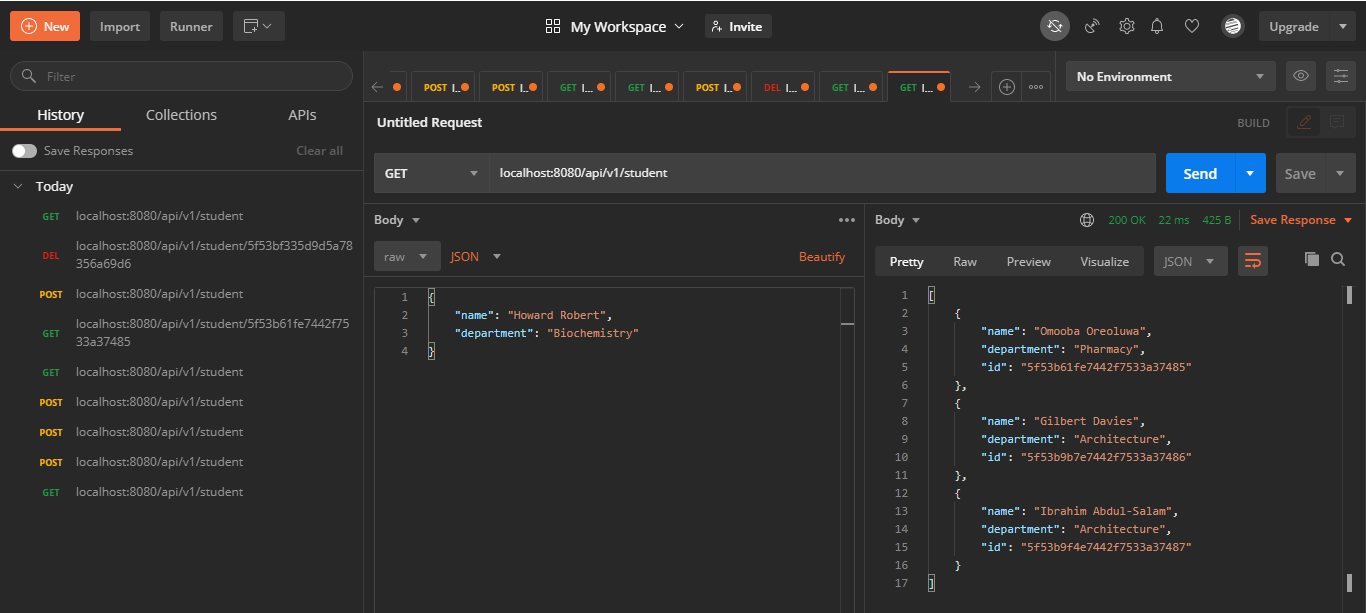
Next, let’s delete a student’s info. I will add a new student with the name “Howard Robert” at Biochemistry, then I will use the delete http request with the generated id to delete the student from the database
接下来,让我们删除学生的信息。 我将在Biochemistry中添加一个名为“ Howard Robert”的新学生,然后将使用带有生成的ID的delete http请求从数据库中删除该学生。
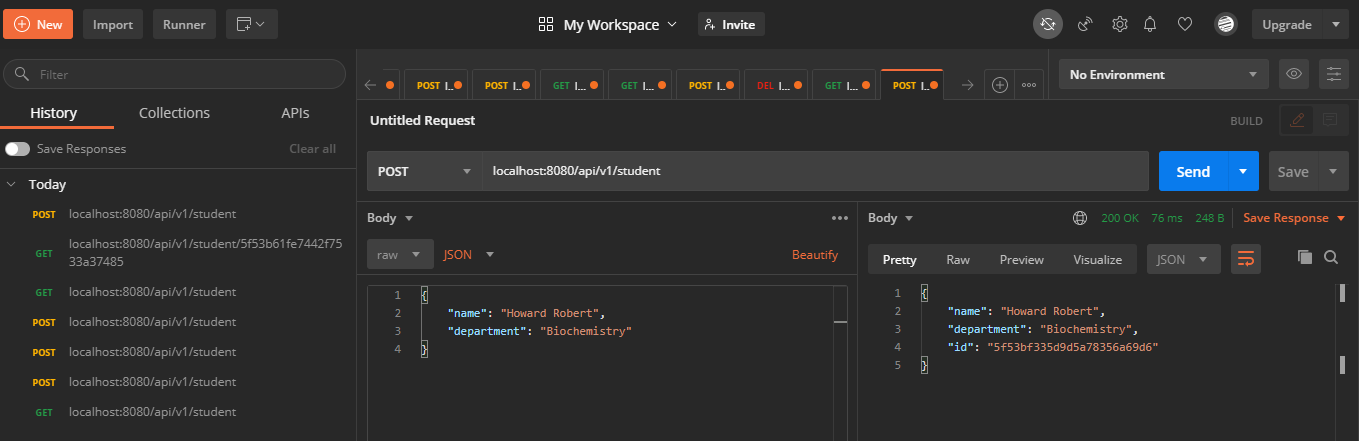
The student data has been added to the database, now, let’s delete the student from the database,
学生数据已添加到数据库中,现在,让我们从数据库中删除学生,
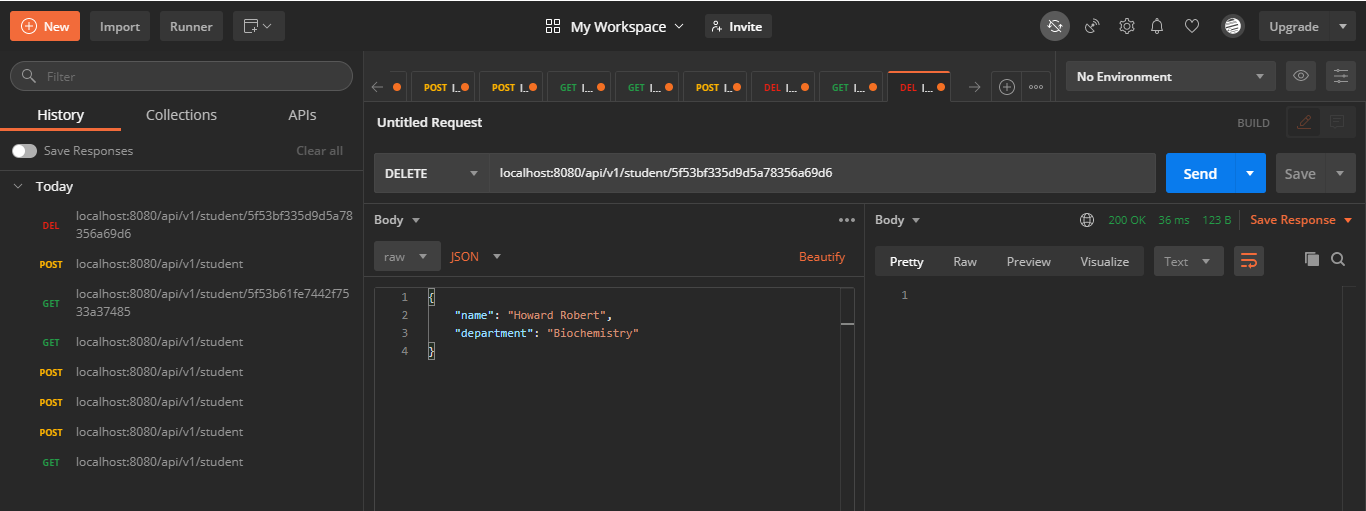
Let’s check the list of students info in our collection, you can see Howard Robert isn’t present in our collection anymore.
让我们检查一下我们集合中的学生信息列表,您会发现Howard Robert不再出现在我们的集合中。
At this point, we’ve verified the functionality of the RESTful API we’ve created and can make request based on the operations we’ve defined. You can go further to add more operations to manipulate our database inside the REST Controller class.
至此,我们已经验证了所创建的RESTful API的功能,并且可以根据已定义的操作发出请求。 您可以进一步在REST Controller类中添加更多操作来操纵我们的数据库。
You can find the project’s code at https://github.com/Ahmodadeola/studentsDataApi_with_SpringBoot2.git.
您可以在https://github.com/Ahmodadeola/studentsDataApi_with_SpringBoot2.git中找到该项目的代码。
Congrats, you can now build RESTful APIs with Spring Boot, go explore more about Spring Boot and build greater apps.
恭喜,您现在可以使用Spring Boot构建RESTful API,进一步了解Spring Boot并构建更大的应用程序。
翻译自: https://medium.com/@ahmodadeola/creating-restful-apis-with-spring-boot-2-and-mongodb-3bba937cd438


 186
186

 被折叠的 条评论
为什么被折叠?
被折叠的 条评论
为什么被折叠?
 到【灌水乐园】发言


