


名派照明连接天猫精灵
Sprites in Daedalus make use of Unity’s lighting system to appear with 3D-like properties.
Daedalus中的Sprite利用Unity的照明系统显示具有类似3D的属性。
Since Unity treats Sprites as flat 3D surfaces, it can do this by applying a shader in the sprite’s material that accepts a normal map, and using that normal map to calculate how light should be applied. But what does that all mean, and what how does one actually do it? I’m first going to talk about the technical details, but if you’re already familiar you can skip the next section on making normals.You can also find a link to the shader I’m using at the start of the final section.
由于Unity将Sprite视作平面3D曲面,因此可以通过在接受标准图的Sprite材质中应用着色器,然后使用该法线图来计算应如何应用光,来实现此目的。 但是,这一切意味着什么,一个人实际上是怎么做的呢? 我将首先讨论技术细节,但是如果您已经很熟悉,则可以跳过下一节中的制作法线。您也可以在最后一节的开头找到我正在使用的着色器的链接。
法线和法线贴图 (Normals and Normal Maps)

First, let’s talk about what a normal map is and what it’s used for. 3D surfaces have a surface normal, that is, the direction perpendicular to the plane of the surface. In Unity2D, that plane is almost always the X-Y plane (green and red arrows), making the normal vector purely in the Z direction.
首先,让我们讨论一下法线贴图是什么以及它的用途。 3D表面具有表面法线,即垂直于表面平面的方向。 在Unity2D中,该平面几乎始终是XY平面(绿色和红色箭头),从而使法向矢量完全在Z方向上。
When people first started rendering 3D environments and assets, their computers couldn’t afford to render many different surfaces. Early 3D games are famous for having an extremely blocky aesthetic. One way to get around this is a shader that uses vertex information to estimate lighting and interpolate it.
人们最初开始渲染3D环境和资产时,他们的计算机负担不起渲染许多不同的表面。 早期的3D游戏以极高的美观性而闻名。 解决此问题的一种方法是使用顶点信息来估计照明并对其进行插值的着色器。

It works by using the normals of the vertices rather than the surfaces, and interpolating between them to estimate the lighting at each pixel.
它通过使用顶点的法线而不是表面的法线并在它们之间进行插值来估计每个像素处的光照来工作。
However, for a much finer grade control we can use a special shader with a normal map. A normal map is a texture that describes modifications to a surface’s normal.
但是,为了更好地控制坡度,我们可以使用带有法线贴图的特殊着色器。 法线贴图是描述对表面法线的修改的纹理。

Psychadelic! But what’s up with those colors exactly? And why is it all so purple?
Psychadelic! 但是这些颜色到底是怎么回事? 为何一切都这么紫色?
As you may have figured out, the normal map is mapping color to different normals. Since color is represented as a 3 part vector of Red, Green, and Blue, it makes sense to map these colors to their respective directions of X, Y, and Z (you can even see this mapping in the Unity3D view picture above).
您可能已经知道,法线贴图会将颜色映射到不同的法线。 由于颜色表示为红色,绿色和蓝色的三部分向量,因此将这些颜色映射到它们各自的X,Y和Z方向是有意义的(您甚至可以在上面的Unity3D视图图片中看到此映射)。
Let’s take a look at the different color values to see what’s going on. There are a few things interesting about these values. First, the center of the sphere and the background color are the same. Second, the blue value ranges from 50% to 100%, but the red and green use the whole spectrum. Why?
让我们看一下不同的颜色值,看看发生了什么。 这些值有一些有趣的事情。 首先,球心和背景色相同。 其次,蓝色值的范围从50%到100%,但是红色和绿色使用整个光谱。 为什么?

The mapping of 0 through 255 of a color value is mapped to the -1 to +1: a value of 128 is mapped to 0. This means that a normal vector of (0,0,1) will map to (128, 128, 255), which happens to be the background color. Remember how the normal of the 2D surface was entirely in the Z direction? That means that a light ray shining into the surface normal will be reflected back along the surface normal. A color that’s 50%R, 100%G, 50%B will face up (positive Y); a color that’s 75%R, 25%G will face to the bottom right; 0%R, 50%G will face to the right, and so on.
颜色值从0到255的映射映射到-1到+1:将值128映射到0。这意味着法向矢量(0,0,1)将映射到(128,128 255),恰好是背景色。 还记得2D表面的法线如何完全在Z方向上吗? 这意味着,照射到表面法线的光线将沿着表面法线反射回去。 颜色为50%R,100%G,50%B的颜色会面朝上(正Y); 右下角为75%R,25%G的颜色; 0%R,50%G将朝右,依此类推。

In this example, there is a light in the center of the console. Rix is lit up on her chest, her chin, and the bright pink part of her hair. Given this, we would expect the normal map to have a color on her chest that looks like the right of the sphere example, a color on her chin that looks like the bottom-right of the sphere example, and a color on her pink hair highlight that resembles the top-right of the sphere example. Not only does this all check out, but other body parts like her elbow are colors that face away. Nice!
在此示例中,控制台中央有一个灯。 Rix的胸部,下巴和头发的亮粉红色部分都亮了起来。 鉴于此,我们希望法线贴图的胸部上的颜色看起来像球形实例的右侧,下巴上的颜色看起来像球形实例的右下角,粉红色的头发上的颜色突出显示,类似于球形示例的右上角。 不仅可以检查所有这些,而且其他身体部位(例如她的肘部)的颜色也会面朝远方。 真好!
创建法线贴图 (Creating a Normal Map)
There are 3 ways I’ve explored of making a normal map: using an external tool, drawing a height map by hand, and drawing a normal map by hand.
我探索了三种制作法线贴图的方法:使用外部工具,手动绘制高度图和手动绘制法线贴图。
For the first, I’m going to plug a tool I think is phenomenal, SpriteDLight.
首先,我将插入一个我认为非常出色的工具SpriteDLight 。
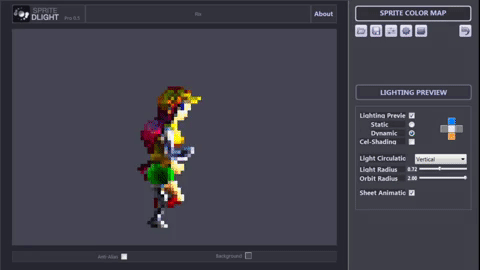
This app can take in a sprite sheet, gives you a few options as to how sharp and deep the bumps are, and spits out a normal map sheet that can even be previewed within the program! It takes into account differences edge differences between different colors and the transparency, and is excellent for characters.
这个应用程序可以放入一个精灵表,为您提供一些关于凹凸的深度和深度的选项,并吐出一个普通的地图表,甚至可以在程序中预览它! 它考虑了不同颜色和透明度之间的边缘差异,非常适合字符。
Since sprite sheets are a bit of a different animal, I tried two ways of making normals for them: converting from height hand painted height maps, and pure hand painted normals.Let’s take a look at a section of the ship’s sprite sheet to see what we’re giving normals to:
由于精灵板有点不同,我尝试了两种制作法线的方法:从高度手绘的高度图转换为纯手绘法线,让我们看一看船上精灵板的一部分以了解什么我们给法线:

In a height map, the brightness of a color corresponds inversely with its depth: darker colors are deeper. They don’t have to be grayscale, but the system I believe only looks at a colors brightness regardless. They work best when the sprite sheet contains no unnatural logical transitions: when you put tiles next to each other that are of different heights and would NOT be next to each other in games, you can get some problems.
在高度图中,颜色的亮度与其深度成反比:深色越深。 它们不必一定是灰度的,但是我相信系统无论如何都只会看到颜色的亮度。 当Sprite表中不包含不自然的逻辑过渡时,它们的工作效果最佳:当您将高度不同且彼此不相邻的图块彼此相邻放置时,可能会遇到一些问题。

As you can see, the map is not entirely filled out because I soon realized the process would not work well on my particular sprite sheet, and that it might be hard to make sheets that meet the requirements listed above. After trying this out, I instead began to hand paint normals, using a palette of 17 colors, and this worked out much better for me:
如您所见,地图并未完全填写,因为我很快意识到该过程无法在我的特定Sprite工作表上很好地工作,并且很难制作满足上述要求的工作表。 经过尝试之后,我开始使用17种颜色的调色板来手工绘制法线,这对我来说要好得多:

This is the approach that I would generally recommend for people: it doesn’t take a lot of understanding to make work, and one can paint with fairly broad and non-detailed strokes to get a good result.
这是我通常向人们推荐的方法:进行工作不需要太多的理解,并且可以使用相当宽泛且不详细的笔触进行绘画以获得良好的效果。
在Unity中使用法线贴图 (Use a Normal Map in Unity)
The current normal map shader I’m using , which I hope to find the original source for soon, uses a bump map argument, “Normalmap”, to shade both sides of a Sprite (for users that flip sprites by multiplying the X scale by -1).
我正在使用的当前法线贴图着色器(希望尽快找到原始源)使用凹凸贴图参数“ Normalmap”来对Sprite的两侧进行着色 (对于将X比例乘以-1)。
When one creates a new Sprite via the Create menu, Unity populates it with a few default options, including the “Sprites-Default” Material which uses the “Sprites/Default” shader.
当通过“创建”菜单创建新的Sprite时,Unity会用一些默认选项填充它,包括使用“ Sprites / Default”着色器的“ Sprites-Default”材质。
Further information can be found at Unity’s rather nice documentation page on normal maps. To sum up, you’ll need a material with a shader that uses a normal map, attach that to your sprite object, and supply your custom normal map in the normal map argument. Pop a few lights into your scene and viola, dynamic lighting!
可以在Unity的法线贴图文档页面上找到更多信息。 综上所述,您需要一种材质球,该材质球使用法线贴图,将其附加到您的Sprite对象上,并在法线贴图参数中提供自定义法线贴图。 将几盏灯射入场景,中提琴和动态照明!

If you liked this, consider giving me a follow on Twitter! I can be found @thedeivore and I post updates to this and other projects as often as I can.Thanks for reading!
如果您喜欢这个,请考虑在Twitter上关注我! 可以在@thedeivore上找到我,并且我会尽可能频繁地发布此项目和其他项目的更新。感谢阅读!
翻译自: https://medium.com/swlh/dynamic-sprite-lighting-in-unity-1fa6de78b3b8
名派照明连接天猫精灵


 737
737

 被折叠的 条评论
为什么被折叠?
被折叠的 条评论
为什么被折叠?
 到【灌水乐园】发言


