


firebase登录验证
If you’ve got a brilliant idea and craved for implementing it right away in a short period of time, you should consider the tool which can boost productivity and speed up development. Adopting a cloud based platform with ready-made solutions is definitely a good choice, you not only enjoy the benefit of scalable infrastructure but also avoid the effort to re-invent those common features such as sign-in, security control and backend store.
如果您有一个绝妙的主意并且渴望在短时间内立即实施它,则应该考虑使用可以提高生产率并加快开发速度的工具。 采用带有现成解决方案的基于云的平台绝对是一个不错的选择,您不仅可以享受可扩展基础架构的好处,而且可以避免重新发明那些常用功能(如登录,安全控制和后端存储)的麻烦。
Recently, I realized the power of Firebase’s ready made services as I transformed my personal app by enabling authentication and migrating to cloud based backend storage. Hence, I’m eager to share my experience and hope that it will be helpful to you if you are interested in enhancing your app with lesser effort. In this article, I will focus on authentication setup and walkthrough the setup and code how to implement my app using Firebase services.
最近,当我通过启用身份验证并迁移到基于云的后端存储来转换个人应用程序时,我意识到了Firebase现成服务的强大功能。 因此,我很想分享我的经验,并希望对您以较少的精力来增强您的应用程序有帮助。 在本文中,我将重点介绍身份验证设置,并逐步进行设置并编码如何使用Firebase服务实现我的应用程序。
火力基地 (Firebase)
Firebase is my favorite companion when it comes app development. Why? It offers a wide range of amazing ready-made services, making mobile app development so much easier. It is part of Google and so I can manage the Firebase services using my Google account. Those backend services are easily configurable in the console the developer-friendly SDK for app integration, resulting in improving productivity and absurdly fast track of the app build.
在开发应用程序时,Firebase是我最喜欢的伴侣。 为什么? 它提供了各种惊人的现成服务,使移动应用程序的开发变得如此容易。 它是Google的一部分,因此我可以使用我的Google帐户管理Firebase服务。 这些后端服务可在控制台中轻松配置为开发人员友好的SDK,以实现应用程序集成,从而提高了生产率并以惊人的速度快速跟踪应用程序的构建。
费用追踪器应用 (Expense Tracker App)
Expense Tracker App I built for myself several years ago is a simple but useful tool to keep track of my daily spending and it also let me know my current and historical expenditure so that I can manage and control my expenses. In terms of technology, it is an Ionic hybrid app that stores records in SQLite database in my mobile phone.
我几年前为自己创建的Expense Tracker App是一个简单但有用的工具,可以跟踪我的日常支出,还可以让我知道当前和历史支出,以便我可以管理和控制支出。 在技术上,这是一个Ionic混合应用程序,可将记录存储在我手机SQLite数据库中。
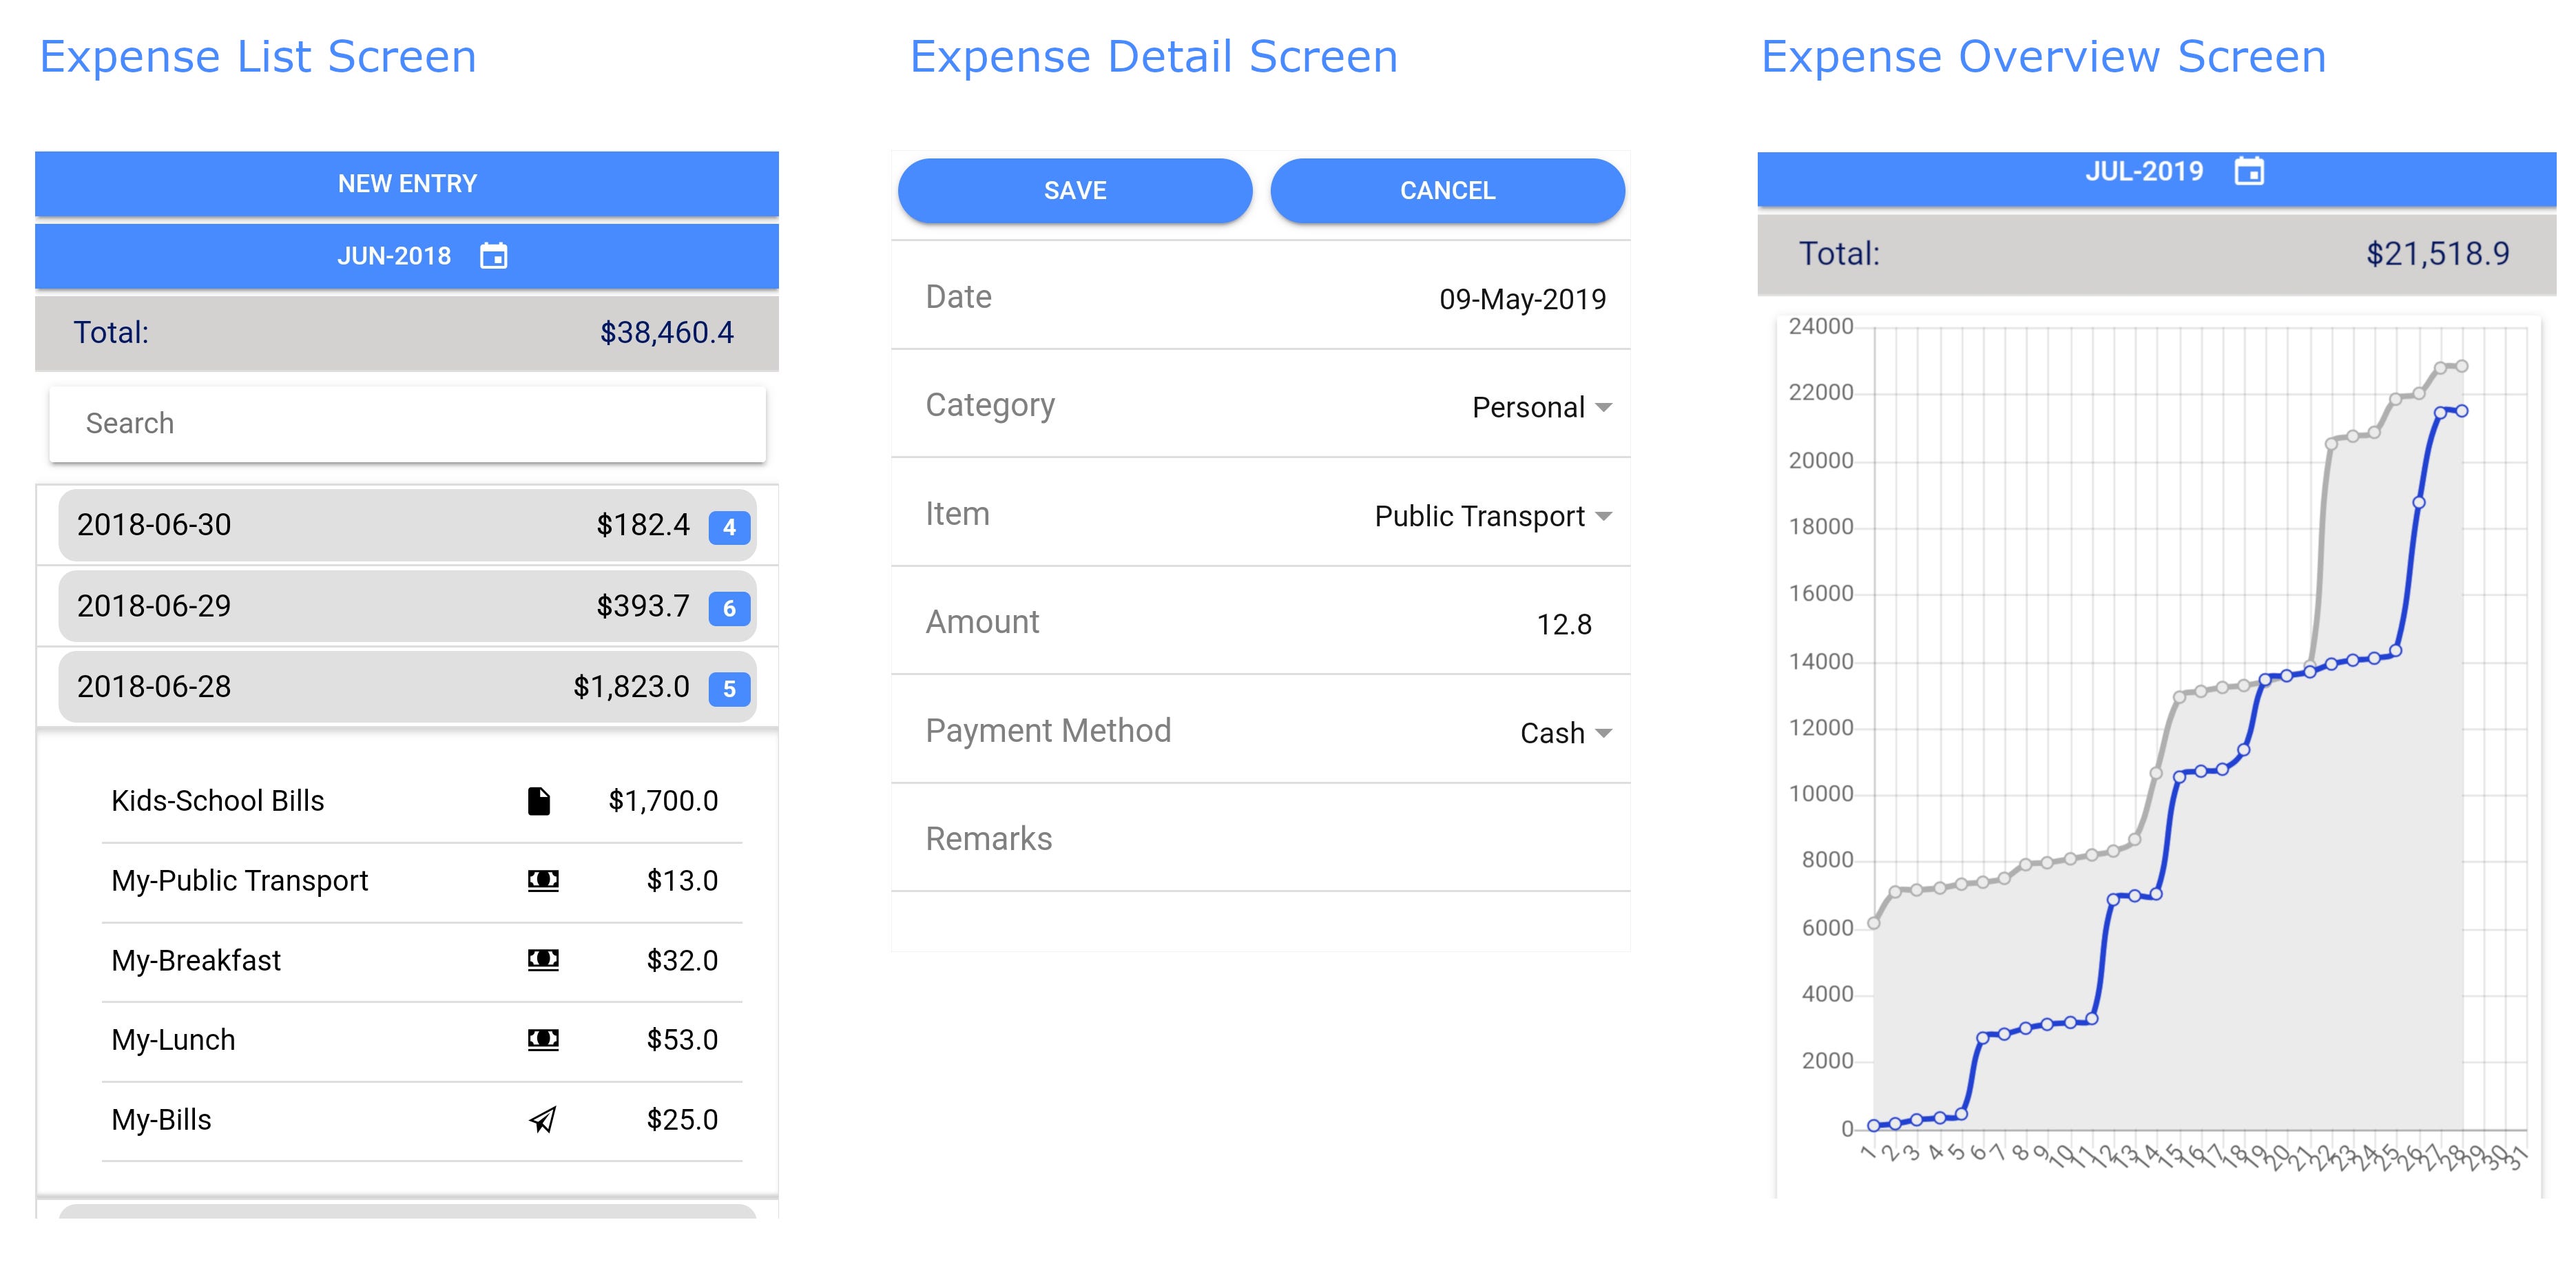
The initiative is to transform the app functionalities and move the local database to cloud backend storage with multiple user profile support. Therefore, authentication and security control are the essential feature to protect the data access.
该计划旨在通过多种用户配置文件支持来转换应用程序功能并将本地数据库移至云后端存储。 因此,身份验证和安全控制是保护数据访问的基本功能。
The app was built based on the framework of React Redux, you can refer to this article if you would like to revisit the key concepts of React Redux. In this article, I will make use of this app to demonstrate the implementation of Firebase authentication.
该应用程序是基于React Redux框架构建的,如果您想重新了解React Redux的关键概念,可以参考本文 。 在本文中,我将利用此应用程序演示Firebase身份验证的实现。
Firebase身份验证功能 (Firebase Authentication Feature)
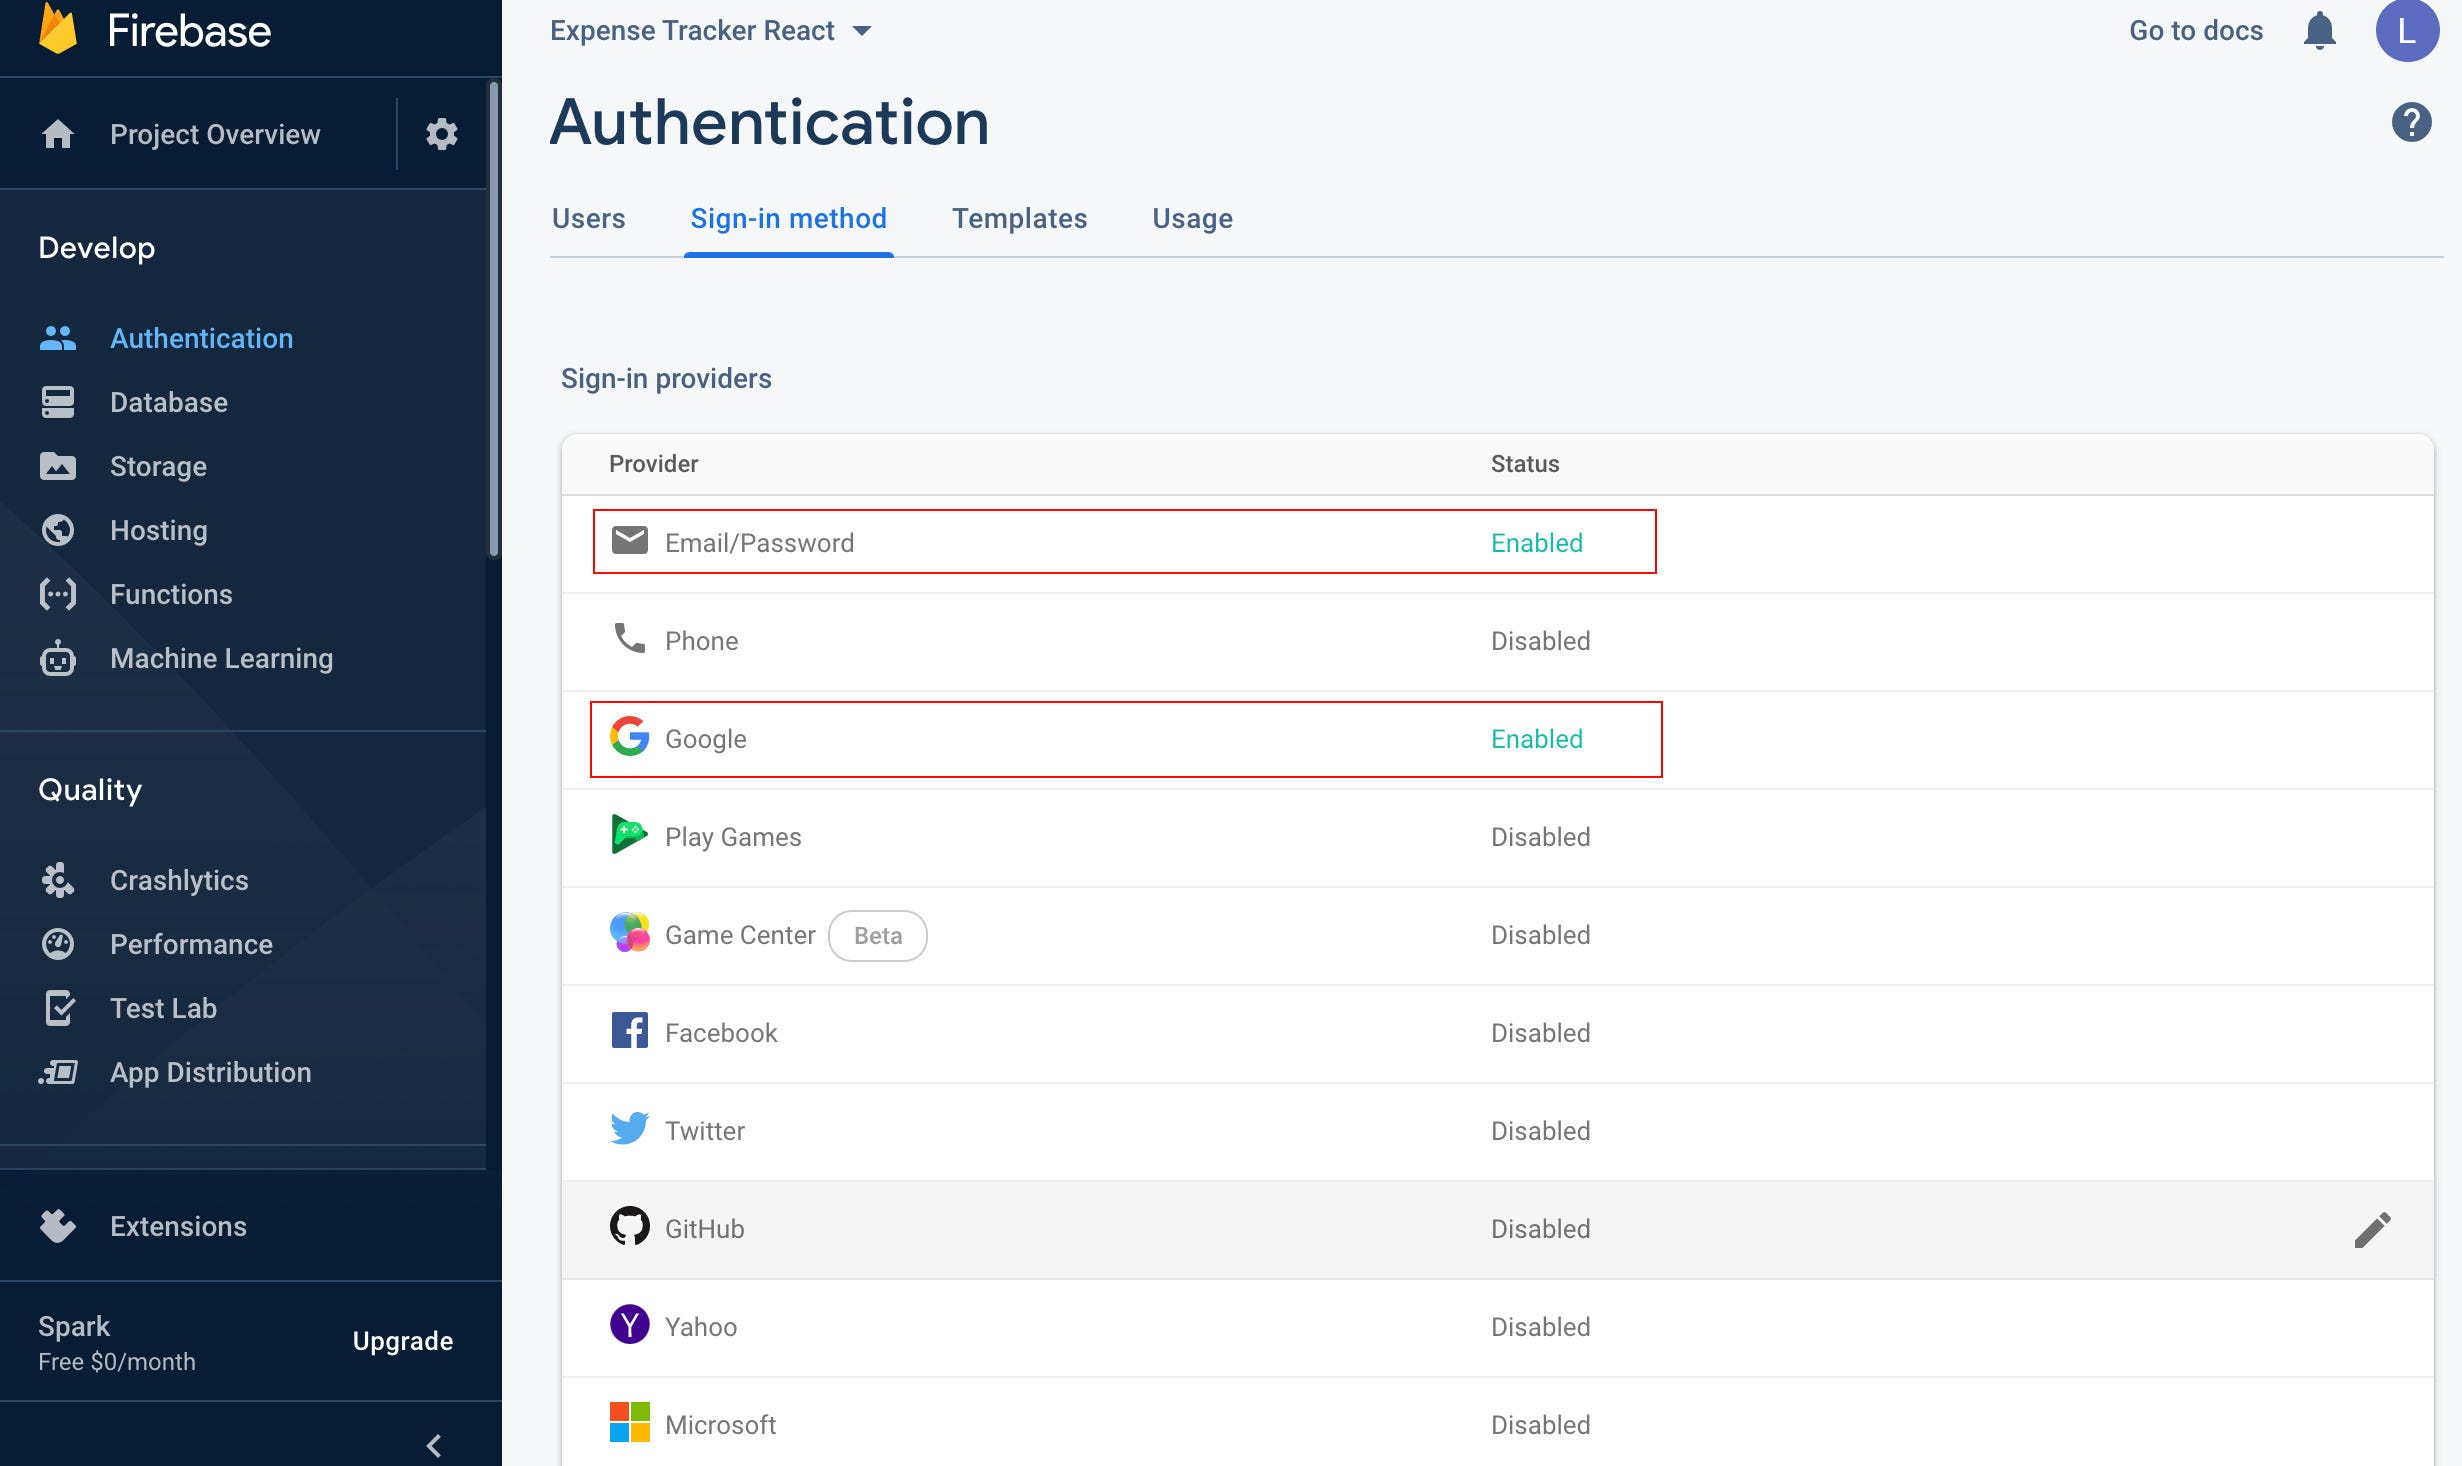
Let’s look into authentication. Firebase offers a number of sign-in methods including the basic email & password as well as OAuth authentication by identity providers such as Google, Facebook, GitHub, etc. To enable authentication service, you can firstly create a project in Firebase console and then switch on the target sign-in methods on the console. For my app, I enabled 2 sign-in methods - Email & password and Google.
让我们来看看身份验证。 Firebase提供了许多登录方法,包括基本的电子邮件和密码以及由身份提供商(例如Google,Facebook,GitHub等)进行的OAuth身份验证。要启用身份验证服务,您可以首先在Firebase控制台中创建一个项目,然后进行切换控制台上的目标登录方法。 对于我的应用程序,我启用了2种登录方法-电子邮件和密码以及Google。
登录方法-电子邮件和密码 (Sign-In Method — Email & Password)
This is a basic type of authentication, you can register email address as the logon id with initial password.
这是一种基本的身份验证,您可以使用初始密码将电子邮件地址注册为登录ID。
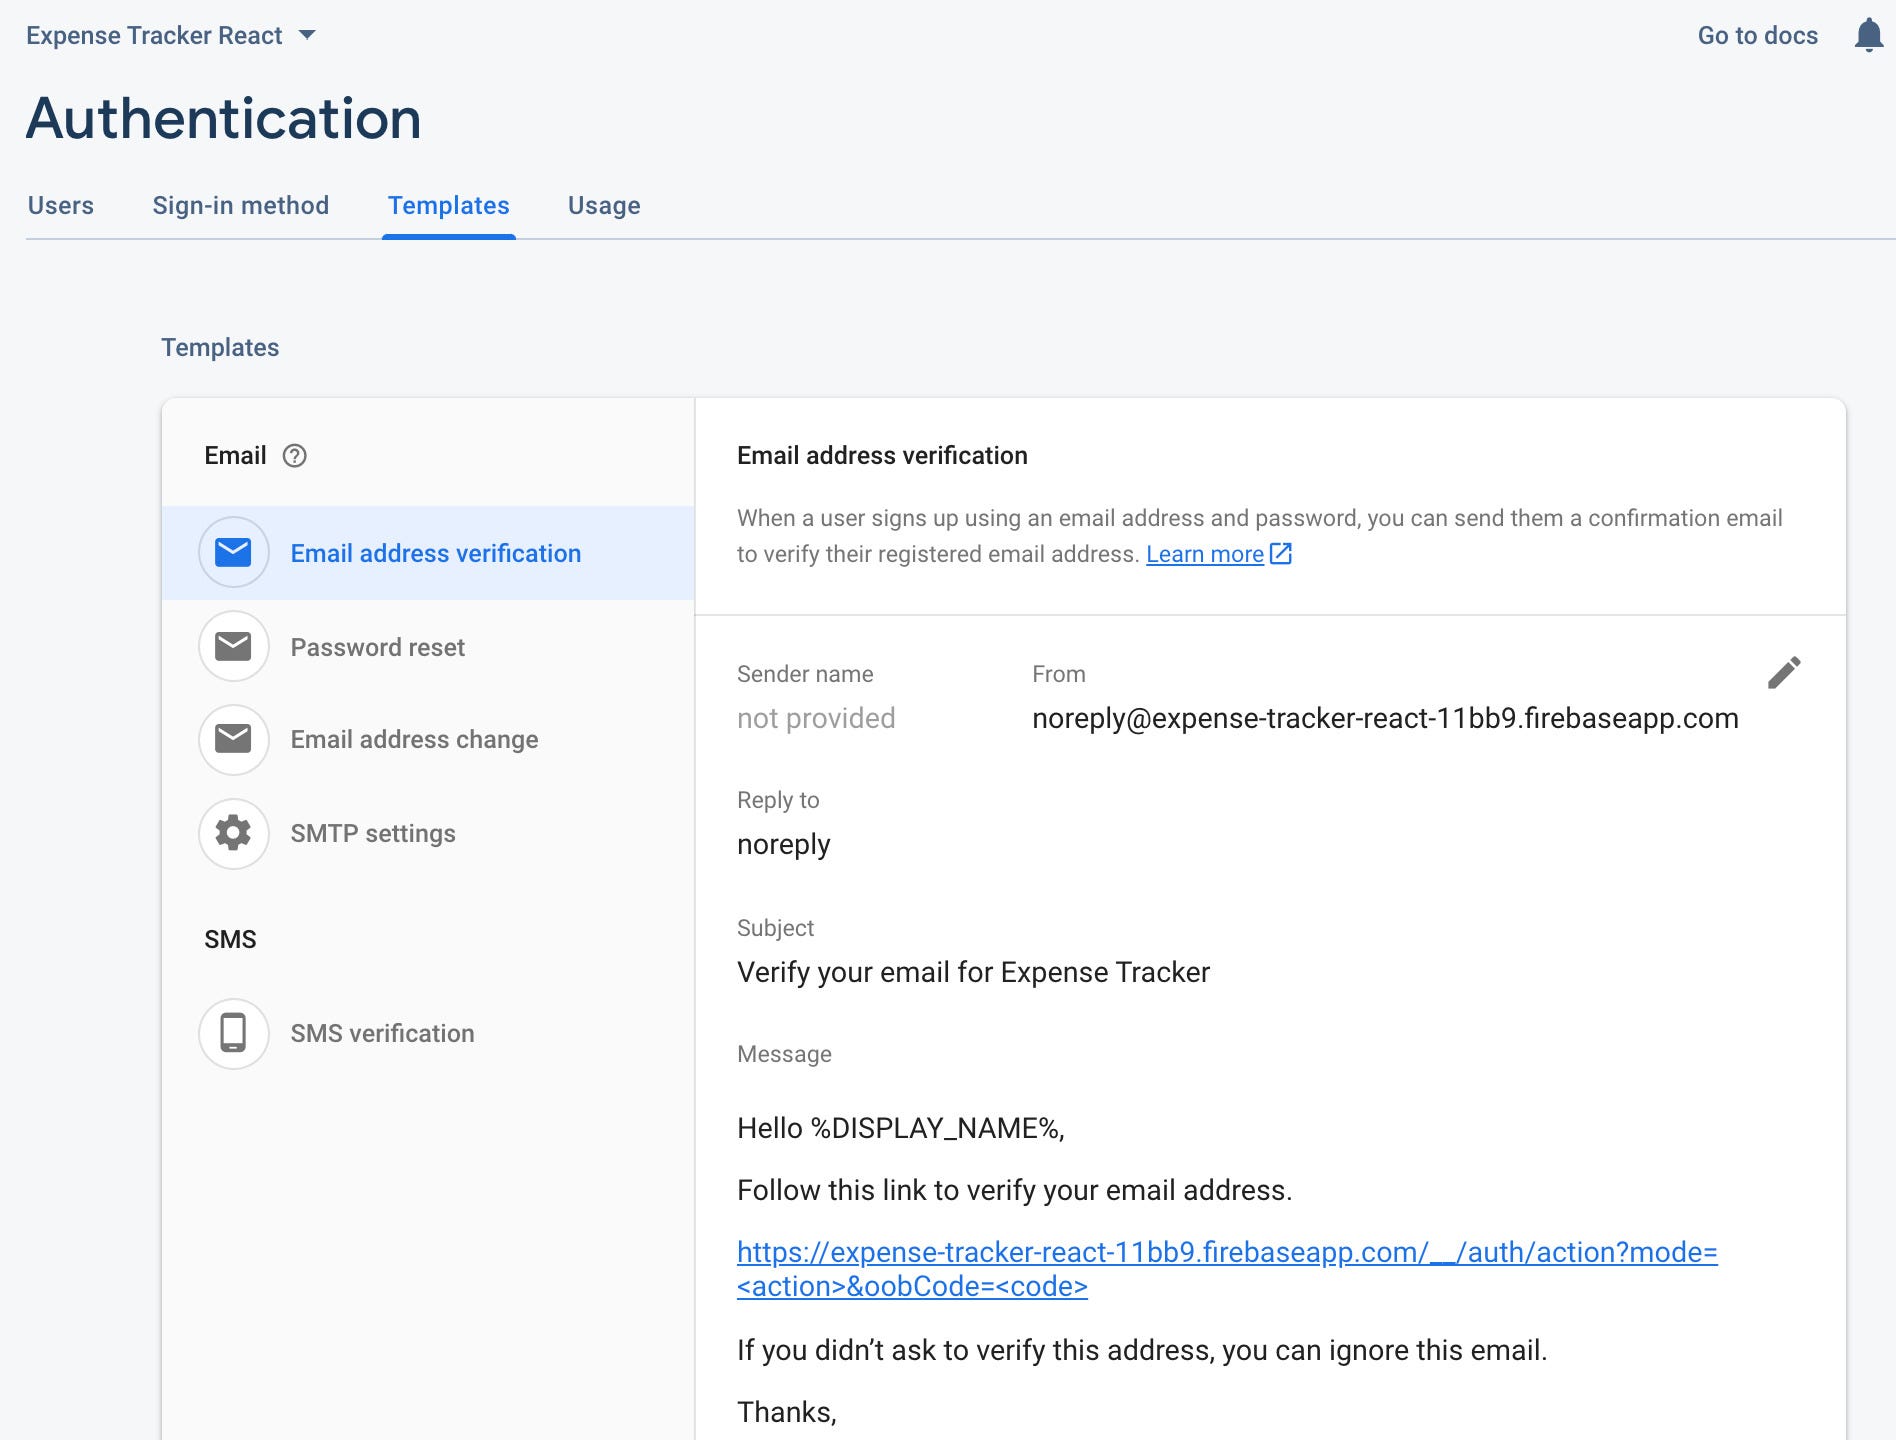
This sign-in method comes with standard features of invitation email and password reset, Firebase allows customization of the email content template. Firebase SDK provides function calls for system to implement screen flow to trigger password reset, email verification and update of email address.
此登录方法具有邀请电子邮件和重置密码的标准功能,Firebase允许自定义电子邮件内容模板。 Firebase SDK为系统提供了功能调用,以实现屏幕流程以触发密码重置,电子邮件验证和电子邮件地址更新。
登录方法-使用Google,Facebook Microsoft…登录。 (Sign-In Method — Logon with Google, Facebook Microsoft….)
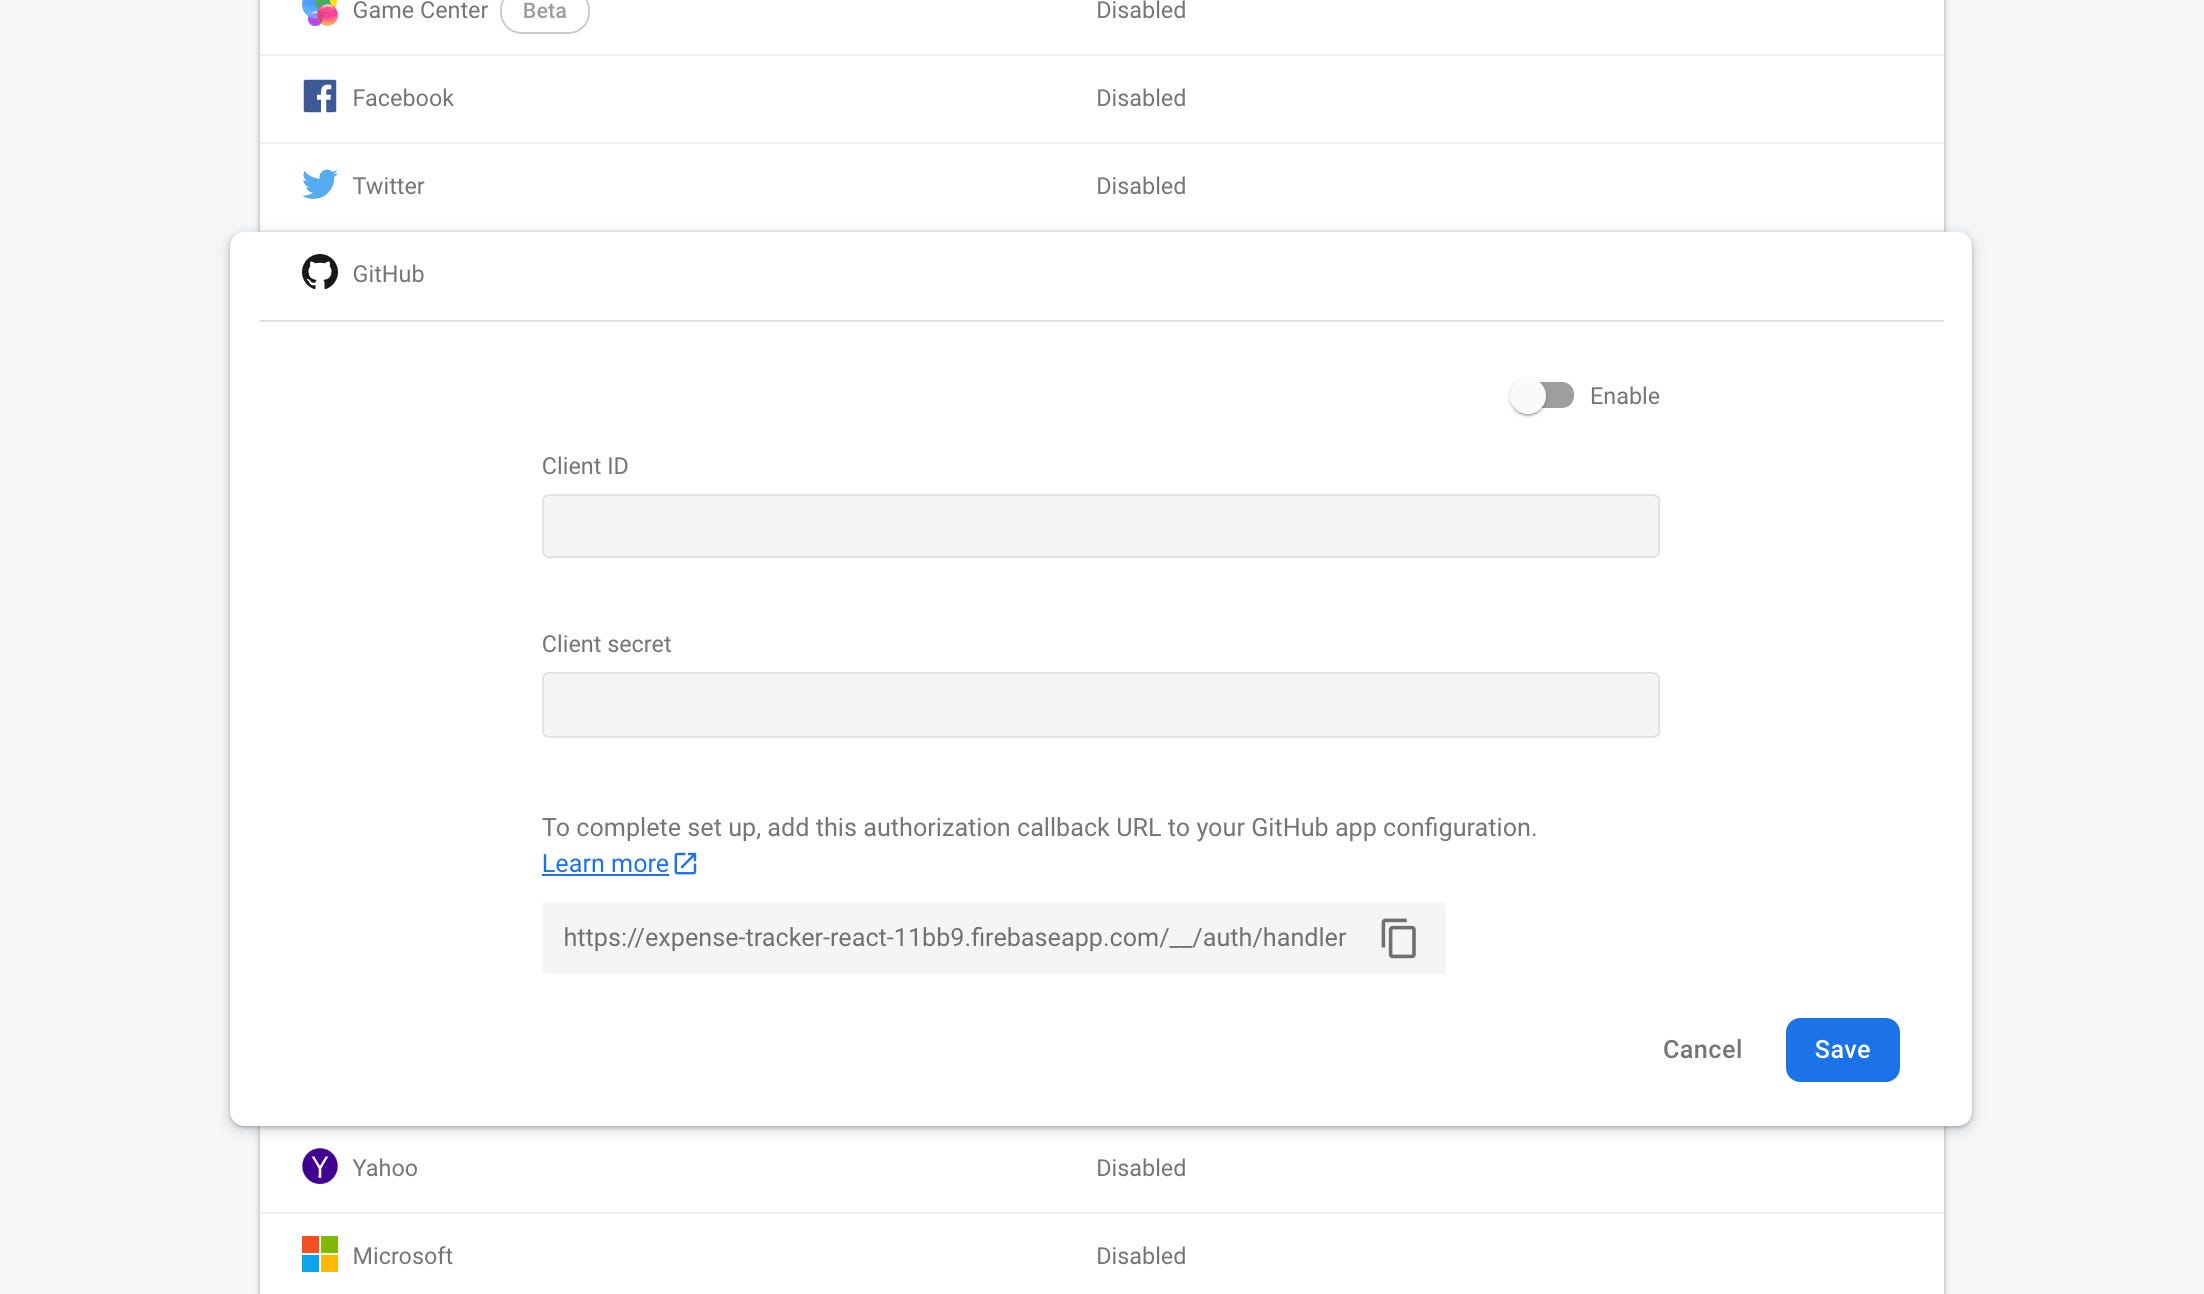
The support of 3rd party sign-in providers is a game changer because it offers excellent user experience by allowing users to logon using their existing identity instead of creating a new set of credential. Firebase supports list of sign-in providers which can be enabled on Firebase console with simple configuration such as the registered client ID and secret. The sample screenshot below are the configuration of Google and GitHub sign-in
第三方登录提供商的支持可以改变游戏规则,因为它通过允许用户使用其现有身份进行登录而不是创建新的凭据来提供出色的用户体验。 Firebase支持登录提供程序列表,可以通过简单的配置(例如注册的客户端ID和密钥)在Firebase控制台上启用登录提供程序。 下面的示例屏幕截图是Google和GitHub登录的配置

应用集成以进行身份验证 (App Integration for Authentication)
Once we have completed the configuration on Firebase console, we can start working on integration on app. Firebase offers developer-friendly SDK so that we can easily implement the login with a few function calls.
在Firebase控制台上完成配置后,就可以开始在应用程序上进行集成了。 Firebase提供了开发人员友好的SDK,因此我们可以通过几个函数调用轻松实现登录。
验证服务组件 (Authentication Service Component)
As per the best practice of software development, I strongly recommend to create a facade service to provide a front face to serve the functionality of Authentication, the purpose is to decouple app logic’s direct dependency on Firebase SDK, allowing the flexibility in case we need to switch to another underlying service provider or minimize possible impact due to breaking changes introduced by new version of SDK in the future.
根据软件开发的最佳实践,我强烈建议创建外观服务,以提供正面服务来提供身份验证功能,其目的是消除应用程序逻辑对Firebase SDK的直接依赖,从而在需要时提供灵活性切换到其他基础服务提供商,或最大程度地减少由于将来新版本的SDK引入的重大更改而可能造成的影响。
Here is the sample implementation of AuthService. It is a singleton service component to provide authentication services and interface with app logic. First of all, Configuration firebase-api.json can be generated on Firebase console, it is the configuration to let SDK know which project to connect to. Then, Firebase SDK instance can be initialized with configuration followed by any authentication function call.
这是AuthService的示例实现。 它是一个单例服务组件,用于提供身份验证服务和与应用程序逻辑的接口。 首先,可以在Firebase控制台上生成配置firebase-api.json,它是让SDK知道要连接到哪个项目的配置。 然后,可以通过配置以及任何身份验证功能调用来初始化Firebase SDK实例。
import * as firebase from 'firebase/app';
import 'firebase/auth';
import { getFirebaseInstance } from './FirebaseService';


export class AuthService {
    private firebaseApp: firebase.app.App;


    // AuthService is a singleton
    private static instance: AuthService;
    private constructor() {
        this.firebaseApp = getFirebaseInstance();
    }
    static getInstance() {
        if (!AuthService.instance) {
            AuthService.instance = new AuthService();
        }
        return AuthService.instance;
    }


    // Trigger the redirect to Google for authentication
    signWithRedirectToGoogle() {
        const authProvider = new firebase.auth.GoogleAuthProvider();
        this.firebaseApp.auth().signInWithRedirect(authProvider);
    }


    // Obtain and return the authentication result from identity provider
    async getRedirectResultFromIdentityProvider() {
        return await this.firebaseApp.auth().getRedirectResult();
    }


    // Sign-in with email & password
    async signInWithEmailAndPassword(userId:string, password:string): Promise<any> {
        // invoke logon with email & password
        return await this.firebaseApp.auth().signInWithEmailAndPassword(userId, password);
    }

    // Register handler for change of authenticaton state
    onAuthStateChange(handleAuthStateChange:any) {
        this.firebaseApp.auth().onAuthStateChanged(handleAuthStateChange);
    }

    // Logout
    async signOut() {
        await this.firebaseApp.auth().signOut();
    }


}
登录屏幕 (Logon Screen)
Now, let’s work on logon screen. It is a React functional component with 2 buttons for the sign-in with email and Google respectively.
现在,让我们在登录屏幕上工作。 它是一个具有2个按钮的React功能组件,分别用于通过电子邮件和Google登录。
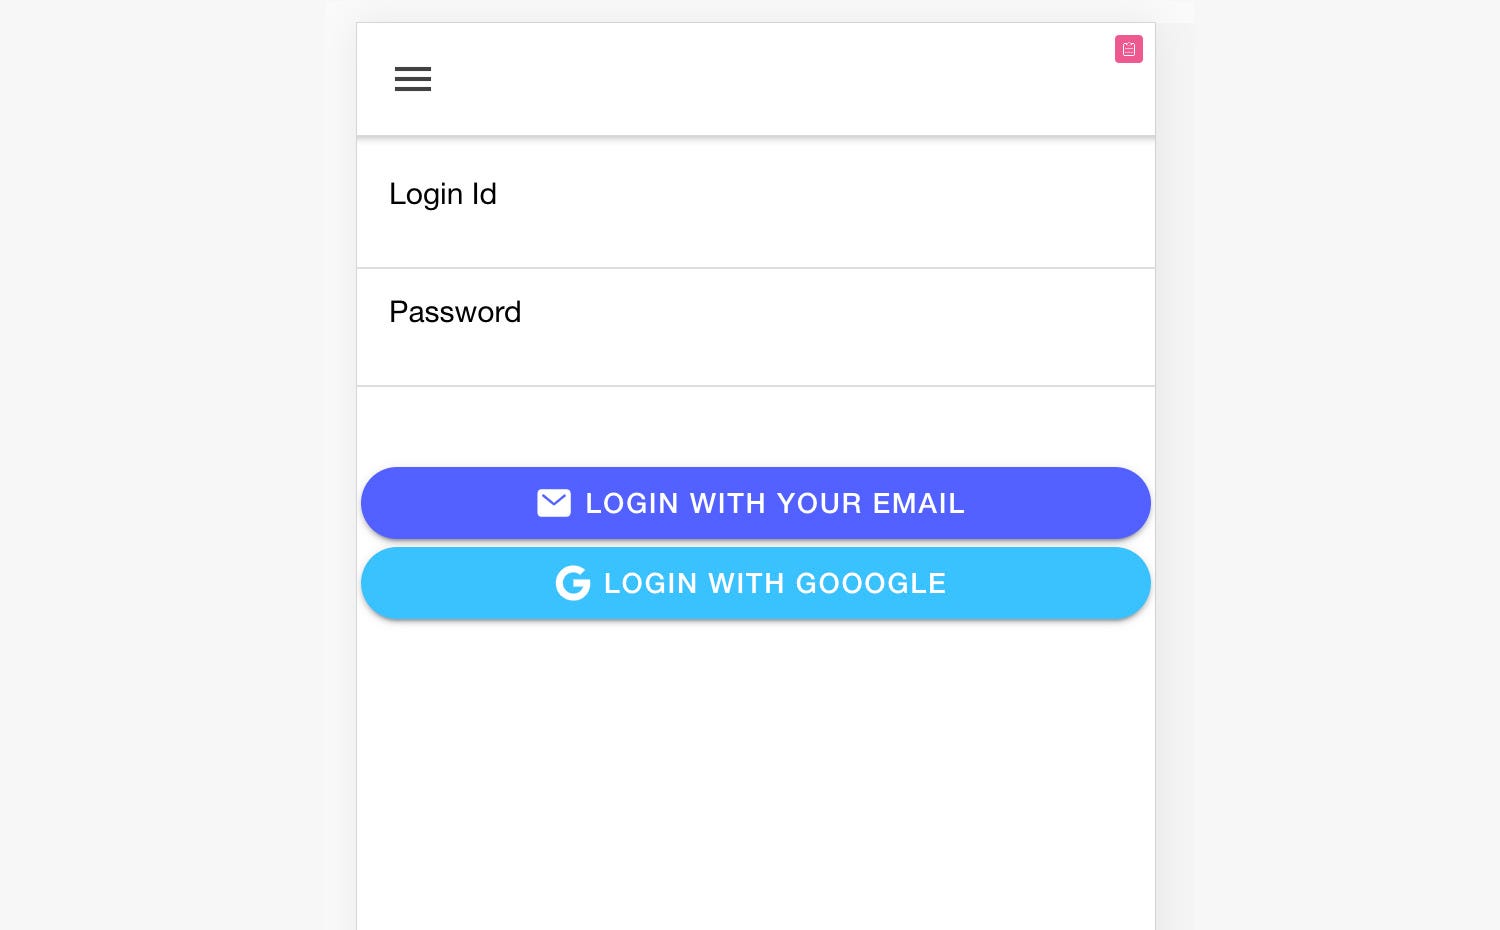
The code snippet is a simplified version of Logon page React component
该代码段是登录页面React组件的简化版本
const Logon: React.FC = () => {


  // form data in local state
  const [formData, setFormData] = useState<FormDataType>({email: "", password: ""});

  // function to dispatch Redux action
  const dispatch = useDispatch();

  // setup side effect for auto navigation and redirect result
  useLogon();
  useRedirectResult();


  return (
    <IonPage>
      ...
      <IonContent>
        ...
        <form>
        <IonList>
          <IonItem>
            <IonLabel class="logon-input-label" position="stacked">Login Id <IonText color="danger">*</IonText></IonLabel>
            <IonInput name="email" .../>
          </IonItem>
          <IonItem>
            <IonLabel class="logon-input-label" position="stacked">Password</IonLabel>
            <IonInput name="password" type="password .../>
          </IonItem>
          <br/><br/>
          <IonButton type="button" color="tertiary" shape="round" expand="block" fill="solid" onClick={() => loginWithEmailPassword()}>
            <IonIcon slot="start" icon={mail}/>Login with your Email
          </IonButton>
          <IonButton type="button" color="secondary" shape="round" expand="block" fill="solid" onClick={() => loginWithGoogle()}>
            <IonIcon slot="start" icon={logoGoogle}/>Login with Gooogle
          </IonButton>
        </IonList>
        </form>
      </IonContent>
    </IonPage>
  );
};


export default Logon;
使用电子邮件地址和密码登录 (Sign-in With Email Address & Password)
This sign-in method is simple and straightforward, user just key-in email address and password. Then, a function call on AuthService to verify against the records in Firebase.
这种登录方法简单明了,用户只需输入电子邮件地址和密码即可。 然后,在AuthService上调用函数以针对Firebase中的记录进行验证。
Below is the sample code of Redux async action which is dispatched by logon screen when user click on button “Sign-in with Your Email” to verify email address & password. To provide better user experience, Logon Pending action is dispatched to update state accordingly in order to showing loading overlay prior to the verification of email & password.
下面是Redux异步操作的示例代码,当用户单击“使用电子邮件登录”按钮来验证电子邮件地址和密码时,登录屏幕将分派该Redux异步操作的示例代码。 为了提供更好的用户体验,将分派“登录挂起”操作以相应地更新状态,以便在验证电子邮件和密码之前显示加载覆盖。
const authService = AuthService.getInstance();


// Async Action to handle logon with Email & Password.
export const logonWithEmailPassword = (loginId: string, password: string) => {
    return async (dispatch: ThunkDispatch<RootState, void,  Action>) => {
      // dispatches logonPending action to update UI state to show loading indicator
      dispatch(logonPending());
      // invoke authentication service to sign-in with Email & Password
      await authService.signInWithEmailAndPassword(loginId, password);
    }
};
使用Google登录 (Sign-in With Google)
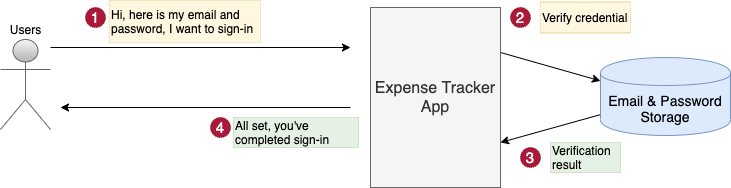
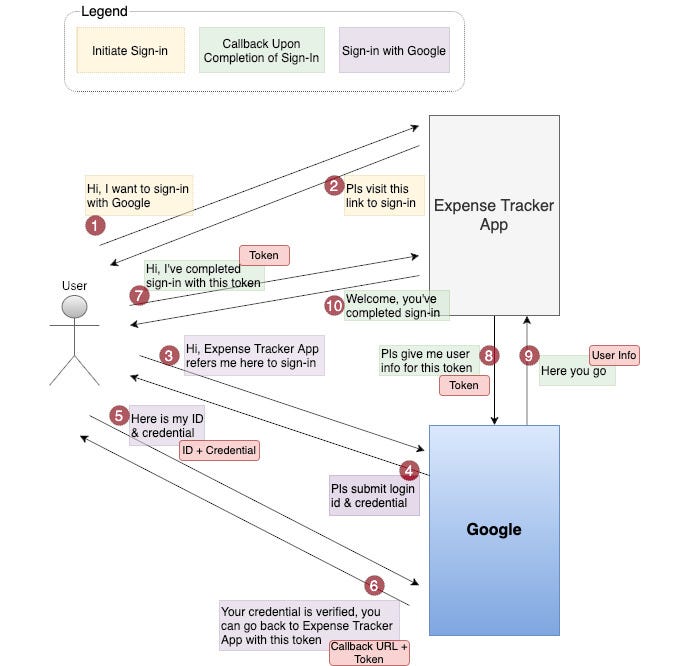
This approach leverages the OAuth protocol to delegate the authentication to 3rd party, specifically Google in this example. Let’s me walkthrough the flow behind the scene with the following diagram.
这种方法利用OAuth协议将身份验证委派给第三方,在此示例中特别是Google。 让我用下图逐步说明幕后流程。
[Step 1–2] — As user presses the button to sign-in with Google, Expense Tracker redirects user to Google for sign-in.
[步骤1-2]-当用户按下按钮登录Google时,Expense Tracker会将用户重定向到Google进行登录。
[Step 3–6] — User provides ID and credential to Google for sign-in. Upon completion of authentication, Google returns a token and redirects user back to Expense Tracker App as Google knows that it is an OAuth authentication instead of a normal logon.
[步骤3–6]-用户向Google提供ID和凭据以进行登录。 身份验证完成后,Google会返回令牌并将用户重定向回Expense Tracker App,因为Google知道这是OAuth身份验证而不是常规登录。
[Step 7–10] — Expense Tracker App retrieve user info (e.g. name) from Google using the token and completes the whole sign-in process.
[步骤7-10] -Expense Tracker App使用令牌从Google检索用户信息(例如名称),并完成整个登录过程。
Looking into the code snippet. It is the action shows the function call to redirect user to Google for sign-in [Step 1–2]
查看代码段。 该操作显示了将用户重定向到Google进行登录的功能调用[步骤1-2]
const authService = AuthService.getInstance();


// Async Action to handle logon with Google.
export const logonWithGoogle = () => {
  return async (dispatch: ThunkDispatch<RootState, void, Action>) => {
    // dispatches logonPending action to update UI state to show loading indicator
    dispatch(logonPending());
    // Invoke authentication service to sign-in with Google
    authService.signInWithRedirectToGoogle();
  }
};
Upon completion of Google sign-in, Google will provide a token and redirect user back to the app. The React Hook below is to extract and process the authentication result from Google [Step 7–10]. If user information is undefined or empty, that means logon failed or user canceled the sign-in. we should update state to indicate that logon was canceled.
完成Google登录后,Google将提供令牌并将用户重定向回该应用。 下面的React Hook是从Google提取并处理身份验证结果的步骤[7-10]。 如果用户信息未定义或为空,则表示登录失败或用户取消了登录。 我们应该更新状态以指示登录已被取消。
export const useRedirectResult = () => {


    const dispatch = useDispatch();

    // Retrieve Google authentication status from redirect result
    // If user record is null or undefined, dispatch action to cancel logon
    // With the redirect result call, callback handler will be invoked automatically to process success logon
    const authService = AuthService.getInstance();
    useEffect(() => {
      (async () => {
        let user = await authService.getRedirectResultFromIdentityProvider();
        if (user === undefined || user === null) {
          dispatch(logonCancel());
        }
      })();
    }, [authService])
}
处理成功登录 (Processing of Successful Sign-In)
You might notice that the code snippet I’ve shown so far only involves action dispatching to initiate sign-in but what is the post-processing after a successful sign-in? It is supposed that system should navigate to a landing or home screen instead of stay in logon screen if logon has been done.
您可能会注意到,到目前为止,我所显示的代码片段仅涉及操作分派以启动登录,但是成功登录后的后处理是什么? 假设系统已登录,则系统应导航到登录屏幕或主屏幕,而不要停留在登录屏幕上。
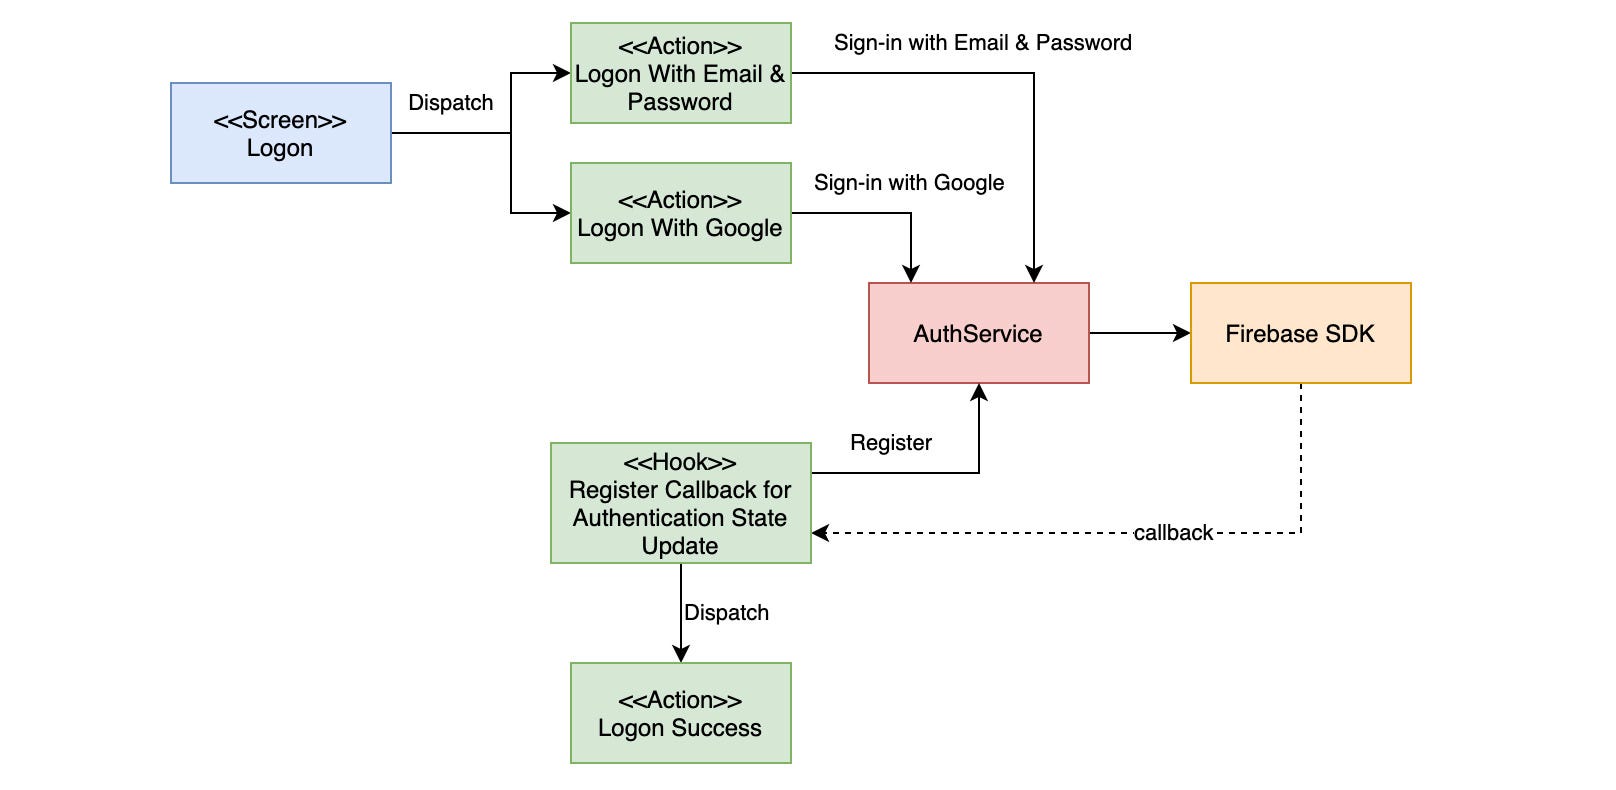
We relies on an event driven flow to handle the post-processing of successful logon. Regardless of sign-in method, Firebase emits an event whenever there is change on authentication status such as successful logon. Once the event is received, the event handler triggers action which updates [isAuthenticated] indicator in app state. Next, the change of app state will then trigger Logon Screen Hook to navigate to Expense List. The diagram below shows the event flow:
我们依靠事件驱动的流程来处理后处理 登录成功。 无论登录方法如何,只要身份验证状态发生更改(例如成功登录),Firebase都会发出一个事件。 接收到事件后,事件处理程序将触发操作,该操作将更新应用程序状态中的[isAuthenticated]指示器。 接下来,应用程序状态的更改将触发“登录屏幕挂钩”以导航到“费用列表”。 下图显示了事件流:

Authentication State Event Handler
身份验证状态事件处理程序
When there is change on authentication state with user object, it means user has successfully signed-in. Event handler then dispatch action to update app state such as setting [isAuthenticated] indicator and turning on the loading overlay
如果用户对象的身份验证状态发生更改,则表示用户已成功登录。 然后,事件处理程序将分派操作以更新应用程序状态,例如设置[isAuthenticated]指示器并打开加载叠加层
export const useApp = () => {


    const dispatch = useDispatch();


    const authService = AuthService.getInstance();


    useEffect(() => {


        // Register callback for the change of authentication state
        authService.onAuthStateChange((user:any) => {
          // if user record is not null, means user has been authenticated
          if (user != null && user.email != null) {
              dispatch(loginSuccess(user.email));  // dispatch action to update authentication status in state
          }
        });

      }, [authService]);


}
Logon Screen Hook
登录屏幕挂钩
This is the handler listening for change of [isAuthenticated] indicator in app state. If [isAuthenticated] indicator is updated to be true, app automatically navigates to the target screen or Expense Record List screen.
这是处理程序,在应用程序状态下侦听[isAuthenticated]指示器的更改。 如果[isAuthenticated]指示器更新为true,则应用程序将自动导航到目标屏幕或“费用记录列表”屏幕。
export const useLogon = () => {


    const history = useHistory();
    const location = useLocation();

    // obtain authentication status from state
    const isAuthenticated = useSelector((state: RootState) => state.loginSession.isAuthenticated);


    // Auto navigate to original target Screen if there is already a logon session
    let from: any  = location.state;
    if (from == null || from.pathname === "/page/Login") {
      from.pathname = "/page/ExpenseList" ;
    }
    useEffect(
      () => {
          if (isAuthenticated) history.push(from.pathname);
      },
      [isAuthenticated]
    )
}
登录会话持久性和自动登录 (Logon Session Persistence & Auto Sign-in)
Retaining existing logon session is a crucial feature, otherwise, users will need to sign-in every time when they access the app. Fortunately, Firebase by default persists the logon session so that system recognizes user’s identity the next time access to the app and go straight to Expense Record List screen. No need to develop any extra logic to support the auto sign-in because Firebase automatically detects the persistent logon session and emits event to the app for handling accordingly.
保留现有的登录会话是一项至关重要的功能,否则,用户每次访问该应用程序时都需要登录。 幸运的是,Firebase默认情况下会保留登录会话,以便系统在下次访问该应用程序时识别用户的身份,并直接转到“费用记录列表”屏幕。 无需开发任何额外的逻辑来支持自动登录,因为Firebase会自动检测到持久登录会话并向应用程序发出事件以进行相应处理。
最终思想 (Final Thought)
Authentication is a fundamental and mandatory feature required by most application nowadays due to the growing demand on access control and private data & resources protection. However, implementation can be painful and complicated especially the integration with various 3rd party identity providers by OAuth. Leveraging Firebase’s ready made authentication service as the building block can considerably simplify the integration and hence significantly reduce development effort.
由于对访问控制以及私有数据和资源保护的需求不断增长,认证是当今大多数应用程序所需的基本和强制性功能。 但是,实施可能会很痛苦且复杂,尤其是OAuth与各种第三方身份提供者的集成。 利用Firebase的现成的身份验证服务作为构建块可以大大简化集成,从而显着减少开发工作。
With the authentication in place, we can go on the migration of application data to persistent data storage. My next sharing will continue the journey of application development with Firebase data store, I will walkthrough the data schema design and how we can implement data security rule in Firebase data store.
有了身份验证后,我们就可以继续将应用程序数据迁移到持久性数据存储。 我的下一个共享将继续使用Firebase数据存储进行应用程序开发的过程,我将逐步介绍数据架构设计以及如何在Firebase数据存储中实现数据安全规则。
firebase登录验证


 1021
1021

 被折叠的 条评论
为什么被折叠?
被折叠的 条评论
为什么被折叠?
 到【灌水乐园】发言


