


angular 自定义更新
Hey guys, I’m here today to talk about custom libraries. I hope that by the end of this article you will know how to create your own custom library. 😊
大家好,我今天在这里谈论自定义库。 我希望到本文结尾,您将知道如何创建自己的自定义库。 😊
介绍 (Introduction)
As you’re doing your initial planning of your Angular architecture, you may find that one of your shared resources needs to be shared across multiple apps. You want to put it up in npm, for instance, or maybe in an internal npm that your company may use. That way, multiple applications could take advantage of it. Sounds good? Yes, sounds great 😊.
在对Angular架构进行初始规划时,您可能会发现需要在多个应用程序之间共享您的共享资源之一。 例如,您想将其放在npm中 ,或者放在公司可能使用的内部npm中。 这样,多个应用程序可以利用它。 听起来不错? 是的,听起来不错😊。
创建一个自定义库 (Creating a Custom Library)
To get started, you’ll first need to create a new project using the CLI.
首先,您首先需要使用CLI创建一个新项目。

We should be all good at this point. From here though, we need to use a command that the CLI provides in Angular 6 or higher, which is ng generate. This ng generate library is designed to create a custom shared library. Then, by giving your library a name, it will be added to a separate project, which is called a workspace.
在这一点上我们应该一切都很好。 但是从这里开始,我们需要使用CLI在Angular 6或更高版本中提供的命令ng generate 。 此ng生成库旨在创建自定义共享库。 然后,通过给您的库命名,它将被添加到一个单独的项目中,该项目称为工作区。

When you do ng new you get a workspace with one project in it, which is your web project. This ng generate will add a second version into the workspace so that we can actually test out our library in the Angular app without publishing to npm or any other resource. Now, this modifies the tsconfig file and that’s going to be updated so that the Angular project, the separate one in the workspace, understands how to get to the library, the shared library that we’re going to be building.
新建时,您将获得一个包含一个项目的工作空间,这是您的Web项目。 此ng生成将在工作空间中添加第二个版本,以便我们实际上可以在Angular应用中测试我们的库,而无需发布到npm或任何其他资源。 现在,这将修改tsconfig文件,并且将对其进行更新,以使Angular项目(工作空间中的单独项目)了解如何访问该库(我们将要构建的共享库)。
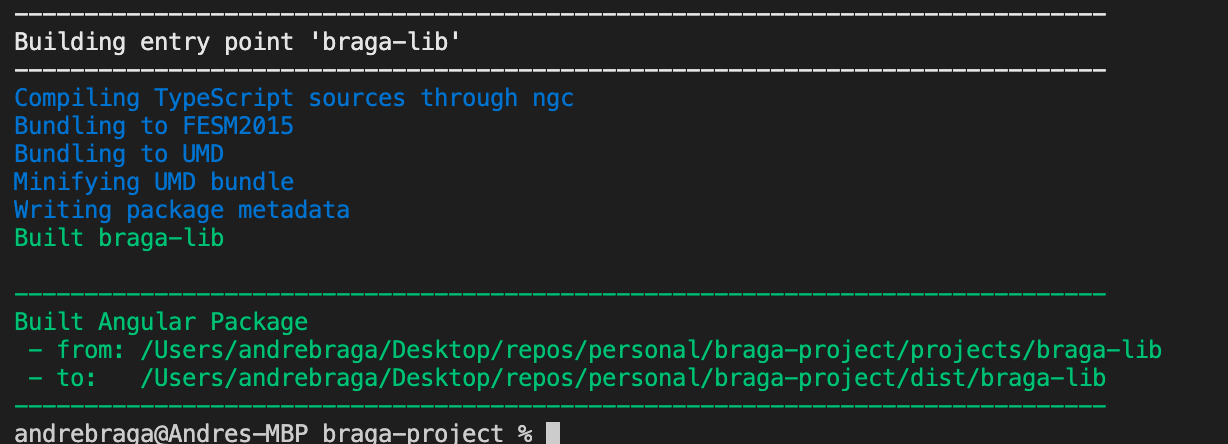
Then you can build your library using the ng build command and then give it the name of your project, like this:
然后,您可以使用ng build命令来构建您的库,然后为其指定项目名称,如下所示:

You can use this and test it directly in the other Angular project that’s within your workspace. So, it makes it really easy to do this without having to publish into npm somewhere. After that, we would want to publish to npm once we’re ready to go, we’ve tested it out and it looks good, because we want to be able to pull in from npm, whether it’s the npm that’s just out there that anybody can get to, or if it’s an internal npm you may have at your company. We want to pull from those into our different applications so we can get reuse. There’s a link if you’re new to contributing to npm that’s out there.
您可以使用它并直接在工作区中的另一个Angular项目中对其进行测试。 因此,无需在某个地方发布到npm中就可以很容易地做到这一点。 之后,一旦准备就绪,我们将要发布到npm,我们对其进行了测试,它看起来不错,因为我们希望能够从npm引入,无论是npm就是任何人都可以进入,或者如果它是公司内部的内部npm。 我们希望将它们从我们的不同应用程序中提取出来,以便获得重用。 如果您不熟悉向npm做出贡献,则有一个链接 。

We need to do this to go into the dist folder and there will be a package.json file included. That’s going to be used to then publish up to npm. We only need to write the following command:
我们需要执行此操作以进入dist文件夹,其中将包含package.json文件。 然后将用于发布npm。 我们只需要编写以下命令:

So, should we see how things are different in our solution? Let’s go ☺.
那么,我们应该看看解决方案有什么不同吗? 我们去吧。

So first off, you’ll notice that we have a projects folder. We also now have an updated tsconfig as you can see in the following image:
首先,您会注意到我们有一个项目文件夹。 如下面的图像所示 ,我们现在还具有更新的tsconfig :

It added the paths to where ultimately we’re going to be building our dist folder once we do a build and that’s why you have to build first, before you can do this because TypeScript is actually going to look to this to be able to make this all work.
它在完成构建后将路径添加到了最终我们将要构建dist文件夹的位置,这就是为什么您必须首先构建,然后再执行此操作的原因,因为TypeScript实际上将着眼于此以便能够所有这一切。
Now, the other big thing that has been done is our angular.json file has a new project in it:
现在,完成的另一件大事是我们的angular.json文件中有一个新项目:

So, we have a secondary project right here, which is our braga-lib and you’ll notice the path there for the root of the project. Now, everything else needed to build and test is included. So, those are the main things it modifies. Now, what we can do from here is make changes to our library. So, if we come on in, you’ll see normal files in here and a src folder and then what they add is a lib as you can see:
因此,我们在这里有一个辅助项目,这是我们的braga-lib,您将注意到那里的项目根目录路径。 现在,包含了构建和测试所需的所有其他内容。 因此,这些是它修改的主要内容。 现在,我们可以从这里进行更改库。 因此,如果我们进入,您将在这里看到普通文件和一个src文件夹,然后它们添加的是一个lib,如您所见:

The lib is going to have our component, our module and even a service if you want it. If you open up the component file, it pretty much just says “braga-lib works!”.
如果需要的话,lib将具有我们的组件,我们的模块甚至是服务。 如果您打开组件文件,它几乎只会说“ braga-lib有效!”。

Now notice the selector “lib-braga-lib”. You can change this, but right now let’s leave it as it is and let’s use it on our Angular project. Let’s take a look at that? Oh yeah ☺
现在注意选择器“ lib-braga-lib”。 您可以更改它,但是现在让我们保持原样,并在Angular项目中使用它。 让我们来看看吗? 哦
消费自定义库 (Consuming a Custom Library)
Let’s take a look now at how we can consume our shared library. So, I’m going to our app.component.html and I’m going to delete most of what they put on this file and add our shared library tag.
现在让我们看一下如何使用共享库。 因此,我将转到我们的app.component.html,并删除它们在此文件上放置的大部分内容,并添加我们的共享库标签。

You can see that our shared library tag goes red. Well that’s because we haven’t imported the shared library module. That’s easy to fix. We can go to app.module and add our shared library to the imports.
您会看到我们的共享库标签变成红色。 那是因为我们还没有导入共享库模块。 很容易解决。 我们可以转到app.module并将共享库添加到导入中。

Here, the import line is ‘../../projects/braga-lib/src/public-api’. What they’ve done is created this is create this public API to export what’s inside of this particular shared component.
在这里,导入行是“ ../../projects/braga-lib/src/public-api ”。 他们完成的工作是创建此公共API,以导出此特定共享组件内部的内容。

This is the public API service, as it says above. Notice that the shared module (our braga.lib module) is one of the things they’re exporting, and is sufficient for this exercise. We can go back to our app.component.html and our red line will be gone.
如上所述,这是公共API服务。 请注意,共享模块(我们的braga.lib模块)是它们要导出的东西之一,足以完成本练习。 我们可以返回到app.component.html ,红线将消失。

Now we’re ready to go ☺. We can first try to run the project by doing “ng serve -o” but we will get an error because we don’t have the dist folder yet for our shared library. So, the first thing that we need to do is run the “ng build braga-lib”.
现在我们准备出发了。 我们可以先尝试通过执行“ ng serve -o ”来运行项目,但是由于我们的共享库还没有dist文件夹,因此会出现错误。 因此,我们需要做的第一件事就是运行“ ng build braga-lib ”。
Now we can do our regular “ng serve -o” to launch our project with our shared library there.
现在,我们可以执行常规的“ ng serve -o ”以使用共享库在那里启动我们的项目。

As you can see, we now have our shared library inside of our Angular project. With a minimal amount of effort, literally in a matter of minutes, you can get a shared library up and running. The final step would be to actually publish to npm.
如您所见,我们现在在Angular项目中有了共享库。 只需几分钟,您只需花费很少的精力,就可以启动并运行共享库。 最后一步是实际发布到npm。
结论 (Conclusion)
This is super useful for when you’re planning future implementations with your team. Now you can say: these particular widgets are going to be used by many of our apps so let’s just plan on making a library rather than putting them in the shared folder of the app and then having to copy and paste between applications!
当您与团队一起计划将来的实施时,这非常有用。 现在您可以说:这些特定的小部件将被我们的许多应用程序使用,因此让我们计划建立一个库,而不是将它们放在应用程序的共享文件夹中,然后在应用程序之间进行复制和粘贴!
翻译自: https://itnext.io/creating-a-custom-library-with-angular-888a7e3689ca
angular 自定义更新


 932
932

 被折叠的 条评论
为什么被折叠?
被折叠的 条评论
为什么被折叠?
 到【灌水乐园】发言


