


使用c#制作打字游戏
Chapter III in the series of tutorials on how to build a game from scratch with TypeScript and native browser APIs
本系列教程的第三章,介绍如何使用TypeScript和本机浏览器API从头开始构建游戏
Welcome to part 4 of the Chapter III “Drawing Grid”! In previous parts of the chapter, we learned that drawing itself is simply a matter of calling proper canvas APIs of the browser. But the underlying logic of the Grid has to be a bit more sophisticated.
欢迎来到第三章“绘图网格”的第四部分! 在本章的前几部分,我们了解到绘图本身仅是调用浏览器的适当canvas API的问题。 但是Grid的基本逻辑必须更加复杂。
We divided this logic onto separate elements: Grid entity, Node entity and NodeDrawComponent. Each of them has its responsibility. We also presented the very basic Vector2D that helps us operate 2d structure.
我们将此逻辑划分为单独的元素: Grid实体, Node实体和NodeDrawComponent 。 他们每个人都有责任。 我们还介绍了非常基本的Vector2D ,它可以帮助我们操作2d结构。
In this article, we are looking to make a few more tweaks.
在本文中,我们希望进行更多调整。
In Chapter III “Drawing Grid”, we are implementing a fundamental piece of our turn-based game: we are drawing the grid of nodes. Other Chapters are available here:
在第三章“绘制网格”中,我们实现了回合制游戏的基础:绘制节点的网格。 其他章节可在此处找到:
Chapter III. Drawing Grid (Part 1, Part 2, Part 3, Part 4, Part 5)
- Chapter IV. Drawing ships 第四章 绘图船
- Chapter V. Interaction System 第五章互动系统
- Chapter VI. Pathfinding 第六章 寻找路径
- Chapter VII. Moving ship 第七章 搬船
- Chapter VIII. State Machina 第八章 国家机械工业
- Chapter IX. Attack System: Health and Damage 第九章 攻击系统:生命与伤害
- Chapter X. Winning and Losing the Game 第十章。输赢
- Chapter XI. Enemy AI 第十一章。 敌人AI
Feel free to switch to the
drawing-grid-3branch of the repository. It contains the working result of the previous posts and is a great starting point for this one.随时切换到存储库的
drawing-grid-3分支。 它包含了以前的帖子的工作结果,是此帖子的一个很好的起点。
目录 (Table of Contents)
- Introduction 介绍
- Canvas Rendering Engine 画布渲染引擎
- Testing Canvas 测试画布
- Conclusion 结论
介绍 (Introduction)
Last time we successfully rendered the grid on the screen:
上一次我们成功在屏幕上渲染了网格:

However, if you check the dev tools of the browser, you can see that something fishy is going on here:
但是,如果您检查浏览器的开发工具,您会发现这里有些混乱:
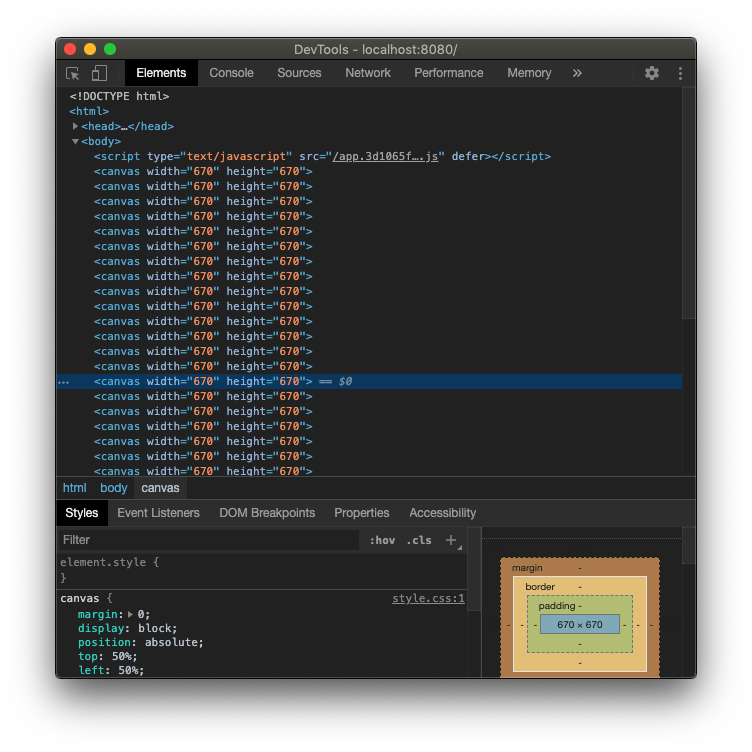
Apparently, we now render a bunch of canvases. Generally, it’s better practice to keep as little canvases as possible, and having dedicated canvas for every Node is definitely something we want to avoid. So, how should we go about it?
显然,我们现在渲染了一堆画布。 通常,更好的做法是保留尽可能少的画布,并且每个Node都有专用的画布绝对是我们要避免的事情。 那么,我们应该怎么做呢?
If you recall, we explicitly create a canvas DOM element on every Awake of NodeDrawComponent:
回想一下,我们在每个NodeDrawComponent Awake上显式创建一个canvas DOM元素:
// draw.ts
// ... //
export class NodeDrawComponent implements IComponent {
  public Awake(): void {
    const canvas = document.createElement('canvas')
    const canvasSize = (Settings.grid.nodeSize + Settings.grid.nodeOffset) * Settings.grid.dimension + Settings.grid.nodeOffset
    canvas.setAttribute('width', canvasSize.toString())
    canvas.setAttribute('height', canvasSize.toString())
    document.body.appendChild(canvas)


    // ... //
  }
}
We had to do this because we require access to canvas context to draw anything:
我们必须这样做,因为我们需要访问canvas上下文才能绘制任何内容:
const ctx = canvas.getContext('2d')!Awake happens once for every Node we create. Thus, the number of canvases now is equal to the number of nodes.
我们创建的每个Node都会发生一次Awake 。 因此,画布的数量现在等于节点的数量。
We could create a canvas DOM element somewhere else to fix this situation. For example, we could do that in the Grid before the loop and then pass the reference of the context to the Node:
我们可以在其他地方创建canvas DOM元素来解决这种情况。 例如,我们可以在循环之前在Grid执行此操作,然后将上下文的引用传递给Node :
// pseudo-code
export class Grid extends Entity {
  // ... //
  private InitNodes(): void {
    // --- PSEUDO ADD --- //
    const canvas = document.createElement('canvas')
    const canvasSize = (Settings.grid.nodeSize + Settings.grid.nodeOffset) * Settings.grid.dimension + Settings.grid.nodeOffset
    canvas.setAttribute('width', canvasSize.toString())
    canvas.setAttribute('height', canvasSize.toString())
    document.body.appendChild(canvas)


    const ctx = canvas.getContext('2d')!
    // --- PSEUDO ADD --- //


    for (let y = 0; y < Settings.grid.dimension; y++) {
      for (let x = 0; x < Settings.grid.dimension; x++) {
        const node = new Node(start, end, index, ctx) // <--- PSEUDO CHANGE


        this._nodes.push(node)
      }
    }
  }
}
This would require Node to change its constructor and expect the fourth parameter, Ctx :
这将要求Node更改其构造函数,并期望第四个参数Ctx :
// pseudo-code
// ... //
export class Node extends Entity {
 // ... //
 constructor(
    public readonly Start: Vector2D,
    public readonly End: Vector2D,
    public readonly Index: Vector2D,
    public readonly Ctx: CanvasRenderingContext2D // <--- PSEUDO ADD
  ) {
    super()
  }
 // ... //
}
And then NodeDrawComponent could access the Ctx from the Node entity. And they would live happily ever after…
然后NodeDrawComponent可以访问Ctx从Node实体。 从此以后他们会过上幸福的生活……
I have a problem with this approach, however. In this scenario, Node becomes tightly coupled with the notion of canvas and drawing. Indeed, Ctx becomes required parameter of the Node.
但是,我对这种方法有疑问。 在这种情况下, Node与canvas和drawing的概念紧密相关。 实际上, Ctx成为Node 必需参数。
But as we determined earlier, being able to be drawn is only one of its numerous components, not necessarily a core feature. We discussed that Node could potentially even be invisible, lacking the Draw component whatsoever. Also, I would rather keep code that deals with the browser’s API (like document.createElement or ctx.beginPath) independent of the game code.
但是,正如我们之前确定的那样,能够被绘制只是其众多组成部分之一 ,不一定是核心特征 。 我们讨论过, Node可能甚至不可见,因为缺少Draw组件。 另外,我宁愿保留与浏览器的API无关的代码(例如document.createElement或ctx.beginPath ),而与游戏代码无关。
Ideally, we want some layer of abstraction that can handle communication with the underlying rendering platform. And make only NodeDrawComponent interact with it. For our purposes, I will call this layer a rendering engine.
理想情况下,我们需要某种抽象层来处理与底层渲染平台的通信。 并仅使NodeDrawComponent与之交互。 为了我们的目的,我将这一层称为渲染引擎 。
画布渲染引擎 (Canvas Rendering Engine)

I start by defining a dedicated utility class that holds the responsibility of dealing with Canvas API:
我首先定义一个专用的实用程序类,该类负责处理Canvas API:
// src/utils/canvas/canvas.ts
export class Canvas {}
Browser requires width and height to create canvas DOM element, hence they should be required by our engine too. We can reuse Vector2d to represent this data as a “tuple” of a sort:
浏览器需要 width和height来创建画布DOM元素,因此我们的引擎也需要它们。 我们可以重用Vector2d将这些数据表示为某种“元组”:
// src/utils/canvas/canvas.ts
import { Vector2D } from '@/utils' // <--- ADD


export class Canvas {
  constructor(public readonly Size: Vector2D) { } // <--- ADD
}
Traditionally, we should set up barrel files:
传统上,我们应该设置桶文件:
// src/utils/canvas/index.ts
export * from './canvas'


// src/utils/index.ts
export * from './canvas' // <--- ADD
export * from './ecs'
export * from './lifecycle'
export * from './vector2D'
Our rendering engine has to create a canvas element to draw on it. It would be convenient to preserve a reference to this element, as well as the rendering context of it. Canvas is the only one who can change them, but the outside world should have read-only access. To implement this, I define private fields with public getters:
我们的渲染引擎必须创建一个canvas元素以在其上进行绘制。 保留对此元素的引用及其呈现上下文将很方便。 Canvas是唯一可以更改它们的人,但是外界应该具有只读访问权限。 为了实现这一点,我使用公共获取器定义了私有字段:
// src/utils/canvas/canvas.ts
// ... //
export class Canvas {
  // --- ADD --- //
  private _elm: HTMLCanvasElement
  private _ctx: CanvasRenderingContext2D


  public get Element(): HTMLCanvasElement {
    return this._elm
  }


  public get Context(): CanvasRenderingContext2D {
    return this._ctx
  }
  // --- ADD --- //


  // ... //
}
We could create a canvas in the constructor. But, as we discussed a few articles ago, it’s better to keep a constructor lean. And manipulating the DOM can be quite expensive, so we better do it someplace else.
我们可以在构造函数中创建一个画布。 但是,正如我们在前几篇文章中讨论的那样,最好使构造函数保持精简。 而且操作DOM可能会非常昂贵,因此我们最好在其他地方进行。
If you recall, we have an excellent mechanism to deal with all initialization logic. Please welcome, our good old friend, Awake method:
您还记得吗,我们有一个很好的机制来处理所有初始化逻辑。 欢迎您,我们的好朋友, Awake方法:
// src/utils/canvas/canvas.ts
import { IAwake, Vector2D } from '@/utils' // <--- CHANGE


export class Canvas implements IAwake { // <--- CHANGE
  // ... //


  // --- ADD --- //
  public Awake(): void {
    const canvas = document.createElement('canvas')
    canvas.setAttribute('width', `${this.Size.x}px`)
    canvas.setAttribute('height', `${this.Size.y}px`)


    document.body.appendChild(canvas)
    this._elm = canvas


    const ctx = this._elm.getContext('2d')
    if (!ctx) {
      throw new Error('Context identifier is not supported')
    }


    this._ctx = ctx
  }
  // --- ADD --- //
}
Note, we double-check that context actually exists. Otherwise, we report an error
注意,我们仔细检查上下文是否确实存在。 否则,我们会报告错误
Nothing stops us now from defining a method that draws a rectangle:
现在,没有什么可以阻止我们定义绘制矩形的方法了:
// src/utils/canvas/canvas.ts
export class Canvas implements IAwake {
  // ... //
  public FillRect(start: Vector2D, size: Vector2D, color: string): void {
    this._ctx.beginPath()
    this._ctx.fillStyle = color
    this._ctx.rect(start.x, start.y, size.x, size.y)
    this._ctx.fill()
  }
}
Everything should look familiar. We basically copied code from NodeDrawComponent. Coordinates and size, however, are arguments of the function now. Nice and clean API!
一切都应该看起来很熟悉。 我们基本上从NodeDrawComponent复制了代码。 但是,坐标和大小现在是函数的参数。 干净的API!
Finally, let’s create a method that allows the cleanup of a rectangle. We will need it to make sure a particular area has no stale drawings:
最后,让我们创建一个允许清理矩形的方法。 我们将需要它来确保特定区域没有陈旧的图纸:
// src/utils/canvas/canvas.ts
// ... //
export class Canvas implements IAwake {
  // ... //
  public ClearRect(start: Vector2D, size: Vector2D): void {
    this._ctx.clearRect(start.x, start.y, size.x, size.y)
  }
}
Awesome! Yet, it is a rather humble rendering engine at this point. Of course, it may have much, much more functionality. But following the incremental approach, we implement features when we need them, keeping the options open for further extension.
太棒了! 但是,在这一点上,它是一个相当不起眼的渲染引擎。 当然,它可能具有更多的功能。 但是,采用增量方法后 ,我们会在需要时实现功能,并保留选项以供进一步扩展。
测试画布 (Testing Canvas)

We are in a good position to test this little rendering engine. I create a spec file and make a basic setup:
我们已经可以测试这个小的渲染引擎了。 我创建一个规范文件并进行基本设置:
// src/utils/canvas/canvas.spec.ts
import { Canvas } from './canvas'
import { Vector2D } from '@/utils'


describe('>>> Canvas', () => {
  const size = new Vector2D(100, 100)
  let canvas: Canvas


  beforeEach(() => {
    canvas = new Canvas(size)
  })
})
We have quite a few things to verify. First, we should check Canvas creates and attaches to the DOM a new element when it awakes:
我们有很多事情要验证。 首先,我们应该检查Canvas创建并在唤醒时将新元素附加到DOM:
// src/utils/canvas/canvas.spec.ts
// ... //
describe('>>> Canvas', () => {
  // ... //
  // --- ADD --- //
  it('should create and attach canvas to the DOM when awakens', () => { })
  // --- ADD --- //
})
I start by spying on native DOM API: createElement and appendChild:
首先,我监视本机DOM API: createElement和appendChild :
// src/utils/canvas/canvas.spec.ts
// ... //
describe('>>> Canvas', () => {
  // ... //


  it('should create and attach canvas to the DOM when awakens', () => {
    // --- ADD --- //
    const createElmSpy = jest.spyOn(document, 'createElement')
    const appendChildSpy = jest.spyOn(document.body, 'appendChild')


    expect(createElmSpy).not.toBeCalled()
    expect(appendChildSpy).not.toBeCalled()
    // --- ADD --- //
  })
})
And then check both spies get called after Canvas awakes:
然后检查Canvas唤醒后两个间谍是否被调用:
// src/utils/canvas/canvas.spec.ts
// ... //
describe('>>> Canvas', () => {
  // ... //


  it('should create and attach canvas to the DOM when awakens', () => {
    // ... //

    // --- ADD --- //
    canvas.Awake()


    expect(createElmSpy).toBeCalled()
    expect(appendChildSpy).toBeCalled()
    // --- ADD --- //
  })
})
Awesome! Your code should compile with npm start and tests should pass with npm t:
太棒了! 您的代码应使用npm start进行编译,而测试应使用npm t :

But that’s just half of the story. We have two more methods to check: FillRect and ClearRect.
但这只是故事的一半。 我们还有两种检查方法: FillRect和ClearRect 。
We can cover them under one umbrella, API, since both methods are primary API of this class:
我们可以将它们归入API ,因为这两种方法都是此类的主要API :
// src/utils/canvas/canvas.spec.ts
// ... //
describe('>>> Canvas', () => {
  // ... //

  // --- ADD --- //
  describe('>> API', () => {
    beforeEach(() => {
      canvas.Awake()
    })


    it('should draw and fill the rect', () => { })


    it('should clear the rect', () => { })
  })
  // --- ADD --- //
})
In both cases, Canvas must awake first, so I use beforeEach here to make that happen.
在这两种情况下, Canvas必须首先唤醒,因此我在此处使用beforeEach来实现。
I start with ClearRect because it’s slightly easier to test. The approach should sound familiar: first, I spy on something, then trigger something and then expect something to happen.
我从ClearRect开始,因为它比较容易测试。 这种方法听起来应该很熟悉:首先,我监视某件事 ,然后触发某事 ,然后期望某事发生。
In this case, I spy on the native clearRect function. Then execute our ClearRect method and expect a spy to be called:
在这种情况下,我监视本机的clearRect函数。 然后执行我们的ClearRect方法并期望一个间谍被调用:
// src/utils/canvas/canvas.spec.ts
// ... //
describe('>>> Canvas', () => {
  // ... //
  describe('>> API', () => {
    // ... //
    it('should clear the rect', () => {
      // --- ADD --- //
      const start = new Vector2D(0, 0)
      const size = new Vector2D(10, 10)


      const spy = jest.spyOn(canvas.Context, 'clearRect')
      expect(spy).not.toBeCalled()


      canvas.ClearRect(start, size)


      expect(spy).toBeCalledWith(start.x, start.y, size.x, size.y)
      // --- ADD --- //
    })
  })
})
Testing FillRect follows the same approach. The difference is only in the number of native functions we expect to be triggered:
测试FillRect遵循相同的方法。 区别仅在于我们希望触发的本机函数的数量:
// src/utils/canvas/canvas.spec.ts
// ... //
describe('>>> Canvas', () => {
// ... //
describe('>> API', () => {
// ... //
it('should draw and fill the rect', () => {
// --- ADD --- //
const start = new Vector2D(0, 0)
const size = new Vector2D(10, 10)
const color = '#ffff00'
const beginPathSpy = jest.spyOn(canvas.Context, 'beginPath')
const rectSpy = jest.spyOn(canvas.Context, 'rect')
const fillSpy = jest.spyOn(canvas.Context, 'fill')
canvas.FillRect(start, size, color)
expect(beginPathSpy).toBeCalled()
expect(rectSpy).toBeCalledWith(start.x, start.y, size.x, size.y)
expect(fillSpy).toBeCalled()
expect(canvas.Context.fillStyle).toBe(color)
// --- ADD --- //
})
// ... //
})
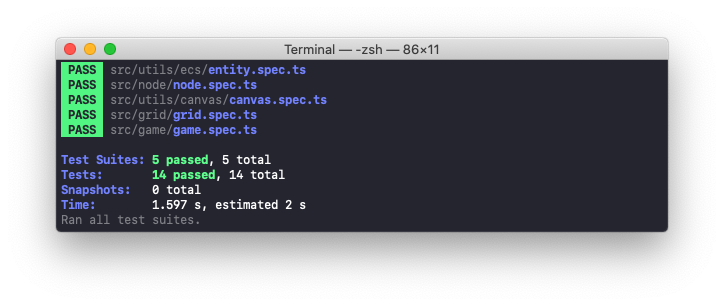
})Cool! At this point, your code should compile again with npm start and all test should pass with npm t:
凉! 此时,您的代码应使用npm start再次编译,并且所有测试应使用npm t :
You can find the complete source code of this post in the
drawing-grid-4branch of the repository.您可以在存储库的
drawing-grid-4分支中找到此文章的完整源代码。
结论 (Conclusion)
Nice! In this post, we created our own little rendering system, the abstraction layer on top of the browser’s canvas API. But how can we wire it up with the NodeDrawComponent? And how can we make sure we won’t couple drawing logic with the Node entity?
真好! 在本文中,我们创建了自己的小型渲染系统,即在浏览器的画布API之上的抽象层。 但是如何将其与NodeDrawComponent ? 以及如何确保不会将绘制逻辑与Node实体耦合?
We will look into that in our final post of the Chapter III “Drawing Grid”. We also will talk about canvas z positioning and how we can make sure one independent image is drawn on top of another. Last but not least, we will make sureNode drawings are always stay fresh and up-to-date.
我们将在第三章“绘图网格”的最后一篇文章中对此进行研究。 我们还将讨论画布z定位以及如何确保一个独立的图像绘制在另一个图像之上。 最后但并非最不重要的一点是,我们将确保Node图始终保持最新状态。
If you have any comments, suggestions, questions, or any other feedback, don’t hesitate to send me a private message or leave a comment below! Thank you for reading, and I’ll see you next time!
如果您有任何意见,建议,问题或任何其他反馈,请随时给我发送私人消息或在下面留下评论! 感谢您的阅读,下次再见!
This is Chapter III in the series of tutorials “Building a game with TypeScript”. Other Chapters are available here:
这是系列教程“ 使用TypeScript构建游戏 ”的第三章 。 其他章节可在此处找到:
Chapter III. Drawing Grid (Part 1, Part 2, Part 3, Part 4, Part 5)
- Chapter IV. Drawing ships 第四章 绘图船
- Chapter V. Interaction System 第五章互动系统
- Chapter VI. Pathfinding 第六章 寻找路径
- Chapter VII. Moving ship 第七章 搬船
- Chapter VIII. State Machina 第八章 国家机械工业
- Chapter IX. Attack System: Health and Damage 第九章 攻击系统:生命与伤害
- Chapter X. Winning and Losing the Game 第十章。输赢
- Chapter XI. Enemy AI 第十一章。 敌人AI
翻译自: https://medium.com/swlh/building-a-game-with-typescript-iii-drawing-grid-4-5-398af1dd638d
使用c#制作打字游戏


 2310
2310


 被折叠的 条评论
为什么被折叠?
被折叠的 条评论
为什么被折叠?
 到【灌水乐园】发言


