


xcode写在
A travelers guide.
旅行者指南。
Why is it that GUIs always seem to be the hardest part of any project? Particularly anything involving Xcode — there’s a lot going on here. Even worse than not finding something, it’s often hard to put into words what button you can’t find — so you can’t even search for it!
为什么GUI似乎始终是任何项目中最困难的部分? 特别是涉及Xcode的所有内容-这里有很多事情。 甚至比找不到东西还要糟糕,通常很难用语言将您找不到的按钮写成单词-因此您甚至无法搜索到它!
What follows is a non-exhaustive list of miscellaneous seemingly hidden buttons. It’s prepared for Xcode 11.5 — I’ll put off making the switch until the new version is out of beta.
接下来是不完整的看似隐藏的其他按钮列表。 它已为Xcode 11.5做好了准备-我将推迟进行切换,直到新版本退出beta版为止。
左,右和下 (Left, right, and bottom)
Let’s start with something easy:
让我们从简单的事情开始:
Left is the Navigator — ⌘0
左侧是导航器—⌘0
Botttom is the Debug area — ⇧⌘Y
Botttom是调试区域-—Y
Right are the Inspectors — ⌥⌘0
检查员是正确的-⌥⌘0
It’s important to memorize these names, because many guides will often refer to them without a picture, assuming you know which one they mean.
记住这些名称很重要,因为许多指南通常会在没有图片的情况下引用它们,前提是您知道它们的含义。
They can all be controlled via the buttons on the top right.
它们都可以通过右上角的按钮进行控制。

组与文件夹 (Groups vs folders)
By default on the left you’ll see the Project navigator, with all your project files. In most projects you’ll see both folders in yellow (sometimes in blue?) and groups, also in yellow but with a little earmark on the bottom. What a tiny indication that they are different!
默认情况下,您会在左侧看到“项目”导航器以及所有项目文件。 在大多数项目中,您会同时看到黄色(有时是蓝色?)和组 文件夹 ,也都是黄色,但在底部有一个小标记。 多么微小的迹象表明它们不同!
The difference is that:
区别在于:
- Folders correspond to actual folders on your Mac. 文件夹与Mac上的实际文件夹相对应。
- Groups exist only in Xcode and don’t move the actual files they contain. 组仅存在于Xcode中,不会移动它们包含的实际文件。

查看最后编辑的文件 (View the last edited file)
Just like in a browser, you can go back and forth to previously viewed files using the arrows at the top of the file.
就像在浏览器中一样,您可以使用文件顶部的箭头来回浏览以前查看过的文件。

I know it’s trivial, but I didn’t take advantage of it for a while, and it’s actually very convenient! For example, if you navigate to another file to copy something, and then just want to go back to the previous file to paste it!
我知道这很简单,但是我有一段时间没有使用它了,实际上非常方便! 例如,如果您导航到另一个文件以复制某些内容,然后只想回到上一个文件将其粘贴!
在助手编辑器中查看标题和相关文件 (View headers and related files in the assistant editor)
Let’s say you’re working on a C++ project and want to have the source and header files next to eachother. Or, if you’re working on an iOS project, let’s say you want to open the code for a ViewController next to the storyboard. You can open the assistant editor using the button on the top right of an open file.
假设您正在开发C++项目,并且希望源文件和头文件彼此相邻。 或者,如果您正在处理iOS项目,则假设您要在故事板旁边打开ViewController的代码。 您可以使用打开的文件右上方的按钮打开助手编辑器。


Note that it’s often strangely based on the filename (like matching src.cpp and src.hpp), and can be rather ignorant of the actual classes in the files.
请注意,它通常是奇怪的基于文件名(例如匹配src.cpp和src.hpp ),并且可能完全忽略文件中的实际类。
添加/删除标签 (Adding/removing tabs)
If you want to open two files next to each other which are unrelated, it’s better to use tabs than the assistant. Click the plus button on the top right of an open file. Switch the files by clicking their names at the top.
如果要打开彼此不相关的两个文件,最好使用选项卡而不是助手。 单击打开的文件右上角的加号按钮。 通过单击顶部的文件名来切换文件。

小地图 (Minimap)
In the same menu on the top right, you can open the minimap. It’s stolen from other editors like Sublime, but I find it absurdly useful for navigating big files!
在右上角的同一菜单中,您可以打开小地图。 它是从Sublime等其他编辑器窃取的,但是我发现它在导航大文件时非常有用!

标记,TODO,FIXME,并快速导航到其他方法 (Mark, TODO, FIXME, and quickly navigating to other methods)
In the minimap, you will also see headers (big text) and horizontal lines. You can create a header with the MARK comment. Another useful directive is the TODO directive. Although you can only view your TODO list by searching for the TODO string in the project, which is kind of a missed opportunity. Another one is the FIXME directive.
在小地图中,您还将看到标题(大文本)和水平线。 您可以使用MARK注释创建标题。 另一个有用的指令是TODO指令。 尽管您只能通过在项目中搜索TODO字符串来查看TODO列表,但这是一种错失的机会。 另一个是FIXME指令。


You can however view all the MARK , TODO , and FIXME sections, and maybe even better, all the methods in the file, by clicking on the methods at the top of the file.
但是,您可以通过单击文件顶部的方法来查看所有MARK , TODO和FIXME部分,甚至更好的文件中的所有方法 。

This is possible the best way to navigate through a big file! Or to gain an overview of someone else’s code.
这可能是浏览大文件的最佳方法! 或获得他人代码的概述。
阅读文档 (Reading documentation)
You can read the documentation for a section by holding down the option key ⌥ and clicking on the piece of code.
您可以通过按住选项键⌥并单击代码段来阅读本节的文档。

You can also use the Quick Help inspector in the Inspectors section on the right after you have put your cursor on the relevant code.
将光标放在相关代码上之后,您也可以在右侧的“ 检查器”部分中使用“ 快速帮助”检查 器 。

撰写文件 (Writing documentation)
Equally useful is writing documentation. You can generate the documentation template to fill out with by putting your cursor into the relevant method and pressing command-option-slash: ⌘⌥/.
编写文档同样有用。 您可以通过将光标置于相关方法中并按command-option-slash: ⌘⌥/来生成文档模板。

设置断点 (Setting breakpoints)
I set my first breakpoint by accident. If you’re reading this there’s a good chance you did too. You can set them by just clicking on the line numbers on the left.
我偶然设置了第一个断点。 如果您正在阅读本文,那么您很有可能也这样做了。 您只需单击左侧的行号即可进行设置。

You can edit by double clicking the breakpoint.
您可以通过双击断点进行编辑。

删除断点 (Removing breakpoints)
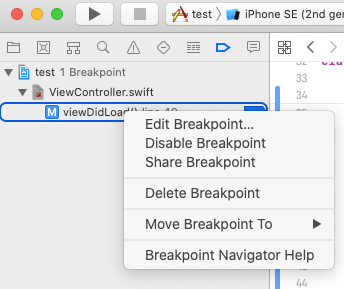
Equally important is to remove breakpoints. One way is to just click and drag the breakpoint, throwing it away. This works OK for one or two breakpoints, but with breakpoints scattered through your project, its better to use the Breakpoint navigator in the navigator panel on the left.
同样重要的是删除断点。 一种方法是单击并拖动断点,将其扔掉。 对于一个或两个断点,这可以正常工作,但由于断点分散在您的项目中,因此最好使用左侧导航器面板中的“ 断点”导航器 。
单步执行断点 (Stepping through breakpoints)
This one’s more intuitive, but for completeness: to step through a breakpoint, look in the Variables View on the bottom left and use the Continue button.
这是更直观的方法,但出于完整性考虑:要遍历断点,请查看左下角的“ 变量视图 ”,然后使用“ 继续”按钮。

There’s couple more crazy features here, but let’s leave them until later.
这里还有一些更疯狂的功能,但让我们将其留待以后再使用。
建造和清洁 (Build and clean)
During development, more useful than running the program is building it with ⌘B, and occasionally cleaning the build folder with ⇧⌘K.
在开发过程中,使用⌘B生成程序比运行程序更有用,并且偶尔使用⇧⌘K清理生成文件夹。

重新缩进代码 (Re-indent code)
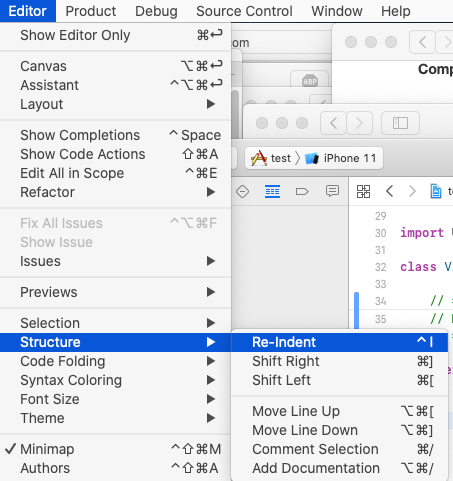
Strangely hidden in a submenu, the re-indent code is needed for everyone’s sanity, and can be invoked with ⌃I.
重新缩进的代码奇怪地隐藏在子菜单中,这对于每个人的理智都是必需的,并且可以使用⌃ I调用。
源代码控制-查看更改 (Source control — viewing changes)
There’s several ways to do this. There’s the big button on the top right.
有几种方法可以做到这一点。 右上方有一个大按钮。

You can also use the History inspector on the right to view specific commits.
您也可以使用右侧的“ 历史记录”检查器查看特定的提交。

源代码控制-落实,推动,拉动 (Source control — committing, pushing, pulling)
Oh and there’s a big source control menu at the top, which lets you commit, push, pull, and even initialize a git repo for the project if you haven’t already used it.
哦,顶部有一个很大的源代码管理菜单,如果您尚未使用它,则可以为该项目提交,推送,拉取甚至初始化git repo。

When you press commit, you get a nice menu where you can review the code differences, and add a commit message.
当您按下提交时,您会看到一个漂亮的菜单,您可以在其中查看代码差异,并添加一条提交消息。

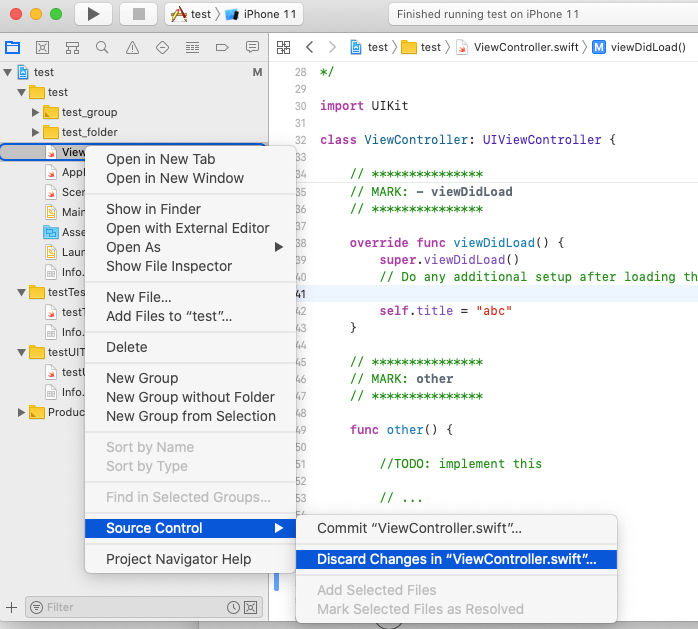
On the left in the project navigator, there’s symbols M for modified, A for new added file, etc. Here there’s also an easy way to discard changes in a file if you ever feel that need, by right clicking on the file.
在项目导航器的左侧,有M表示修改的符号, A表示新添加的文件的符号,等等。如果您有需要,可以通过右键单击该文件来丢弃文件中的更改,这是一种简便的方法。
颜色和主题 (Colors and themes)
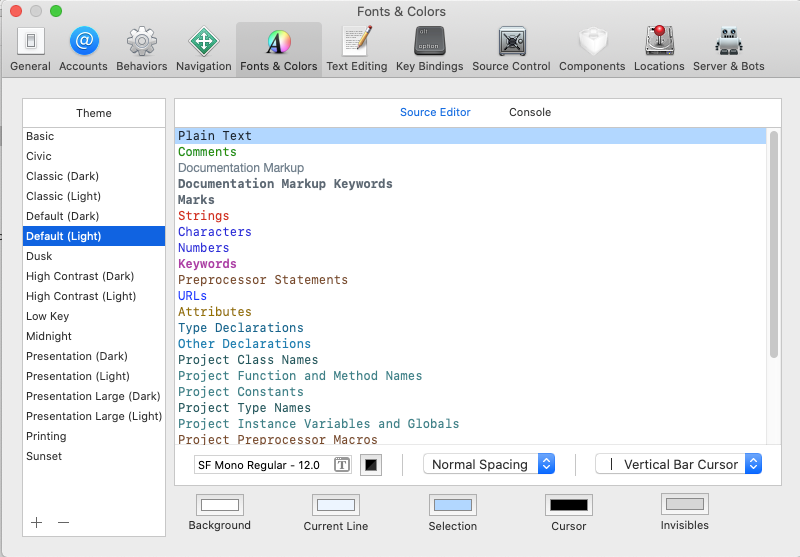
You can switch colors and themes in the menu bar under Editor/Theme and Editor/Syntax Coloring .
您可以在菜单栏中的“ Editor/Theme和“ Editor/Syntax Coloring下切换颜色和主题。

You can otherwise set the colors in the preferences to your liking.
您也可以根据自己的喜好在首选项中设置颜色。
堆栈跟踪 (Stack trace)
When your code inevitably fails, you can step through the executions in the Debug navigator on the left.
当代码不可避免地失败时,您可以在左侧的Debug导航器中逐步执行。

在报告导航器中查看以前的错误 (View previous errors in the Report navigator)
You can view the results and errors of previous builds and runs in the Report navigator on the left.
您可以在左侧的“报告”导航器中查看先前构建和运行的结果和错误。

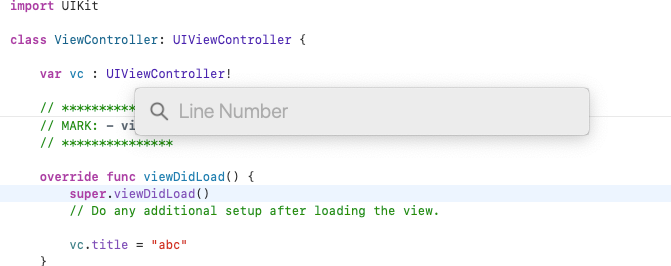
跳转到行/定义 (Jump to line/definition)
Probably you already know to use ⌘L to jump to a specific line.
可能您已经知道使用⌘L跳至特定行。
Equally useful is to jump to a function definition using ⌃⌘J after you click on the method.
同样有用的是单击方法后使用⌃⌘J跳转到函数定义。

奖励:从CMake项目生成Xcode项目 (Bonus: Generate Xcode project from CMake project)
Beyond Swift: Xcode is also great for other projects. Using CMake , you can generate an Xcode project using:
超越Swift:Xcode也非常适合其他项目。 使用CMake ,您可以使用以下命令生成Xcode项目:
cmake .. -GXcodeNext, let’s get into some Swift/iOS specific parts. Storyboards are littered with buttons you can’t find.
接下来,让我们进入一些特定于Swift / iOS的部分。 情节提要板上堆满了找不到的按钮。
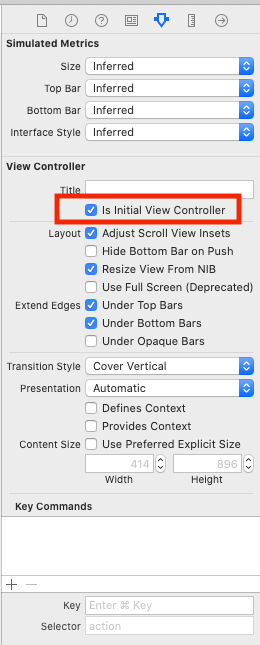
更改初始视图控制器 (Changing the initial view controller)
One way is to drag the default arrow around, but that always seems impossible if your project is big. Luckily there’s also a menu button if you click on the ViewController and select Is Initial View Controller.
一种方法是拖动默认箭头,但是如果您的项目很大,这似乎总是不可能的。 幸运的是,如果您单击ViewController并选择Is Initial View Controller那么还有一个菜单按钮。
弹出窗口与全屏 (Popover vs full-screen)
By default, new view controllers presented with a Show segue come as a page that doesn’t cover the full screen.
默认情况下,带有“ Show新视图控制器以不覆盖全屏的页面形式出现。

You can change this to cover the full screen by selecting Presentation/Full Screen on the right.
您可以通过选择右侧的“ Presentation/Full Screen ”将其更改为覆盖Presentation/Full Screen 。

调试视图层次结构 (Debugging the view hierarchy)
Back to the breakpoints — when you are in a breakpoint, you can debug the view hierarchy, which is a great way to figure out why your views aren’t showing correctly.
回到断点-当您处于断点时,您可以调试视图层次结构,这是弄清楚为什么视图显示不正确的好方法。


Wow that looks fancy!
哇,看起来不错!
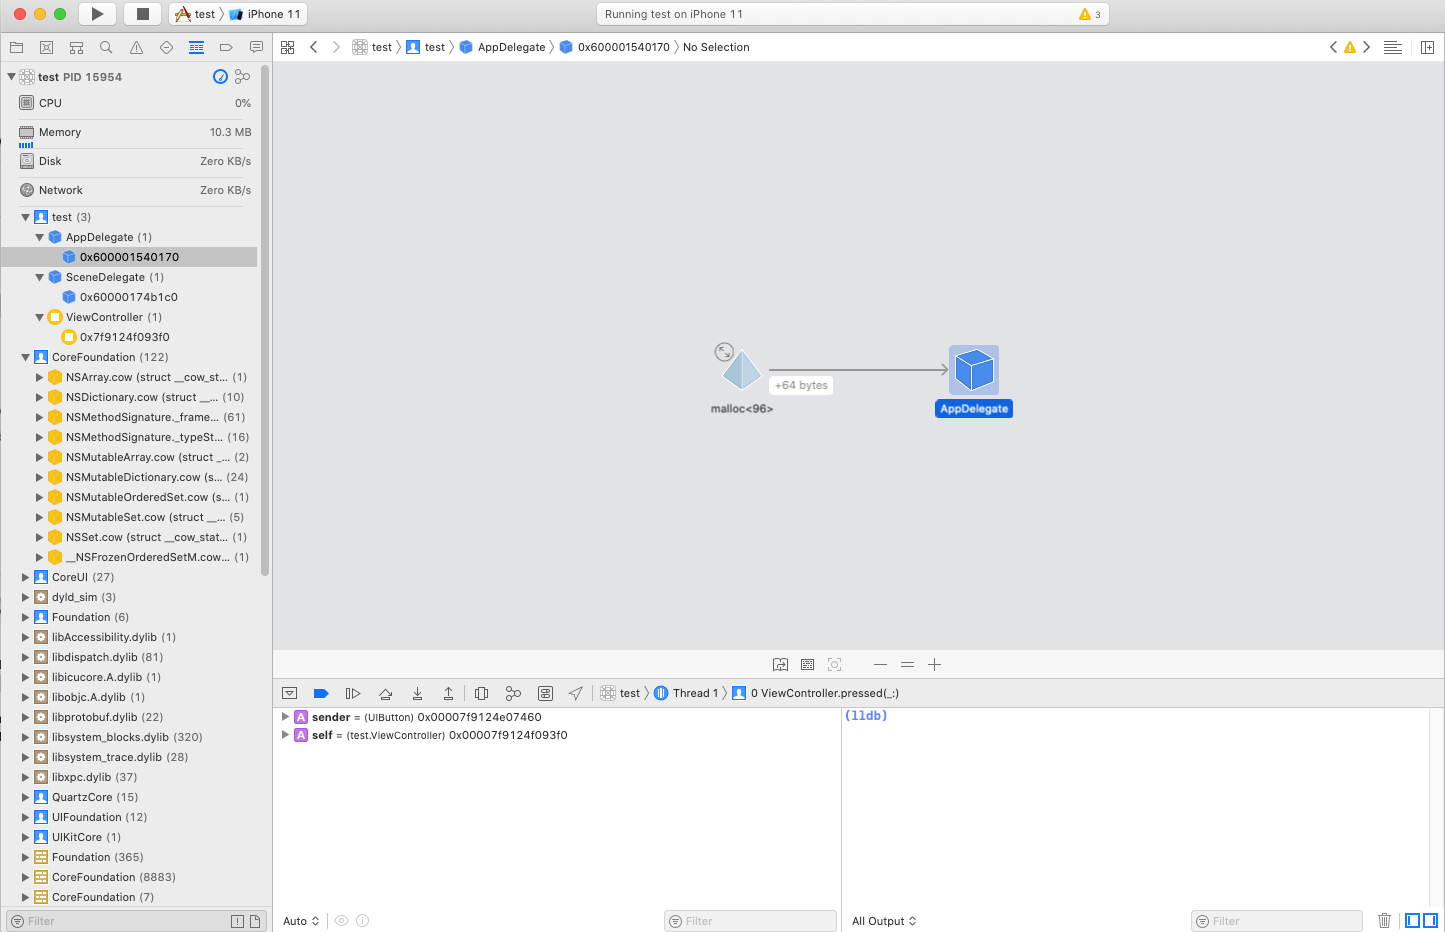
记忆图 (Memory graph)
Just as crazy as the view hierarchy debugger has to be the memory graph — the button next to the view hierarchy one. It lets you investigate exactly who’s eating up resources.
正如视图层次结构调试器必须要疯狂一样,它是内存图-视图层次结构旁边的按钮。 它使您可以准确调查谁正在消耗资源。
环境优先 (Environment overrides)
A final very useful debugging tool is the environment overrides button, in the same row as the memory graph and the view hierarchy. It lets you change some features, mostly related to the views, mid-run of your program. For example, you can switch light and dark mode!
最后一个非常有用的调试工具是环境覆盖按钮,与内存图和视图层次结构位于同一行。 它使您可以在程序中期更改某些功能,这些功能主要与视图相关。 例如,您可以切换明暗模式!

从代码跳转到情节提要 (Jump from code to storyboard)
Usually we go from UI elements and hook them up to the code.
通常,我们从UI元素开始,然后将它们连接到代码。
But did you know you can jump directly back from the code to storyboard just by pressing the black connection button next to a reference?
但是您知道您只需按一下参考旁边的黑色连接按钮就可以直接从代码跳回到情节提要吗?


在没有助手的情况下将代码连接到情节提要 (Hooking up code to the storyboard without the assistant)
When you first go through tutorials on Swift, you are most often taught to use the assistant editor next to the storyboard to hook your code and references up to the storyboard. But if you are have the code (e.g. by copy pasting it from elsewhere), you can hook up the UI elements entirely in the storyboard by dragging from the elements to the view controller. This can be done in the view controller:
第一次浏览Swift教程时,通常会教您使用情节提要旁边的助手编辑器来将代码和引用链接到情节提要。 但是,如果您有代码(例如,通过从其他位置复制粘贴代码),则可以通过将UI元素从元素拖到视图控制器来完全将它们挂在情节提要中。 这可以在视图控制器中完成:

Or even in the list on the left:
甚至在左侧列表中:

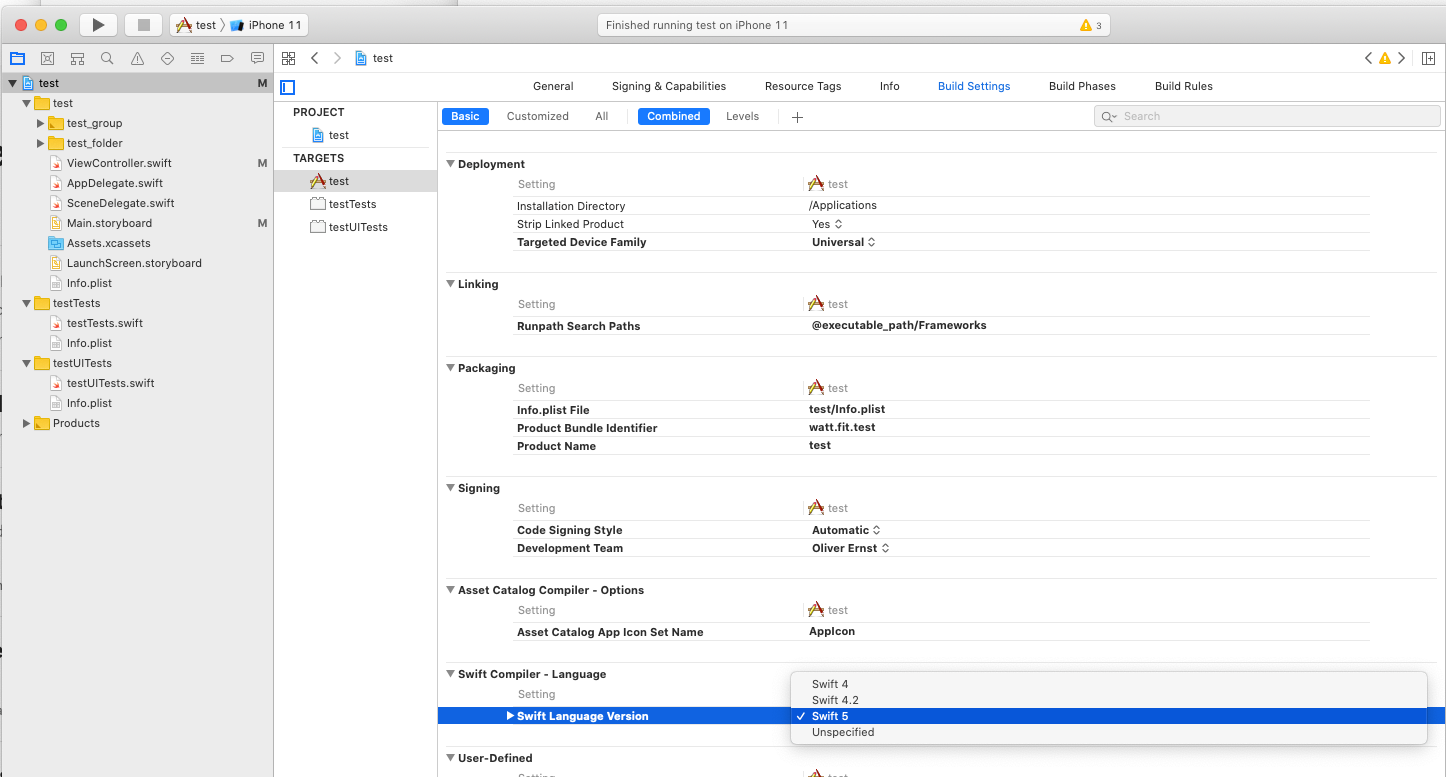
更改Swift版本 (Changing the Swift version)
Changing the Swift version comes up somewhat frequently on large projects, especially when it’s updated in a newer version of Xcode and you don’t feel like making the switch. You can change it in the project settings under Build Settings.
在大型项目中经常会更改Swift版本,特别是在更新版本的Xcode中更新它并且您不希望进行切换时。 您可以在“ 构建设置”下的项目设置中对其进行更改。
添加/删除源文件 (Adding/removing source files)
Sometimes, you add a file to your project and for some reason or other it just doesn’t end up being compiled. Or maybe worse, you delete a file and Xcode complains that it’s still trying to build it. You can edit the Compile Sources in the projects Build Phases.
有时,您将文件添加到项目中,但由于某种原因或其他原因,该文件最终没有被编译。 也许更糟的是,您删除了一个文件,而Xcode抱怨它仍在尝试构建它。 您可以在“ 构建阶段 ”项目中编辑“ 编译源 ”。

最后的想法 (Final thoughts)
There’s certainly a million more buttons and features not described here, but hopefully this will help orient someone a little.
当然,这里没有描述的按钮和功能肯定还有100万个,但是希望这可以帮助一些人。
We’re all great programmers on the inside — if only we could figure out how to operate these strange machines in front of us!
我们都是内在的优秀程序员,只要我们能弄清楚如何在我们眼前操作这些奇怪的机器!
翻译自: https://medium.com/practical-coding/lost-in-xcode-land-302dc8b243cf
xcode写在


 2181
2181

 被折叠的 条评论
为什么被折叠?
被折叠的 条评论
为什么被折叠?
 到【灌水乐园】发言


