


ios create ml
In this article, we shall see how to train a model and integrate it into an iOS app. If you already have an ML model and want to see how to integrate it in your app, you can scroll down to the Implementation on iOS section.
在本文中,我们将看到如何训练模型并将其集成到iOS应用中。 如果您已经拥有一个ML模型,并且想了解如何将其集成到您的应用中,则可以向下滚动至iOS上的实现部分。
The objective of this article is to demonstrate how to train an ML model and use it in iOS, and you won’t need any machine learning knowledge to follow through this article.
本文的目的是演示如何训练ML模型并在iOS中使用它,并且您不需要任何机器学习知识即可理解本文。
An ML Model is an alias for a trained (or yet to be trained) model which is expected to perform some intelligent stuff, in our case we are training it to identify some specific objects
ML模型是已训练(或尚未训练)的模型的别名,该模型预计将执行一些智能操作,在我们的情况下,我们正在训练它以识别一些特定对象
训练模型 (Training a model)
We are using Google’s Teachable Machine to train a model. It is a fantastic tool that allows us to train a model without requiring any knowledge of machine learning. Currently, it enables us to train models to recognize objects in images, a particular sound, or a pose. For our project we are using images to recognize objects.
我们正在使用Google的可教机来训练模型。 这是一个了不起的工具,它使我们能够训练模型而无需任何机器学习知识。 当前,它使我们能够训练模型以识别图像,特定声音或姿势中的对象。 对于我们的项目,我们使用图像来识别对象。

Now for our model to recognize particular objects we are providing multiple images of that object. We can use a webcam or upload set of images. The more images we upload the more accurate result we are getting. Make sure to choose pictures from different positions, angles, and environments.
现在,为了让我们的模型能够识别特定对象,我们将提供该对象的多个图像。 我们可以使用网络摄像头或上传一组图像。 我们上传的图片越多,获得的结果越准确。 确保从不同的位置,角度和环境选择图片。
- Provide pictures and edit the class name with the name of the object 提供图片并使用对象名称编辑类名称
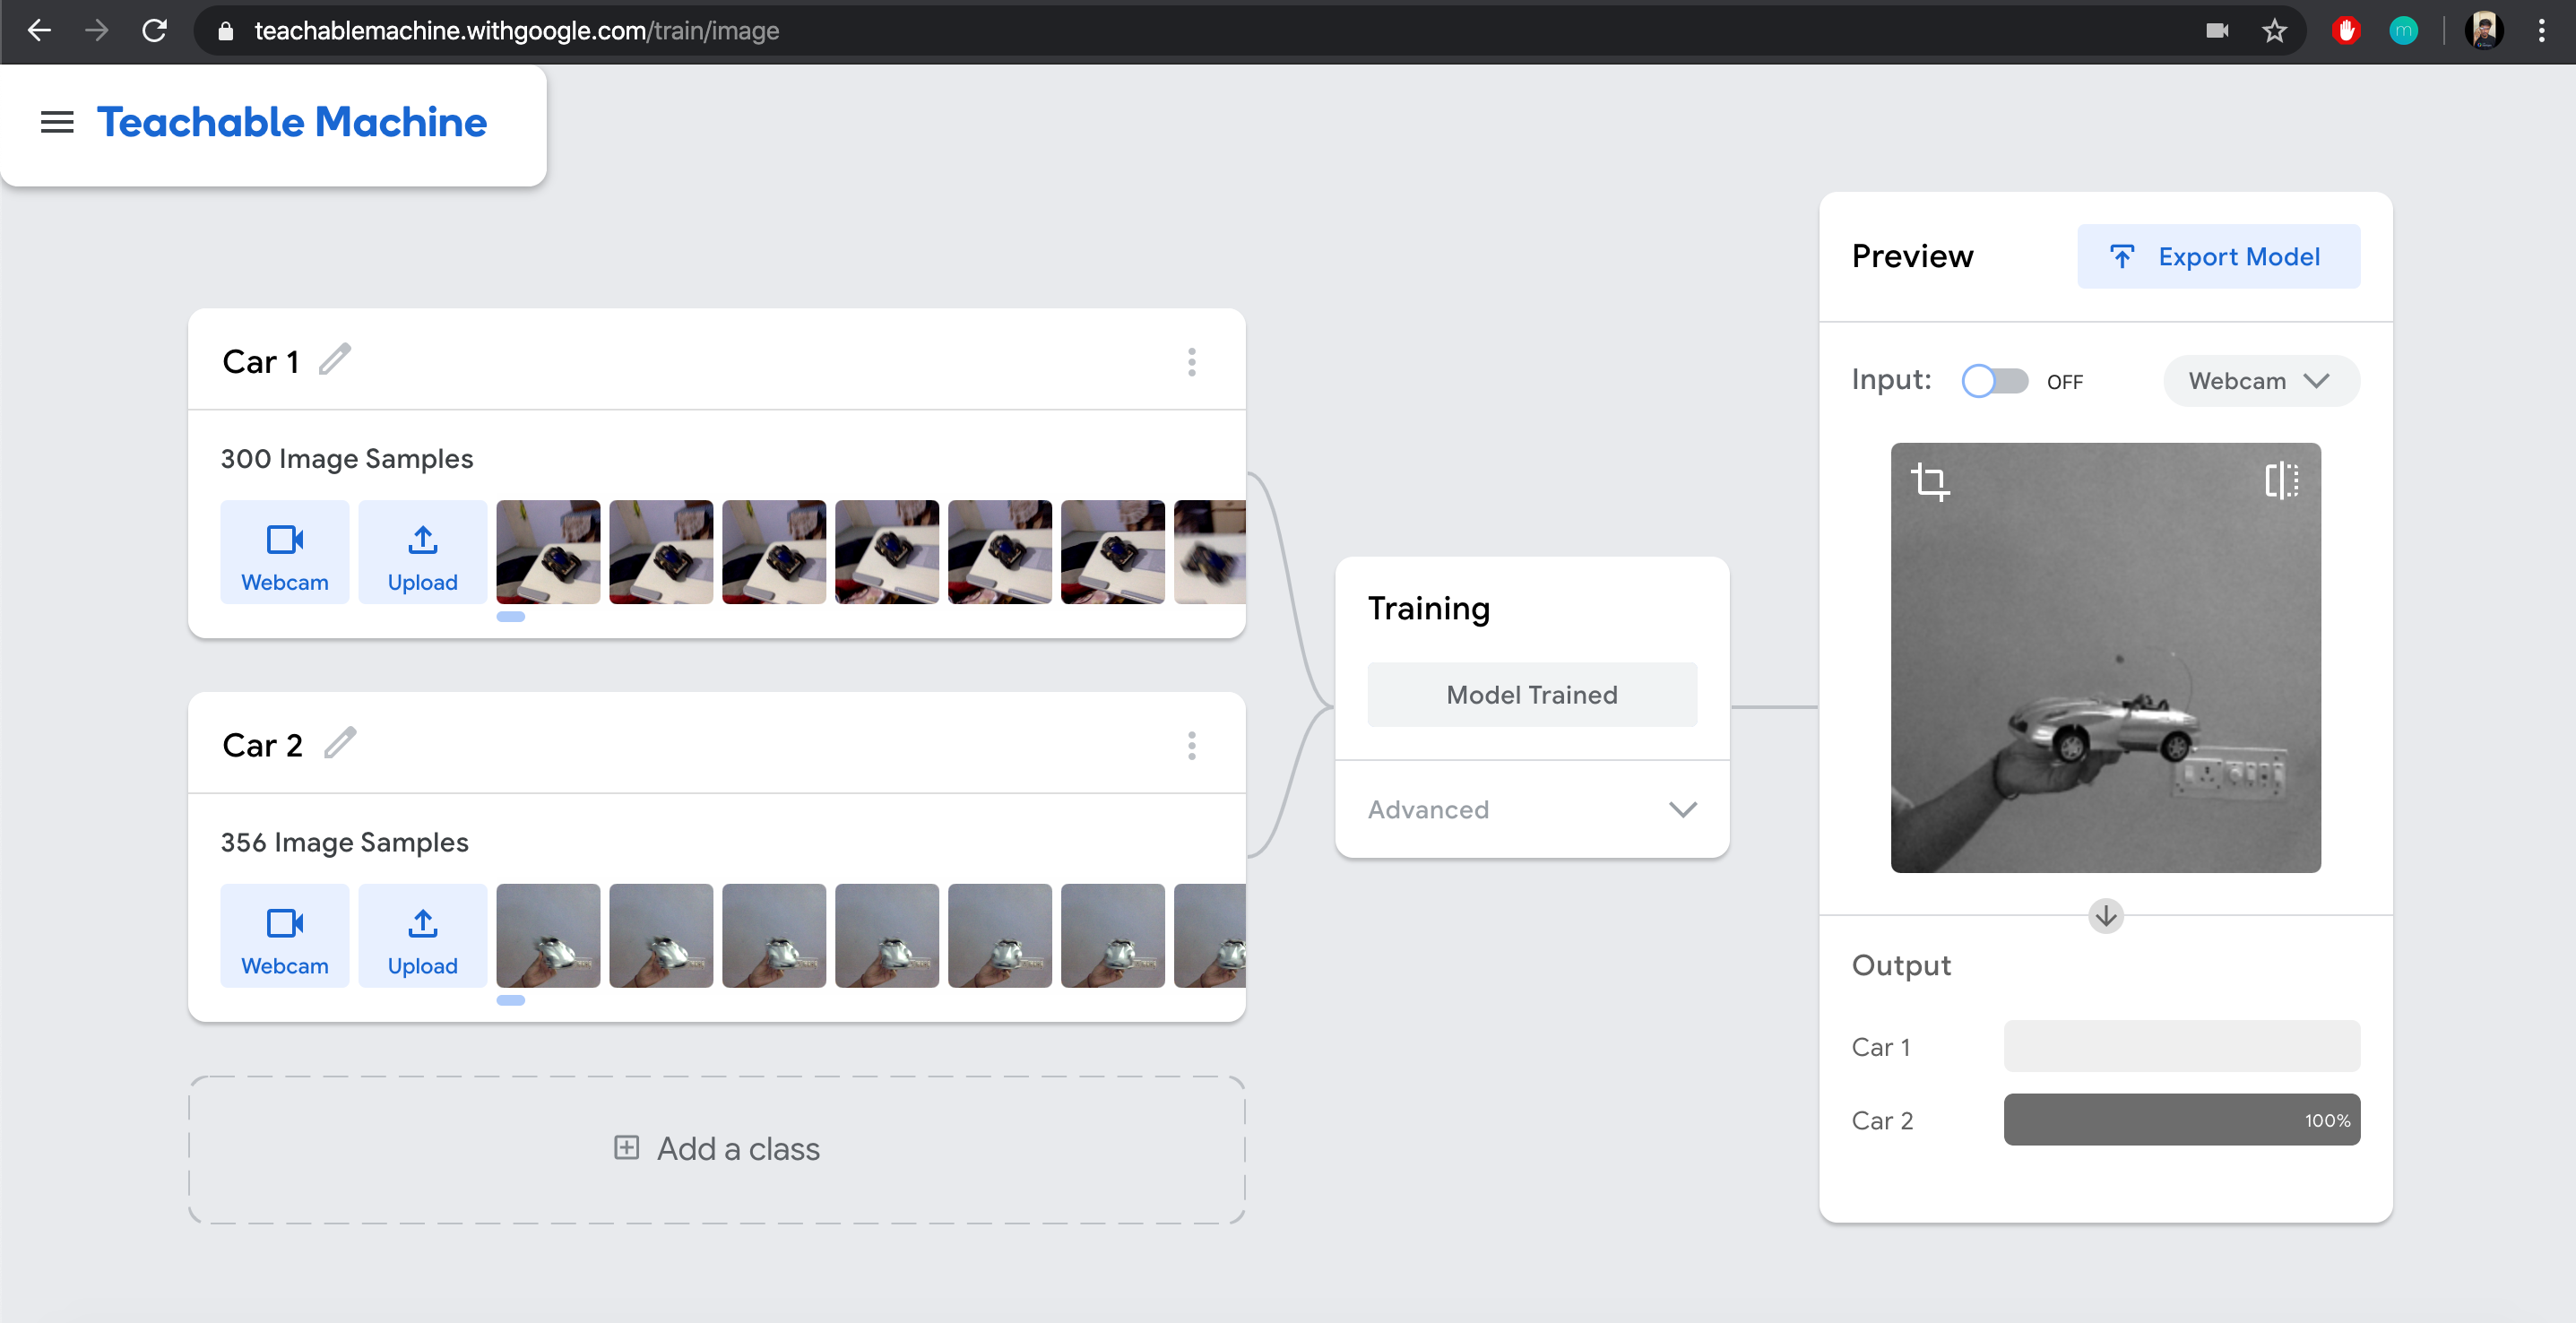
I have added two classes for recognizing two different cars as Car 1 and Car 2.
我添加了两个类来识别两种不同的汽车,分别为Car 1和Car 2 。
Once done click on train model
完成后,单击火车模型

Once the model is trained, we get to watch a live preview. Our model is now able to differentiate between the two objects when placed in front of webcam. The only drawback is that it always returns us one of class value so if none of the class objects (cars in this case) is placed in front of the webcam it will show us the value of the first class of our model (in this case Car 1)
训练模型后,我们将观看实时预览。 现在,当放置在网络摄像头前面时,我们的模型能够区分两个对象。 唯一的缺点是它总是向我们返回类值之一,因此,如果没有将任何类对象(在这种情况下为汽车)放置在摄像头前面,它将向我们显示模型的第一类的值(在这种情况下) 汽车1 )
Click on export model (next to Preview)
单击导出模型 ( 预览旁边)
In the dialog box, select Tensorflow Lite → Floating point and click Download my model
在对话框中,选择Tensorflow Lite → 浮点 ,然后单击下载我的模型

Extracting the downloaded model gives us a
.tflitefile and one.txtfile which we will use in iOS提取下载的模型会得到一个
.tflite文件和一个.txt文件,我们将在iOS中使用该文件
在iOS上实施 (Implementation on iOS)
There are two ways of integrating our model in our app:
有两种方法可以将模型集成到应用中:
- Using the Tensorflow Lite library 使用Tensorflow Lite库
- Using Firebase ML Kit 使用Firebase ML套件
For our project we will be using Firebase ML Kit as
对于我们的项目,我们将使用Firebase ML Kit作为
- It is easy to set up 设置容易
- Models can be hosted on Firebase and also bundled with the app 模型可以托管在Firebase上,也可以与应用捆绑在一起
- We can update our model without updating the application 我们可以更新模型而无需更新应用程序
让我们开始吧 (Lets get Started)
- Create a new project on Xcode 在Xcode上创建一个新项目
整合Firebase (Integrate Firebase)
If you have an existing Firebase project integrated in your app you can skip this part and go to next step
如果您的应用程序中集成了现有的Firebase项目,则可以跳过此部分并转到下一步
Go to the Firebase console here and create a new project
在此处转到Firebase控制台并创建一个新项目
- In the Firebase project overview page click on iOS to start the setup 在Firebase项目概述页面中,单击iOS以开始设置
- Provide the bundle identifier to register the app 提供捆绑包标识符以注册应用
Add the
GoogleService-Info.plistfile to your project将
GoogleService-Info.plist文件添加到您的项目中
Now that we have Firebase integrated in our app let’s
现在我们已经将Firebase集成到了我们的应用中
添加Firebase ML套件 (Add Firebase ML Kit)
Create a pod file if you don’t already have one by typing
pod initin your terminal in the project’s root folder通过在项目的根文件夹中的终端中输入
pod init来创建Pod文件(如果尚未创建的话)
pod init- Add this line to your pod file 将此行添加到您的pod文件中
pod 'Firebase/MLModelInterpreter', '6.25.0'In the terminal type
pod installto install the dependency在终端中键入
pod install以安装依赖项
pod install Once installed initialize Firebase in your
AppDelegateclass as shown in the setup instructions安装完成后,按照设置说明中的说明在
AppDelegate类中初始化Firebase
And with that we have successfully set up Firebase for our app.
至此,我们已经成功为我们的应用程序设置了Firebase。
Now in order to use it add our model(.tflite file) and label file we created earlier to our project.
现在,为了使用它,将我们先前创建的模型( .tflite文件)和标签文件添加到项目中。
After doing so, for our UI we will just use a text label placed it at the centre of our screen.
这样做之后,对于我们的UI,我们将只使用一个文本标签放置在屏幕中心。
Add an image for one of the objects (in our case
Car 1) in the app’s asset catalog在应用程序的资产目录中为其中一个对象(在本例中为
Car 1)添加图像Add this code to
ViewControllerclass将此代码添加到
ViewController类
//
//  ViewController.swift
//  ML with iOS
//
//  Created by kushal dave on 14/07/20.
//  Copyright © 2020 kushal dave. All rights reserved.
//

import UIKit
import Firebase


class ViewController: UIViewController {


    @IBOutlet var tvIdentifiedItem:UILabel!
    override func viewDidLoad() {
        super.viewDidLoad()

        // load model from path
        guard let modelPath = Bundle.main.path(
          forResource: "model_unquant",
          ofType: "tflite"
        ) else { return }
        let localModel = CustomLocalModel(modelPath: modelPath)
        //initialise interpreter
        let interpreter = ModelInterpreter.modelInterpreter(localModel: localModel)


        let ioOptions = ModelInputOutputOptions()
        do {
            try ioOptions.setInputFormat(index: 0, type: .float32, dimensions: [1, 224, 224, 3])
            try ioOptions.setOutputFormat(index: 0, type: .float32, dimensions: [1, 2])
        } catch let error as NSError {
            print("Failed to set input or output format with error: \(error.localizedDescription)")
        }

        /* Here we are using static image from drawable to keep the code minimum and avoid distraction,
        Recommended method would be to get the image from user by camera or device photos using
         the same code by handling all this logic in a method and calling that every time */

        let image = UIImage(imageLiteralResourceName: "car1").cgImage!
        guard let context = CGContext(
          data: nil,
          width: image.width, height: image.height,
          bitsPerComponent: 8, bytesPerRow: image.width * 4,
          space: CGColorSpaceCreateDeviceRGB(),
          bitmapInfo: CGImageAlphaInfo.noneSkipFirst.rawValue
        ) else {
          return
        }


        context.draw(image, in: CGRect(x: 0, y: 0, width: image.width, height: image.height))
        guard let imageData = context.data else { return  }


        let inputs = ModelInputs()
        var inputData = Data()
        do {
          for row in 0 ..< 224 {
            for col in 0 ..< 224 {
              let offset = 4 * (col * context.width + row)
              // (Ignore offset 0, the unused alpha channel)
              let red = imageData.load(fromByteOffset: offset+1, as: UInt8.self)
              let green = imageData.load(fromByteOffset: offset+2, as: UInt8.self)
              let blue = imageData.load(fromByteOffset: offset+3, as: UInt8.self)


              // Normalize channel values to [0.0, 1.0]. This requirement varies
              // by model. For example, some models might require values to be
              // normalized to the range [-1.0, 1.0] instead, and others might
              // require fixed-point values or the original bytes.
              var normalizedRed = Float32(red) / 255.0
              var normalizedGreen = Float32(green) / 255.0
              var normalizedBlue = Float32(blue) / 255.0


              // Append normalized values to Data object in RGB order.
              let elementSize = MemoryLayout.size(ofValue: normalizedRed)
              var bytes = [UInt8](repeating: 0, count: elementSize)
              memcpy(&bytes, &normalizedRed, elementSize)
              inputData.append(&bytes, count: elementSize)
              memcpy(&bytes, &normalizedGreen, elementSize)
              inputData.append(&bytes, count: elementSize)
              memcpy(&bytes, &normalizedBlue, elementSize)//changed
              inputData.append(&bytes, count: elementSize)
            }
          }
          try inputs.addInput(inputData)
        } catch let error {
          print("Failed to add input: \(error)")
        }

        interpreter.run(inputs: inputs, options: ioOptions) { outputs, error in
            guard error == nil, let outputs = outputs else { return }
            // Process outputs
            let output = try? outputs.output(index: 0) as? [[NSNumber]]
            let probabilities = output?[0]
            //loads labels file
            guard let labelPath = Bundle.main.path(forResource: "labels", ofType: "txt") else { return }
            let fileContents = try? String(contentsOfFile: labelPath)
            guard let labels = fileContents?.components(separatedBy: "\n") else { return }


            var higherProbablityFloat:Float = 0
            for i in 0 ..< labels.count-1 {
              if let probability = probabilities?[i] {
                print("\(labels[i]): \(probability)")
                if (Float(truncating: probability)>higherProbablityFloat) {
                    higherProbablityFloat = Float(truncating: probability)
                    var label = String(labels[i].dropFirst())
                    label = String(label.dropFirst())
                    self.tvIdentifiedItem.text = "The Image is of \(label)"
                }

              }
            }
        }
    }
}
Here we are using static images from assets to keep the code minimal and avoid distraction. The recommended method would be to let the user provide an image by using the camera or image picker.
在这里,我们使用资产的静态图像来使代码最少并避免分散注意力。 推荐的方法是让用户使用相机或图像选择器提供图像。
- Run the app :) 运行应用程序:)
With this we have implemented the local ML integration part. You can find all the code on GitHub here
这样,我们就实现了本地ML集成部分。 你可以找到所有的代码在GitHub 这里
Lastly let’s not forget to thank the developers of Teachable Machine and Firebase for their amazing products , they wrote thousands of lines of code which enabled us to train and use our models in just a few lines of code.
最后,我们不要忘了感谢Teachable Machine和Firebase的开发人员的出色产品,他们编写了数千行代码,使我们能够仅用几行代码来训练和使用模型。
Thanks for reading! Feel free to say hi or share your thoughts on Twitter @that_kushal_guy or in the responses below!
谢谢阅读! 欢迎在Twitter @that_kushal_guy或以下回复中打个招呼或分享您的想法!
You can checkout Android variant of this article here.
您可以在此处查看本文的Android版本。
资源资源 (Resources)
翻译自: https://medium.com/firebase-developers/ml-with-ios-f6551ebfc6f0
ios create ml


 982
982

 被折叠的 条评论
为什么被折叠?
被折叠的 条评论
为什么被折叠?
 到【灌水乐园】发言


