


swift 获取所有属性
Many APIs require developers to provide an API key and/or API secret to be able to access the API.
许多API要求开发人员提供API密钥和/或API机密才能访问API。
This is both to identify the app that is accessing the API and to limit access to the API for apps that are known to the API.
这既可以识别正在访问API的应用程序,又可以限制API已知的应用程序对API的访问。
Both the API key and the secret (if you have one) should be treated as a secret: Anyone who knows these can access and use the API, impersonating your app. This results in all sorts of security concerns: Depending on the type of API, an attacker might be able to access your application’s data, compromise your users’ data, and access information that is protected by the terms of service established between you and the service provider. They might also thrash the API, causing a large bill for you at the end of the month.
API密钥和密钥(如果有的话)都应视为密钥:任何知道密钥和密钥的人都可以访问和使用API,从而冒充您的应用程序。 这导致了各种各样的安全问题:根据API的类型,攻击者可能能够访问您的应用程序数据,破坏用户的数据并访问受您与服务之间建立的服务条款保护的信息。提供者。 他们还可能会破坏API,从而在月底为您带来大笔账单。
All of these are good reasons to make sure to keep your API keys and secrets safe and secure.
所有这些都是确保您的API密钥和机密安全的好理由。
In this article, we’re going to look at how to make sure your API keys and secrets don’t accidentally leak to your version control system. The easiest, but also the most dangerous, way to store your API key is to define a constant in your app’s source code. You might have seen code like this:
在本文中,我们将研究如何确保API密钥和机密不会意外泄漏到版本控制系统中。 存储API密钥的最简单但最危险的方法是在应用程序的源代码中定义一个常量。 您可能已经看到如下代码:
let apiKey = "s33cr3t!k3y"

func search(queryString: String) {
  TMDB.set(apiKey: apiKey)


  TMDB.Search.movies(query: queryString) { pagedListResult in
    // handle result
  }
}
When committing code like this to your version control system, anyone who has access to your repository can go ahead and use the API key in their app to access the API. This might not be a big deal if your code lives in an in-house repository with tight access control, but it is a huge security risk for open source projects.
将这样的代码提交到版本控制系统时,有权访问您的存储库的任何人都可以继续使用其应用程序中的API密钥来访问API。 如果您的代码位于具有严格访问控制的内部存储库中,那么这可能没什么大不了的,但是对于开源项目而言,这是巨大的安全风险。
The easiest way to work around this is to externalise your API key into a configuration file that you don’t check in to your repository. You can then keep the API key in a secure location (such as a password manager) and hand it out to developers on a need-to-know basis. For example, you might want to use the API key for accessing the production endpoints only on your CI/CD server and provide developers with API keys to the development endpoints (which might have stricter rate limiting and tighter cost caps).
解决此问题的最简单方法是将您的API密钥外部化为不签入存储库的配置文件。 然后,您可以将API密钥保存在安全的位置(例如密码管理器),并根据需要将其分发给开发人员。 例如,您可能希望仅使用API密钥访问CI / CD服务器上的生产端点,并为开发人员提供指向开发端点的API密钥(这可能具有更严格的速率限制和更严格的成本上限)。
In iOS, we traditionally use PLIST (short for property list) files to store and manage configuration data. PLIST files essentially are XML files with benefits. For example, Xcode provides a graphical editor to make editing PLIST files more pleasant, and there’s an easy-to-use API for reading PLIST files.
在iOS中,传统上我们使用PLIST(属性列表的缩写)文件来存储和管理配置数据。 PLIST文件本质上是具有优势的XML文件。 例如,Xcode提供了一个图形编辑器,使编辑PLIST文件更轻松,并且有一个易于使用的API可以读取PLIST文件。
Let’s have a look at how this helps us to keep the API key in the above code snippet safe and make our code more secure.
让我们看一下这如何帮助我们确保上述代码段中的API密钥安全,并使我们的代码更安全。
外部化API密钥 (Externalising the API Key)
The steps to properly externalise an API key are:
正确外部化API密钥的步骤是:
- Add a PLIST file to your project. 将PLIST文件添加到您的项目。
- Define the keys/values in the PLIST file. 在PLIST文件中定义键/值。
- Read the API key from the PLIST file. 从PLIST文件中读取API密钥。
- Use the API key. 使用API密钥。
- Handle error scenarios. 处理错误方案。
To add a new PLIST file to your project, make sure to select your project’s root folder in the project navigator, and then choose “New File …” from the root folder’s context menu. Type “property” into the filter field, and then choose the Property File type from the Resources section:
要将新的PLIST文件添加到您的项目,请确保在项目导航器中选择项目的根文件夹,然后从根文件夹的上下文菜单中选择“ New File…”。 在过滤器字段中键入“属性”,然后从“资源”部分中选择“属性文件”类型:

Choosing a good name for your property list file is essential as we will later write a build script to automate handling of this file. I recommend the following naming scheme: <name of the API>-Info.plist. In our example, we access TMDB ( The Movie Database), so we'll name the file TMDB-Info.plist.
为属性列表文件选择一个好名字是必不可少的,因为我们稍后将编写一个构建脚本来自动处理该文件。 我建议使用以下命名方案: <name of the API>-Info.plist 。 在我们的示例中,我们访问TMDB( 电影数据库 ),因此我们将文件命名为TMDB-Info.plist 。
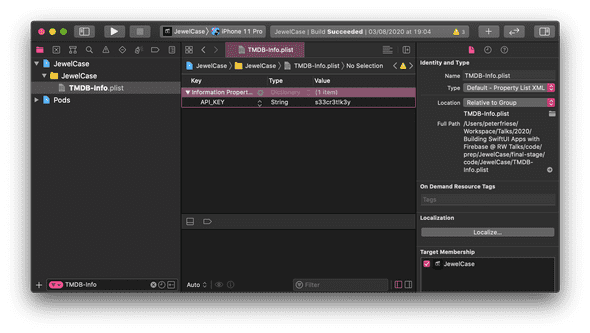
Next, go ahead and add a new key/value pair to the newly created file. I chose API_KEY as the name for the key. Most API keys are strings, so choose String as the data type, and then insert the key itself in the value field. Here is how it should look like:
接下来,继续并将新的键/值对添加到新创建的文件中。 我选择API_KEY作为密钥的名称。 大多数API密钥都是字符串,因此请选择String作为数据类型,然后将密钥本身插入到value字段中。 它看起来应该像这样:
Let’s now write some code to read the API key from the PLIST file and use it when accessing the API.
现在,让我们编写一些代码以从PLIST文件读取API密钥,并在访问API时使用它。
Reading a PLIST file is just a one-liner: let plist = NSDictionary(contentsOfFile: filePath).This will give you a dictionary, which makes reading the API key as simple as let value = plist?.object(forKey: "API_KEY") as? String. To make reading the API key and using it in our code as easy as possible, we will wrap it in a computed property. This will also give us the opportunity to perform some error handling.
读取PLIST文件只是一种方法: let plist = NSDictionary(contentsOfFile: filePath) 。这将为您提供一个字典,这使读取API密钥的过程像let value = plist?.object(forKey: "API_KEY") as? String let value = plist?.object(forKey: "API_KEY") as? String 。 为了尽可能轻松地读取API密钥并在我们的代码中使用它,我们将其包装在一个计算属性中。 这也将使我们有机会执行一些错误处理。
private var apiKey: String {
  get {
    // 1
    guard let filePath = Bundle.main.path(forResource: "TMDB-Info", ofType: "plist") else {
      fatalError("Couldn't find file 'TMDB-Info.plist'.")
    }
    // 2
    let plist = NSDictionary(contentsOfFile: filePath)
    guard let value = plist?.object(forKey: "API_KEY") as? String else {
      fatalError("Couldn't find key 'API_KEY' in 'TMDB-Info.plist'.")
    }
    return value
  }
}
First, we use Bundle.main.path(forResource:ofType) to obtain the path to our PLIST file. If the file doesn't exist, we crash fatally (not providing the file is a programming error after all, and there is no way the app can recover), issuing a helpful error message.
首先,我们使用Bundle.main.path(forResource:ofType)获取PLIST文件的路径。 如果该文件不存在,我们将致命崩溃(毕竟,如果不提供该文件是编程错误,则该应用程序将无法恢复),并发出有用的错误消息。
Next, we try to load the PLIST file into a dictionary (2), and then read the value for the API key from the dictionary. If the value doesn’t exist or is of the wrong type, we issue another error message (and crash the app).
接下来,我们尝试将PLIST文件加载到字典(2)中,然后从字典中读取API密钥的值。 如果该值不存在或类型错误,我们将发出另一条错误消息(并使应用程序崩溃)。
And finally, we return the value. Since we named the computed property apiKey, just like the constant, we can now delete the constant from our code, and our app will continue working as before.
最后,我们返回值。 由于我们将计算后的属性apiKey命名为常量,因此我们现在可以从代码中删除该常量,并且我们的应用程序将像以前一样继续工作。
With that, we’ve got the basic infrastructure in place. Before you can relax with a hot or cold beverage of your choice, we’ll have to talk about source control.
这样,我们就已经有了基本的基础结构。 在您可以选择冷热饮品放松身心之前,我们必须谈谈源代码控制。
源代码控制 (Source Control)
If you’ve accidentally checked in an API key to a public repository, there are two ways to fix the situation:
如果您不小心签入了公共存储库的API密钥,则有两种方法可以解决这种情况:
- Rotate the API key (i.e., remove the old one from your code, get a new one, and then make sure to not check the new one in). 旋转API密钥(即,从代码中删除旧密钥,获取新密钥,然后确保不要签入新密钥)。
Rewrite history (if you’re using Git). Before doing this, I urge you to watch Scott Hanselman’s video Git Push -Force will destroy the timeline and kill us all from his brilliant series Computer Stuff They Didn’t Teach You, and then choose option 1.
重写历史记录(如果您使用的是Git)。 在执行此操作之前,我敦促您观看Scott Hanselman的视频Git Push -Force将销毁时间表,并杀死他精彩的系列电影《他们没有教给您的知识》中的 所有人 ,然后选择选项1。
Even better than having to revoke an API key is to prevent accidentally checking it in. To this end, add any configuration files that contain API keys to your .gitignore file. This also means each developer can have their own copy of this file, with their specific values. For example, you might be using an API key and URL for the production endpoint, whereas your colleague who is working on a new feature is using the development key and URL for the development endpoint.
与必须撤销API密钥相比,更好的方法是防止意外检入。为此,请将包含API密钥的所有配置文件添加到.gitignore文件中。 这也意味着每个开发人员都可以拥有自己的此文件副本以及它们的特定值。 例如,您可能将API密钥和URL用于生产端点,而正在使用新功能的同事正在将开发密钥和URL用于开发端点。
To make it easier for new team members (or when you need to check out your code on a different machine), provide a sample configuration file. I suggest naming it <name of the Plist file>-Sample.plist. Then, add all required keys to this file and provide placeholder values. By prefixing the placeholder values with an underscore (or any other character that usually doesn't occur in your configuration) you can then extend your error handling code:
为了使新团队成员更容易(或在需要在其他计算机上签出代码时),请提供示例配置文件。 我建议将其命名为<name of the Plist file>-Sample.plist 。 然后,将所有必需的键添加到此文件并提供占位符值。 通过使用下划线(或配置中通常不出现的任何其他字符)作为占位符值的前缀,然后可以扩展错误处理代码:
private var apiKey: String {
  get {
    // 1
    guard let filePath = Bundle.main.path(forResource: "TMDB-Info", ofType: "plist") else {
      fatalError("Couldn't find file 'TMDB-Info.plist'.")
    }
    // 2
    let plist = NSDictionary(contentsOfFile: filePath)
    guard let value = plist?.object(forKey: "API_KEY") as? String else {
      fatalError("Couldn't find key 'API_KEY' in 'TMDB-Info.plist'.")
    }
    // 3
    if (value.starts(with: "_")) {
      fatalError("Register for a TMDB developer account and get an API key at https://developers.themoviedb.org/3/getting-started/introduction.")
    }
    return value
  }
}
The code in (3) checks if the value read from the PLIST file starts with an underscore (which denotes a placeholder) and issues an error message that tells the developer how to obtain an API key.
(3)中的代码检查从PLIST文件读取的值是否以下划线(表示占位符)开头,并发出一条错误消息,告知开发人员如何获取API密钥。
When adding this sample PLIST file to your project, make sure you do not include it in any build target — we don’t want to include this file in our application binary. It’s only relevant when checking out the project from your repository.
在将此示例PLIST文件添加到项目中时,请确保您不将其包含在任何构建目标中-我们不想将此文件包含在应用程序二进制文件中。 仅在从存储库中签出项目时才有意义。
奖励:签出后置备PLIST文件 (Bonus: Provisioning the PLIST File After Checking Out)
Speaking of your repository, wouldn’t it be nice if the config file (in our case, TMDB-Info.plist) was created automatically after checking out the project from source control?
说到您的存储库,如果从源代码管理中签出项目后自动创建配置文件(在我们的示例中为TMDB-Info.plist ),那会不会很好?
We can use Xcode build phases to achieve this. Here is how:
我们可以使用Xcode构建阶段来实现这一点。 方法如下:
- Select your target in the Xcode project editor. 在Xcode项目编辑器中选择目标。
- Navigate to Build Phases. 导航到构建阶段。
- Add a new Run Script build phase, making sure it is the first build phase in your target. Name this new phase “Copy sample API key.” 添加一个新的运行脚本构建阶段,确保它是目标中的第一个构建阶段。 将此新阶段命名为“复制示例API密钥”。
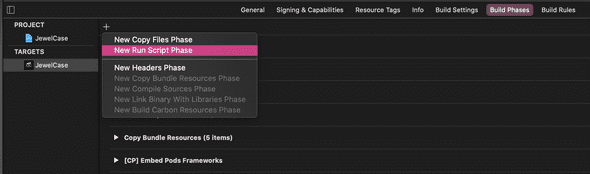
- Paste the following code 粘贴以下代码
CONFIG_FILE_BASE_NAME="TMDB-Info"


CONFIG_FILE_NAME=${CONFIG_FILE_BASE_NAME}.plist
SAMPLE_CONFIG_FILE_NAME=${CONFIG_FILE_BASE_NAME}-Sample.plist


CONFIG_FILE_PATH=$SRCROOT/$PRODUCT_NAME/$CONFIG_FILE_NAME
SAMPLE_CONFIG_FILE_PATH=$SRCROOT/$PRODUCT_NAME/$SAMPLE_CONFIG_FILE_NAME


if [ -f "$CONFIG_FILE_PATH" ]; then
  echo "$CONFIG_FILE_PATH exists."
else
  echo "$CONFIG_FILE_PATH does not exist, copying sample"
  cp -v "${SAMPLE_CONFIG_FILE_PATH}" "${CONFIG_FILE_PATH}"
fi
Finally, change the variable CONFIG_FILE_BASE_NAME to match your config file name. The code in this build phase will create a new API key config file based on the sample file you've checked in to the repository.
最后,更改变量CONFIG_FILE_BASE_NAME以匹配您的配置文件名。 此构建阶段中的代码将根据您签入到存储库中的样本文件创建一个新的API密钥配置文件。
This means whenever you (or one of your team members) check out your project and build it, the API key config file will be created. When you run the app, the error-handling code in the computed property will detect that this is a pristine copy and tell you to replace the placeholder value with a proper API key.
这意味着只要您(或您的团队成员之一)签出您的项目并进行构建,就会创建API密钥配置文件。 当您运行应用程序时,calculated属性中的错误处理代码将检测到这是原始副本,并告诉您用适当的API密钥替换占位符值。
结论 (Conclusion)
Keeping your API keys and secrets secure is just one piece of the puzzle of implementing and operating your app safely and securely, but it is an important one. I hope this article helped you to take this important step on the path to a more secure app while making this a pleasant experience for you and your team.
确保API密钥和机密的安全只是安全可靠地实现和操作应用程序的难题之一,但这是一个重要的难题。 我希望本文能帮助您在迈向更安全的应用程序的道路上迈出重要的一步,同时为您和您的团队带来愉悦的体验。
翻译自: https://medium.com/better-programming/fetch-api-keys-from-property-list-files-in-swift-4a9e092e71fa
swift 获取所有属性


 3517
3517


 被折叠的 条评论
为什么被折叠?
被折叠的 条评论
为什么被折叠?
 到【灌水乐园】发言


