appium ios自动化
This tutorial is to start/set up your environment for iOS Automation. Here, we will be doing it with an Appium desktop instead of appium as an npm package.
本教程旨在启动/设置iOS自动化的环境。 在这里,我们将使用Appium桌面而不是将appium作为npm软件包来执行此操作。
为什么选择Appium Desktop? : (Why Appium Desktop? :)
Appium Desktop is an app for Mac, Windows, and Linux which gives you the power of the Appium automation server in a beautiful and flexible UI. It is a combination of a few Appium-related tools:
Appium Desktop是适用于Mac,Windows和Linux的应用程序,可在美观而灵活的UI中为您提供Appium自动化服务器的功能。 它是一些与Appium相关的工具的组合:
- A graphical interface for the Appium Server. You can set options, start/stop the server, see logs, etc… You also don’t need to use Node/NPM to install Appium, as the Node runtime comes bundled with Appium Desktop. Appium服务器的图形界面。 您可以设置选项,启动/停止服务器,查看日志等。您还不需要使用Node / NPM来安装Appium,因为Node运行时与Appium Desktop捆绑在一起。
- An Inspector that you can use to look at your app’s elements (Safari/Chrome browser, native or hybrid app), get basic information about them, and perform basic interactions with them. This is useful as a way to learn about Appium or as a way to learn about your app so you can write tests for it. 您可以使用该检查器查看应用程序的元素(Safari / Chrome浏览器,本机或混合应用程序),获取有关它们的基本信息以及与它们进行基本交互。 这对于了解Appium或了解应用程序非常有用,因此您可以为其编写测试。
系统要求 : (System Requirements :)
- Mac OS High Sierra (10.13) (or higher) Mac OS High Sierra(10.13)(或更高版本)
- A 64 bit CPU 64位CPU
系统设置 : (System setup :)
Xcode (Xcode)
Xcode is an integrated development environment (IDE) for macOS containing a suite of software development tools developed by Apple for developing software for macOS, iOS, iPadOS, watchOS, and tvOS. You can install it from here.
Xcode是用于macOS的集成开发环境(IDE),其中包含由Apple开发的一套软件开发工具,用于开发用于macOS,iOS,iPadOS,watchOS和tvOS的软件。 您可以从这里安装它。
家酿 (Homebrew)
Homebrew is a package management software that will make it much simpler for us to install a few other software. You can install it from here.
Homebrew是一个软件包管理软件,它将使我们更容易安装其他软件。 您可以从这里安装它。
迦太基 (Carthage)
Carthage builds your dependencies and provides you with binary frameworks, its needed by the WebDriverAgent. Use the following command to install :
迦太基构建您的依赖关系,并为您提供WebDriverAgent所需的二进制框架。 使用以下命令进行安装:
brew install carthageios部署 (ios-deploy)
ios-deploy is a utility to install and debug iPhone apps from the command line, without using Xcode. In terminal, run the following command :
ios-deploy是一个实用程序,可从命令行安装和调试iPhone应用程序,而无需使用Xcode。 在终端中,运行以下命令:
brew install ios-deployideviceinstaller (ideviceinstaller)
ideviceinstaller is a tool to interact with the installation_proxyof an iOS device allowing to install, upgrade, uninstall, archive the iOS applications. In terminal, run the following command :
ideviceinstaller是与iOS设备的installation_proxy交互的工具,可用于安装,升级,卸载和归档iOS应用程序。 在终端中,运行以下命令:
brew install ideviceinstallerios_webkit_debug_proxy (ios_webkit_debug_proxy)
Appium uses this tool to access web views on real iOS devices. In terminal, run the following command :
Appium使用此工具访问真实iOS设备上的Web视图。 在终端中,运行以下命令:
brew install ios-webkit-debug-proxy可选: Node JS和npm (Optional : Node JS and npm)
Installing node is completely optional beacuse node runtime comes bundled with Appium Desktop.
安装节点完全是可选的,因为Appium Desktop捆绑了节点运行时。
Node is a javascript run-time environment and npm is the node package manager. In terminal, run the following command :
Node是一个javascript运行时环境,npm是节点包管理器。 在终端中,运行以下命令:
brew install nodeAppium桌面 (Appium Desktop)
You can install the Appium desktop from here. You can read more about appium desktop from the following link : https://github.com/appium/appium-desktop
您可以从此处安装Appium桌面。 您可以通过以下链接阅读有关appium桌面的更多信息: https : //github.com/appium/appium-desktop
After you install all the above mentioned dependancies, we are good to start with the setting up the WebDriverAgent.
安装上述所有依赖关系后,我们最好从设置WebDriverAgent开始。
WebDriverAgent (WebDriverAgent)
WebDriverAgent is a WebDriver server implementation for iOS that can be used to remote control iOS devices. It allows you to launch & kill applications, tap & scroll views or confirm view presence on a screen. This makes it a perfect tool for application end-to-end testing or general purpose device automation. It works by linking XCTest.framework and calling Apple's API to execute commands directly on a device. WebDriverAgent is developed and used at Facebook for end-to-end testing and is successfully adopted by Appium.
WebDriverAgent是用于iOS的WebDriver服务器实现,可用于远程控制iOS设备。 它允许您启动和终止应用程序,点击并滚动视图或确认屏幕上是否存在视图。 这使其成为用于应用程序端到端测试或通用设备自动化的理想工具。 它通过链接XCTest.framework并调用Apple的API来直接在设备上执行命令来工作。 WebDriverAgent是Facebook开发并用于端到端测试的,并已被Appium成功采用。
In short WebDriverAgent is Mobile JSON wire protocol through which you can communicate with the iOS Device.
简而言之,WebDriverAgent是移动JSON有线协议,您可以通过该协议与iOS设备进行通信。
Before we continue with WebDriverAgent setup, make sure you have the Apple developer Accout. Without the developer account we may not be able to build the WebDriverAgent successfully.
在继续进行WebDriverAgent设置之前,请确保您具有Apple开发人员Accout 。 没有开发者帐户,我们可能无法成功构建WebDriverAgent。
Steps to build WebdriverAgent :
生成WebdriverAgent的步骤:
Lauch the appium desktop application.
播放appium桌面应用程序。
Start the server.
启动服务器。
3. Connect your iOS Device to your system through USB.
3. 通过USB将iOS设备连接到系统。
4. Click on the Appium inspector icon.
4. 单击“ Appium检查器”图标。

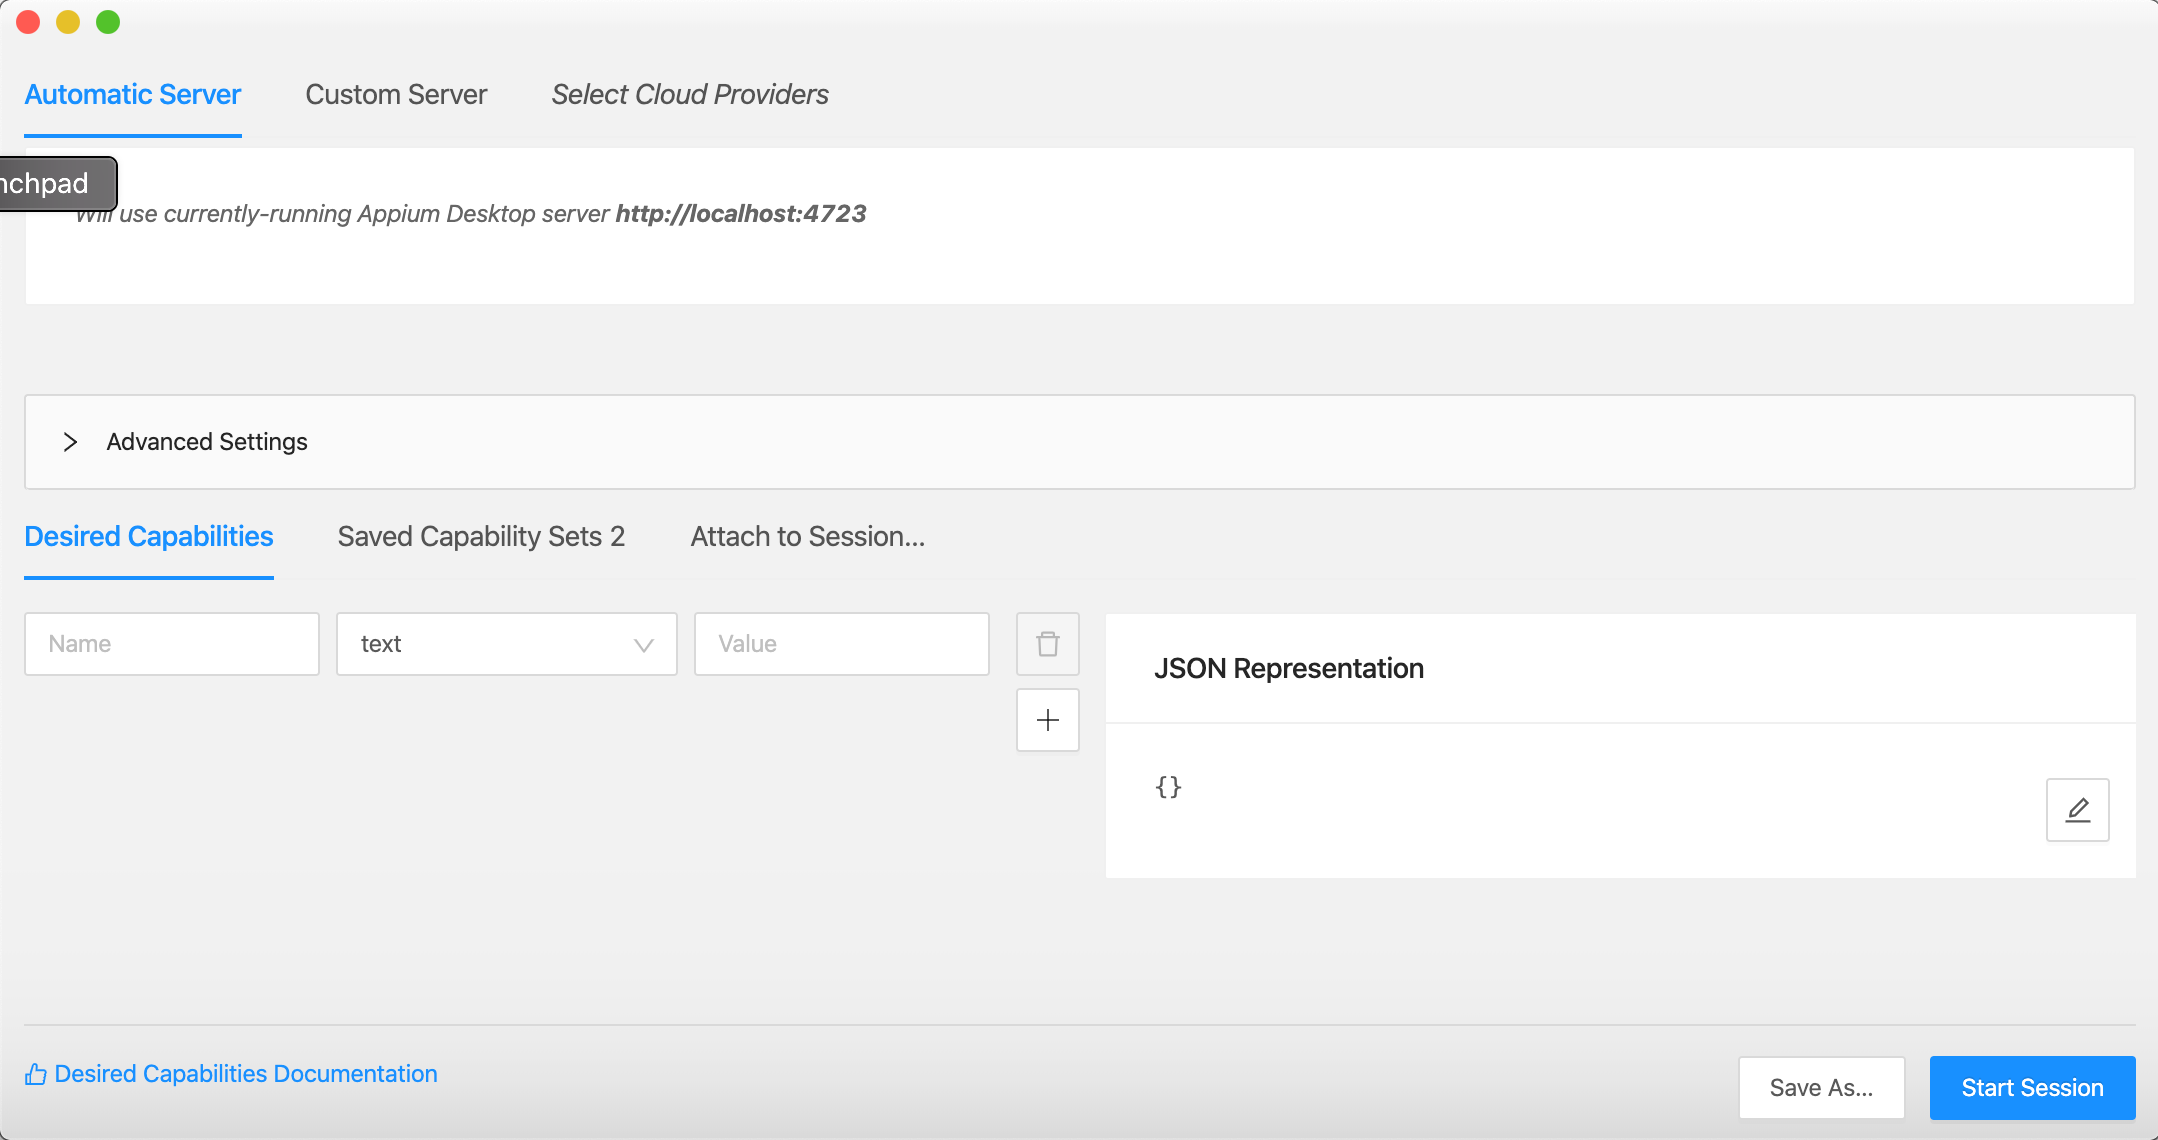
You will see a screen that looks like this :
您将看到一个类似如下的屏幕:

5. Choose “Automatic Server”.
5. 选择“自动服务器”。
6. Prepare the desired capability based on your device configuration :
6. 根据您的设备配置准备所需的功能:
{
  "deviceName": "iPhone",
  "platformName": "iOS",
  "platformVersion": "13.6",
  "automationName": "XCuiTest",
  "udid": "<YOUR-DEVICE-UDID>",
  "bundleId": "<YOUR-APPLICATION-BUNDLE-ID>",
  "xcodeOrgId": "<YOUR-XCODE-ORG-ID>",
  "xcodeSigningId": "iPhone Developer"
}
To get the xcodeOrgId follow the steps below :
要获取xcodeOrgId,请按照以下步骤操作:
- Login with you Apple developer account. 使用您的Apple开发人员帐户登录。
- Click Membership in the sidebar. 点击边栏中的会员资格。
- Your Team ID appears in the Membership Information section under the team name. 您的团队ID出现在团队名称下方的“成员资格信息”部分。
Once you have the desired capability JSON ready :
一旦具备所需的功能,就可以准备JSON了:
- Click on the edit icon in the JSON Representation section. 单击“ JSON表示形式”部分中的编辑图标。
- Replace “{}” with the JSON that you have prepared. 将“ {}”替换为您准备的JSON。
- Click on the save button. 点击保存按钮。
- Your screen should look like this now : 屏幕现在应该如下所示:

You can save these capabilites by clicking on the Save As button, before we continue with the next steps.
您可以通过单击另存为按钮来保存这些功能,然后再继续下一步。
7. Click on the “Start Session” button, but there are going to be some failures lets fix them as we continue with the tutorial.
7. 单击“开始会话”按钮,但是随着我们继续本教程,将会出现一些故障让我们修复它们。
8. Notice you appium terminal, you will see some lines like below
8. 注意您的appium终端,您将看到如下几行
[WebDriverAgent] Beginning test with command 'xcodebuild build-for-testing test-without-building -project
 /Applications/Appium.app/Contents/Resources/app/node_modules/appium/node_modules/appium-webdriveragent/WebDriverAgent.xcodeproj -scheme WebDriverAgentRunner -derivedDataPath /Users/bio-india/Library/Developer/Xcode/DerivedData/WebDriverAgent-alwvnomvwrdtzoaxbbkniqrpcdpp -destination id=13435433-000514680A83002E IPHONEOS_DEPLOYMENT_TARGET=13.6 -xcconfig /var/folders/g3/4bgm1zrj74z3chm8vwwrkpjw0000gp/T/2020719-9679-167r3lc.acxv/appium-temp.xcconfig GCC_TREAT_WARNINGS_AS_ERRORS=0 COMPILER_INDEX_STORE_ENABLE=NO' in directory '/Applications/Appium.app/Contents/Resources/app/node_modules/appium/node_modules/appium-webdriveragent'
9. From the above lines you can get the path to the WebDriverAgent.xcodeproj which is :
9.从以上几行中,您可以获取WebDriverAgent.xcodeproj的路径,该路径是:
/Applications/Appium.app/Contents/Resources/app/node_modules/appium/node_modules/appium-webdriveragent/WebDriverAgent.xcodeproj10. Open a terminal and run the following command :
10. 打开一个终端并运行以下命令 :
open /Applications/Appium.app/Contents/Resources/app/node_modules/appium/node_modules/appium-webdriveragent/WebDriverAgent.xcodeprojNow you will see Xcode starting with your WebDriverAgent.xcodeproj
现在您将看到以WebDriverAgent.xcodeproj开头的Xcode
Once the Xcode is launched, add you developer credentials to Xcode with the steps below :
启动Xcode后 ,请按照以下步骤将开发人员凭据添加到Xcode中:
Click on the Xcode Menu > Preferences, Alternatively you can also use the below shortcut to go to the preferences
单击Xcode菜单> 首选项 ,或者,您也可以使用以下快捷方式转到首选项
Command + ,2. Click on the Accounts tab
2.单击帐户选项卡
3. Click on the “+” icon and provide your developer credentials.
3.单击“ +”图标并提供您的开发人员凭据。
Once you have added your account you can then “Download your manual profiles”.
添加帐户后,您可以“下载手动配置文件”。
11. Configuring your WebDriverAgent
11. 配置您的WebDriverAgent
Now that, we have opened the WebDriverAgent project in the xcode and we have added our developer credentials to the Xcode. Lets configure the WebDriverAgent.
现在,我们已经在xcode中打开了WebDriverAgent项目,并将开发人员凭据添加到了Xcode中。 让我们配置WebDriverAgent。
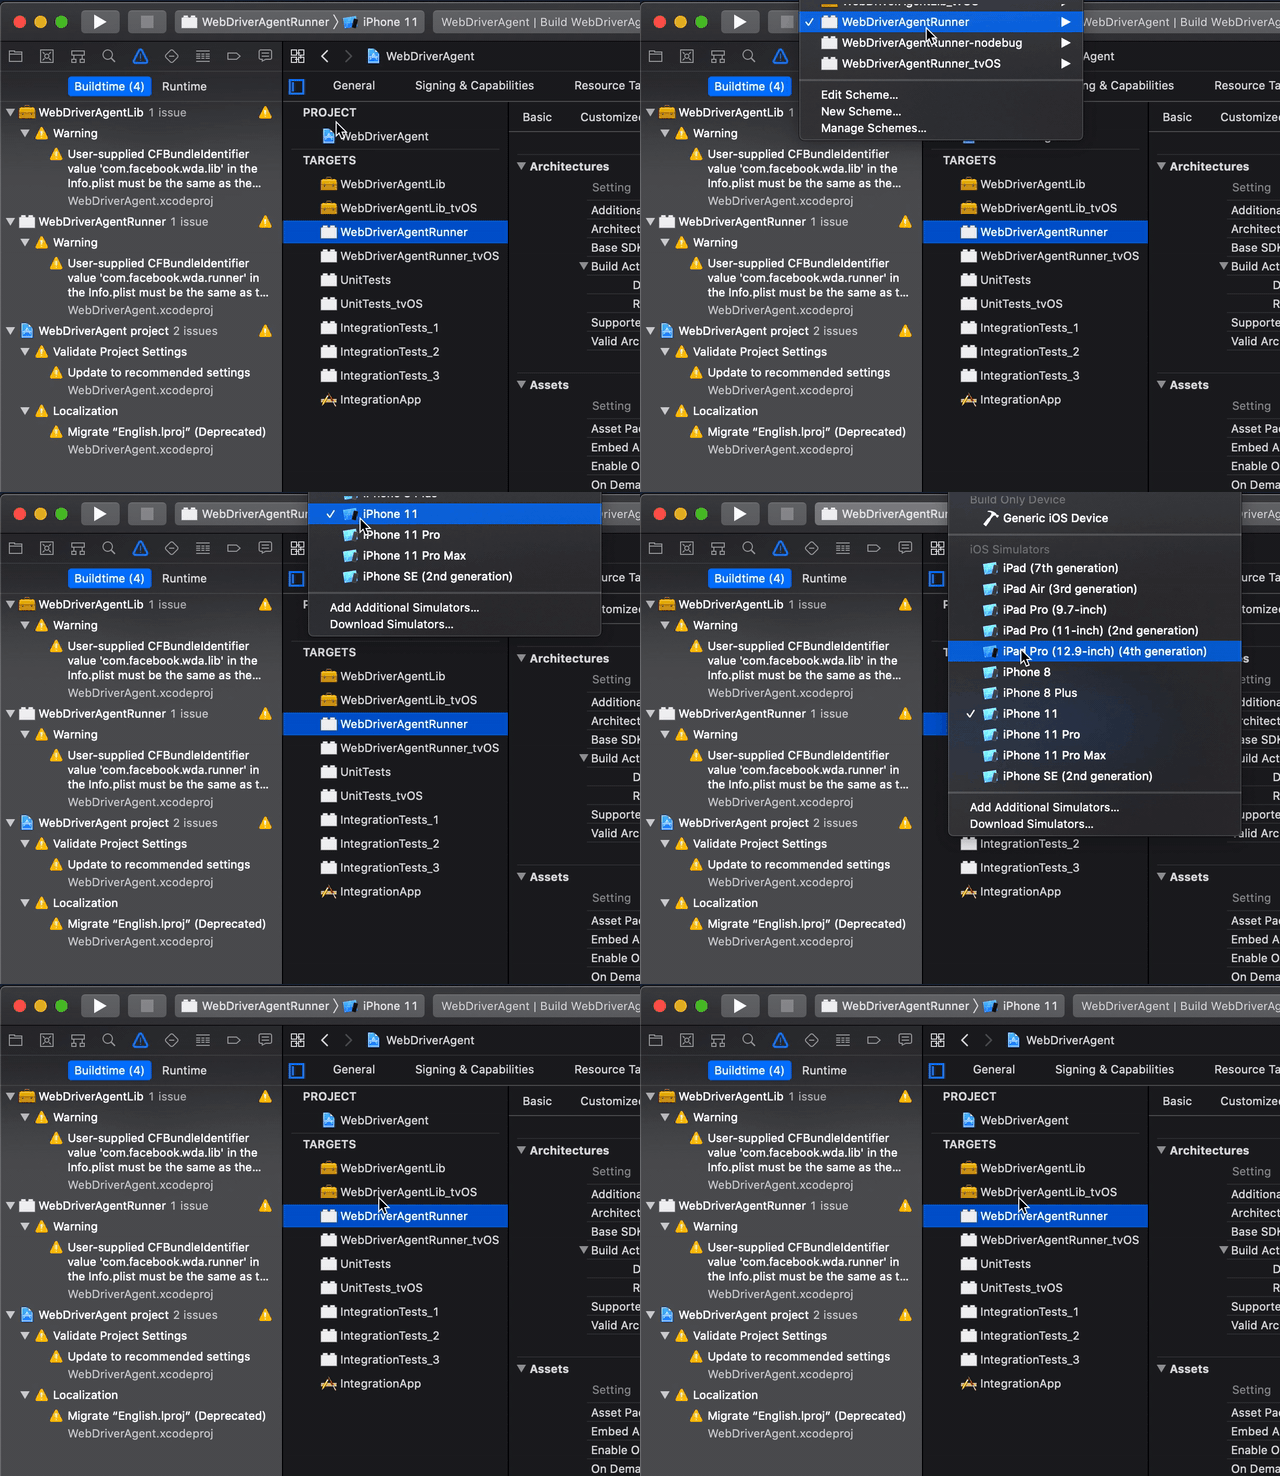
Your screen should look something like this now (You may have some errors as well, which will get fixed with the below steps) :
您的屏幕现在应该看起来像这样(您可能还会出现一些错误,将通过以下步骤进行修复):

- Click on the WebDriverAgentRunner in the targets section, you can see that highlighted in the above screenshot. 单击目标部分中的WebDriverAgentRunner,您可以在上面的屏幕截图中看到突出显示的内容。
- Click on the “Signing & Capabilities” tab. 单击“签名和功能”选项卡。
- Check the “Automatically manage signing” checkbox. 选中“自动管理签名”复选框。
- Choose your Team in the Team dropdown. 在团队下拉列表中选择您的团队。
- Now, you will notice that the errors are gone. 现在,您将注意到错误已消失。
- The last step here is to change the bundle id for the WebDriverAgentRunner, Click on “Build Setting” tab. 这里的最后一步是更改WebDriverAgentRunner的捆绑软件ID,单击“ Build Setting”选项卡。
- Search for “Product Bundle Identifier” and replace the value with a bundle identifier of your choice. For ex : “com.<YOUR-ORG>.wda.runner” 搜索“产品捆绑包标识符”,然后将值替换为您选择的捆绑包标识符。 例如:“ com。<YOUR-ORG> .wda.runner”
We are now done with configuring the WebDriverAgent runner lets test this by building it.
现在我们已经完成了配置WebDriverAgent运行器的工作,可以通过构建它来对其进行测试。
Choose the WebDriverAgentRunner as the target application and choose your device as a target device. In this case I chose a simulator and click on the build button “Play Icon”.
选择WebDriverAgentRunner作为目标应用程序,然后选择您的设备作为目标设备。 在这种情况下,我选择了一个模拟器,然后单击构建按钮“播放图标”。

Now you will see the message “Build Succeded”. With this the WebDriverAgentRunner setup is complete and you can try restarting the session from your Appium Desktop. (Repeat step 7)
现在,您将看到消息“ Build Succeded”。 这样就完成了WebDriverAgentRunner的设置,您可以尝试从Appium桌面重新启动会话。 (重复步骤7)
Now you may see a new error in the Appium Console. “xcodebuild exited with code ‘65’”. This is because your device doesnt trust the developer.
现在,您可能会在Appium控制台中看到一个新错误。 “ xcodebuild退出,代码为'65'”。 这是因为您的设备不信任开发人员。
To the trust the developer follow the below steps :
要信任开发人员,请执行以下步骤 :
- Click on the “Start Session” button on the Appium Inspector. 单击Appium Inspector上的“开始会话”按钮。
- Notice your mobile launcher, you will see a new App called WebDriverAgent Installed. 注意您的移动启动器,您将看到一个名为WebDriverAgent Installed的新应用程序。
- Go to the phone Settings > General > Device Management. 转到电话设置>常规>设备管理。
- You will see you developer account in the list, 您会在列表中看到您的开发人员帐户,
- Choose that and Click on “Trust the developer”. 选择该选项,然后单击“信任开发人员”。
Now you should see your application launched by the appium desktop and you can notice the same screen on the Appium Inspector as well.
现在,您应该看到由appium桌面启动的应用程序,并且您还可以在Appium Inspector上看到相同的屏幕。
结论 (Conclusion)
You can use the same desired capabilities in you code to run the automated tests like below :
您可以在代码中使用相同的所需功能来运行自动化测试,如下所示:
DesiredCapabilities iosCapabilities = new DesiredCapabilities();
iosCapabilities.setCapability(MobileCapabilityType.DEVICE_NAME, "");
iosCapabilities.setCapability(MobileCapabilityType.PLATFORM_NAME, "");
iosCapabilities.setCapability(MobileCapabilityType.PLATFORM_VERSION, "");
iosCapabilities.setCapability(MobileCapabilityType.AUTOMATION_NAME, "");
iosCapabilities.setCapability(MobileCapabilityType.UDID, "");
iosCapabilities.setCapability(MobileCapabilityType.NO_RESET, true);
iosCapabilities.setCapability("xcodeOrgId", "<YOUR-TEAM-ID>");
iosCapabilities.setCapability("xcodeSigningId", "iPhone Developer");
iosCapabilities.setCapability("bundleId", "");
driver = new IOSDriver(new URL("http://127.0.0.1:4723/wd/hub"), iosCapabilities);
Alternatively if you wish to install the application into your device through appium you can use the capability mentioned below :
另外,如果您希望通过appium将应用程序安装到设备中,则可以使用以下功能:
iosCapabilities.setCapability(MobileCapabilityType.APP, "<IPA-FILE>");Cheers.
干杯。
翻译自: https://medium.com/swlh/ios-automation-with-appium-desktop-for-real-devices-simulators-41539b0439f1
appium ios自动化


 1200
1200


 被折叠的 条评论
为什么被折叠?


