


ecs部署tomcat
For the past few days I have been building a new micro-service at my workplace. Our team decided to automate the deployment process so that whatever we are working on can be used by other teams and the feedback loop would be a lot shorter.
在过去的几天里,我一直在自己的工作场所中构建新的微服务。 我们的团队决定自动化部署过程,以便其他团队可以使用我们正在从事的工作,并且反馈循环将大大缩短。
Our goal is to deploy code whenever a Pull Request is merged to the master branch. I will be using AWS ECS and Gitlab CI/CD to solve this.
我们的目标是每当合并请求到主分支时就部署代码。 我将使用AWS ECS和Gitlab CI / CD来解决此问题。
Understanding ECS
了解ECS
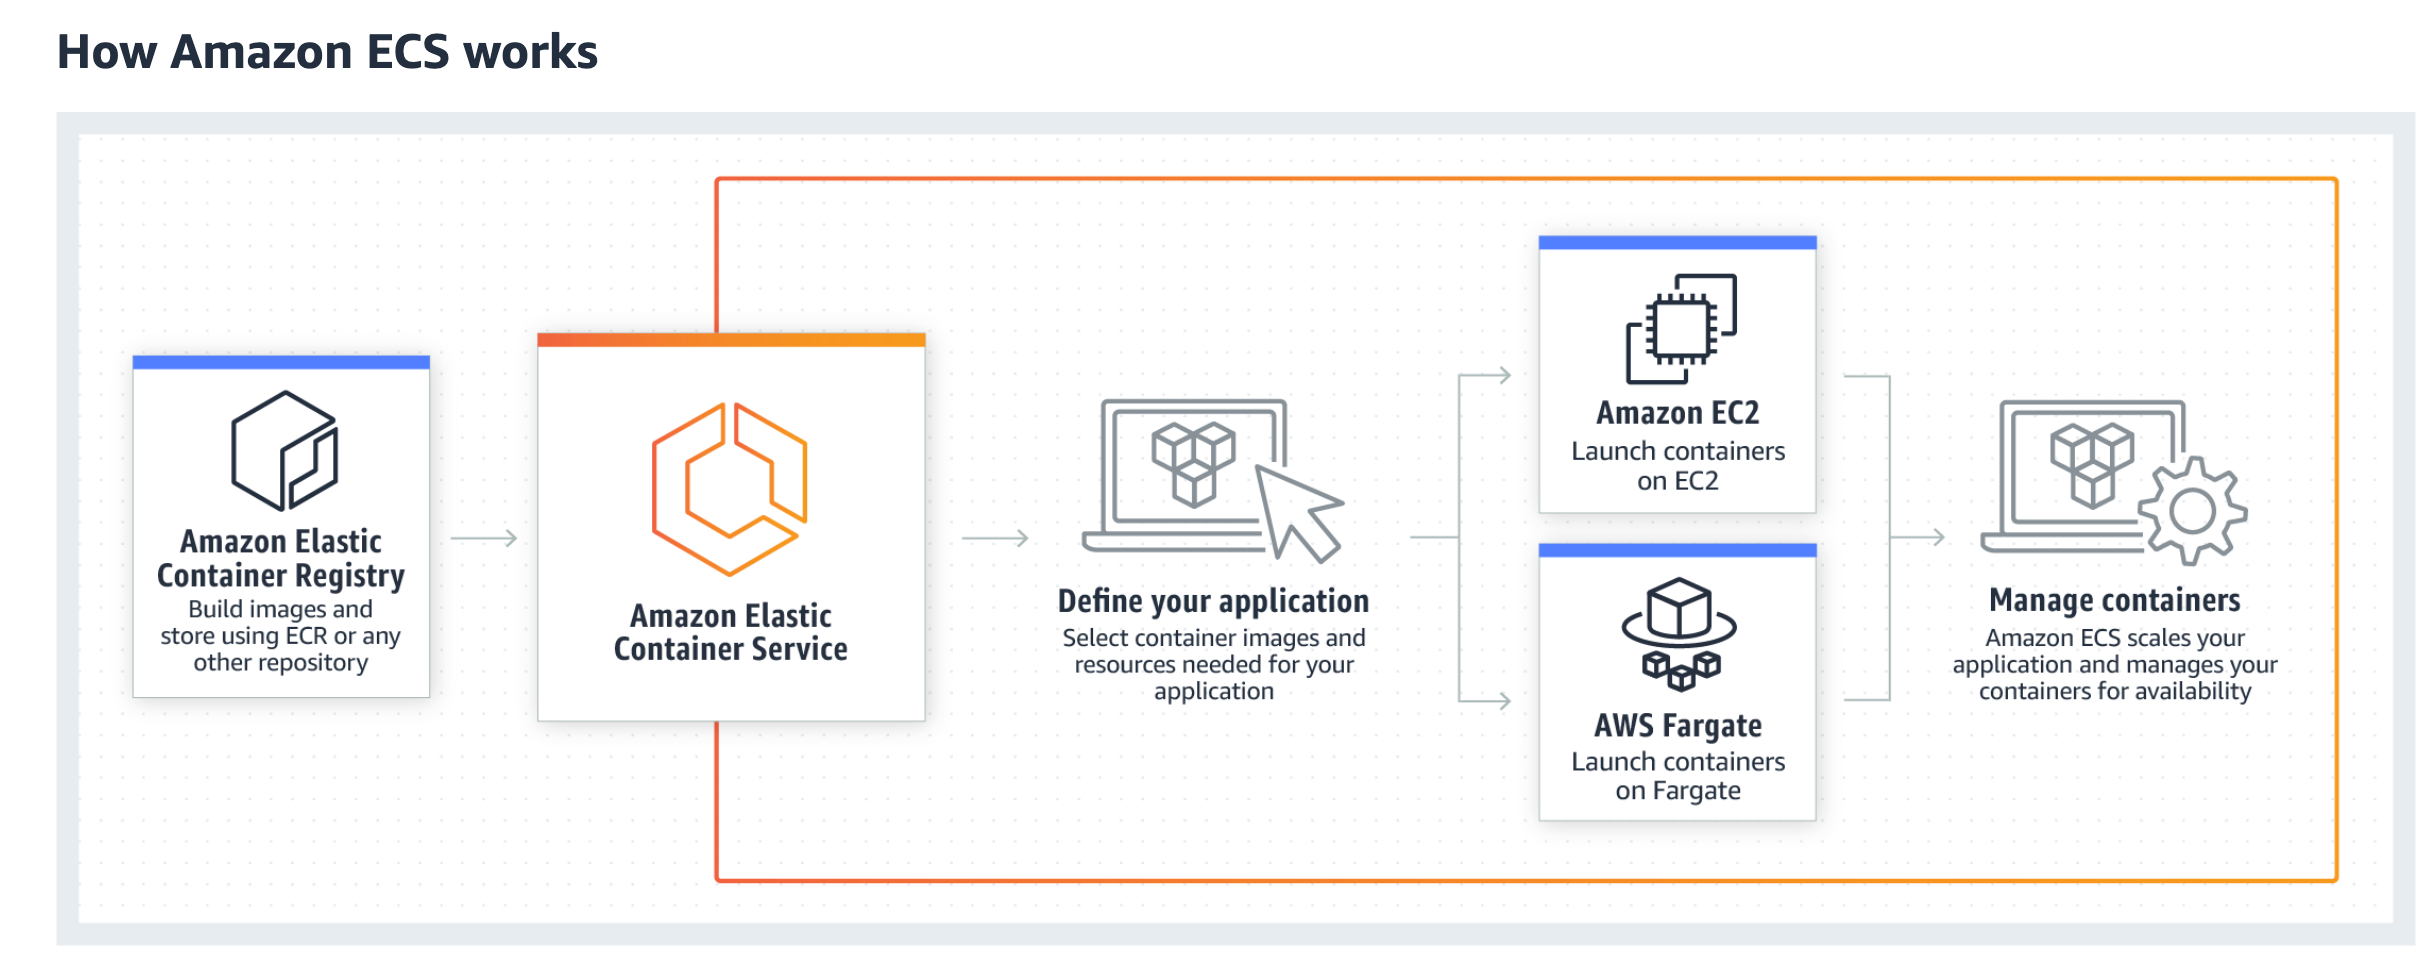
Amazon Elastic Container Service (ECS) is a container management service, which allows us to run our docker containers directly on managed clusters of amazon EC2 instances or the serverless compute engine Fargate.
Amazon Elastic Container Service(ECS)是一种容器管理服务,它使我们可以直接在Amazon EC2实例的托管集群或无服务器计算引擎Fargate上运行docker容器。
ECS eliminates the need for us manually operating the cluster, saving us from a lot of headaches. Complex tasks like scaling servers up and down can be done in just a few clicks.
ECS消除了我们手动操作集群的需要,从而免除了我们的许多麻烦。 只需单击几下即可完成诸如扩展服务器和缩减服务器之类的复杂任务。
ECS uses ECR(Elastic Container Registry) to store our docker images. We can specify whichever image we want to use in our application.
ECS使用ECR(弹性容器注册表)存储我们的docker映像。 我们可以指定我们要在应用程序中使用的图像。
在ECS上部署 (Deploying on ECS)
Let’s dive into this. We will need an app to deploy our code….duh.
让我们深入研究。 我们将需要一个应用程序来部署我们的代码…….duh。
Here’s a basic app for us to work with https://gitlab.com/iamads/my-ecs-demo. It is a basic server with a status api, which says the service is running.
这是供我们使用https://gitlab.com/iamads/my-ecs-demo的基本应用程序。 它是带有状态api的基本服务器,表示该服务正在运行。
Assuming you are all set with the app. Let’s check our Dockerfile.
假设您都已设置好应用程序。 让我们检查一下Dockerfile。
All it does here is takes a node image, copies our code into the work directory. After that it installs all the required packages. It exposes port 8080, because this is the port on which the server is running. We expose this port so that requests from outside can reach the server. Finally we run the app `node index.js`
它所做的只是获取一个节点图像,将我们的代码复制到工作目录中。 之后,它将安装所有必需的软件包。 它公开端口8080,因为这是服务器运行所在的端口。 我们公开此端口,以便来自外部的请求可以到达服务器。 最后,我们运行应用程序`node index.js`
构建docker映像并将其推送到ECR (Building the docker image and pushing it to ECR)

On AWS go to ECR and click on create repository and, just name the repository and click on `Create repository`. This will create a new repository for you. The link of the url should looks something like this:
在AWS上,转到ECR并单击创建存储库,然后仅命名存储库并单击“创建存储库”。 这将为您创建一个新的存储库。 网址的链接应如下所示:
<AWS ACCOUNT ID>.dkr.ecr.eu-central-1.amazonaws.com/<ECS REPOSITORY NAME>.
<AWS帐户ID> .dkr.ecr.eu-central-1.amazonaws.com / <ECS存储库名称>。
From now on we will call it <REPOSITORY_URL>.
从现在开始,我们将其称为<REPOSITORY_URL> 。
Before we push our image to ECR, we will need to install aws-cli. After installing it run: aws configure . It will ask you for access_key, secret and region.
在将映像推送到ECR之前,我们需要安装aws-cli 。 安装后,运行: aws configure。 它将要求您输入access_key,机密信息和区域。
This will login us to AWS ECR. Now we can build our docker image and tag it with the <REPOSITORY_URL> and push it. We can find this image in Amazon ECR -> Repositories.
这将使我们登录到AWS ECR。 现在,我们可以构建docker映像,并使用<REPOSITORY_URL>对其进行标记并进行推送。 我们可以在Amazon ECR->存储库中找到此图像。
Before we get into it, we will have to create a security group for our ECS
在进入之前,我们必须为我们的ECS创建一个安全组。
aws ec2 create-security-group — group-name my-ecs-sg --description my-ecs-sgNow let’s deploy this app on ECS, for that we will have to create a cluster first.
现在,让我们在ECS上部署此应用程序,为此,我们必须首先创建集群。
创建集群 (Create Cluster)
In the AWS dashboard go to ECS and select clusters. Then click on create clusters.
在AWS仪表板中,转到ECS并选择集群。 然后单击创建集群。

Here select EC2 Linux + Networking cluster template. Then go to next step.
在这里选择EC2 Linux +网络集群模板。 然后转到下一步。

I used the above options to create a cluster.
我使用上述选项来创建集群。
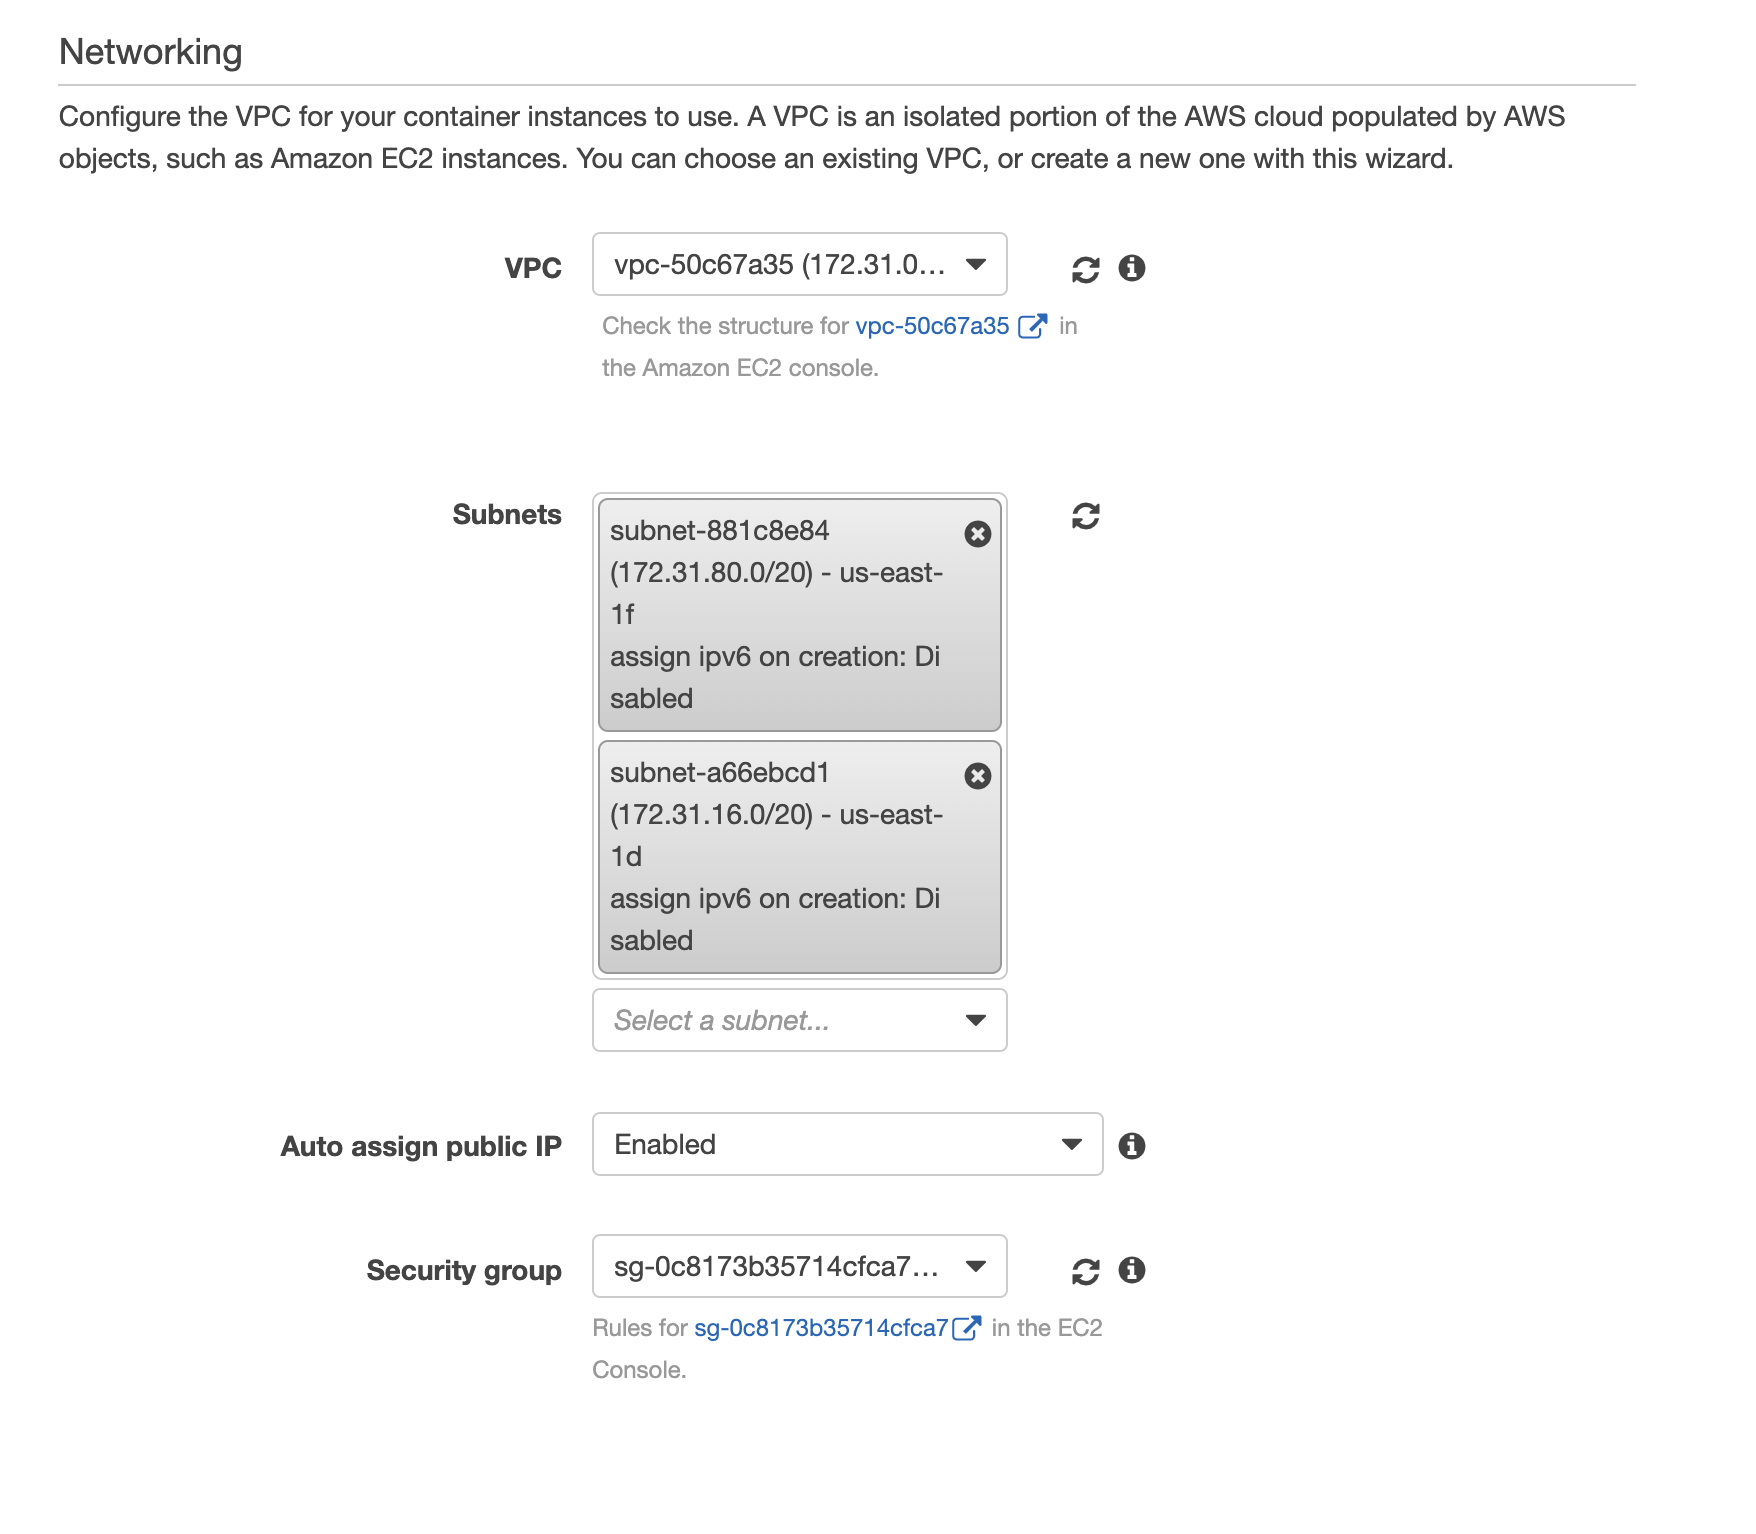
Use the default VPC and subnets here. We selected the security group that I created beforehand. Finally click on create cluster and your cluster would be created.
在此处使用默认的VPC和子网。 我们选择了我之前创建的安全组。 最后,单击创建集群,将创建集群。

创建任务定义 (Create Task Definition)
We will now create a task definition, go to task definitions page and click on Create new Task Definition.
现在,我们将创建一个任务定义,转到任务定义页面,然后单击创建新任务定义。

We will go with EC2 .Click on next step.
我们将使用EC2。单击下一步。

Name the Task Definition.
命名任务定义。

Add task memory and the task cpu (it should be greater than or equal to 128 for both). Click on Add container.
添加任务内存和任务cpu(两者都应大于或等于128)。 单击添加容器。

Add container name and the image url (i.e. <REPOSITORY_URL>). Add the port mappings, here we map host port(ec2) to the container’s. Any request coming to host port would be passed on the container port.
添加容器名称和图片网址(即<REPOSITORY_URL>)。 添加端口映射,这里我们将主机端口(ec2)映射到容器的端口。 到达主机端口的任何请求都将在容器端口上传递。

On scrolling down, we’ll find the environment variables section. We can add any of the ENV variables needed by the app here. For our example this is not needed.
向下滚动,我们将找到环境变量部分。 我们可以在此处添加应用所需的任何ENV变量。 对于我们的示例,这不是必需的。
创建服务 (Creating a Service)
We select our cluster. On the Services tab, click on CREATE.
我们选择集群。 在服务选项卡上,单击创建。
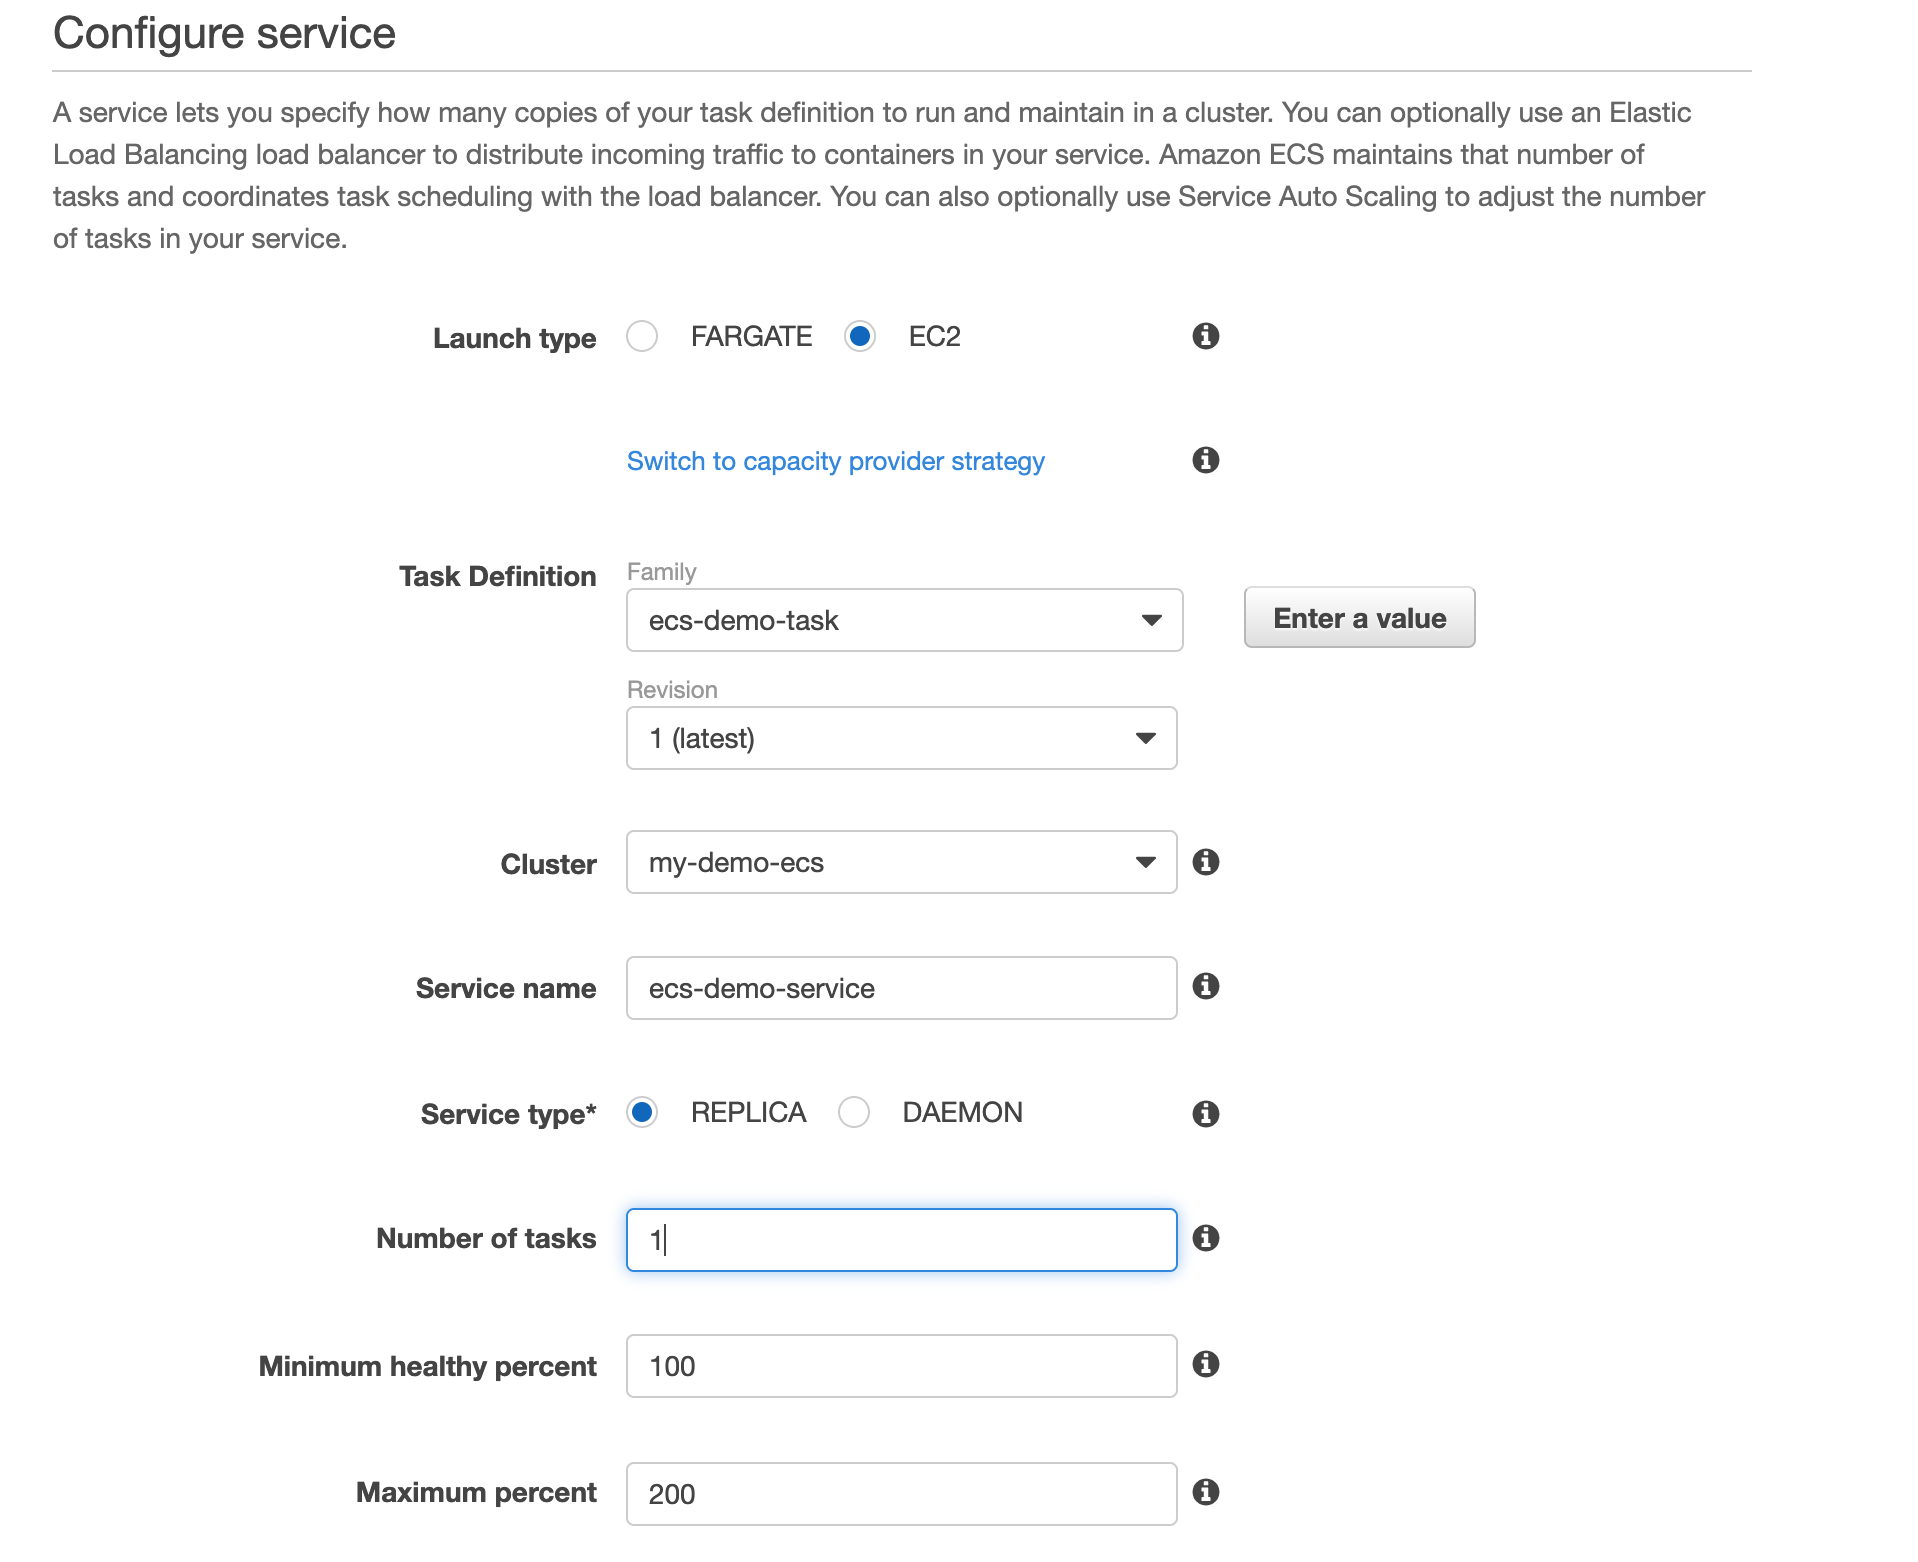
Launch type would be EC2, select the correct task definition and cluster. Name the service. Service type would be REPLICA. Set the number of tasks, I will go with 1, increase it if you will have more load.
启动类型为EC2,选择正确的任务定义和集群。 命名服务。 服务类型为REPLICA。 设置任务数,我将继续执行1,如果您有更多负载,请增加它。
Going further, we will use no load balancer and disable autoscaling.Finally, create service.
更进一步,我们将不使用负载平衡器并禁用自动扩展功能。最后,创建服务。
We can also setup ELB for this service. For more info: https://medium.com/boltops/gentle-introduction-to-how-aws-ecs-works-with-example-tutorial-cea3d27ce63d
我们也可以为此服务设置ELB。 有关更多信息: https : //medium.com/boltops/gentle-introduction-to-how-aws-ecs-works-with-example-tutorial-cea3d27ce63d
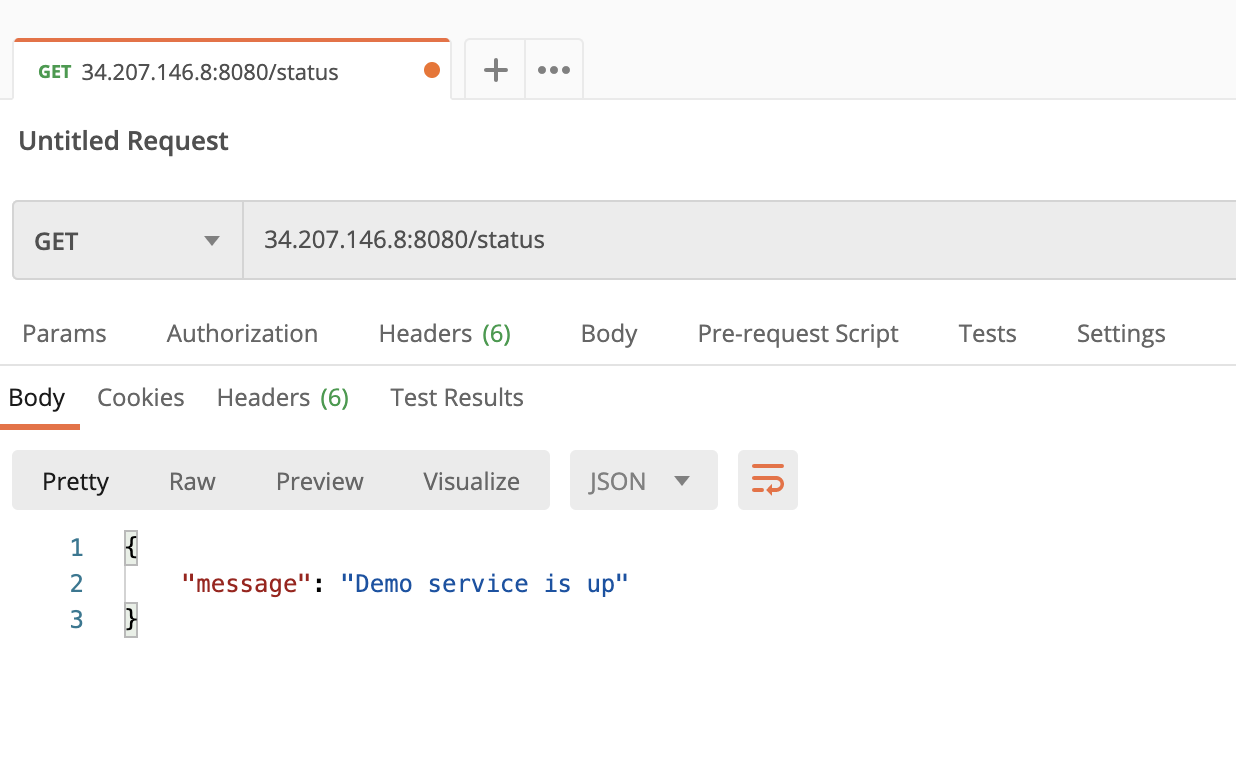
To check if our service is running. I will get the IP of the EC2 instance and do a GET request on <ip>:8080/status
检查我们的服务是否正在运行。 我将获取EC2实例的IP并在<ip>:8080 / status上执行GET请求
If you get unreachable error, you will have to allow inbound traffic to ECS. You will need to edit the inbound rules for ECS security group.
如果遇到无法到达的错误,则必须允许入站流量到ECS。 您将需要编辑ECS安全组的入站规则。

This means allow inbound TCP traffic to port 8080 from anywhere.
这意味着允许从任何地方到端口8080的入站TCP通信。
与Gitlab CI / CD集成 (Integrating With Gitlab CI/CD)
Note: You will need your role to be either Maintainer or Owner
注意:您将需要担任维护者或所有者的角色
Go to settings -> CI/CD and then click on variables.
转到设置-> CI / CD,然后单击变量。

Add these variables AWS_ACCESS_KEY_ID, AWS_SECRET_ACCESS_KEY and AWS_DEFAULT_REGION. As a best practice AWS_ACCESS_KEY_ID & AWS_SECRET_ACCESS_KEY should only give programmatic access.
添加这些变量AWS_ACCESS_KEY_ID,AWS_SECRET_ACCESS_KEY和AWS_DEFAULT_REGION。 作为最佳实践,AWS_ACCESS_KEY_ID和AWS_SECRET_ACCESS_KEY应该仅提供编程访问权限。
On adding these fields we can also decide if we protect or mask a variable. A protected variable will only be available for protected branches. This would be useful if we want to deploy to production when code is merged to master branch. On the other hand marking a variable as masked means its value will not show up in the logs.
添加这些字段后,我们还可以决定是否保护或屏蔽变量。 受保护的变量仅可用于受保护的分支。 如果我们希望在代码合并到master分支时部署到生产环境,这将很有用。 另一方面,将变量标记为已屏蔽意味着它的值将不会显示在日志中。
Now add .gitlab-ci.yml to your repository and add the following
现在将.gitlab-ci.yml添加到您的存储库中,并添加以下内容
Let’s go through it bit by bit
让我们一点一点地经历它
image: docker:19.03.10services:
  — docker:dind
This is needed to build docker based builds. You can find more info here.
这是构建基于docker的构建所必需的。 您可以在此处找到更多信息。
variables:
  REPOSITORY_URL: <REPOSITORY_URL>
  TASK_DEFINITION_NAME: <TASK_DEFINITION>
  CLUSTER_NAME: <CLUSTER_NAME>
  SERVICE_NAME: <SERVICE_NAME>
Here we populate these variables with the corresponding values from the previous section.
在这里,我们使用上一部分中的相应值填充这些变量。
before_script:
  - apk add --no-cache curl jq python py-pip
  - pip install awscli
  - aws configure set aws_access_key_id $AWS_ACCESS_KEY_ID
  - aws configure set aws_secret_access_key $AWS_SECRET_ACCESS_KEY
  - aws configure set region $AWS_DEFAULT_REGION
  - $(aws ecr get-login --no-include-email --region "${AWS_DEFAULT_REGION}")
  - IMAGE_TAG="$(echo $CI_COMMIT_SHA | head -c 8)"
Here it installs requirements jq, python, pip and aws-cli. Then we configure the aws-cli so that it can connect to our AWS account. Next we login to ECR. And finally we set the IMAGE_TAG variable.
在这里,它会安装需求jq,python,pip和aws-cli。 然后,我们配置aws-cli,以便它可以连接到我们的AWS账户。 接下来,我们登录到ECR。 最后,我们设置IMAGE_TAG变量。
stages:
   - build
   - deploy
Here we define the stages of our pipeline. Right now, we only have the build and deploy stage, but we can easily add steps for unit testing, integration tests etc.
在这里,我们定义了管道的阶段。 目前,我们只有构建和部署阶段,但是我们可以轻松地添加单元测试,集成测试等步骤。
build:
   stage: build
   script:
     - echo "Building image..."
     - docker build -t $REPOSITORY_URL:latest .
     - echo "Tagging image..."
     - docker tag $REPOSITORY_URL:latest $REPOSITORY_URL:$IMAGE_TAG
     - echo "Pushing image..."
     - docker push $REPOSITORY_URL:latest
     - docker push $REPOSITORY_URL:$IMAGE_TAG
   only:
     - master
Here we build the image, then tag the image with both latest and IMAGE_TAG. We do this so that if something goes bad, we can rollback to stable version. Finally we push it. And all this happens when we merge/commit on master branch.
在这里,我们构建图像,然后使用最新的和IMAGE_TAG标记图像。 我们这样做是为了在出现问题时可以回滚到稳定版本。 最后,我们推动它。 当我们在master分支上合并/提交时,所有这些都会发生。
deploy:
   stage: deploy
   script:
     - echo $REPOSITORY_URL:$IMAGE_TAG
     - TASK_DEFINITION=$(aws ecs describe-task-definition --task-definition "$TASK_DEFINITION_NAME" --region "${AWS_DEFAULT_REGION}")
     - NEW_CONTAINER_DEFINTIION=$(echo $TASK_DEFINITION | jq --arg IMAGE "$REPOSITORY_URL:$IMAGE_TAG" '.taskDefinition.containerDefinitions[0].image = $IMAGE | .taskDefinition.containerDefinitions[0]')
     - echo "Registering new container definition..."
     - aws ecs register-task-definition --region "${AWS_DEFAULT_REGION}" --family "${TASK_DEFINITION_NAME}" --container-definitions "${NEW_CONTAINER_DEFINTIION}"
     - echo "Updating the service..."
     - aws ecs update-service --region "${AWS_DEFAULT_REGION}" --cluster "${CLUSTER_NAME}" --service "${SERVICE_NAME}"  --task-definition "${TASK_DEFINITION_NAME}"
   only:
     - master
And finally the deploy stage runs. It looks scary but if we look carefully we’ll see it just registers the new container definition and updates the service, whenever code is merged/committed to master branch.
最后,部署阶段开始运行。 它看起来很吓人,但是如果我们仔细看的话,只要将代码合并/提交到master分支,它就会注册新的容器定义并更新服务。
And we are done. As soon as we merge/commit code to master branch it will trigger a build.
我们完成了。 一旦我们将代码合并/提交到master分支,它将触发构建。
Here are some links which I found really useful:
以下是一些我发现确实有用的链接:
https://medium.com/boltops/gentle-introduction-to-how-aws-ecs-works-with-example-tutorial-cea3d27ce63dhttps://medium.com/@Elabor8/a-complete-spring-boot-microservice-build-pipeline-using-gitlab-aws-and-docker-part-2-984c7107ceadhttps://gist.github.com/jlis/4bc528041b9661ae6594c63cd2ef673c翻译自: https://medium.com/@iamads/deploying-your-app-with-ecs-gitlab-ci-cd-e211e6f103e1
ecs部署tomcat


 129
129

 被折叠的 条评论
为什么被折叠?
被折叠的 条评论
为什么被折叠?
 到【灌水乐园】发言


