


azure ci
In this guide, I will run through the steps to help you set up a project workflow with Azure and Github using a React App. Before we start, let’s go over the basics and why we are doing this.
在本指南中,我将逐步执行步骤,以帮助您使用React App与Azure和Github设置项目工作流。 在开始之前,让我们先了解基础知识以及为什么要这样做。
What is CI/CD?
什么是CI / CD?
Continuous integration (CI) focuses on building and testing the new code changes.
持续集成(CI)专注于构建和测试新的代码更改。
Continuous delivery/deployment (CD) focuses on getting new changes ready for deployment in production.
持续交付/部署(CD)的重点是准备新的更改以准备在生产中进行部署。
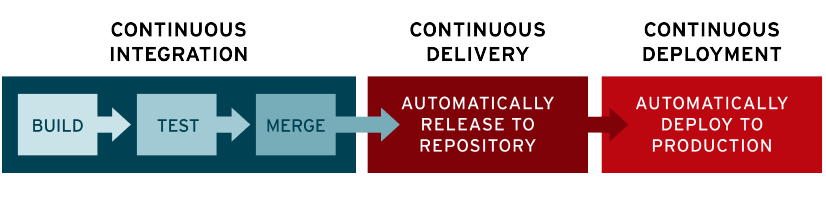
Benefits of CI/CD
CI / CD的好处
CI/CD can help teams speed up the deployment process, allowing developers to make small code changes to minimize bugs in production.
CI / CD可以帮助团队加快部署过程,允许开发人员进行少量代码更改以最小化生产中的错误。
(Optional) Step 0: Create a React App
(可选)步骤0:创建一个React App
If you already have an app ready, go to step 1.
如果您已经准备好应用程序,请转到步骤1。
npx create-react-app <project-name>Step 1: Setup CI/CD pipeline
步骤1:设定CI / CD管道
If you are new to Azure, check out Microsoft's New User Guide; it explains the key concepts in Azure Pipeline.
如果您不熟悉Azure,请查看Microsoft的《 新用户指南》 。 它说明了Azure Pipeline中的关键概念。
Create an azure-pipeline.yml file in your project root directory. This file lists out the steps to build an artifact.
在项目根目录中创建azure-pipeline.yml文件。 该文件列出了构建工件的步骤。
trigger:
 - master
pool:
   vmImage: 'ubuntu-latest'
steps:
  - task: NodeTool@0
    inputs:
     versionSpec: '10.x'
    displayName: 'Install Node.js'
  - script: |
     npm install
     npm run build
    displayName: 'npm install and build'
  - task: CopyFiles@2
    inputs:
     Contents: 'build/**' # Pull the build directory (React)
     TargetFolder: '$(Build.ArtifactStagingDirectory)'
  - task: PublishBuildArtifacts@1
    inputs:
      pathtoPublish: $(Build.ArtifactStagingDirectory)
      ArtifactName: 'www' # output artifact named www
Push up the azure-pipeline.yml file to GitHub and continue.
将azure-pipeline.yml文件推送到GitHub并继续。
Step 2: Setup project
步骤2:建立专案
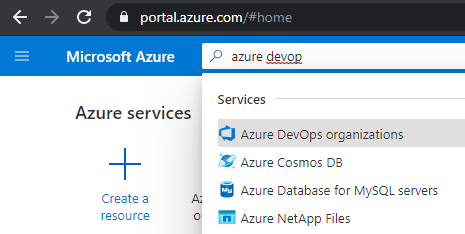
Go to portal.azure.com and then go to Azure DevOps organizations.
转到portal.azure.com ,然后转到Azure DevOps组织。
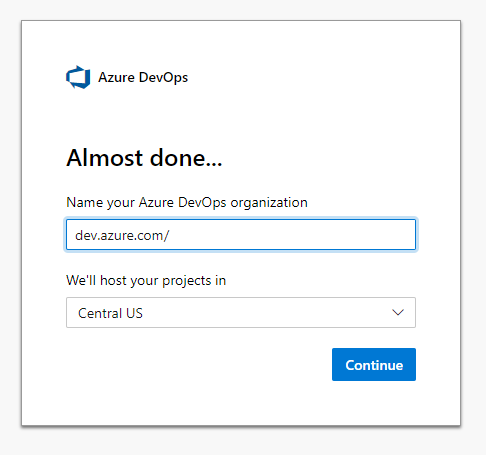
If you are new to Azure, you need to set up a new organization before setting up a project. Click on the ‘Create new organization’ button on the top right corner.
如果您不熟悉Azure,则需要在建立项目之前先建立一个新组织。 点击右上角的“创建新组织”按钮。
Once you created a new organization, select a ‘New Project’ and fill out the project details. Then you should see the project homepage.
创建新组织后,选择“新项目”并填写项目详细信息。 然后,您应该看到项目主页。

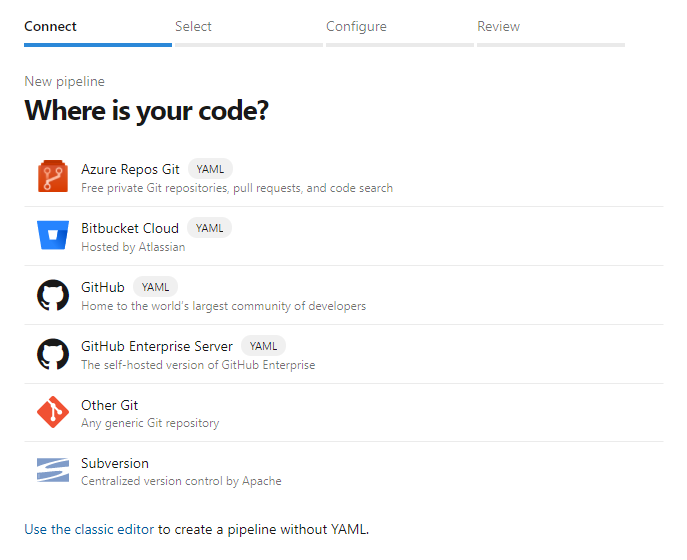
Go to ‘Pipelines’ and select ‘Create Pipeline.’ First, we need to connect the codebase, so select ‘GitHub.’
转到“管道”,然后选择“创建管道”。 首先,我们需要连接代码库,因此选择“ GitHub”。
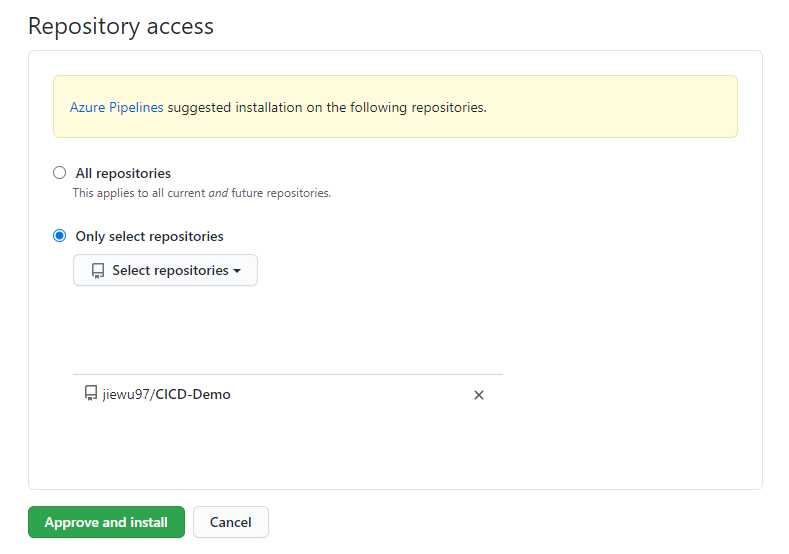
Once you select GitHub, you should be directed to a GitHub page for authentication and approval. Make sure you grant Azure access to the correct repo.
选择GitHub后,应将您定向到GitHub页面进行身份验证和批准。 确保您授予Azure对正确存储库的访问权限。
Next, we need to configure the CI/CD pipeline. Select ‘Existing Azure Pipelines YAML File.’
接下来,我们需要配置CI / CD管道。 选择“现有的Azure Pipelines YAML文件”。
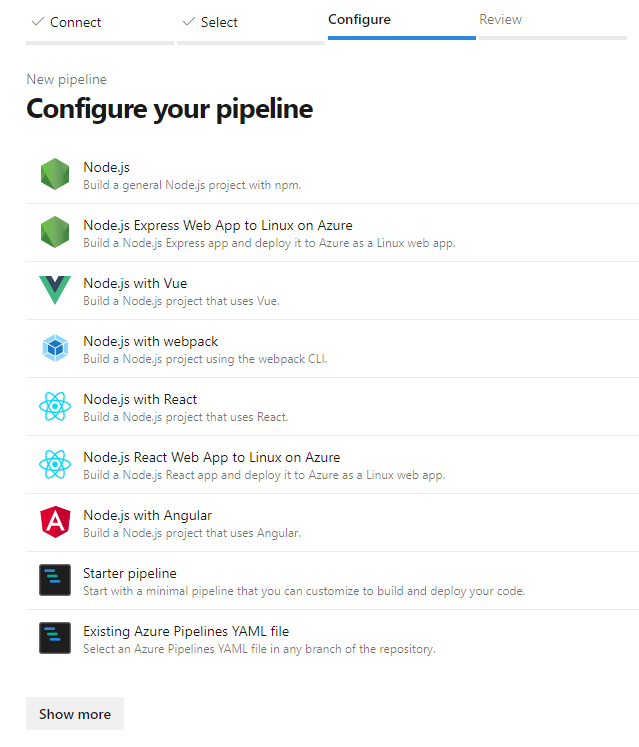
Use the azure-pipeline.yml file.
使用azure-pipeline.yml文件。

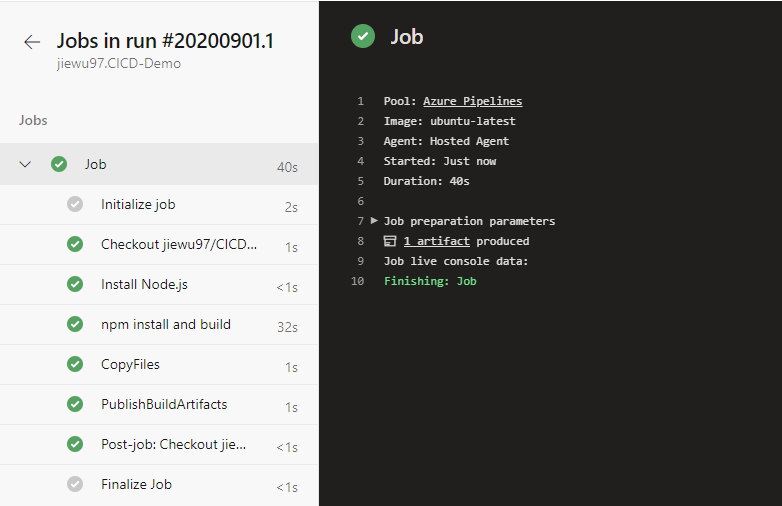
Then, run your pipeline to create an artifact and go to jobs to see a realtime build.
然后,运行管道以创建工件,并转到作业以查看实时构建。
Step 3: Set up App Service
步骤3:设定应用程式服务
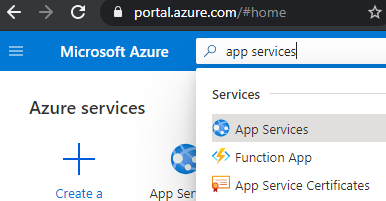
Navigate back to the portal and go to App Services to set up the project URL.
浏览回到门户并转到App Services设置项目URL。
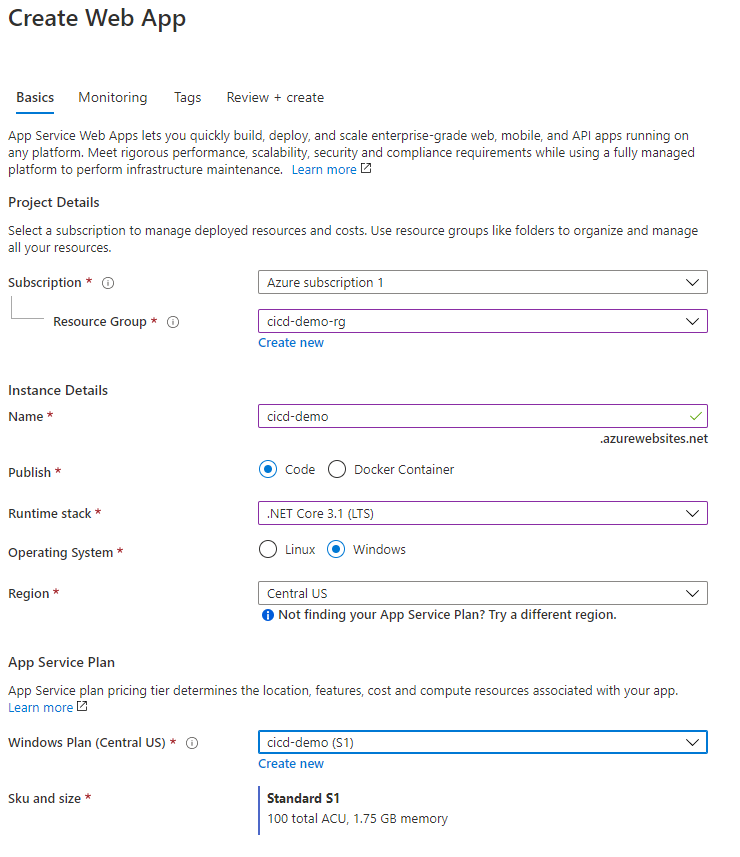
Click on ‘Add’ and fill in the project details. Here is a basic web app set up.
单击“添加”并填写项目详细信息。 这是一个基本的Web应用程序设置。
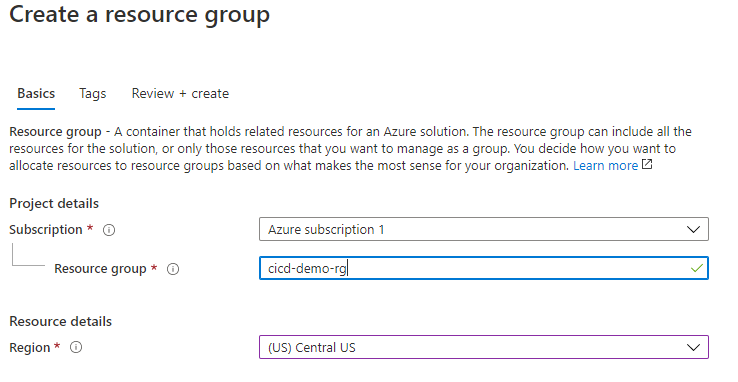
If you don't have a resource group, go to the search bar and lookup ‘Resource Group’ and create a basic group like the screenshot below.
如果您没有资源组,请转到搜索栏并查找“资源组”,然后创建一个基本组,如下面的屏幕截图所示。
The same goes for Windows Plan, lookup ‘App Service Plan,’ and create a plan.
Windows计划,查找“应用服务计划”和创建计划也是如此。

Step 4: Create a release pipeline
步骤4:创建发布管道
Now go back to the project homepage and select ‘Releases’ under the pipeline tab.
现在返回项目主页,并在管道选项卡下选择“发布”。
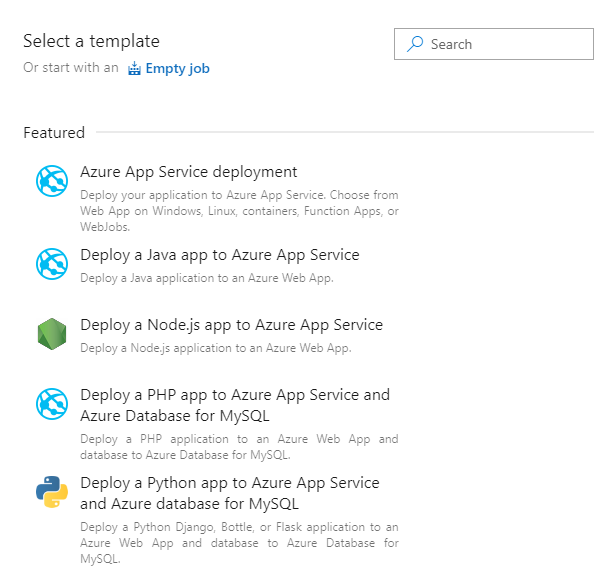
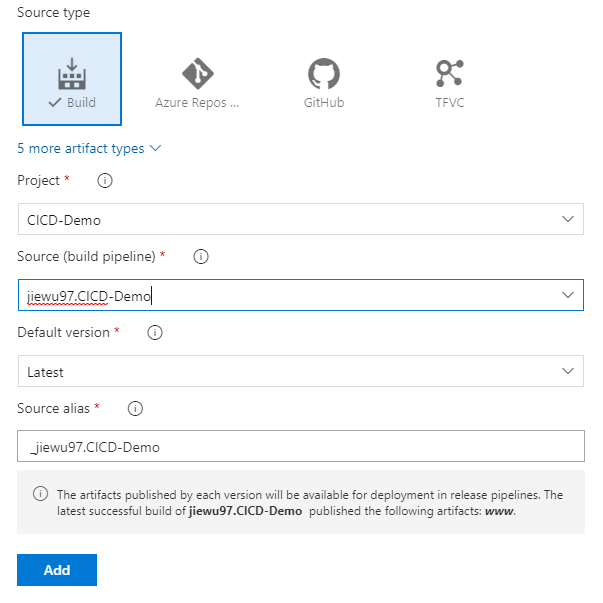
Apply ‘Azure App Service deployment’ and then select ‘Add an artifact.’
应用“ Azure App Service部署”,然后选择“添加工件”。
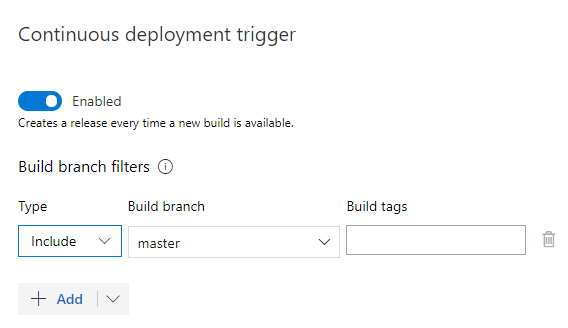
Now we need to add a deployment trigger. In this guide, the trigger is set on the master branch. So whenever new code gets pushed to master, a new build will start. Click on the lightning bolt next to the article to enable the trigger.
现在,我们需要添加一个部署触发器。 在本指南中,触发器是在master分支上设置的。 因此,每当将新代码推送到主代码时,就会开始新的构建。 单击文章旁边的闪电以启用触发器。
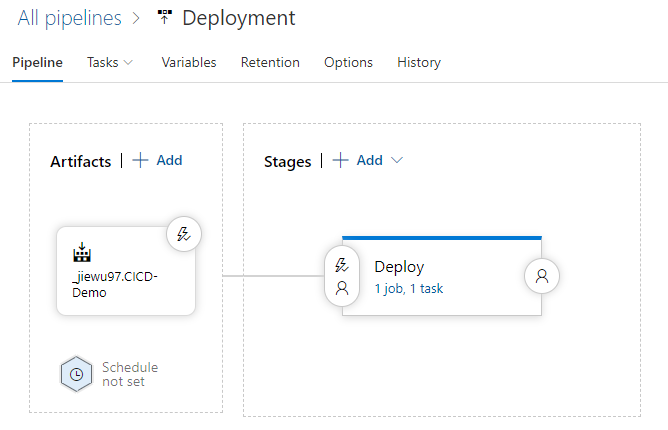
The pipeline should look like this.
管道应如下所示。
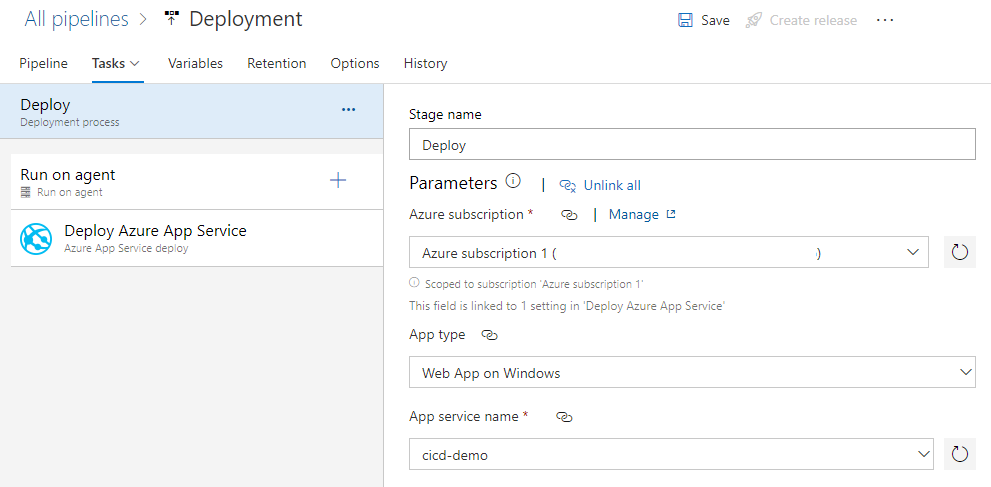
Go the ‘Tasks’ tab to select the correct subscription and app service name.
转到“任务”标签,选择正确的订阅和应用服务名称。
Select ‘Deploy Azure App Service’ and go to ‘Package or folder.’ Replace the original path with the following.
选择“部署Azure应用服务”并转到“程序包或文件夹”。 用以下内容替换原始路径。
$(System.DefaultWorkingDirectory)/<sourcec-alias>/www/buildFor example, it should look like this.
例如,它应该看起来像这样。

Step 5: Test CI/CD
步骤5:测试CI / CD
To test your CI/CD pipeline, make some changes to the app and push up the code. Once you do, go to the repo on GitHub, you should see a yellow dot next to the commit hash.
要测试您的CI / CD管道,请对应用程序进行一些更改并增加代码。 完成后,转到GitHub上的仓库,您应该在提交哈希旁边看到一个黄点。

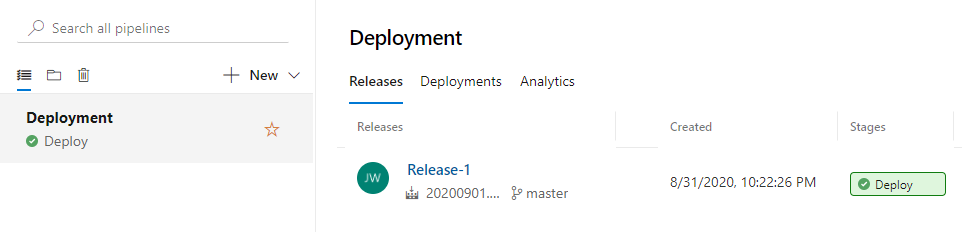
Once the build is complete, it should trigger the release pipeline. Go to ‘Releases,’ and you should see the release progress in realtime.
构建完成后,它将触发发布管道。 转到“发布”,您应该实时查看发布进度。
To view the website, go to <web-app-name>.azurewebsites.net
要查看网站,请访问< web-app-name > .azurewebsites.net
The web-app-name is the name from the create web app page.
Web应用程序名称是创建Web应用程序页面中的名称。
Building and Deploying your Code with Azure Pipelines by Microsoft Visual Studio
Microsoft Visual Studio 使用Azure管道构建和部署代码
翻译自: https://medium.com/@jessiejiewu/set-up-ci-cd-with-azure-and-github-under-10-minutes-39a6846fff90
azure ci


 1659
1659

 被折叠的 条评论
为什么被折叠?
被折叠的 条评论
为什么被折叠?
 到【灌水乐园】发言


