


项目介绍 (Project Description)
1. Create a container image that has Linux and other basic configuration required to run Slave for Jenkins. ( example here we require kubectl to be configured )
1.创建具有运行Slave for Jenkins所需的Linux和其他基本配置的容器映像。 (在这里的例子中,我们要求配置kubectl)
2. When we launch the job it should automatically start the job on slave based on the label provided for a dynamic approach.
2.启动作业时,它应根据为动态方法提供的标签在从属服务器上自动启动作业。
3. Create a job chain of job1 & job2 using the build pipeline plugin in Jenkins
3.使用Jenkins中的构建管道插件创建作业1和作业2的工作链
4. Job1: Pull the Github repo automatically when some developers push the repo to Github and perform the following operations as:
4. Job1:当一些开发人员将仓库推送到Github并执行以下操作时,它会自动拉出Github仓库:
- Create the new image dynamically for the application and copy the application code into that corresponding docker image 动态为应用程序创建新映像并将应用程序代码复制到相应的docker映像中
- Push that image to the docker hub (Public repository) 将该图像推送到docker hub(公共存储库)
( Github code contain the application code and Dockerfile to create a new image )
(Github代码包含应用程序代码和Dockerfile来创建新映像)
5. Job2 ( Should be run on the dynamic slave of Jenkins configured with Kubernetes kubectl command): Launch the application on the top of Kubernetes cluster performing following operations:
5. Job2(应在使用Kubernetes kubectl命令配置的Jenkins动态从属服务器上运行):在Kubernetes集群顶部启动应用程序,执行以下操作:
- If launching the first time then create a deployment of the pod using the image created in the previous job. Else if deployment already exists then do a rollout of the existing pod making zero downtime for the user. 如果是第一次启动,则使用上一个作业中创建的映像创建Pod的部署。 否则,如果已经存在部署,则对现有的Pod进行部署,使用户的停机时间为零。
- If Application created the first time, then Expose the application. Else don’t expose it. 如果“应用程序”是首次创建的,则公开该应用程序。 否则不要暴露它。
实用的前提条件: (Pre-requisites for the practical :)
Git Installed on Your System
- A Github Repository should be there to commit the code or cloned in the local system. Github存储库应该在那里提交代码或在本地系统中克隆。
Create a post-commit hook in .git/hooks folder in Git for git push so that if a developer commits code then it automatically pushes to Github.
在Git的.git / hooks文件夹中创建一个提交后钩子 ,以进行git push,这样,如果开发人员提交代码,则它会自动将其推送到Github。
Configure Jenkins in your Client Rhel OS.
在Client Rhel OS中配置Jenkins 。
- Docker should be installed in Client and Server Rhel VM’s. Docker应该安装在客户端和服务器Rhel VM中。
Note: Preferably, Perform the tasks on Linux Machine for smooth functioning and seamless installations ( I am using RHEL-8).
注意:最好在Linux Machine上执行任务,以实现平稳运行和无缝安装(我正在使用RHEL-8)。
分步实施: (Stepwise Implementation:)
STEP 0: Load your Jenkins server and restart the services
步骤0:加载Jenkins服务器并重新启动服务
$ systemctl restart jenkinsSTEP 1: Create a container image that has Linux and other basic configuration required to run Slave for Jenkins. ( example here we require kubectl to be configured )
步骤1: 创建一个容器映像,该容器映像具有运行Slave for Jenkins所需的Linux和其他基本配置。 (在这里的例子中,我们要求配置kubectl)
First, we create a Dockerfile to create a docker image for our slave
首先,我们创建一个Dockerfile来为我们的奴隶创建一个Docker映像
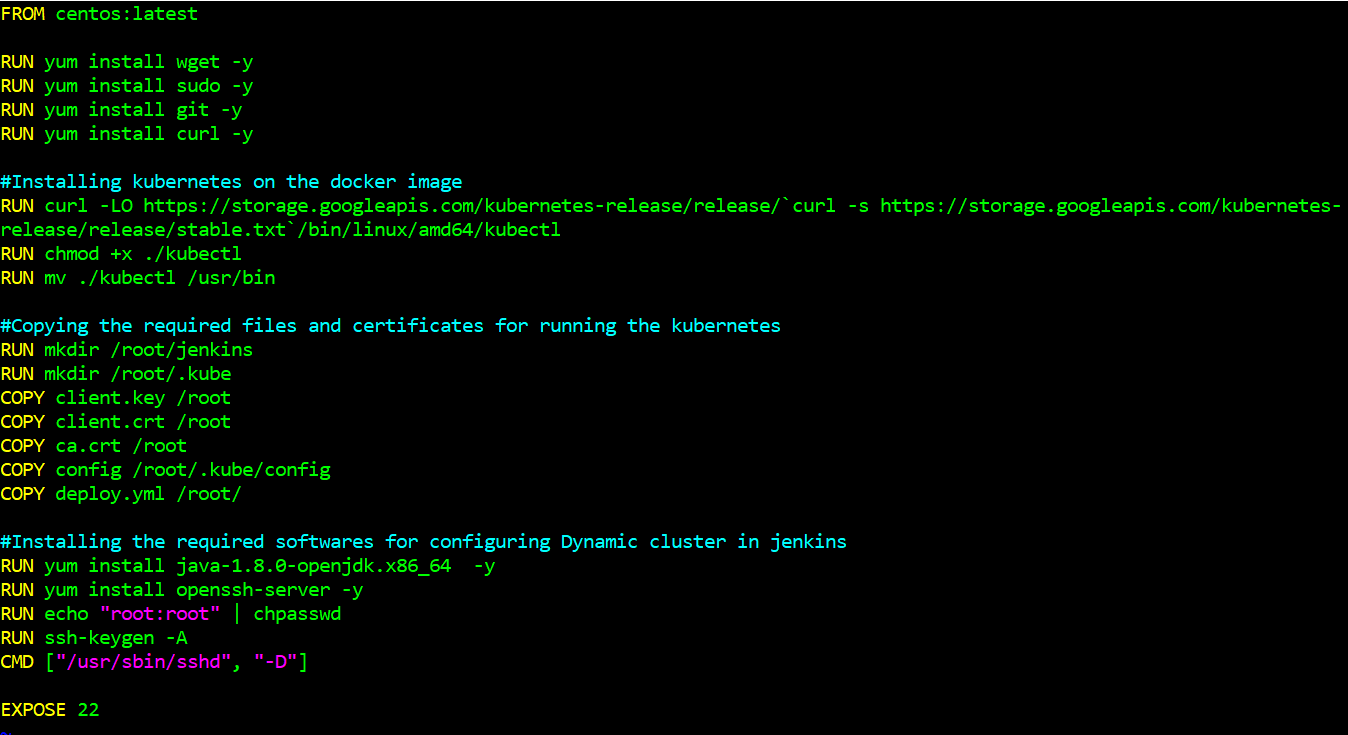
Now we build the image and also push it to the docker hub repository
现在我们构建映像并将其推送到docker hub存储库
$ docker build -t jenkins-slave:v1 .
$ docker tag jenkins-slave:v1 saurabh43800/jenkins-slave:v1
$ docker push saurabh43800/jenkins-slave:v1
STEP 2: When we launch the job it should automatically start the job on slave based on the label provided for a dynamic approach.
步骤2: 启动作业时,它应根据为动态方法提供的标签在从属服务器上自动启动作业。
- For setting up the environment for dynamic Jenkins cluster we use two VM, one is used for docker server and another is used for docker client. And also we have to make some changes in the file to start networking or TCP support in Docker Server VM. 为了为动态Jenkins集群设置环境,我们使用两个VM,一个用于docker服务器,另一个用于docker client。 此外,我们还必须对文件进行一些更改以在Docker Server VM中启动网络或TCP支持。
$ vim /usr/lib/systemd/system/docker.service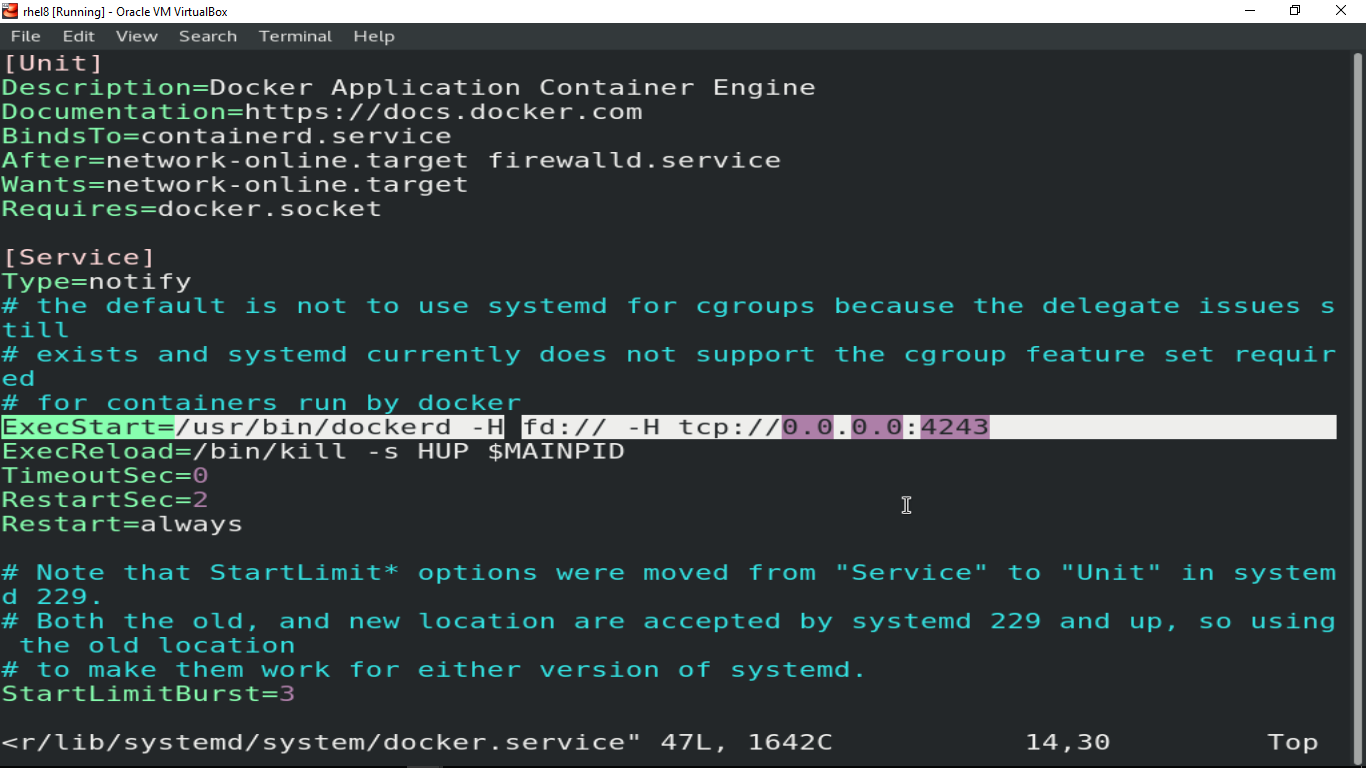
Now restart the services for Docker in the Server VM
现在重新启动服务器VM中的Docker服务
$ systemctl daemon-reload
$ systemctl restart docker
$ systemctl status docker
Now in Client VM do this process to connect the Docker server from the client through networking
现在在Client VM中执行此过程,以通过网络从客户端连接Docker服务器
$ systemctl stop docker
$ DOCKER_HOST=<server vm ip>:4243
$ export $DOCKER_HOST=<server vm ip>:4243
$ echo $DOCKER_HOST
$ docker ps
2. For creating Dynamic Job Cluster in Jenkins
2.用于在詹金斯中创建动态作业集群
- Go to Jenkins -> Manage Plugins -> Available -> Search Docker -> Docker,Docker API (install these plugins) 转到Jenkins->管理插件->可用->搜索Docker-> Docker,Docker API(安装这些插件)
- Before doing Dynamic setup delete all static nodes 在执行动态设置之前,请删除所有静态节点
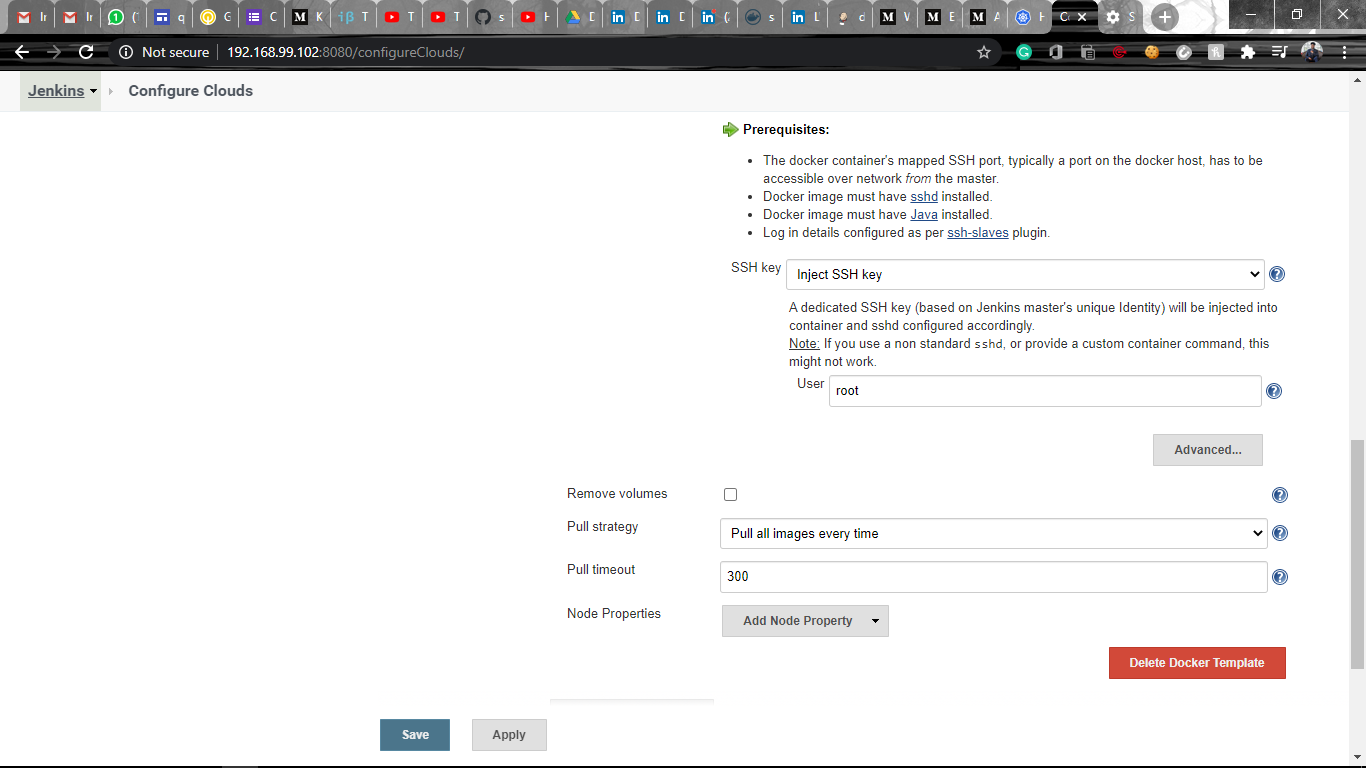
- Go to Jenkins -> Manage node and cloud -> Configure Cloud -> Add a new cloud -> Select Docker and provide the Docker host URL as Server IP with port 4243 转到Jenkins->管理节点和云->配置云->添加新云->选择Docker并提供Docker主机URL作为服务器IP并使用端口4243
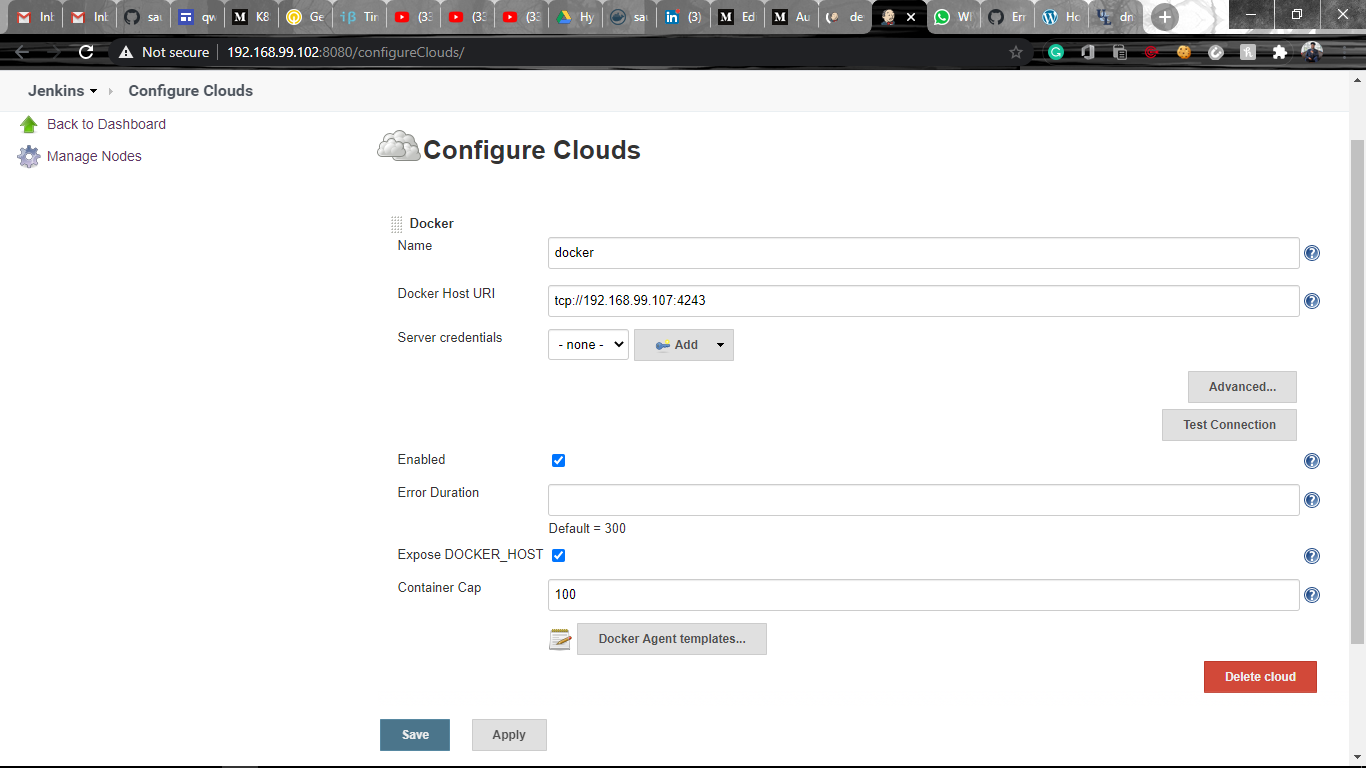
- Provide the container image name on which you want to deploy the slave and also the remote file system root which will be present in your container 提供您要在其上部署从服务器的容器映像名称,以及要在容器中显示的远程文件系统根目录
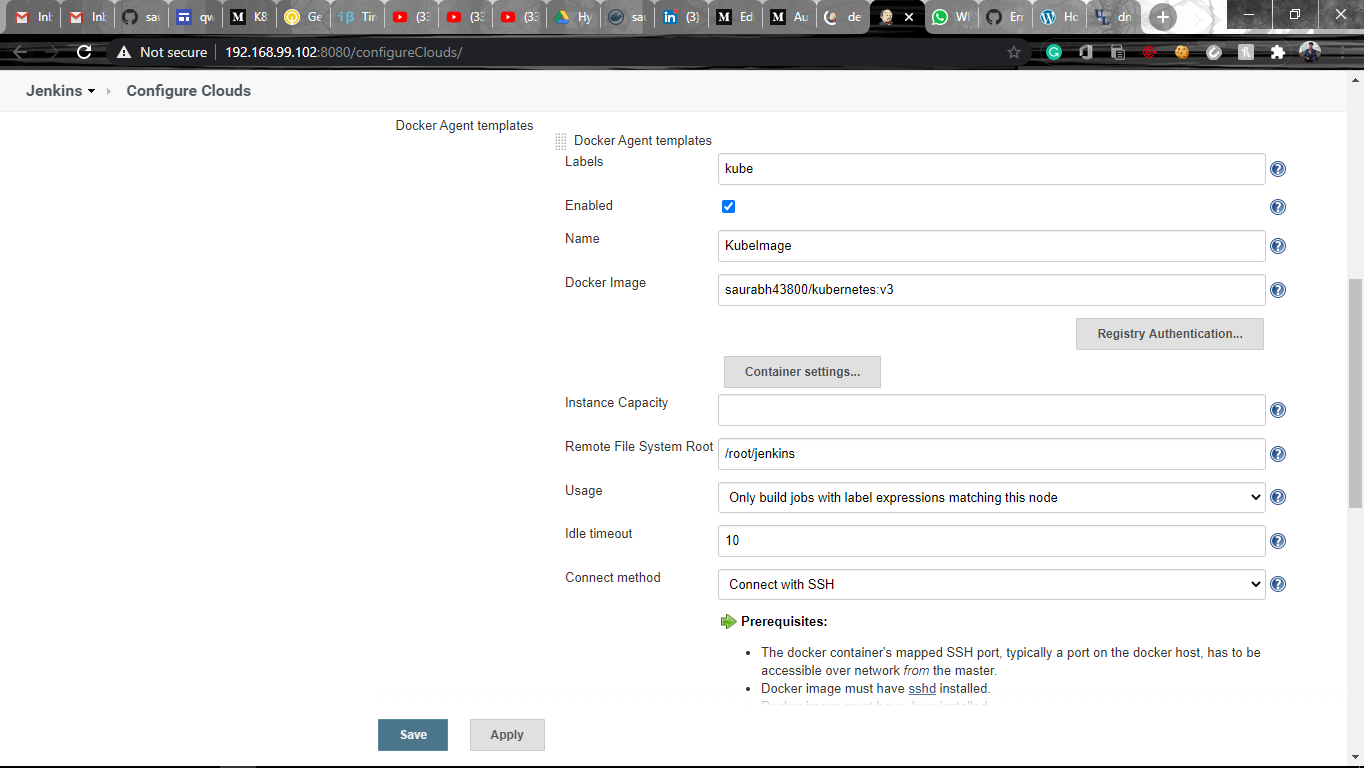
- Here I am connecting with the container using SSH method 在这里我正在使用SSH方法与容器连接
STEP 3: Create Job1 which will pull the Github repo automatically when some developers push the repo to Github
步骤3:创建Job1,当一些开发人员将仓库推送到Github时,它将自动拉出Github仓库
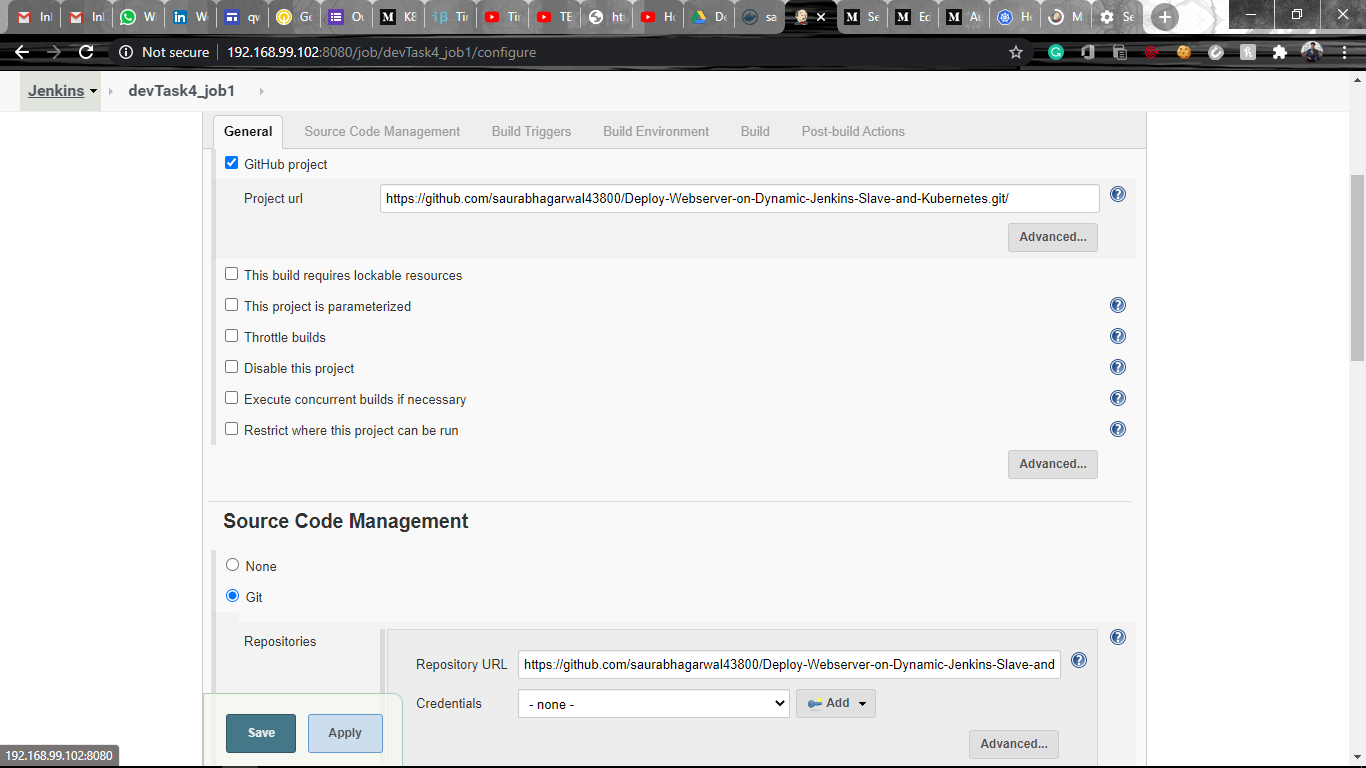
Select SCM as Git and provide the URL of GitHub repo which will help this job to pull the code from GitHub repo and in Build Trigger, select GitHub hook trigger which makes the job pull the code only when there are some changes made in GitHub repo
选择SCM作为Git并提供GitHub存储库的URL,这将帮助此作业从GitHub存储库中提取代码,在Build Trigger中,选择GitHub钩子触发器 ,这使得该作业仅在GitHub存储库中进行了一些更改时才可以提取代码。
2. Create the new image dynamically for the application and copy the application code into that corresponding docker image
2.为应用程序动态创建新映像,并将应用程序代码复制到相应的docker映像中
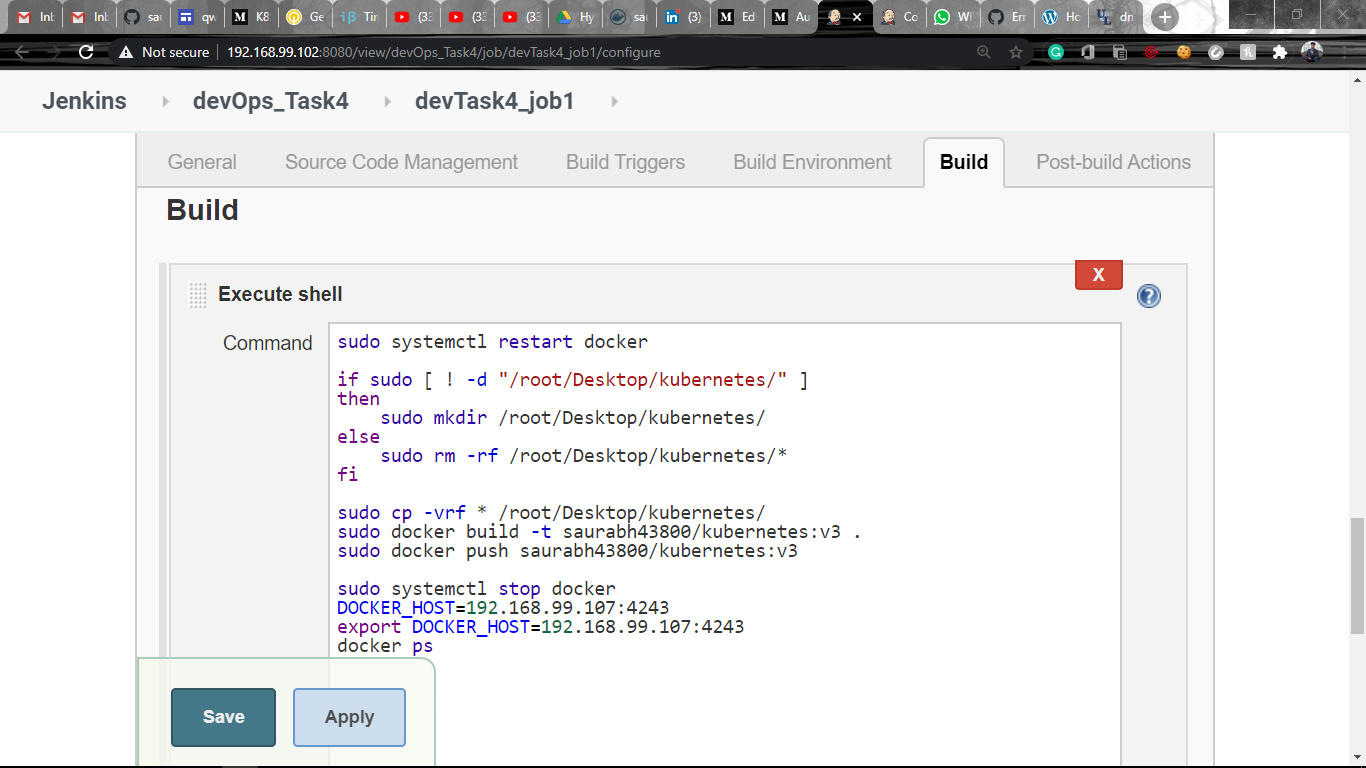
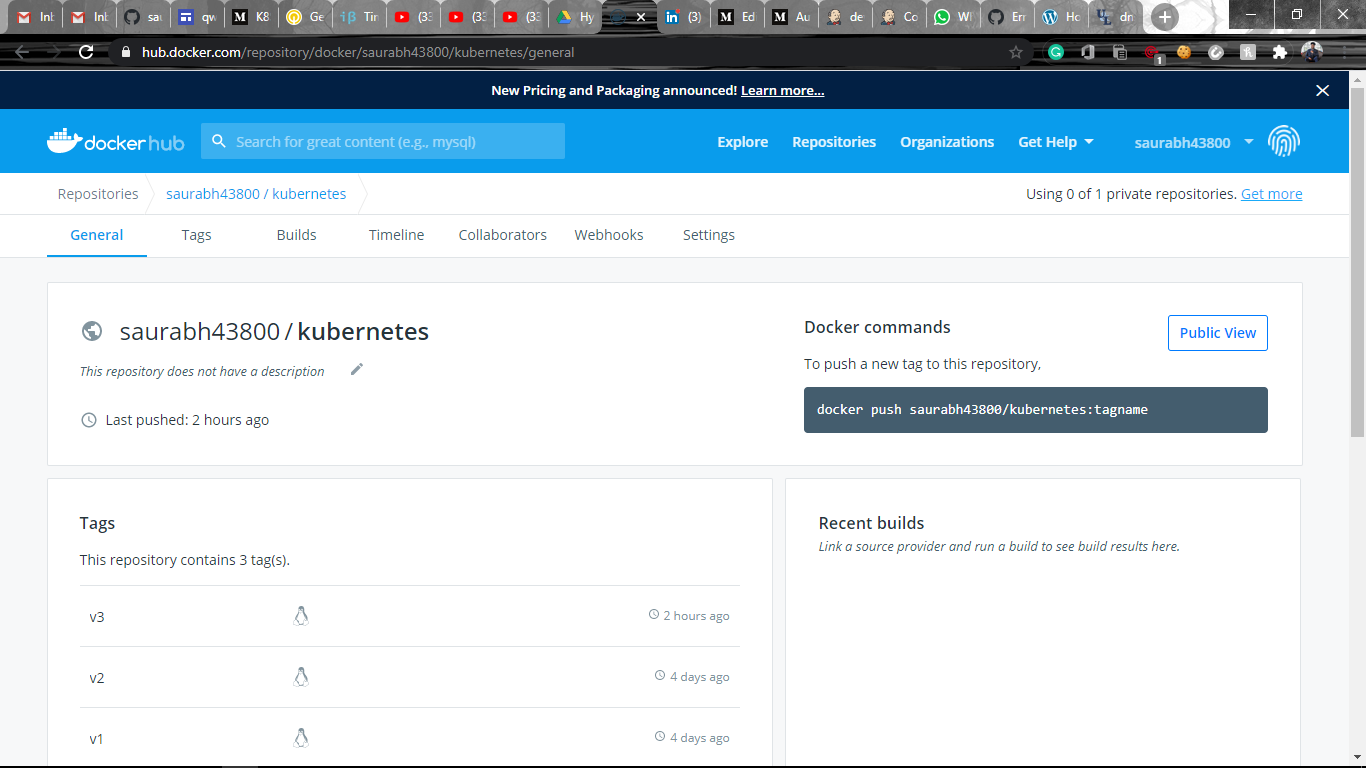
3. Push the image build to the docker hub with some version(Public repository)
3.使用某个版本(公共存储库)将映像构建推送到泊坞窗中心
STEP 4: Create a Job2 that should be run on the dynamic slave of Jenkins configured with Kubernetes kubectl command. Launch the application on the top of Kubernetes cluster
步骤4:创建一个Job2,该Job2应该在使用Kubernetes kubectl命令配置的Jenkins的动态从属服务器上运行。 在Kubernetes集群顶部启动应用程序
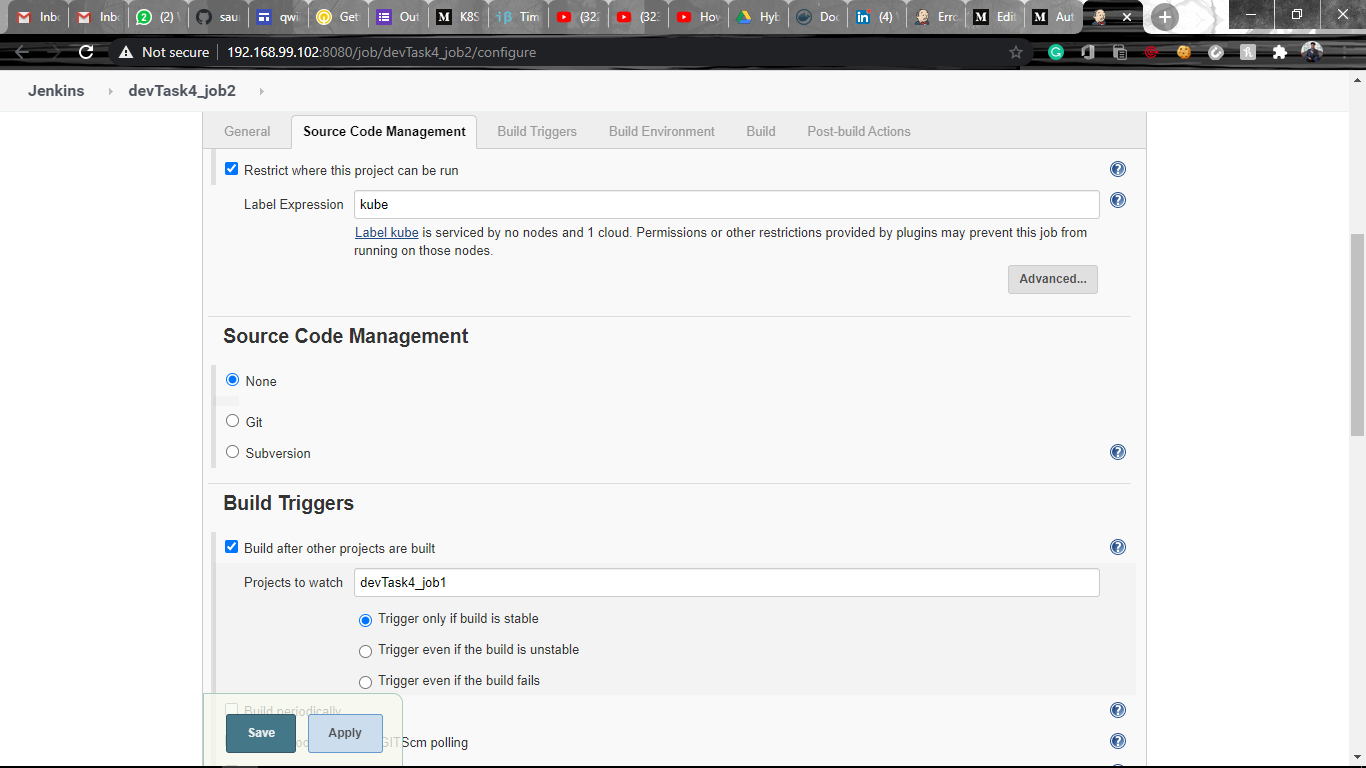
- In Build Triggers, select Build after other projects are built and write the name of job1 which makes the job2 to run only if the job1 ran successfully and also restrict this project with the label mentioned while configuring cloud for Dynamic Jenkins cluster so that it can be built on top of a container image created 在“构建触发器”中,选择“在构建完其他项目之后构建”,并写上job1的名称,该名称使job2仅在job1成功运行时才能运行,并且在为Dynamic Jenkins集群配置云时使用提到的标签限制该项目,以便可以建立在创建的容器映像之上
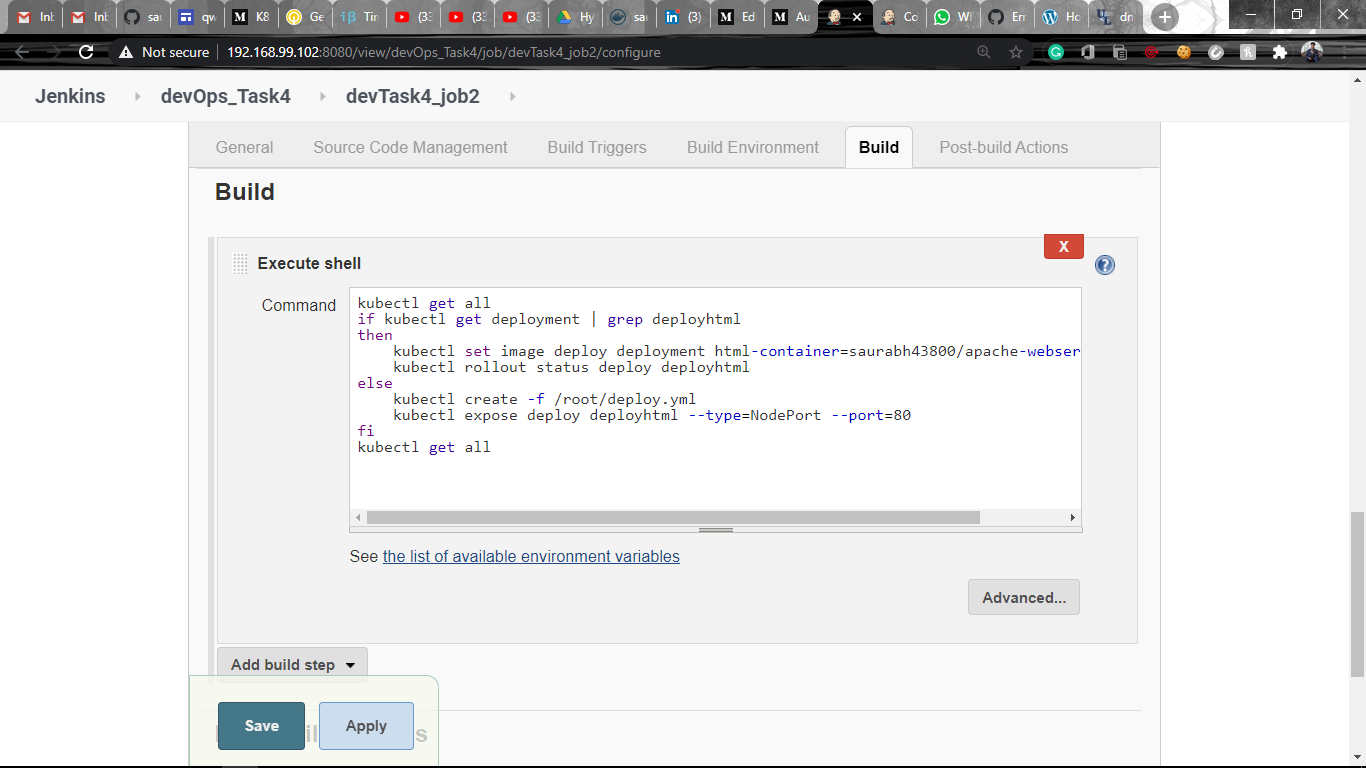
2. If launching the first time then create a deployment of the pod using the image created in the previous job. Else if deployment already exists then do a rollout of the existing pod making zero downtime for the user.
2.如果是第一次启动,请使用在上一个作业中创建的映像创建Pod的部署。 否则,如果已经存在部署,则对现有的Pod进行部署,使用户的停机时间为零。
If Application created for the first time, then Expose the application otherwise don’t expose it.
如果“应用程序”是第一次创建,则“公开”该应用程序,否则不要公开它。
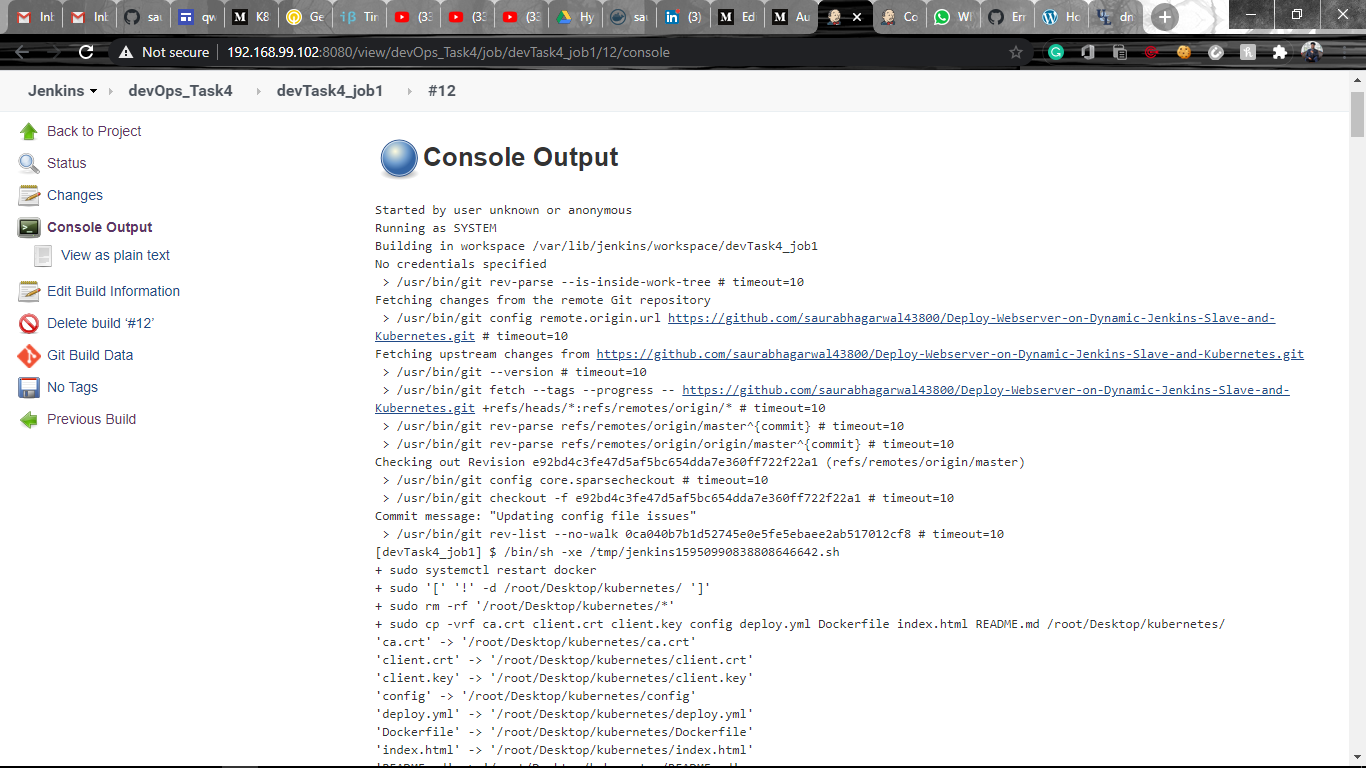
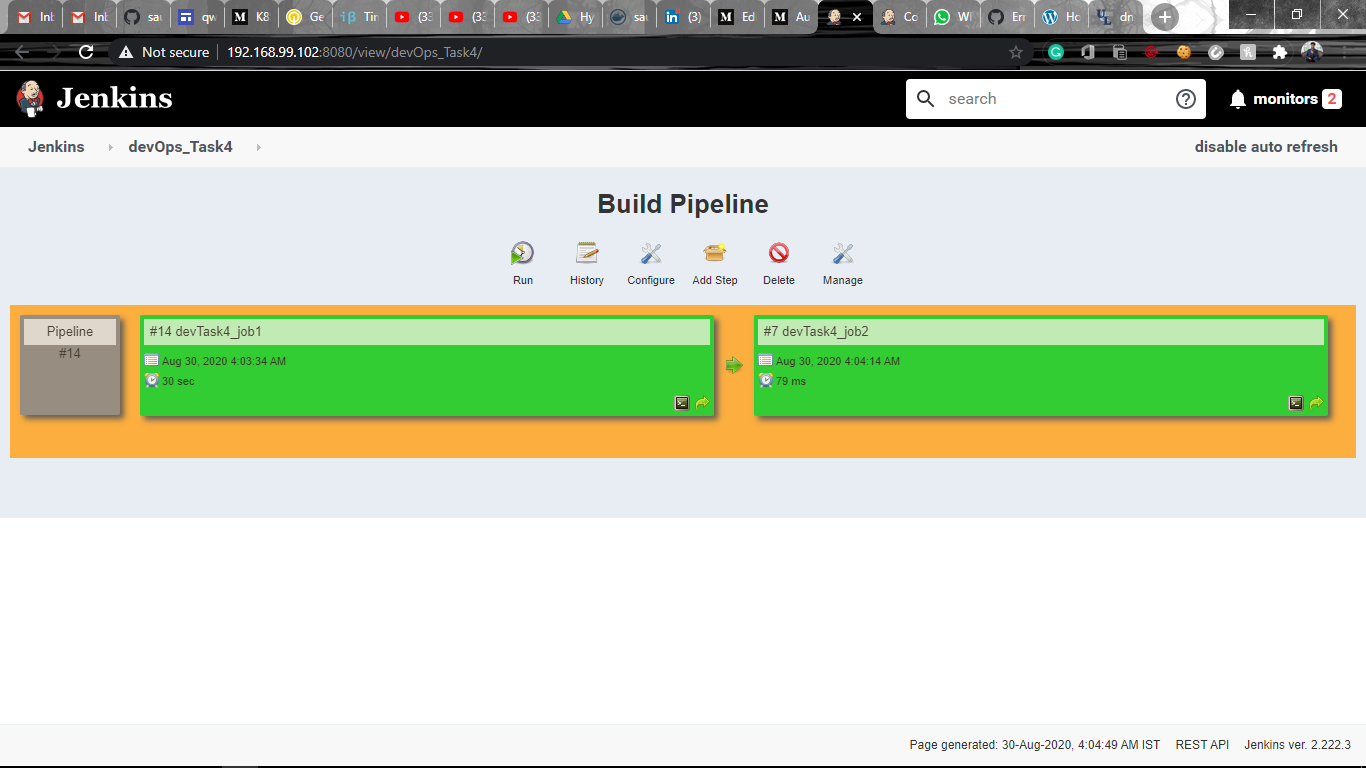
This is how Build pipeline looks like and all the jobs ran successfully!!
这就是构建管道的样子,所有作业都成功运行了!!
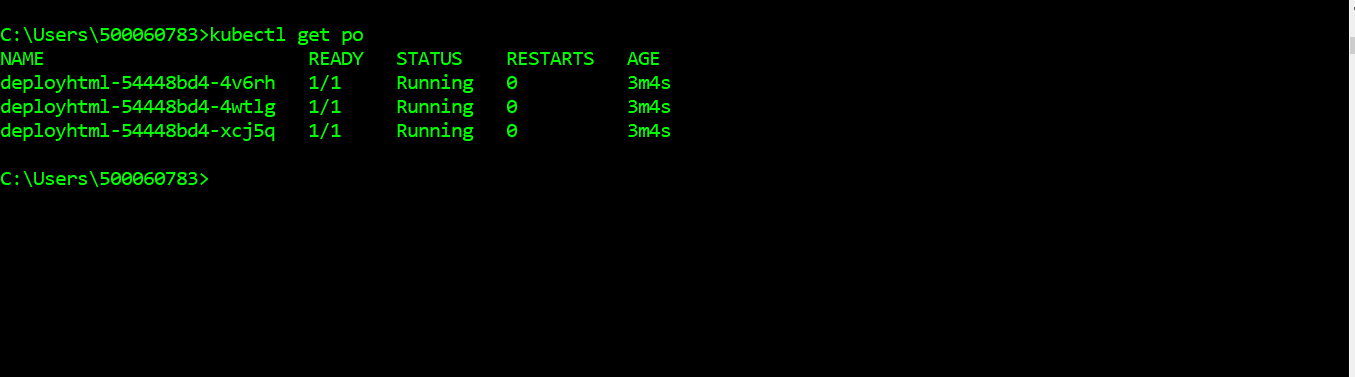
You can also check whether the deployment is successful and pods are running or not.
您还可以检查部署是否成功以及Pod是否正在运行。
GitHub链接: (GitHub Link:)
The repo container Dockerfile, deployment.yaml, config file and all the necessary files for connecting with Kubernetes cluster.
回购容器Dockerfile,deployment.yaml,配置文件以及所有与Kubernetes集群连接所需的文件。
https://github.com/saurabhagarwal43800/Deploy-Webserver-on-Dynamic-Jenkins-Slave-and-Kubernetes.git
https://github.com/saurabhagarwal43800/Deploy-Webserver-on-Dynamic-Jenkins-Slave-and-Kubernetes.git


 1215
1215


 被折叠的 条评论
为什么被折叠?
被折叠的 条评论
为什么被折叠?
 到【灌水乐园】发言


