


docker php 扩展
Hi there,
嗨,您好,
The goal of this article is to make you understand scalability and microservices and how it leads the road to Docker, but let’s make it clear that scalability and microservices aren’t the only reason to use Docker. It has many other advantages.
本文的目的是使您了解可伸缩性和微服务及其如何通往Docker的道路,但让我们明确一点,可伸缩性和微服务并不是使用Docker的唯一原因。 它还有许多其他优点。
Also, most of the time when I talk about microservices people start screaming Docker, So let’s clear this first as well
另外,在大多数时候,当我谈论微服务时,人们开始大喊Docker,所以让我们先来澄清一下
“NO! Docker is not microservices and neither is using Docker the only way we can implement microservices”
“没有! Docker不是微服务,也不是我们实现微服务的唯一方式使用Docker”
Microservices and Docker is just a good duo when it comes to implementing and scaling microservices, hence it’s been adopted by big organizations for eg: Netflix, Spotify, IBM, etc.
微服务和Docker在实现和扩展微服务方面只是一个很好的组合,因此已被Netflix,Spotify,IBM等大型组织采用。
So lets start understanding Scalability by considering a scenario:
因此,让我们 通过考虑一个场景来 开始理解 可伸缩性 :
You made an application, hosted it on a server in the cloud or on-premises, and you were getting 10k users per second and your server running your application was easily able to serve your users.
您创建了一个应用程序,并将其托管在云中或本地的服务器上,并且每秒获得1万个用户,并且运行该应用程序的服务器可以轻松地为您的用户提供服务。
This number 10k varies depending on the hardware specifications and how your code is handling the user requests, for eg: Node-based servers use asynchronous non-blocking IO as compared to Java or PHP based servers which use synchronous blocking IO and consequently, Node-based servers are able to handle much more concurrent requests.
这个数字10k取决于硬件规格和代码如何处理用户请求,例如:与使用同步阻塞IO的基于Java或PHP的服务器相比,基于节点的服务器使用异步非阻塞IO,因此,基于服务器的服务器能够处理更多并发请求。
Coming back, your server was performing fine and then you had a new feature launched and suddenly some of your users started getting timeout errors.
回来后,您的服务器运行良好,然后启动了一项新功能,突然一些用户开始出现超时错误。
So what happened here?
那这里怎么了
You look at the logs and you see more than 100k requests at a time and your application wasn’t able to process them all. So the user couldn’t get the response back within time and there occurred a timeout (the timeout is generally around 100s).
您查看日志,一次看到超过10万个请求,而您的应用程序将无法全部处理它们。 因此,用户无法在一定时间内获得响应,并且发生了超时(超时通常在100秒左右)。
So you realized that your server wasn’t able to handle this huge number of user requests simultaneously
因此,您意识到您的服务器无法同时处理大量用户请求
So you googled for a solution and the first result was:
所以您用谷歌搜索了一个解决方案,第一个结果是:
Do Vertical Scaling
进行垂直缩放
- i.e increase your RAM size or get a better CPU or both. But there’s a limit to this and on the other hand, your user base constantly grows day by day. Therefore, it isn’t the best solution. 即增加您的RAM大小或获得更好的CPU或同时使用两者。 但这是有局限的,另一方面,您的用户群每天都在不断增长。 因此,这不是最佳解决方案。

So you googled for something better than this and result was
所以你用谷歌搜索了比这更好的东西,结果是
Do Horizontal Scaling
做水平缩放
- i.e Buy multiple servers and host them in different regions and direct users from a region to the server hosted in that specific region, for eg: one server in India, one in the US, UK, and so on. 例如,购买多台服务器并将其托管在不同的区域中,并将用户从某个区域定向到该特定区域中托管的服务器,例如:印度的一台服务器,美国的英国的一台服务器,等等。
- This is a good solution but soon you realize that only one server in a particular region is not enough as there was again a surge in the number of users. You were now getting 100k requests from each region and a single server couldn’t fulfill the need. 这是一个很好的解决方案,但是您很快就会意识到,特定区域中仅一台服务器是不够的,因为用户数量再次激增。 您现在从每个区域收到10万个请求,而单个服务器无法满足需求。
So this time you didn’t google rather you used the previous concept of horizontal scaling.
因此,这次您没有使用google,而是使用了以前的水平缩放概念。
So you deployed multiple servers in each and every region behind a Reverse Proxy
因此,您在反向代理后面的每个区域中都部署了多个服务器
- A reverse proxy is another server that sits in front of your application servers and load balances the requests to these servers. 反向代理是位于您的应用程序服务器前面的另一台服务器,用于平衡对这些服务器的请求。
- Now, if you are wondering what load balancing means, it simply means distributing all the incoming requests to different application servers so that every application server gets a similar amount of load i.e almost equal number of incoming requests. 现在,如果您想知道负载平衡是什么意思,它只是意味着将所有传入请求分配到不同的应用程序服务器,以便每个应用程序服务器获得相似的负载量,即传入请求的数量几乎相等。
- For eg: now your 100k incoming requests per second are being handled not by 1 application server but say 3 application servers. So 1 application server is now processing only 33k requests at a time and is easily able to do that. 例如:现在,您每秒100k的传入请求不是由1个应用程序服务器处理,而是由3个应用程序服务器处理。 因此,一台应用服务器现在一次只能处理33k个请求,并且很容易做到这一点。
- The reverse proxy is in charge of load balancing. For that all you need to do is specify the Load Balancing Algorithm it should use along with the IP of your application servers. By default, its Round Robin for most of the load balancers. 反向代理负责负载平衡。 为此,您只需指定应与应用程序服务器的IP一起使用的负载平衡算法即可。 默认情况下,它的Round Robin用于大多数负载均衡器。
- So now you’ve deployed 3 to 4 servers in every region. So now your system is easily able to serve 300k to 400k incoming requests per region and everything works perfectly fine. 因此,现在您已经在每个区域中部署了3到4台服务器。 因此,现在您的系统可以轻松地为每个区域提供300k至400k的传入请求,并且一切运行正常。
Considering you have 3 such regions then you would be serving more than a million requests per second. “Congrats! that’s a huge milestone achieved very simply.”
考虑到您有3个此类区域,那么您每秒将处理超过一百万个请求。 “ 恭喜! 这是非常简单的一个巨大的里程碑。”
This was an example of scaling up your system as the load increases. But scalability is not restricted to scaling up, it's also about being able to scale down during off-peak hours and this could really save you a lot of resources. Scalability is about the flexibility to increase or decrease the resources as per demand or need.
这是随着负载增加而扩展系统规模的示例。 但是可伸缩性不仅限于扩大规模,还涉及在非高峰时段进行缩减,这确实可以节省大量资源。 可伸缩性是指根据需求增加或减少资源的灵活性。
Once all this is done, as your business grew, your application code was becoming huge and complex and as a result you started facing problems with maintaining your code and data on multiple servers. Adding new features and integrating 3rd party services became more and more tedious.
一旦完成所有这些操作,随着业务的发展,您的应用程序代码将变得庞大而复杂,结果,您开始面临在多台服务器上维护代码和数据的问题。 添加新功能和集成第三方服务变得越来越乏味。
Every time you try adding a new feature,
每次您尝试添加新功能时,
- you have to first take down the entire application from your server 您必须首先从服务器中删除整个应用程序
- rebuild your new application with that new feature and 使用该新功能重建您的新应用程序,并
- deploy it back on the server 将其重新部署到服务器上
This redeployment of a huge application was taking more than 20 minutes sometimes, so you had a downtime of around 20 minutes. And that’s a lot. As a consequence, you were losing customers. (There are some cheap tricks(workarounds) to mitigate this downtime as well but those are just workarounds and not solutions)
有时,重新部署大型应用程序要花费20多分钟,因此您的停机时间约为20分钟。 而且很多。 结果,您失去了客户。 (也有一些便宜的技巧(变通方法)来减轻这种停机时间,但这只是变通方法,而不是解决方案 )
So you googled again and found that moving to microservices could solve this.
因此,您再次搜索了一下,发现转向微服务可以解决此问题。
So what is microservices?
那么什么是微服务 ?

Microservices is just an architectural pattern that breaks a huge service into small(micro) services that can be tested, deployed independently, and scaled infinitely.
微服务只是一种架构模式,打破一个巨大的服务变成了可以检测的,独立部署,以及无限缩放小(微)服务。
So you slowly and carefully started breaking down your huge, highly coupled application (called a Monolith in technical terms) into small independent services that could talk to each other and do what the monolith was doing.
因此,您缓慢而仔细地开始将巨大的,高度耦合的应用程序(在技术上称为Monolith )分解为小型的独立服务,这些服务可以相互通信并完成Monolith的工作。
Let’s take a quick example of how you would go about doing this.
让我们举一个简短的示例,说明如何进行此操作。
Let's consider you have a social networking site and whenever someone wants to follow a user, he/she clicks on the follow button of that user’s profile and a request comes to your server and your monolith starts processing the request. It basically triggers a function that you’ve written to handle the ‘follow’ request.
假设您有一个社交网站,并且每当有人要关注该用户时,他/她单击该用户的个人资料的关注按钮,就会向您的服务器发送请求,您的整体将开始处理该请求。 它基本上会触发您编写的用于处理“跟随”请求的函数。
So, that single function will
因此,该单一功能将
Firstly verify the SSL certificates (I know you’ll say, “Wait, this is done by the reverse proxy we had set up” or “my hosting platform takes care of that for me” but for this example, let's consider we don’t have these yet and we are in the stone age where we implement everything from scratch.)
首先验证SSL证书(我知道您会说,“等等,这是由我们设置的反向代理完成的”或“我的托管平台为我完成了此工作”),但在此示例中,让我们考虑一下还没有这些,我们正处在石器时代,我们从头开始实施一切。 )
- Next, it will authenticate the user who’s sending the request. 接下来,它将验证发送请求的用户。
- Then after performing some basic validations it creates a record in a table which stores the relation ‘who’s following whom’. 然后,在执行了一些基本的验证之后,它在一个表中创建了一条记录,该记录存储了“谁跟随谁”的关系。
- Then it creates and sends a notification for the user who’s being followed. 然后,它创建并向所关注的用户发送通知。
And if all the above tasks succeed you send back a response with 200 stating “you are now following the user” or else you send 400s or 500s corresponding to the error occurred.
并且,如果上述所有任务均成功完成,您将返回200,表明“您正在关注用户” ,否则将发送与发生错误相对应的400s或500s。
So now you are wondering what’s wrong here?
所以现在您想知道这里出什么问题了吗?
- The steps are perfect but a single function doing all these steps is not a good design practice as it introduces coupling which makes maintenance of large scale projects complex and cumbersome. 这些步骤是完美的,但是执行所有这些步骤的单个功能不是一个好的设计实践,因为它引入了耦合,这使大型项目的维护变得复杂而繁琐。
- You will also see duplication of code as most of your functions that handle the user requests will always have the first 2 steps i.e verifying SSL certificates and authenticating the user which could lead to an increase in the size of your codebase. 您还将看到代码重复,因为大多数处理用户请求的功能将始终具有前两个步骤,即验证SSL证书和对用户进行身份验证,这可能会导致代码库大小增加。
Let’s hope you are convinced enough to take the road of breaking this monolith down to small services(microservice) that would separately handle each step of your function.
我们希望您有足够的信心说服您走这条路,将其分解为分别处理功能的每个步骤的小型服务(微服务)。
So you start by
所以你开始
Firstly, creating an Authentication Microservice to authenticate your users.
首先,创建一个身份验证微服务以对您的用户进行身份验证。
Next, you create a UserFollowing Microservice that would create a record of who’s following whom.
接下来,创建一个UserFollowing微服务 ,该服务将创建记录谁在关注谁。
Then you create a Notification MicroService that sends a notification to the user being followed.
然后,您创建一个Notification MicroService ,该通知将通知发送给所关注的用户。
Now you would ask, ”Hey, but what about the SSL certificates verification?”
现在您会问, “嘿,那SSL证书验证又如何呢?”
Well, we don’t generally create a specific Microservice for that. We instead use an API Gateway. Think of API Gateway as an advanced reverse proxy we talked about earlier. We could have set up a reverse proxy as well, but that would involve writing a lot of configurations. Hence for large scale purposes, we use 3rd party platforms like Mulesoft or Apigee which provide these API gateways along with API management, analytics, security, and much more. Organizations can delegate these non-functional requirements to a 3rd party service and focus more on business logic.
好吧,我们通常不会为此创建特定的微服务。 相反,我们使用API网关。 将API Gateway视为我们之前讨论的高级反向代理。 我们也可以设置反向代理,但这将涉及编写许多配置。 因此,出于大规模目的,我们使用Mulesoft或Apigee之类的第三方平台,这些平台提供这些API网关以及API管理,分析,安全性等等。 组织可以将这些非功能性需求委派给第三方服务,并更加关注业务逻辑。
So the API Gateway will now be doing SSL certificates verification. Additionally, using this gateway, we don’t need to implement Authentication and a microservice. For the sake of this example though, let’s keep it as a Microservice as there’s nothing wrong in doing so, it's just not a smart decision.
因此,API网关现在将进行SSL证书验证。 此外,使用此网关,我们不需要实现身份验证和微服务。 不过,对于本示例而言,我们将其保留为微服务,因为这样做没有错,但这并不是一个明智的决定。
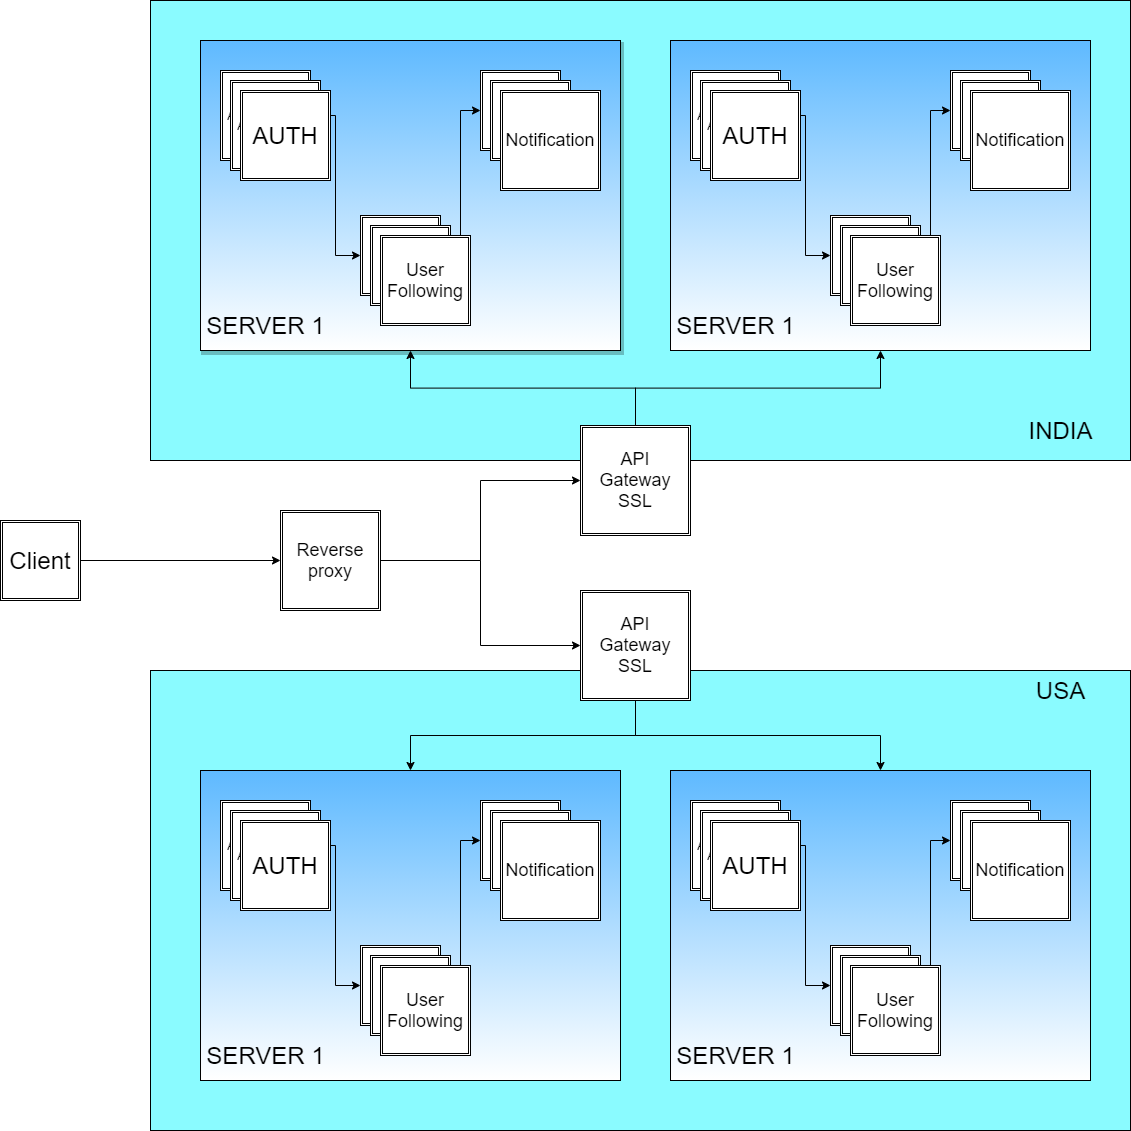
So now, the request flow will be,
所以现在,请求流程将是
- As soon as the user clicks ‘follow’, the requests will come from the proxy to the API gateway. 用户单击“跟随”后,请求将从代理发送到API网关。
- API gateway will do the SSL verification. API网关将执行SSL验证。
Then the Authentication Microservice will be called to authenticate the user.
则认证微服务将被调用来对用户进行认证。
Then the request will go to the UserFollowing Microservice which will create the record.
然后,该请求将转到将创建记录的UserFollowing微服务 。
Then the Notification Microservice will be called and it will send the notification.
然后,将调用Notification Microservice ,它将发送通知。
So, now we have decoupled the entire process flow of a Monolith into separate microservices that work together to do the same thing. Isn’t that interesting?
因此,现在我们已经将Monolith的整个处理流程分离为可以共同完成相同任务的单独微服务。 那不是很有趣吗?
Now we have to figure out how do we deploy these microservices?
现在我们必须弄清楚如何部署这些微服务?
Well you might say “Ohh!, It's pretty easy, run these microservices on separate ports, Authentication Microservice on 3000, Notification Microservice on 4000, API gateway on some other port on your operating system and communicate over the network using ReST APIs” and believe me this works like a charm.
好吧,您可能会说: “哦,这很容易,在单独的端口上运行这些微服务,在3000上运行身份验证微服务,在4000上运行Notification Microservice,在操作系统的其他端口上运行API网关,并使用ReST API通过网络进行通信”,并相信对我来说,这就像一种魅力。
Now, let's say you created a new feature with the latest version of the underlying programming language/SDKs and updated your operating system’s environment with the latest version. On doing so you realized that some other Microservice that was built using an older version is not working now. This happened because the newer version removed some of the previous versions APIs that this Microservice(the one not working) was using.
现在,假设您使用最新版本的基础编程语言/ SDK创建了一个新功能,并使用最新版本更新了您的操作系统环境。 通过这样做,您意识到使用较旧版本构建的其他一些微服务现在无法正常工作。 发生这种情况的原因是,较新的版本删除了该微服务(不起作用的)正在使用的某些先前版本的API。
Or you might be using some third-party tools that require different versions of the same underlying dependency for eg: Software A needs Java 8 and Software B requires Java 11 and you can’t install these two versions on the same OS.
或者您可能正在使用一些需要相同基础依赖项不同版本的第三方工具,例如:软件A需要Java 8,软件B需要Java 11,并且您不能在同一操作系统上安装这两个版本。
So what to do we now?
那么,我们现在该怎么办?
Just what we use to do, Google it!
Google就是我们过去要做的事情!
Now we see that we can use Virtual Machines to solve this problem.
现在,我们可以使用虚拟机解决此问题。
Yes, the ones which we used for installing Kali Linux on Windows and do some hacking stuff or just to play around with different operating systems.
是的,我们用来在Windows上安装Kali Linux并进行一些黑客攻击或只是在不同的操作系统上玩耍的工具。
Yes, exactly that. However, the utility of those VMs goes beyond simply playing around. We can actually use it to create an isolated environment on top of the OS or directly on top of the Hardware.
是的,就是这样。 但是,这些VM的实用性不只是简单地发挥作用。 实际上,我们可以使用它在操作系统之上或直接在硬件之上创建一个隔离的环境。
“So how does it solve the above problem with different versions?”
“那么它如何解决不同版本的上述问题?”
As you might have guessed, we can create different operating systems with the required dependencies for each Microservice on top of the OS and run them on that single server. By doing so, every Microservice will be working fine and the whole system would be up and running.
您可能已经猜到了,我们可以为操作系统上的每个微服务创建具有所需依赖项的不同操作系统,并在该服务器上运行它们。 这样,每个微服务都可以正常工作,并且整个系统都可以启动并运行。
Now, you might say “Hold on, the title has docker mentioned and he hasn’t even mentioned docker yet”
现在,您可能会说“等等,标题中提到了码头工人,而他甚至都没有提到码头工人”
Well, I guess its time!
好吧,我猜是时候了!
Let’s continue the pattern of discussing the problem followed by the solution.
让我们继续讨论解决问题的方式。
So, now you realized that these virtual machines were very slow to spin up every time you wanted to re-deploy the microservices after a change. It is similar to turning on your PC/Laptop and accidentally clicking on ‘restart’ instead of ‘shut-down’ and now you have to wait for like an eternity just to shut it down again.
因此,现在您意识到,每次更改后想要重新部署微服务时,这些虚拟机的启动速度都非常慢。 这类似于打开PC /笔记本电脑,然后不小心地单击“重新启动”而不是“关闭”,现在您必须像永恒一样等待再次将其关闭。
Apart from taking too much time to boot up, VMs also use a whole lot of memory because we have a whole operating system that spins up a lot of other OS-specific processes that our app doesn’t need at all. Our app just needs an OS with only the required dependencies and nothing else.
虚拟机除了花费太多时间来启动之外,还占用了大量内存,因为我们拥有一个完整的操作系统,可以启动许多我们应用程序根本不需要的其他特定于操作系统的进程。 我们的应用程序只需要一个仅具有所需依赖项的操作系统,而无需其他任何东西。
And as you can see in the below diagram that’s exactly what docker provides.
正如您在下图中所看到的,这正是docker提供的功能。

We just need a docker daemon which is a background process to virtualize your OS kernel and run these isolated environments called containers on top of the OS. This is very lightweight than having a separate OS and other libraries on top of it.
我们只需要一个docker守护程序即可,它是一个后台进程,用于虚拟化OS内核并在OS顶部运行称为容器的这些隔离环境。 这比在上面拥有一个单独的OS和其他库而言非常轻巧。
One thing to note, Docker virtualizes your OS kernel, hence if you are using a Linux distribution like Ubuntu you can’t create a Windows-based environment(container) on top of Ubuntu but you can create environments(container) of other Linux distributions like Debian, Fedora, etc.
值得注意的是,Docker虚拟化了您的OS内核,因此,如果您使用的是Ubuntu之类的Linux发行版,则无法在Ubuntu之上创建基于Windows的环境(容器),但是您可以创建其他Linux发行版的环境(容器)例如Debian,Fedora等。
So now we are saving upon memory and processing power.
因此,现在我们节省了内存和处理能力。
We are also spinning up these microservices which usually used to take a lot of time in the era of the virtual machines in significantly less amount of time. It hardly takes 20 secs to spin up a simple node-based application which is blazingly fast.
我们还正在分拆这些微服务,这些微服务通常在虚拟机时代花费大量时间,而用的时间却少得多。 快速启动一个基于节点的简单应用程序几乎不需要20秒。
So how do we go about deploying the system?
那么我们如何去部署系统呢?
- We take each Microservice and create a docker file for it which describes how the docker image should be built. 我们采用每个微服务,并为其创建一个docker文件,该文件描述应如何构建docker映像。
- Run these images as containers using the Docker daemon. 使用Docker守护程序将这些映像作为容器运行。
So that’s it, we have our microservices up and running. Clients can now start sending requests and this will work in the same manner as it was working when deployed with VMs.
就是这样,我们已经启动并运行了微服务。 客户端现在可以开始发送请求,并且将以与VM部署时相同的方式工作。
“So what about communication between these microservices?”
“那么这些微服务之间的通信呢?”
Well, that stays exactly the same as before with just a little bit of configuration with Docker.
好吧,与Docker进行一些配置后,它与以前完全一样。
“Finally, we saved a huge amount of development time and resource usage using Docker”
“最后,我们使用Docker节省了大量的开发时间和资源使用情况”
So what next? Do we have any other problems with this Docker and microservices approach?
那接下来呢? 这种Docker和微服务方法还存在其他问题吗?
Yes, there are.
是的,有。
- As we introduced a lot of microservices, we are introducing new complexities of communication between these microservices. 随着我们引入大量微服务,我们也引入了这些微服务之间通信的新复杂性。
We have to go completely stateless with these microservices i.e we can’t store state in these microservices (it's also a pro because we can now strictly follow ReST which says communication should be stateless).
我们必须使这些微服务完全无状态,即我们不能在这些微服务中存储状态( 这也是一个优点,因为我们现在可以严格遵循ReST,即通信应该是无状态的 )。
- Orchestration of these containers involves scaling up and down the number of docker containers, load balancing between them, for eg. if a container goes down bring it up, etc. This is where we have services like Kubernetes, Docker swarm to solve this problem and if you would like to go one step further to club orchestration with CI/CD you can use Openshift. 这些容器的编排涉及扩大和减少docker容器的数量,例如在它们之间进行负载平衡。 如果容器发生故障,请提起它,等等。这是我们提供的服务,例如Kubernetes,Docker群来解决此问题,如果您想进一步完善CI / CD的俱乐部编排,则可以使用Openshift。
- And the last con due to microservices is the asynchronous communication between microservices because your microservice that’s serving user requests needs to be highly available, so it can’t hold on to a request and wait for its completion. We would have to implement messaging queues for this asynchronous communication and to do this there are services like RabbitMQ which one can use. 由于微服务的最后一个缺点是微服务之间的异步通信,因为为用户请求提供服务的微服务需要高度可用,因此它无法保留请求并等待其完成。 我们将必须为此异步通信实现消息传递队列,并且要做到这一点,就可以使用RabbitMQ之类的服务。
In our above example of the social networking site, the Notification service is the best example for which we should implement a message queue because if someone sends a follow request we can’t hold on until the notification service sends the notification. What we do is, put this sendNotification() message in the message queue, and without waiting for its completion we send a confirmation to the user.
在上面的社交网站示例中,通知服务是我们应该实现消息队列的最佳示例,因为如果有人发送关注请求,我们将无法保留,直到通知服务发送通知为止。 我们要做的是,将这个sendNotification() 消息队列中的消息,而无需等待其完成,我们会向用户发送确认。
Then a question would be, "how can we be sure that the notification will be sent to the user?"
然后会有一个问题,“我们如何确定通知会发送给用户?”
- Well, that’s handled by the message queue implementation. They generally come with a persistence feature so messages that you put in the message queue will not be lost and the notification will surely be sent. 嗯,这是由消息队列实现处理的。 它们通常具有持久性功能,因此您放入消息队列中的消息不会丢失,并且肯定会发送通知。
So, these are the different stages we go through as our system becomes mature. However moving to Microservice is not always the best option, choose it only if you really have a good reason, or else you will be headbanging against your computer with all this complexity and you would not be able to focus on the actual business logic.
因此,随着系统的成熟,这是我们经历的不同阶段。 但是,迁移到Microservice并不总是最好的选择,只有在确实有充分理由的情况下才选择它,否则,您将因为所有这些复杂性而与计算机发生冲突,而您将无法专注于实际的业务逻辑。
So, I hope you learned a bit about how scalability and microservices have paved the way to use Docker.
因此,我希望您了解了有关可伸缩性和微服务如何为使用Docker铺平道路的一些知识。
Stay tuned for more!
敬请期待更多!
翻译自: https://medium.com/dev-crumbs/scalability-and-microservices-a-road-to-docker-2d547f89755
docker php 扩展


 3660
3660

 被折叠的 条评论
为什么被折叠?
被折叠的 条评论
为什么被折叠?
 到【灌水乐园】发言


