


jetpack组件
Navigation has always been a key component in every app, however, it has presented many challenges for Android developers to ponder over. Common among these challenges is fragment transactions, up/back navigation, passing arguments between scenes safely and securely, managing the back stack of an app and many more. That is why in 2018 Google announced the Navigation Architecture Component library. The navigation component forms part of a collection of libraries, tools, and guides known as Android Jetpack which is aimed at making android app development easy and quick.
导航一直是每个应用程序中的关键组件,但是,它给Android开发人员带来了许多挑战。 这些挑战中常见的是片段事务,向上/向后导航,在场景之间安全可靠地传递参数,管理应用程序的后向堆栈等等。 这就是为什么Google在2018年发布了Navigation Architecture Component库。 导航组件是称为Android Jetpack的库,工具和指南的集合的一部分,旨在使Android应用程序的开发变得轻松快捷。
In this article, I will be presenting my experience using the Navigation Component as part of my learnings. Let’s start by getting an overview of exactly what the library does:
在本文中,我将作为学习的一部分介绍我使用导航组件的经验。 让我们首先概述一下库的功能:
- It handles Fragment transaction 它处理片段交易
- Simplifies handling Up/Back navigation 简化上/后导航的处理
- Handles deep linking to different parts of the app 处理与应用程序不同部分的深层链接
- Allows us to pass arguments in a safe and secure way 允许我们以安全可靠的方式传递参数
- Handles back stack management in the app 在应用程序中处理后退堆栈管理
- It simplifies testing navigation in the app 它简化了应用程序中的测试导航
- Most of all it does all of this in a consistent way, which helps developers to follow Android’s principles of navigation. 最重要的是,它以一致的方式完成所有这一切,这有助于开发人员遵循Android的导航原理。
This leads us to:
这导致我们:
导航原理 (The Principles of Navigation)
According to androids documentation on the principles of navigation, The Navigation component is designed to implement these principles by default, ensuring that users can apply the same heuristics and patterns in navigation as they move between apps. Let us take a look at each of these principles:
根据有关导航原理的android文档, 导航组件默认情况下设计为实现这些原理,以确保用户在应用之间移动时可以在导航中应用相同的启发式和模式。 让我们看一下这些原则:
1.固定的开始目的地 (1. Fixed start destination)
Every app has a fixed start destination. This is usually the first screen the user sees when they launch your app from the launcher. It is also the last screen they see when they click the back button before exiting your app. It is worth noting that apps that require login can have an exception to this rule since a user will usually not log in every time they are going to use your app.
每个应用都有固定的启动目标。 这通常是用户从启动器启动应用程序时看到的第一个屏幕。 这也是他们退出应用程序之前单击“后退”按钮时看到的最后一个屏幕。 值得注意的是,需要登录的应用程序可以对此规则有例外,因为用户通常不会在每次使用您的应用程序时登录。
2.导航状态显示为一堆目的地 (2. Navigation state is presented as a stack of destinations)
The navigation state of your app should be represented with a last in first out structure(LIFO). A typical navigation stack has the start destination at the bottom of the stack and the current destination at the top of the stack. Operations that change the navigation of the app should always operate at the top of the stack either by pushing a new destination to the top or popping the topmost destination from the stack.
应用的导航状态应使用后进先出(LIFO)表示。 典型的导航堆栈在堆栈底部具有起始目的地,而在堆栈顶部具有当前目的地。 更改应用程序导航的操作应始终在堆栈顶部进行操作,方法是将新的目标推入顶部或从堆栈中弹出最高的目标。
3.在您的应用程序任务中,“上”和“后”是相同的 (3. Up and Back are identical within your apps tasks)
The Up button in the ActionBar and the system Back button both work in the same way when navigating the history of screens a user has recently visited within your app. While the two buttons perform similar actions, it is important to note that only the Back button is used to navigate out of the app. The Up button, does not appear in the start destination of the app because it never exits the app (note that this is an effort to ensure consistency across android apps).
浏览用户最近在您的应用中访问过的屏幕的历史记录时,ActionBar中的“向上”按钮和系统的“后退”按钮都以相同的方式工作。 尽管这两个按钮执行类似的操作,但必须注意,只有“后退”按钮用于导航到应用程序之外。 “向上”按钮不会出现在应用程序的启动目标中,因为它永远不会退出应用程序(请注意,这是为了确保android应用程序之间的一致性)。
如何导航 (How to Navigate)
Now that we have covered the principles of navigation, let’s see how we will implement this in a project that has one activity and fragments.
既然我们已经介绍了导航原理,让我们看看如何在一个有一个活动和多个片段的项目中实现这一点。
1.将导航组件添加到项目 (1. Adding the Navigation Component to the project)
First, we need to add the navigation component to our project in the app’s build.gradle file.
首先,我们需要将导航组件添加到应用程序的build.gradle文件中的项目中。
dependencies {
    implementation "android.arch.navigation:navigation-fragment-       ktx:$version_navigation"
    implementation "android.arch.navigation:navigation-ui-   ktx:$version_navigation"
}
2.将导航图添加到项目 (2. Adding the Navigation Graph to the project)
The navigation graph is a resource file that contains all your app’s destinations, and actions that a user can take to navigate from one destination to another. To add it:
导航图是一个资源文件,其中包含您应用程序的所有目标,以及用户可以从一个目标导航到另一个目标的操作。 要添加它:
right-click on the res directory in your project window and select New > Android resource file. The New Resource dialog appears. Select Navigation as the resource type and name the file navigation. This creates a navigation.xml file which serves as your navigation graph.
右键单击项目窗口中的res目录,然后选择“新建”>“ Android资源文件”。 出现“新资源”对话框。 选择Navigation作为资源类型,然后将文件命名为Navigation 。 这将创建一个navigation.xml文件作为您的导航图。

3.将Navigation Host片段放入“活动布局”中。 (3. Put Navigation Host fragment in your Activity Layout.)
Now go to your activity layout (eg. activity_main.xml) and include your container fragment. Give it an ID navHostFragment, set the name attribute the name of the fragment and the app:navGraph attribute to @navigation/navigation and then set defaultNavHost = true, this allows the navHost to intercept the system back key.
现在转到您的活动布局(例如activity_main.xml),并包含您的容器片段。 给它一个ID navHostFragment,将片段的名称属性name和app:navGraph属性设置为@ navigation / navigation,然后将defaultNavHost = true设置,这将使navHost可以截获系统后退键。
<fragment
   android:id="@+id/navHostFragment"
   android:name="androidx.navigation.fragment.NavHostFragment"
   android:layout_width="match_parent"
   android:layout_height="match_parent"
   app:navGraph="@navigation/navigation"
   app:defaultNavHost="true"/>
4.将片段添加到导航图 (4. Adding Fragments to the Navigation Graph)
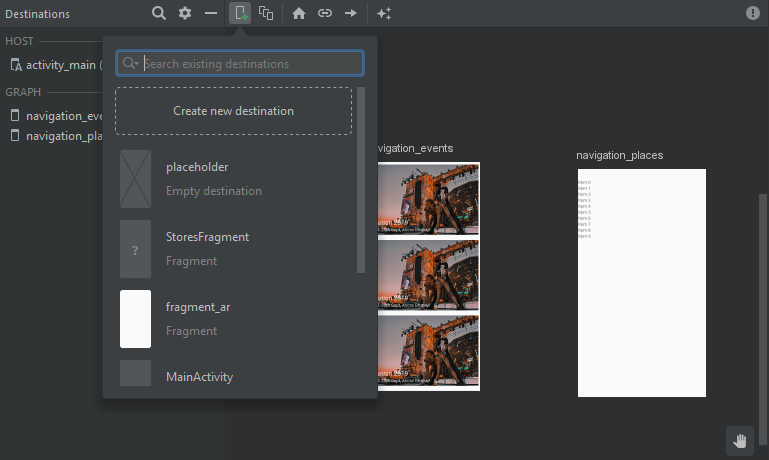
Now that your host fragment is set up, it is time to add fragments to it. This is has been made very simple by using the navigation editor. To do this, open the design view of your navigation editor, click on the little plus like button in the left corner, and from the list that appears, choose the destination you want to add to the navigation graph.
现在,您的主机片段已设置完毕,是时候向其中添加片段了。 使用导航编辑器可以使此操作非常简单。 为此,请打开导航编辑器的设计视图,单击左上角的小加号按钮,然后从出现的列表中选择要添加到导航图的目标。
5.用动作连接两个片段 (5. Connecting Two Fragments with an Action)
To connect FragmentA and FragmentB, hover over FragmentA. You’ll see a circular connection point on the right side of the fragment view. Click on the connection point and drag it to FragmentB to add an Action that connects the two fragments.
要连接FragmentA和FragmentB,请将鼠标悬停在FragmentA上。 您会在片段视图的右侧看到一个圆形的连接点。 单击连接点并将其拖到FragmentB,以添加连接两个片段的Action。

6.使用按钮从FragmentA导航到FragmentB (6. Navigating from FragmentA to FragmentB using a Button)
Now to navigate between these two fragments using a button, set an onClick listener on the button and then using the Navigation’s onClick listener to implement it as follows.
现在,要使用按钮在这两个片段之间导航,请在按钮上设置一个onClick侦听器,然后使用导航的onClick侦听器来实现它,如下所示。
binding.button.setOnClickListener(
Navigation.createNavigateOnClickListener(R.id.action_FragmentA_to_FragmentB))
And with this, you should successfully navigate from one fragment to another.
这样,您就可以成功地从一个片段导航到另一个片段。
To further read on this topic, here are the reference materials I used:
为了进一步阅读该主题,以下是我使用的参考资料:
翻译自: https://medium.com/swlh/getting-started-with-the-jetpack-navigation-component-99d1fc2fbc1e
jetpack组件


 818
818

 被折叠的 条评论
为什么被折叠?
被折叠的 条评论
为什么被折叠?
 到【灌水乐园】发言


