


flutter构建桌面应用
I’m a fan of Google Keep, I’ve been using it since it was launched. I put pending tasks, reminders for chores, almost anything needs to remember, into Keep. It’s intuitive to use, helps me stay focused on the priorities.
我是Google Keep的粉丝,自启动以来就一直在使用它。 我将待处理的任务,琐事的提醒以及几乎所有需要记住的内容放入了Keep。 使用起来很直观,可以帮助我专注于优先事项。
Since I’ve been building Flutter apps during the past two years, I think it might be interesting to make a notebook app like Keep from scratch.
由于我在过去两年中一直在开发Flutter应用程序,因此我认为从零开始制作像Keep这样的笔记本应用程序可能会很有趣。
The so-called ‘Flutter Keep’ app I made so far looks like:
到目前为止,我制作的所谓的“ Flutter Keep ”应用看起来像:
I’m going to introduce the process in a series of articles. Key components will be added to the app during iterations, to make it easier to understand.
我将在一系列文章中介绍该过程。 关键组件将在迭代过程中添加到应用程序,以使其更易于理解。
In this first part of the series, we’re going to set up the Flutter project, provide an authentication process, and a simple screen to show the note list.
在本系列的第一部分中,我们将设置Flutter项目,提供身份验证过程以及一个简单的屏幕来显示笔记列表。
Let’s get started.
让我们开始吧。
Before creating the project, you may want to enable web support via the command: flutter config -- enable-web, if you want the app to be able to run on Web besides Android and iOS.
在创建项目之前,您可能希望通过以下命令启用Web支持: flutter config -- enable-web ,如果您希望该应用程序除了可以在Android和iOS上运行,还可以在Web上运行。
Now, execute the command: flutter create flt_keep to create the Flutter Keep app, flt_keep is the package name that will be used in the import statements.
现在,执行以下命令: flutter create flt_keep创建Flutter Keep应用程序, flt_keep是将在import语句中使用的包名称。
For those who are new to Flutter, please follow the Get started guide to install the SDK, and get familiar with the project structure.
对于那些不熟悉Flutter的用户,请按照入门指南安装SDK,并熟悉项目结构。
数据结构 (Data structure)
For a notebook app, the first thing to consider is how the notes should be persisted and queried.
对于笔记本应用程序,首先要考虑的是如何保留和查询笔记。
What I concern includes:
我所关注的包括:
- First, the privacy. Notes of different accounts should be separated from each other. 首先,隐私。 不同账户的票据应相互分开。
- Second, the app ought to work offline. Users should be able to take notes under any network condition. It is the app’s responsibility to sync the data when network connectivity recovers. 其次,该应用程序应该可以离线工作。 用户应该能够在任何网络条件下做笔记。 网络连接恢复后,应用程序有责任同步数据。
My choice is Cloud Firestore, mainly because of the experience I gained from previous projects, but also because it is straightforward to adopt.
我之所以选择Cloud Firestore ,主要是因为我从以前的项目中获得了经验,但也因为它很容易采用。
I decided to use a dedicated collection to store each user’s notes, one document for a single note. For the reasons:
我决定使用一个专用集合来存储每个用户的注释,一个文档用于存储单个注释。 出于以下原因:
- Better segregation of each account’s data 更好地隔离每个帐户的数据
- Easy to query 易于查询
Avoids some limitations in reading & writing data
避免读写数据上的一些限制
This approach also comes with a cost, but it is acceptable for a demonstration purpose. That is, I have to create indexes for each collection dynamically, I’ll discuss the issue in a later article.
这种方法也有成本,但是出于演示目的是可以接受的。 也就是说,我必须为每个集合动态创建索引,我将在以后的文章中讨论该问题。
For now, the data structure is like:
现在,数据结构如下:

应用架构 (App architecture)
Now it’s time to consider how to organize the app logic. It won’t worth it to apply a ‘real’ architecture to an app mostly for demonstration. But there’s still a need to manage states across multiple screens in the app.
现在是时候考虑如何组织应用程序逻辑了。 将“真实”架构应用于主要用于演示的应用程序是不值得的。 但是仍然需要在应用程序的多个屏幕上管理状态。
In this case, we’re going to use the provider package to manage the app state. It allows us to write code in a reactive (or data-driven) style.
在这种情况下,我们将使用提供程序包来管理应用程序状态。 它使我们能够以React性(或数据驱动)样式编写代码。
The most important screens in the app include:
该应用程序中最重要的屏幕包括:
- The authentication screen, watching the signed-in state, makes sure that only authenticated users can take notes 验证屏幕会监视登录状态,以确保只有经过验证的用户才能记笔记
- The note list screen, displaying the most recent state of the notes, should react to changes to any note 显示便笺最新状态的便笺列表屏幕应对任何便笺的更改做出React
- The note editor should also be reactive to outside modifications of the particular note being edited 注释编辑器还应对正在编辑的特定注释的外部修改起React
Via providers, we can fulfill the above requirements easier, with a cleaner codebase.
通过提供者,我们可以使用更干净的代码库更轻松地满足上述要求。
With the scheme in mind, let’s begin writing the code.
考虑到该方案,让我们开始编写代码。
To use provider and the Firebase SDKs, we have to add the dependencies to the pubspec.yaml file:
要使用provider和Firebase SDK,我们必须将依赖项添加到pubspec.yaml文件中:
provider: ^4.0.2
firebase_core: ^0.4.4
firebase_auth: ^0.15.4
cloud_firestore: ^0.13.3
google_sign_in: ^4.1.4
Please follow the detailed instructions to integrate Firebase SDKs for both Android and iOS, also the Web platform.
进入应用 (Entry of the app)
Remember that we have to reject unauthenticated users, let’s build a gatekeeper widget to the root.
请记住,我们必须拒绝未经身份验证的用户,让我们在根目录下构建网守小部件。
The StreamProvider/Consumer pair here is to watch the onAuthStateChanged, a stream of Firebase authentication events, whenever the signed-in state has changed, the Consumer will get notified and re-build the widget according to the current state.
这里的StreamProvider / Consumer对将观看onAuthStateChanged (Firebase身份验证事件流),每当登录状态发生更改时, Consumer都会收到通知,并根据当前状态重新构建窗口小部件。
A little trick here is to use a CusttentUser to wrap the FirebaseUser, to distinguish the default initial and the unauthenticated state, both of which are null.
这里的一个小技巧是使用CusttentUser包装FirebaseUser ,以区分默认的初始状态和未经身份验证的状态,两者均为null 。
Google登录和Firebase身份验证 (Google Sign-in & Firebase Auth)
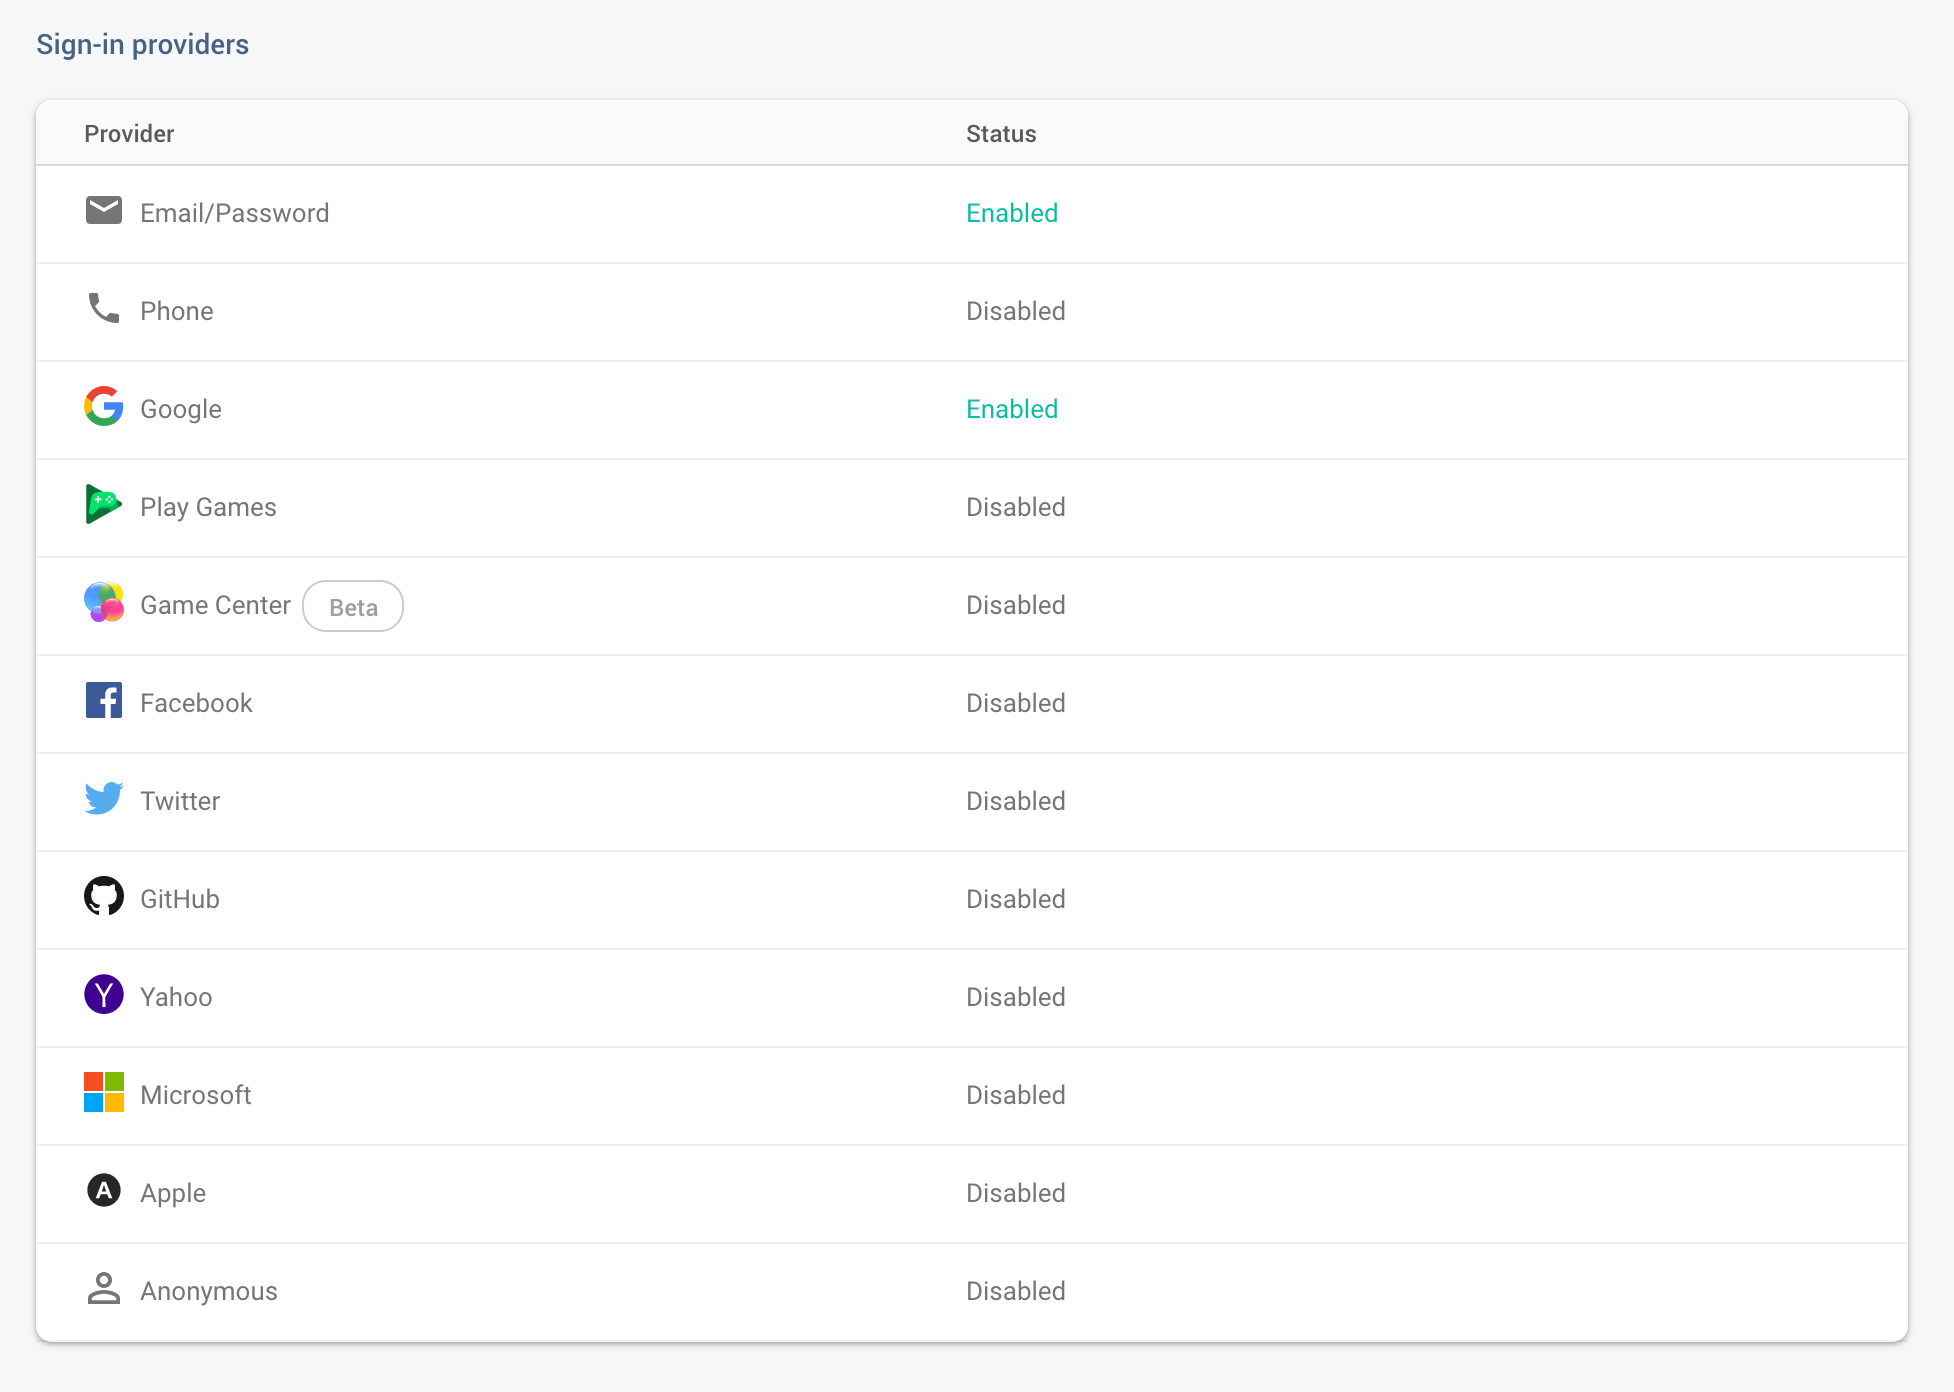
I use Google Sign-in as an example because it’s easy to integrate. In fact, it is just one of the many services supported by Firebase Auth. You can enable what you need in the Firebase console.
我以Google登录为例,因为它易于集成。 实际上,它只是Firebase Auth支持的众多服务之一。 您可以在Firebase控制台中启用所需的功能。
The code snippet to authenticate using Google Sign-In:
使用Google登录进行身份验证的代码段:
Just ask for a Google Sign-In credential, and then use it to authenticate with Firebase.
只需索取Google登录凭据,然后将其用于Firebase进行身份验证即可。
You can see that there’s nothing to do after the authentication finished successfully. In this situation, the FirebaseAuth.onAuthStateChanged stream emits a ‘Signed-in’ event, which triggers a re-build of the root gatekeeper widget so that the HomeScreen is rendered.
您可以看到身份验证成功完成后无需执行任何操作。 在这种情况下, FirebaseAuth.onAuthStateChanged流将发出一个“已登录”事件,该事件将触发根网守小部件的重新构建,以便呈现HomeScreen 。
The above is an example of Reactive Programming: just mutate the state, the listeners who concern about the state will do the remaining jobs.
上面是响应式编程的一个示例:仅改变状态,关注状态的侦听器将完成剩余的工作。
Back to the project, before testing your login screen, please make sure you’re not ignoring the following settings:
返回项目,在测试登录屏幕之前,请确保您没有忽略以下设置:
For the Android platform, you must specify the SHA-1 fingerprint in the Firebase console
对于Android平台,您必须在Firebase控制台中指定SHA-1指纹
For the iOS platform, you have to add a custom URL scheme to the Xcode project
对于iOS平台,您必须向Xcode项目添加自定义URL方案
For the Web platform, add a meta tag like
<meta name="google-signin-client_id" content="{web_client_id}">toweb/index.html, you can find the Web client id in the ‘OAuth 2.0 Client IDs’ section of your project’s credentials page in the Google Cloud console对于Web平台,将
<meta name="google-signin-client_id" content="{web_client_id}">类的元标记添加到web/index.html,您可以在“ OAuth 2.0客户端ID”中找到该Web客户端ID。 Google云端控制台中项目凭据页面的 “”部分
查询笔记 (Querying notes)
With an authenticated user, we can now enter the main screen of the app, the note list.
现在,通过身份验证的用户,我们可以进入应用程序的主屏幕,即注释列表。
But how can you add the first note without a note editor? You can do this with the Firebase Console:
但是,如何在没有音符编辑器的情况下添加第一个音符呢? 您可以使用Firebase控制台执行此操作:

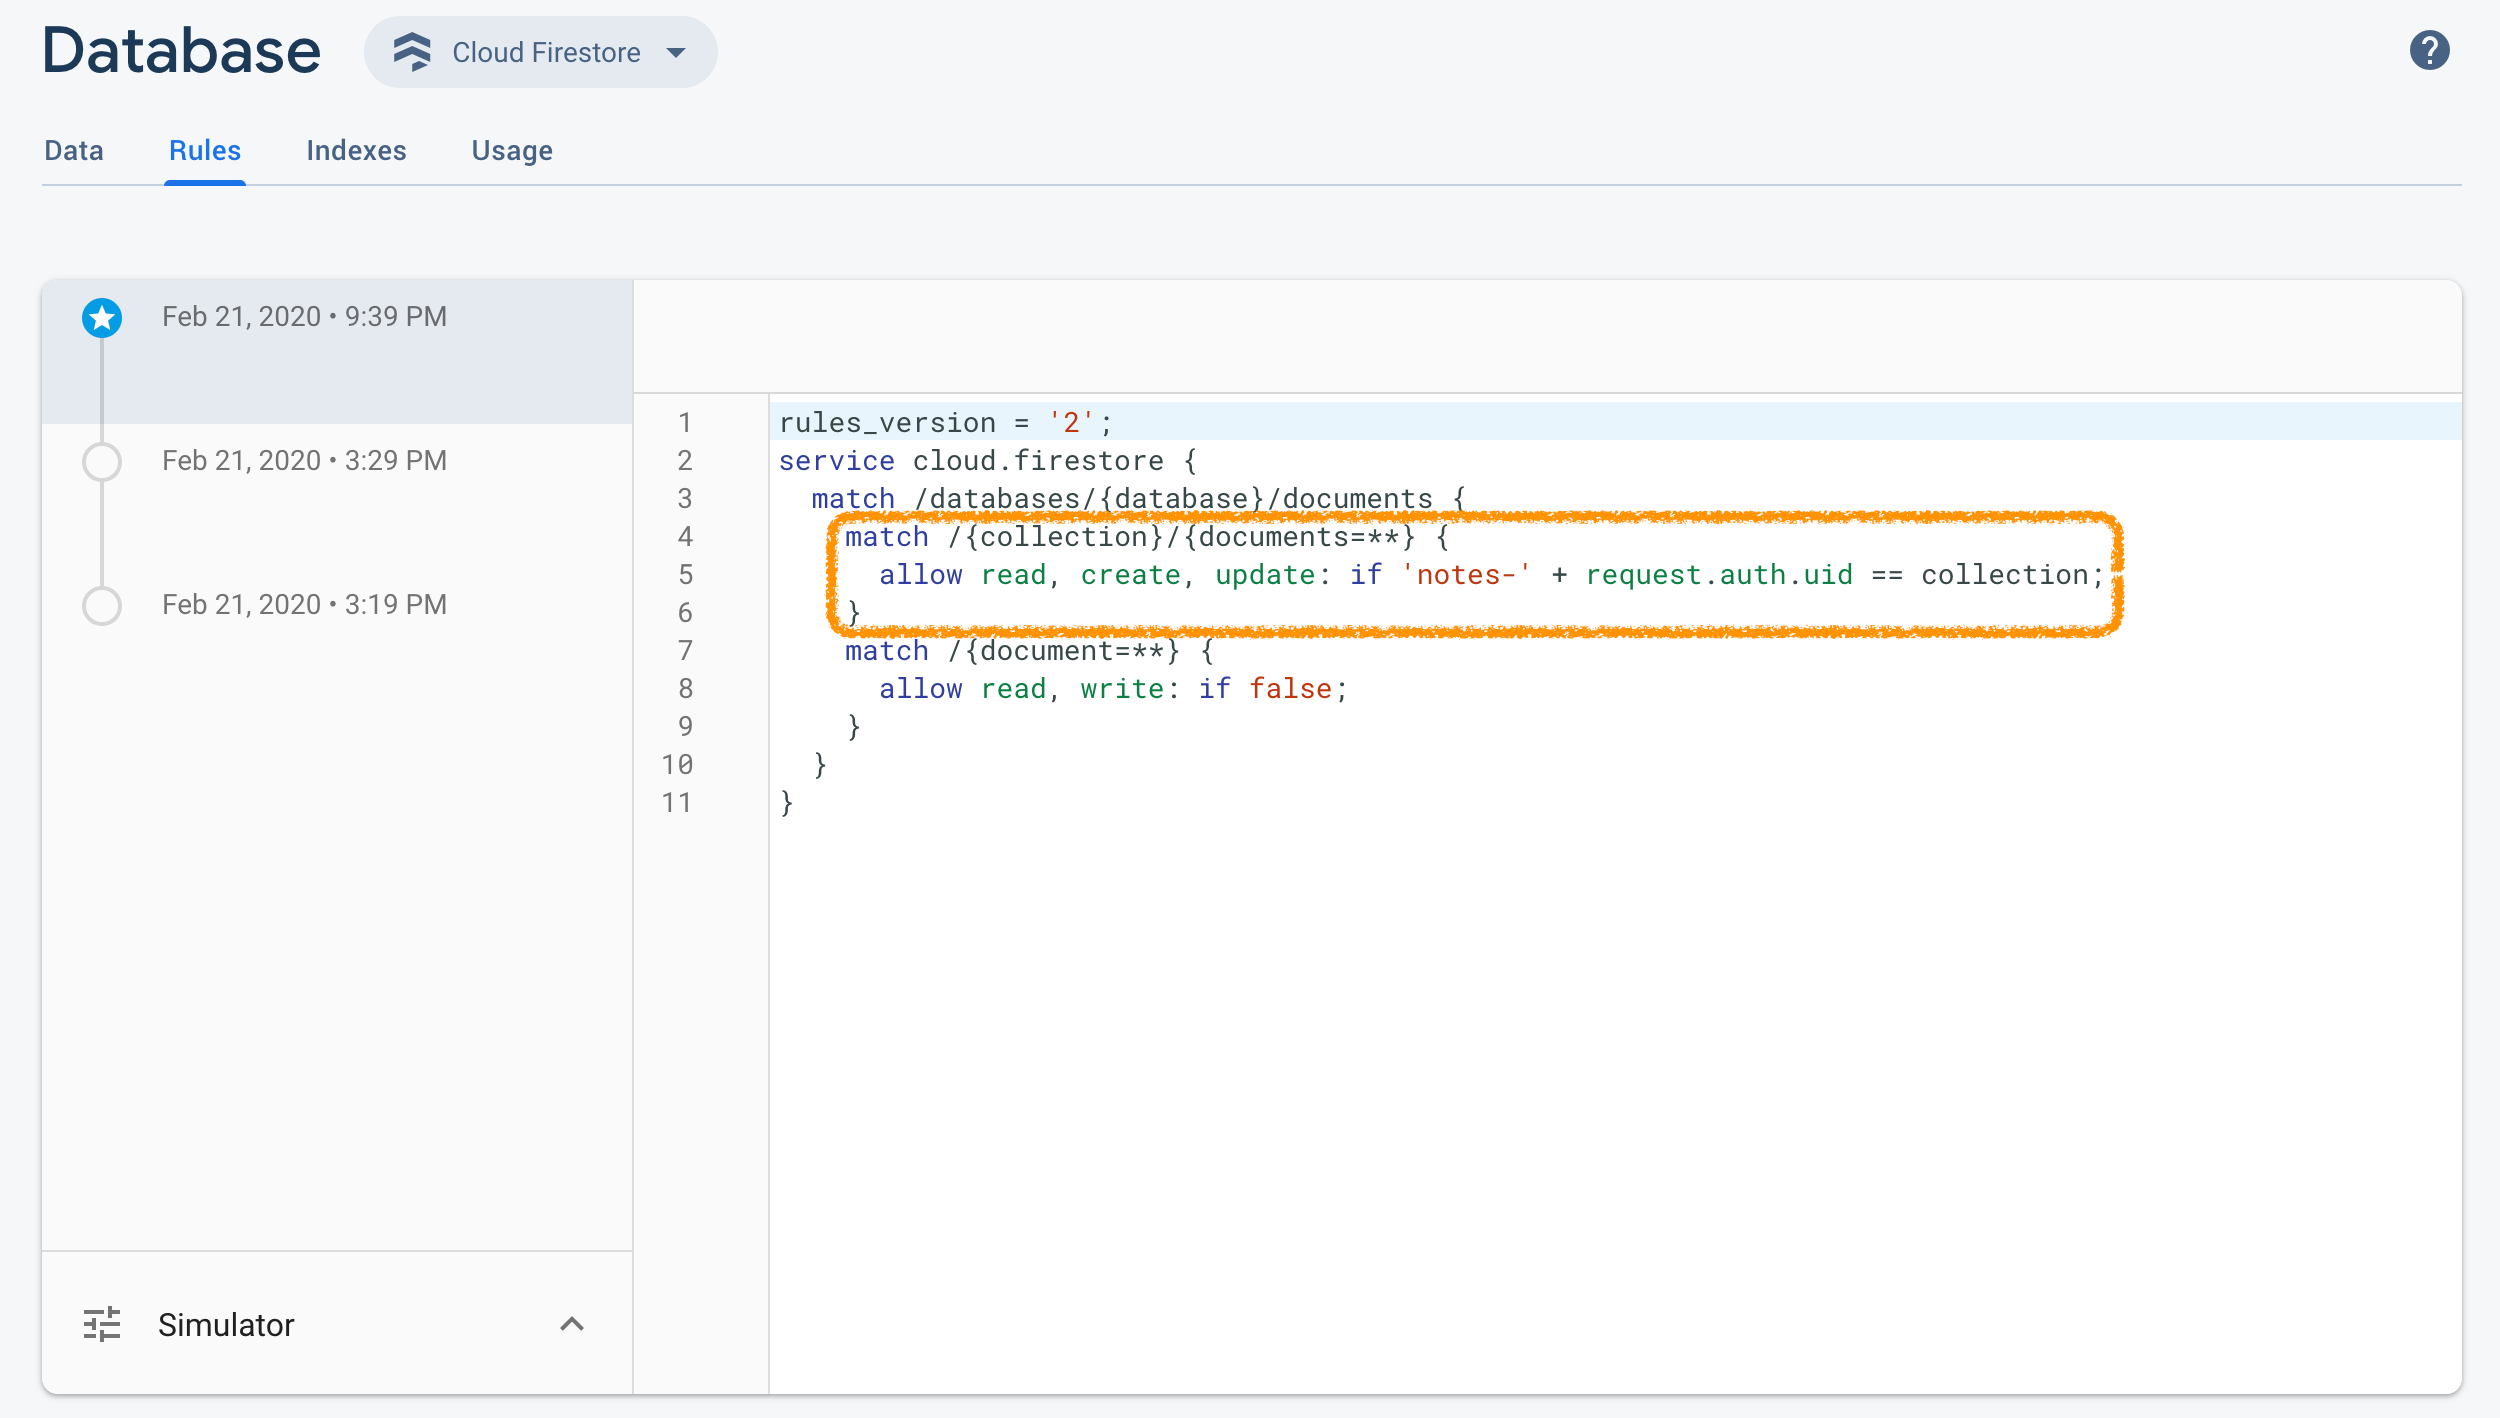
Please name the collection as notes-{user_id}, and you can find your user id in the Authentication page of the Firebase Console.
请将集合命名为notes-{user_id} ,您可以在Firebase控制台的“ 身份验证”页面中找到您的用户ID。
To reinforce privacy security, you may also want to set access rules against the dataset, making sure that users can only see & edit their own notes.
为了加强隐私安全性,您可能还需要针对数据集设置访问规则,以确保用户只能查看和编辑自己的注释。
Before we can retrieve notes from Firestore, we need a model that represents an individual note, and functions to transform between the Firestore model and our own.
在我们从Firestore检索笔记之前,我们需要一个代表单个笔记的模型,并具有在Firestore模型和我们自己的模型之间进行转换的功能。
Again we’re going to use a StreamProvider in the HomeScreen, which watches the notes query result, so that any changes happen to the backend reflect here instantly. The Firestore SDK also delivers the offline capabilities we need, we don’t have to change the code used to access the data.And thanks for the gatekeeper widget we built previously, which enables us to retrieve the authentication info any time via Provider.of<CurrentUser>.
再次,我们将在HomeScreen使用StreamProvider ,它HomeScreen注释查询结果,以便后端发生的任何更改都将立即反映在此处。 Firestore SDK还提供了我们所需的脱机功能,我们无需更改用于访问数据的代码。感谢之前构建的网守小部件,它使我们能够随时通过Provider.of<CurrentUser>检索身份验证信息。 Provider.of<CurrentUser> 。
The code is a little bit verbose, for I provide here a floating AppBar looks like the one in Google Keep.
代码有点冗长,因为我在这里提供了一个浮动的AppBar看起来像Google Keep中的那个。
For NotesGrid and NotesList, they are much similar: just kind of a wrapper of a SliverGrid and a SliverList respectively.
对于NotesGrid和NotesList ,他们更相似:只是样的一个包装的SliverGrid和SliverList分别。
I’m not posting all the detailed code here. Please find the full example in my GitHub repo.
我没有在这里发布所有详细的代码。 请在我的GitHub存储库中找到完整的示例。
If everything goes fine, you should now be able to see the first note in your self-made Flutter Keep app!
如果一切顺利,您现在应该可以在自制的Flutter Keep应用中看到第一个音符!

We’re doing well so far. We’ve built a simple reactive-styled app by using the provider package, and also learned how to use the Firebase toolkits.
到目前为止,我们做得很好。 我们使用provider包构建了一个简单的React式应用程序,还学习了如何使用Firebase工具箱。
However, the app is less than useful without a note editor. We’ll add more functionalities to it in the next parts of the series.
但是,如果没有注释编辑器,该应用程序就没什么用了。 在本系列的下一部分中 ,我们将为其添加更多功能。
Thank you for reading! 🙌
感谢您的阅读! 🙌
flutter构建桌面应用


 925
925

 被折叠的 条评论
为什么被折叠?
被折叠的 条评论
为什么被折叠?
 到【灌水乐园】发言


