


跨平台开发 方法
Run one codebase but provide a multi-platform look!
运行一个代码库,但提供多平台外观!
Possibly, like myself, when you began learning Flutter, you yourself went through the lab exercise called, Write your first Flutter app. You may even remember, at the end when you completed both Part 1 and 2 of this exercise, you’re then greeted with this message:
可能像我一样,当您开始学习Flutter时,您自己经历了名为“ 编写第一个Flutter应用程序”的实验室练习。 您甚至可能还记得,当您完成本练习的第1部分和第2部分时,就会收到以下消息:
I remember being somewhat disappointed with that message. Yes, indeed it runs on both an iOS phone and an Android phone, but on both phones, the app has only one ‘look and feel.’ Both used the Material design theme. If running on an iPhone, wouldn’t you have preferred the iOS-style Cupertino design theme instead? Of course, you’ve got to implement all that yourself and run the appropriate theme depending on the phone your running on.
我记得对该消息有些失望。 是的,它确实可以在iOS手机和Android手机上运行,但是在这两款手机上,该应用程序都只有一种“外观”。 两者都使用了Material design主题。 如果在iPhone上运行,您会不会更喜欢iOS风格的Cupertino设计主题? 当然,您必须自己实现所有功能,并根据运行的手机运行适当的主题。
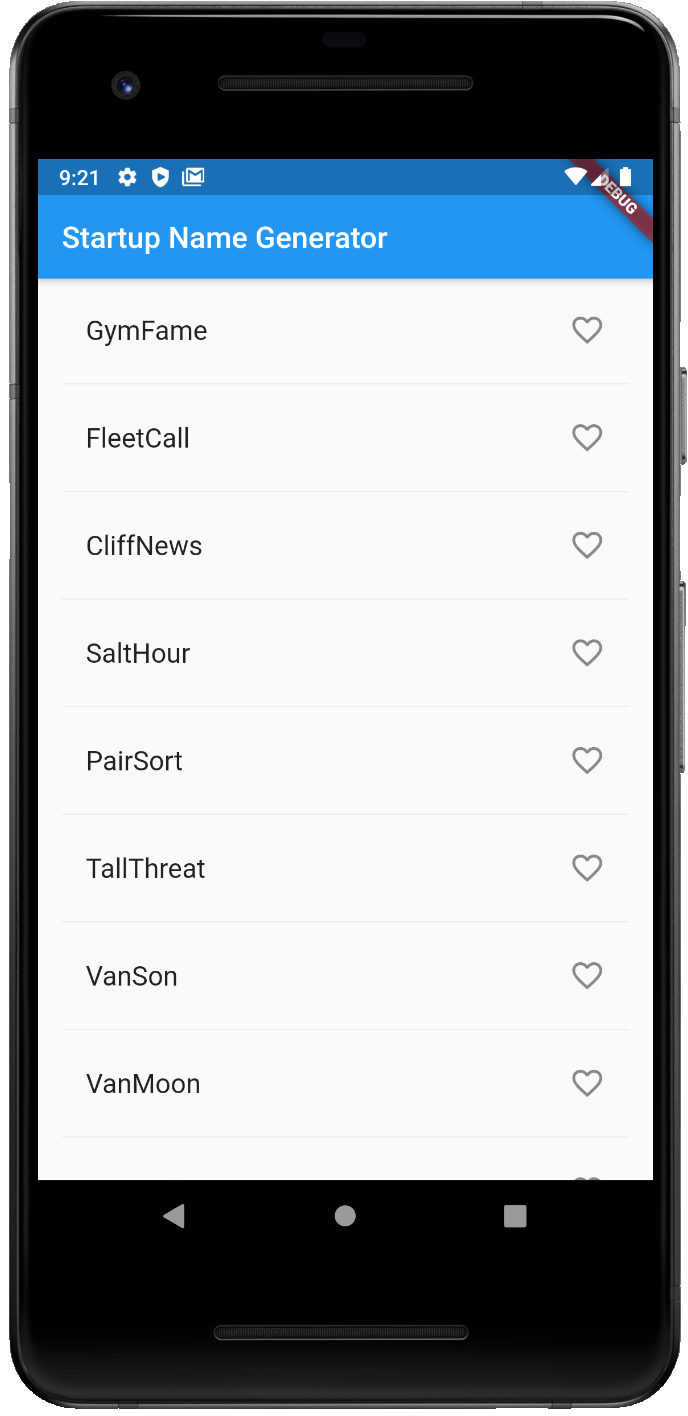
Below are two screenshots. On the left, is the ‘Material theme’, and on the right, is the ‘Cupertino theme.’ On the left, is the chosen theme for Android phones. On the right, the theme more familiar to iPhones. Both are in the same codebase. In this article, I’ll show you how I can pick which theme to use no matter what type of phone. Wanna know how? Read on.
以下是两个屏幕截图。 左边是“材料主题”,右边是“ Cupertino主题”。 左侧是为Android手机选择的主题。 右侧是iPhone更加熟悉的主题。 两者都在同一代码库中。 在本文中,我将向您展示无论如何使用哪种类型的手机,如何选择要使用的主题。 想知道吗? 继续阅读。

As in most of my articles, I use well-founded examples to demonstrate the topic at hand. In this article, as you may have already guessed, I’m going to use the very same “Write Your First App” example. However, this example will be modified to either convey the appropriate ‘look and feel’ depending on the platform it’s running on, or you can specify which look you would prefer when running it. You can get a copy for this from the following gist, write_your_first_app.dart.
就像在我的大多数文章中一样,我使用有充分根据的示例来说明当前的主题。 正如您可能已经猜到的那样,在本文中,我将使用相同的“编写您的第一个应用程序” 示例 。 但是,将修改此示例以根据其运行的平台传达适当的“外观”,或者您可以指定在运行时希望使用的外观。 您可以从以下要点write_your_first_app.dart获取此副本。
我喜欢截图。 单击要点。 (I Like Screenshots. Click For Gists.)
As always, I prefer using screenshots over gists to show concepts rather than just show code in my articles. I find them easier to work with frankly. However, you can click or tap on these screenshots to see the code they represent in a gist or in Github. Ironically, it’s better to read this article about mobile development on your computer than on your phone. Besides, we program on our computers — not on our phones. For now.
与往常一样,我更喜欢使用屏幕截图而不是要点来显示概念,而不是仅在文章中显示代码。 坦率地说,我发现它们更易于使用。 但是,您可以单击或点击这些屏幕截图,以查看它们在要点或Github中表示的代码。 具有讽刺意味的是,最好在计算机上阅读这篇文章,而不是在手机上阅读有关移动开发的文章。 此外,我们在计算机上编程,而不是在手机上编程。 目前。
Let’s begin.
让我们开始。

主题设计 (The Theme’s Design)
First, a quick blurb about the two design themes we’ll be working with, today. The Material theme was designed by Google to emulate the physicality of paper. However, as described by its designer, Matías Duarte, “unlike real paper, our digital material can expand and reform intelligently. Material has physical surfaces and edges. Seams and shadows provide meaning about what you can touch.” It was introduced in 2014, intended initially for the Android platform, but would later migrate to iOS and even the Web. As for the Cupertino design theme, it’s named after the city of Cupertino in California’s Silicon Valley. The company, Apple, is headquartered there, and is, of course, responsible for the distinct ‘look and feel’ that is the Cupertino design theme.
首先,快速介绍一下我们今天将要使用的两个设计主题。 材质主题是Google设计的,用于模拟纸张的物理外观。 但是,正如其设计师MatíasDuarte所描述的那样,“与真正的纸张不同,我们的数字资料可以智能地扩展和改革。 材料具有物理表面和边缘。 接缝和阴影为您可以触摸的内容提供了含义。” 它于2014年推出,最初打算用于Android平台,但后来迁移到iOS甚至是Web。 至于库比蒂诺设计主题,它以加利福尼亚州硅谷的库比蒂诺市命名。 苹果公司(Apple)的总部设在那儿,并且当然负责作为库比蒂诺设计主题的独特“外观”。
主题班 (A Theme Class)
Each design theme has a dedicated library file to access their specific widgets: material.dart and cupertino.dart.Further, each has a class that serves as the foundation of their individual ‘look and fee.’ Like the CuperitnoApp class and its iOS-style design, Flutter’s MaterialApp class documentation describes, the MaterialApp as, “a convenience widget that wraps a number of widgets that are commonly required for material design applications.”
每个设计主题都有一个专用的库文件来访问其特定的小部件: material.dart和cupertino.dart. 此外,每个人都有一个类,作为其个人“外观和费用”的基础。 像CuperitnoApp类及其iOS风格的设计一样,Flutter的MaterialApp类文档将MaterialApp描述为:“一种便捷小部件,其中包装了材料设计应用程序通常需要的许多小部件。”
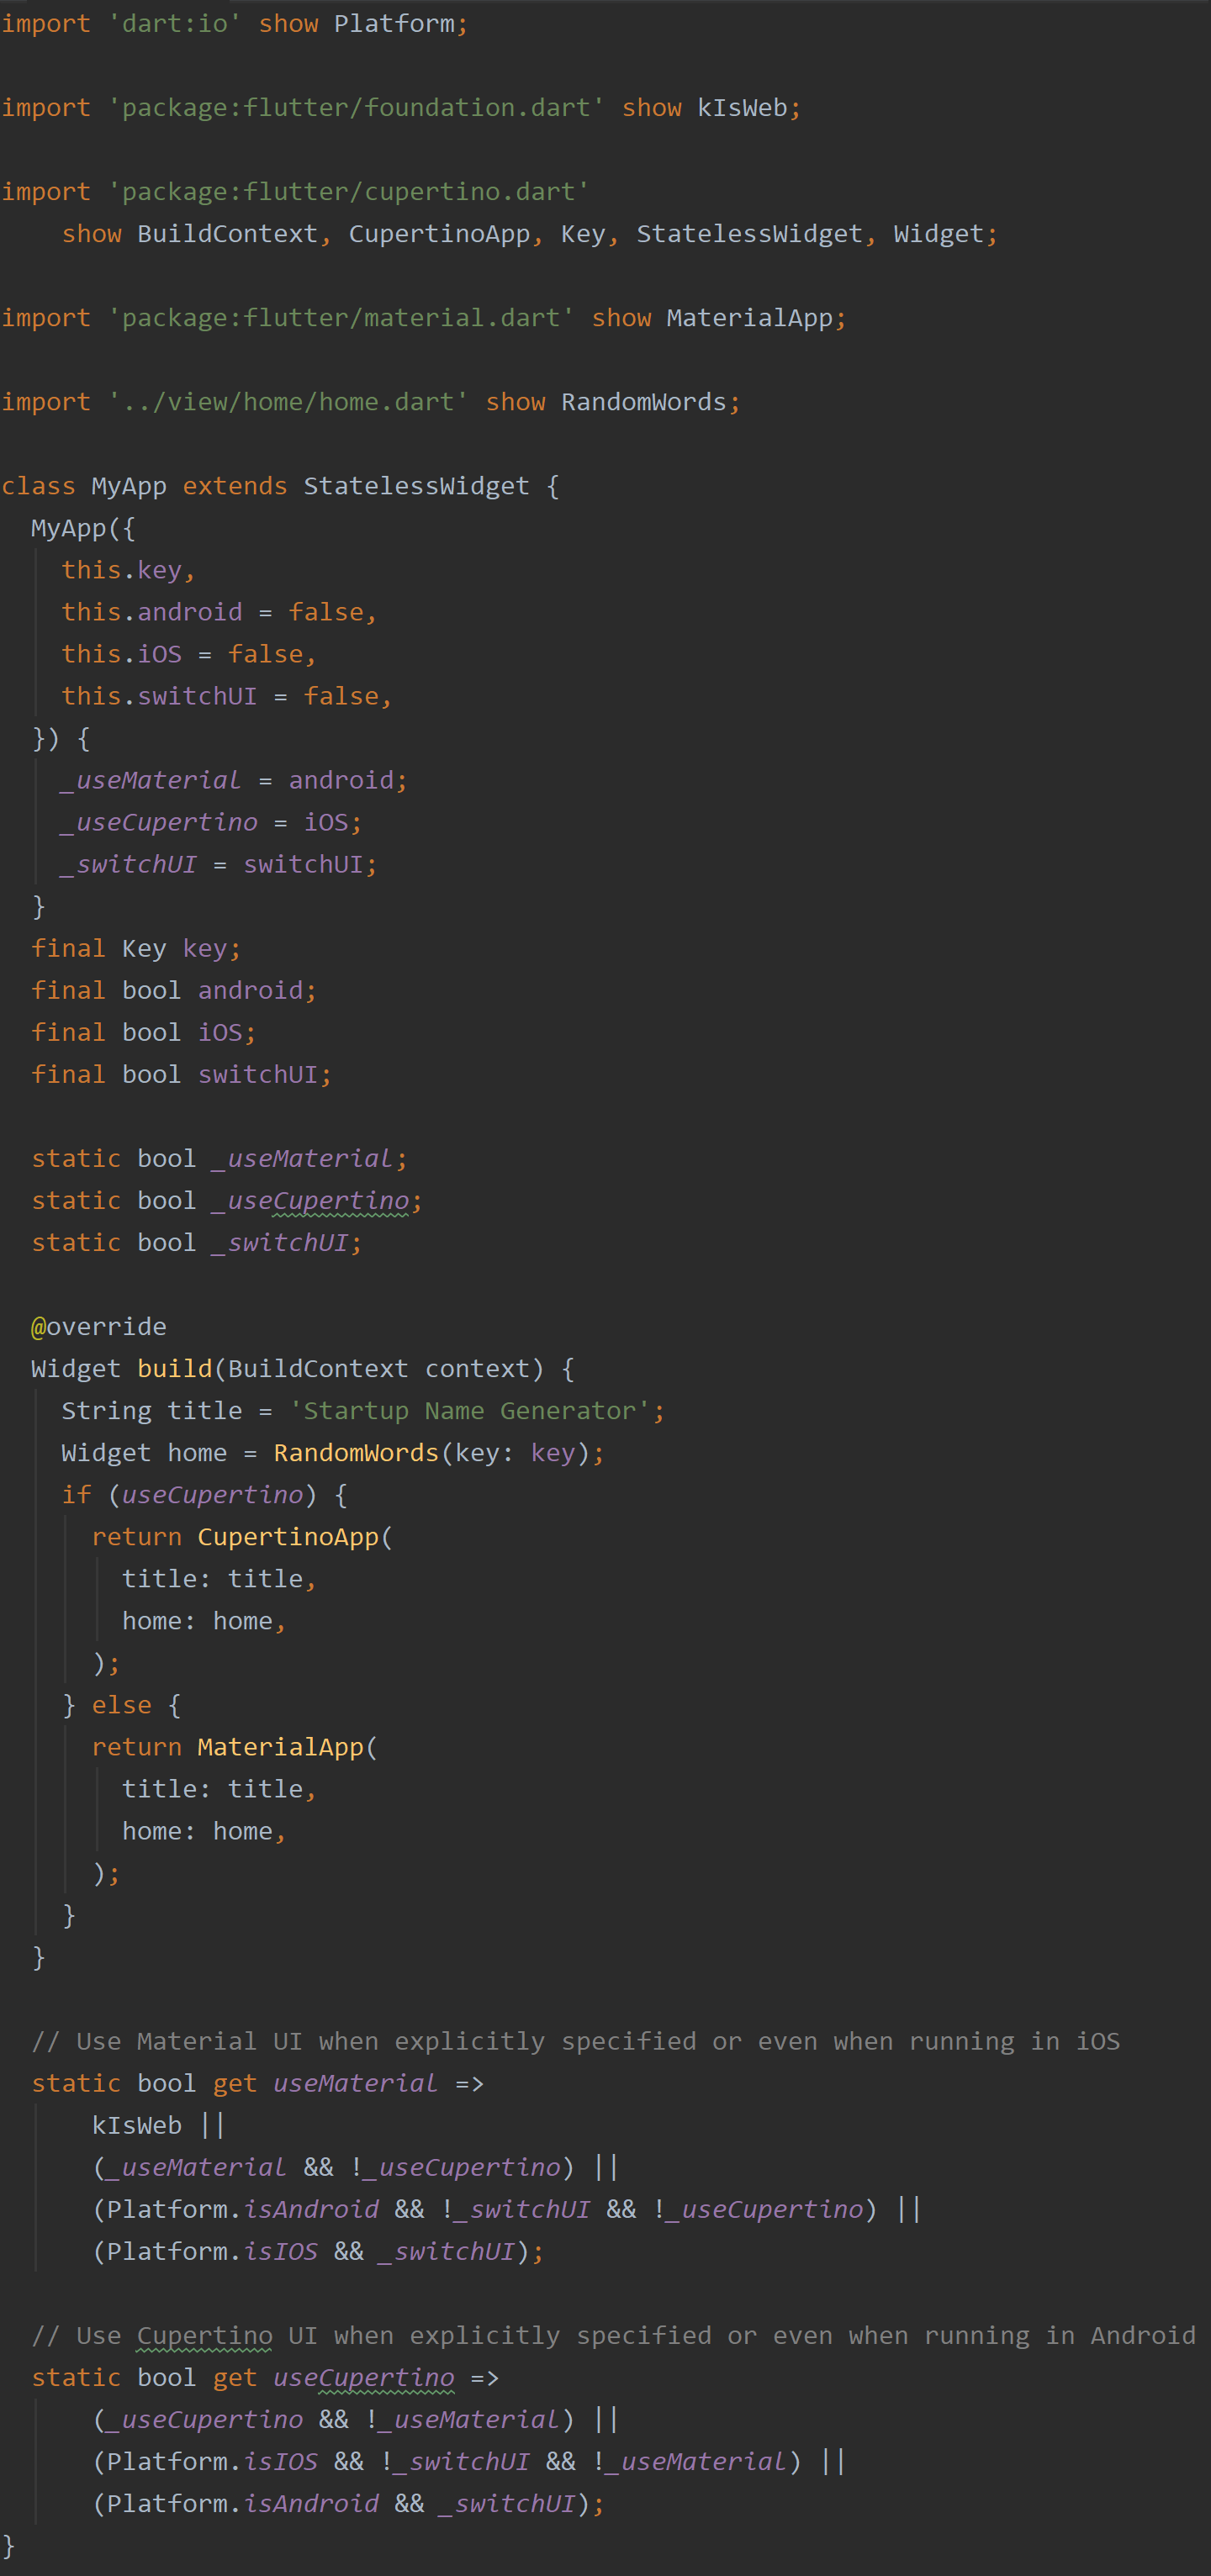
Of course, Flutter allows you to determine which platform your app is running on, and so base on that, you can easily apply a specific widget. For example, depending on the platform the ‘Write Your First App’ example is running on, either the MaterialApp widget or the CupertinoApp widget could be used. You can see this in the screenshot below. Again, as a rule, the MaterialApp widget is designated for the Android platform, the CupertinoApp widget is used on the iOS platform. As you see in the screenshot below, Flutter’s Platform class has static variables to determine the current operating system. If running in the iOS operating system, the variable, Platform.isIOS, is set true, and so the CupertinoApp widget will run. See how that works?
当然,Flutter允许您确定应用程序在哪个平台上运行,因此,在此基础上,您可以轻松地应用特定的小部件。 例如,根据运行“编写第一个应用程序”示例的平台,可以使用MaterialApp小部件或CupertinoApp小部件。 您可以在下面的屏幕截图中看到它。 同样,通常将MaterialApp小部件指定为Android平台,将CupertinoApp小部件用于iOS平台。 如下面的屏幕快照所示,Flutter的Platform类具有用于确定当前操作系统的静态变量。 如果在iOS操作系统中运行,则将变量Platform.isIOS设置为true,因此CupertinoApp小部件将运行。 看看如何运作?

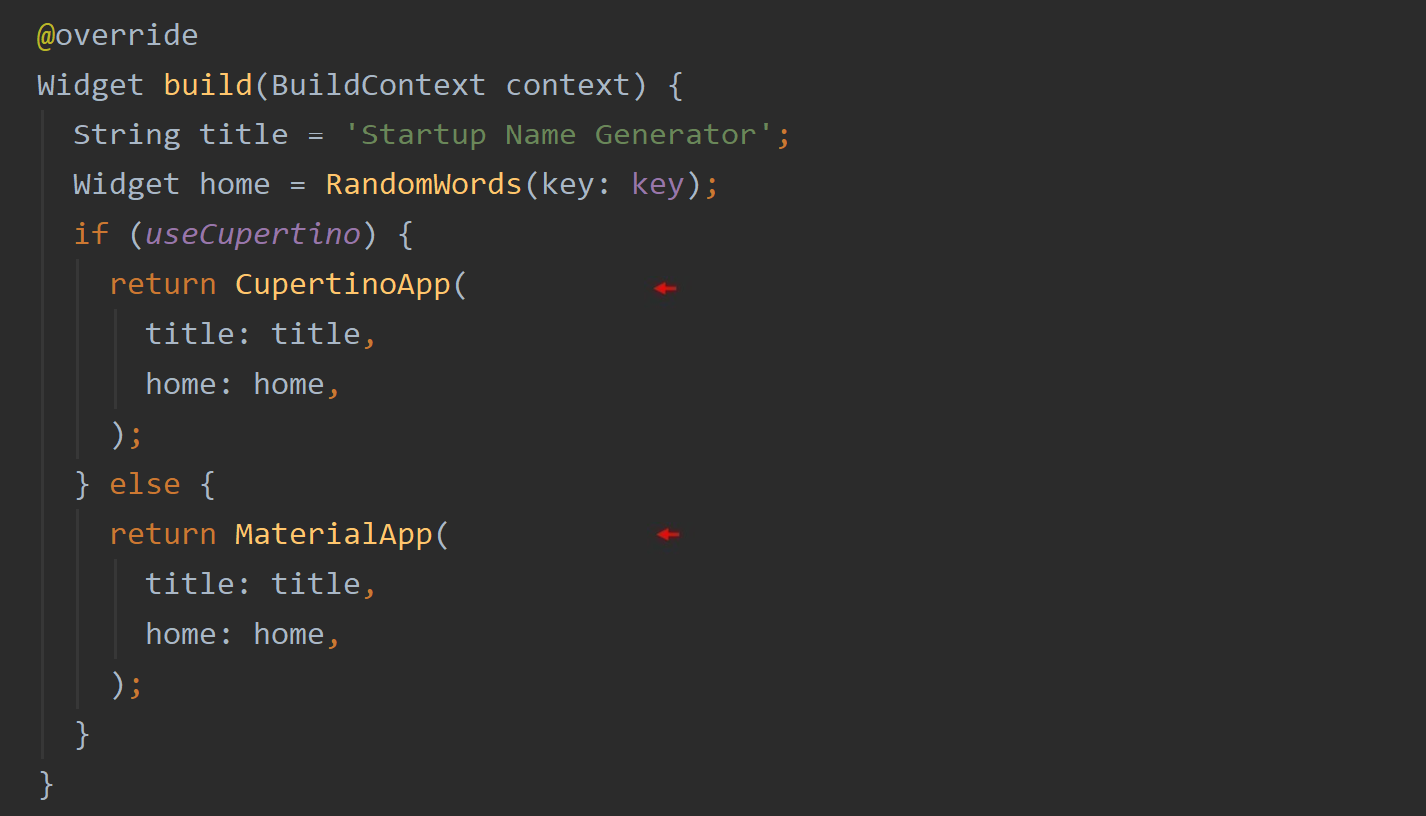
Of course, rules are meant to be broken! I’ve replaced that Platform variable with a particular getter called, useCupertino, that I regularly use in my app’s. If it’s true, the CupertinoApp widget is used. However, if it’s false, the MaterialApp widget is used no matter the type of phone. Simple.
当然,规则注定要被打破! 我已经用一个名为useCupertino的特定吸气剂替换了Platform变量,我经常在应用程序中使用它。 如果为true,则使用CupertinoApp小部件。 但是,如果为假,则无论手机类型如何,都将使用MaterialApp小部件。 简单。
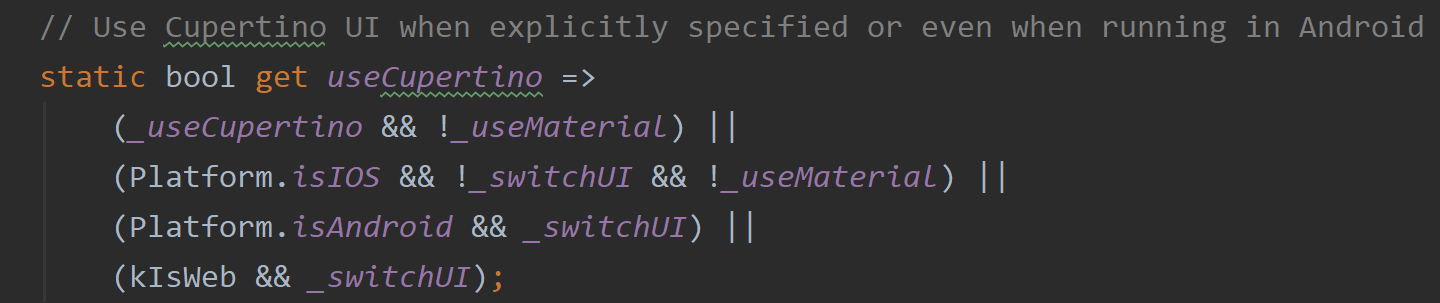
Let’s now take a look at this wonderous getter. Of course, I don’t copy n’ paste this getter into every new app I begin to work on. I’ve built up a collection of Dart library files in the form of packages over these many months that now serves as my standard toolkit. To be exact, it’s part of the framework I wrote to include with every project I work on. However, that’s for another story. In this article, I intend to merely apply this one bit of code to the example code so to demonstrate a means for you to do the same with your apps. However, looking at that getter below, you see it’s a rather busy-looking boolean expression.
现在让我们看一下这个奇妙的吸气剂。 当然,我不会将此吸气剂复制并粘贴到我开始使用的每个新应用中。 这些月来,我已经以软件包的形式建立了Dart库文件的集合,现在可以用作我的标准工具箱。 确切地说,它是我编写的框架的一部分,该框架包含在我从事的每个项目中。 但是,这是另一个故事。 在本文中,我仅打算将这部分代码应用于示例代码,以便演示一种对您的应用程序执行相同操作的方法。 但是,查看下面的吸气剂,您会发现它是一个看起来很忙的布尔表达式。
Best to illuminate where its parts come from so to understand the whole. The first two private variables, _useCupertino and _useMaterial, for example, come from the named parameters used at the start of the example app. A screenshot below points out where all three private variable, _useMaterial, _useCupertino, and _switchUI, get their values from.
最好照亮其部分来自何处,以便了解整体。 例如,前两个私有变量_useCupertino和_useMaterial来自示例应用程序开始时使用的命名参数。 下面的屏幕快照指出了所有三个私有变量_useMaterial,_useCupertino和_switchUI的值。
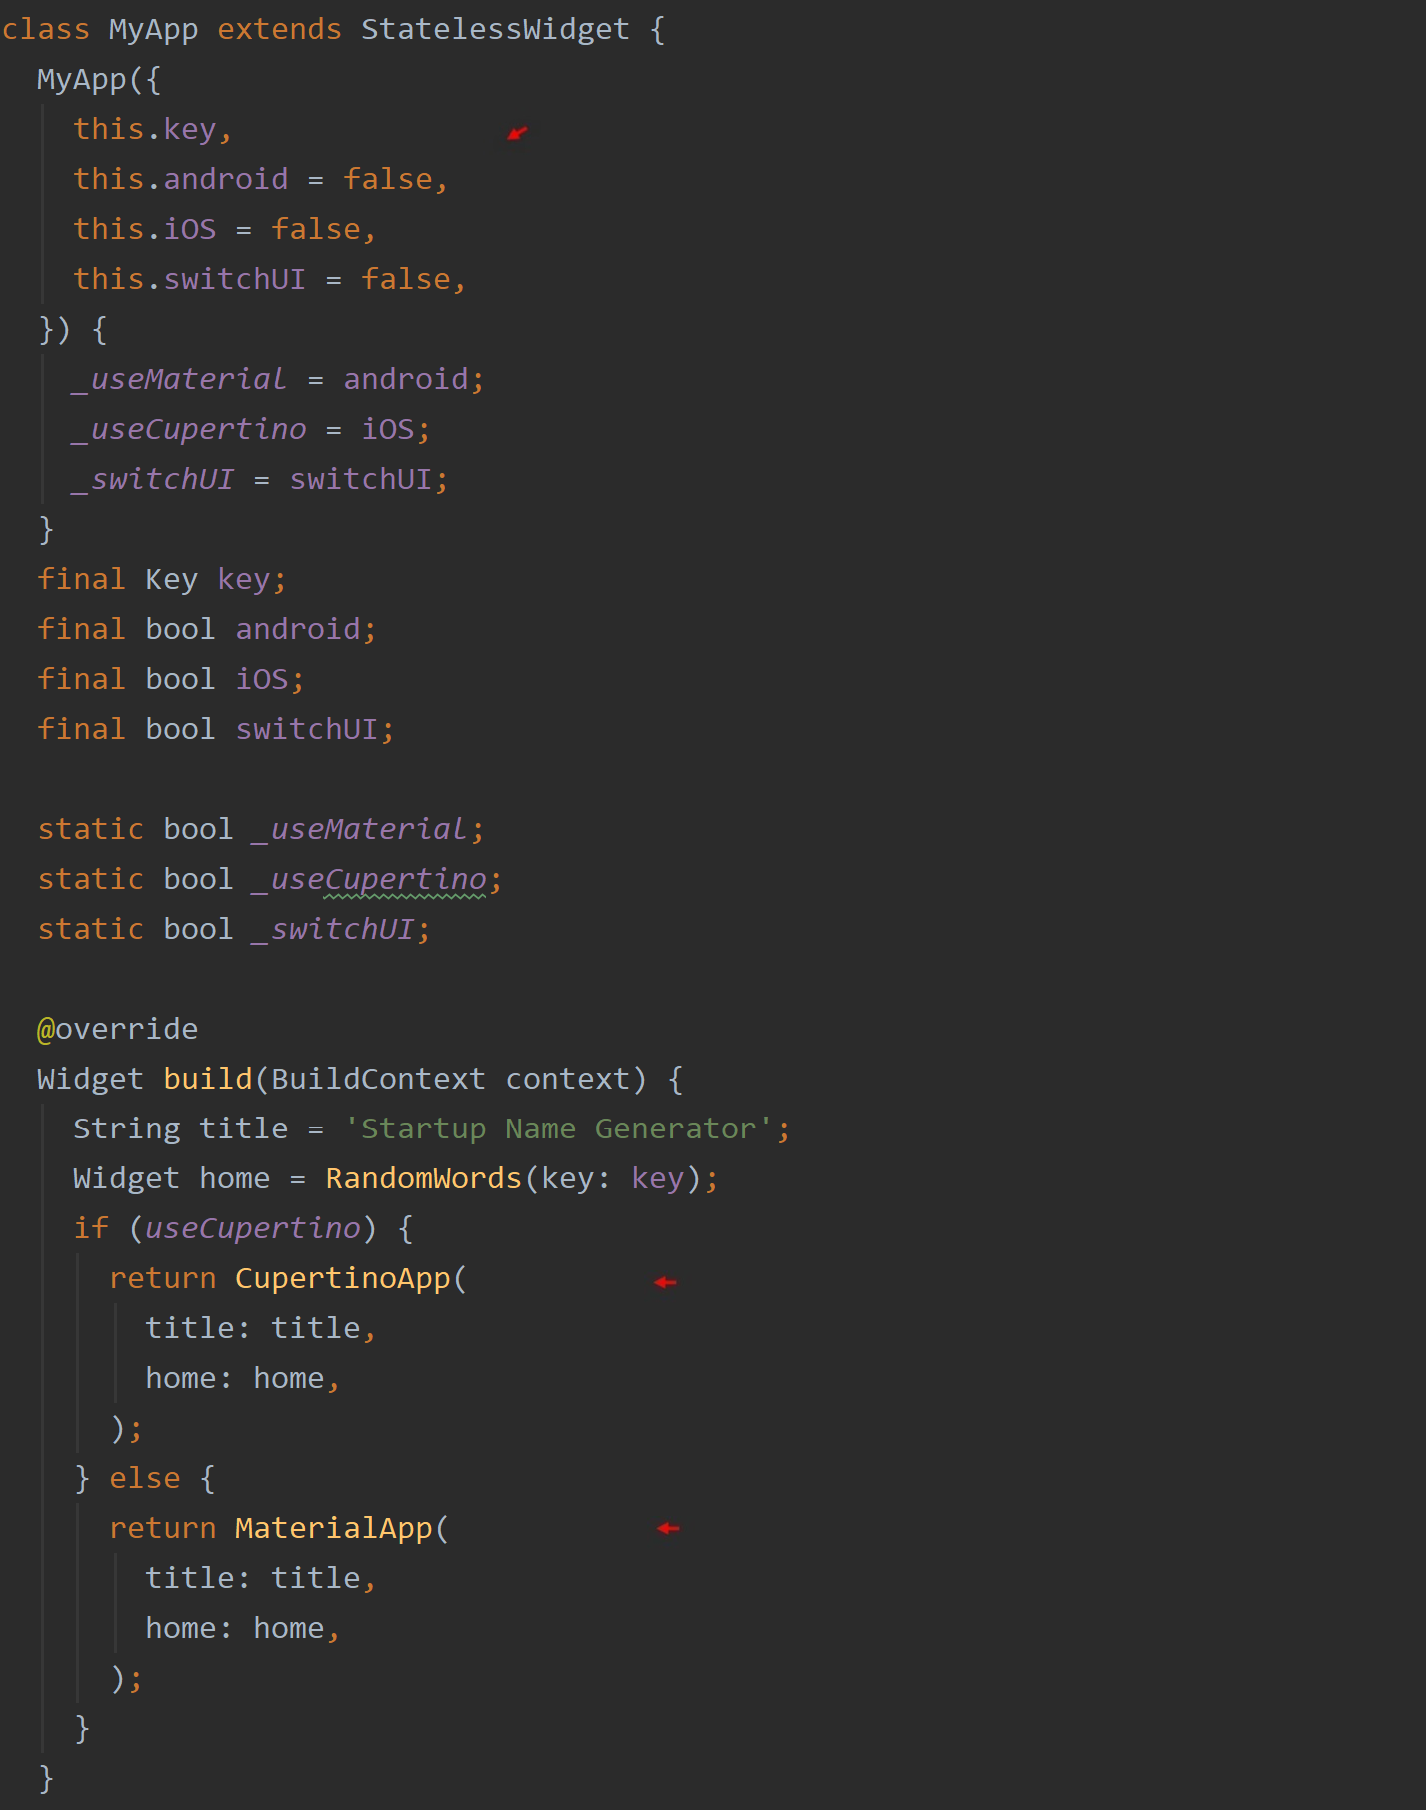
There are two screenshots below showing the ‘main’ file, main.dartwith a named parameter used in each. As a result of the value,true, being passed to these named parameters, if running on an Android phone, for example, both would result in a Cupertino theme interface. The first one explicitly tells the app to use the ‘iOS-style’ interface, while the second one, no matter what platform the app is running on, will ‘switch’ to the opposite interface. Both convenient features when developing apps on one particular platform allowing you to test and develop the two interfaces.
下面有两个屏幕快照,显示了“ main”文件main.dart ,每个文件中main.dart使用了命名参数。 由于将值true传递给这些命名参数,例如,如果在Android手机上运行,则两者都将导致Cupertino主题界面。 第一个明确告诉应用程序使用“ iOS风格”界面,而第二个则不管应用程序运行在哪个平台上,都将“切换”到相反的界面。 在一个特定平台上开发应用程序时,这两个方便的功能使您可以测试和开发两个界面。


Here you go. Below is a screenshot of both my ‘Material’ getter and my ‘Cupertino’ getter. Both have been placed in this example code. Again, I use either one regularly throughout my apps to control and test the many interfaces I make available all in one codebase. Nice.
干得好。 下面是我的“材料” 吸气剂和我的“ Cupertino” 吸气剂的屏幕截图。 两者都已放置在此示例代码中。 再次, 我会在整个应用程序中定期使用任一控件来控制和测试我在一个代码库中提供的所有接口。 真好

It’s easier to just present a table indicating which design theme is used depending on which getter is set to true and which platform the app is running on. The two things to take away is, if both getters are true, it defaults to the theme usually used on the platform, and if it’s running on the Web, Material would be the default theme. You heard right…the Web.
只需提供一个表格,指示使用哪个设计主题,取决于哪个getter设置为true以及应用程序在哪个平台上运行,会更容易。 要删除的两件事是,如果两个getter都正确,则默认为平台上通常使用的主题,如果它在Web上运行,则Material为默认主题。 您没听错…网络。

That’s what that variable, kIsWeb, is all about. It’s provided by Flutter’s foundation library and is set to true if your Flutter app is running on a browser. I suspect like many of you, I’ve dabbled with running my app’s on the Web, but again, that’s for another story. Let’s continue on with the example code and see what’s next.
这就是变量kIsWeb的全部含义 。 它由Flutter的基础库提供,如果您的Flutter应用程序在浏览器上运行,则将其设置为true 。 我怀疑像你们中的许多人一样,我涉足了在Web上运行我的应用程序的问题,但这又是另一回事了。 让我们继续看示例代码,看看接下来要做什么。
回家 (Coming Home)
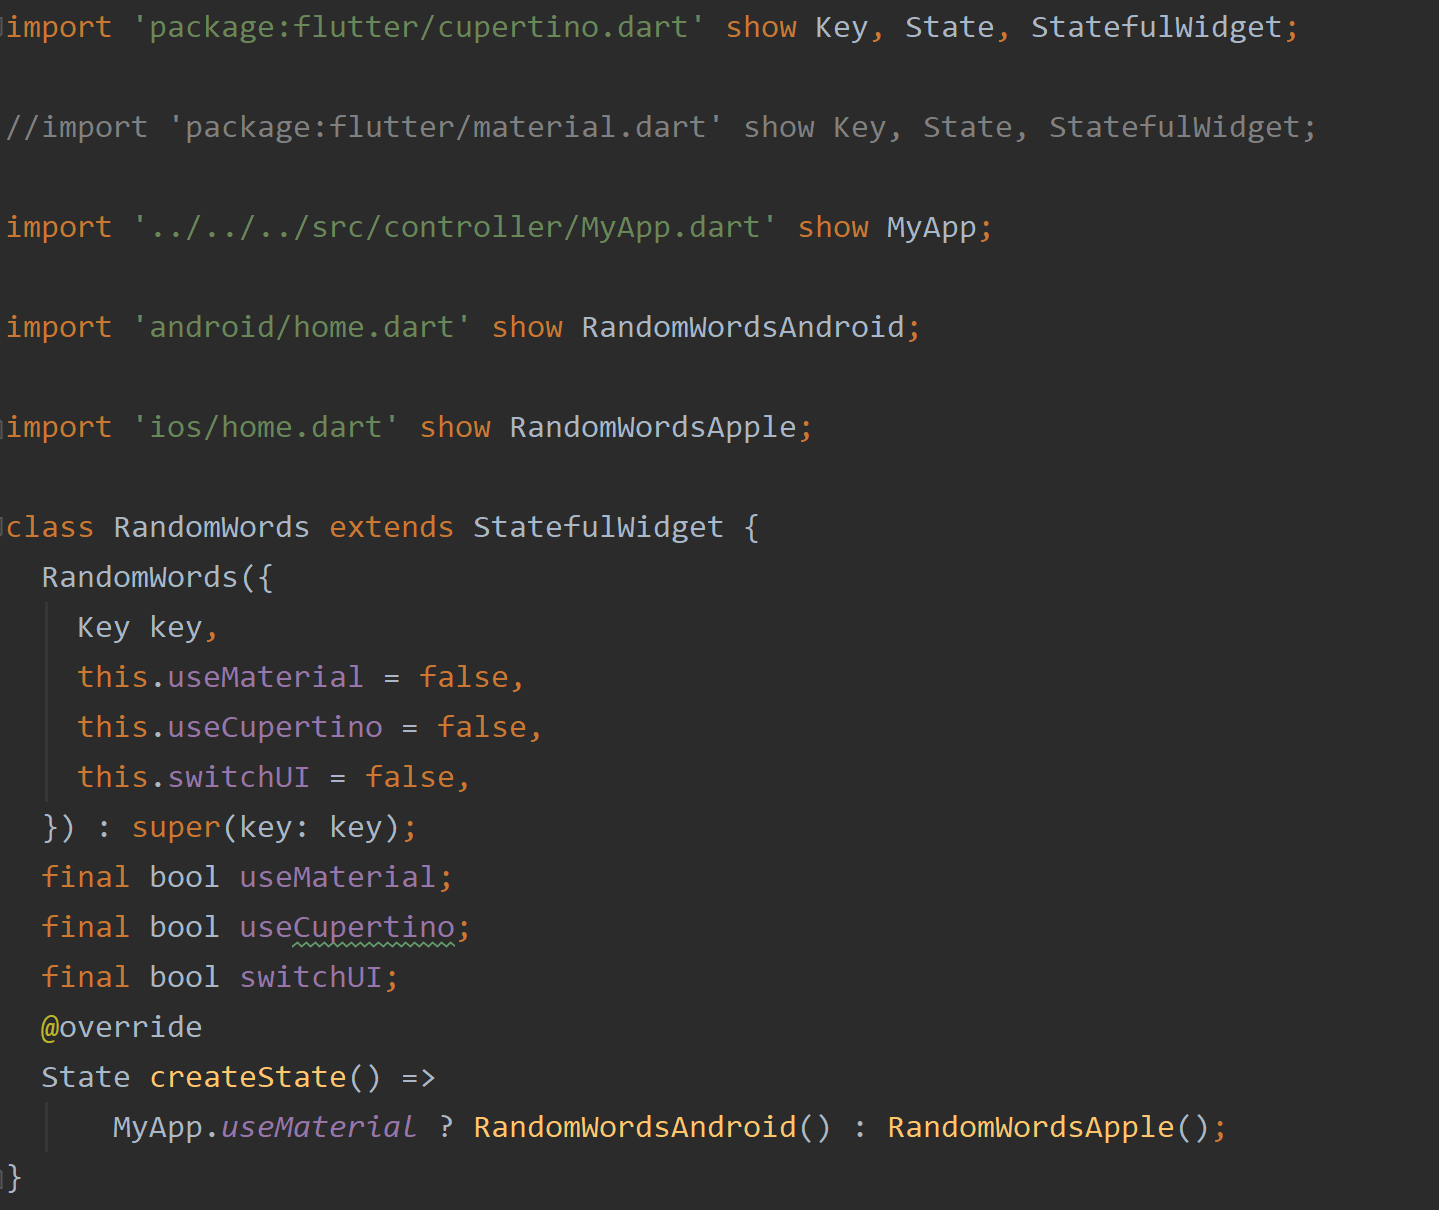
What we’ll look at next is the ‘home’ widget designated to be displayed in this example app. After determining whether we’re going to use the material.dart library or the, cupertino.dartlibrary, the next bit of code is the Stateful widget that makes up the ‘home’ widget. However, unlike the original version from the lab exercise, this version has an interesting variation. You can see one of those two getters is again utilized here. This time, it’s the getter, useMaterial . It’s used to determine which State object to use. By the State objects’ very names, you can deduce what happens if the getter, useMaterial, is set to true. If true, the State object, RandomWordsAndroid, is called. As you can guess, it is here where the app determines whether to display the Android’s ‘look and feel’ or the iOS ‘look and feel.’
接下来,我们将看到指定在此示例应用程序中显示的“ home”小部件。 在确定我们将要使用material.dart库还是cupertino.dart库之后,下一部分代码是组成“ home”小部件的有状态小部件。 但是,与实验室练习的原始版本不同,此版本有一个有趣的变化。 您可以看到这里再次利用了这两个吸气剂之一。 这次是useMaterial的获取方法。 用于确定要使用哪个State对象。 通过State对象的名字,您可以推断出getter useMaterial设置为true会发生什么。 如果为true,则调用State对象RandomWordsAndroid 。 如您所料,应用程序在这里确定是显示Android的“外观”还是iOS的“外观”。

Of course, I could have just as easily used the other getter, MyApp.useCupertino, and switch the State objects around appropriately. Either way would do.
当然,我可以轻松地使用另一个getter MyApp.useCupertino ,并适当地切换State对象。 无论哪种方式都可以。
MyApp.useCupertino ? RandomWordsApple() : RandomWordsAndroid();
MyApp.useCupertino ? RandomWordsApple() : RandomWordsAndroid();
两部分状态 (A Two-Part State)
Notice I take advantage of the fact that StatefulWidget’s are made up of two separate components. It’s in the StatefulWidget’s createState() function where there’s a logical location for a conditional operator ( ?: ) to choose which ‘interface’ is to be displayed. A convenient circumstance.
注意,我利用了StatefulWidget由两个单独的组件组成的事实。 在StatefulWidget的createState ()函数中,这里有一个逻辑位置,供条件运算符( ? :)选择要显示的“接口”。 方便的情况。
无国籍国家 (A Stateless State)
That’s all nice and good for StatefulWidgets, but how about StatelessWidget you might ask. Well, I asked that question as well with one of my projects but realized StatelessWidgets are rather ‘light’ by design. It’s little overhead to make up a two-part arrangement in StatelessWidgets as well. In this case, I have a StatelessWidget calling another StatelessWidget. The screenshot below of one of my projects will reflect what I’m talking about. Since StatelessWidget’s don’t have the createState() function, the conditional operator, ?:, is instead found in the first StatelessWidget’s build() function. It calls, in turn, the appropriate StatelessWidget depending on the value of, App.useCupertino. Easy peasy.
这对StatefulWidgets来说都不错,但是您可能会问StatelessWidget怎么样。 好吧,我在我的一个项目中也问过这个问题,但是意识到StatelessWidgets在设计上相当“轻巧”。 在StatelessWidgets中组成两部分的安排也很少有开销。 在这种情况下,我有一个StatelessWidget调用另一个StatelessWidget。 我的一个项目的以下屏幕截图将反映我在说什么。 由于StatelessWidget不具有createState ()函数,因此可以在第一个StatelessWidget的build ()函数中找到条件运算符?: 。 依次根据App.useCupertino的值调用适当的StatelessWidget。 十分简单。

安卓版 (The Android Version)
The screenshot below is the ‘Android version’ of the State object. It’s not readily apparent here, but all the widgets involved in its build() function come from the library file, material.dart.You’ll notice another difference from the original lab exercise version as well. All the ‘logic’ as it were, in other words, all the code responsible for generating the many names specifically, is no longer visible in this State objects build() function. It’s all now encased in a separate class called, _WordPair. Now, why is that? Of course, one of the first things you learned about programming is to reduce repeated code. Repeating such code, in this app, would be a nightmare to maintain and prone to errors. And so, as you may have guessed, the very class _WordPair used in the ‘Android’ State object is used in the ‘iOS’ State object as well.
下面的屏幕截图是State对象的“ Android版本”。 在这里并不容易看出来,但是其build ()函数中涉及的所有小部件都来自库文件material.dart. 您还会注意到与原始实验室练习版本的另一个区别。 所有的“逻辑”,换句话说,所有专门负责生成许多名称的代码,在此State对象的build ()函数中不再可见。 现在,所有这些都封装在一个名为_WordPair的单独的类中。 现在,为什么呢? 当然,您学习编程的第一件事就是减少重复的代码。 在此应用程序中重复这样的代码,将是维护和容易出错的噩梦。 因此,您可能已经猜到了,在'Android'状态对象中使用的_WordPair类也将在'iOS'状态对象中使用。

Let’s place those two State objects side by side below. You can then readily see the differences and similarities between them. On the left, is the iOS version; the Android version on the right. In theory, all the widget that makes up the Cupertino version is from the library,cupertino.dart while the Android version, again, uses only the library file, material.dart
让我们将这两个State对象并排放置在下面。 然后,您可以轻松地看到它们之间的差异和相似之处。 左边是iOS版本; 右侧的Android版本。 从理论上讲,组成Cupertino版本的所有小部件都来自库cupertino.dart而Android版本再次仅使用库文件material.dart

Admittedly, having been an Android developer in a past life, I’m more attune to the Material design and not the Cupertino design. For example, I’m not familiar with a Cupertino version of the Divider widget — if, in fact, there is one. As a result, I’m using Material’s Divider class in both interfaces. Further, there doesn’t appear to be a Cupertino-counterpart for the ListTile widget. I had to find one, CupertinoListTile. There’s some further tweaks required, but I feel the article has met its intent regardless.
诚然,我过去曾是一名Android开发人员,所以我更喜欢Material设计而不是Cupertino设计。 例如,我不熟悉Divider小部件的Cupertino版本-如果实际上有一个。 结果,我在两个接口中都使用了Material的Divider类。 而且, ListTile小部件似乎没有Cupertino的对应部分 。 我必须找到一个CupertinoListTile 。 还需要进行一些进一步的调整,但是无论如何,我认为本文已经达到了其意图。
TL; DR (TL;DR)
全部设计 (All By Design)
As with separating the ‘platform code’ in my apps, I also tend to separate the data, the Interface, and the logic that makes up my apps following the Model-View-Controller design pattern. Far from an original concept, the MVC software design pattern was first introduced by Trygve Reenskaug while visiting the Xerox Palo Alto Research Center back in the 1970s. For some 40 years, it would be a prominent approach to software development. Of course, Google formally endorses the Provider architecture for separating aspects of your app into manageable parts. Why MVC in this case? Personal preference.
与在我的应用程序中分离“平台代码”一样,我也倾向于按照模型-视图-控制器设计模式来分离数据,接口和构成我的应用程序的逻辑。 MVC软件设计模式远非最初的概念,是1970年代由Trygve Reenskaug首次提出的,当时他访问了施乐帕洛阿尔托研究中心。 在大约40年的时间里,这将是软件开发的杰出方法。 当然,Google正式认可Provider架构,该架构可将您的应用程序的各个方面分为可管理的部分。 为什么在这种情况下使用MVC? 个人喜好。
And so, instead of having the example code all in one file, for instance, you’ll find following some sort of ‘software design pattern’ like MVC will organize your code in such a fashion to make it much easier to then maintain and even change as time goes by. Further, following such an approach allows new developers to take over duties that much easier and that much faster. Let me show you what I mean.
因此,例如,与将示例代码全部存储在一个文件中相比,您会发现遵循某种“ 软件设计模式 ”,例如MVC将以这种方式组织代码,从而使维护和维护变得更加容易随着时间的流逝而改变。 此外,采用这种方法可使新开发人员更轻松,更快速地接管工作。 让我告诉你我的意思。
Below is a screenshot of the ‘main entry file’ of the example again, but now much of the source code is found elsewhere, no longer making it one big monolithic program file. Following best practices in Dart, while the code in the directory, lib/, is considered public and accessible to other Dart packages, code under the directory, lib/src/,is private, and that’s where the rest of the example code now lives.
下面是该示例的“主条目文件”的屏幕截图,但是现在许多源代码都在其他地方找到,不再使它成为一个庞大的整体程序文件。 遵循Dart的最佳实践,虽然目录lib/,的代码被认为是公共的,并且可供其他Dart软件包访问,但目录lib/src/,下的代码是私有的,因此其余示例代码现在都存在。
In fact, at a glance, you can see there are now three additional directories: controller, model, and view. If you’re familiar with the MVC design pattern, you’d guess correctly then the code responsible for the example’s data would be under the directory, model, the interface code would be found under the directory, view, and all the code that responses to user and system events (the logic) would be under the directory, controller. By the way, organizing your source code in such a way, also allows separate teams of developers to work in those separate areas in conjunction with each other, or when advantageous…separately — in theory, allowing for more efficient use of time and resources.
实际上,您一眼就能看到三个额外的目录: controller , model和view 。 如果您熟悉MVC设计模式,那么您会猜对了,那么负责该示例数据的代码将位于目录model下 ,该接口代码将位于目录view和所有响应的代码下用户和系统事件(逻辑)将在controller目录下。 顺便说一下,以这种方式组织您的源代码,还允许独立的开发人员团队在彼此独立的地方或在有利时……在理论上分开(在理论上)一起工作,以便更有效地利用时间和资源。
独立平台 (Separate Platforms)
Opening up those directories now relieves all the source code that makes up the example app in this article. If you examine the directory names closely, in time, you’d probably figure out what each dart file is responsible for.
现在打开这些目录将消除构成本文示例应用程序的所有源代码。 如果仔细检查目录名称,您可能会及时找出每个dart文件的职责。
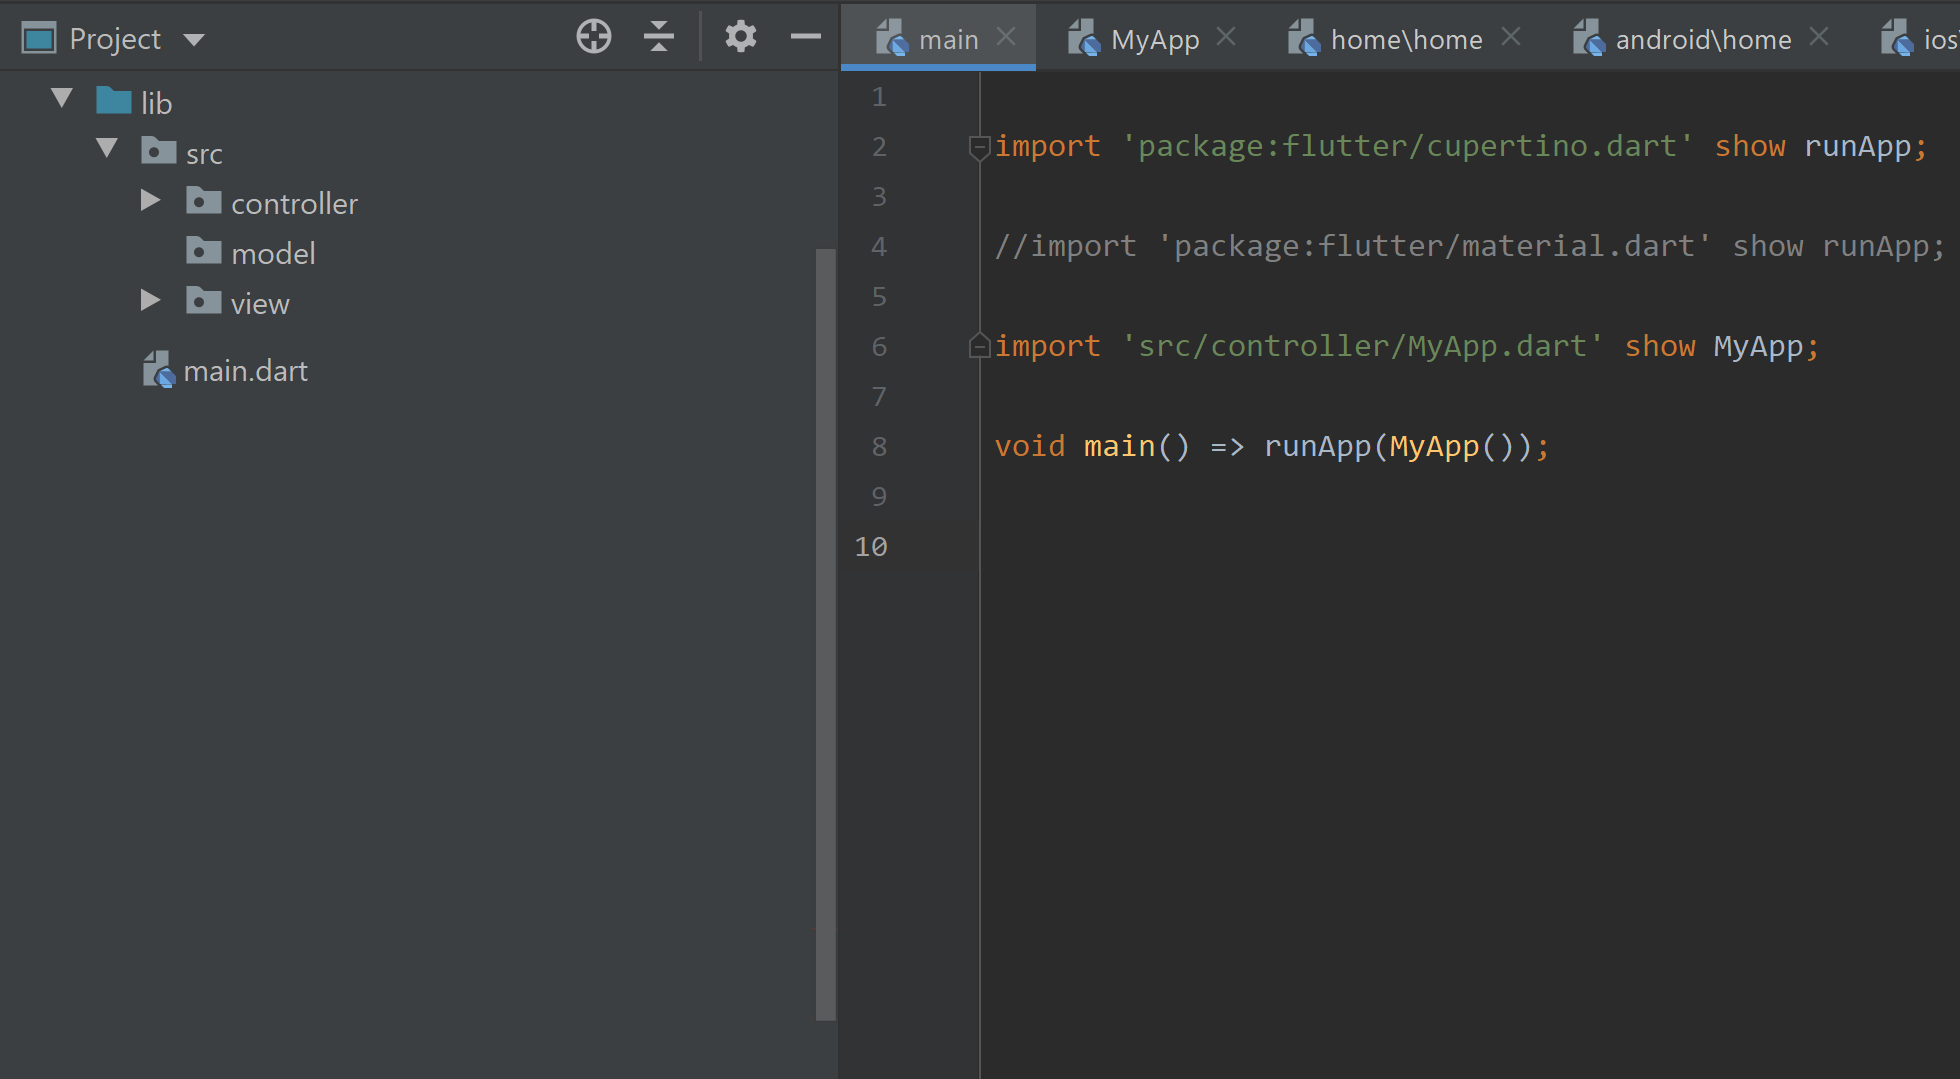
For example, we see below the library file, main.dart,which now contains only what it needs to do its part. There’s no longer any extra code masking what this file is to accomplish. It’s cleaner. More efficient. Note, both the library file, material.dart and cupertino.dart,has access to the function, runApp(), however, I’m only using one of them. At this point, which one you use would be a personal preference. Also, I like using the ‘show’ clause in import statements. It’s so that, at a glance, I can then see what is used in a particular library file — my own personal preference.
例如,我们在库文件main.dart,下方看到,该文件现在仅包含其执行任务所需的内容。 不再有任何额外的代码掩盖此文件要完成的工作。 比较干净 更高效。 请注意,库文件material.dart和cupertino.dart,都可以访问函数runApp (),但是,我仅使用其中之一。 在这一点上,您使用哪个将是个人喜好。 另外,我喜欢在导入语句中使用“ show”子句。 这样一眼便可以看到特定库文件中使用的内容-我个人的喜好。
So what else is going on in that file? Well, of course, the ‘MyApp’ widget is passed to the runApp() function. Now, where is that file? There is an import statement to ‘show’ where that widget is, of course, but you can see in the screenshot below it’s under the directory, controller. It’s been placed there by design to describe its role in this example app. Now things are a little more organized. Let’s take a look at that file next.
那么,该文件还有什么其他情况? 好吧,当然,“ MyApp”小部件将传递给runApp ()函数。 现在,那个文件在哪里? 当然,有一个导入语句可以“显示”该小部件的位置,但是您可以在下面的屏幕快照中看到它位于目录controller下 。 它是根据设计放置在此处的,以描述其在此示例应用程序中的角色。 现在事情变得更有条理了。 接下来让我们看一下该文件。

我的应用程式 (My App)
Like the file, main.dart,this file contains only what it needs to perform its role. As you know from reading this article, the MyApp class essentially establishes the foundation for the remaining widgets to be called from and thus displayed in this app. In most cases, this will be based on the platform this app is running on. Of course, there are now those named parameters: android, iOS, and switchUI to dictate the interface used. The logic of all this resides now in this one lone file. If, down the road, someone changes those parameters, for example, the rest of the code will not be affected — not directly anyway. The rest of the code will be none the wiser. Further, a team leader could now more readily control who has access to this file to make such changes. Nice feature, no? Nice and clean.
与文件main.dart,此文件仅包含执行其角色所需的内容。 从阅读本文可以知道,MyApp类实质上为其余的小部件奠定了基础,以便从该小部件中调用该小部件,从而在该应用中显示该小部件。 在大多数情况下,这将基于此应用程序所运行的平台。 当然,现在有那些命名参数: android , iOS和switchUI来指示所使用的接口。 所有这些的逻辑现在驻留在这个单独的文件中。 例如,如果在途中有人更改了这些参数,则代码的其余部分将不会受到影响,无论如何也不会受到直接影响。 其余的代码都不是更明智的选择。 此外,团队负责人现在可以更容易地控制谁可以访问此文件以进行此类更改。 不错的功能,不是吗? 干净整洁。
What else does that file do? Oh yes! It determines the ‘home’ widget to be called to display the app’s interface. The screenshot below highlights where that file resides. It’s under the directory, view/home/. Make sense. It involves the app’s interface (view) and involves the ‘home’ widget (home), and so, that’s where it lives. Of course, the last import in the screenshot above conveys that location. Note, by convention, it’s discouraged to actually use the ‘relative path’ in import statements. The full notation starting with the package’s name is preferable, but since I just slapped this together as a supplement read to this article, please forgive my indolence.
该文件还有什么作用? 哦,是的! 它确定要显示应用程序界面的“ home”小部件。 下面的屏幕截图突出显示了该文件所在的位置。 它在目录view/home/. 合理。 它涉及应用程序的界面(视图),并涉及“ home”小部件(home),因此,它就在其中。 当然,以上屏幕快照中的最后一次导入传达了该位置。 注意,按照惯例,不建议在import语句中实际使用“相对路径”。 以软件包名称开头的完整符号是可取的,但是由于我只是将其打成掌,作为对本文的补充阅读,请原谅我的懒惰。

And so, it determines the ‘home’ widget, and in fact, it’s in a file named, home.dart. Unlike Java, its resident class does not have to be the same name as the file and is called, RandomWords. It’s in the screenshot below. Of course, we already know how it determines which ‘interface’ to display.
因此,它确定了“ home”小部件,实际上,它位于名为home.dart的文件中。 与Java不同,它的常驻类不必与文件同名,并且被称为RandomWords 。 它的 在下面的屏幕截图中。 当然,我们已经知道它如何确定要显示的“界面”。
Again, we’re taking advantage of the fact that two components make up a StatefulWidget. This allows us to not only separate the type of interfaces logically but also physically in this case. The two State objects involved now live in two separate locations in the directory structure in two separate files. Both are highlighted in the screenshot below.
同样,我们利用了一个事实,即两个组件组成了StatefulWidget。 在这种情况下,这不仅使我们能够在逻辑上而且在物理上分离接口的类型。 现在,所涉及的两个State对象位于目录结构中两个单独文件中的两个单独位置。 两者都在下面的屏幕快照中突出显示。
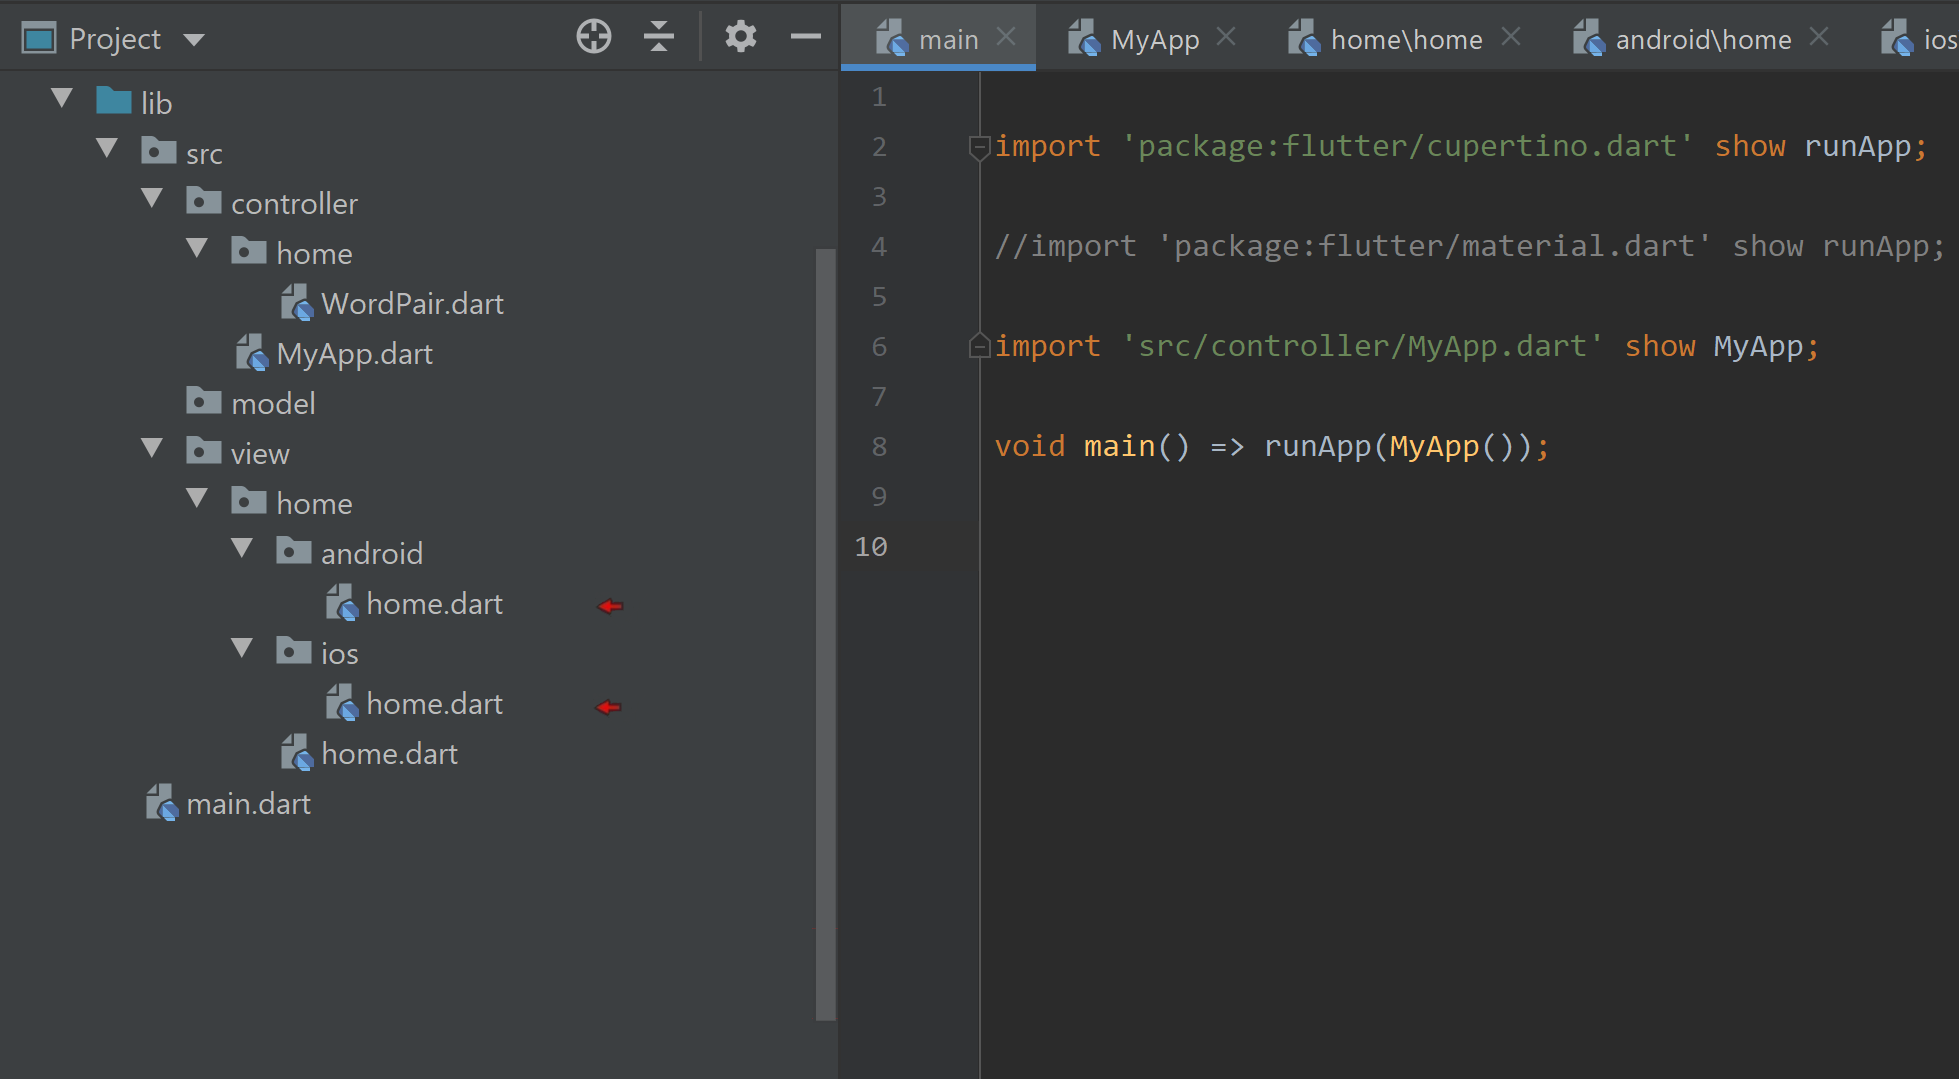
Note, with this arrangement, now there’s no “stepping on each other's toes” when separate developers are assigned to these interfaces: One for android, the other for iOS for example. They’re working on separate files now! Each using separate libraries for their widgets: material.dart and cupertino.dart
请注意,通过这种安排,当将单独的开发人员分配给这些接口时,现在不再存在“彼此踩脚”的情况:一个用于android,另一个用于iOS。 他们现在正在处理单独的文件! 每个窗口小部件都使用单独的库: material.dart和cupertino.dart
Android和iOS的观点 (The View Of Android And iOS)
Looking now at the two classes, RandomWordsAndroid and RandomWordsApple, we can see what’s all involved with a quick glance at their import statements. We see the import statements in each that references the StatefulWidget counterpart, RandomWords. However, it’s the last import statement in each that may perk your interest.
现在看一下RandomWordsAndroid和RandomWordsApple这两个类,我们可以快速浏览一下它们的import语句。 我们在每个引用StatefulWidget对应对象RandomWords的导入语句中看到。 但是,这是每个中可能会引起您兴趣的最后一个import语句。
The last import statement in each introduces the ‘Controller’ of this design pattern. Those familiar with MVC will know this is ‘the brains’ of the operation. It is common practice in this design pattern to have the interface (View) readily access a reference of the app’s logic in the form of a Controller. In this case, the Controller is responsible for the generating of names, and as it happens, in the screenshots below, the Controller’s variable, wordPair, is purple in colour, and so you can readily see where it comes into play throughout the code. And so, the two screenshots represent the View in the app’s design pattern, and the variable, wordPair, represents the Controller in the app’s design pattern.
每个中的最后一个import语句都介绍了此设计模式的“控制器”。 那些熟悉MVC的人会知道这是手术的“大脑”。 在这种设计模式中,通常的做法是让界面(视图)以控制器的形式随时访问应用程序逻辑的引用。 在这种情况下,控制器负责生成名称,并且在下面的屏幕快照中,控制器的变量wordPair的颜色为紫色,因此您可以很容易地看到它在整个代码中的作用。 因此,这两个屏幕截图代表了应用程序设计模式中的View,变量wordPair代表了应用程序设计模式中的Controller。

Below is the class, WordPair — the Controller in this design pattern. In this arrangement, the View knows the names of the functions of this class, WordPair. It can be said then the View knows how to ‘talk to’ the Controller. This is represented with an arrow going from the View to the Controller in the graphic below.
下面是类WordPair-此设计模式中的Controller。 在这种安排下,View知道此类的功能名称WordPair 。 可以说View知道如何与Controller对话。 在下图中,用箭头表示从视图到控制器的箭头。

In the screenshot below, the Controller, WordPair, has two functions and two getters called by the two Views, RandomWordsAndroid and RandomWordsApple. Note, it’s not only ‘doing stuff’; this Controller is offering data to display like, wordPair.current. This is not quite following the MVC design pattern. Where is the Model in this arrangement?
在下面的屏幕截图中,Controller WordPair具有两个函数和两个getter,这两个视图分别由RandomViewsAndroid和RandomWordsApple调用。 请注意,这不仅是“做事”,还包括 该Controller正在提供要显示的数据,如wordPair.current 。 这是 不完全遵循MVC设计模式。 此安排中的模型在哪里?
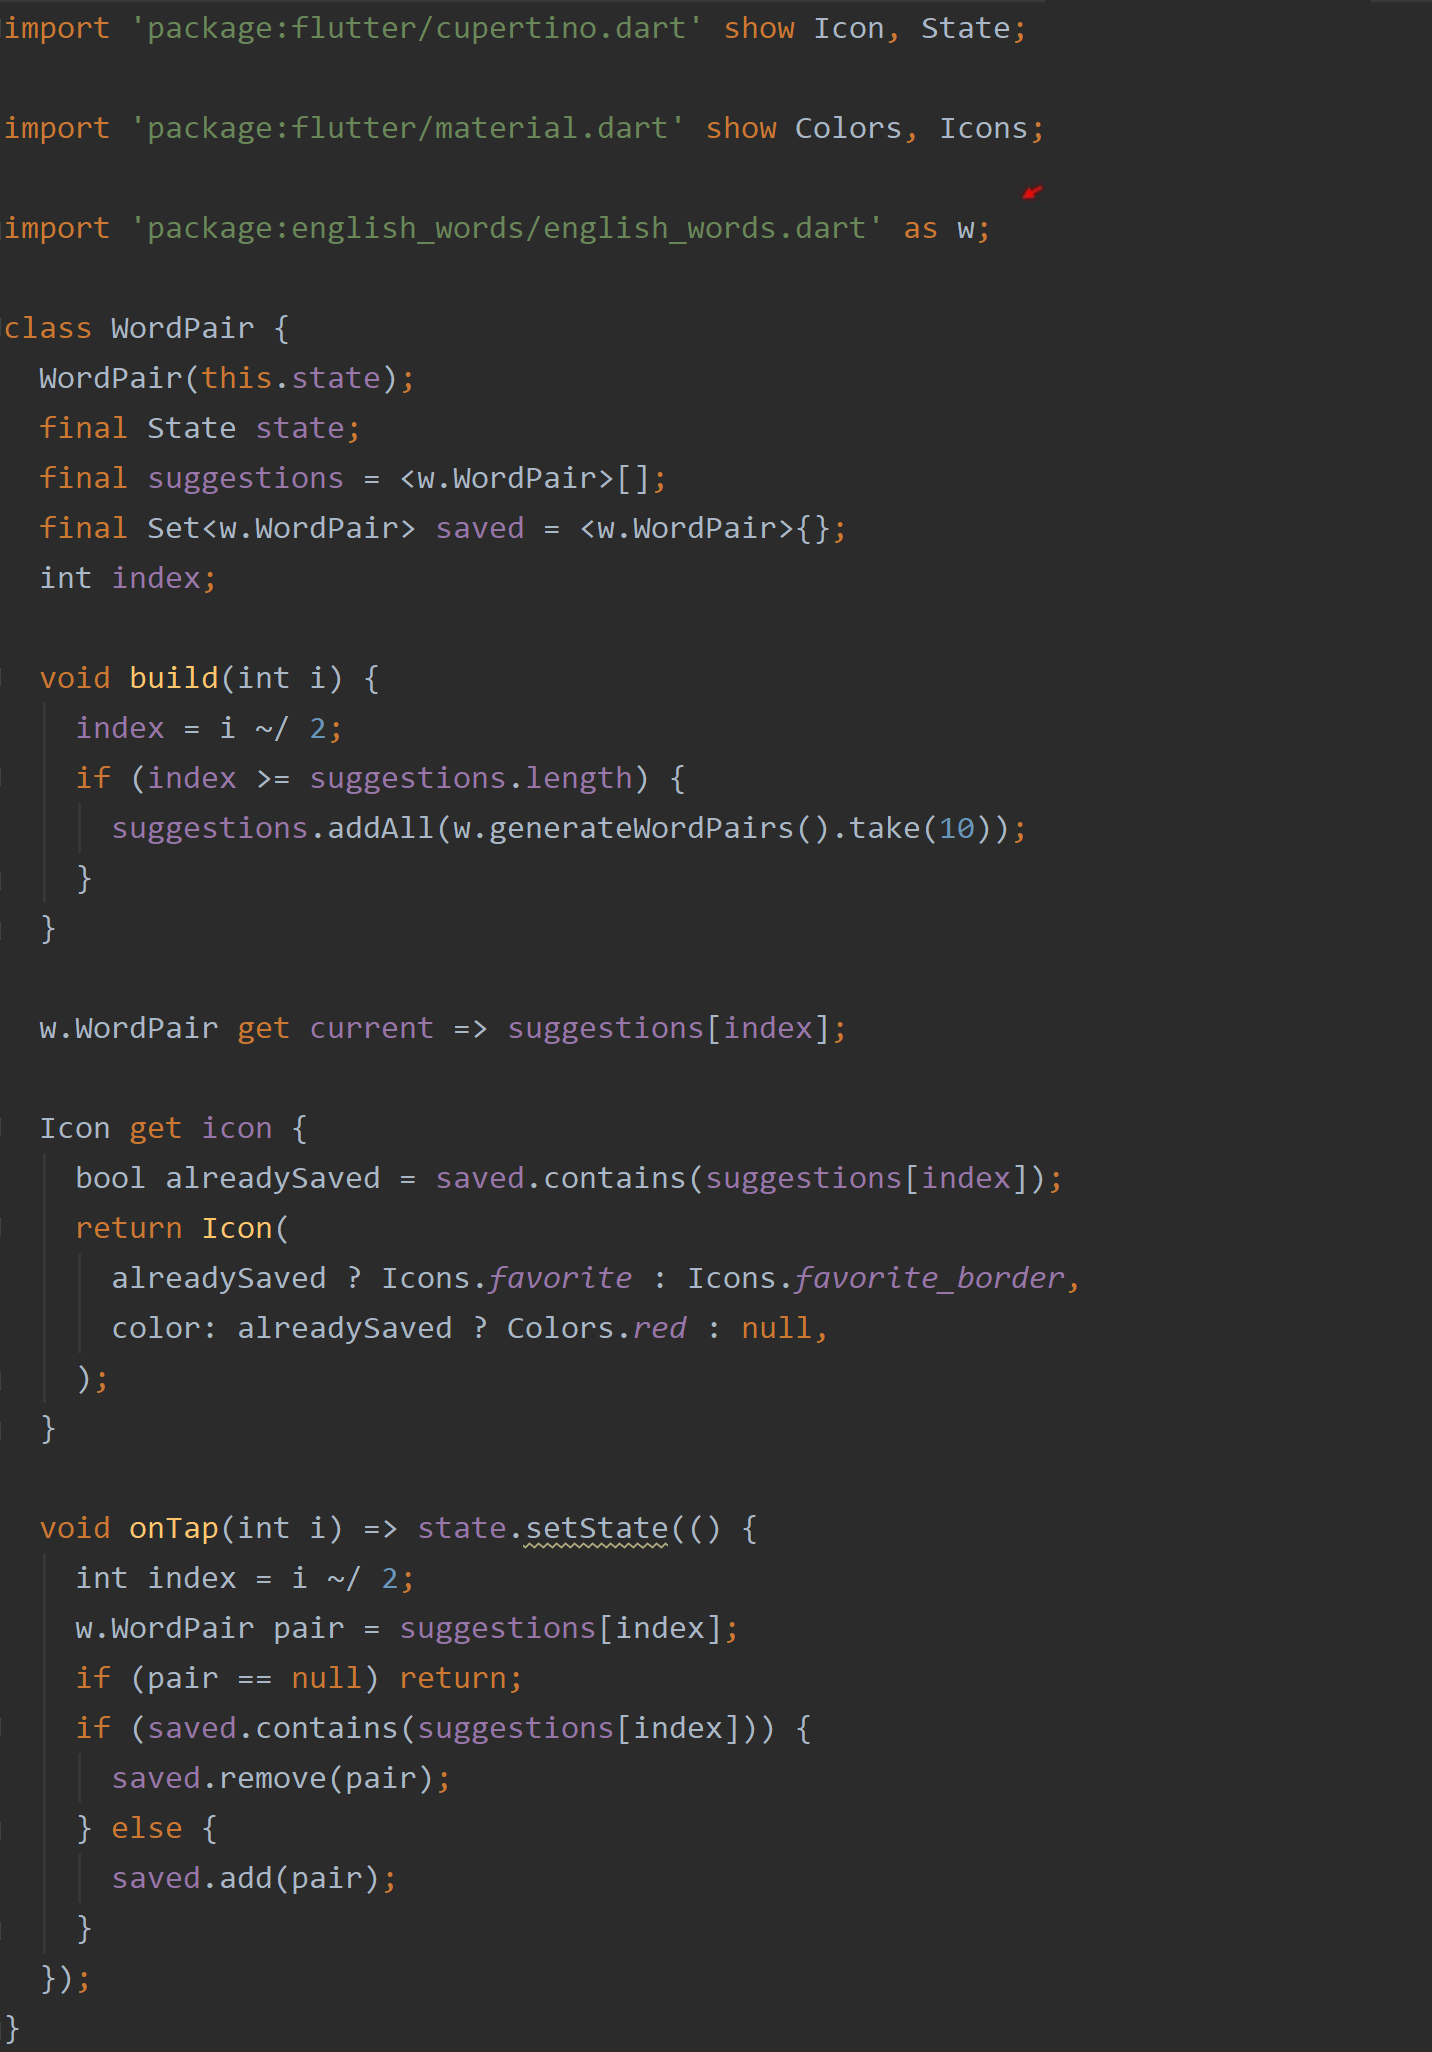
As it stands right now, the class, WordPair, serves as the Controller and as the Model. The data source, english_words.dart, is clearly retained inside the Controller. Thus, this class contains both the logic and the data source involved in this app. We could do better.
就目前而言,WordPair类充当控制器和模型。 数据源english_words.dart显然保留在Controller内部。 因此,此类包含此应用程序涉及的逻辑和数据源。 我们可以做得更好。

MVC中的“ M” (The ‘M’ in MVC)
When there’s a Model included in the design, in many cases, the View (interface) talks to the Controller (logic), and the Controller talks to the Model (data). However, the View and the Model don’t communicate directly. In other words, for example, the View doesn’t know what the Controller’s property, wordPair.current,actually retrieves, but nor should it need to. The Controller is ‘the bridge’ to the data. The View doesn’t need to know how to ‘talk to’ the Model (the data). Such an arrangement is then depicted as so:
当设计中包含模型时,在许多情况下,视图( 接口 )与控制器( 逻辑 )对话,而控制器与模型( 数据 )对话。 但是,视图和模型不直接通信。 换句话说,例如,View不知道Controller的属性wordPair.current,实际上会检索什么,但也不需要。 控制器是数据的“桥梁”。 视图不需要知道如何与模型(数据)“对话”。 这样的安排如下所示:

获得更多泛型 (Get More Generic)
Note, your View and Controller could use more ‘generic’ terms to represent the API (Application Programming Interface) between them. In theory, you are then free to ‘switch out’ the Controller and or View with completely different code — as long and the publicly accessible functions, getters, etc. use the same names. See below. I’ve made some changes.
请注意,您的View和Controller可以使用更多的“通用”术语来表示它们之间的API(应用程序编程接口)。 从理论上讲,您可以使用完全不同的代码自由地“切换” Controller和/或View —只要公开的功能,获取器等使用相同的名称即可。 见下文。 我做了一些改变。

控制器名称 (Controller By Name)
The two screenshots below represent the Controller in the example app. The one on the right is the ‘latest’ version, and if you compare the two, you’ll see there are changes. The most pronounced change is that the data source, english_words.dart, has been moved out of this file and placed in another file named,model.dart. The rest of the changes are the use of more generic terms.
下面的两个屏幕截图代表示例应用程序中的Controller。 右边的是“最新”版本,如果您将两者进行比较,将会看到有变化。 最明显的变化是,数据源english_words.dart已从该文件中移出,并放置在另一个名为model.dart文件中。 其余的更改是使用更通用的术语。

The screenshot below introduces you to the Model for this example. You’ll see its contents and where the file is located. The Model ‘hides’ what sort of data it works with. The ‘english-words’ library file is now only accessed in the file,model.dart. The rest of the app’s code need not know the source of the data. Further, with this arrangement, we could swap out that source with anything we like without affecting the rest of the app. Today, it’s English word pairs, tomorrow, its Chinese surnames or what have you. There’s this innate separation of roles now implemented in the code allowing for easy change and scalability.
下面的屏幕截图向您介绍了此示例的模型。 您将看到其内容以及文件所在的位置。 该模型“隐藏”它处理的数据类型。 现在只能在model.dart文件中访问“英语”库文件。 应用程序的其余代码无需知道数据源。 此外,通过这种安排,我们可以用我们喜欢的任何内容交换该源,而不会影响应用程序的其余部分。 今天是英文单词对,明天是中文姓氏或您的名字。 现在,在代码中实现了角色的先天分离,从而可以轻松更改和扩展。

So there you have it. You now know how to present the appropriate interface. You now know Flutter offers static properties from its libraries to do just that, and I’ve offered an approach to implement them. Granted, I went on a tangent there with MVC, but you know how it is: Rules are meant to be broken.
所以你有它。 您现在知道了如何呈现适当的界面。 您现在知道Flutter会从其库中提供静态属性来实现此目的,而我已经提供了一种实现它们的方法。 当然,我与MVC保持切线关系,但是您知道它是怎么回事:规则注定要被打破。
Cheers
干杯

翻译自: https://medium.com/@greg.perry/flutters-cross-platform-approach-f6a0a1c39e11
跨平台开发 方法


 6663
6663

 被折叠的 条评论
为什么被折叠?
被折叠的 条评论
为什么被折叠?
 到【灌水乐园】发言


