firebase
Google has recently introduced One Tap sign-in and sign-up on Android. This service allows your app’s new users to create an account, securely with just a single tap on a beautiful dialog.Users who already have an account can also have the same experience, so they don’t need to remember the username or password they had previously used when they created an account in that app.You can read more about One Tap in this other post.
Google最近在Android上引入了One Tap登录和注册 。 这项服务可让您的应用程序的新用户只需在一个漂亮的对话框上单击即可安全地创建帐户。已经拥有帐户的用户也可以拥有相同的体验,因此无需记住他们的用户名或密码以前在他们在该应用中创建帐户时使用。您可以在另一篇文章中了解有关“一键通”的更多信息 。
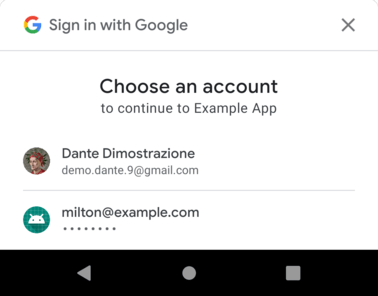
Here’s what that beautiful dialog looks like:
漂亮的对话框如下所示:

In this post, I’ll show you how to connect the One Tap UI with Firebase Authentication.
在本文中,我将向您展示如何将One Tap UI与Firebase身份验证连接起来。
具有Google登录功能的Firebase Auth (Firebase Auth with Google Sign-In)
I’ll assume that you’ve already implemented Google Sign-in using Firebase Auth on your Android app, so I’ll not go over the steps on how to do that. But if you haven’t, you can still do so by following this guide on the documentation. Also, I’ll be using some of the methods created on this same documentation, so in case you see a method/property that you don’t recognize, please be sure to look for it on that page or on the sample app I’ve created.
我假设您已经在Android应用上使用Firebase Auth实施了Google登录,因此,我不再赘述该操作的步骤。 但是,如果您还没有这样做,仍然可以按照文档上的本指南进行操作 。 另外,我将使用在同一文档中创建的一些方法,因此,如果您看到无法识别的方法/属性,请确保在该页面或我所提供的示例应用程序中查找创建。
Google’s One Tap UI comes bundled in com.google.android.gms:play-services-auth , which you might already be using, since this library is needed when you’re implementing Google Sign-In. Just check the dependencies on your build.gradle(app) file to make sure you’re using version 18.0.0 or higher.
Google的One Tap UI捆绑在您可能已经在使用的com.google.android.gms:play-services-auth ,因为在实现Google登录时需要此库。 只需检查build.gradle(app)文件上的依赖项,以确保您使用的是版本18.0.0或更高版本。
Now the next thing we need to do is declare some variables and initialize them on the Activity’s onCreate() or (in my case) the fragment’s onViewCreated():
现在,我们需要做的下一件事是声明一些变量,并在Activity的onCreate()或(在我的情况下)片段的onViewCreated()上onViewCreated() :
class MainActivity : AppCompatActivity() {


    private lateinit var oneTapClient: SignInClient
    private lateinit var signInRequest: BeginSignInRequest


    // Control whether user declined One Tap UI
    private var userDeclinedOneTap = false
    private val RC_ONE_TAP = 124

    override fun onCreate(savedInstanceState: Bundle?) {
        super.onCreate(savedInstanceState)
        setContentView(R.layout.activity_main)

        // ... Your activity code to implement Google Sign in, etc

        oneTapClient = Identity.getSignInClient(this) // On a fragment, use requireContext() instead
        signInRequest = BeginSignInRequest.builder()
            .setGoogleIdTokenRequestOptions(
                BeginSignInRequest.GoogleIdTokenRequestOptions.builder()
                    .setSupported(true)
                    .setServerClientId(getString(R.string.default_web_client_id))
                    // Only show accounts previously used to sign in.
                    .setFilterByAuthorizedAccounts(true)
                    .build())
            .build()
    }
}
Notice that on our BeginSignInRequest we’re setting filterByAuthorizedAccounts to true. This means the OneTap UI will only display accounts that have previously logged in to this app. If you’re displaying the Google Sign -In option on a Sign up screen, you should set filterByAuthorizedAccounts to false instead, so that the UI displays all user accounts available on that Android device.
注意,在BeginSignInRequest我们将filterByAuthorizedAccounts设置为true 。 这意味着OneTap UI将仅显示以前登录此应用程序的帐户。 如果你显示谷歌注册-在选项上的注册屏幕,你应该设置filterByAuthorizedAccounts以false代替,从而使UI显示所有用户帐户可用的Android设备上。
Those variables that we just declared will be used to initiate the One Tap sign-in flow on our updateUI() method (the one called from onStart()):
我们刚刚声明的那些变量将用于在我们的updateUI()方法(从onStart()调用的方法updateUI()上启动“一键登录”流程:
class MainActivity : AppCompatActivity() {


    // variable declarations omitted for brevity

    override fun onCreate(savedInstanceState: Bundle?) {
        // ... Activity code omitted for brevity
    }

    override fun onStart() {
        super.onStart()
        // Check if user is signed in (non-null) and update UI accordingly.
        val currentUser = auth.currentUser
        updateUI(currentUser)
    }

    private fun updateUI(currentUser: FirebaseUser?) {
        if (currentUser != null) {
            // If currentUser != null, let's go to the next screen
            // TODO: Write your own logic to update your UI or go to a second Activity/Fragment
        } else {
            // If the user hasn't already declined to use One Tap sign-in
            if (!userDeclinedOneTap) {
                // Check if the user has saved credentials on our app
                // and display the One Tap UI
                oneTapClient.beginSignIn(signInRequest)
                    .addOnSuccessListener { result ->
                        // This listener will be triggered if the
                        // user does have saved credentials
                        try {
                            startIntentSenderForResult(
                                result.pendingIntent.intentSender, RC_ONE_TAP,
                                null, 0, 0, 0, null)
                        } catch (e: IntentSender.SendIntentException) {
                            Log.e(TAG, "Couldn't start One Tap UI: ${e.localizedMessage}")
                        }


                    }.addOnFailureListener { e ->
                        // No saved credentials found. Launch the One Tap sign-up flow, or
                        // do nothing and continue presenting the signed-out UI.
                        Log.e(TAG, "No saved credentials: ${e.localizedMessage}")
                    }
            }
        }
    }
}
If the OnFailureListener gets executed, it means the user has never logged in to this app before or another error occurred. One other error that might happen is the 24-hour cooldown period, which the OneTap UI uses as a way to limit the prompts that it shows. If you face this error during development, the documentation recommends:
如果执行了OnFailureListener ,则意味着用户之前从未登录过此应用程序,或者发生了另一个错误。 另一个可能发生的错误是24小时的冷却时间,OneTap UI将其用作限制显示的提示的一种方法。 如果在开发过程中遇到此错误,则文档建议:
“… reset the cooldown by clearing Google Play services’ app storage.”
“…通过清除Google Play服务的应用存储来重置冷却时间。”
But otherwise, if the SuccessListener gets executed instead, startIntentSenderForResult() will display the One Tap UI for users to select the account they wish to use in order to continue. So we need to update our onActivityResult code in order to receive and handle the result coming from One Tap:
但是否则,如果改为执行SuccessListener,则startIntentSenderForResult()将显示“一键式”用户界面,以便用户选择希望使用的帐户以继续。 因此,我们需要更新我们的onActivityResult代码,以便接收和处理来自One Tap的结果:
class MainActivity : AppCompatActivity() {

  // ... Other methods such as onCreate()

  override fun onActivityResult(requestCode: Int, resultCode: Int, data: Intent?) {
        super.onActivityResult(requestCode, resultCode, data)
        when (requestCode) {
            // Result returned from launching the Intent from GoogleSignInApi.getSignInIntent(...);
            RC_SIGN_IN -> { /* handle google sign in */ }
            // Result returned from launching the Intent from startIntentSenderForResult(...)
            RC_ONE_TAP -> {
                try {
                    val credential = oneTapClient.getSignInCredentialFromIntent(data)
                    // This credential contains a googleIdToken which
                    // we can use to authenticate with FirebaseAuth
                    credential.googleIdToken?.let {
                        firebaseAuthWithGoogle(it)
                    }
                } catch (e: ApiException) {
                    when (e.statusCode) {
                        CommonStatusCodes.CANCELED -> {
                            // The user closed the dialog
                            userDeclinedOneTap = true
                        }
                        CommonStatusCodes.NETWORK_ERROR -> {
                            // No Internet connection ?
                        }
                        else -> {
                            // Some other error
                        }
                    }
                }
            }
        }
    }
}
Note that if the user closes the One Tap UI, getSignInCredentialFromIntent() returns an ApiException with the status code CommonStatusCodes.CANCELED. In that case, we set our variable back to false and we don’t prompt the user again. Although using this variable may work fine, you can also use SharedPreferences instead, if you prefer.
请注意,如果用户关闭“一键式” UI,则getSignInCredentialFromIntent()将返回ApiException ,其状态码为CommonStatusCodes. CANCELED CommonStatusCodes. CANCELED 。 在这种情况下,我们将变量设置回false并且不再提示用户。 尽管使用此变量可能会很好,但如果愿意,也可以使用SharedPreferences 。
And that’s it! You can now run your app and test the One Tap UI. This is what the One Tap UI with Google Sign-In should look like:
就是这样! 现在,您可以运行您的应用并测试“一键式” UI。 带有Google登录功能的“一键式”用户界面应如下所示:

带有电子邮件/密码的Firebase身份验证 (Firebase Auth with Email/Password)
If your app also provides Email/Password authentication, One Tap UI can also help your users signing in to your app using that method. You’ll need to update the BeginSignInRequest we created earlier and handle the result in the onActivityResult() function:
如果您的应用程序还提供电子邮件/密码身份验证,则一键式UI还可帮助您的用户使用该方法登录到您的应用程序。 您需要更新我们之前创建的BeginSignInRequest并在onActivityResult()函数中处理结果:
class MainActivity: AppCompatActivity() {
  // variable declarations
  override fun onCreate(savedInstanceState: Bundle?) {
    // ... other initializations and function calls
    signInRequest = BeginSignInRequest.builder()
            // ADD THIS FOR EMAIL/PASSWORD
            .setPasswordRequestOptions(BeginSignInRequest.PasswordRequestOptions.builder()
                .setSupported(true)
                .build())
            .setGoogleIdTokenRequestOptions(/* the options */)
            .build()
    // the rest of the onCreate method
  }

  override fun onActivityResult(requestCode: Int, resultCode: Int, data: Intent?) {
        super.onActivityResult(requestCode, resultCode, data)
        when (requestCode) {
            // Result returned from launching the Intent from GoogleSignInApi.getSignInIntent(...);
            RC_SIGN_IN -> { /* handle google sign in */ }
            // Result returned from launching the Intent from startIntentSenderForResult(...)
            RC_ONE_TAP -> {
                try {
                    val credential = oneTapClient.getSignInCredentialFromIntent(data)

                    // ... handle the google ID here

                    // ADD THIS FOR EMAIL/PASSWORD
                    credential.password?.let { password ->
                        // Call your method that signs in to Firebase Auth
                        // with Email/Password, passing credential.id as email
                        // and credential.password as password
                        signInWithPassword(credential.id, password)
                    }
                } catch (e: ApiException) { /* handle exception */ }
            }
        }
    }
}
This password request feature is backed by the Autofill framework which was introduced in Android 8.0 (API level 26), so you’ll need to optimize your app for Autofill. This means you should add android:autofillHints to your EditText’s XML as shown below:
此密码请求功能由Android 8.0(API级别26)中引入的Autofill框架提供支持,因此您需要针对Autofill优化应用 。 这意味着您应该将android:autofillHints添加到EditText的XML中,如下所示:
<!-- Layout Declarations, etc -->


<!-- Email/Username field -->
<com.google.android.material.textfield.TextInputEditText
            ...
            android:autofillHints="username"
            android:hint="Email/Username" />


<!-- Password field -->
<com.google.android.material.textfield.TextInputEditText
            ...
            android:inputType="textPassword"
            android:autofillHints="password"
            android:hint="Password" />
<!-- Other Layout components -->
And this should do it. Now in order to test this feature, you’ll need to enable Autofill on your testing device, if you’re not already using it. To do that, make sure your device is running Android 8.0 (or above) and navigate to Settings > System > Language and Input > Autofill and select an Autofill framework.
这应该做到。 现在,要测试此功能,您需要在测试设备上启用自动填充功能(如果尚未使用该功能)。 为此,请确保您的设备运行的是Android 8.0(或更高版本),然后导航至“设置”>“系统”>“语言和输入法”>“自动填充”,然后选择一个“自动填充”框架。
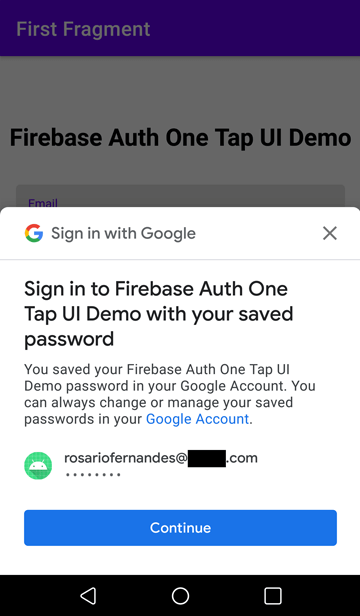
Once you login for the first time on the app, Autofill will prompt if you want to save your credentials. If you accept, the next time you login to the app, One Tap UI should display your saved credentials:
首次登录该应用后,如果您要保存凭据,则会自动提示“自动填充”。 如果您接受,则下次登录应用程序时,“一键式”用户界面应显示您保存的凭据:

Additionally, if you also have a website or a web app on the same Firebase project, you can also enable automatic sign-in between apps and websites, which will allow your users to sign-in to your web app with the password they saved on the mobile app and vice-versa.
此外,如果您在同一Firebase项目上也有网站或网络应用程序,则还可以启用应用程序和网站之间的自动登录 ,这将允许您的用户使用保存在其上的密码登录到您的网络应用程序移动应用,反之亦然。
And that’s all for today. I hope this helps you implement One Tap sign-in and sign-up in your Firebase Apps. You can find the sample app on Github:
今天就这些。 我希望这可以帮助您在Firebase Apps中实现一键登录和注册。 您可以在Github上找到示例应用程序:
翻译自: https://medium.com/firebase-developers/firebase-auth-one-tap-86ca80a80973
firebase


 4455
4455

 被折叠的 条评论
为什么被折叠?


