


阿帕奇类库
A hands-on tutorial into Spark DataFrames.
关于Spark DataFrames的动手教程。
If you’ve ever attempted to learn Data Engineering, it’s likely that you’re quickly overwhelmed. Whether it’s complicated terminology or tutorials that assume an extensive base in programming experience, Data Engineering is typically far from accessible.
如果您曾经尝试学习数据工程,那么您可能很快就会不知所措。 无论是复杂的术语还是需要丰富编程经验的教程,数据工程通常都无法访问。
This guide is meant to not only be accessible to beginners but to be fun along the way! You’ll get your hands on a project and dive into the concept of a Spark Dataframe.
本指南不仅供初学者使用,而且在旅途中也很有趣! 您将开始一个项目,并深入了解Spark Dataframe的概念。
在开始之前,我有一个要问你的。 不要略过本指南! 我可以向您保证,如果您完全投入其中并自己进行练习,将会从中获得更多收益。 (Before we get started, I have one ask of you. Don’t skim this guide! I can promise you that you’ll get much more out of this if you dive into it fully and attempt the exercises yourself.)
So without further ado, let’s jump in!
因此,事不宜迟,让我们开始吧!
让我们将计算机设置为运行一些Spark程序。 (Let’s get your computer set up to run some Spark programs.)
For this (and future) tutorials, you’ll need to have IntelliJ, Git, Java, and Apache Spark installed. Follow my step by step guide for the installation walkthrough: Setting up IntelliJ, Git, Java, and Apache Spark
对于本教程(以及以后的教程),您需要安装IntelliJ,Git,Java和Apache Spark。 请按照我的逐步指南进行安装: 设置IntelliJ,Git,Java和Apache Spark
现在,您已经完成了安装,开始有趣了! (Now that you’re through the installations, the fun begins!)
什么是Apache Spark? (What is Apache Spark?)
My brain works best with analogies. So hang tight. Think of a beehive. You have a single queen and hundreds or thousands of worker bees. They have very distinct roles. The queen is largely responsible for the ‘brains’ of the entire operation, conducting the orchestra of worker bees who are fulfilling the hundreds of tasks that need to be accomplished. The worker bees are the executors, putting in the work required to accomplish those tasks.
打个比方,我的大脑工作得最好。 快挂吧 想想一个蜂巢。 您有一个女王/王后和成百上千的工蜂。 他们扮演着非常不同的角色。 女王在很大程度上负责整个行动的“大脑”,指挥工蜂乐团来完成需要完成的数百个任务。 工蜂是执行者,负责完成这些任务所需的工作。
蜜蜂与Apache Spark有什么关系? (What do Bees have to do with Apache Spark?)
Good question, they’ll come in handy soon. The formal definition of Apache Spark is that it is a general-purpose distributed data processing engine. It is also known as a cluster computing framework for large scale data processing. Let’s break that down.
好问题,他们会很快派上用场。 Apache Spark的正式定义是它是一种通用的分布式数据处理引擎 。 它也被称为用于大规模数据处理的集群计算框架 。 让我们分解一下。
Distributed Data: Spark is built to handle extremely large scale data. The sheer amount of data being loaded into the spark application is enough to overwhelm almost any computer. To handle that, Spark utilizes multiple computers (called a cluster) to process the tasks required for that job and work together to produce the desired output. This is where the bee analogy comes in. Let’s start with a diagram.
分布式数据: Spark旨在处理超大规模数据。 加载到spark应用程序中的大量数据足以淹没几乎所有计算机。 为了解决这个问题,Spark利用多台计算机(称为群集)来处理该作业所需的任务,并共同产生所需的输出。 这就是蜜蜂的类比之处。让我们从图开始。
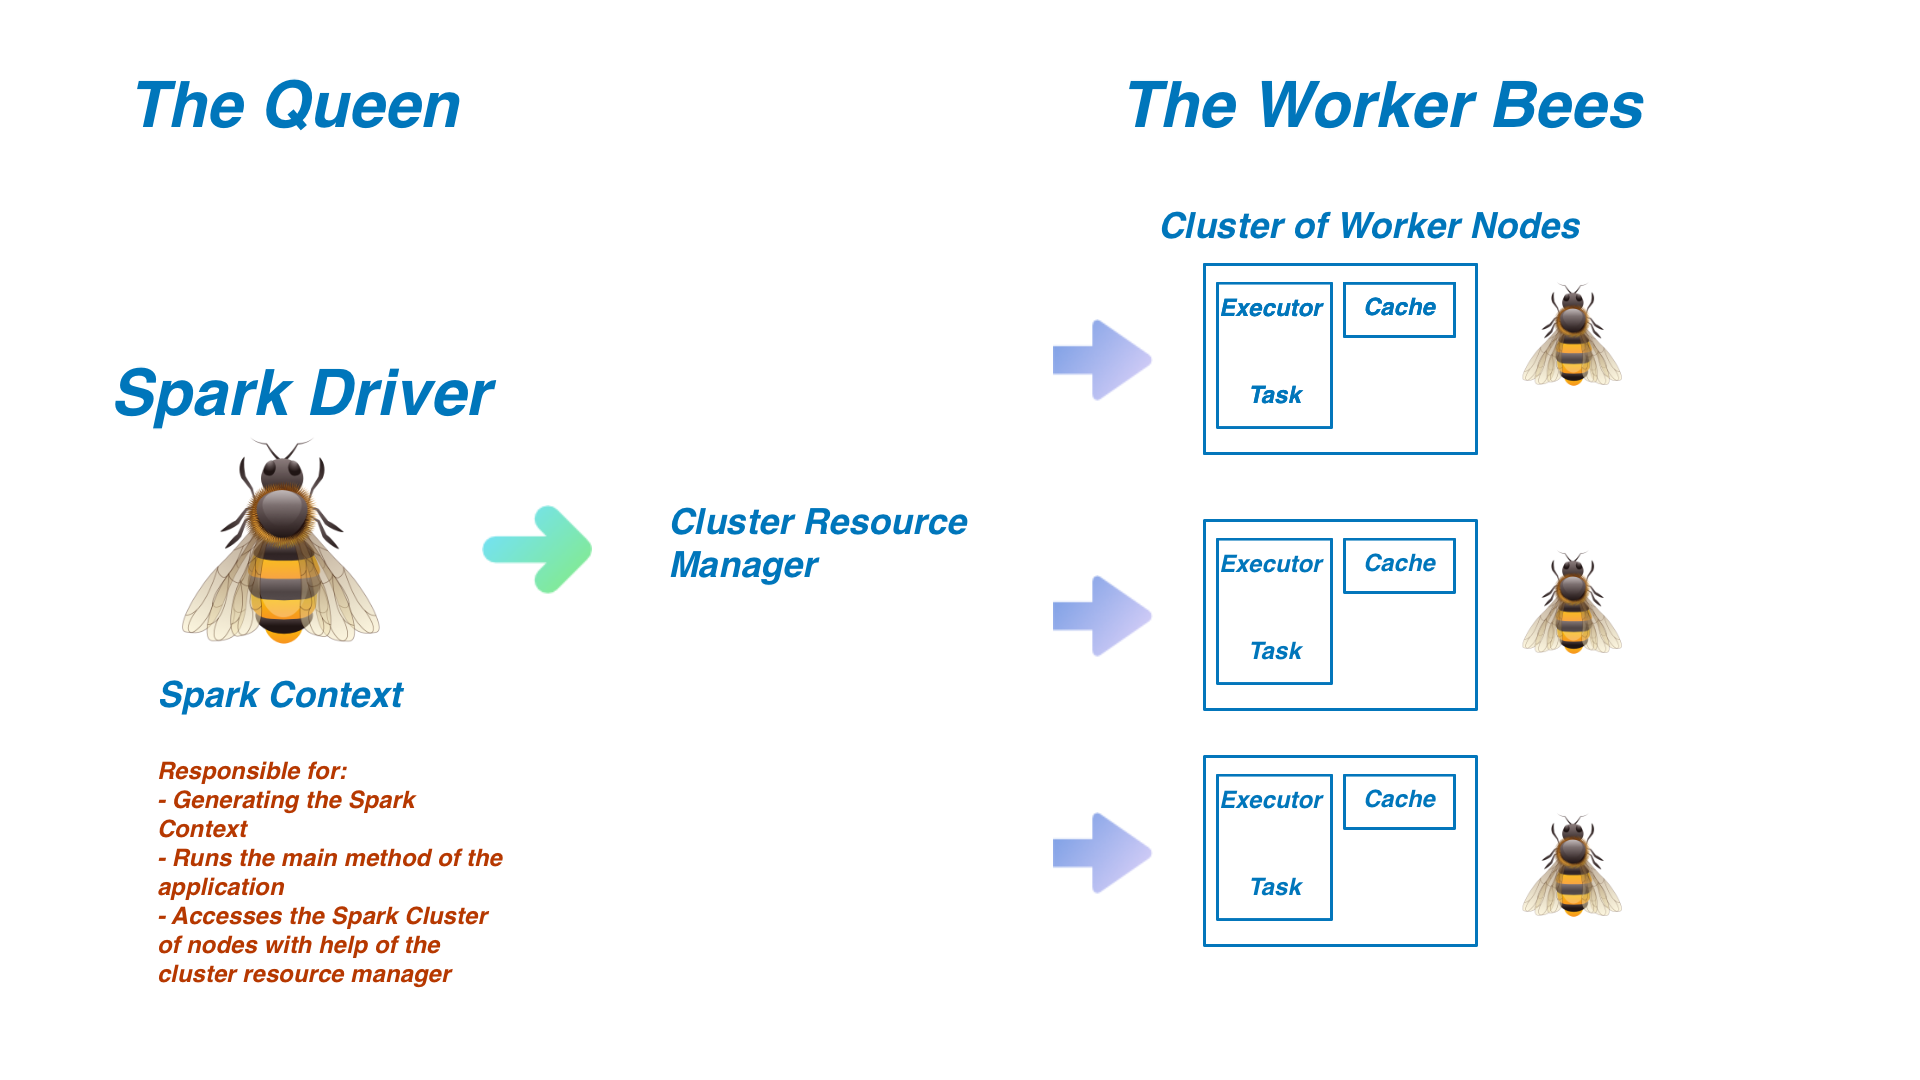
Spark Driver: The Queen Bee of the operation. The Spark Driver is responsible for generating the Spark Context. The Spark Context is extremely important since it is the entryway into all of Spark’s functionality. Using the Cluster Resource Manager (typically YARN, Mesos, or Standalone), the Driver will access and divide work between the cluster of Spark Executors (worker nodes). The Spark Driver is where the main method is run, meaning that any written program will first interact with the driver before being sent in the form of tasks to the worker nodes.
火花驱动程序 :手术的女王蜂。 Spark驱动程序负责生成Spark上下文。 Spark上下文非常重要,因为它是Spark所有功能的入口。 使用群集资源管理器(通常为YARN,Mesos或Standalone),驱动程序将在Spark执行器群集(工作程序节点)之间访问和划分工作。 运行主方法的地方是Spark驱动程序,这意味着任何编写的程序都将首先与驱动程序进行交互,然后再以任务的形式发送给工作程序节点。
Spark Executors: The worker bees. The executors are responsible for completing the tasks assigned to them by the driver with the help of the Cluster Resource Manager. As they perform the tasks instructed to them, they will store the results in memory, referred to as a cache. If any one of these nodes crashes, the task assigned to that executor will be reassigned to another node to complete the task. Every node can have up to one executor per core. Results are then returned to the Spark Driver upon completion.
星火执行者:工蜂。 执行者负责在群集资源管理器的帮助下完成驱动程序分配给他们的任务。 当他们执行指示给他们的任务时,他们会将结果存储在内存中,称为缓存。 如果这些节点中的任何一个崩溃,分配给该执行程序的任务将被重新分配给另一个节点以完成任务。 每个节点每个核心最多可以有一个执行程序。 完成后,结果将返回给Spark驱动程序。
We’ve made it through a lot. Let’s start to get a little bit more practical. Don’t worry, the hands-on piece is coming soon!
我们已经做了很多。 让我们开始更实际一些。 不用担心,动手练习即将推出!
关键概念:Spark DataFrames (Key Concept: Spark DataFrames)
One of the most important aspects of Spark that we’ll be diving into in this tutorial is the DataFrames API.
我们将在本教程中介绍的Spark最重要的方面之一是DataFrames API。
You can think of DataFrames as distributed spreadsheets with rows and columns. The spreadsheet is split across different nodes. Each node contains the schema of the DataFrame and some of the rows.
您可以将DataFrames视为具有行和列的分布式电子表格。 电子表格分为不同的节点。 每个节点都包含DataFrame的架构和一些行。
The schema in a DataFrame is a list describing column names and column types. Each schema can hold an arbitrary number of columns. Every row across every node will have exactly the same schema for the DataFrame. Spark uses a concept called partitioning to split the data into files to share with nodes in the cluster.
DataFrame中的架构是一个描述列名称和列类型的列表。 每个模式可以容纳任意数量的列。 每个节点上的每一行都将具有与DataFrame完全相同的架构。 Spark使用称为分区的概念将数据拆分为文件,以便与集群中的节点共享。
A few concepts that you should know when working with DataFrames:
使用DataFrames时应了解的一些概念:
- They are immutable. Once you’ve created a DataFrame, it cannot be changed. 他们是一成不变的。 一旦创建了DataFrame,就无法更改它。
- DataFrames can handle a wide range of data formats. For this tutorial, we’ll start with JSON data. DataFrames可以处理多种数据格式。 在本教程中,我们将从JSON数据开始。
- With the help of Spark SQL, you can query a DataFrame as you would any relational database. 借助Spark SQL,您可以像查询任何关系数据库一样查询DataFrame。
尝试您的第一个DataFrame! (Try Your First DataFrame!)
Now for the fun part! Open up a new tab and navigate to this GitHub repository: https://github.com/nickrafferty78/Apache-Spark-Is-Fun.
现在是有趣的部分! 打开一个新选项卡,并导航到以下GitHub存储库: https : //github.com/nickrafferty78/Apache-Spark-Is-Fun 。
By now I’m assuming you’ve created a GitHub account yourself. If you haven’t, you’ll need to do that first before moving on to the next step.
现在,我假设您已经创建了一个GitHub帐户。 如果还没有,则需要先执行此操作,然后再继续进行下一步。
First, fork the repository.
首先,派生存储库。

Next, navigate to your own GitHub and open up the repository that you just forked. (If these concepts are unfamiliar to you I’d encourage you to read more here: https://guides.github.com/introduction/git-handbook/. Click the ‘Code’ button and copy the URL as shown below. Next, type this command into your terminal (make sure to replace the ‘your-github-username’ with your own username):
接下来,导航到您自己的GitHub并打开您刚创建的存储库。 (如果您不熟悉这些概念,我鼓励您在这里阅读更多内容: https : //guides.github.com/introduction/git-handbook/ 。单击“代码”按钮并复制URL,如下所示。接下来,在您的终端中键入以下命令(确保将“ your-github-username”替换为您自己的用户名):
git clone https://github.com/your-github-username/Apache-Spark-Is-Fun.git
Now let’s get IntelliJ started. Open up IntelliJ and open the project that you just cloned to your computer. Navigate to the Tutorial class under src/main/scala/Tutorial.scala.
现在让我们开始IntelliJ。 打开IntelliJ,然后打开刚克隆到计算机上的项目。 导航到src / main / scala / Tutorial.scala下的Tutorial类。
创建Spark会话 (Creating the Spark Session)
There is a little starter code to help this app get set up. It should look like this:
有一些入门代码可帮助您设置此应用。 它看起来应该像这样:
import org.apache.spark.sql.SparkSession
import org.apache.spark.sql.functions._
import org.apache.log4j.{Level, Logger}
import org.apache.spark.sql.types.LongType
import Utilities._
object Tutorial extends App {
  Utilities.setupLogging()
}
Underneath Utilities.setupLogging(), copy and paste this code:
在Utilities.setupLogging()下面,复制并粘贴以下代码:
val spark = SparkSession
  .builder()
  .appName("InstrumentReviews")
  .master("local[*]")
  .getOrCreate()
Congrats, you’ve written your first Spark Session! Let’s break that down.
恭喜,您已经编写了第一个Spark会话! 让我们分解一下。
As we mentioned above, the Spark Session is your entry point to begin using DataFrames. The main things you need to know are:
如上所述,Spark Session是您开始使用DataFrames的入口点。 您需要了解的主要内容是:
The .appName method names your Spark Session. Since this section will be using the InstrumentReviews.json dataset, I am going to name it ‘InstrumentReviews’.
.appName方法命名您的Spark会话。 由于本节将使用InstrumentReviews.json数据集,因此我将其命名为“ InstrumentReviews”。
The .master method tells spark which URL to connect to. Since we are running this on your own personal computer, ‘local’ tells spark to use your personal computer instead of using an external machine. The ‘[*]’ after local is an interesting piece you might not know. This is one of the core tenets of spark, to be able to distribute data in an extremely efficient way. Your computer likely has more than one core. Each core on your computer can process jobs independently of each other. My own computer has 2 cores, so by telling spark [*], you are telling it to run on every single core in your computer.
.master方法告诉spark连接到哪个URL。 由于我们是在您自己的个人计算机上运行此程序,因此“本地”告诉spark使用您的个人计算机而不是外部计算机。 local之后的“ [*]”是您可能不知道的有趣片段。 这是spark的核心原则之一,它能够以极其有效的方式分发数据。 您的计算机可能具有多个核心。 您计算机上的每个内核都可以彼此独立地处理作业。 我自己的计算机有2个核心,因此通过告知spark [*],您是在告诉它在计算机的每个核心上运行。
Finally, .getOrCreate() creates your session.
最后, .getOrCreate()创建您的会话。
读取数据 (Reading Data)
We’re going to be working with musical instrument review data in this example. Before reading the data, it’s always good to get a lay of the land with what data you’ll be working with. Navigate to /data/InstrumentReviews.json and you should see an extremely large file filled with instrument review data. Here is an example entry:
在此示例中,我们将使用乐器评论数据。 在读取数据之前,最好先弄清楚要使用的数据。 导航到/data/InstrumentReviews.json,您应该看到一个非常大的文件,其中充满了仪器检查数据。 这是一个示例条目:
{
   "reviewerId":"A2IBPI20UZIR0U",
   "reviewerName":"cassandra tu \"Yeah, well, that's just like, u...",
   "reviewText":"Not much to write about here, but it does exactly what it's supposed to. filters out the pop sounds. now my recordings are much more crisp. it is one of the lowest prices pop filters on amazon so might as well buy it, they honestly work the same despite their pricing,",
   "overall":5.0,
   "summary":"good"
}
Now back in Tutorial.scala, underneath the Spark Session you created, copy, and paste this code:
现在回到Tutorial.scala中,在您创建的Spark会话的下面,复制并粘贴以下代码:
val firstDataFrame = spark
  .read
  .format("json")
  .option("inferSchema", "true")
  .load("data/InstrumentReviews.json")
You’ve already created the variable spark above, so in this code block, you are utilizing that spark session to read the incoming data.
您已经在上面创建了变量spark,因此在此代码块中,您正在利用该spark会话读取传入的数据。
The .format method specifies what type of structure the data is coming in. Our musical instrument review data is in JSON.
.format方法指定数据将进入的结构类型。我们的乐器检查数据为JSON。
.option with “inferSchema”, “true” is telling spark to infer the schema of the musical instrument review data without you explicitly defining it.
.option带有“ inferSchema”,“ true”的意思是告诉spark推断乐器检查数据的模式,而无需您明确定义。
.load gives spark the path to the data file.
.load使spark指向数据文件的路径。
Let’s test if that will work!
让我们测试一下是否可行!
Underneath your code for the firstDataFrame, write these two lines:
在firstDataFrame的代码下面,编写以下两行:
firstDataFrame.show()
firstDataFrame.printSchema()
If all went well you should see something like this:
如果一切顺利,您应该会看到以下内容:

root
 |-- overall: double (nullable = true)
 |-- reviewText: string (nullable = true)
 |-- reviewerId: string (nullable = true)
 |-- reviewerName: string (nullable = true)
 |-- summary: string (nullable = true)
If you see that, congrats on writing your first DataFrame!
如果看到了,恭喜您编写了第一个DataFrame!
等等,这是什么意思? (Wait, what does all this mean??)
Remember what we said in the above section, a DataFrame is a distributed collection of rows that conform to this schema.
记住我们在上一节中所说的,DataFrame是符合该模式的分布式行集合。
This is your schema:
这是您的架构:
root
 |-- overall: double (nullable = true)
 |-- reviewText: string (nullable = true)
 |-- reviewerId: string (nullable = true)
 |-- reviewerName: string (nullable = true)
 |-- summary: string (nullable = true)
When you told spark to inferSchema, this is what came up based on the structure of the file in InstrumentReviews.json.
当您将spark告知inferSchema时,这就是基于InstrumentReviews.json中文件结构的结果。
But be careful, you don’t want to get caught with Spark inferring the wrong schema. So let’s write this manually ourselves.
但是请注意,您不想被Spark推断出错误的架构。 因此,让我们自己手动编写此代码。
First, remove this line: .option(“inferSchema”, “true”) from your variable firstDataFrame.
首先,从变量firstDataFrame中删除以下行: .option(“inferSchema”, “true”) 。
Now we are going to write our first schema manually. In spark, you can create a StructType that holds an array of your StructFields.
现在,我们将手动编写第一个架构。 在spark中,您可以创建一个StructType来保存您的StructFields的数组。
什么? (A what?!)
In spark, a StructType is an object that is used to define a schema. It is populated with StructFields that define the name, type, and if the field can be nullable. So let’s see this in action.
在Spark中 , StructType是用于定义架构的对象。 它用定义名称,类型以及字段是否可以为空的StructFields填充。 因此,让我们看看实际情况。
Go to the file /data/InstrumentReviews.json. Here is your schema:
转到文件/data/InstrumentReviews.json。 这是您的架构:
{
   "reviewerId":"A2IBPI20UZIR0U",
   "reviewerName":"cassandra tu \"Yeah, well, that's just like, u...",
   "reviewText":"Not much to write about here, but it does exactly what it's supposed to. filters out the pop sounds. now my recordings are much more crisp. it is one of the lowest prices pop filters on amazon so might as well buy it, they honestly work the same despite their pricing,",
   "overall":5.0,
   "summary":"good"
}
Ok so we know that we need to name the first column ‘reviewerID’ and it will be a StringType.
好的,我们知道我们需要将第一列命名为“ reviewerID”,并且它将是StringType。
Let’s start writing our schema based on that. Go to Utilities.scala and let’s manually create our Schema.
让我们开始基于此编写模式。 转到Utilities.scala,让我们手动创建模式。
Again you should see starter code like this:
再次,您应该看到像这样的入门代码:
import org.apache.log4j.{Level, Logger}
import org.apache.spark.sql.types.{ArrayType, DoubleType, IntegerType, LongType, StringType, StructField, StructType}
object Utilities {
  def setupLogging() = {
    Logger.getLogger("org.apache.spark").setLevel(Level.ERROR)
  }
}
Underneath and outside of the setupLogging method, declare a variable.
在setupLogging方法的下面和外面,声明一个变量。
val instrumentReviewsSchema = StructType(Array(
/* Your code goes here*/
))
Now try to complete this part without checking the solution. What would you fill this with?
现在尝试在不检查解决方案的情况下完成此部分。 你会用什么来填补?
You might have been a little off on the syntax but hopefully, you were able to guess based on what was explained above. Here is what the entire instrument review schema should look like:
您可能在语法上还差一点,但是希望您能够根据上面解释的内容进行猜测。 整个仪器检查模式应如下所示:
val instrumentReviewsSchema = StructType(Array(
  StructField("reviewerId", StringType, nullable = true),
  StructField("reviewerName", StringType, nullable = true),
  StructField("reviewText", StringType, nullable = true),
  StructField("overall", DoubleType, nullable = true),
  StructField("summary", StringType, nullable = true),
))
You’ll need to tell spark to include the schema you just created. So go back to Tutorial.scala and replace the option infer schema true with .schema(instrumentReviewsSchema)
您需要告诉spark包含刚刚创建的架构。 因此,请返回Tutorial.scala并将选项推断架构true替换为.schema(instrumentReviewsSchema)
Let’s run it!
让我们运行它!
自己尝试:练习1 (Try it yourself: Exercise #1)
Now it’s time for your first exercise. Navigate to src/main/scala/ExerciseOne.scala You’ll complete the next steps in that file.
现在是您第一次锻炼的时候了。 导航到src/main/scala/ExerciseOne.scala您将完成该文件中的后续步骤。
- Go to data/yelp.json and start to understand the structure of the JSON file coming in. 转到data / yelp.json并开始了解传入的JSON文件的结构。
- In Utilities.scala, write a schema for yelp.json. You’ll have a challenge that we haven’t gone over yet with objects inside of a JSON field. I encourage you to research what that will look like. 在Utilities.scala中,为yelp.json编写一个架构。 您将面临一个挑战,我们尚未解决JSON字段内的对象。 我鼓励您研究它的外观。
- Create a spark session. You are welcome to call this whatever you like. In my solution I will call it “YelpReviews” 创建一个火花会话。 欢迎您随意拨打此电话。 在我的解决方案中,我将其称为“ YelpReviews”
- Read the DataFrame from the data/yelp.json file. Make sure to include the schema you wrote in #2. 从data / yelp.json文件读取DataFrame。 确保包括您在#2中编写的架构。
- Show and print schema for the DataFrame you wrote. 显示并打印您编写的DataFrame的架构。
That’s it! This will get you started on your first DataFrame. Make sure to read the notes above if you get stuck. Don’t continue reading until you’ve completed it!
而已! 这将使您开始使用第一个DataFrame。 如果卡住,请务必阅读以上说明。 完成阅读之前,请勿继续阅读!
If you get stuck, make sure to refer to the notes above or try to Google to figure it out before checking the solution below.
如果您遇到麻烦,请确保在查看下面的解决方案之前,先参考上面的说明或尝试让Google找出问题。
扰流板警报! 这是练习的答案。 (Spoiler alert! Here are the answers to the exercises.)
All of these are written out in AnswerKey.scala.
所有这些都写在AnswerKey.scala中。
- This structure is slightly more complicated than the musical instrument's data that we’ve worked with. I hope that was a little challenge for you. Here is what the data looks like: 这种结构比我们处理过的乐器数据要复杂得多。 我希望这对您来说是一个小挑战。 数据如下所示:
{
   "name":"Peace of Mind and Body Massage",
   "city":"Akron",
   "stars":5.0,
   "review_count":3,
   "state":"OH",
   "hours":{
      "Friday":"9:0-17:0",
      "Monday":"9:0-17:0",
      "Saturday":"9:0-20:0",
      "Tuesday":"9:0-17:0",
      "Wednesday":"9:0-17:0"
   }
2. The big challenge with this data set is the nested JSON object within “hours”. To handle this, you’ll need to do what we’ve already done, and write a StructType array filled with StructFields within the hours Structfield. Here is an example:
2.此数据集的最大挑战是在“小时”内嵌套JSON对象。 要处理此问题,您需要做已完成的工作,并在Structfield的小时内编写一个填充有StructFields的StructType数组。 这是一个例子:
StructField("hours", StructType(
  Array(
    StructField("Monday", StringType),
    StructField("Tuesday", StringType),
    StructField("Wednesday", StringType),
    StructField("Thursday", StringType),
    StructField("Friday", StringType),
    StructField("Saturday", StringType),
    StructField("Sunday", StringType)
  )
))
Here is the entire schema:
这是整个架构:
val yelpSchema = StructType(Array(
  StructField("name", StringType, nullable = true),
  StructField("city", StringType, nullable = true),
  StructField("stars", DoubleType, nullable = true),
  StructField("review_count", IntegerType, nullable = true),
  StructField("hours", StructType(
    Array(
      StructField("Monday", StringType),
      StructField("Tuesday", StringType),
      StructField("Wednesday", StringType),
      StructField("Thursday", StringType),
      StructField("Friday", StringType),
      StructField("Saturday", StringType),
      StructField("Sunday", StringType)
    )
  )),
))
3. The Spark Session is very similar to the one we wrote above. Your answer should have looked like this:
3. Spark会话与我们上面写的非常相似。 您的答案应该看起来像这样:
val spark = SparkSession
  .builder()
  .appName("YelpReviews")
  .master("local[*]")
  .getOrCreate()
4. With the schema you’ve defined, read the yelp.json file.
4.使用已定义的架构,阅读yelp.json文件。
val yelpDF = spark.read
  .schema(yelpSchema)
  .format("json")
  .load("data/yelp.json")
5. Finally show and print.
5.最后显示并打印。
yelpDF.show()
yelpDF.printSchema()
Your output should look something like this:
您的输出应如下所示:

root
 |-- name: string (nullable = true)
 |-- city: string (nullable = true)
 |-- stars: double (nullable = true)
 |-- review_count: integer (nullable = true)
 |-- hours: struct (nullable = true)
 |    |-- Monday: string (nullable = true)
 |    |-- Tuesday: string (nullable = true)
 |    |-- Wednesday: string (nullable = true)
 |    |-- Thursday: string (nullable = true)
 |    |-- Friday: string (nullable = true)
 |    |-- Saturday: string (nullable = true)
 |    |-- Sunday: string (nullable = true)
就是这样! (And that’s it!)
Huge congrats! You have successfully made it through your first exercise in Spark. You now know how to create a spark session, write a schema, and read a JSON file in Spark. Not to mention you’ve set yourself up to be able to learn a ton more about Spark. There is much more to learn, so get ready for part two where we continue into writing DataFrames and performing aggregations.
恭喜! 您已经通过Spark的第一次练习成功实现了它。 现在,您知道如何在Spark中创建Spark会话,编写架构以及读取JSON文件。 更不用说您已经设置自己能够学习很多关于Spark的信息。 还有很多东西要学习,因此请为第二部分做好准备,我们将继续编写DataFrame和执行聚合。
翻译自: https://medium.com/@nickrafferty78/apache-spark-is-fun-eadcaf141c02
阿帕奇类库


 395
395

 被折叠的 条评论
为什么被折叠?
被折叠的 条评论
为什么被折叠?
 到【灌水乐园】发言


