


apollo ios
GraphQL is a powerful tool, in this article you will learn how to use it on iOS starting from scratches using Swift.
GraphQL是一个功能强大的工具,在本文中,您将学习如何使用Swift从头开始在iOS上使用它。
一些背景 (Some Background)
As Wikipedia says
正如维基百科所说
GraphQL is an open-source data query and manipulation language for APIs, and a runtime for fulfilling queries with existing data.It provides an approach to developing web APIs, and has been compared and contrasted with REST and other web service architectures. It allows clients to define the structure of the data required, and the same structure of the data is returned from the server, therefore preventing excessively large amounts of data from being returned, but this has implications for how effective web caching of query results can be. The flexibility and richness of the query language also adds complexity that may not be worthwhile for simple APIs. It consists of a type system, query language and execution semantics, static validation, and type introspection.
GraphQL是一种用于API的开源数据查询和操作语言,并且是用于使用现有数据执行查询的运行时,它提供了一种开发Web API的方法,并且已与REST和其他Web服务体系结构进行了比较和对比。 它允许客户端定义所需数据的结构,并从服务器返回相同的数据结构,因此可以防止返回过多的数据,但这对于可以有效查询结果的Web缓存有影响。 。 查询语言的灵活性和丰富性也增加了复杂性,这对于简单的API可能不值得。 它由类型系统,查询语言和执行语义,静态验证以及类型自省组成 。
I don’t have the authority to say that GraphQL is better than Restful APIs, but it brings many benefits and flexibility that we cannot find in the latest, for example:
我无权说GraphQL比Restful API更好,但是它带来了许多好处和灵活性,这是我们最近无法找到的,例如:
- Instead of calling multiple endpoints to fetch data we have a single endpoint 我们没有调用多个端点来获取数据,而是有一个端点
- It offers a strong type system as we will see later in the article 它提供了一个强大的类型系统,我们将在本文后面看到
- We fetch the exact data that we need without any additional useless information or needing to do multiple calls to multiple endpoints to get all the information that we need 我们获取所需的准确数据,而无需任何其他无用的信息,或者需要对多个端点进行多次调用以获取我们需要的所有信息
创建一个简单的PostgreSQL数据库 (Creating a simple PostgreSQL database)
Let’s create a simple database with Postgres.
让我们用Postgres创建一个简单的数据库。
安装 (Installation)
We can basically install Postgres in 2 ways:
我们基本上可以通过两种方式安装Postgres:
Downloading Postgres.app
- Manually with Homebrew and Terminal 手动使用自制程序和终端机
使用Postgres.app (With Postgres.app)
It’s pretty straightforward:
这很简单:
Download the app from the following link
从以下链接下载应用程序
- Move it do the Application folder 将其移至“应用程序”文件夹
- Open it and click on “initialize” 打开它,然后单击“初始化”
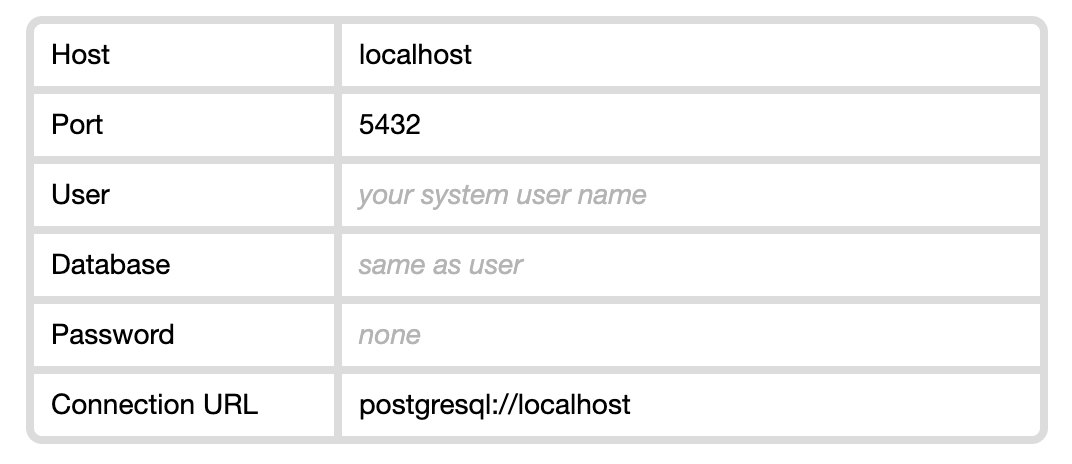
Done! You now have a PostgreSQL server running on your Mac with these default settings:
做完了! 现在,您已经在Mac上使用以下默认设置运行了PostgreSQL服务器:
手动安装 (Manual Installation)
If you opted for the manual solution let’s start by installing Homebrew, we’ll follow this guide.
如果您选择了手动解决方案,那么让我们从安装Homebrew开始,我们将按照本指南进行操作 。
- Run the following command in your terminal 在终端中运行以下命令
/usr/bin/ruby -e "$(curl -fsSL https://raw.githubusercontent.com/Homebrew/install/master/install)"2. Then
 最低0.47元/天 解锁文章


 6477
6477


 被折叠的 条评论
为什么被折叠?
被折叠的 条评论
为什么被折叠?
 到【灌水乐园】发言


