


swiftui
SwiftUI offers developers the ability to quickly mock up and tweak design elements. Creations that would have taken hours or days using Storyboards, UIViews, and Core Graphics now take a few minutes. Since the results are entirely in code, they can be highly reusable.
SwiftUI使开发人员能够快速模拟和调整设计元素。 现在,使用情节提要,UIViews和Core Graphics进行的创建可能需要花费数小时或数天的时间。 由于结果完全在代码中,因此它们可以高度重用。
建立 (Setup)
Start up Xcode and select New Project. Select Single View iOS App. Then select Swift for the language and SwiftUI for the user interface.
启动Xcode并选择New Project。 选择Single View iOS App。 然后为语言选择Swift,为用户界面选择SwiftUI。
Delete everything in the ContentView.swift file. Then copy and paste the following implementation into the ContentView.swift file:
删除ContentView.swift文件中的所有内容。 然后将以下实现复制并粘贴到ContentView.swift文件中:
In the code above, we’ve created a LevelMeter View and the MeterCell Views that it contains. The LevelMeter view is reusable and can be customized by changing the number of bars present and which value it is bound to.
在上面的代码中,我们创建了一个LevelMeter视图和其中包含的MeterCell视图。 LevelMeter视图是可重用的,并且可以通过更改显示的条数及其绑定到的值进行自定义。
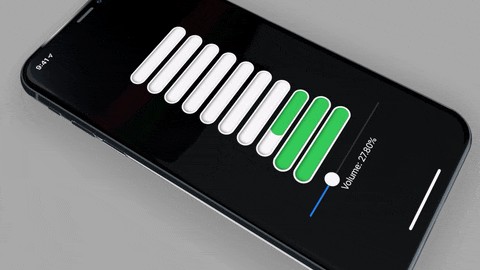
Either build and run or just preview it in the canvas. You should be able to see the meter in action by adjusting the slider. When the meter peaks out, you’ll see text animate from the top. You can easily experiment with the animation by adjusting the values in the modifier that trails the text (“BOOM”):
生成并运行,或者只是在画布中预览。 通过调整滑块,您应该能够看到正在使用的仪表。 当仪表达到峰值时,您会看到文本从顶部开始动画。 您可以通过调整尾随文本(“ BOOM”)的修饰符中的值来轻松地尝试动画:
.animation(.interpolatingSpring(stiffness: 100.0, damping: 5.0))With SwiftUI, it’s easy to experiment with small details and see the results near real-time in the canvas. This can dramatically reduce development time.
借助SwiftUI,您可以轻松地尝试一些小细节,并在画布上近乎实时地查看结果。 这样可以大大减少开发时间。
For those unfamiliar with Swift’s pattern matching operator (~=) as applied to ranges, the colorForLower() function might be confusing.
对于不熟悉Swift应用于范围的模式匹配运算符( ~= )的人, colorForLower()函数可能会造成混淆。
The ~= operator just lets us know if the range contains the “lower” variable that was passed into the function.
~=运算符只是让我们知道范围是否包含传递到函数中的“较低”变量。
The snaking animation is caused by simply changing the alignment property of the MeterCell view as it is added to the meter in the LevelMeterView. The animation grows from the aligned side.
蛇行动画是通过简单地更改MeterCell视图的对齐属性(将其添加到LevelMeterView中的仪表)而引起的。 动画从对齐的一侧开始增长。
.alignment: number.isMultiple(of: 2) ? .leading : .trailing)For a different effect, you could make all the MeterCells animate from the same side by changing the above to:
为了获得不同的效果,您可以通过将以上内容更改为以下内容,使所有MeterCell都从同一侧进行动画处理:
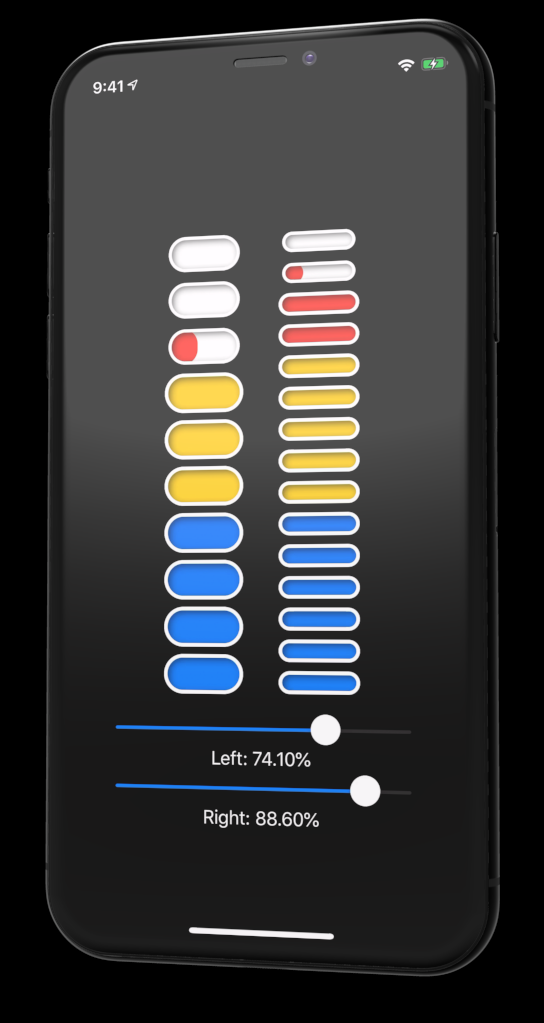
.alignment: .trailingVery simple changes can have very large effects. Reusable components allow us to make large changes in a way that’s almost as easy as copying and pasting. For example, I added a second meter bar, a slider, and another text label. I also changed the lower-range color to blue. It took about a minute. It looks like so:
非常简单的更改会产生很大的影响。 可重用的组件使我们能够以几乎与复制和粘贴一样简单的方式进行大型更改。 例如,我添加了第二个仪表栏,一个滑块和另一个文本标签。 我还将较低范围的颜色更改为蓝色。 花了大约一分钟。 看起来像这样:
挑战性 (Challenges)
- Match the changes above. 匹配上面的更改。
- Make the sliders vertical. 使滑块垂直。
- Move the percentage labels and animated “BOOM” text into the LevelMeter view. 将百分比标签和动画的“ BOOM”文本移动到LevelMeter视图中。
4. Add more and different color ranges.
4.添加更多和不同的颜色范围。
翻译自: https://medium.com/better-programming/build-a-customizable-meter-in-swiftui-a44fabeb08c2
swiftui


 1492
1492

 被折叠的 条评论
为什么被折叠?
被折叠的 条评论
为什么被折叠?
 到【灌水乐园】发言


