


Since April 2020, all apps that use a third-party or social login service are required to offer Sign in with Apple if they want to be accepted in the App Store.
自2020年4月起,如果所有希望使用App Store接受使用第三方或社交登录服务的应用程序,则必须提供“使用Apple登录”功能。
In this tutorial, we’ll go through the steps of adding Sign in with Apple to that iMessage clone.
在本教程中,我们将逐步完成将“ 使用Apple登录 ”添加到该iMessage克隆的步骤。
If you get lost during this tutorial, you can always check the completed project in this GitHub repo. If you run into any errors, there’s a troubleshooting section at the end of the repo’s README that you can check on.
如果您在本教程中迷路了,可以随时在GitHub存储库中检查已完成的项目。 如果遇到任何错误,则在回购自述文件的末尾有一个疑难解答部分,您可以检查该部分。
用Apple登录什么? (What’s Sign in with Apple?)
“Sign in with Apple makes it easy for users to sign in to your apps and websites using their Apple ID. Instead of filling out forms, verifying email addresses, and choosing new passwords, they can use Sign in with Apple to set up an account and start using your app right away. All accounts are protected with two-factor authentication for superior security, and Apple will not track users’ activity in your app or website.”
“使用Apple登录可以使用户使用其Apple ID轻松登录到您的应用和网站。 他们可以使用“使用Apple登录”来设置帐户并立即开始使用您的应用程序,而无需填写表格,验证电子邮件地址和选择新密码。 所有帐户均受到两因素身份验证的保护,以提供更高的安全性,Apple不会跟踪用户在您的应用程序或网站中的活动。”
你需要什么 (What you need)
- iOS 13+ iOS 13以上
- Xcode 11+ Xcode 11以上
- Node.js 10+ Node.js 10以上
A Stream account
流帐号
Enrollment in the Apple Developer Program
1.配置客户端项目 (1. Configuring the Client Project)
If your app is still early in development or using the iMessage clone project, follow the steps in the image below. If your application is already in production, you can jump to the next image.
如果您的应用仍处于开发初期或正在使用iMessage clone项目 ,请按照下图中的步骤操作。 如果您的应用程序已经在生产中,则可以跳至下一个图像。
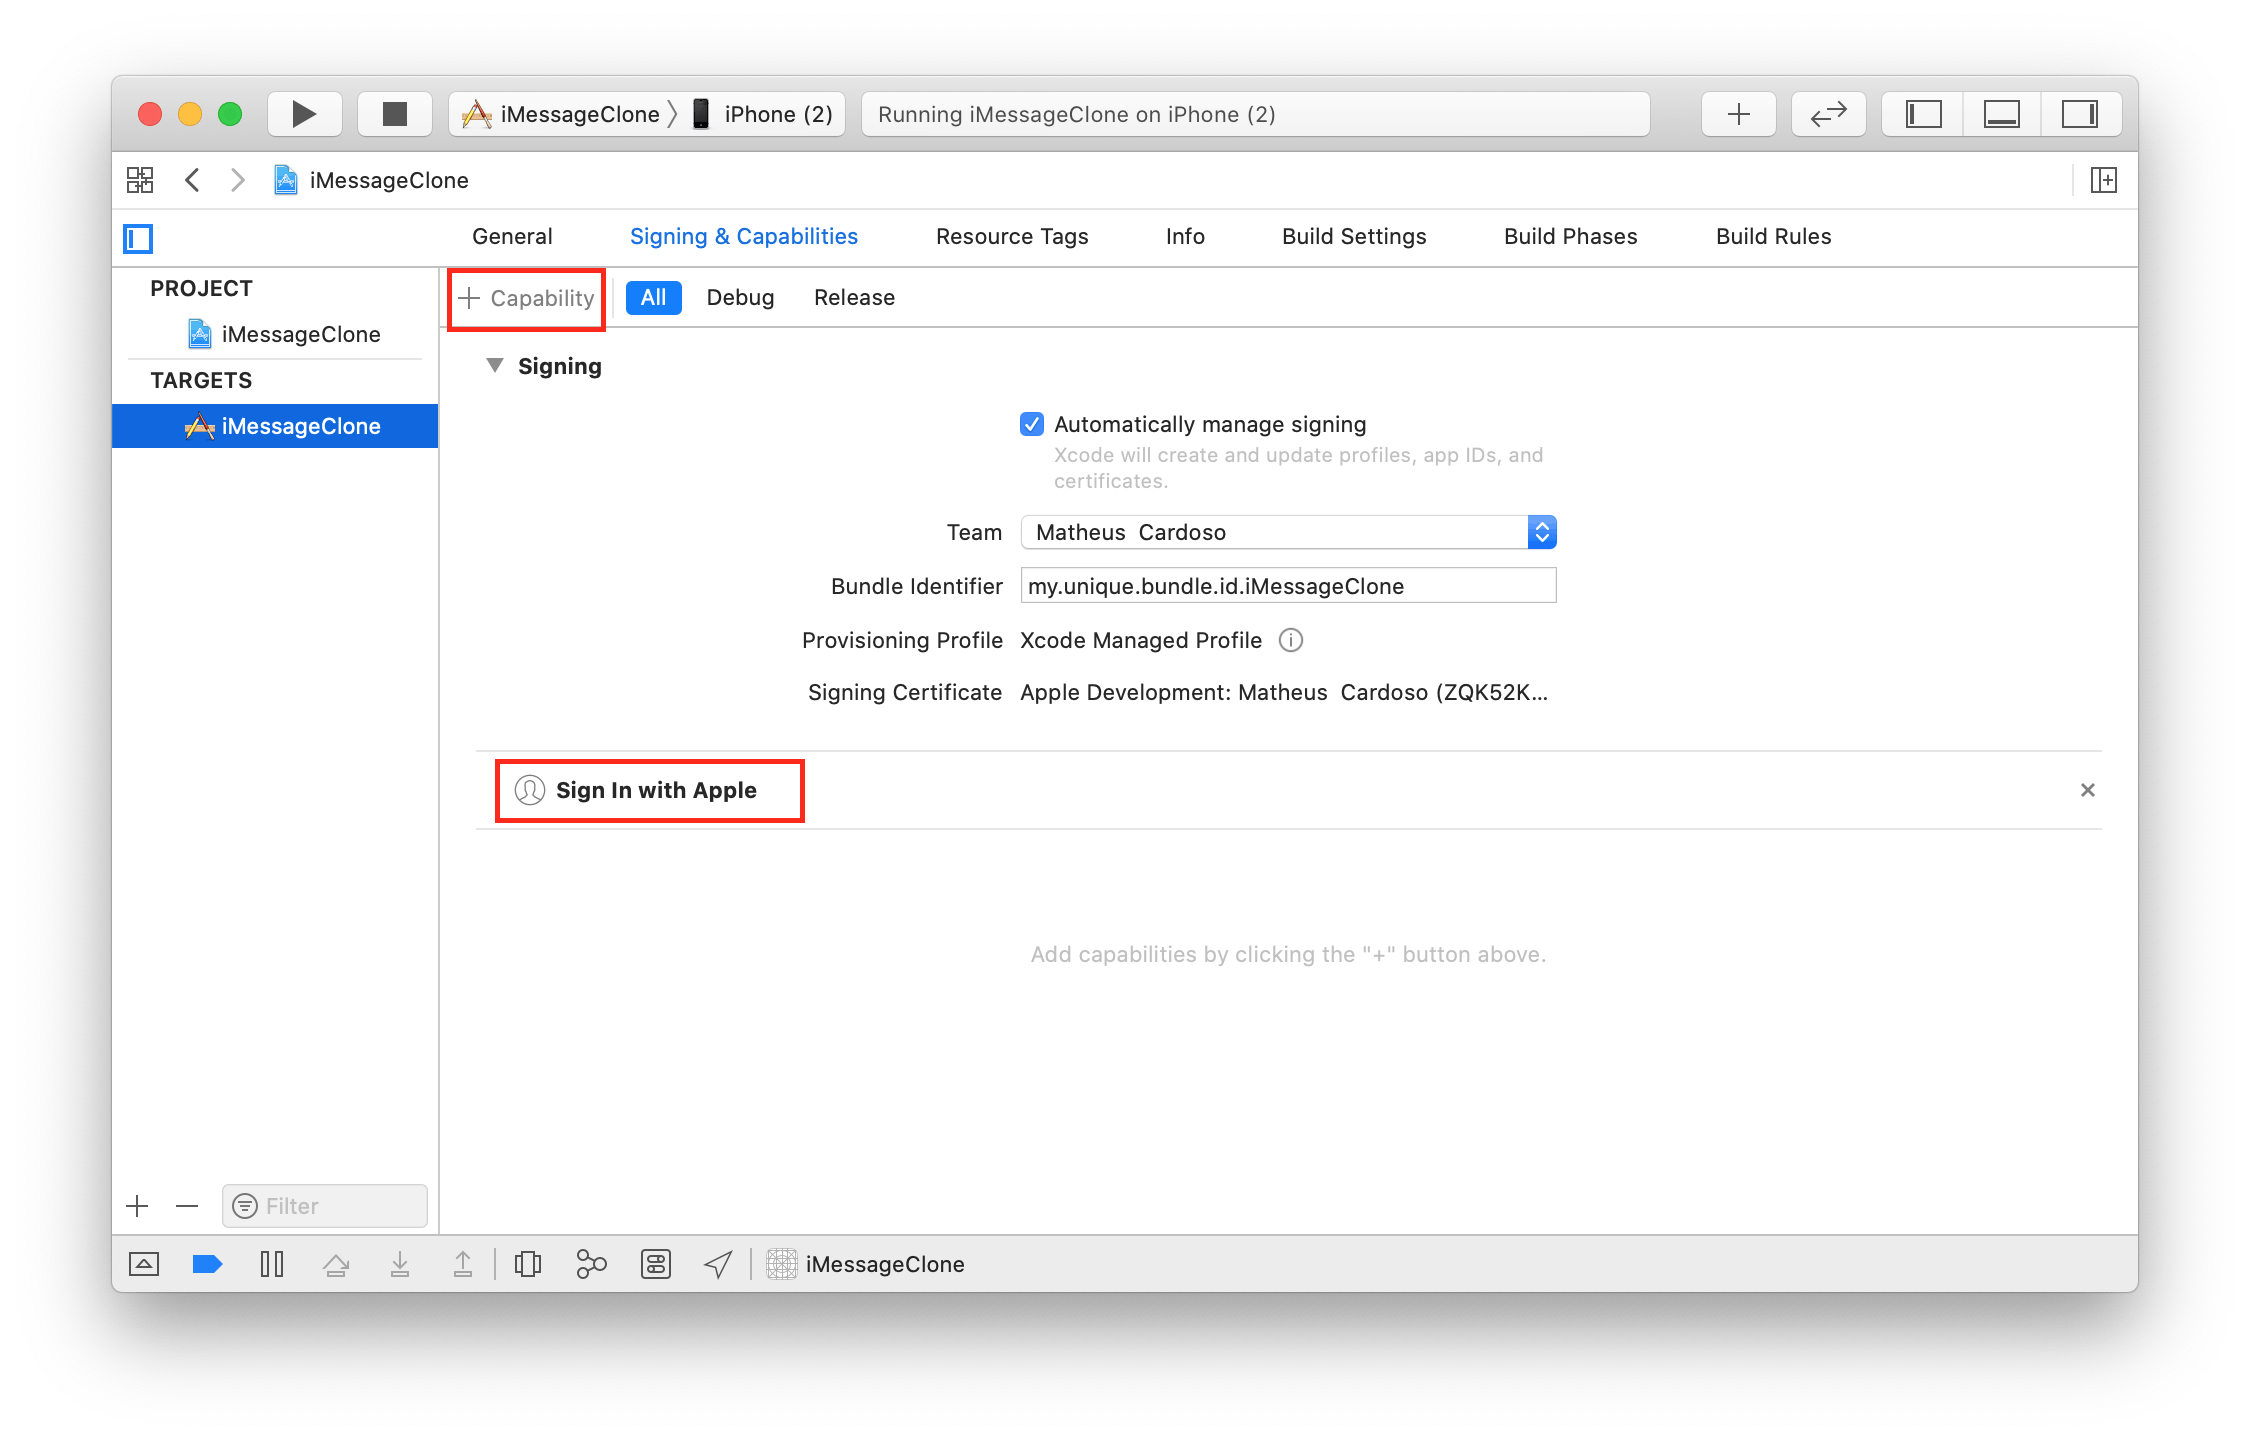
Now, you need to add the Sign in with Apple capability in the “Signing & Capabilities” tab of your target.
现在,您需要在目标的“签名和功能”选项卡中添加“使用Apple登录”功能。
2.添加登录按钮 (2. Adding the Sign-In Button)
To add the sign-in button, we’ll use the AuthenticationServices framework, which provides all the functionality needed, including UI elements.
要添加登录按钮,我们将使用AuthenticationServices框架,该框架提供所需的所有功能,包括UI元素。
We also need to add the authentication screen, which will appear before the contacts screen. Let’s create an AuthenticationViewController.swift file and paste in the following code:
我们还需要添加身份验证屏幕,该屏幕将出现在联系人屏幕之前。 让我们创建一个AuthenticationViewController.swift文件,并粘贴以下代码:
import UIKit
import AuthenticationServices


class AuthViewController: UIViewController {
    override func viewDidLoad() {
        super.viewDidLoad()
        setupSignInButton()
    }

    func setupSignInButton() {
        let button = ASAuthorizationAppleIDButton()
        button.center = view.center
        view.addSubview(button)
        button.addTarget(self, action: #selector(handleSignInPress), for: .touchUpInside)
    }

    @objc func handleSignInPress() {
        performSegue(withIdentifier: "kAuthToContactsSegueId",
                     sender: nil)
    }
}
Now, let’s add this new screen as the first screen in the storyboard. If you’re using the iMessage clone project, it should be the root view controller of the navigation controller. To finish it up, set up a segue from it to the contacts screen with the ID kAuthToContactsSegueId:
现在,让我们将此新屏幕添加为情节提要中的第一个屏幕。 如果您使用的是iMessage克隆项目,则它应该是导航控制器的根视图控制器。 要完成此过程,请使用ID kAuthToContactsSegueId从它到联系人屏幕设置一个kAuthToContactsSegueId :
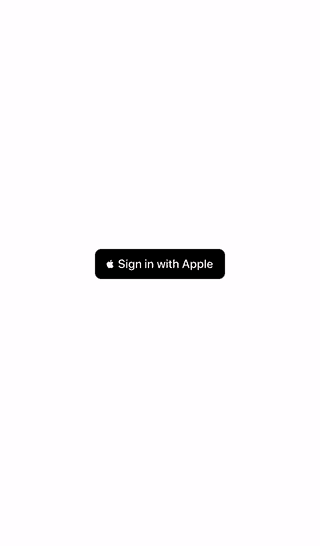
Now, run the project, and you should have a button that, when pressed, leads to the contacts screen.
现在,运行该项目,您应该有一个按钮,当按下该按钮时,它会转到联系人屏幕。
Of course, there’s no real authentication happening here yet. We’ll look into that in the next steps.
当然,这里还没有真正的身份验证。 我们将在后续步骤中对此进行研究。
3.设置后端 (3. Setting Up the Back End)
Before we build real authentication into the client, we’ll need a back end that can generate a Stream token when given the Apple ID credentials. If you already have a back end, you can use one of Stream’s server-side chat libraries to set it up similarly.
在将真正的身份验证构建到客户端之前,我们需要一个后端,当给定Apple ID凭据时,该后端可以生成Stream令牌。 如果您已经有后端,则可以使用Stream的服务器端聊天库之一来进行类似设置。
To keep things short, we’ll build a simple Node.js/Express back end with one endpoint: /authenticate. We'll also use the node-persist package to persist new user data the first time they authenticate. If you're not interested in building the back end yourself or are having problems, you can get the complete code in the repository.
为了简短起见,我们将构建一个具有一个端点的简单Node.js / Express后端: /authenticate 。 我们还将使用node-persist包在新用户数据进行首次身份验证时保留它们。 如果您不希望自己构建后端或遇到问题,可以在存储库中获取完整的代码。
In the terminal, run the following commands:
在终端中,运行以下命令:
$ mkdir backend; cd backend
$ npm init --yes
$ npm install stream-chat apple-auth express node-persist jsonwebtoken --save
$ touch index.js
The following code snippets can be copied in sequence into the index.js file.
可以将以下代码片段按顺序复制到index.js文件中。
Let’s start coding our index.js by importing the objects we need:
让我们开始通过导入所需的对象来编码index.js :
const StreamChat = require('stream-chat').StreamChat;
const AppleAuth = requite('apple-auth');
const express = require('express');
const storage = require('node-persist');
const jwt = require('jsonwebtoken');
Now, configure the Stream Chat client with the credentials that you get in your Stream dashboard:
现在,使用您在Stream仪表板中获得的凭据配置Stream Chat客户端:
const apiKey = '[api_key]'
const serverKey = '[server_key]'
const client = new StreamChat(apiKey, serverKey);
Configure the Apple Auth client:
配置Apple Auth客户端:
const appleAuth = new AppleAuth({
  client_id: "[client_id]", // eg: my.unique.bundle.id.iMessageClone
  team_id: "[team_id]", // eg: FWD9Q5VYJ2
  key_id: "[key_id]", // eg: 8L3ZMA7M3V
  scope: "name email"
}, './config/AuthKey.p8');
For details on filling in those parameters, read apple-auth’s SETUP.md.
有关填写这些参数的详细信息,请阅读apple-auth的SETUP.md 。
If you’re using something other than Node.js for your back end, there are versions of this library for other languages, such as Go. If you can’t find it for your preferred back-end stack, you’ll have to read through apple-auth’s source code and Sign in with Apple’s API specifications to implement something similar from scratch.
如果您在后端使用的不是Node.js,则该库有其他语言版本,例如Go 。 如果找不到您首选的后端堆栈,则必须通读apple-auth的源代码并使用Apple的API规范登录才能从头开始实现类似的功能。
Initialize Express and the node-persist storage:
初始化Express和node-persist存储:
var app = express();
app.use(express.json());


storage.init();
Now, let’s start building the handler for the /authenticate endpoint by extracting the parameters we need from the request:
现在,让我们从请求中提取所需的参数,开始为/authenticate端点构建处理程序:
app.post('/authenticate', async (req, res) => {
  const {appleUid, appleAuthCode, name} = req.body;
  console.log(`[INFO] Sign in attempt with request: ${JSON.stringify(req.body)}`)
Now, we verify the appleAuthCode with Apple’s servers using apple-auth and extract the user’s email address from the response:
现在,我们使用apple-auth在Apple的服务器上验证appleAuthCode ,并从响应中提取用户的电子邮件地址:
let email;
  try {
    const response = await appleAuth.accessToken(appleAuthCode);
    email = jwt.decode(response.id_token).email;
    console.log(`[INFO] User identity confirmed by Apple.`)
  } catch {
    console.log(`[ERROR] Could not confirm user identity with Apple.`);
    res.sendStatus(401);
    return;
  }
If we have an email and a name was supplied in the authentication request, we need to store that information in our persistent storage:
如果我们有电子邮件,并且在身份验证请求中提供了名称,则需要将该信息存储在持久存储中:
if(email && name) {
    const streamId = Buffer.from(email).toString('base64').replace(/=/g, '@');
    const userData = {streamId, email, name}
    await storage.set(appleUid, userData);
    console.log(`[INFO] User registered with email: ${email}. Derived streamId: ${streamId}`)
  }
Information other than the Apple UID and the auth code is only guaranteed to be given by Apple the first time the user tries to sign in. We use this fact to determine when to register the user, and it’s why we need to save the information and resupply it in every authentication response.
除Apple UID和auth代码外,其他信息仅由Apple保证在用户首次尝试登录时提供。我们使用此事实确定何时注册用户,这就是为什么我们需要保存信息和在每个身份验证响应中重新提供它。
Now, let’s finish the handler by fetching the user data from local storage and relaying it in the response:
现在,让我们通过从本地存储中获取用户数据并在响应中进行中继来完成处理程序:
const userData = await storage.get(appleUid);


  if (!userData) {
    console.log(`[ERROR] User not found in persistent storage.`);
    res.sendStatus(404);
    return;
  }


  const response = {
    apiKey,
    streamId: userData.streamId,
    streamToken: streamClient.createToken(userData.streamId),
    email: userData.email,
    name: userData.name
  }


  console.log(`[INFO] User signed in successfully with response: ${JSON.stringify(response)}.`);


  res.send(response);
});
Finally, let’s configure the Express app to listen on port 4000:
最后,让我们配置Express应用程序以监听端口4000 :
const port = process.env.PORT || 4000;
app.listen(port);
console.log(`Running on port ${port}`);
Now, we can close index.js and leave the back end running with the following command:
现在,我们可以关闭index.js并使后端运行以下命令:
$ node index.jsIf this is working, opening localhost:4000/authenticate in your browser will display Cannot GET /authenticate, which is OK because we'll use POST in the client application.
如果可行,在浏览器中打开localhost:4000/authenticate将显示Cannot GET /authenticate ,这是可以的,因为我们将在客户端应用程序中使用POST 。
4.使用Apple ID请求授权 (4. Request Authorization With an Apple ID)
Let’s go back to Xcode.
让我们回到Xcode。
First, we need to code the function to interface with the /authenticate endpoint we just created. Let’s create a file named Authentication.swift and start by defining the request and response structures.
首先,我们需要对函数进行编码以与我们刚创建的/authenticate端点接口。 让我们创建一个名为Authentication.swift的文件,并从定义请求和响应结构开始。
import Foundation


struct AuthRequest: Codable {
    let appleUid: String
    let appleAuthCode: String
    let name: String?

    func encoded() -> Data {
        try! JSONEncoder().encode(self)
    }
}


struct AuthResponse: Codable {
    let apiKey: String
    let streamId: String
    let streamToken: String
    let email: String
    let name: String?

    init?(data: Data) {
        guard let res = try? JSONDecoder().decode(AuthResponse.self, from: data) else {
            return nil
        }

        self = res
    }
}
Thanks to Codable, we can easily transform those objects into and from JSON, which comes in handy as we define the actual function to interface with /authenticate by sending AuthRequest and receiving AuthResponse:
多亏了Codable ,我们可以轻松地将这些对象与JSON相互转换,这在派发AuthRequest并接收AuthResponse来定义与/authenticate接口的实际函数时AuthRequest AuthResponse :
func authenticate(request: AuthRequest,
                  completion: @escaping (AuthResponse) -> Void) {
    var urlReq = URLRequest(url: URL(string: "http://[your local ip]:4000/authenticate")!)
    urlReq.httpBody = request.encoded()
    urlReq.httpMethod = "POST"
    urlReq.addValue("application/json", forHTTPHeaderField: "Content-Type")
    urlReq.addValue("application/json", forHTTPHeaderField: "Accept")

    URLSession.shared.dataTask(with: urlReq) { data, response, error in
        completion(AuthResponse(data: data!))
    }.resume()
}
Reminder: Sign in with Apple will only work on a real device. Make sure to replace [your local ip] with your Mac’s local network IP address, which is not localhost or 127.0.0.1. To find it out, run the following command on a terminal in your Mac:
提醒:使用Apple登录只能在真实设备上使用。 确保将[your local ip]替换为Mac的本地网络IP地址,该地址不是localhost或127.0.0.1 。 要找出答案,请在Mac的终端上运行以下命令:
$ ipconfig getifaddr en0
192.168.0.11 // example output
Now, to authenticate the user with Apple, let’s go back to AuthViewController.swift and edit the button’s press handler to add this behavior:
现在,要通过Apple验证用户,让我们回到AuthViewController.swift并编辑按钮的新闻处理程序以添加以下行为:
@objc func handleSignInPress() {
    let provider = ASAuthorizationAppleIDProvider()
    let request = provider.createRequest()
    request.requestedScopes = [.fullName, .email]


    let controller = ASAuthorizationController(authorizationRequests: [request])
    controller.delegate = self
    controller.presentationContextProvider = self
    controller.performRequests()
}
This implementation will make pressing the Sign in with Apple button trigger the Sign in with Apple screen.
此实现将使按下“使用Apple登录”按钮触发“使用Apple登录”屏幕。

However, it won’t compile yet because we haven’t conformed AuthViewController to a couple of required protocols.
但是,由于我们尚未使AuthViewController符合几个必需的协议,因此它尚未编译。
We need to conform AuthViewController to ASAuthorizationControllerPresentationContextProviding to tell Sign in with Apple which window to render the flow in:
我们需要遵守AuthViewController到ASAuthorizationControllerPresentationContextProviding与苹果告诉登录呈现在流动的窗口:
extension AuthViewController: ASAuthorizationControllerPresentationContextProviding {
    func presentationAnchor(for controller: ASAuthorizationController) -> ASPresentationAnchor {
        return self.view.window!
    }
}
Most importantly, we also need the conformance to ASAuthorizationControllerDelegate, which will let us receive the Apple credentials after the user completes the sign-in flow. We can then use this to authenticate — and then configure our Stream client and move to the contacts screen:
最重要的是,我们还需要符合ASAuthorizationControllerDelegate ,这将使我们在用户完成登录流程后接收Apple凭据。 然后,我们可以使用它进行身份验证-然后配置我们的Stream客户端并移至“联系人”屏幕:
extension AuthViewController: ASAuthorizationControllerDelegate {
    func authorizationController(controller: ASAuthorizationController, didCompleteWithAuthorization authorization: ASAuthorization) {
        let cred = authorization.credential as! ASAuthorizationAppleIDCredential
        let code = String(data: cred.authorizationCode!, encoding: .utf8)!

        var name: String? = nil
        if let fullName = cred.fullName {
            name = PersonNameComponentsFormatter().string(from: fullName)
        }

        let request = AuthRequest(appleUid: cred.user, appleAuthCode: code, name: name)


        authenticate(request: request) { [weak self] res, error in
            DispatchQueue.main.async {
                guard let res = res else {
                    let alert = UIAlertController(title: "Error", message: error, preferredStyle: .alert)
                    alert.addAction(UIAlertAction(title: "OK", style: .default))
                    self?.present(alert, animated: true)
                    return
                }

                Client.config = .init(apiKey: res.apiKey, logOptions: .info)
                let extraData = UserExtraData(name: res.name)
                let user = User(id: res.streamId, extraData: extraData)
                Client.shared.set(user: user, token: res.streamToken)

                self?.performSegue(withIdentifier: "kAuthToContactsSegueId", sender: nil)
            }
        }
    }
}
Finally, we have a functioning Sign in with Apple implementation:
最后,我们可以使用Apple实施功能登录:

Since it’s a new user, we don’t have any contacts showing.
由于它是新用户,因此没有任何联系人显示。
The back-end logs should look similar to this:
后端日志应类似于以下内容:
[INFO] Sign in attempt with request: {"name":"Matheus Cardoso","appleUid":"001482.30f24b627a403ee4837b27a403ee6a22.1758","appleAuthCode":"ce73969641ba34969a5e69641ba349697.0.nruys.ElBakUhUlBakUhUZMB-xJQ"}
[INFO] User identity confirmed by Apple.
[INFO] User registered with email: matheus@cardo.so. Derived streamId: bWF0aGV1c0BjYXJkby5zbw@@
[INFO] User signed in successfully with response: {"apiKey":"zgtb7uugmvx3","streamId":"bWF0aGV1c0BjYXJkby5zbw@@","streamToken":"eyJhbGciOiJ5cCI6IkpXVInR5cCI6IkpXVCJ9.eyJ1c2VyX2lkIjoiY1c2VyX2lkFjMEJqWVhKa2J5NXpid0BAIn0.1FqhMbQU70EB-i837w7oKcWLeon2FqhMbQU707cdSP8","email":"matheus@cardo.so","name":"Matheus Cardoso"}.
结语 (Wrapping Up)
Congratulations! You can now build Sign in with Apple authentication into any iOS app. Make sure to read Sign in with Apple’s guidelines and documentation to keep up to date with the requirements and announcements.
恭喜你! 现在,您可以将使用Apple身份验证的登录功能构建到任何iOS应用中。 请务必阅读使用Apple的指南和文档登录,以了解最新的要求和声明。
Thanks for reading, and happy coding!
感谢您的阅读,并祝您编程愉快!
翻译自: https://medium.com/better-programming/adding-sign-in-with-apple-to-your-ios-app-569e326b3e48


 1万+
1万+


 被折叠的 条评论
为什么被折叠?
被折叠的 条评论
为什么被折叠?
 到【灌水乐园】发言


