


json转jwt
In this part of the tutorial, we’ll integrate JSON Web Token, or JWT, to our Node.js app and use it for user authentication. On the diagram above, I outlined the main use case for using JWT. User authenticates and receives a JWT. Only Auth Service has a Private Key, and uses it to create a JWT with a jwt.sign(), which will include any payload (userId in our case). jwt.sign() also sets up a JWT expiration time. No backend services are required to persist JWT; it is a client’s responsibility. Any other service, when it receives a request from a user with a JWT, verifies the JWT with jwt.verify(), and extracts the payload (userId) using a Public Key. userId can be used for further requests processing. Let’s get started.
在本教程的这一部分中,我们将JSON Web令牌(即JWT)集成到我们的Node.js应用程序中,并将其用于用户身份验证。 在上图中,我概述了使用JWT的主要用例。 用户认证并接收JWT。 只有Auth Service有一个Private Key ,并使用它来创建一个jwt.sign()的JWT,其中将包含任何有效负载(在本例中为userId )。 jwt.sign()还会设置JWT到期时间。 持久化JWT不需要后端服务; 这是客户的责任。 任何其他服务,当其通过JWT接收到来自用户的请求时,都使用jwt.verify()验证JWT,并使用Public Key提取有效负载( userId )。 userId可用于进一步的请求处理。 让我们开始吧。
In the previous part of the tutorial, we implemented POST /api/v1/user request which creates a user in MongoDB. If you don’t follow the tutorial, you can get the sources and use them as a start point:
在本教程的上一部分中,我们实现了POST / api / v1 / user请求,该请求在MongoDB中创建了一个用户。 如果您不遵循本教程,则可以获取源并将其用作起点:
$ git clone https://github.com/losikov/api-example.git
$ cd api-example
$ git checkout tags/v5.0.0$ yarn install
Install jsonwebtoken npm:
安装jsonwebtoken npm:
$ yarn add jsonwebtoken @types/jsonwebtoken私钥/公钥 (Private/Public Keys)
We need to generate a private and public key pair. It is ok to store them in git for development and test purposes, but for production deployment, you might need another strategy. Also, only authentication/login service needs a private key to generate JWT, while other services need public key only. In this example, there’s a single code base, and no split between services. But, private key will be used to generate JWT, and public key to verify/decode it.
我们需要生成一个私钥和公钥对。 出于开发和测试目的,可以将它们存储在git中,但是对于生产部署,您可能需要其他策略。 此外,唯一的身份验证/登录服务需要一个私钥生成JWT,而其他服务只需要公钥。 在此示例中,只有一个代码库,并且服务之间没有拆分。 但是,私有密钥将被用来产生JWT和公钥来验证/解码。
Private key can be used for both, generating and verifying the token. Instead of a private key you can use just a random secret value.
私钥可用于生成和验证令牌。 除了私钥,您还可以使用随机秘密值。
To generate the keys, run the following commands. It will ask you for a passphrase. In the example, I used “PEMPassPhrase”.
要生成密钥,请运行以下命令。 它将要求您输入密码。 在示例中,我使用了“ PEMPassPhrase”。
$ mkdir config/jwt
$ openssl genpkey -algorithm RSA -aes256 -out config/jwt/private.pem
$ openssl rsa -in config/jwt/private.pem -pubout -outform PEM -out config/jwt/public.pem
Let’s add the file paths and a passphrase to env files. Update the schema file, config/.env.schema, add:
让我们将文件路径和密码添加到env文件中。 更新架构文件config / .env.schema ,添加:
PRIVATE_KEY_FILE=
PRIVATE_KEY_PASSPHRASE=
PUBLIC_KEY_FILE=
To the file with default values, config/.env.defaults, add:
向具有默认值的文件config / .env.defaults ,添加:
PRIVATE_KEY_FILE=./config/jwt/private.pem
PRIVATE_KEY_PASSPHRASE=PEMPassPhrase
PUBLIC_KEY_FILE=./config/jwt/public.pem
For the convenience, to read the variables easily, update src/config/index.ts file. Add the variables to Config interface, and to config constant:
为了方便起见,为了轻松读取变量,请更新src / config / index.ts文件。 将变量添加到Config接口和config常量中:
生成JWT (Generate JWT)
Update src/api/services/user.ts imports and file header to read private and public key files:
更新的src / API /服务/ user.ts进口和文件头读取私钥和公钥文件:
Check the options, line 18–21 which will be used for a token generation, and line 24–26 which will be used for token verification.
检查选项,第18–21行将用于生成令牌,而第24–26行将用于令牌验证。
To the same file, add createAuthToken and login functions. Include them to the default export (line 41 below):
在同一文件中,添加createAuthToken和登录功能。 将它们包括到默认导出中(下面的第41行):
login function from the code snippet above accepts login and password as arguments. It finds the user in DB (line 19), verifies the password (line 24), and finally calls createAuthToken (line 29). It returns a user id, a JWT, and an expiration time.
上面代码片段中的login函数接受login和password作为参数。 它在DB中找到用户(第19行),验证密码(第24行),最后调用createAuthToken (第29行)。 它返回一个用户ID,一个JWT和一个到期时间。
createAuthToken generates a token with a single jwt.sing() call (line 3). userId is passed as a payload. The generated JWT has an expiration time specified in signOptions, 14 days. But, I get it programmatically in lines 5–7, to pass it back to a user and to cache the tokens which will be described in the part 8.
createAuthToken通过一次jwt.sing()调用生成令牌(第3行)。 userId作为有效负载传递。 生成的JWT的到期时间为signOptions中指定的14天。 但是,我在第5-7行以编程方式获取了它,将其传递回用户并缓存了令牌,这将在第8部分中进行描述。
sign() callback doesn’t return the expiration time; decode JWT in order to get the expiration time is CPU intensive operation
sign()回调不返回到期时间; 解码JWT以获取到期时间是CPU密集型操作
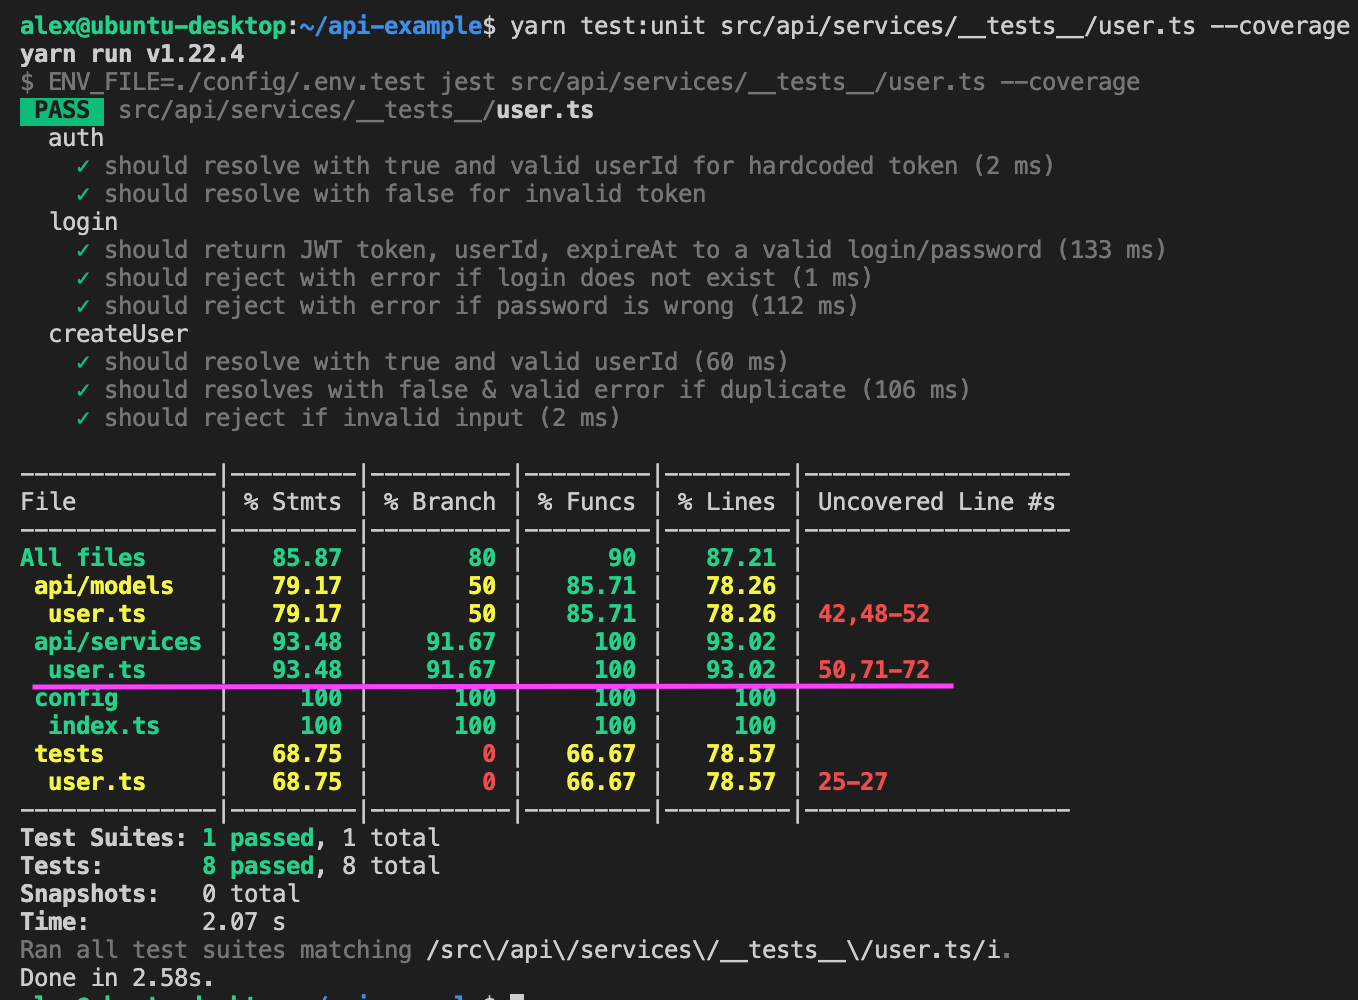
Let’s cover login service and token generation with unit tests. Create src/tests folder and user.ts helper file in it with the following content:
让我们用单元测试介绍登录服务和令牌生成。 创建src /测试 其中包含以下内容的文件夹和user.ts帮助文件:
dummy function returns a fake email, password, and name.
虚拟函数返回伪造的电子邮件,密码和名称。
createDummy creates a fake user and saves it to database.
createDummy创建一个伪造的用户并将其保存到数据库。
createDummyAndAuthorize creates a fake user, saves it to a database, and generates JWT with the user id.
createDummyAndAuthorize创建一个伪造的用户,将其保存到数据库,并使用用户ID生成JWT。
Finally, update src/api/services/__tests__/user.ts import createDummy from the file we’ve just created, and add tests for login:
最后,更新src / api / services / __ tests __ / user.ts从我们刚刚创建的文件中导入createDummy ,并添加用于登录的测试:
If you run unit tests with the --coverage flag, we’ll see that we don’t cover jwt.sign() failure callback:
如果使用--coverage标志运行单元测试,我们将看到我们不涉及jwt.sign()故障回调:
There’re might be some elegant ways to make jwt.sign to fail (call callback with an error), but I like a simple and straightforward solution. Create src/api/services/__tests__/user_failure.ts file with the following content:
可能有一些优雅的方法可以使jwt.sign失败(调用回调并出错),但是我喜欢一个简单明了的解决方案。 使用以下内容创建src / api / services / __ tests __ / user_failure.ts文件:
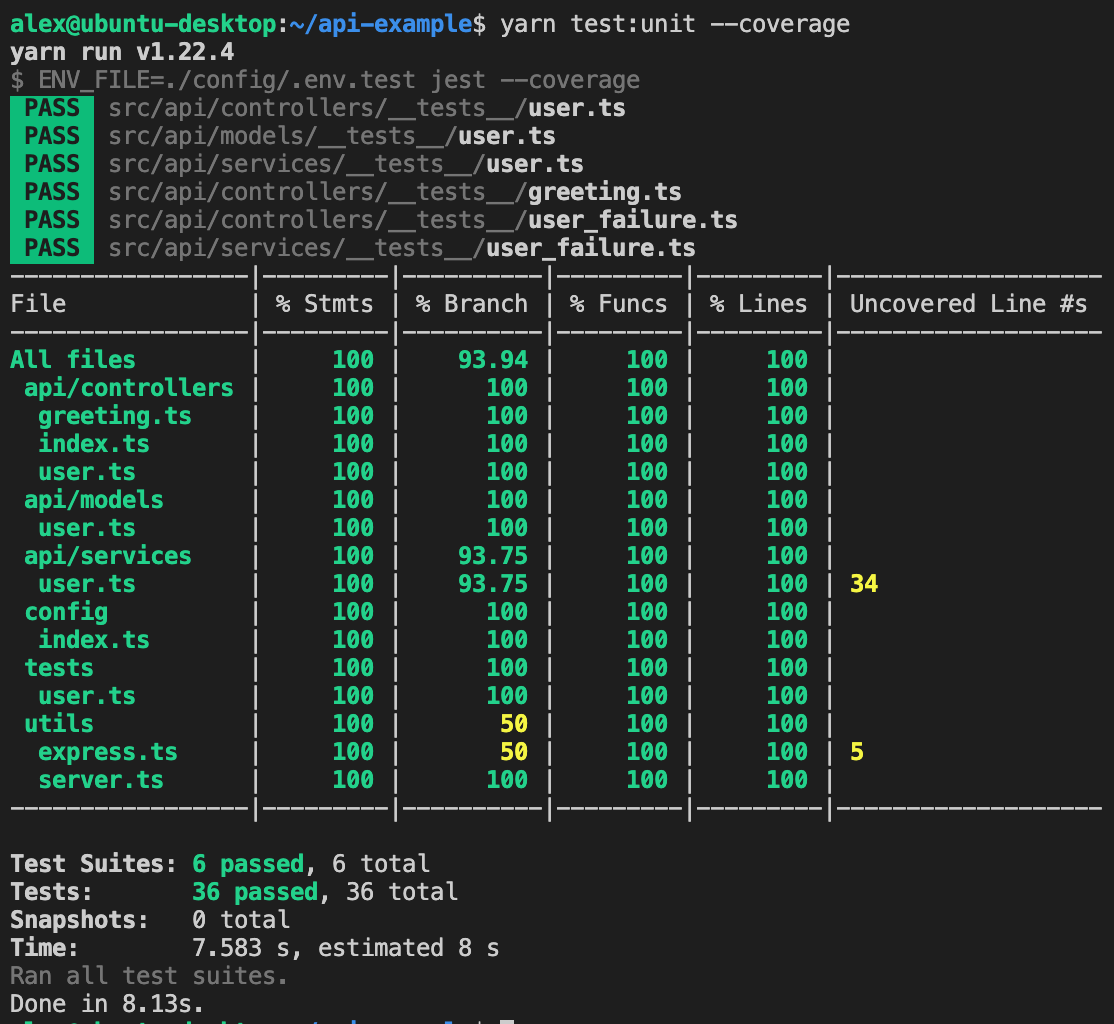
If you run yarn unit:tests --coverage now, you will see that src/api/services/user.ts is covered 100%.
如果现在运行yarn unit:tests --coverage ,您将看到src / api / services / user.ts被覆盖100%。
验证JWT (Verify JWT)
Update auth function in src/api/services/user.ts to call jwt.verify:
更新src / api / services / user.ts中的auth函数以调用jwt.verify :
Update auth unit tests in src/api/services/__tests__/user.ts:
在src / api / services / __ tests __ / user.ts中更新身份验证单元测试:
If you run all unit tests now, you will see that 'should return 200 & valid response to authorization with fakeToken request' test fails as it uses fake token. Update src/api/controllers/__tests__/greeting.ts headers and the test to create a user authenticated with JWT, and check for a real user id. Don’t forget to connect to DB in beforeAll, and close the connection in afterAll:
如果现在运行所有单元测试,您将看到“应使用假令牌请求返回200及对授权的有效响应”测试失败,因为它使用假令牌。 更新src / api / controllers / __ tests __ / greeting.ts标头和测试以创建通过JWT认证的用户,并检查真实的用户ID。 不要忘了连接到数据库中beforeAll,并关闭毕竟连接:
Run unit tests, include the --coverage flag. All we need to do now is to implement a login request.
运行单元测试,包括--coverage标志。 我们现在要做的就是实现一个登录请求。
POST / api / v1 / login (POST /api/v1/login)
It is not a good practice to pass a password in a plain text. Use btoa/atob in client/server at least.
以纯文本形式传递密码不是一个好习惯。 至少在客户端/服务器中使用btoa / atob 。
In config/openapi.yml, add /login section and add bearerFormat to bearerAuth section as below:
在config / openapi.yml中,添加/ login部分,并将bearerFormat添加到bearerAuth部分,如下所示:
Implement login function in src/api/controllers/user.ts:
在src / api / controllers / user.ts中实现登录功能:
Add the import and describe(‘POST /api/v1/login’, …) to src/api/controllers/__tests__/user.ts:
将import和describe('POST / api / v1 / login',…)添加到src / api / controllers / __ tests __ / user.ts中:
In this example, I don’t add all extensive unit tests. To keep close to 100% coverage, add describe(‘login failure’, …) to src/api/controllers/__tests__/user_failure.ts:
在此示例中,我没有添加所有广泛的单元测试。 为了保持接近100%的覆盖率,请将describe('login failure',…)添加到src / api / controllers / __ tests __ / user_failure.ts中:
We are good as of coverage now:
截至目前我们的覆盖范围是:
For production code, you should add more tests for all corner cases, and also you can add end to end unit tests calling a sequence of POST /api/v1/user, POST /api/v1/login, etc.
对于生产代码,应该为所有极端情况添加更多测试,还可以添加端到端单元测试,以调用POST / api / v1 / user , POST / api / v1 / login等序列。
智威汤逊的缺点 (JWT Drawbacks)
Token size, around 1Kb. Keep in mind if your user requests are frequent, small, and simple, and you need high throughput and performance.
令牌大小,大约1Kb。 请记住,如果您的用户请求频繁,小而简单,并且需要高吞吐量和性能。
CPU intensive. On my I9–9880H (MacBook Pro 16 2019), it can verify only ~16K tokens per second (auth method, code below). Keep in mind in your architecture that Node.js is a single core app and not designed for CPU consuming processing. You can scale it vertically though even on a single host with multiple cores, or use a cache for already verified tokens (next 2 parts).
CPU密集型。 在我的I9–9880H(MacBook Pro 16 2019)上,它每秒只能验证约16,000个令牌(身份验证方法,下面的代码)。 请记住,在您的体系结构中,Node.js是单个核心应用程序,并非为消耗CPU的处理而设计。 即使在具有多个内核的单个主机上,您也可以垂直扩展它,或者将缓存用于已验证的令牌(接下来的2部分)。
Insert this code to src/api/services/__tests__/user.ts to try it yourself:
将此代码插入src / api / services / __ tests __ / user.ts可以自己尝试:
You can download the project sources from git https://github.com/losikov/api-example. Git commit history and tags are organized based on the parts.
您可以从git https://github.com/losikov/api-example下载项目源。 Git提交历史记录和标签是根据零件进行组织的。
In the next two parts of the tutorial, we’ll review the caching in Node.js, internal with node-cache and external with redis.
在本教程的后两部分中,我们将回顾Node.js中的缓存,内部使用node-cache进行缓存,外部使用redis进行缓存。
翻译自: https://medium.com/@losikov/part-6-authentication-with-jwt-json-web-token-ec78459b9c88
json转jwt


 2733
2733


 被折叠的 条评论
为什么被折叠?
被折叠的 条评论
为什么被折叠?
 到【灌水乐园】发言


