


azure flask
介绍 (Intro)
This tutorial will be based on creating a CRUD Flask Web app and then deploying it on azure. We will use the PostgreSQL database for this web app. The tutorial has three important parts —
本教程将基于创建CRUD Flask Web应用程序,然后将其部署在Azure上。 我们将为此Web应用程序使用PostgreSQL数据库。 本教程包含三个重要部分-
- Creating the Web App and testing it locally 创建Web应用程序并在本地进行测试
- Testing locally with database on Azure 在Azure上使用数据库进行本地测试
- Deploying Web App with Docker using Azure DB for PostgreSQL. 使用适用于PostgreSQLAzure DB与Docker一起部署Web App。
什么是CRUD (What is CRUD)
Simple definition for CRUD —
CRUD的简单定义—
C- Create, R- Read, U- Update, D- Delete
C-创建,R-读取,U-更新,D-删除
These are the four functionalities that every single web application has. You will see a lot of tutorials for creating a CRUD web app(well, this is also one of that :P). Because generally, this is the next step when you are learning some kind of MVC (Model-View-Controller) framework or programming language.
这些是每个Web应用程序都具有的四个功能。 您将看到很多有关创建CRUD Web应用程序的教程(嗯,这也是其中之一:P)。 因为通常来说,这是学习某种MVC(模型-视图-控制器)框架或编程语言时的下一步。
如何建立应用程式 (How to create App)
Let’s start, by creating a very simple web app for this. You can clone my Github repo (This repo has the source code to test the webapp locally) and start creating the web app.
让我们开始,为此创建一个非常简单的Web应用程序。 您可以克隆我的Github存储库(此存储库包含用于在本地测试Web应用程序的源代码),然后开始创建Web应用程序。
Requirements for the Web App:-
Web应用程序的要求:
Python, Flask, Github, PostgreSQL, Docker
Python,Flask,Github,PostgreSQL,Docker
本地测试 (Test locally)
After cloning the GitHub, install the requirements. For this, just run the command (All command ran on MacOS).
克隆GitHub之后,安装需求。 为此,只需运行命令(All命令在MacOS上运行)。
pip -r install requirements.txtThis command will install all the packages mentioned in the requirements.txt.
此命令将安装requirements.txt中提到的所有软件包。
Now, create a database of our flask web app.
现在,创建我们的flask Web应用程序的数据库。
PostgreSQL (PostgreSQL)
Install PostgreSQL if you don’t have it. Once installed , PostgreSQL creates a default user for you i.e. ‘postgres’.
如果没有PostgreSQL,请安装它。 安装后,PostgreSQL为您创建一个默认用户,即“ postgres”。
To create the database, you need to log in as the user and password must be set during the installation process of PostgreSQL. After running this command, enter your password.
要创建数据库,您需要登录,因为必须在PostgreSQL安装过程中设置用户和密码。 运行此命令后,输入密码。
psql -U postgresLet’s create a database named flask_project.
让我们创建一个名为flask_project的数据库。
postgres=# CREATE DATABASE flask_project;After creating a database we will make a fruits table in which we have three columns — id, fruit, quantity
创建数据库后,我们将创建一个水果表,其中有三列-id,水果,数量
CREATE TABLE fruits(
id SERIAL PRIMARY KEY,
fruit VARCHAR(255),
quantity VARCAR(255));
Now, test the application by running the command
现在,通过运行命令来测试应用程序
python app.pyYou will see a screen like below and it has all the instructions. To request a server you can use Postman or curl command.
您将看到如下屏幕,其中包含所有说明。 要请求服务器,可以使用Postman或curl命令。

在Azure DB for PostgreSQL上使用数据库进行本地测试 (Test locally with database on Azure DB for PostgreSQL)
When we tested the application previously, the database was on a local system. Now, we are gonna host our database on Azure.
当我们之前测试应用程序时,数据库位于本地系统上。 现在,我们将在Azure上托管数据库。
The following are the steps to create a database server on azure.
以下是在azure上创建数据库服务器的步骤。
- Search PostgreSQL and then click on Azure DB for PostgreSQL server. 搜索PostgreSQL,然后单击Azure DB for PostgreSQL服务器。
- Click on single server. 单击单个服务器。
- Next fill up all the information asked in the form. 接下来,填写表格中要求的所有信息。

Once you are finished with the above steps, then we will start migrating our PostgreSQL database.
完成上述步骤后,我们将开始迁移PostgreSQL数据库。
迁移PostgreSQL数据库 (Migrate PostgreSQL database)
Since we have database right now on our local system, we will use two command-line utility to migrate database to Azure. These are pg_dump and psql.
由于我们现在在本地系统上有数据库,因此我们将使用两个命令行实用程序将数据库迁移到Azure。 这些是pg_dump和psql。
pg_dump can be used to extract out PostgreSQL database into a script file and then psql will be used to import the data into our azure DB i.e. our target database.
pg_dump可用于将PostgreSQL数据库提取到脚本文件中,然后psql将用于将数据导入我们的Azure数据库(即目标数据库)中。
The below command is ran to create a script file that contains the data.
运行以下命令以创建包含数据的脚本文件。
Or I have already provided a database file in the git repository and you can also use that. If you are using the file provided in the repository then just skip the next command and move onto the importing of the database.
或者我已经在git存储库中提供了一个数据库文件,您也可以使用它。 如果您使用的是存储库中提供的文件,则只需跳过下一个命令,然后继续导入数据库即可。
pg_dump — host=localhost — username=postgres — dbname=flask_project — file=flask_project.sqlNext, to import the data into the target database, run the command mentioned below.
接下来,要将数据导入目标数据库,请运行下面提到的命令。
psql — file=flask_project.sql — host=testserver.database.windows.net — port=5432 — username=login@testserver — dbname=postgresYou can find the information needed to run the above command on the overview page of your Azure database server. Below you can find a screenshot of the overview page.
您可以在Azure数据库服务器的概述页面上找到运行上述命令所需的信息。 您可以在下面找到概述页面的屏幕截图。

Run that command and you have successfully imported data into the target database.
运行该命令,您已成功将数据导入目标数据库。
测试与Azure数据库的连接 (Testing connection with Azure db)
To test the connection with azure DB, Connection strings are needed to be included in our files. Open database.py, and change the settings with the values you have obtained from the overview page of the azure database. Add sslmode because SSL connections between your server and client applications protect against MITM (man in the middle) attacks.
要测试与Azure DB的连接,需要在我们的文件中包含连接字符串。 打开database.py,并使用您从azure数据库的概述页面获得的值更改设置。 添加sslmode是因为服务器和客户端应用程序之间的SSL连接可以抵御MITM(中间人)攻击。
host = “<server-name>”
dbname = “<database-name>”
user = “<admin-username>”
password = “<admin-password>”
sslmode = “require”
Once you have updated it, run the command
更新后,运行命令
python app.pyYou can test your application once again by using postman or curl command.
您可以使用postman或curl命令再次测试您的应用程序。
创建Dockerfile并在本地对其进行测试 (Creating Dockerfile and Testing it Locally)
I have already included the Dockerfile in the git repository. Or you can create a new file in IDE. Below you can find the Dockerfile for the web app.
我已经将Dockerfile包含在git存储库中。 或者,您可以在IDE中创建一个新文件。 您可以在下面找到该Web应用程序的Dockerfile。
FROM python:3.6.1RUN mkdir /codeWORKDIR /codeADD requirements.txt /code/RUN pip install -r requirements.txtADD . /code/# sshENV SSH_PASSWD "root:Docker!"RUN apt-get update \&& apt-get install -y --no-install-recommends dialog \&& apt-get update \&& apt-get install -y --no-install-recommends openssh-server \&& echo "$SSH_PASSWD" | chpasswdCOPY sshd_config /etc/ssh/COPY init.sh /usr/local/bin/RUN chmod u+x /usr/local/bin/init.shEXPOSE 5000 2222#COPY sshd_config /etc/ssh/sshd_configENTRYPOINT ["init.sh"]After adding the file you can test it locally if the Dockerfile is working or not.
添加文件后,您可以在本地测试它,无论Dockerfile是否正常工作。
使用Docker在Azure上部署WebApp。 (Deploy WebApp on Azure using Docker.)
Before deploying it locally we need to configure the application settings in the azure portal and add few lines in our app.py or you can also check out the sample app at GitHub (This repo has the source code for deploying webapp on azure).
在本地部署它之前,我们需要在azure门户中配置应用程序设置,并在我们的app.py中添加几行,或者您也可以在GitHub上查看示例应用程序(此存储库包含在azure上部署webapp的源代码)。
Add the lines below in app.py
在app.py中添加以下行
dbuser=os.environ['db_admin_user']dbpass=os.environ['db_password']dbhost=os.environ['db_server_name']dbname=os.environ['db_name']dbsslmode = os.environ['db_ssl_mode']Its recommended to keep the database settings in azure portal. As, application settings are directly injected into the docker container as an environment variable automatically.
建议将数据库设置保留在Azure门户中。 因此,应用程序设置会自动作为环境变量直接注入到docker容器中。
Next, replace line
接下来,替换行
conn_string = "host={0} user={1} dbname={2} password={3}".format(host, user, dbname, password)With the line below. We just need to replace the variable name as we are now getting the database settings from our Azure portal application settings.
与下面的行。 我们现在只需从Azure门户应用程序设置中获取数据库设置,只需替换变量名即可。
conn_string = "host={0} user={1} dbname={2} password={3} sslmode={4}".format(dbhost, dbuser, dbname, dbpass, dbsslmode)Once you are finished with updating the app.py then we are gonna create a web app on azure using docker. You can follow the steps that I have listed in my previous article.
完成更新app.py之后,我们将使用docker在azure上创建一个Web应用程序。 您可以按照上一篇文章中列出的步骤进行操作。
After creating the web app, click on the configuration in the left pane. And add application settings as shown below.
创建Web应用程序后,单击左窗格中的配置。 并如下所示添加应用程序设置。
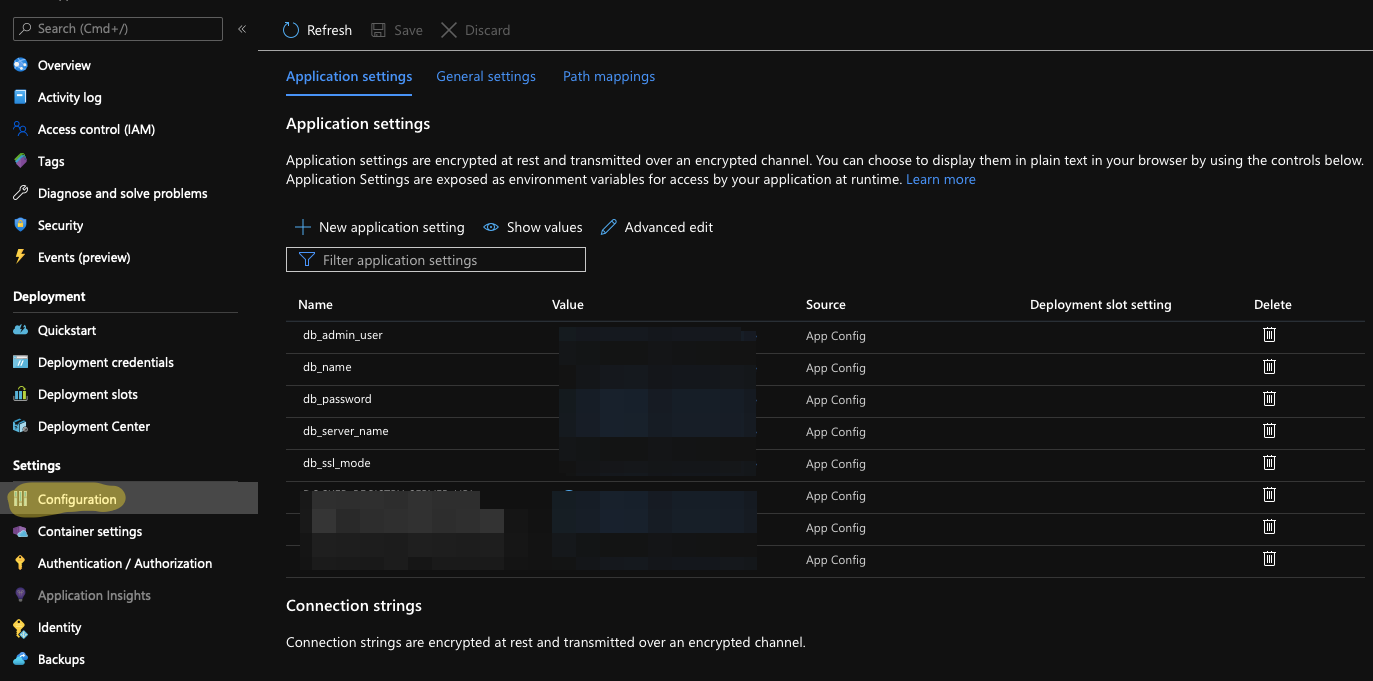
You need to add these particular settings in configuration and the values for these settings can be found on the overview page of the azure database.
您需要在配置中添加这些特定设置,并且这些设置的值可以在azure数据库的概述页面上找到。
db_admin_user, db_password, db_server_name, db_name, db_ssl_modeAfter updating both app.py and application settings in the Azure portal you can stop the app and restart it.
在Azure门户中更新app.py和应用程序设置后,您可以停止应用程序并重新启动它。
Now you can access the URL provided by azure for your web app and test the CRUD application.
现在,您可以访问azure为您的Web应用程序提供的URL,并测试CRUD应用程序。
结论 (Conclusion)
In this article, We learned about how to create a simple CRUD web app and test the web app by deploying it on azure with docker. We also went through various stages of creating an application when a database is hosted locally and when the database is hosted on azure. All feedback and suggestions are appreciated. View the source code used for deploying the Web App here and the source code used for testing the Web App locally here.
在本文中,我们了解了如何创建一个简单的CRUD Web应用程序以及如何通过使用docker在azure上部署Web应用程序来测试该Web应用程序。 当数据库托管在本地且数据库托管在Azure上时,我们还经历了创建应用程序的各个阶段。 感谢所有反馈和建议。 查看用于部署Web应用程序的源代码在这里和源代码,用于本地测试的Web应用程序在这里 。
翻译自: https://medium.com/swlh/deploying-crud-flask-web-app-with-docker-on-azure-d83544522ea0
azure flask


 655
655

 被折叠的 条评论
为什么被折叠?
被折叠的 条评论
为什么被折叠?
 到【灌水乐园】发言


