


组件填充panel
Inserting a component in the middle of the Hilt component hierarchy is not possible. However, you can create a custom component with a Hilt component as a parent and access its scoped types using entry points. In the article, we’ll see what all this implies and how to add a custom component in the Dagger 2 codelab code.
无法在Hilt组件层次结构的中间插入组件。 但是,您可以使用Hilt组件作为父组件来创建自定义组件,并使用入口点访问其范围类型。 在本文中,我们将了解所有这些含义以及如何在Dagger 2代码实验室代码中添加自定义组件。
The Dagger 2 codelab goes through adding Dagger to a multiple-Activity application. As the user can log in and out of the app, user information is handled in a Dagger component with a lifespan longer than activity components.
Dagger 2代码实验室通过将Dagger添加到多活动应用程序中来进行。 由于用户可以登录和注销应用程序,因此用户信息将在Dagger组件中处理,其使用寿命比活动组件更长。
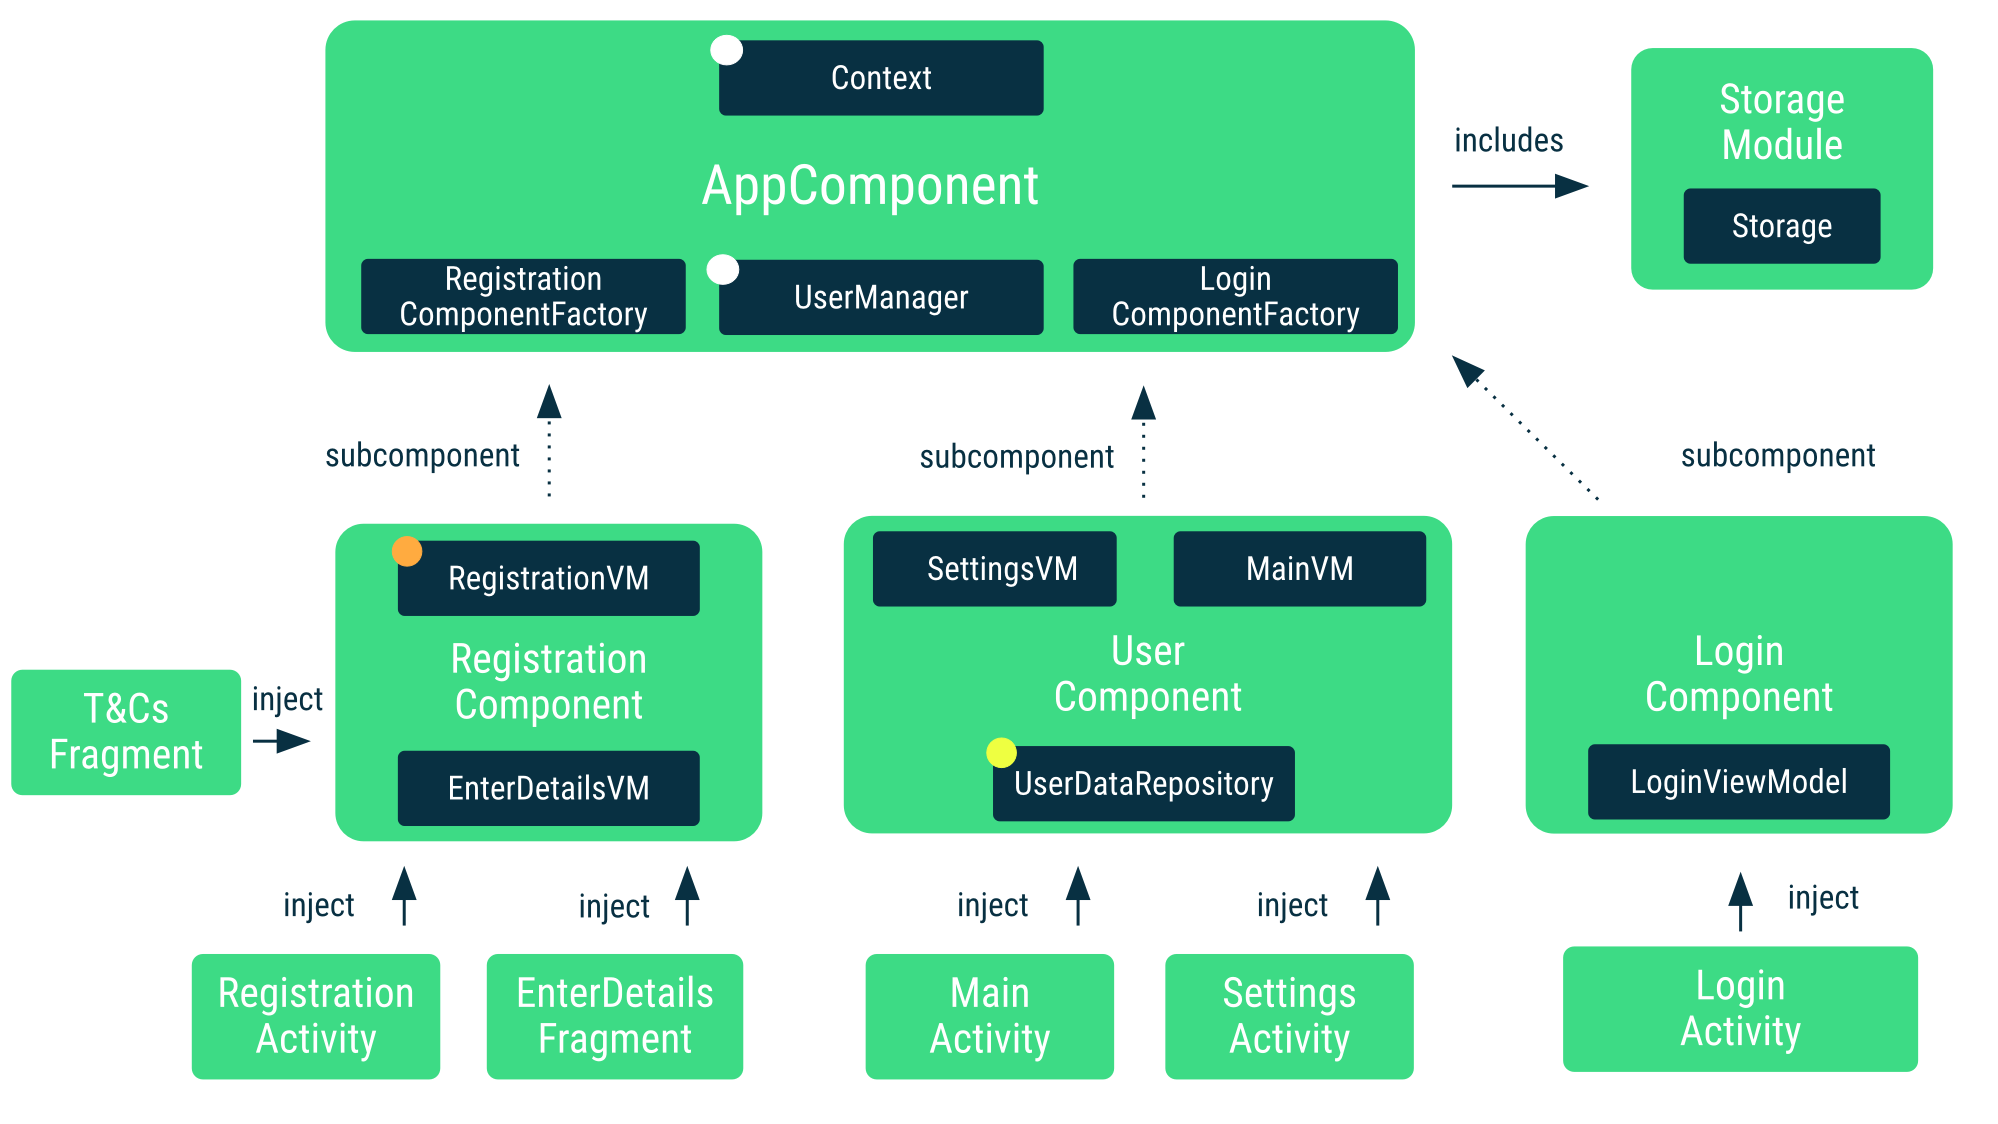
In the diagram above, notice how MainActivity and SettingsActivity access the UserComponent with UserDataRepository scoped to it. The in-memory UserDataRepository handles information related to a logged-in user. When the user logs out, we want to remove the info from memory.
在上图中,请注意MainActivity和SettingsActivity如何访问范围为UserDataRepository的UserComponent 。 内存中的UserDataRepository处理与已登录用户有关的信息。 当用户注销时,我们要从内存中删除信息。
In Hilt and Dagger, every component must be held by an object (you can think of it as a lifecycle owner) that knows when the component needs to be created or destroyed. In our example, that class is UserManager that keeps track of logins and logouts. When the user logs in, a new component is created and when the user logs out, the component is destroyed. In that way, MainActivity and SettingsActivity can access the same instance of the component to get injected by it.
在Hilt and Dagger中,每个组件都必须由一个对象(您可以将其视为生命周期所有者)持有,该对象知道何时需要创建或销毁该组件。 在我们的示例中,该类是UserManager ,它跟踪登录和注销。 当用户登录时,将创建一个新组件,而当用户注销时,该组件将被销毁。 这样, MainActivity和SettingsActivity可以访问组件的相同实例以被其注入。
All components of this app except UserComponent can be mapped to Hilt’s standard components: AppComponent maps to Hilt’s ApplicationComponent while RegistrationComponent and LoginComponent map to ActivityComponent.
该应用程序的除 UserComponent 之外的所有组件都可以映射到Hilt的标准组件: AppComponent映射到Hilt的ApplicationComponent而RegistrationComponent和LoginComponent映射到ActivityComponent 。
What can we do to make UserComponent more Hilt-friendly? We have different possibilities:
我们该怎么做才能使UserComponent更加友好? 我们有不同的可能性:
Scope
UserDataRepositoryto theApplicationComponentand handle nullability when the user is logged out. This is what the Migrating your Dagger app to Hilt codelab does. Not ideal, but could work in this case. However, it might add some tricky race conditions to deal with on a user switch.将
UserDataRepository为ApplicationComponent并在用户注销时处理可为空性。 这就是将Dagger应用程序迁移到Hilt codelab的过程 。 不理想,但是可以在这种情况下工作。 但是,这可能会增加一些棘手的竞争条件,以便在用户切换时进行处理。Make
MainActivityandSettingsActivityfragments, and have theUserDataRepositoryscoped to the activity (Hilt’sActivityRetainedComponent) where those fragments are used. This is a “doing stuff to fit the framework rather than the framework fitting the use case” sort of solution. This doesn’t even work for all situations as you might need to access user information in other places that aren’t tied to the activity like a broadcast receiver.制作
MainActivity和SettingsActivity片段,并将UserDataRepository范围限定为使用这些片段的活动(Hilt的ActivityRetainedComponent)。 这是一种“适合框架而不是适合用例的框架”的解决方案。 这甚至无法在所有情况下都起作用,因为您可能需要在与活动无关的其他地方(例如广播接收器)访问用户信息。Keep the same navigation structure and add the
UserComponentto be used by Hilt.保持相同的导航结构,并添加Hilt要使用的
UserComponent。
As an exercise to learn more about the flexibility of Hilt, let’s cover option 3 in this post: adding a component to the Hilt component hierarchy.
为了进一步了解Hilt的灵活性,我们在本文中介绍选项3:向Hilt组件层次结构添加组件。
制定设计决策 (Hilt design decisions)
Hilt is opinionated on its component hierarchy as it contains the most common set of components an Android app typically uses. Due to compatibility concerns and Hilt not knowing how to create your component (e.g. what userId to use), it’s not possible to insert a component between the layers (e.g. making a custom component X subcomponent of ApplicationComponent, and parent of ActivityRetainedComponent).
Hilt在其组件层次结构方面持坚决态度,因为它包含Android应用程序通常使用的最常见的组件集。 由于兼容性方面的考虑,并且Hilt不知道如何创建您的组件(例如,要使用的userId ),因此无法在各层之间插入组件(例如,创建ApplicationComponent的自定义组件X子组件,以及ActivityRetainedComponent父代)。
What is possible is adding a component to the hierarchy as a leaf component. In our case, we could make our custom component UserComponent to be a subcomponent of ApplicationComponent as seen in the image.
可以将一个组件作为叶组件添加到层次结构中。 在本例中,我们可以使自定义组件UserComponent成为ApplicationComponent的子组件,如图所示。
The use case in this article consists of adding a custom component (i.e.
UserComponent) to the hierarchy that hasApplicationComponentas a parent. However, as we’ll see later, you can make your custom component extend any Component you want, either a predefined Hilt component or your own other custom one.本文中的用例包括向以
ApplicationComponent为父级的层次结构中添加自定义组件(即UserComponent)。 但是,正如我们稍后将看到的那样,您可以使自定义组件扩展所需的任何组件,可以是预定义的Hilt组件,也可以是您自己的其他自定义组件。
The main difference between inserting and adding a component is that if you insert a component in the hierarchy, its scoped bindings are available in its subcomponents (components below in the hierarchy) whereas if you add a component, they won’t. You could make those scoped bindings flow down (or being available in) the hierarchy if you create your own hierarchy parallel to Hilt’s one. However, that’d make you lose the @AndroidEntryPoint functionality and you’d have to use entry points to obtain dependencies in Android framework classes.
插入和添加组件之间的主要区别在于,如果在层次结构中插入组件,则其作用域绑定可在其子组件(层次结构中位于下方的组件)中使用,而如果添加组件,则不会。 如果您创建自己的与Hilt层次结构平行的层次结构,则可以使这些范围绑定向下(或在层次结构中可用)。 但是,这会使您失去@AndroidEntryPoint功能,并且必须使用入口点来获取Android框架类中的依赖项。
As we’ll be adding a component to the hierarchy in our example, we won’t have UserDataRepository (UserComponent’s scoped type) available as a binding in @AndroidEntryPoint classes, so we won’t be able to inject it as any other scoped type:
由于在示例中将组件添加到层次结构中,我们将无法在@AndroidEntryPoint类中将UserDataRepository ( UserComponent的作用域类型)用作绑定,因此无法像其他任何注入方式一样范围类型:
/* Copyright 2020 Google LLC.
   SPDX-License-Identifier: Apache-2.0 */
@Singleton
class AnalyticsRepository @Inject constructor(...) { ... }


class MainActivityAnalyticsAdapter @Inject constructor(
  // AnalyticsRepository is available as it's scoped to ApplicationComponent
  analyticsRepository: AnalyticsRepository,


  // 💥 Build time error!
  // UserDataRepository is NOT available to Hilt in MainActivity as the binding
  // is not available in ActivityComponent, it's in UserComponent and it's not
  // propagated down the Hilt components hierarchy
  userDataRepository: UserDataRepository
) { ... }
We’ll see later what are the different options to obtain the scoped instance of UserDataRepository in our classes.
稍后我们将在类中了解获得UserDataRepository范围实例的不同选项。
将组件添加到层次结构 (Adding a component to the hierarchy)
As shown in the custom components docs, you can declare a component using the @DefineComponent annotation.
如自定义组件文档中所示 ,您可以使用@DefineComponent批注声明一个组件。
/* Copyright 2020 Google LLC.
   SPDX-License-Identifier: Apache-2.0 */
// Annotation for scoping to UserComponent
@Scope
@MustBeDocumented
@Retention(value = AnnotationRetention.RUNTIME)
annotation class LoggedUserScope


// Types scoped to this component must be annotated with @LoggedUserScope
@LoggedUserScope
// Make UserComponent subcomponent of ApplicationComponent
@DefineComponent(parent = ApplicationComponent::class)
interface UserComponent {


    // Builder to create instances of UserComponent
    @DefineComponent.Builder
    interface Builder {
        fun setUser(@BindsInstance user: User): UserComponent.Builder
        fun build(): UserComponent
    }
}
We made UserComponent a subcomponent of ApplicationComponent as specified in the parent parameter of the @DefineComponent annotation. Additionally, we created the @LoggedUserScope to be able to scope types to UserComponent. Use the builder annotated with @DefineComponent.Builder to create instances of UserComponent, as you’ll see later, this is what UserManager will be using.
如@DefineComponent批注的父参数中所指定,我们使UserComponent成为ApplicationComponent的子组件。 另外,我们创建了@LoggedUserScope ,以便能够将类型的作用域范围扩展到UserComponent 。 使用带有@DefineComponent.Builder批注的构建器来创建UserComponent实例,这将在以后看到,这是UserManager将使用的。
Use
@DefineComponentto define a new custom component you can use in your app. It takes in the parent component as a parameter. The new component will extend the parent component meaning that all parent bindings will be available in the new component. Because of our the specific use case for this blog post, we used Hilt’s ApplicationComponent, however, you can make it extend any component you want: it could be a Hilt component or any other custom component you already have defined.使用
@DefineComponent定义可以在应用程序中使用的新自定义组件。 它以父组件作为参数。 新组件将扩展父组件,这意味着所有父绑定将在新组件中可用。 由于我们针对此博客文章的特定用例,我们使用了Hilt的ApplicationComponent,但是,您可以使其扩展所需的任何组件:它可以是Hilt组件或您已经定义的任何其他自定义组件。
With this, we can scope types to this component already:
这样,我们就可以将类型的作用域限定为此组件:
@LoggedUserScope
class UserDataRepository @Inject constructor(...) { ... }
管理组件的生命周期 (Managing the lifecycle of the component)
A class scoped higher up in the components hierarchy should be responsible for the lifecycle of this component. In our case, this class is UserManager which is scoped to the ApplicationComponent.
在组件层次结构中作用域较高的类应负责此组件的生命周期。 在我们的例子中,此类是UserManager ,其范围是ApplicationComponent 。
As UserManager needs to know how to create instances of UserComponent, it should receive its builder in the constructor. As UserComponent is a subcomponent of ApplicationComponent, the builder is available as a binding in there.
由于UserManager需要知道如何创建UserComponent实例,因此应该在构造函数中接收其生成器。 由于UserComponent是ApplicationComponent的子组件,因此可以在其中使用构建器作为绑定。
/* Copyright 2020 Google LLC.
   SPDX-License-Identifier: Apache-2.0 */
@Singleton
class UserManager @Inject constructor(
    // Since UserManager will be in charge of managing the UserComponent's
    // lifecycle, it needs to know how to create instances of it. We use the
    // provider (i.e. factory) Dagger generates for us to create instances of UserComponent.
    private val userComponentProvider: Provider<UserComponent.Builder>
) {


  /**
   *  UserComponent is specific to a logged in user. Holds an instance of
   *  UserComponent. This determines if the user is logged in or not, when the
   *  user logs in, a new Component will be created.
   *  When the user logs out, this will be null.
   */
  var userComponent: UserComponent? = null
      private set


  ...


  private fun userLoggedIn(userId: String) {
    // When the user logs in, we create a new instance of UserComponent
    val user = createUser(userId)
    userComponent = userComponentProvider.get().setUser(user).build()
  }


  private fun logout() {
    // When the user logs out, we remove the instance of UserComponent from memory
    userComponent = null
  }
}
访问范围绑定 (Accessing the scoped bindings)
You can access the scoped bindings of UserComponent with entry points. For our case, we can create an entry point exposing the UserDataRepository:
您可以使用入口点访问UserComponent的作用域绑定。 对于我们的情况,我们可以创建一个暴露UserDataRepository的入口点:
@InstallIn(UserComponent::class)@EntryPoint
interface UserComponentEntryPoint {
  fun userDataRepository(): UserDataRepository
}
You can access this entry point by using an instance of UserComponent:
您可以使用UserComponent的实例访问此入口点:
@AndroidEntryPoint
class MainActivity : AppCompatActivity() {


  // Injected by ActivityComponent
  @Inject lateinit var userManager: UserManager


  // Populated by UserComponent
  private lateinit var userDataRepository: UserDataRepository


  override fun onCreate(savedInstanceState: Bundle?) {
    super.onCreate(savedInstanceState)


    userDataRepository = EntryPoints.get(
      userManager.userComponent, UserComponentEntryPoint::class.java
    ).userDataRepository()


    // Do something with userDataRepository
  }
}
注意事项 (Caveats)
There are some caveats to the code we’ve seen so far:
到目前为止,我们对代码有一些警告:
Scoped types in custom components don’t flow down the Hilt components hierarchy. That’s why you need to use entry points and you cannot have it as a dependency of another class unless you use AssistedInject as shown in this example.
自定义组件中的作用域类型不会沿Hilt组件层次结构流动。 这就是为什么您需要使用入口点,并且除非如本例所示使用AssistedInject ,否则不能将其作为另一个类的依赖项。
This is not a full login/user solution as this setup works when the user explicitly logs in and out of the app. If your app allows switching accounts while on the same screen, then you’d need to manually restart the activity/fragment when that happens. Alternatively, you could add a callback to
UserManagerto know when an account has changed to update the information on the screen accordingly.这不是完整的登录/用户解决方案,因为当用户显式登录和注销应用程序时,此设置有效。 如果您的应用允许在同一屏幕上切换帐户,那么您需要在发生这种情况时手动重新启动活动/片段。 另外,您可以向
UserManager添加回调,以了解何时更改了帐户以相应地更新屏幕上的信息。
Even though inserting a component in the middle of the Hilt component hierarchy is not possible, you can create a component with a Hilt component as a parent and access its scoped types using entry points.
即使无法在Hilt组件层次结构的中间插入组件,您也可以创建一个以Hilt组件为父组件的组件,并使用入口点访问其作用域类型。
翻译自: https://medium.com/androiddevelopers/hilt-adding-components-to-the-hierarchy-96f207d6d92d
组件填充panel


 1701
1701

 被折叠的 条评论
为什么被折叠?
被折叠的 条评论
为什么被折叠?
 到【灌水乐园】发言


