


github ci cd
This article will show you how to create a web application with a framework around a WebAssembly component. I will use the Angular framework, but the steps will be similar for other frameworks, like React or Vue.js. You can create the UI in a mature framework, as you would in other modern websites, and do your heavy calculation in WASM.
本文将向您展示如何使用围绕WebAssembly组件的框架来创建Web应用程序。 我将使用Angular框架,但是其他框架(如React或Vue.js)的步骤将相似。 您可以像在其他现代网站中那样在成熟的框架中创建UI,并在WASM中进行大量计算。
I will use Rust because it is a modern low-level language with great support for WASM apps.
我将使用Rust,因为它是一种现代的低级语言,对WASM应用程序有很大的支持。
I will also automatically deploy the application from GitHub to Azure Storage Account via Azure DevOps. You can find the finished code in this repository.
我还将通过Azure DevOps将应用程序从GitHub自动部署到Azure存储帐户。 您可以在此存储库中找到完成的代码。
I will assume that you know the basics of Angular, Rust, and Git in this guide.
我将假定您已了解本指南中的Angular,Rust和Git基础知识。
设置项目 (Setting up the project)
Start by creating an empty GitHub repository and clone it to your computer. I called mine rust-wasm-angular. If you haven’t already, install node.js, Angular CLI, and wasm-pack on your system.
首先创建一个空的GitHub存储库,并将其克隆到您的计算机。 我称我的rust-wasm-angular 。 如果尚未安装,请在系统上安装node.js , Angular CLI和wasm-pack 。
Enter the repository folder and generate a new Angular project with ng init. This should be the result.
输入存储库文件夹并使用ng init生成一个新的Angular项目。 这应该是结果。
In the root of your project run command wasm-pack new wasm. This will create a new folder with a skeleton of your Rust application. It generates a new README and some YAML files. You can delete those since you will not need them. There is a single greet function in the src/lib.rs file that you will call from Angular. Your repository should contain these files.
在项目的根目录中,运行命令wasm-pack new wasm 。 这将创建一个具有Rust应用程序框架的新文件夹。 它生成一个新的自述文件和一些YAML文件。 您可以删除它们,因为您将不需要它们。 从Angular调用的src/lib.rs文件中只有一个greet函数。 您的存储库应包含这些文件。
Go to the AppComponent in /src/app/app.component.ts and add a ngOnInit function that will call the greet method from wasm:
转到/src/app/app.component.ts中的AppComponent并添加一个ngOnInit函数,该函数将从wasm中调用greet方法:
ngOnInit(): void {
 const rust = import(‘../../wasm/pkg’);

 rust.then(m => m.greet()).catch(console.error);
}
You import the WASM files from wasm/pkg folder. But these do not exist yet. Go to the wasm folder and run command wasm-pack build to generate them. My IDE can now find those files and show me type hints thanks to Typescript. I also removed generated items from the component html template. All was done in this commit.
您从wasm/pkg文件夹导入WASM文件。 但是这些还不存在。 转到wasm文件夹并运行命令wasm-pack build生成它们。 我的IDE现在可以找到这些文件,并通过Typescript向我显示类型提示。 我还从组件html模板中删除了生成的项目。 一切都在此提交中完成。
Let’s start the application. You already created WASM files with wasm-pack build. Run npm install and ng serve to start the app locally.
让我们启动应用程序。 您已经使用wasm-pack build创建了WASM文件。 运行npm install和ng serve在本地启动应用程序。
When you open the app in your browser, Angular will call a WASM function written in Rust, that will emit an alert.
在浏览器中打开应用程序时,Angular将调用用Rust编写的WASM函数,该函数将发出警报。
These commands will generate new files for us in the wasm/pkg and dist folder. These auto-generated files should not be uploaded to git, just like files generated by your IDE.
这些命令将在wasm/pkg和dist文件夹中为我们生成新文件。 这些自动生成的文件不应上载到git,就像您的IDE生成的文件一样。
This is a good starting point for your application. You have a scalable solution for writing the UI thanks to Angular, and you can do the heavy lifting in Rust.
这是您应用程序的一个很好的起点。 有了Angular,您就有了可扩展的解决方案来编写UI,并且可以在Rust中完成繁重的工作。
持续集成和持续交付 (Continuous integration and continuous delivery)
Now let’s look into CI/CD. You will host our app publicly so to make it available to the world. You will set up the build process once, and then every time you commit to the master branch, the public version of the app will be updated.
现在让我们看一下CI / CD。 您将公开托管我们的应用,以便将其发布给全世界。 您将设置构建过程一次,然后每次您提交到master分支时,将更新该应用程序的公共版本。
There are many services available for this. This article will use Microsoft Azure for the integration. I will show you how use a Storage Account at https://portal.azure.com/ to store the dist files of our application. This service can host these files as a Static Website. For the build of the app, you will use Azure Pipelines at https://dev.azure.com/.
有许多可用的服务。 本文将使用Microsoft Azure进行集成。 我将在https://portal.azure.com/上向您展示如何使用存储帐户来存储我们应用程序的dist文件。 该服务可以将这些文件作为静态网站托管。 对于应用程序的构建,您将在https://dev.azure.com/上使用Azure Pipelines 。
准备在Azure中托管网站 (Preparing website hosting in Azure)
Start by creating a free account on the Azure portal. When you create your account, you will also need a free Azure Subscription.
首先在Azure门户上创建一个免费帐户。 创建帐户时,您还需要一个免费的Azure订阅。
创建一个Azure存储帐户 (Create an Azure storage account)
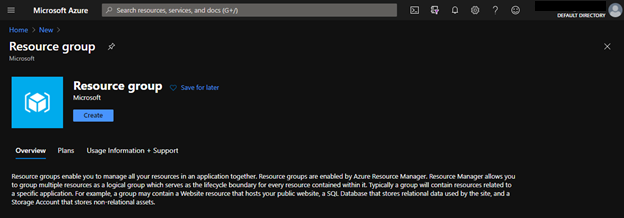
Before creating the Storage account itself, you need to create a Resource group for the Storage Account. The Resource group can also various resources related to the application, like an SQL database.
在创建存储帐户本身之前,您需要为该存储帐户创建一个资源组。 资源组还可以与应用程序相关的各种资源,例如SQL数据库。
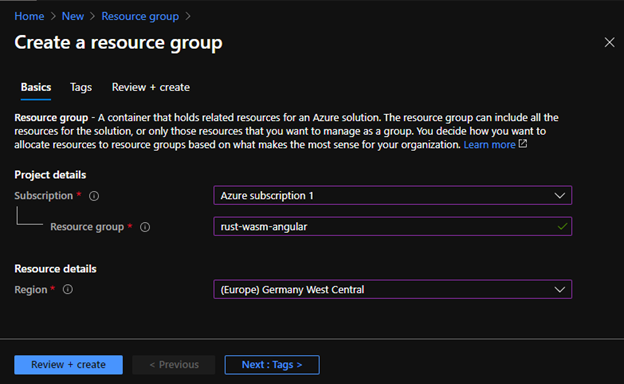
创建一个新的资源组 (Create a new Resource group)
Go to the https://portal.azure.com/ and click on Create a new Resource.
转到https://portal.azure.com/ ,然后点击创建新资源。

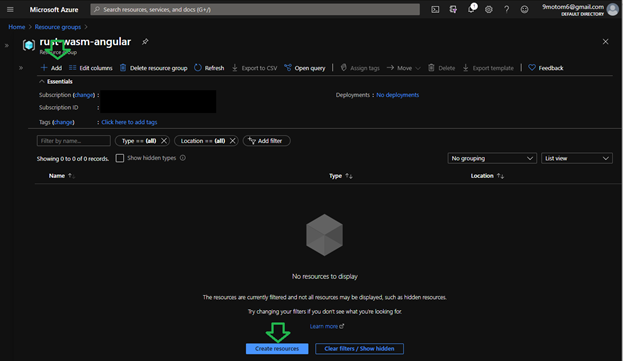
添加存储帐户资源 (Add Storage Account Resource)
A toast message with a link to the resource group will pop up. Click on the link to see the Resource Group page. You can also search for the group by name in the search bar at the top.
带有链接到资源组的吐司消息将弹出。 单击链接以查看“资源组”页面。 您也可以在顶部的搜索栏中按名称搜索组。
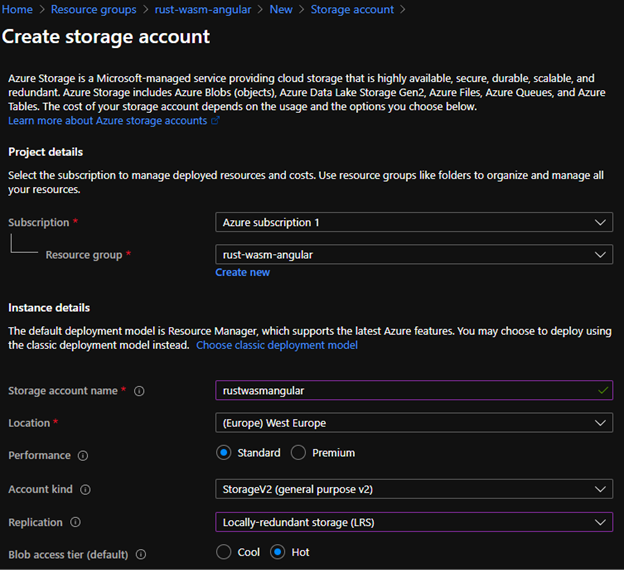
Click on the Review + create button and then the Create button to deploy the Storage account. This will take a short time to create. When it is done, click on the Go to resource button.
单击Review + create按钮,然后单击Create按钮以部署存储帐户。 这将花费很短的时间来创建。 完成后,单击“转到资源”按钮。
启用静态网站 (Enable Static Website)
Now you have a place where you can store our build files. Before doing that, you need to enable Static website service first.
现在您有了一个可以存储我们的构建文件的地方。 在此之前,您需要先启用静态网站服务。

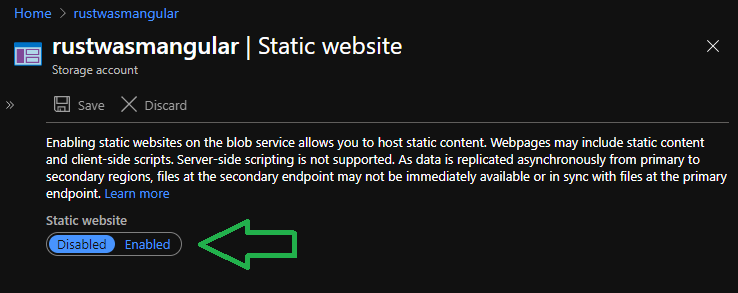
When you go to the URL, you will see a “The requested content does not exist.” error. That is because there are no files yet.
转到URL时,将看到“请求的内容不存在”。 错误。 那是因为还没有文件。
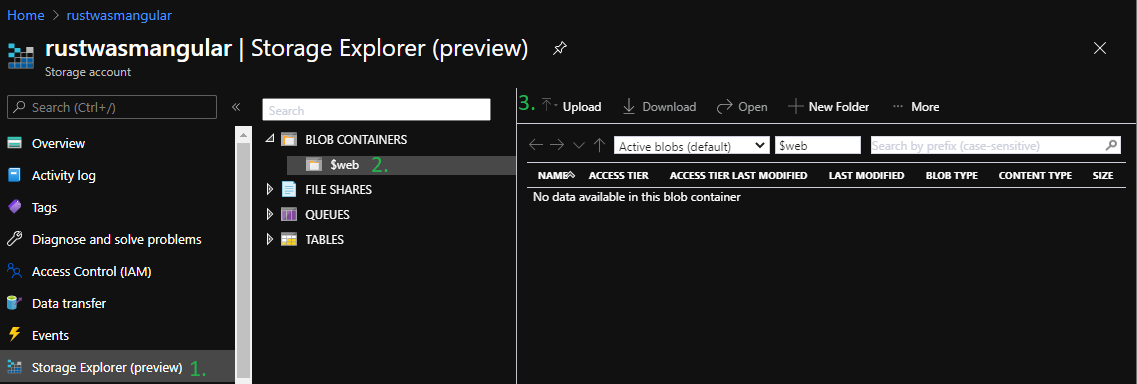
(可选)手动上传网站 ((Optional) Upload the website manually)
You can upload the website files manually in Azure. In the left panel find the Storage Explorer, then open BLOB CONTAINERS, and select the newly created $web container. Then you can use the Upload button to upload a simple index.html file or the whole contents of your dist folder.
您可以在Azure中手动上传网站文件。 在左面板中找到Storage Explorer ,然后打开BLOB CONTAINERS,然后选择新创建的$ web容器。 然后,您可以使用“上传”按钮上传简单的index.html文件或dist文件夹的全部内容。
自动建立网站 (Building the website automatically)
With the Storage Account prepared, you can use Azure pipelines to build the web app and upload it to the Storage every time someone commits to the master branch in the git repository. You can set up various checks, reviews, automated test etc., but that is out of scope of this article.
准备好存储帐户后,您可以使用Azure管道构建Web应用程序,并在每次有人向git存储库中的master分支提交时将其上载到存储。 您可以设置各种检查,评论,自动测试等,但这超出了本文的范围。
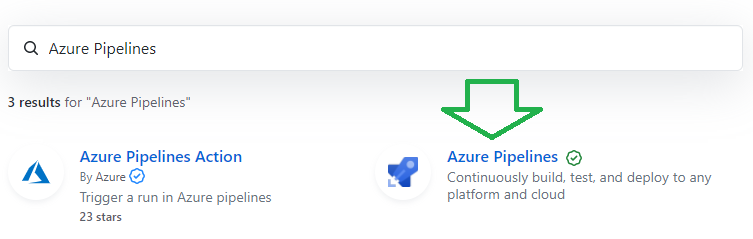
将Azure Pipelines添加到您的GitHub帐户 (Adding Azure Pipelines to your GitHub account)
Start by going to your GitHub and select Marketplace at the top menu. Then search for Azure Pipelines and select it.
首先转到您的GitHub,然后在顶部菜单中选择Marketplace 。 然后搜索Azure Pipelines并选择它。
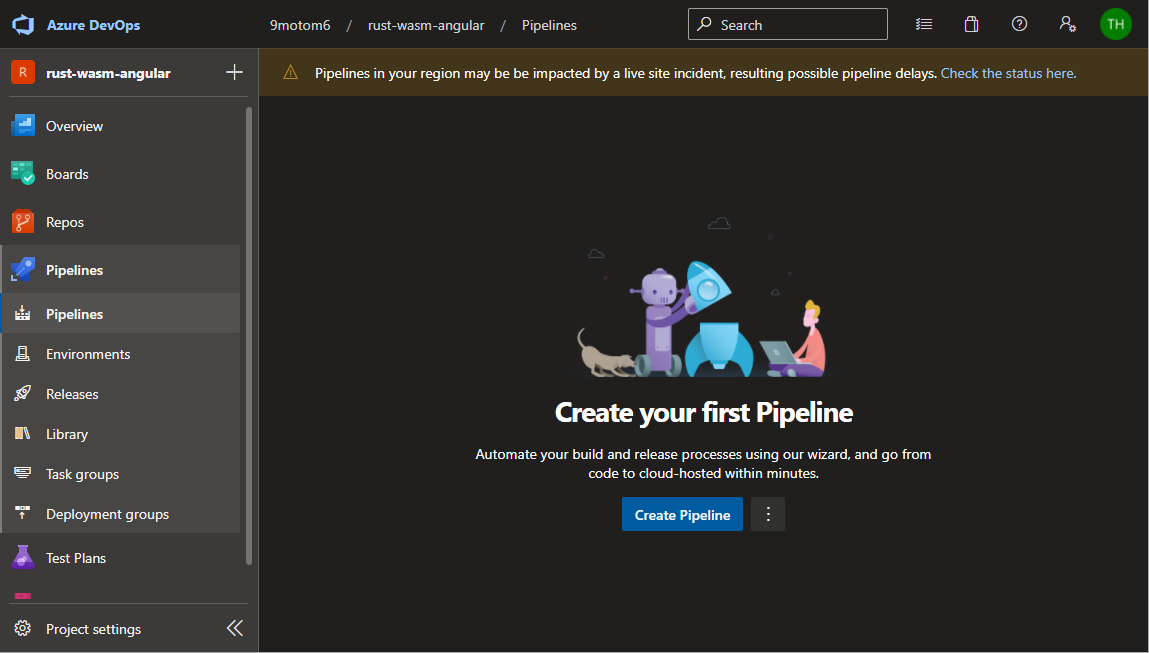
创建管道 (Create a pipeline)
In the Azure DevOps, go to your project and select Pipelines. You should see this a page that looks like this:
在Azure DevOps中,转到您的项目,然后选择Pipelines 。 您应该看到如下页面:
This will generate a simple Hello World pipeline. Click on the Save and Run button. You can keep the default values and click Save and run again. This will add a new file azure-pipelines.yml to your repository. This YAML file specifies the steps that the Azure Pipeline should do. Since it is triggered by updating master, and you just pushed a new commit to master by creating this file, your fist pipeline Job just started!
这将生成一个简单的Hello World管道。 单击保存并运行按钮。 您可以保留默认值,然后单击“保存”并再次运行。 这将向存储库中添加一个新文件azure-pipelines.yml 。 此YAML文件指定Azure管道应执行的步骤。 由于它是通过更新master触发的,并且您刚刚通过创建此文件将新提交推送到master,因此您的第一条管道Job才开始!
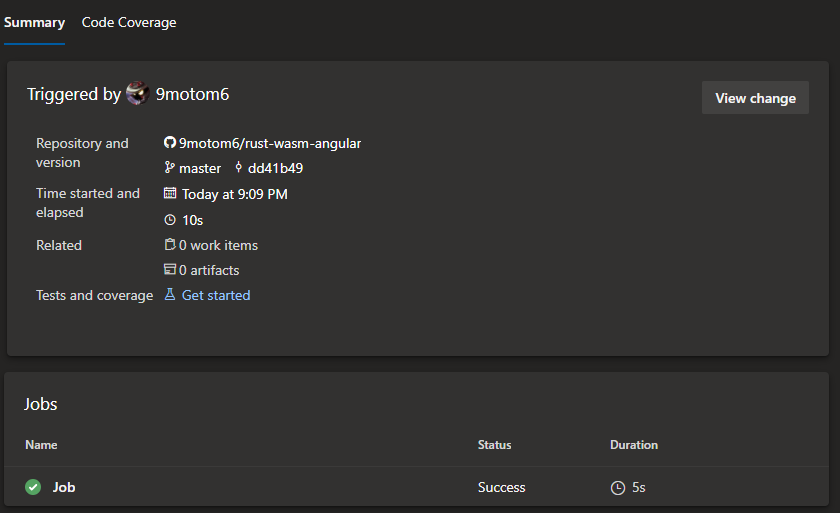
You should see the Job on this Pipeline run summary page:
您应该在此管道运行摘要页面上看到“作业”:
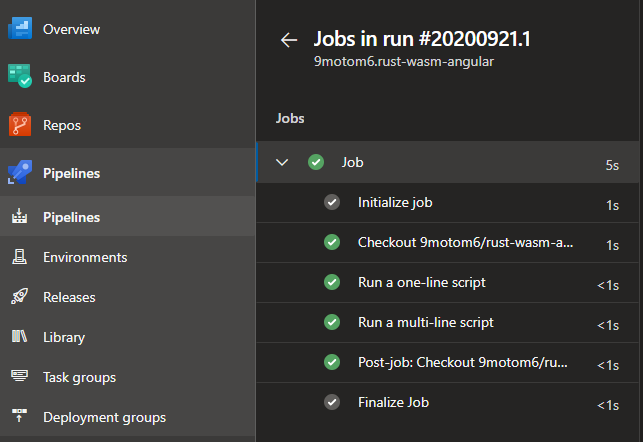
In the Pipeline run summary page, select your Job. You should see this page with all steps green:
在“管道运行摘要”页面中,选择您的作业。 您应该看到此页面的所有步骤均为绿色:
完成管道 (Completing the pipeline)
Lastly, set up the pipeline to build our project and send it to our Storage Account.
最后,建立管道以构建我们的项目并将其发送到我们的存储帐户。
Click on Pipelines, select your new pipeline, and click the Edit button. You should see the YAML file again. If you do not know YAML, I recommend checking out Learn Yaml in Y minutes. Basically, you will just specify a list of steps that the pipeline should do.
单击管道,选择新管道,然后单击编辑按钮。 您应该再次看到YAML文件。 如果您不了解YAML,建议您在Y分钟内查看Learn Yaml 。 基本上,您将只指定管道应执行的步骤的列表。
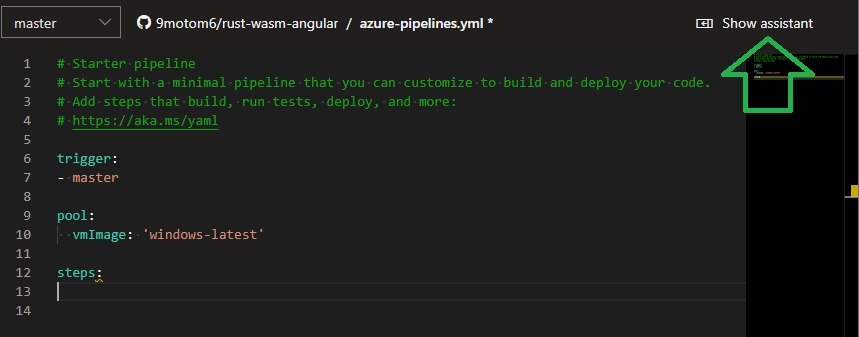
Start by changing the vmImage to ‘windows-latest’. You need to use Windows because you will use the Azure File Copy tool that requires Powershell under the hood. Continue by deleting the two predefined script steps and finally Click on the Show assistant button to see available tasks.
首先将vmImage更改为 'windows-latest' 。 您需要使用Windows,因为您将使用需要Powershell的Azure File Copy工具。 继续删除两个预定义的脚本步骤,最后单击“显示助手”按钮以查看可用任务。
Place your cursor on line 13 and search for theNode.js tool installer tool. Change the version to 10.x and click on the Add button. You can then manually add displayName: ‘Install Node.js’.
将光标放在第13行上,然后搜索Node.js工具安装程序工具。 将版本更改为10.x,然后单击“添加”按钮。 然后,您可以手动添加displayName: 'Install Node.js' 。
Then search for Command line task and use this script to install wasm-pack and build your Rust code with it:
然后搜索Command line任务,并使用此脚本安装wasm-pack并使用它构建您的Rust代码:
curl https://rustwasm.github.io/wasm-pack/installer/init.sh -sSf | sh
wasm-pack build
Under Advanced, set the Working directory to $(Build.SourcesDirectory)\wasm and click Add. $(Build.SourcesDirectory) is a variable for the location of your code that was pulled from GitHub.
在“高级”下,将“工作目录”设置为$(Build.SourcesDirectory)\wasm ,然后单击“添加”。 $(Build.SourcesDirectory)是用于从GitHub提取代码位置的变量。
Add two more Command line scripts, one for npm install and the other for npm run build. This will generate your dist folder.
再添加两个命令行脚本,一个用于npm install ,另一个用于npm run build. 这将生成您的dist文件夹。
The last task will be Azure file copy. Set the source to$(Build.SourcesDirectory)\dist\rust-wasm-angular\* The * means that the contents of the folder will be copied. Select your subscription and authorize it. Choose Destination Type Azure Blob, Storage account rustwasmangularaand Container name $web.
最后一个任务是Azure文件复制。 将源设置为$(Build.SourcesDirectory)\dist\rust-wasm-angular\* *表示将复制文件夹的内容。 选择您的订阅并授权。 选择“目标类型”“ Azure Blob ,“存储帐户rustwasmangulara和“容器名称$web 。
trigger:
- master


pool:
  vmImage: 'windows-latest'


steps:
- task: NodeTool@0
  inputs:
    versionSpec: '10.x'
  displayName: 'Install Node.js'


- task: CmdLine@2
  inputs:
    script: |
      curl https://rustwasm.github.io/wasm-pack/installer/init.sh -sSf | sh
      wasm-pack build
    workingDirectory: '$(Build.SourcesDirectory)\wasm'
  displayName: 'Install wasm-pack and build Rust'


- task: CmdLine@2
  inputs:
    script: 'npm install'
  displayName: 'npm install'

- task: CmdLine@2
  inputs:
    script: 'npm run build'
  displayName: 'npm run build'


- task: AzureFileCopy@4
  inputs:
    SourcePath: '$(Build.SourcesDirectory)\dist\rust-wasm-angular\*'
    azureSubscription: 'Azure subscription 1(e1d33e78-07f6-4df4-b39d-979bad805079)'
    Destination: 'AzureBlob'
    storage: 'rustwasmangular'
    ContainerName: '$web'
  displayName: 'Copy files to Azure'
Click the Save button. The Pipeline job will start but will need permission to access GitHub. You can ignore that for now.
单击保存按钮。 Pipeline作业将开始,但需要访问GitHub的权限。 您现在可以忽略它。
启用访问控制 (Enable Access Control)
Before running the pipeline, you need to set Access Control to allow the uploading of files from azure pipelines to your Storage Account. If you don’t have this set up correctly, the Azure File Copy will fail on AuthorizationPermissionMismatch.
在运行管道之前,您需要将访问控制设置为允许从天蓝色管道将文件上传到您的存储帐户。 如果没有正确设置,Azure文件副本将在AuthorizationPermissionMismatch失败。
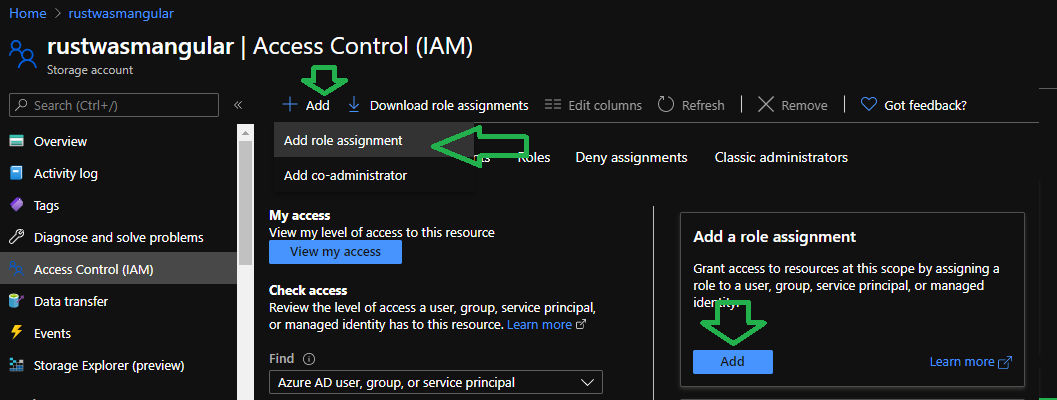
Go to your Storage Account in the Azure portal and in the left panel select Access Control.
转到Azure门户中的“存储帐户” ,然后在左侧面板中选择“访问控制” 。
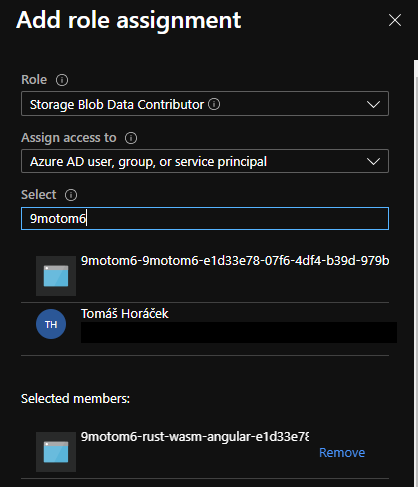
rust-wasm-angularrust-wasm-angular
Save.
Save 。
启动管道 (Start the Pipe)
Go to Azure DevOps and click on Pipelines. Select your pipeline to see its runs. There should be 2 items on the list. One completed Hello World run and a second one that is waiting. Click on the waiting one. You should see message This pipeline needs permission to access a resource before this run can continue. Click on the View button and grand the permissions. When the job finishes, the site should be available online.
转到Azure DevOps,然后单击“管道” 。 选择您的管道以查看其运行。 列表上应该有2个项目。 一个已完成的Hello World运行,另一个正在等待。 单击等待的。 您应该看到消息,此管道需要权限才能访问资源,然后此运行才能继续。 单击查看按钮,然后授予权限。 作业完成后,该站点应该可以在线访问。
后续步骤/练习 (Next steps / Exercises)
- Run unit tests in your pipeline. When the tests fail, the pipeline will fail, so the broken build will not get to production. 在管道中运行单元测试。 当测试失败时,管道将失败,因此损坏的版本将无法投入生产。
Clean the $web container before the Azure File Copy action
在执行Azure File Copy操作之前清理$ web容器
Copy the .wasm files separately and set the MIME content type for them to application/wasm
分别复制.wasm文件,并将其MIME内容类型设置为application / wasm
- Add more content to your application 向您的应用程序添加更多内容
- Add the build Status badge to your README file将构建状态标志添加到您的自述文件中
概要(Summary)
You have a basic, but scalable foundation for your project. You can use Angular to build the UI and Rust to write the parts of your application that benefit from the WASM speed. And your new features will be published automatically.
您有一个基本但可扩展的项目基础。 您可以使用Angular来构建UI,并使用Rust来编写应用程序中受益于WASM速度的部分。 并且您的新功能将自动发布。
翻译自: https://medium.com/@9motom6/ci-cd-with-angular-webassembly-rust-github-and-azure-c61f187d0acb
github ci cd


 1947
1947

 被折叠的 条评论
为什么被折叠?
被折叠的 条评论
为什么被折叠?
 到【灌水乐园】发言


