


mlflow
Hello again friends! We’re back here with another quick tip, and because I do attempt to keep these posts quick, this is actually going to be part one in a series of tips related to MLFlow. In the spirit of full transparency, MLFlow is pretty new to me, so I’m going to be learning things alongside you all over the next few weeks. If you’d like to follow along with my code, check out this link to my correlated GitHub repository.
朋友您好! 我们回到了另一个快速提示,并且因为我确实尝试使这些帖子保持快速,所以实际上这将成为与MLFlow相关的一系列提示的一部分。 本着完全透明的精神,MLFlow对我来说是新手,因此在接下来的几周里,我将与大家一起学习事物。 如果您想遵循我的代码,请查看此链接到我相关的GitHub存储库。
I’m sure the first question on your mind is, what is MLflow? Simply put, MLflow is an open source platform designed to help streamline the machine learning lifecycle process. Again, I’m still learning all it does, but it seems to offer a lot of promising features that I’m excited to explore within future posts. These things range from creating a model registry, easy deployment of models as APIs, and more. I honestly don’t know how long this sub-series will go, but I imagine we’re going to get a lot out of this neat tool!
我确定您想到的第一个问题是什么是MLflow? 简而言之, MLflow是一个开放源代码平台,旨在帮助简化机器学习生命周期过程。 同样,我仍在学习所有功能,但是它似乎提供了许多很有希望的功能,我很高兴在以后的帖子中对此进行探索。 这些事情包括创建模型注册表,将模型轻松部署为API等等。 老实说,我不知道这个子系列会持续多久,但是我想我们将从这个整洁的工具中受益匪浅!
But of course, we all gotta start somewhere. We’re going to take baby steps into this world to get ourselves prepped properly for future posts. That said, we’re going to take a pretty barebones approach to MLflow with creating and logging a very simple model. Before getting started, we’ll need to install MLflow, which is as simple as running the following pip command:
但是,当然,我们都必须从某个地方开始。 我们将迈出第一步,为将来的发布做好适当的准备。 就是说,我们将通过创建和记录一个非常简单的模型来对MLflow采取简单的方法。 在开始之前,我们需要安装MLflow,它与运行以下pip命令一样简单:
pip install mlflowIn the last few posts, we’ve been working with the Titanic dataset, but this time, we’re going to deviate over to using the classic Red Wine Quality dataset 🍷 . Now, I’m personally not a wine drinker (nor alcohol drinker in general), but for you wine connoisseurs out there, I think you’ll enjoy this dataset equally as much as Titanic, if not more since it’s not based on a huge tragedy!
在最近的几篇文章中,我们一直在使用Titanic数据集,但是这次,我们将转向使用经典的Red Wine Quality数据集🍷。 现在,我个人不是喝酒的人(一般也不是喝酒的人),但是对于您那里的葡萄酒鉴赏家来说,我认为您将像泰坦尼克号一样享受这个数据集,甚至更多,因为它不是基于大量的悲剧!
The reason we’re changing to this dataset is because all the features in this dataset are numerical in nature, so we don’t really have to do any feature engineering in order to get it fit into a model. Granted, I will not at all guarantee that we’ll get quality results, but at least we can get a simple model up and running without the fuss of data cleansing. The only thing we’ll do is import the data and appropriately split it between training and validation sets like so:
我们之所以要更改此数据集,是因为该数据集中的所有要素本质上都是数值型的,因此,为了使其适合模型,我们实际上不必进行任何要素工程。 当然,我完全不能保证会得到高质量的结果,但是至少我们可以建立并运行一个简单的模型而不必大惊小怪地清理数据。 我们要做的唯一一件事就是导入数据,并在训练和验证集之间进行适当的拆分,如下所示:
# Loading data and prepping for training
df_wine = pd.read_csv('../data/wine/train.csv')X = df_wine.drop(columns = 'quality')
y = df_wine[['quality']]X_train, X_val, y_train, y_val = train_test_split(X, y, random_state = 42)
(Oh, by the way, I feel the need to say that today’s post is more or less a copy of MLflow’s first tutorial, but I intentionally simplified it a lot and am explaining my simplifaction more thoroughly here.)
(哦,顺便说一句,我觉得有必要说,今天的帖子或多或少是MLflow的第一个教程的副本,但是我有意简化了它,并且在这里更详尽地解释了我的简单性。)
Now is when we start stepping into the world of MLflow. I’ll go ahead and paste the remainder of the script below and explain what each piece is doing throughout.
现在是我们开始进入MLflow世界的时候了。 我将继续在下面粘贴脚本的其余部分,并解释每篇文章在做什么。
# Defining model parameters
alpha = 1
l1_ratio = 1# Running MLFlow script
with mlflow.start_run():# Instantiating model with model parameters
    model = ElasticNet(alpha = alpha,
                       l1_ratio = l1_ratio)# Fitting training data to the model
    model.fit(X_train, y_train)# Running prediction on validation dataset
    preds = model.predict(X_val)# Getting metrics on the validation dataset
    rmse = mean_squared_error(preds, y_val)
    abs_error = mean_absolute_error(preds, y_val)
    r2 = r2_score(preds, y_val)# Logging params and metrics to MLFlow
    mlflow.log_param('alpha', alpha)
    mlflow.log_param('l1_ratio', l1_ratio)
    mlflow.log_metric('rmse', rmse)
    mlflow.log_metric('abs_error', abs_error)
    mlflow.log_metric('r2', r2)# Logging model to MLFlow
    mlflow.sklearn.log_model(model, 'model')
Under “mlflow.start_run()”, the first few lines of code should look very familiar to you already. Here we’re simply instantiating a model with the provided parameters, fitting the training data on the parameters, and then getting the predicted results with our newly trained model with the validation dataset. With our predicted results and actual results noted from the validation dataset, we then get appropriate metrics surrounding the root mean squared error, mean absolute error, and R2 score. So far, nothing really new here.
在“ mlflow.start_run()”下,您的前几行代码应该看起来非常熟悉。 在这里,我们只是简单地使用提供的参数实例化模型,将训练数据拟合到参数上,然后使用带有验证数据集的新训练模型获得预测结果。 利用验证数据集中记录的预测结果和实际结果,然后获得围绕均方根误差,平均绝对误差和R2得分的适当度量。 到目前为止,这里没有什么新鲜的东西。
Now is when we start stepping into some new stuff. Fortunately, I think simply reading the code itself is pretty self explanatory. It’s logging time, friends! In our code, we’re going to be logging three different things: the parameters of the model, the metrics from the validation set, and the model itself. The reason for this is going to become quickly apparent as we explore the UI down below.
现在是我们开始涉足一些新事物的时候了。 幸运的是,我认为仅仅阅读代码本身是可以自我解释的。 朋友,这是伐木时间! 在我们的代码中,我们将记录三个不同的东西:模型的参数,来自验证集的度量以及模型本身。 当我们在下面浏览UI时,其原因将很快变得显而易见。
After you run this code, you’ll notice a new directory called “mlruns” should appear adjacent to where you ran your code. When you first glance at it, it might look weird, but if you dig deep down far enough, you’ll get to the stuff you actually care about. Notably, you should be able to dig up everything you just logged, including the serialized model artifact itself.
运行此代码后,您会发现一个名为“ mlruns”的新目录应出现在运行代码的位置附近。 当您初看它时,它看起来可能很奇怪,但是如果您深入挖掘足够的深度,您将获得您真正关心的东西。 值得注意的是,您应该能够挖掘出刚刚记录的所有内容,包括序列化模型工件本身。

Now before we move onto the next section, I want to take note that I ran this code both in a Jupyter notebook and in a basic Python script. You don’t need to do this, but it’ll make sense down below why I’m noting that now.
现在,在进入下一部分之前,我要注意一下,我在Jupyter笔记本和基本的Python脚本中都运行了此代码。 您不需要执行此操作,但是从下面我为什么现在要注意的角度来看这是很有意义的。
Alright, now here comes the fun part! In your command line, navigate to the directory above “mlruns”. (If you just ran the Python script, you should already be there.) Run the following command, and you should see the following screen:
好了,现在有趣的部分来了! 在命令行中,导航到“ mlruns”上方的目录。 (如果只是运行Python脚本,则应该已经在其中了。)运行以下命令,然后应该会看到以下屏幕:
mlflow ui
If you’re like me, this interface might look familiar to you as it appears to be using Gunicorn behind the scenes to serve out this UI. As you’ll notice in my case, it looks like the UI is being served on localhost:5000. Fire up your favorite browser and navigate on over to that address. This is the screen you should see.
如果您像我一样,这个界面可能看起来很熟悉,因为它似乎在后台使用Gunicorn来提供此UI。 在我的情况下,您会注意到,UI似乎在localhost:5000上提供。 启动您喜欢的浏览器并导航到该地址。 这是您应该看到的屏幕。
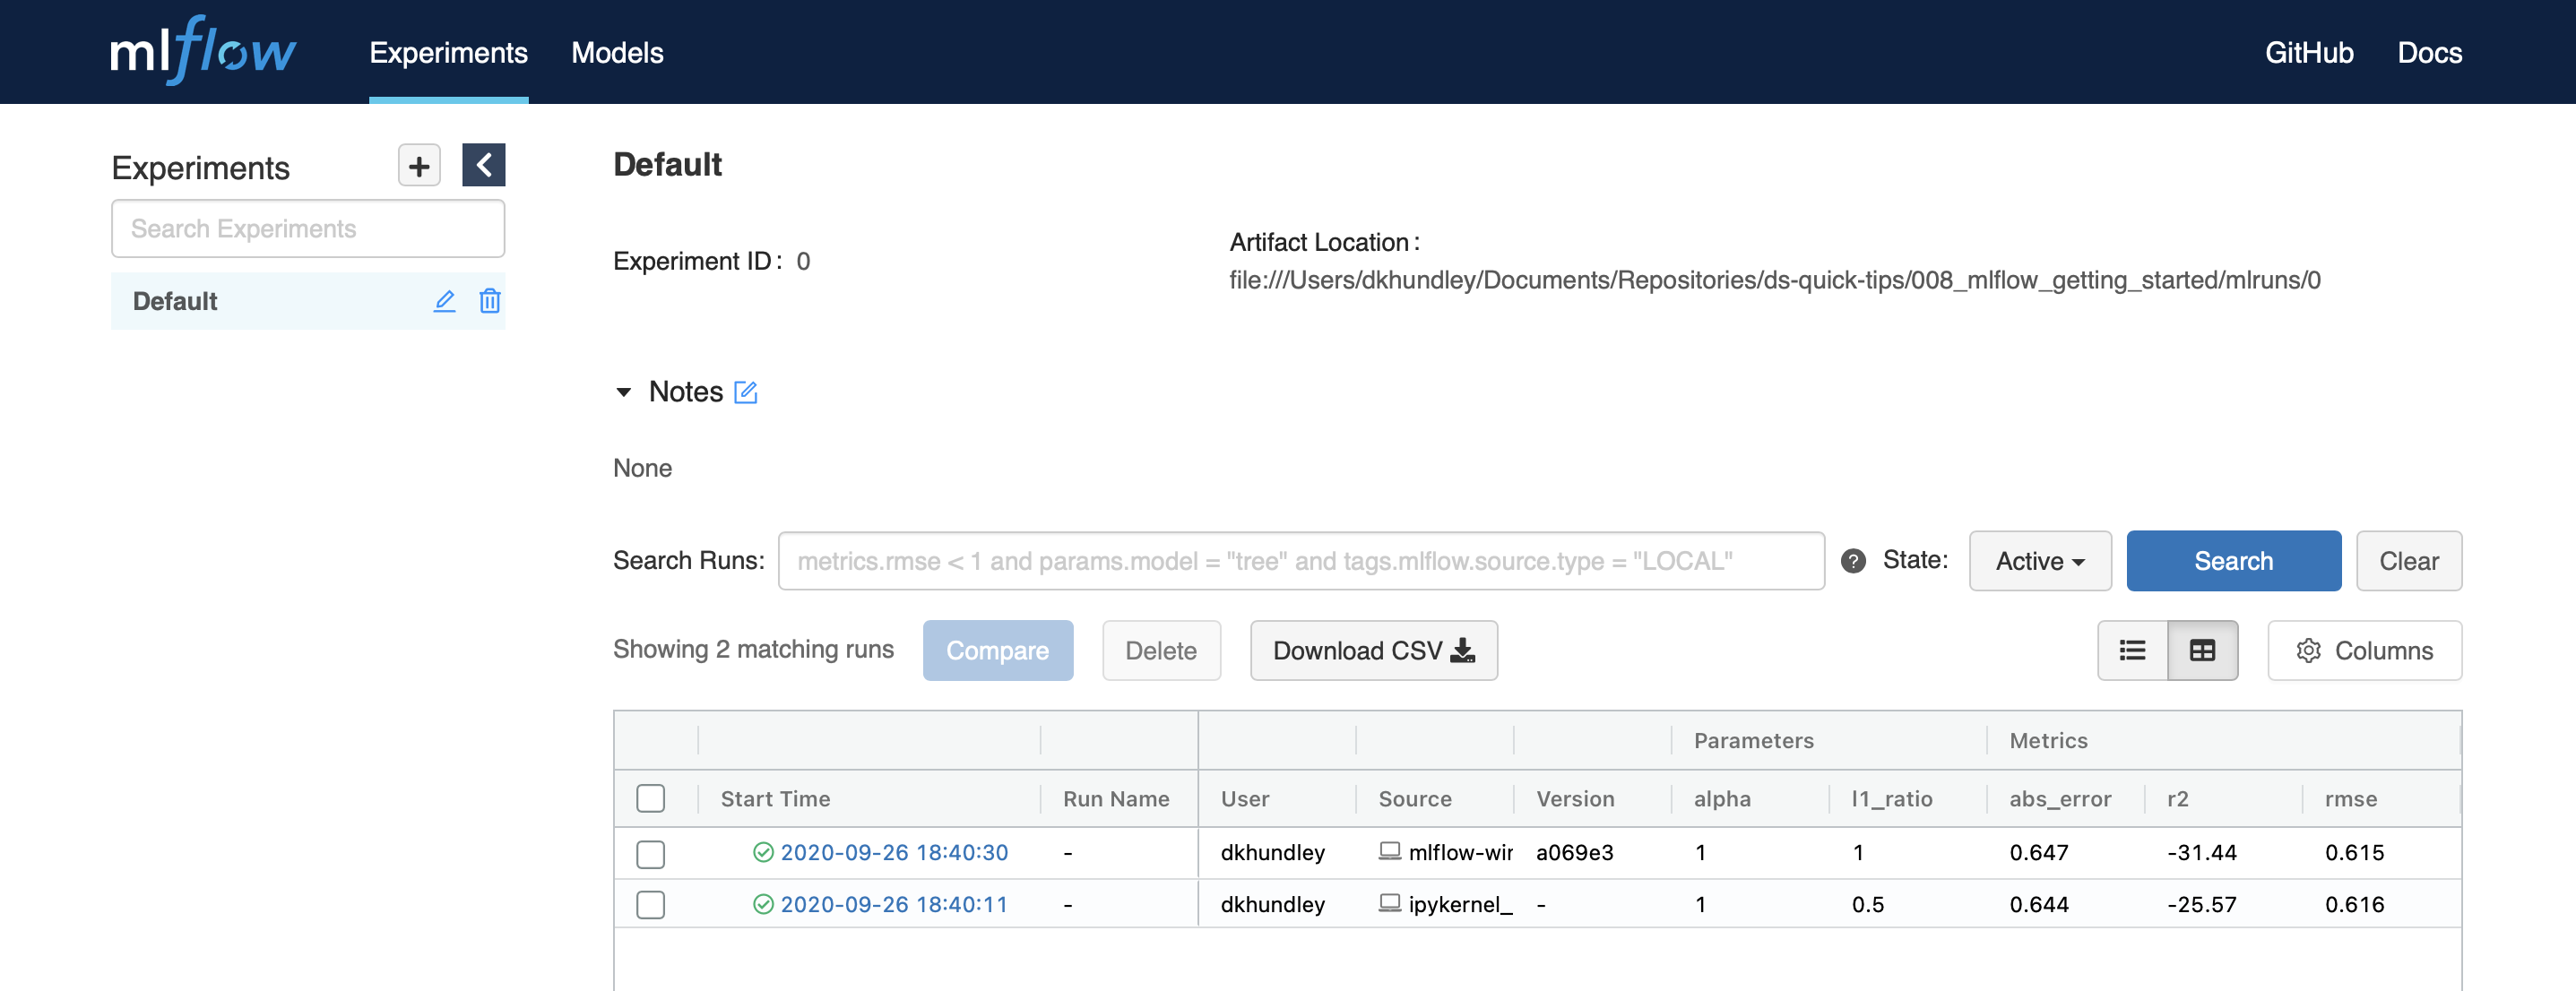
Neat, huh? Notice within that table that there are two runs showing. If you look at the source of those runs, you’ll notice that one was run from my mlflow-wine.py Python script while the other was run from an iPykernel, which of course is my Jupyter notebook! Additionally, you’ll see our model parameters listed in the next few columns, and finally you can see the model metrics in the last set of columns.
整洁吧? 请注意,该表中显示了两个运行。 如果您查看这些运行的来源,您会注意到一个运行于我的mlflow-wine.py Python脚本,而另一个运行于iPykernel,这当然是我的Jupyter笔记本! 另外,您将在接下来的几列中看到我们的模型参数,最后,您可以在最后一组列中看到模型指标。
Next, go ahead and open one of those models by clicking one of the hyperlinks under “Start Time”. This is what you should see.
接下来,继续并通过单击“开始时间”下的超链接之一打开这些模型之一。 这是您应该看到的。
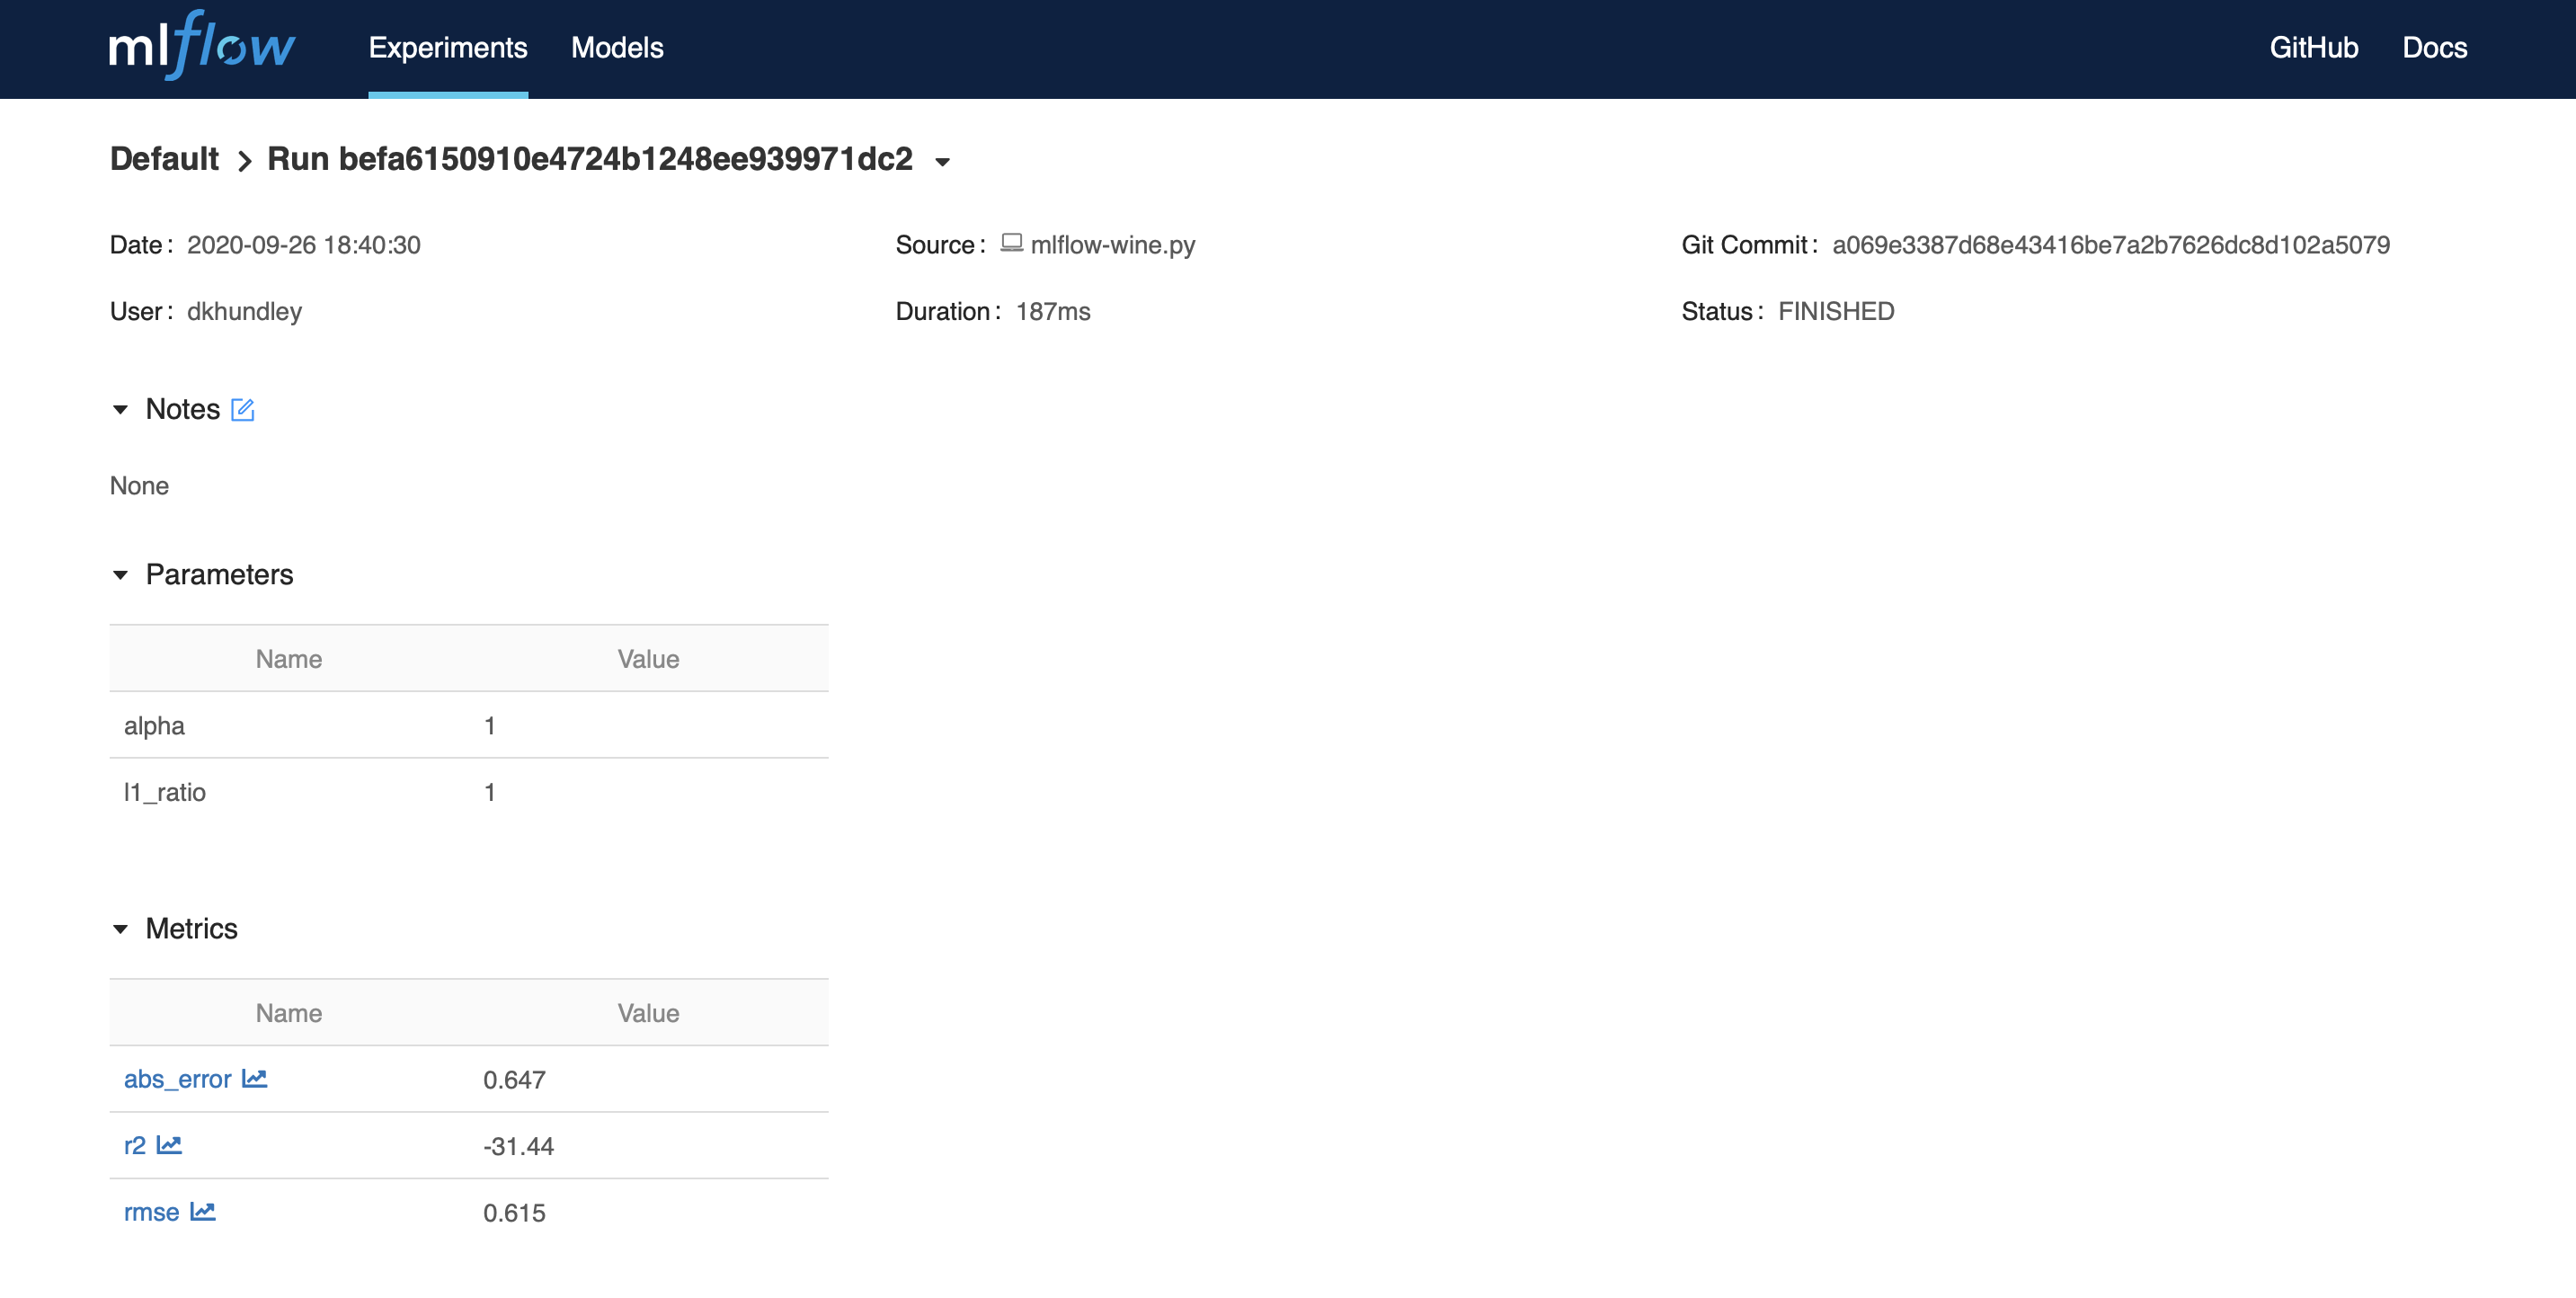
Again, we see things like our model parameters and validation metrics, but we also see other additional things here, like the duration and associated git commit. I couldn’t capture everything in a single screenshot, but if you were to scroll down from here, you’d also be able to navigate to the model artifacts themselves directly from the UI, which I think is just too darned cool!
再次,我们看到了诸如模型参数和验证指标之类的东西,但在这里还看到了其他一些东西,例如持续时间和相关的git commit。 我无法在单个屏幕截图中捕获所有内容,但是如果您从此处向下滚动,则还可以直接从UI导航到模型工件本身,我觉得这太酷了!
And that wraps it up for this first introduction! We’re barely scratching the surface here, so I look forward to learning alongside you all in the next few posts as we continue to explore MLflow together. Hope you enjoyed this quick intro! See you all again soon. 😃
到此结束,这是第一个介绍! 我们在这里几乎没有涉及任何内容,因此,我希望在接下来的几篇文章中与大家一起学习,因为我们将继续一起探索MLflow。 希望您喜欢这个快速的介绍! 很快再见。 😃
翻译自: https://towardsdatascience.com/mlflow-part-1-getting-started-with-mlflow-8b45bfbbb334
mlflow


 1360
1360


 被折叠的 条评论
为什么被折叠?
被折叠的 条评论
为什么被折叠?
 到【灌水乐园】发言


