


ios 在标题栏添加按钮
We will be developing this in Swift using CoreText and AVKit.
我们将使用CoreText和AVKit在Swift中进行开发。
我们会怎么做? (What will we be doing?)
AVKit uses an AVPlayerLayer instance to display video in a view. AVPlayerLayer is a subclass of CALayer. In UIKit all views are backed by a CALayer instance. CALayer has a mask property, according to Apple's developer documentation, this is what it does:
AVKit使用AVPlayerLayer实例在视图中显示视频。 AVPlayerLayer是CALayer的子类。 在UIKit中,所有视图均由CALayer实例支持。 根据Apple的开发人员文档, CALayer具有mask属性,它的作用是:
An optional layer whose alpha channel is used to mask the layer’s content.
一个可选的图层,其Alpha通道用于掩盖该图层的内容。
We will create an image from a string using CoreText, with the rest of the image filled with the UIColor.clear, and use it as the the AVPlayerLayer's mask.
我们将使用CoreText从字符串创建图像,其余图像填充UIColor.clear ,并将其用作AVPlayerLayer的蒙版。
VideoLabel.swift (VideoLabel.swift)
Create a new Xcode project, using the iOS Single View Application template. Call it VideoLabelDemo. In the next screen, make sure to select Storyboard in the drop down menu titled User Interface.
使用iOS Single View Application模板创建一个新的Xcode项目。 称为VideoLabelDemo 。 在下一个屏幕中,确保在标题为User Interface的下拉菜单中选择Storyboard 。

We will be using UIKit for VideoLabel. Create a new Custom Touch Class source file.
我们将使用UIKit for VideoLabel 。 创建一个新的Custom Touch Class源文件。
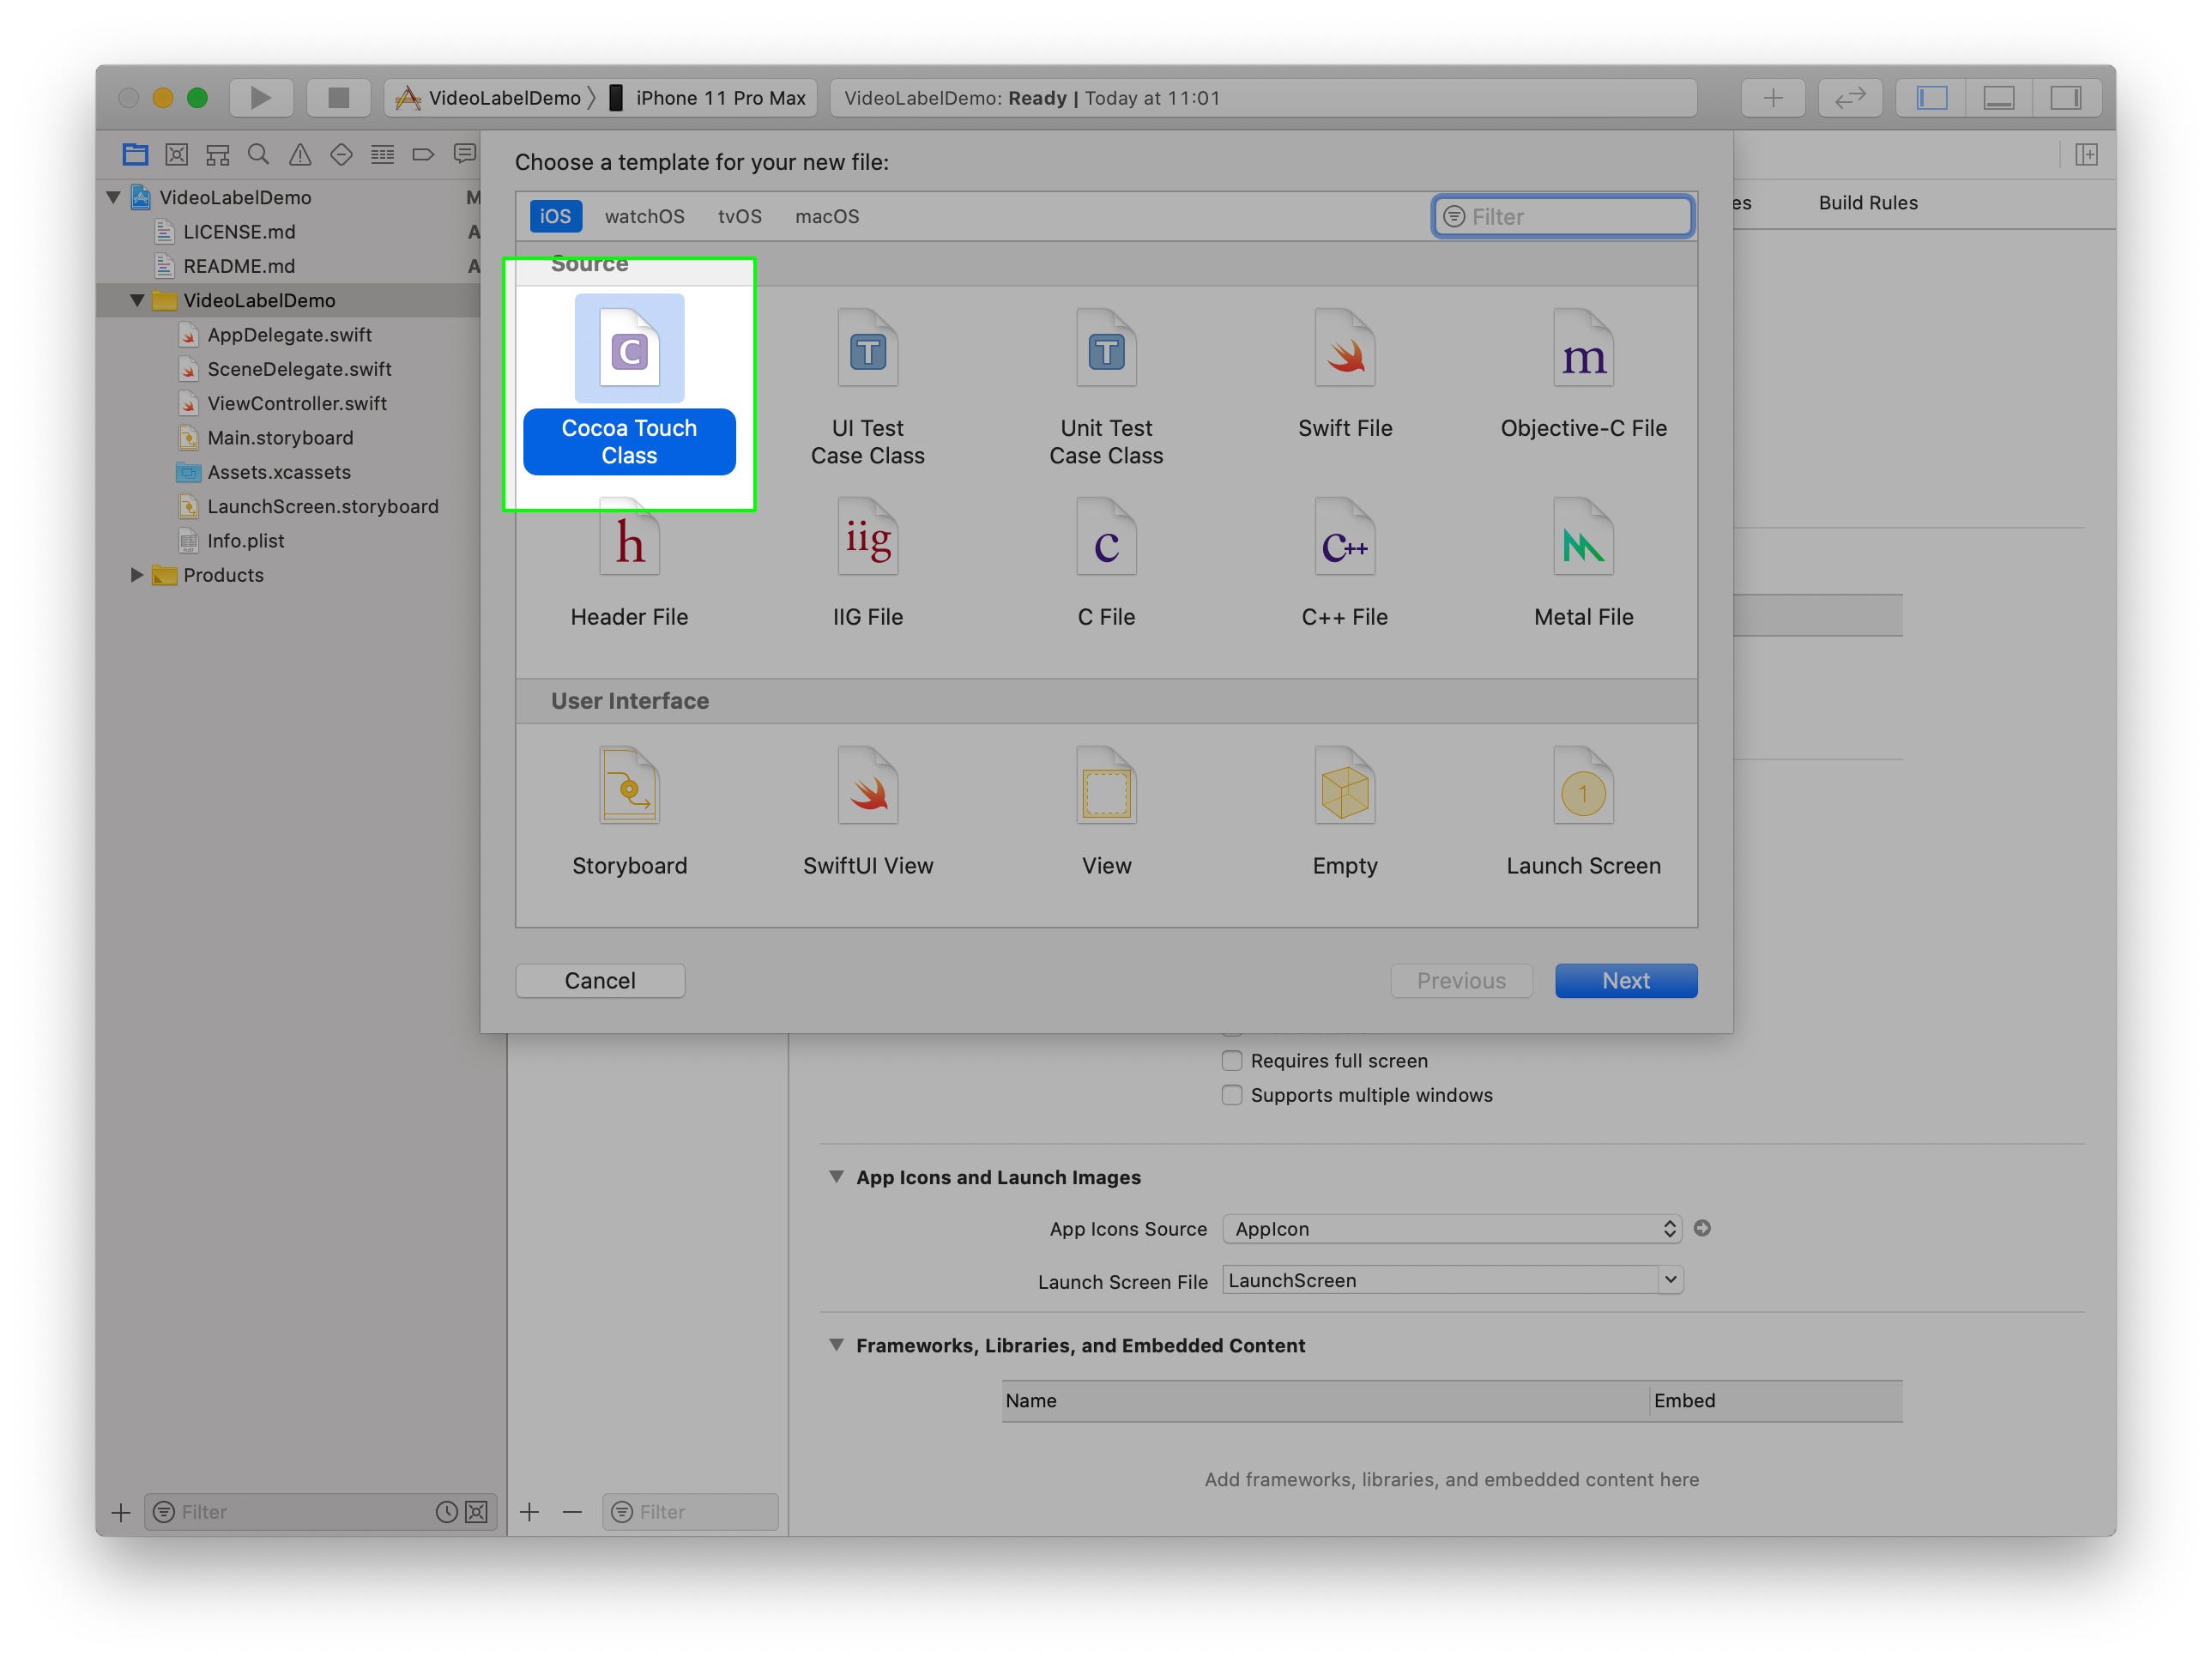
Call it VideoLabel and make it a subclass of UIView.
将其称为VideoLabel并使其成为UIView的子类。

Using the label should be as easy as possible, hence we will create 2 initializers that allows us to plugin the values and off it goes.
使用标签应该尽可能地容易,因此我们将创建2个初始化器,使我们可以插入值并将其关闭。
// This initilizer will use the UIFont.preferredFont(forTextStyle: .largeTitle)

    init(text: String, url: URL) {
            self.text = text
            self.url = url
            super.init(frame: .zero)
    }


    // This initilizer will the use the font attribute of the text,
    // otherwise it will revert to UIFont.preferredFont(forTextStyle: .largeTitle)

    // Recommended approch
    init(attributedText text: NSAttributedString, url: URL) {
            self.attributedText = text
            self.url = url
            super.init(frame: .zero)
    }
Now that we have all we need, let’s layout our view.
现在我们有了所需的一切,让我们布置视图。
override func layoutSubviews() {
    super.layoutSubviews()

    setupBackgroundVideoIfNeeded()
    updateVideoMask()
}
setupBackgroundVideoIfNeeded() will create our video player that will play in a loop in the background. updateVideoMask()will create the text mask and update its dimensions when the view changes any of its dimensions.
setupBackgroundVideoIfNeeded()将创建我们的视频播放器,该播放器将在后台循环播放。 当视图更改其任何尺寸时, updateVideoMask()将创建文本掩码并更新其尺寸。
setupBackgroundVideoIfNeeded() (setupBackgroundVideoIfNeeded())
The definition of the this method looks like this:
此方法的定义如下所示:
private func setupBackgroundVideoIfNeeded() {
    guard playerLayer == nil, let url = url else {
        return
    }

    let player = AVPlayer(url: url)

    if let playerItem = player.currentItem {
        NotificationCenter.default.addObserver(forName: .AVPlayerItemDidPlayToEndTime, object: playerItem, queue: nil) { [weak self] notification in
            let currentItem = notification.object as? AVPlayerItem
            currentItem?.seek(to: .zero, completionHandler: nil)

            if let player = self?.playerLayer?.player,
                player.currentItem == currentItem {
                player.play()
            }
        }
    }

    let playerLayer = AVPlayerLayer(player: player)
    playerLayer.videoGravity = .resizeAspectFill
    layer.addSublayer(playerLayer)

    playerLayer.frame = CGRect(x: 0.0, y: 0.0,
                                width: frame.size.width,
                                height: frame.size.height)
    self.playerLayer = playerLayer


    player.volume = 0
    player.play()
}
We only want to initialize the player layer once, therefore we will check if the property playerLayer has been set up or not. AVPlayerLayer presents the video but it needs an AVPlayer to present. We setup an AVPlayer instance with the URL provided when initializing the view. We also add an observer to the player, that will inform us when playback has ended so that we can loop the video by rewinding and playing again.
我们只想初始化播放器图层一次,因此我们将检查是否设置了属性playerLayer 。 AVPlayerLayer呈现视频,但它需要AVPlayer呈现。 我们使用初始化视图时提供的URL设置AVPlayer实例。 我们还向播放器添加了一个观察者,它会在播放结束时通知我们,以便我们可以通过倒带并再次播放来循环播放视频。
Once our player is setup, we can create an AVPlayerLayer, add it to our view's layer hierarchy and start playback.
设置播放器后,我们可以创建AVPlayerLayer ,将其添加到视图的图层层次结构中并开始播放。
updateVideoMask() (updateVideoMask())
The definition of this method looks like this:
该方法的定义如下:
private func generateTextMask() -> CGImage? {
    guard frame.size.width != 0.0,
        frame.size.height != 0.0,
        let attributedString = maskAttributedText() else {
        return nil
    }


    let bitmap = Bitmap(width: frame.size.width, height: frame.size.height)


    bitmap.context.clear(bitmap.bounds)

    let framesetter = CTFramesetterCreateWithAttributedString(attributedString)
    let range = CFRange(location: 0, length: attributedString.length)
    var effectiveRange: CFRange = .init(location: 0, length: 0)
    let suggestedSize = CTFramesetterSuggestFrameSizeWithConstraints(framesetter, range, nil, bitmap.bounds.size, &effectiveRange)

    if effectiveRange.length < range.length {
        print("VideoLabel ERROR: The view's frame is too small to display the full text.")
    }

    let path = CGMutablePath()
    let bitmapBounds = bitmap.bounds

    let textRect: CGRect

    let alignment = textAlignment(for: attributedString)

    switch alignment {
    case .left, .natural:
        textRect = CGRect(x: 0.0,
                          y: (bitmapBounds.size.height - suggestedSize.height) * 0.5,
                          width: suggestedSize.width,
                          height: suggestedSize.height)

    case .right:
        textRect = CGRect(x: bitmapBounds.size.width - suggestedSize.width,
                          y: (bitmapBounds.size.height - suggestedSize.height) * 0.5,
                          width: suggestedSize.width,
                          height: suggestedSize.height)

    case .justified, .center:
        textRect = CGRect(x: (bitmapBounds.size.width - suggestedSize.width) * 0.5,
                          y: (bitmapBounds.size.height - suggestedSize.height) * 0.5,
                          width: suggestedSize.width,
                          height: suggestedSize.height)
    @unknown default:
        textRect = CGRect(x: (bitmapBounds.size.width - suggestedSize.width) * 0.5,
                          y: (bitmapBounds.size.height - suggestedSize.height) * 0.5,
                          width: suggestedSize.width,
                          height: suggestedSize.height)
    }

    path.addRect(textRect)
    let textRectInViewSpace = CGRect(x: textRect.origin.x / Bitmap.contentScale,
                                     y: textRect.origin.y / Bitmap.contentScale,
                                     width: textRect.size.width / Bitmap.contentScale,
                                     height: textRect.size.height / Bitmap.contentScale)
    let textRectInScreenSpace = UIAccessibility.convertToScreenCoordinates(textRectInViewSpace, in: self)
    accessibilityFrame = textRectInScreenSpace

    let ctFrame = CTFramesetterCreateFrame(framesetter, CFRange(location: 0, length: CFIndex(attributedString.length)), path, nil)


    CTFrameDraw(ctFrame, bitmap.context)

    return bitmap.cgImage
}
We create an attributed text from the text property provided at initilization, if the view was initilized with attributedText we will modifiy it's font size to take into consideration the OS's Dynamic Text settings, making our label respect Accessiblity's Larger Text settings values. We also set the accessibilityFrame to match our text’s bounding box, the accessibilityFrame should be in screen coordinates, we transform our text box, from the bitmap's space, to view space then to screen space.
我们从初始化时提供的text属性创建一个属性文本,如果视图是通过attributedText初始化的,我们将修改字体大小以考虑操作系统的Dynamic Text设置,使我们的标签尊重Accessiblity的Larger Text设置值。 我们还设置了accessibilityFrame以匹配文本的边界框, accessibilityFrame应该在屏幕坐标中,然后将我们的文本框从位图的空间转换为视图空间,然后转换为屏幕空间。
The attributed text is used to draw a string in a graphics context using CoreText. An image is created from the graphics context and returned to the calling function.
属性文本用于使用CoreText在图形上下文中绘制字符串。 从图形上下文创建图像,并将其返回到调用函数。
辅助功能 (Accessibility)
Our label supports Dynamic Text and has set it’s accessibilityFrame, we will need to provide more information to properly support VoiceOver. Add the following method to the view:
我们的标签支持动态文本,并已将其设置为accessibilityFrame ,我们将需要提供更多信息以正确支持VoiceOver。 在视图中添加以下方法:
private func updateAccessibility() {
    isAccessibilityElement = true

    if let text = text {
        accessibilityLabel = text
    } else if let attributedText = attributedText {
        accessibilityLabel = attributedText.string
    }
    accessibilityTraits = .staticText
}
This will set our text as the accessiblity label and tell VoiceOver that to treat us as static text. Call it in the updateVideoMask() method.
这会将我们的文本设置为可访问性标签,并告诉VoiceOver将该文本视为静态文本。 在updateVideoMask()方法中调用它。
如何使用VideoLabel (How to use VideoLabel)
You can import the project using Swift Pacakage manager, or you can drag the VideoLabel.swift file into your Xcode project. Then use one of the initializer described above.
您可以使用Swift Pacakage管理器导入项目,也可以将VideoLabel.swift文件拖到Xcode项目中。 然后使用上述初始化程序之一。
Finally, you can use multiple labels in your view with different videos, you are not limited to one video at a time.
最后,您可以在视图中将多个标签用于不同的视频,而不仅限于一次观看一个视频。

I hope you enjoyed the tutorial and thank you for reading.
希望您喜欢本教程,并感谢您的阅读。
翻译自: https://medium.com/swlh/bring-your-titles-to-life-in-ios-d427bb3311b
ios 在标题栏添加按钮


 732
732

 被折叠的 条评论
为什么被折叠?
被折叠的 条评论
为什么被折叠?
 到【灌水乐园】发言


