


Dive deeper into Go web socket and concurrency programming
深入研究Go Web套接字和并发编程
Chatting app can be done in various way (theoretically). Like using simple long-polling request that provide half-duplex (one-way communication) or using protocol that provide full-duplex (2 way) communication like TCP Socket. But, website cannot directly connect to TCP, fortunately, there is a wrapper to TCP called Websocket.
聊天应用程序可以通过多种方式(理论上)进行。 就像使用提供半双工(单向通信)的简单长轮询请求或使用提供全双工(2路)通信的协议(如TCP套接字)一样。 但是,网站不能直接连接到TCP,幸运的是,有一个TCP的包装程序Websocket 。
You may read more explanation of Websocket that spread through internet, and this time, I’ll explain more about how to implement it in Go
您可能会阅读有关通过Internet传播的Websocket的更多说明,这一次,我将详细说明如何在Go中实现它
需要图书馆 (Library needed)
Before we go right into programming, that’s one library that we need:
在开始编程之前,这是我们需要的一个库:
gorilla/websocket is A fast, well-tested and widely used WebSocket implementation for Go. (quoted from the repo itself)
gorilla / websocket是Go的一种快速,经过测试且广泛使用的WebSocket实现。 (从仓库本身引用)
To do that, right in the project root folder, install the library by typing this command:
为此,请在项目根文件夹中,通过键入以下命令来安装库:
go get github.com/gorilla/websocket项目结构 (The project structure)
You like it simple, right?
您喜欢简单吗?
So, this is the structure:
因此,这是结构:

Yes, just one file. No need to follow SOLID Principle, following best practice, etc. All we need is a minimal working code. And in big picture, the step to make it is as follow:
是的,只有一个文件。 无需遵循SOLID原则,遵循最佳实践等。我们需要的是最少的工作代码。 概括地说,实现这一目标的步骤如下:
- Simple HTTP Server as the receiver of Websocket request 简单的HTTP Server作为Websocket请求的接收者
Websocket connection handler. We call it the Hub. It is a goroutine that save and remove the data of connected client and handle the message broadcast event
Websocket连接处理程序。 我们称之为集线器。 这是一个goroutine,用于保存和删除连接的客户端的数据并处理消息广播事件
- Websocket client manager. It handle the Read and Write of Websocket of each client. Ideally, we create one goroutine for each. And 2 separate go routine for the reader and writer. (Total 3 goroutine for 1 client) Websocket客户经理。 它处理每个客户端的Websocket读取和写入。 理想情况下,我们为每个程序创建一个goroutine。 并为读者和作家提供了两个独立的例程。 (1位客户总共3个goroutine)
I will follow the example provided in this folder of repo
我将按照此回购文件夹中提供的示例进行操作
https://github.com/gorilla/websocket/tree/master/examples/chat
https://github.com/gorilla/websocket/tree/master/examples/chat
Now, let’s go into the code:
现在,让我们进入代码:
Main function and HTTP Endpoint
主要功能和HTTP端点
At this point, we have create a simple HTTP Server that can receive request to http://127.0.0.1:8080/ws
至此,我们已经创建了一个简单的HTTP服务器,可以接收对http://127.0.0.1:8080 / ws的请求
Now, let’s handle the process when user hit the endpoint by using Web socket protocol. Firstly, we create the Hub.
现在,让我们处理用户使用Web套接字协议访问端点时的过程。 首先,我们创建中心。
We have created the Hub. Technically we have provided the container and handler of events like client connection, disconnection and message broadcast that triggered from Websocket. Now we create the Client Manager. Add this below the code, or in the same package (main).
我们已经创建了Hub 。 从技术上讲,我们提供了事件的容器和处理程序,例如由Websocket触发的客户端连接,断开连接和消息广播。 现在,我们创建客户管理器。 将其添加到代码下方,或添加到同一程序包(主程序)中。
*don’t forget to import github.com/gorilla/websocket when writing this part of code
* 在编写这部分代码时 不要忘记导入 github.com/gorilla/websocket
Let’s see, from line 1–4 there, Upgrader used as the parameter of memory buffer constraint for each web socket packet.
让我们从第1-4行开始,将Upgrader用作每个Web套接字数据包的内存缓冲区约束参数。
struct Client represent client connection, it holds reference of Hub and Websocket connection, so it can communicate with other client having the same Hub and Websocket connection reference.
struct Client代表客户端连接,它拥有Hub和Websocket连接的引用,因此它可以与具有相同Hub和Websocket连接引用的其他客户端进行通信。
readPump wait for any incoming message send from client. Once it receive a message, it will pass the data to channel send (send <- message) and next, it will be handled by the Hub.
readPump等待客户端发送的任何传入消息。 收到消息后,它将把数据传递到通道发送 (发送<-消息),然后由集线器处理。
writePump will write (show) the message to the client from incoming data from broadcast (<- send) to client output stream
writePump会将消息从广播(<-发送)到客户端输出流的传入数据写入(显示)到客户端。
serveWs is the gateway for connected HTTP request of client to Websocket world. It will create new instance of websocket connection, create new client object, emitting the register event in hub so the client is registered in the Clients map of Hub. And finally start the reader and writer function
serveWs是客户端将HTTP请求连接到Websocket世界的网关。 它将创建websocket连接的新实例,创建新的客户端对象,并在集线器中发出register事件,以便客户端在集线器的“客户端”图中注册。 最后启动读写器功能
Hub it self identify Client by it’s memory address. So that is why, in the Client map inside Hub struct, the key is the memory address of the client. We don’t have to create a custom ID for every client as it is by nature already unique. (Memory address looks like: 0x2311cc)
集线器通过其内存地址自行识别客户端。 这就是为什么在Hub struct内的Client map中,键是客户端的内存地址的原因。 我们不必为每个客户端创建自定义ID,因为它本质上已经是唯一的。 (内存地址如下:0x2311cc)
Now. let’s go back to the main function. We finish the code by initializing new Hub and adding websocket handler.
现在。 让我们回到主要功能。 我们通过初始化新的Hub并添加websocket处理程序来完成代码。
And the complete code:
以及完整的代码:
测试Websocket连接 (Test the Websocket Connection)
Run the code
运行代码
go run main.goI use wscat https://www.npmjs.com/package/wscat to connect to Websocket via Terminal. You may use your favorite tools
我使用wscat https://www.npmjs.com/package/wscat通过终端连接到Websocket。 您可以使用自己喜欢的工具
First, I open a tab in I use wscat by using the following command
首先,我通过使用以下命令在使用wscat的过程中打开一个选项卡
wscat -c http://127.0.0.1:8080/wsand I open a new tab and use the same command again
我打开一个新标签并再次使用相同的命令
wscat -c http://127.0.0.1:8080/wsSo it looks like this:
所以看起来像这样:

Now, try to send some message. Look for the real time message received from other terminal
现在,尝试发送一些消息。 查找从其他终端收到的实时消息
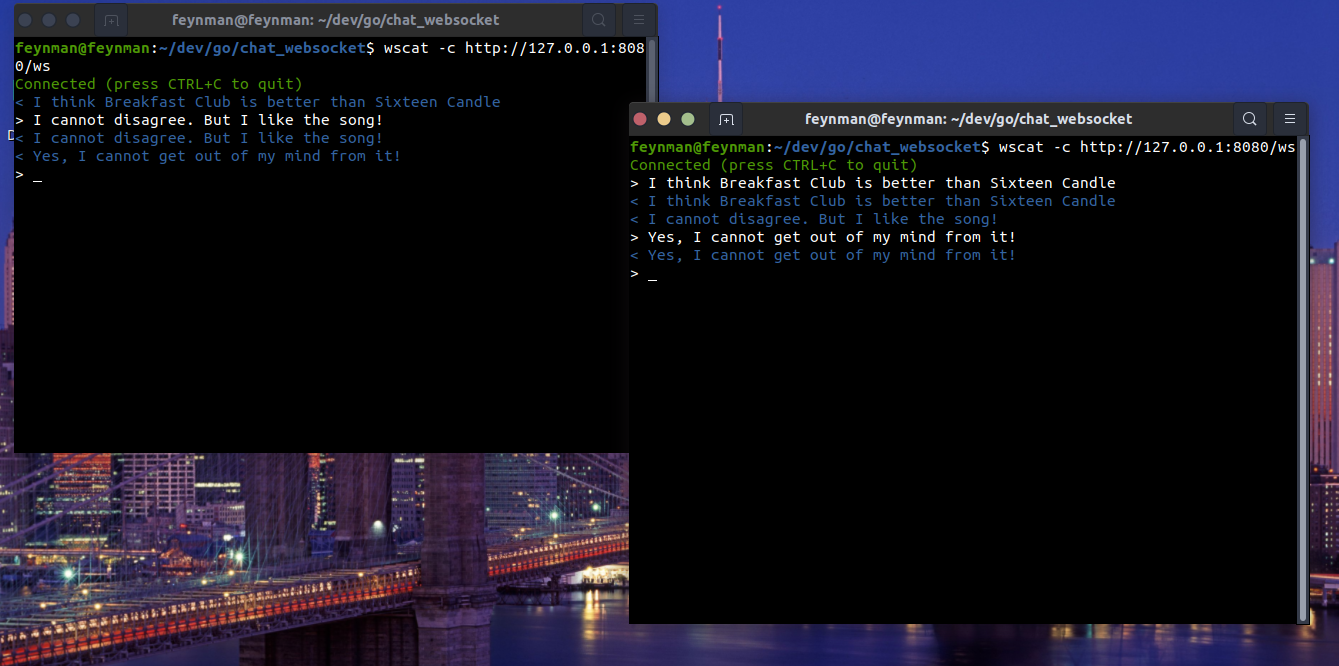
*white text is the message we write, and blue text is the output.
*白色文字是我们写的消息,蓝色文字是输出。
And that’s all
就这样
更多改善 (More improvement)
There are plenty of room to be improve. Since I get the example from the repository itself. I also drop some “fancy” function and make it as minimal as I can. I drop the Ping/pong mechanism, queue messages and some message encodings. But, after we understand how it works, I think it can be your challenge to implement those by your self and add more advance features like custom ID, adding room features like Socket IO or anything that fit it to your needs.
有很大的改进空间。 由于我从存储库本身获得了示例。 我还删除了一些“花式”功能,并使其尽可能最小化。 我删除了Ping / pong机制,队列消息和一些消息编码。 但是,在了解了它的工作原理之后,我认为要自行实现这些功能并添加更多高级功能(如自定义ID),添加房间功能(如Socket IO)或任何适合您需要的功能,可能是您面临的挑战。
Ok. Everything is set up, now let’s dance
好。 一切都准备好了,现在让我们跳舞


 5655
5655

 被折叠的 条评论
为什么被折叠?
被折叠的 条评论
为什么被折叠?
 到【灌水乐园】发言


