windows wsl2
Do you want a similar windows terminal without spending hours or even days going through tutorials, docs, and trying to find that secret phrase to search on google to get useful results?
您是否想要一个类似的Windows终端,而无需花费数小时甚至几天的时间来阅读教程,文档,并试图找到该秘密短语以在Google上进行搜索以获得有用的结果?
Scroll down and you can learn how. But if you just want the settings then go to the bottom and you will find a gist waiting for you.
向下滚动即可了解操作方法。 但是,如果您只想要设置,则转到底部,您将发现一个要点。
新的Windows Terminal💻 (The new Windows Terminal 💻)
I was sketchy about the new Windows Terminal being good, but after using it for a couple of weeks I have to say that it is not bad. There are a few things that are nice as well as annoying about it which I’ll talk about in the end but the good thing is that it is open-source. This means if you want a feature click here, clone the repo, and build it 🤓! But it’s not that easy for newbies like me so we just raise issues and hope that some legend solves it 🙈
我对新的Windows Terminal很好感到不满意,但是使用了几周后,我不得不说它还不错。 最后,我将谈论一些有趣的事情,但好事是它是开源的。 这意味着如果您想要功能, 请单击此处 ,克隆存储库并构建它! 但这对于像我这样的新手来说并不容易,所以我们只是提出一些问题,并希望有传说解决它🙈
Until then download it from the store and scroll down to customize it.
在此之前,请从商店下载它并向下滚动以对其进行自定义。
安装WSL2 🏃🏽♂️ (Install WSL2 🏃🏽♂️)
I’ve always dreaded windows and ridiculed friends who use it to code, but with WSL2 I’m not so sure I can continue doing that. However, if you’re using WSL1 I urge you to get WSL2 because of these reasons but do not if you need these features.
我一直很讨厌使用Windows编写代码的窗口,并嘲笑他们,但是对于WSL2,我不确定是否可以继续这样做。 但是,如果您使用的是WSL1,则由于这些原因,我建议您获取WSL2 ,但如果需要这些功能, 则不要这样做 。
If you’re not convinced to try it out, here are a few reasons to persuade you:
如果您不敢尝试,可以说服您以下几个原因:
Now that you’re hopefully convinced, follow the instructions in the official guide and install it. Beware for it involves a few restarts and errors👹 but the guide shows how to fix them as well.
现在,您已经说服了,请按照官方指南中的说明进行安装。 当心它涉及一些重新启动和错误👹,但该指南还介绍了如何修复它们。
提示1:将WSL发行版设置为默认配置文件🐧 (Tip 1: Set a WSL distro as the default profile🐧)
In the Windows terminal, a profile simply put is a template shell session where you can have an executable such as PowerShell or a WSL distro load up with a specific starting directory to avoid 💿ing to a directory you use a lot, have it’s own color scheme, background image, etc.
在Windows终端中,配置文件只是放置在一个模板shell会话中,您可以在其中使用PowerShell或WSL发行版之类的可执行文件加载特定的起始目录,从而避免切换到您经常使用的目录,并且使用自己的颜色方案,背景图片等。
I don’t think I will ever use Powershell unless I need to install something for Windows. So naturally, I wanted Ubuntu(the WSL distro I use) as my default profile because I am a normal person and I can’t press Ctrl+Shift+4 and be like “That felt good 😏” so yeah this was the first thing I did.
除非需要为Windows安装某些软件,否则我不会使用Powershell。 所以自然而然地,我想将Ubuntu(我使用的WSL发行版)作为默认配置文件,因为我是普通人,并且无法按Ctrl + Shift + 4并像“那感觉很好😏”那样,是的,这是第一件事是的
Customizing the windows terminal is easy because it’s just a JSON file 🤗
定制Windows终端很容易,因为它只是一个JSON文件🤗
步骤1:打开Windows终端的设置 (Step 1: Open the settings of the Windows Terminal)
You can press Ctrl + , or click the down arrow in the top bar and choose the settings option.
您可以按Ctrl +,或单击顶部栏中的向下箭头 ,然后选择设置选项。

第2步:找到所需个人资料的向导 (Step 2: Find the guid of the profile you want)
In the profiles object, there will be a key called list which is the list of profiles. Find the profile you want as default and you will notice a guid key in it.
在配置文件对象中,将有一个名为list的键,它是配置文件的列表。 找到您想要的默认配置文件,您会在其中看到一个引导键。
步骤3:将默认配置文件guid替换为您选择的默认配置文件 (Step 3: Replace the default profile guid with the one you chose)
Copy the guid of a profile you want as default and paste it in the value of the defaultProfile key.
将您想要的配置文件的GUID复制为默认值,并将其粘贴到defaultProfile键的值中。
第4步:保存,关闭,打开并魔术 (Step 4: Save, close, open and magic)
Save the settings.json file. Close the windows terminal and open it again. You should have the profile you chose to show up by default. If you want it to be at the top of the menu, you can always reorder the objects in the profile list.
保存settings.json文件。 关闭Windows终端,然后再次打开。 您应该具有默认选择显示的配置文件。 如果希望它位于菜单的顶部,则可以随时对配置文件列表中的对象进行重新排序。
提示2:同一发行版具有多个配置文件 (Tip 2: Have multiple profiles for the same distro 🤹🏽♂️)
If you’re using your machine for work, learning, projects, etc having separate profiles might help you.
如果您将机器用于工作,学习,项目等,拥有单独的配置文件可能会对您有所帮助。
步骤1:生成GUID或UUID (Step 1: Generate a GUID or UUID)
If you’re using a Linux distro, you can use the pre-installed uuidgen command.
如果您使用的是Linux发行版,则可以使用预安装的uuidgen命令。

If you’re using Powershell, then use the command below with the quotes.
如果您使用的是Powershell,请在下面的命令中加上引号。
'{'+[guid]::NewGuid().ToString()+'}'
'{'+[guid]::NewGuid().ToString()+'}'

步骤2:找到正确的命令行工具和参数 (Step 2: Find the right command-line tool and arguments)
If you’re trying to make a new WSL profile then you can’t use the source key with the value as Windows.Terminal.Wsl . What you can do is use the wsl command-line tool to launch any distro you want.
如果您要创建新的WSL配置文件,则无法使用source 键,值为Windows.Terminal.Wsl 。 您可以使用wsl命令行工具启动所需的任何发行版。
I used the command wsl -d Ubuntu because I installed Ubuntu, but you can replace that with a distro of your choice. Then choose a starting directory for this profile if you want. Since we’re using the command line as the way to launch our profile, we’ll have to provide a path to a custom icon. I used icons8 for this, feel free to use any source of your choice. Once you’re done your profile should look like this.
我使用命令wsl -d Ubuntu 因为我安装了Ubuntu,但是您可以用自己选择的发行版替换它。 然后根据需要选择此配置文件的起始目录 。 由于我们使用命令行作为启动配置文件的方式,因此我们必须提供自定义图标的路径。 我用过icons8 为此,请随时使用您选择的任何来源。 完成后,您的个人资料应如下所示。
秘诀3:配色方案🎨 (Tip 3: Color scheme 🎨)
I don’t need to tell you why you need a color scheme for your terminal, editor, IDE, etc. Adding a color scheme is as easy as adding an object to the schemes array. To find themes like this I used this tool made by Tom. It gives you the color scheme object. Here’s how it looks like.
我不需要告诉您为什么您需要为终端机,编辑器,IDE等使用配色方案。添加配色方案就像将对象添加到schemes数组一样容易。 为了找到这样的主题,我使用了Tom制造的工具 。 它为您提供了配色方案对象。 这是它的样子。
I used the Dracula Plus theme because it has the goodness of Dracula and the simplicity of One Dark.
我使用了Dracula Plus主题,因为它具有Dracula的优点和One Dark的简单性。
After that to use the color scheme you can use the colorScheme key and either set it in the defaults object in profiles or you can have different palettes for different profiles. You can find more settings for how your terminal looks in the Profile Settings docs.
之后,可以使用colorScheme键并将其设置为配置文件中的默认对象,也可以为不同的配置文件使用不同的调色板。 您可以在“ 配置文件设置”文档中找到有关终端外观的更多设置。
提示4:窗格🚪 (Tip 4: Panes 🚪)
If you’ve used tmux or terminator or something similar then you’ll know how cool and useful panes are. However, if you’re new then have another look at the pic on the top. Those small shells are called panes.
如果您使用过tmux或终止符或类似的东西,那么您会知道窗格的实用性和实用性。 但是,如果您是新手,请再看看顶部的图片。 这些小壳称为窗格。
The official docs do a great job of demonstrating how to use them so I’m gonna talk about its only drawback.
官方文档在演示如何使用它们方面做得很出色,因此我将讨论它的唯一缺点。
The Windows terminal does have panes but it’s not normal. It’s a bit weird. When you open a new pane, it does not use the starting directory of the previous pane. Now, you might be like
Windows终端确实有窗格,但这是不正常的。 有点奇怪 当您打开一个新窗格时,它不使用前一个窗格的起始目录。 现在,你可能会像
But fear not, for I have a solution, well more of a workaround.
但是不要担心,因为我有解决方案,但更多的是一种解决方法。
So, in my quest to search for a sane method to use panes I came across the docs for the command line arguments of Windows Terminal. They have arguments for splitting panes, opening new tabs with a profile, starting directory, tab title, etc.
因此,在搜寻使用窗格的理智方法的过程中,我遇到了文档 Windows终端的命令行参数 。 它们具有用于拆分窗格,使用配置文件打开新选项卡,起始目录,选项卡标题等的参数。
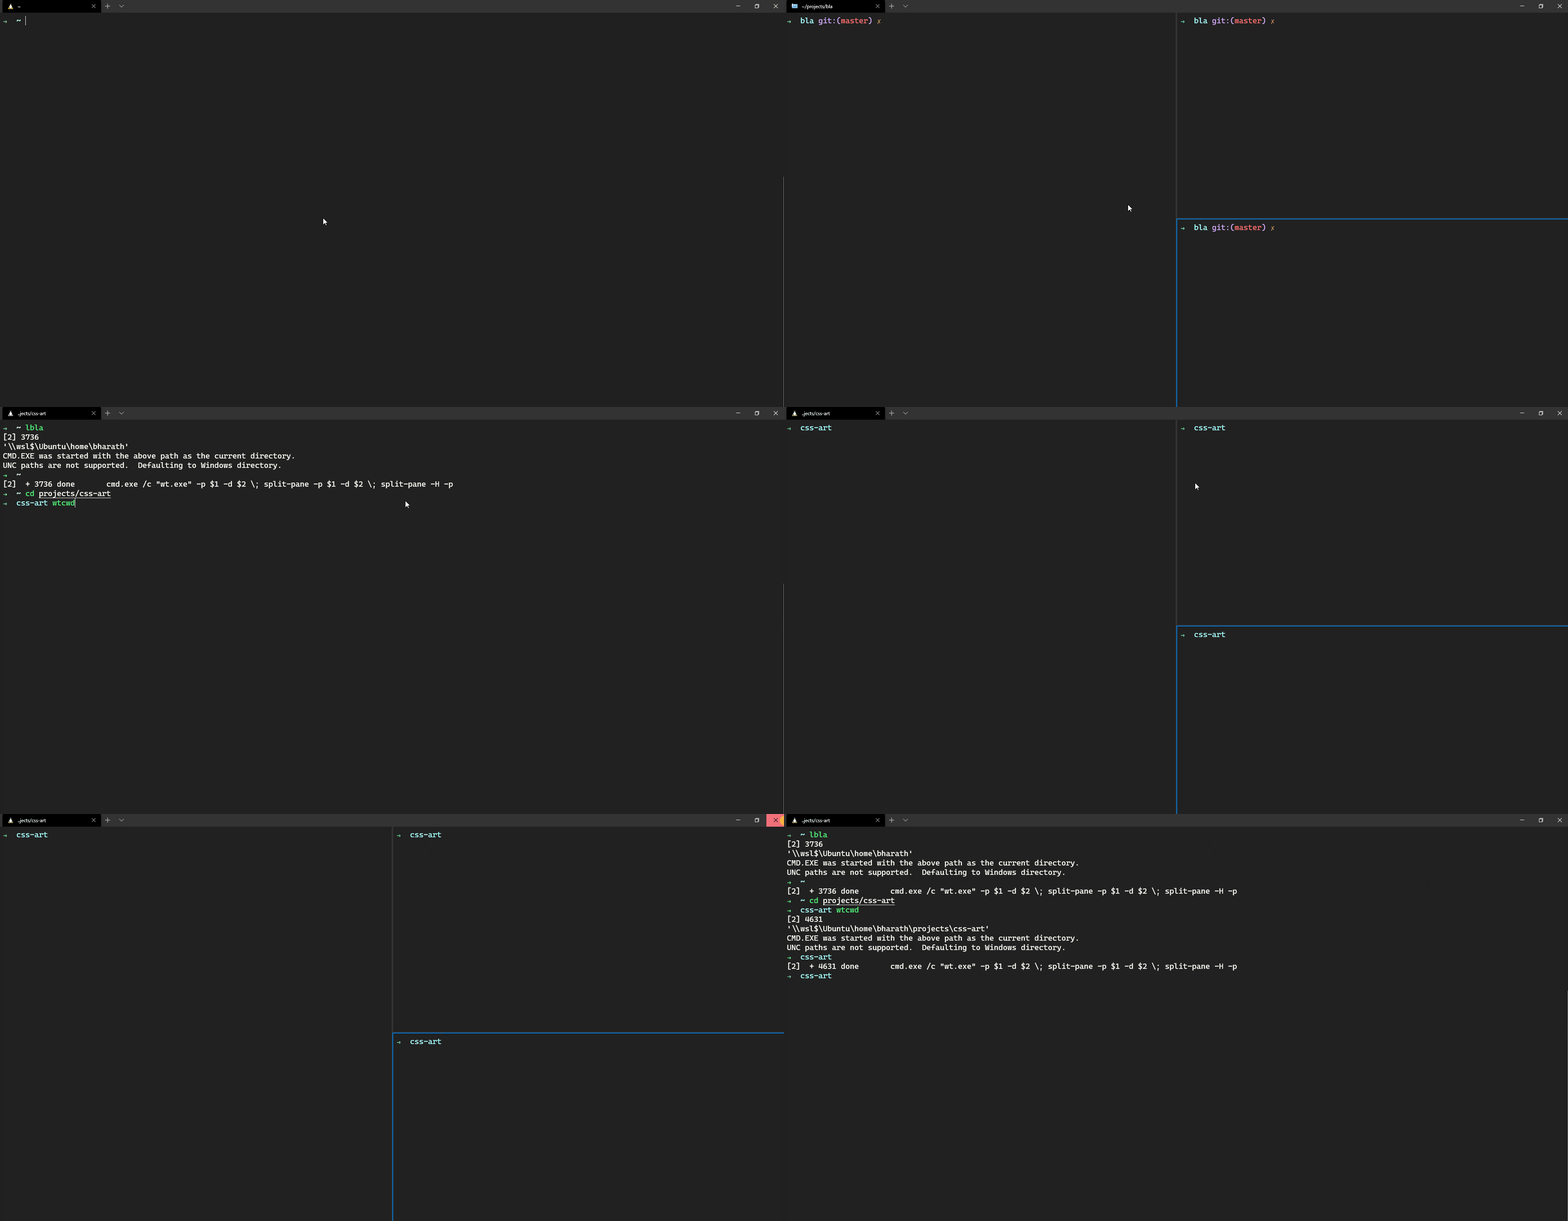
Then it hit me, Linux has this amazing thing called aliases to execute command-line tools with arguments. So, I made a function called coolpanes to accept 2 arguments, the profile name and the starting directory for the panes. Here’s an example:
然后让我感到震惊的是,Linux有一个了不起的东西叫做别名,可以使用参数执行命令行工具。 因此,我创建了一个名为coolpanes的函数来接受2个参数,即配置文件名称和窗格的起始目录 。 这是一个例子:
You can make functions like coolpanes to suit your pane structure, and then use them to make aliases like lbla for each combination of profile and directory of your choice! The reason I called this a workaround is that it always opens it in a new window and sometimes the background process doesn't return but you can always exit the previous window safely so 🤷🏽♂️.
您可以使像coolpanes这样的功能适合您的窗格结构,然后使用它们为您选择的配置文件和目录的每种组合制作别名,如lbla ! 我之所以称其为“替代方法”,是因为它总是在新窗口中打开它,有时后台进程不会返回,但是您始终可以安全地退出前一个窗口,所以🤷🏽️。
But wait, there’s more! Programmers don’t like repetition so making an alias every time you need it is boring. This is why I came up with this new function and alias that uses coolpanes called cwdpanes which stands for the current working directory panes. Then I made an alias just to specify the profile.
但是,等等,还有更多! 程序员不喜欢重复,因此每次需要别名时都会感到无聊。 这就是为什么我想出了这个新的功能和别名使用coolpanes称为cwdpanes它代表当前工作目录窗格。 然后我做了一个别名只是为了指定配置文件。
Fun fact: I was stuck at this for a while because I forgot to prepend //wsl$/Ubuntu to the pwd result 🤦🏽♂️. Typical bug life.
有趣的事实:我被困了一段时间是因为我忘记在//wsl$/Ubuntu前面加上pwd结果🤦🏽♂️。 典型的错误寿命。
Here’s a short gif that demonstrates both lbla and wtcwd.
这是演示lbla和wtcwd的简短gif 。

If you don’t know how to make aliases of your own, this is a good article to help you get started.
如果您不知道如何创建自己的别名, 这 是一篇很好的文章,可以帮助您入门。
提示5:使用Linux文件系统📁 (Tip 5: Use the Linux file system 📁)
Any file that you want to use inside WSL, make sure it lives in the Linux file system and not the Windows file system if you want fast or even normal speeds. I didn’t notice this until I used VS-Code with the Remote WSL extension for a project which was stored in the Windows file system. Any change I made in the terminal was not reflected unless I manually refreshed the file tree. This is when I read Microsoft’s tip that says
您想要在WSL中使用的任何文件,请确保它们位于Linux文件系统中,而不是Windows文件系统中(如果您要使用快速甚至正常速度)。 直到我将VS-Code与Remote WSL扩展一起使用后,我才注意到这一点 用于存储在Windows文件系统中的项目。 除非手动刷新文件树,否则不会反映我在终端上所做的任何更改。 这是我阅读微软的提示时说的
Use the Linux file system for faster performance
使用Linux文件系统以获得更快的性能
- Microsoft docs for WSL 2 vs WSL 1
-WSL 2与WSL 1的Microsoft文档
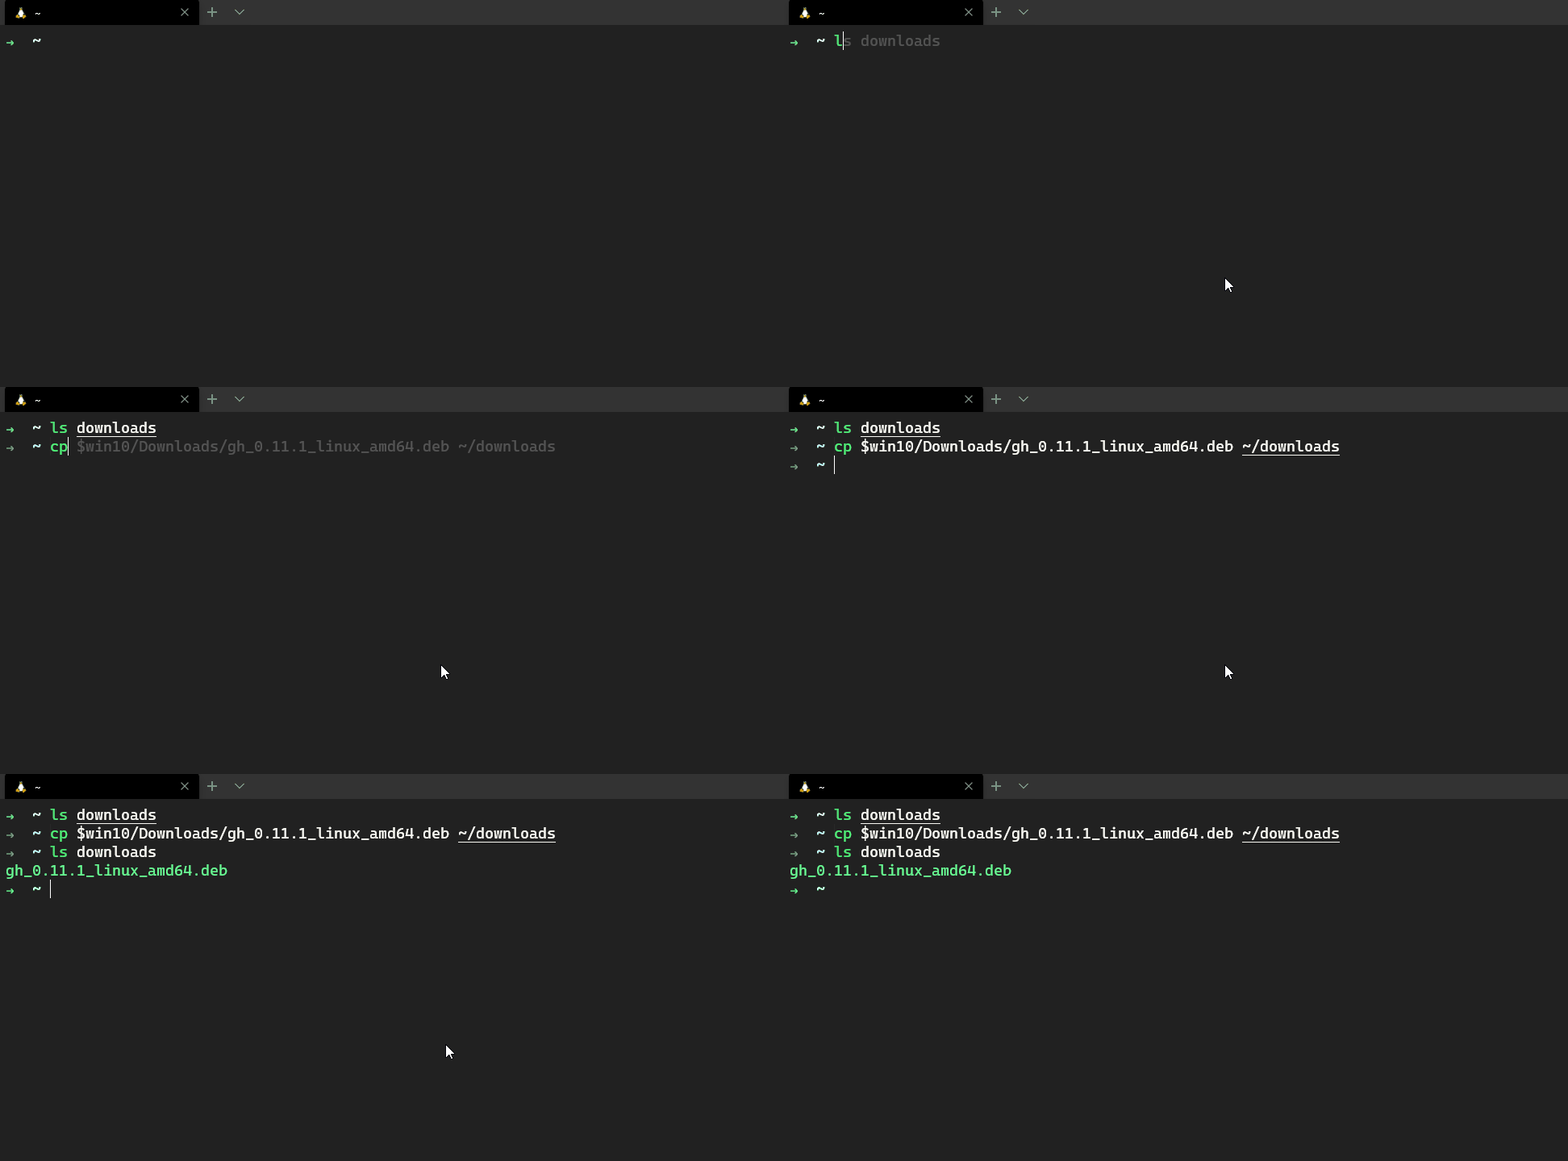
We usually download packages from browsers that get downloaded to the Windows file system. So having an environment variable to the root directory of the windows filesystem can come handy to transfer files between Linux and Windows. This is mine
我们通常会从浏览器下载软件包,然后将其下载到Windows文件系统。 因此,在Windows文件系统的根目录中包含一个环境变量可以很方便地在Linux和Windows之间传输文件。 这是我的
export win10="/mnt/c/Users/Bharath"Here’s a simple demonstration of transferring the Debian package of Github’s new command-line tool called gh from the Windows file system over to Linux.
这是转移Github的新命令行工具gh的Debian软件包的简单演示。 从Windows文件系统到Linux。

提示6:捕捉🐦和systemd👿 (Tip 6: Snaps 🐦 and systemd 👿)
If you’ve been using snaps and tools that need systemd then you should know that systemd is not supported in WSL by default for any distro.
如果您一直在使用需要systemd的快照和工具,那么您应该知道WSL默认不支持任何发行版的systemd。
Here are 2 ways you can get it:
您可以通过以下两种方式获得它:
The first script is only made for Ubuntu distros and the second tool is made for Debian based distros and Arch out of the box but you can build it from source for any other Linux distro.
第一个脚本仅适用于Ubuntu发行版,第二个工具适用于基于Debian的发行版和Arch,但您可以从任何其他Linux发行版的源代码中构建它。
WARNING: I am not responsible if these tools break your machine!
警告 :如果这些工具损坏了您的机器,我概不负责!
So be responsible and back up your files. Make a new fake account and test it there. If you are convinced, only then use it in your main machine.
因此,要负责并备份文件。 制作一个新的假帐户并在那里进行测试。 如果您确信,请仅在主机中使用它。
提示7:请勿右键单击🖱 (Bonus Tip 7: Do not right-click 🖱)
I don’t know why but apparently, it’s a “feature” to paste the clipboard’s content if you right-click in the terminal. So, if you don’t like this then don’t because there is no setting to disable it as of now. Hopefully, it’ll come in a future update.
我不知道为什么,但是显然,如果在终端上单击鼠标右键,粘贴剪贴板的内容是“功能”。 因此,如果您不喜欢此功能,请不要这样做,因为到目前为止没有设置禁用它。 希望它将在将来的更新中发布。
TL; DR (TL;DR)
Here is the gist with my entire settings.json for the Windows Terminal and the part of my zshrc which is relevant for the same. I also disabled the default setting that copies selected text to the clipboard automatically because I usually do that just to scan through long error messages.
这是要点,包含Windows终端程序的我的整个settings.json和我的zshrc中与之相关的部分。 我还禁用了默认设置,该默认设置会自动将所选文本复制到剪贴板,因为我通常这样做只是为了扫描较长的错误消息。
摘要 (Summary)
If you’re wondering how to get your shell prompt to look like mine, that’s because I use zsh and oh-my-zsh. I didn’t mention this as a tip because it’s a preference of mine.
如果您想知道如何使您的shell提示符看起来像我的,那是因为我使用了zsh和oh-my-zsh 。 我没有将此作为提示,因为这是我的偏爱。
The above tips are what I found and made to make my life easier. If you have more then please leave them down in the comments because you never know to whom it might be helpful(I mean me 😁). You can find more global settings, key bindings, and other info here. BTW this video by Fireship is what gave me hope to use Windows for development, so check it out if you’re unsure. Huge shout out to my friend Mayank Shah for his help and insights on the Linux file system and systemd tip 🙏🏽🙏🏽
以上提示是我发现和使我的生活更轻松的秘诀。 如果您还有更多内容,请在评论中保留,因为您永远都不知道对谁有帮助(我是me)。 你可以找到更多的全局设置 , 键绑定 ,和其他信息在这里 。 顺便说一句, Fireship的 这段视频使我希望能够使用Windows进行开发,因此如果不确定,请查看。 向我的朋友Mayank Shah大声喊叫,感谢他对Linux文件系统和systemd技巧的帮助和见解🙏🏽🙏🏽
Hope this helped you out! Thank you for reading and scrolling!
希望这对您有所帮助! 感谢您阅读和滚动!
翻译自: https://medium.com/swlh/6-tips-for-an-awesome-workflow-with-windows-terminal-and-wsl2-c430306369df
windows wsl2


 2262
2262


 被折叠的 条评论
为什么被折叠?


