


介绍 json
介绍 (Introduction)
As a pentester developing new skills in different areas is very important as you might miss something crucial from one approach. Android pentesting is one of them, but it requires a dedicated environment and I will explain how to setup an easy one. So let’s begin!
在五学期中,在不同领域发展新技能非常重要,因为您可能会错过一种方法中的关键内容。 Android渗透测试是其中之一,但它需要专用的环境,我将解释如何设置简单的环境。 因此,让我们开始吧!
Table of contents:
目录:
- Setup android emulator (Genymotion) 设置android模拟器(Genymotion)
- Configure Burp Suite CA certificate on device 在设备上配置Burp Suite CA证书
- Frida to bypass SSL pinning Frida绕过SSL固定
- Bytecode Viewer (for static analysis) 字节码查看器(用于静态分析)
Before installing emulator, I would recommend to install any Linux based distro or Santoku, which is especially designed for mobile pentesting. Installing Santoku is out of scope in this write-up, but you can follow up this guide to setup.
在安装模拟器之前,我建议您安装任何基于Linux的发行版或Santoku ,它们是专门为移动渗透测试而设计的。 安装Santoku在本文写作范围之外,但您可以按照本指南进行设置。
1. Genymotion (1. Genymotion)
When starting out learning, android emulators are the great way to get experience with a variety of devices having different API levels without costing much and free version of Genymotion provides exactly that with great User Experience and easy to configure nature.
开始学习时,Android模拟器是获取具有不同API级别的各种设备的体验的好方法,而无需花费太多,而Genymotion的免费版本恰恰提供了出色的用户体验和易于配置的特性。
Note: VirtualBox is used as a core by genymotion to virtualize Android operating systems. So please install VirtualBox in your system in order to proceed: link
注意:genymotion将VirtualBox用作核心以虚拟化Android操作系统。 因此,请在您的系统中安装VirtualBox以便继续: 链接
Genymotion requires user registration to use its dashboard and for that first you need to create an account: link
Genymotion需要用户注册才能使用其仪表板,为此首先您需要创建一个帐户: 链接
After completing your registration process download its installer from here and install it in your host computer.
完成注册过程后,请从此处下载其安装程序,然后将其安装在主机中。
# Make it executable
$- chmod +x genymotion-<version>-linux_x64.bin# Specify your path, here i am installing in user's home directory
$- ./genymotion-<version>-linux_x64.bin -d ~/
Once Genymotion get install now you can sign in using your credentials specified in the registration process and use its dashboard which looks like shown in Figure 1.
Genymotion立即安装后,您可以使用注册过程中指定的凭据登录,并使用其仪表板,如图1所示。
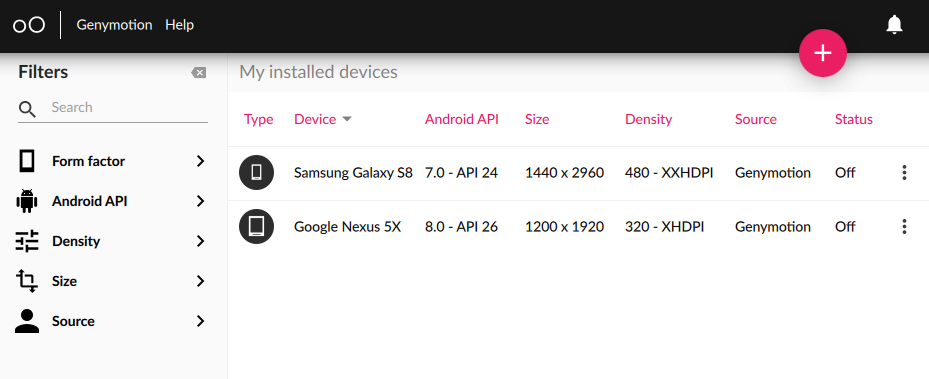
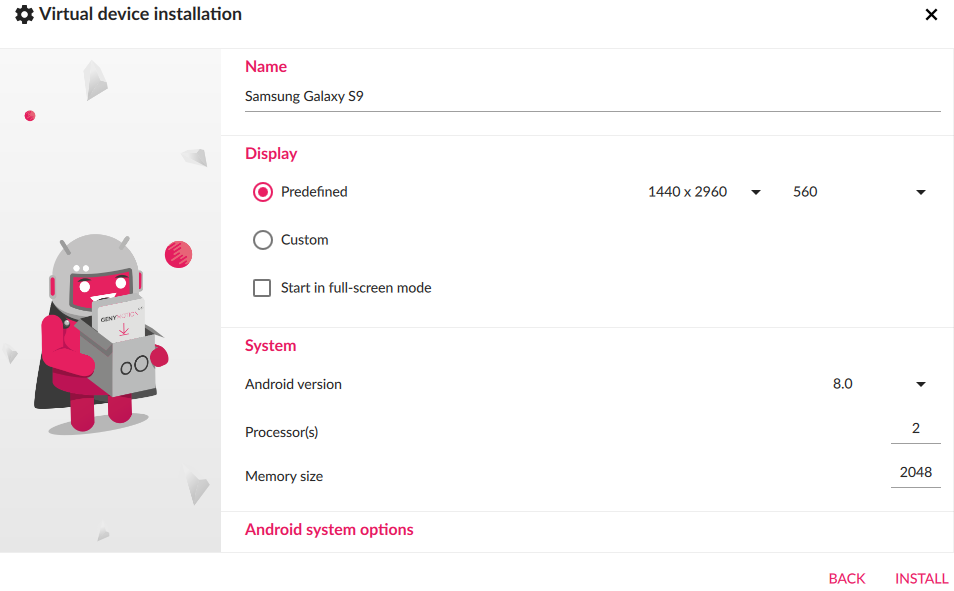
Here I’ve installed two devices already, but you can install a new device by clicking on plus icon at the top right corner and selecting your desired template and for this example I will install Samsung Galaxy S9 (8.0 — API 26)
在这里,我已经安装了两个设备,但是您可以通过单击右上角的加号图标并选择所需的模板来安装新设备,在本示例中,我将安装Samsung Galaxy S9(8.0-API 26)
配置Genymotion (Configuring Genymotion)
After initiating the device, there are a couple of things to consider:
启动设备后,需要考虑以下几点:
ARM translator:
ARM翻译器:
If some app contains ARM native code, then Genymotion will not be able to run the app as it consists of x86 (32-bit) architecture and will throw an error. You can avoid this problem by installing ARM translation library into emulated device: link
如果某些应用程序包含ARM本机代码,则Genymotion将无法运行该应用程序,因为它包含x86(32位)体系结构,并且会引发错误。 您可以通过将ARM翻译库安装到仿真设备中来避免此问题: 链接
Note: At this point of time this library only supports up to android version 8.0 so download right package according to your emulated device’s specifications.
注意:目前,该库仅支持android 8.0最高版本,因此请根据您所仿真设备的规范下载正确的软件包。
Saving APK (Android Package):
正在保存APK(Android软件包):
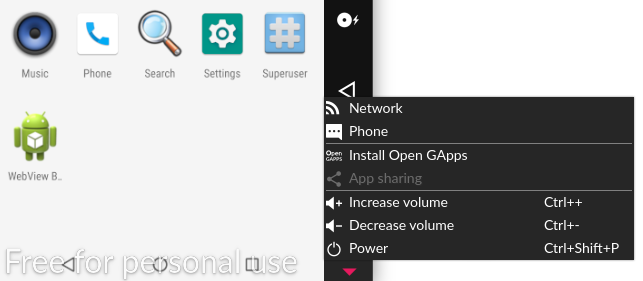
Installing target apps into the emulated device becomes much easier by the Open Gapps widget present in a toolbar which you can access like shown in Figure 3.
通过工具栏中的Open Gapps小部件,可以轻松地将目标应用安装到仿真设备中,如图3所示,您可以对其进行访问。
After its installation you can download your target apps directly from Play Store. But saving this apk into host system would be beneficial for main two reasons:
安装后,您可以直接从Play商店下载目标应用。 但是将这个APK保存到主机系统中将是有益的,主要有两个原因:
- No need to download the same version of app into different emulated devices having same specifications. 无需将相同版本的应用下载到具有相同规格的不同仿真设备中。
- Required for a decompiler in order to review the source code for static analysis. 反编译器需要此代码,以便查看源代码以进行静态分析。
So how we can save them?
那么我们如何保存它们呢?
Usually you have two ways to get apk either download it from sites like evozi or pull it using adb (Android debug bridge)
通常,您有两种获取apk的方法,要么从evozi之类的网站下载它,要么使用adb(Android调试桥)将其提取
Note: Genymotion have pre-installed this tool in its installation directory and mine is located in ~/genymotion/tools/
注意: Genymotion已将此工具预安装在其安装目录中,而我的工具位于〜/ genymotion / tools /
For this demonstration purpose I will use the Twitter Lite app:
为此,我将使用Twitter Lite应用程序:
# Call package manager (pm) and filter out twitter's package name
$- ./adb shell pm list packages | grep twitter# Check the absolute path
$- ./adb shell pm path com.twitter.android.lite# Pull apk and rename to twitter_lite.apk
$- ./adb pull /data/app/com.twitter.android.lite-somevalue.apk twitter_lite.apk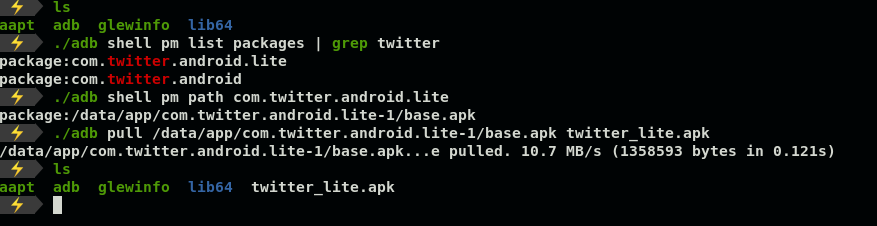
Now just drag & drop these APKs into emulated devices.
现在,只需将这些APK拖放到仿真设备中即可。
2.打p套房 (2. Burp Suite)
I assume the reader already have installed burp suite if not then simply download its community version: link
我假设读者已经安装了burp套件(如果未安装),然后只需下载其社区版本: 链接
Here I will show you only how to configure with android emulated device.
在这里,我仅向您展示如何使用android仿真设备进行配置。
Android Nougat and above (API >= 24) only trusts system level CA (certificate authority) certificates for secure communications especially for WebView. You can read more from here: link
Android Nougat及更高版本(API> = 24)仅信任系统级CA(证书颁发机构)证书以进行安全通信,尤其是WebView。 您可以从此处了解更多信息: 链接
So the easiest method to bypass this restriction is installing Burp CA’s certificate as the system trusted certificate and this method will also prevent us from setting a Lock screen PIN 😎
因此,绕过此限制的最简单方法是将Burp CA的证书安装为系统受信任的证书,并且此方法还将阻止我们设置锁定屏幕的PIN😎
脚步: (Steps:)
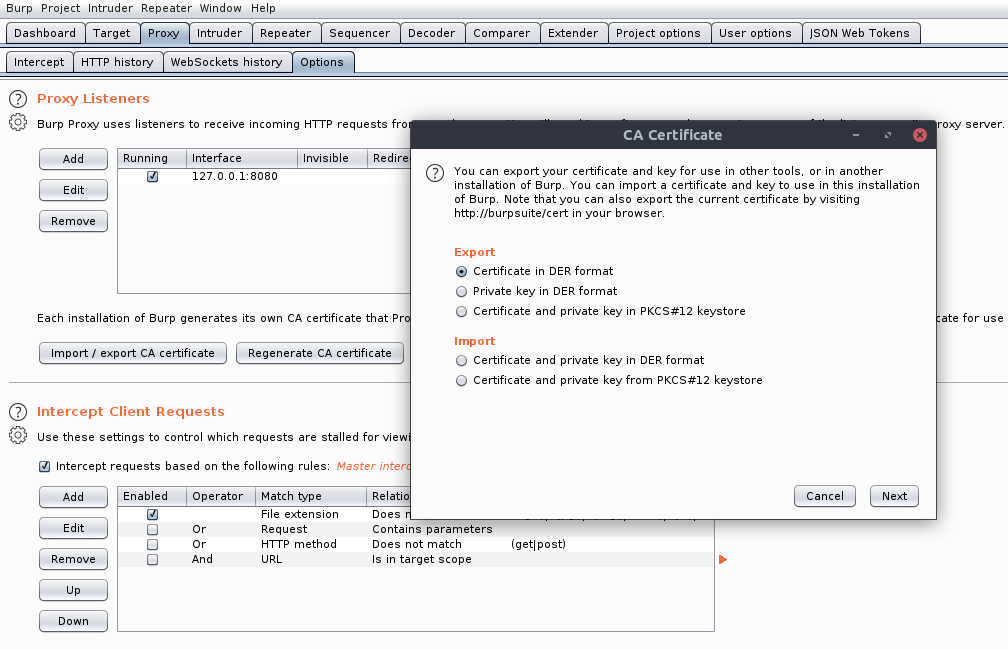
1. Export burp CA into der format
1.将打p CA导出为der格式
2. Use Openssl to convert DER to PEM and rename to <cert-hash>.0
2.使用Openssl将DER转换为PEM,然后重命名为<cert-hash> .0
# Convert certificate format from DER to PEM
$- openssl x509 -inform DER -in cacert.der -out cacert.pem# Display the "hash" of the certificate subject name
$- openssl x509 -inform PEM -subject_hash_old -in cacert.pem | head -1# Move cert.pem and rename to <hash>.0
$- mv cacert.pem 9a5ba575.0
Note: Use -subject_hash if your openssl <1.0
注意:如果您的openssl <1.0,请使用-subject_hash
3. Move certificate in emulated device using adb
3 。 使用ADB在模拟设备中移动证书
# Change /system partition into writable mode with remount
$- ./adb remount# Transfer certificate
$- ./adb push 9a5ba575.0 /system/etc/security/cacerts/# Change its permissions
$- ./adb shell chmod 644 /system/etc/security/cacerts/9a5ba575.0# Reboot to let changes occur
$- ./adb shell reboot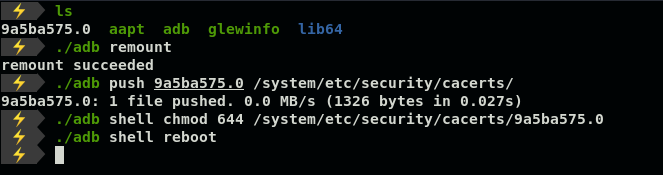
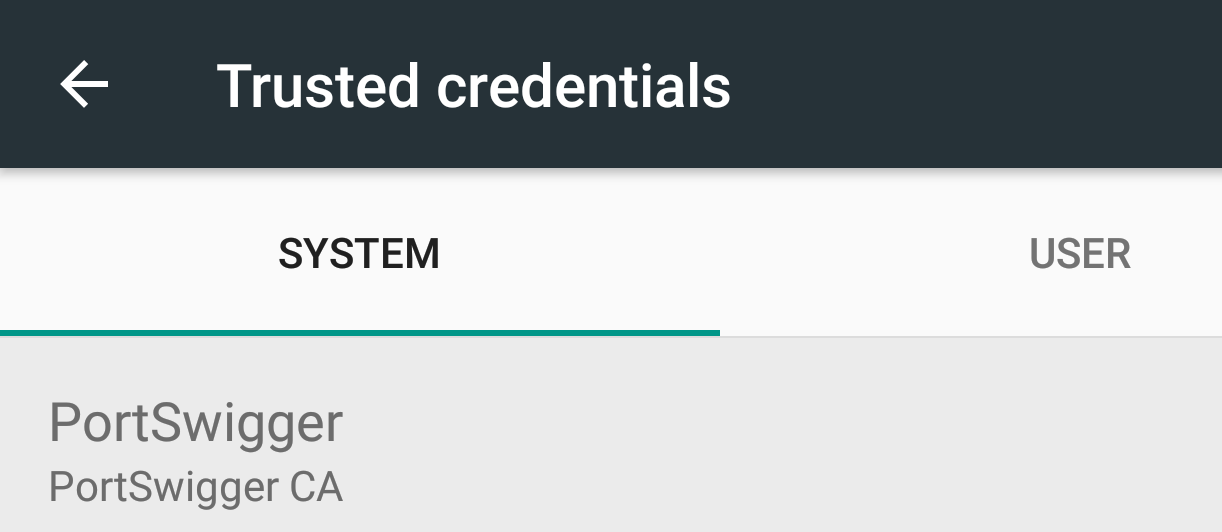
Now your certificate should be installed as a system-trusted CA certificate which you can confirm by navigating:
现在,您的证书应作为系统信任的CA证书安装,您可以通过导航来确认:
Settings →Security & Location → Encryption & credentials → Trusted Credentials
设置→安全和位置→加密和凭据→受信任的凭据
4. Configure burp suite’s proxy
4.配置burp套件的代理
Navigate to Proxy → Options → Proxy Listeners → Add
导航到代理→选项→代理侦听器→添加
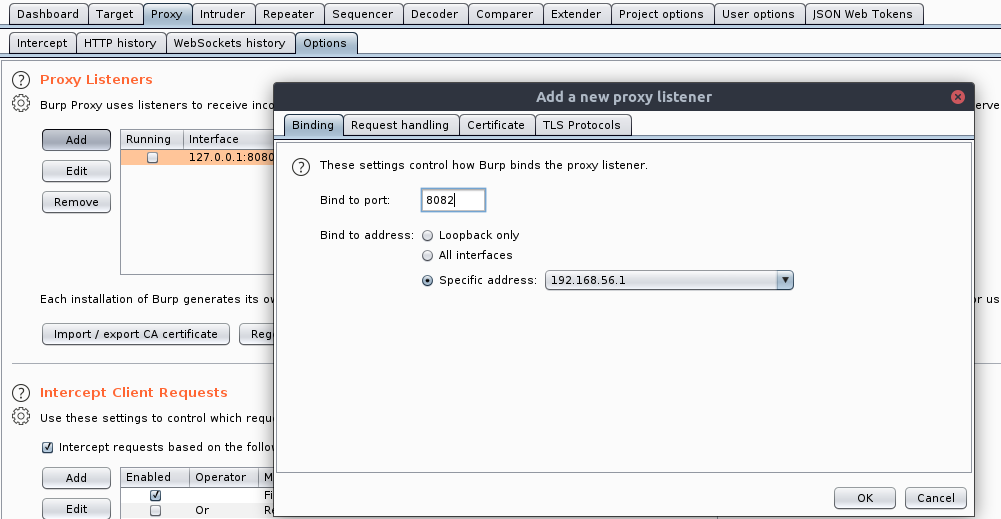
Here I’ve bound port 8082 to my VirtualBox’s interface IP
在这里,我已经将端口8082绑定到VirtualBox的接口IP
5. On emulated device, configure WiFi settings.
5.在模拟设备上,配置WiFi设置。
Navigate to WiFi → Long press WiFi name → Modify Network → Advanced Options → Change proxy None to Manual
导航到WiFi→长按WiFi名称→修改网络→高级选项→将代理无更改为手动
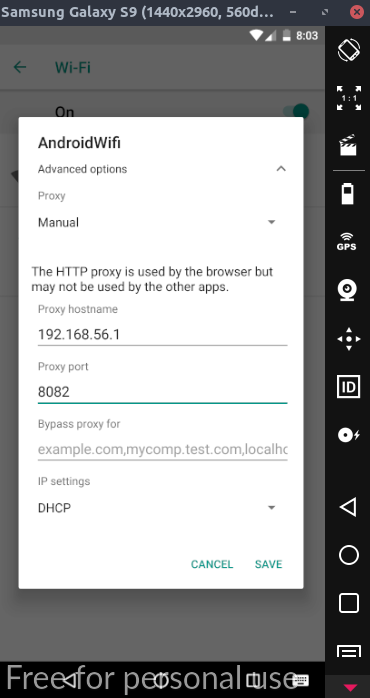
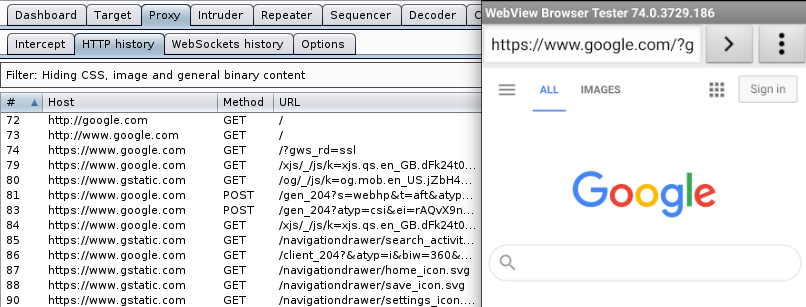
After this you can see network traffic in burp’s history
之后,您可以在burp的历史记录中看到网络流量
3.弗里达 (3. Frida)
Basically Frida is a dynamic code instrumentation toolkit which lets you dynamically inject snippets of code into running processes of the app in order to change its behavior and this is exactly what we need to bypass SSL pinning but now you might be wondering what’s that?
基本上,Frida是一个动态代码检测工具包,它使您可以将代码片段动态注入应用程序的运行进程中,以更改其行为,这正是我们需要绕过SSL固定的条件,但是现在您可能想知道那是什么?
Well, SSL pinning is a technique used in applications as an additional security layer for application traffic in order to prevent attacks like MitM (man-in-the-middle) and this will not allow burp to intercept the traffic unless we use tools like Frida to hook our specific code which bypass this functionality.
嗯,SSL固定是一种在应用程序中用作应用程序流量的附加安全层的技术,目的是防止像MitM(中间人)这样的攻击,除非我们使用Frida这样的工具,否则这将不允许burp拦截流量。挂钩我们绕过此功能的特定代码。
Installation
安装
- Install frida-tools with pip3 in host computer using cli 使用CLI在主机中通过pip3安装frida-tools
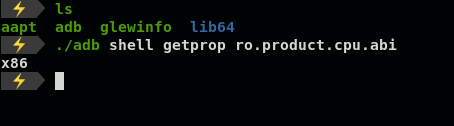
$- pip3 install frida-tools2. Download only x86 version of Frida server because virtual devices by Genymotion are x86-based which you can verify like shown in Figure 12.
2.仅下载x86版本的Frida服务器,因为Genymotion的虚拟设备基于x86,您可以进行验证,如图12所示。
Download link
下载链接
# Downloading using wget as an example
$- wget https://github.com/frida/frida/releases/download/<version>/frida-server-<version>-android-x86.xz# Decompress using unxz
$- unxz frida-server-<version>-android-x86.xz# Rename for ease
$- mv frida-server-<version>-x86.xz frida-server# Transfer into the emulated device using adb
$- ./adb push ~/Downloads/frida-server /data/local/tmp# Change its permissions
$- ./adb shell chmod 755 /data/local/tmp/frida-server# Run Frida-server in the background
$- ./adb shell /data/local/tmp/frida-server &
Now, after setting up Frida server, we will be able to use our scripts but for that first we need to find APK’s name which you can find by either way
现在,在设置Frida服务器之后,我们将能够使用我们的脚本,但是首先我们需要找到APK的名称,您可以通过两种方式找到
# Old method using pm
$- ./adb shell pm list packages | grep someapp# Another way using Frida but for this app first need to be started
$- frida-ps -U | grep someapp
For this demonstration purpose my target is Skrill and i am using this bypass script, simply save this into a js file
出于演示目的,我的目标是Skrill ,我正在使用 这个旁路脚本,只需将其保存到js文件中
Now lets see if Skrill is throwing any SSL error
现在让我们看看Skrill是否抛出任何SSL错误
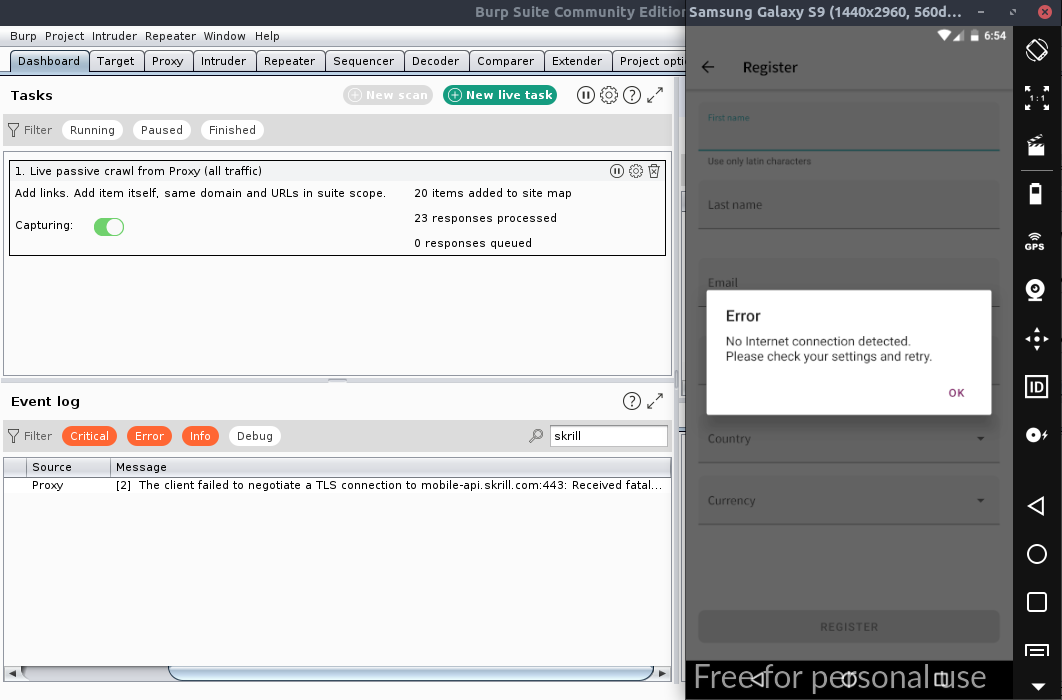
As expected it does, now use Frida with a bypass script to intercept network traffic
如预期的那样,现在使用带有旁路脚本的Frida来拦截网络流量
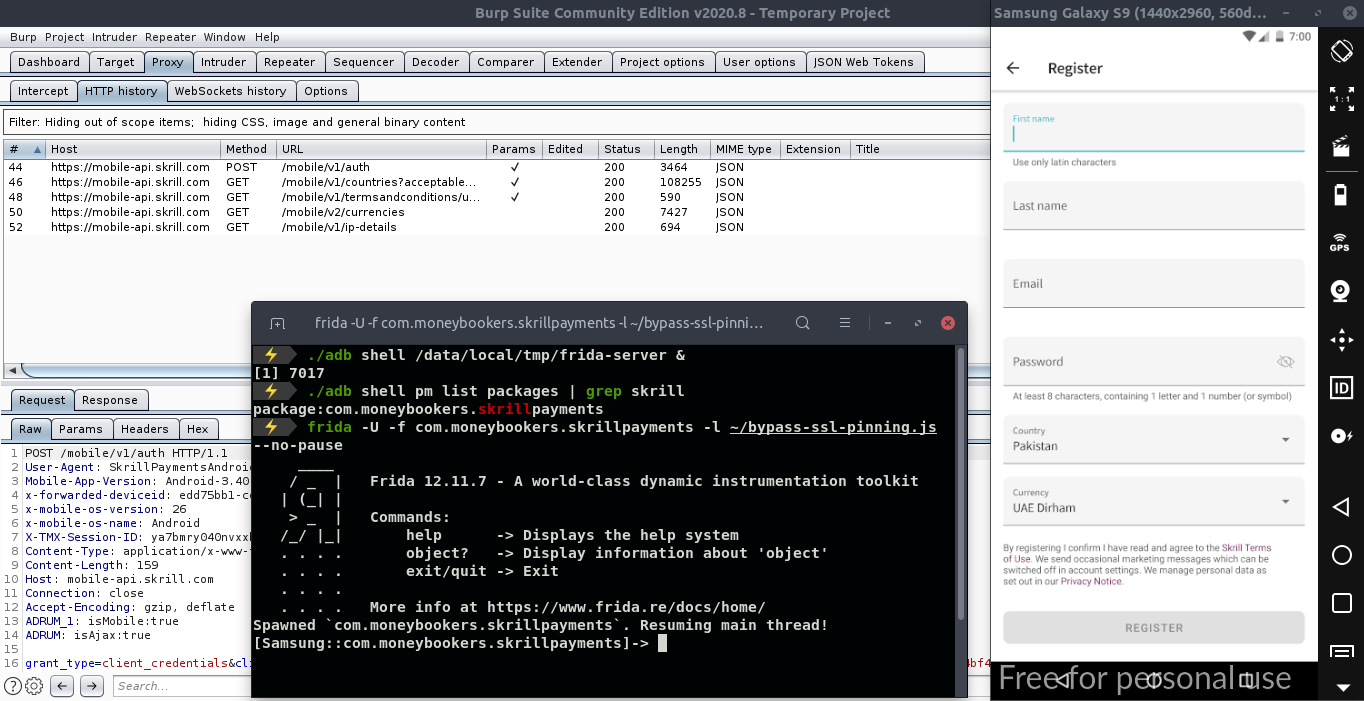
And as you can see now we can continue our testing after successful SSL pinning bypassed using FRIDA 😃
正如您现在所看到的,在使用FRIDA绕过成功的SSL固定之后,我们可以继续进行测试
4.字节码查看器 (4. Bytecode Viewer)
Static analysis is a straightforward process to look how an application performs by reviewing its source code. However decompiling its source code can be hard and for this purpose there are some decompilers like jadx
静态分析是一个简单的过程,可通过查看其源代码来查看应用程序的性能。 但是,反编译其源代码可能很困难,因此有一些反编译器(如jadx)
But I personally liked Bytecode Viewer due to its wide range of different Java decompilers, two bytecode editors and many other features.
但是我个人很喜欢Bytecode Viewer,因为它具有各种Java反编译器,两个字节码编辑器以及许多其他功能。
Download link
下载链接
After downloading, simply run the decompiler and drag & drop your files into the Files section to decompile.
下载后,只需运行反编译器并将文件拖放到“文件”部分即可进行反编译。

That’s it for now 😃
就是这样😃
Hope this make some of your doubts clear and you are able to create your own android LAB.
希望这可以澄清您的一些疑问,并且您能够创建自己的Android LAB。
Happy Hacking!
快乐黑客!
翻译自: https://medium.com/bugbountywriteup/android-pentesting-lab-4a6fe1a1d2e0
介绍 json


 4万+
4万+

 被折叠的 条评论
为什么被折叠?
被折叠的 条评论
为什么被折叠?
 到【灌水乐园】发言


