


angular 输入输出
This article describes how to send data from one component to other with the help of “@Input” and “@Output” decorators. These decorators are used to communicate between Child and Parent components or directives. With the help of this simple example in the article you will get a basic idea about Parent-Child communication in Angular and then you can switch to complex examples.
本文介绍如何在“ @Input”和“ @Output”修饰符的帮助下将数据从一个组件发送到另一个组件。 这些装饰器用于在子组件和父组件或指令之间进行通信。 借助本文中的这个简单示例,您将获得有关Angular中父子通信的基本概念,然后可以切换到复杂的示例。
// Before moving to the example, lets get a rough idea about the following terms that are common while working with Input and Output. //
//在转到示例之前,让我们大致了解以下在使用输入和输出时常用的术语。 //
Decorator- Defines what kind of class, parameter, method or property it is. Always represented by “@” symbol. It is also called Data-Annotation or Meta-data which gives more information about the class,parameter, method or property.
装饰器 -定义它是哪种类,参数,方法或属性。 始终用“ @”符号表示。 它也称为数据注释或元数据 ,它提供有关类,参数,方法或属性的更多信息。
@Input — A Decorator used to send data from Parent component to Child component.
@Input —一个装饰器,用于将数据从父组件发送到子组件。
@Output- A Decorator used to send data from Child Component to Parent component.
@ Output-一个装饰器,用于将数据从子组件发送到父组件。
EventEmitter- Helps to send data out of the component as an event.
EventEmitter-帮助将数据作为事件发送到组件之外。
Template Reference Variable- Special variables to reference a DOM element within a template.
模板引用变量 -引用模板中的DOM元素的特殊变量。
Lets begin to Code -
让我们开始编码-
Step 1
第1步
First start by creating an Angular Project (assuming you have installed Angular CLI).
首先创建一个Angular项目(假设您已经安装了Angular CLI) 。
- Go to the directory in which you want to create project. 转到要在其中创建项目的目录。
Enter the command ng new InputOutput (filename can be anything you wish) then press enter.
输入命令ng new InputOutput (文件名可以是您想要的任何名称),然后按Enter。
Angular will then ask you about routing, press N as we are not using routing in this project.
然后,Angular会询问您有关路由的信息,请按N,因为我们在此项目中未使用路由。
Then it will prompt about which type of Stylesheet format to be used, select CSS and press enter.
然后,它将提示您使用哪种样式表格式,选择CSS并按Enter 。

Step 2
第2步
After creating the project, rename the following in src/app folder -
创建项目后,在src / app文件夹中重命名以下内容-
“app.component.ts” => “child.component.ts”
“ app.component.ts” => “ child.component.ts”
“app.module.ts” => “inputoutput.module.ts”
“ app.module.ts” => “ inputoutput.module.ts ”
“app.component.html” => “child.html”
“ app.component.html” => “ child.html”

Step 3
第三步
In the “child.component.ts”, rename the component as“ ChildComponent” and in the templateUrl property change the value to ‘./child.html’.
在“ child.component.ts”中 ,将组件重命名为“ ChildComponent”,然后在templateUrl属性中将值更改为“ ./child.html”。
Remove the styleUrls property as it is no longer needed.
删除styleUrls属性,因为它不再需要。
Also change the selector value ‘app-root’ to ‘child-root’.
还要将选择器值'app-root'更改为'child-root' 。

Step 4
第4步
Copy the “child.component.ts” and “child.html” and paste them in the same app folder and rename it to “parent.component.ts” and “parent.html”.
复制“ child.component.ts”和“ child.html”并将它们粘贴到同一应用程序文件夹中,并将其重命名为“ parent.component.ts”和“ parent.html”。
- The folder structure should look like this:- 文件夹结构应如下所示:

Step 5
第5步
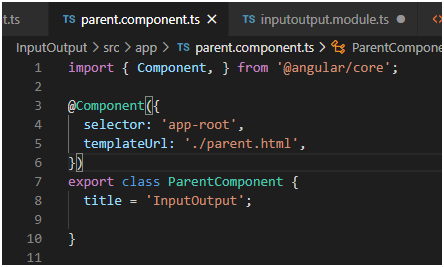
In the “parent.component.ts”, rename the component as “ParentComponent” and in the templateUrl property change the value to “./parent.html”.
在“ parent.component.ts”中 ,将组件重命名为“ ParentComponent”,并在templateUrl属性中将值更改为“ ./parent.html”。
- Remove the styleUrls property. 删除styleUrls属性。
Step 6
第6步
In the “inputoutput.module.ts” , import both the component i.e. “ChildComponent” and “ParentComponent” and add it to the declarations property of the “@NgModule” and change the module name to “InputOutputModule”.
在“ inputoutput.module.ts”中 , 导入两个组件,即“ ChildComponent”和“ ParentComponent ”,并将其添加到“ @NgModule”的声明属性中,并将模块名称更改为“ InputOutputModule” 。
Also change bootstrap value to “ParentComponent”.
还将引导程序值更改为“ ParentComponent” 。

Step 7
步骤7
Go to the main.ts file,
转到main.ts文件,
Import “InputOutputModule” from ‘./inputoutput.module.ts’ and change the “AppModule” to “InputOutputModule”
导入从” ./ inputoutput.module.ts'“InputOutputModule”和改变‘ 的AppModule’到‘InputOutputModule’

Step 8
步骤8
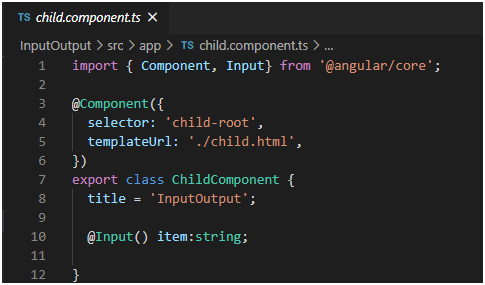
In the “ChildComponent”,
在“ ChildComponent”中 ,
Import “Input” from ‘@angular/core’ and use the “@Input” decorator beside “item” property.
从“ @ angular / core”导入“ Input” ,并使用“ item”属性旁边的“ @Input”装饰器。
Now this “item” is the property which will receive the input value as a string type from the parent.
现在,此“ item ”是属性,它将从父级接收输入值作为字符串类型。
Step 9
步骤9
In the “child.html”, we will bind the “item” using interpolation/expression {{}}.
在“ child.html”中 ,我们将使用插值/表达式{{}} 绑定 “ item” 。

Step 10
第10步
In the “ParentComponent”, create a “parentItem” property having “Computer” value as a string type.
在“ ParentComponent”中 ,创建一个具有“ Computer”值作为字符串类型的“ parentItem ”属性。
This “parentItem” value will be sent to the “ChildComponent”.
此“ parentItem”值将发送到“ ChildComponent” 。

Step 11
步骤11
In the “parent.html”, use custom tag having name as the selector of “ChildComponent” which is <child-root>.
在“ parent.html”中 ,使用具有名称的自定义标签作为“ ChildComponent”的选择器,即<child-root> 。
- Use property binding [ ] to bind the property in the child to the property of the parent. 使用属性绑定[]将子级中的属性绑定到父级中的属性。
[item] is a ChildComponent property binded with “parentItem” property of the “ParentComponent”.
[项目]与“P arentComponent”的“parentItem”属性绑定一个ChildComponent属性。
Due to this binding, the property value of “ParentComponent” i.e. “Computer” will flow from “ParentComponent” to the “ChildComponent”.
由于此绑定,“ ParentComponent”(即“计算机”)的属性值将从“ ParentComponent”流向“ ChildComponent”。

Step 12
步骤12
Fire “ng serve” in the Integrated Terminal .
火“NG服务 ”的综合性码头。
- The following will be the output 以下将是输出

Now for using Output we will import Output and EventEmitter from ‘@angular/core’.
现在使用Output,我们将从'@ angular / core'导入Output和EventEmitter。
Remember that @Output and EventEmitter are mostly used together. EventEmiiter is used to emit the event from Child to the Parent.
请记住,@ Output和EventEmitter通常一起使用。 EventEmiiter用于将事件从子事件发送到父事件。
In this example we will be using <input> where a user can enter a value and click a <button> that raises an event.
在此示例中,我们将使用<input>,用户可以在其中输入一个值,然后单击引发事件的<button>。
Step 13
步骤13
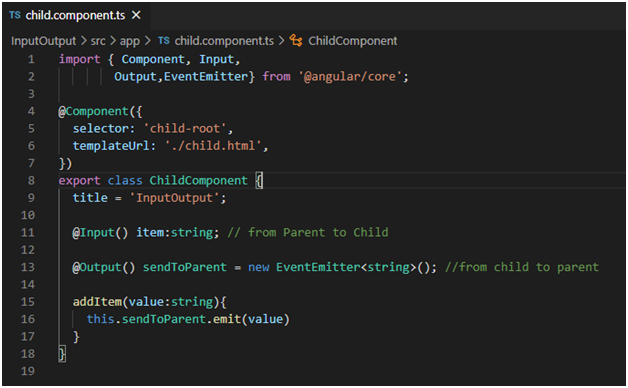
In the “ChildComponent” import “Output” and “EventEmitter” from ‘@angular/core’.
在“ChildComponent”进口“ 输出”,并从“EventEmitter”“@角/核心”。

2. The different parts of the declaration are as follows:
2.声明的不同部分如下:
@Output() - A decorator function marking the property as a way for data to go from the child to the parent.
@Output() -装饰器函数,将属性标记为数据从子级传递到父级的一种方式。
sendToParent- the name of the @Output().
sendToParent-@ Output()的名称。
EventEmitter<string>- the @Output()’s type.
EventEmitter <string> -@Output()的类型。
new EventEmitter<string>()- tells Angular to create a new event emitter and that the data it emits is of type string. The type could be any type, such as number, boolean, and so on.
new EventEmitter <string>() -告诉Angular创建一个新的事件发射器,并且它发射的数据为string类型。 类型可以是任何类型,例如数字,布尔值等。
Step 14
步骤14
Now create “addItem()” method which takes value from child “<input>” and emits the value to the parent.
现在创建“ 的addItem()”方法,该方法需要从子值“<INPUT>”,并发射值到父。
- In other words, when the user clicks the “Send” button in the Child View, the child lets the parent know about the event and gives that data to the parent. 换句话说,当用户单击“子视图”中的“发送”按钮时,子项会通知父项有关该事件的信息,并将该数据提供给父项。
Step 15
步骤15
Now in the “child.html”,
现在在“ child.html”中 ,
“#newItem” is the template reference variable which is used to reference the input text element.
“ #newItem”是模板引用变量,用于引用输入文本元素。
When the user clicks “Send” the value of “#newItem” will be given as a parameter to the addItem() method.
当用户单击“发送”时 ,“ #newItem ”的值将作为addItem()方法的参数给出。

Step 16
步骤16
In the “Parent.component”,
在“ Parent.component”中,
Create an array of “items” in which the received value/item from the “ChildComponent” will be pushed in it.
创建一个“项目” 数组 ,其中将从“ ChildComponent”接收的值/项目推入其中。
Then create a “receivedItem()” method having a parameter value as string which will be pushed into the “items” array.
然后创建一个具有参数值作为字符串的“ receiveItem() ”方法,该方法将被推入“ items”数组。

Step 17
步骤17
In “parent.html”,
在“ parent.html ”中,
Use “sendToParent” of “ChildComponent” and bind that to the “receivedItem()” method of “ParentComponent”.
使用“ ChildComponent”的“ sendToParent”并将其绑定到“ ParentComponent”的“ receiveItem () ”方法。
Due to this binding, “sendToParent” emits the value from child view input element to the parent havingthe “receivedItem()” method.
由于此绑定,“ sendToParent ”将子视图输入元素中的值发送给具有“ receiveItem ()”方法的父元素。
The event binding, “(sendToParent)=receivedItem($event)”, tells Angular to connect the event in the child- “sendToParent”, to the method in the parent- “receivedItem()”, and that the event that the child is notifying the parent about is to be the argument ($event) of “receivedItem()” method.
事件绑定“ (sendToParent)= receivedItem($ event)”告诉Angular将子级“ sendToParent ”中的事件连接到父级 “ ReceivedItem () ”中的方法,并将该事件通知父对象将是“ receiveItem() ”方法的参数($ event) 。

Step 18
步骤18
In “parent.html”,
在“ parent.html”中,
Iterate/Loop the list of items using the “*ngFor” directive to display each item that is pushed in the “items” array from the Child View input element.
使用“ * ngFor ”指令迭代/循环项目列表,以显示从“子视图”输入元素推入“ 项目”数组中的每个项目。
- Remember that the list <ul> is outside the <div> tag which contains Child View. 请记住,列表<ul>在包含子视图的<div>标记之外。

Step 19
步骤19
Fire “ng serve” command in the Integrated Terminal of VS code.
在VS代码的集成终端中触发“ ng serve”命令。
Type any Item in the input area in the Child View e.g.- Laptop and click “Send” button.
在子视图例如笔记本电脑的输入区域中键入任何项目,然后单击“ 发送”按钮。
- The output will be the following 输出如下

Step 20
步骤20
Similarly Add and “Send” more items.
同样,添加并“ 发送”更多项目。
- The output will be:- 输出将是:-

Step 21
步骤21
If you will move <ul> and <li> below “This is parent View “ heading, the output will still be same but will be before Child View.
如果将<ul>和<li>移到“ This is parent View”标题下,输出将仍然相同,但将在Child View之前。

Step 22
步骤22
Add and “Send” items just like Step 20.
就像步骤20一样添加和“ 发送”项目。
- The output will be- 输出将是-

// It is not necessary to use Input and Output together. You can use them separately depending on the requirement of the project.//
//不必同时使用Input和Output。 您可以根据项目的需求单独使用它们。
翻译自: https://medium.com/@aniketeknathjadhav/input-and-output-decorators-in-angular-2-aabf1b71655
angular 输入输出


 292
292

 被折叠的 条评论
为什么被折叠?
被折叠的 条评论
为什么被折叠?
 到【灌水乐园】发言


