


 本文介绍了如何使用Python和OpenCV库实现图像隐写技术,通过隐藏数据在图像中进行秘密通信。内容涵盖图像处理的基础知识和具体实现步骤。
python实现图像隐写
Steganography is the art of hiding secret data in any file.
隐秘术是在任何文件中隐藏秘密数据的艺术。
The secret data can be data of any format like text or even a file. In a nutshell, the main motive of steganography is to hide the intended information within any file, usually an image, audio, or video, without actually changing the external appearance of the file, i.e. it should look the same as before.
秘密数据可以是任何格式的数据,例如文本,甚至是文件。 简而言之,隐写术的主要目的是在任何文件(通常是图像,音频或视频)中隐藏预期的信息,而无需实际更改文件的外观,即,其外观应与以前相同。
In this blog, we will be focussing on learning image-based steganography, i.e. hiding secret data in an image.
在此博客中,我们将专注于学习基于图像的隐写术,即在图像中隐藏秘密数据。
But before diving a little deeper into it, let’s look at what an image comprises of.
但是在深入探讨之前,让我们先看看图像的组成。
- Pixels are the building blocks of an image. 像素是图像的基础。
- Every pixel contains three values: (red, green, blue) also known as RGB values. 每个像素包含三个值:(红色,绿色,蓝色)也称为RGB值。
- Every RGB value ranges from 0 to 255. 每个RGB值的范围是0到255。
This much information is enough to get started.
这些足够的信息足以入门。
Now, let’s look at how we can encode and decode data into our image.
现在,让我们看看如何将数据编码和解码为图像。
编码方式 (Encoding)
There are a lot of algorithms that can be used to encode data into the image, and in fact, you can also make one yourself. The one being used in this blog is easy to understand and implement, as well.
有很多算法可用于将数据编码到图像中,实际上,您也可以自己制作。 本博客中使用的一个也易于理解和实施。
The algorithm is as follows:
算法如下:
- For each character in the data, its ASCII value is taken and converted into 8-bit binary [1]. 对于数据中的每个字符,均采用其ASCII值并将其转换为8位二进制[1]。
- Three pixels are read at a time having a total of 3*3=9 RGB values. The first eight RGB values are used to store one character that is converted into an 8-bit binary. 一次读取三个像素,总共具有3 * 3 = 9 RGB值。 前八个RGB值用于存储一个字符,该字符将转换为8位二进制数。
- The corresponding RGB value and binary data are compared. If the binary digit is 1 then the RGB value is converted to odd and, otherwise, even. 比较相应的RGB值和二进制数据。 如果二进制数字为1,则RGB值将转换为奇数,否则将转换为偶数。
- The ninth value determines if more pixels should be read or not. If there is more data to be read, i.e. encoded or decoded, then the ninth pixel changes to even. Otherwise, if we want to stop reading pixels further, then make it odd. 第九个值确定是否应读取更多像素。 如果还有更多数据要读取(即编码或解码),则第九个像素变为偶数。 否则,如果我们想停止进一步读取像素,则将其设为奇数。
Repeat this process until all the data is encoded into the image.
重复此过程,直到所有数据都编码到图像中。
例 (Example)
Suppose the message to be hidden is ‘Hii’.
假设要隐藏的消息是'Hii' 。
The message is of three bytes, therefore, the pixels required to encode the data are 3 x 3 = 9. Consider a 4 x 3 image with a total of 12 pixels, which are sufficient to encode the given data.
该消息为三个字节,因此,对数据进行编码所需的像素为3 x 3 =9。请考虑一个4 x 3的图像,总共12个像素,足以对给定的数据进行编码。
[(27, 64, 164), (248, 244, 194), (174, 246, 250), (149, 95, 232),
(188, 156, 169), (71, 167, 127), (132, 173, 97), (113, 69, 206),
(255, 29, 213), (53, 153, 220), (246, 225, 229), (142, 82, 175)]
第1步 (Step 1)
The ASCII value of H is 72, whose binary equivalent is 01001000.
H的ASCII值为72,其二进制等效值为01001000 。
第2步 (Step 2)
Read the first three pixels.
读取前三个像素。
(27, 64, 164), (248, 244, 194), (174, 246, 250)第三步 (Step 3)
Now, change the pixel value to odd for 1 and even for 0 as in the binary equivalent of data.
现在,将像素值更改为1的奇数,甚至更改为0的奇数,如数据的二进制等价形式。
For example, the first binary digit is 0 and the first RGB value is 27, it needs to be converted to even, which implies 26.
例如,第一个二进制数字为0 ,第一个RGB值为27 ,需要将其转换为偶数,这意味着26 。
Similarly, 64gets converted to 63because the next binary digit is 1so the RGB value should be made odd.
同样,由于下一个二进制数字为1因此64转换为63 ,因此RGB值应设为奇数。
So, the modified pixels are:
因此,修改后的像素为:
(26, 63, 164), (248, 243, 194), (174, 246, 250)第4步 (Step 4)
Since we have to encode more data, the last value should be even. Similarly, i can be encoded in this image.
由于我们必须编码更多的数据,因此最后一个值应该是偶数。 同样, i可以在此图像中进行编码。
While making the pixel values odd/even by doing +1 or -1, you should take care of binary conditions. I.e., the pixel value should be more than or equal to 0 and less than or equal to 255.
通过+1或-1使像素值奇/偶时,应注意二进制条件。 即,像素值应大于或等于0且小于或等于255。
The new image will look like:
新图像将如下所示:
[(26, 63, 164), (248, 243, 194), (174, 246, 250), (148, 95, 231),
(188, 155, 168), (70, 167, 126), (132, 173, 97), (112, 69, 206),
(254, 29, 213), (53, 153, 220), (246, 225, 229), (142, 82, 175)]
解码 (Decoding)
For decoding, we shall try to find how to reverse the previous algorithm that we used to encode data.
对于解码,我们将尝试找到如何逆转以前用于编码数据的算法。
- Again, three pixels are read at a time. The first 8 RGB values give us information about the secret data, and the ninth value tells us whether to move forward or not. 同样,一次读取三个像素。 前8个RGB值向我们提供有关机密数据的信息,第9个值告诉我们是否继续前进。
For the first eight values, if the value is odd, then the binary bit is
1, otherwise it is0.对于前八个值,如果该值为奇数,则二进制位为
1,否则为0。- The bits are concatenated to a string, and with every three pixels, we get a byte of secret data, which means one character. 这些位被连接成一个字符串,每三个像素,我们得到一个字节的秘密数据,这意味着一个字符。
- Now, if the ninth value is even then we keep reading pixels three at a time, or otherwise, we stop. 现在,如果第九个值是偶数,那么我们将一次读取三个像素,否则我们将停止。
例如 (For example)
Let’s start reading three pixels at a time.
让我们开始一次读取三个像素。
Consider our previously encoded image.
考虑我们以前编码的图像。
[(26, 63, 164), (248, 243, 194), (174, 246, 250), (148, 95, 231),
(188, 155, 168), (70, 167, 126), (132, 173, 97), (112, 69, 206),
(254, 29, 213), (53, 153, 220), (246, 225, 229), (142, 82, 175)]
第1步 (Step 1)
We first read the three pixels:
我们首先阅读三个像素:
[(26, 63, 164), (248, 243, 194), (174, 246, 250)第2步 (Step 2)
Reading the first value: 26, which is even, therefore the binary bit is 0. Similarly, for 63, the binary bit is 1and for 164it is 0. This process continues until the eight RGB value.
读取第一个值: 26 ,它是偶数,因此二进制位是0 。 类似地,对于63 ,二进制位为1 ,对于164为0 。 该过程一直持续到八个RGB值为止。
第三步 (Step 3)
We finally get the binary value: 01001000 after concatenating all individual binary values. The final binary data corresponds to decimal value 72, and in ASCII, it represents the character H.
连接所有单个二进制值后,我们最终获得二进制值: 01001000 。 最终的二进制数据对应于十进制值72,并且以ASCII形式表示字符H
第4步 (Step 4)
Since the ninth value is even, we repeat the above steps. We stop when the ninth value encountered is odd.
由于第九个值是偶数,因此我们重复上述步骤。 当遇到的第九个值是奇数时,我们停止。
As a result, we get our original message back which was Hii.
结果,我们得到的原始消息是Hii 。
The Python program for the above algorithm is as follows:
用于上述算法的Python程序如下:
# Python program implementing Image Steganography


# PIL module is used to extract
# pixels of image and modify it
from PIL import Image


# Convert encoding data into 8-bit binary
# form using ASCII value of characters
def genData(data):


        # list of binary codes
        # of given data
        newd = []


        for i in data:
            newd.append(format(ord(i), '08b'))
        return newd


# Pixels are modified according to the
# 8-bit binary data and finally returned
def modPix(pix, data):


    datalist = genData(data)
    lendata = len(datalist)
    imdata = iter(pix)


    for i in range(lendata):


        # Extracting 3 pixels at a time
        pix = [value for value in imdata.__next__()[:3] +
                                imdata.__next__()[:3] +
                                imdata.__next__()[:3]]


        # Pixel value should be made
        # odd for 1 and even for 0
        for j in range(0, 8):
            if (datalist[i][j] == '0' and pix[j]% 2 != 0):
                pix[j] -= 1


            elif (datalist[i][j] == '1' and pix[j] % 2 == 0):
                if(pix[j] != 0):
                    pix[j] -= 1
                else:
                    pix[j] += 1
                # pix[j] -= 1


        # Eighth pixel of every set tells
        # whether to stop ot read further.
        # 0 means keep reading; 1 means thec
        # message is over.
        if (i == lendata - 1):
            if (pix[-1] % 2 == 0):
                if(pix[-1] != 0):
                    pix[-1] -= 1
                else:
                    pix[-1] += 1


        else:
            if (pix[-1] % 2 != 0):
                pix[-1] -= 1


        pix = tuple(pix)
        yield pix[0:3]
        yield pix[3:6]
        yield pix[6:9]


def encode_enc(newimg, data):
    w = newimg.size[0]
    (x, y) = (0, 0)


    for pixel in modPix(newimg.getdata(), data):


        # Putting modified pixels in the new image
        newimg.putpixel((x, y), pixel)
        if (x == w - 1):
            x = 0
            y += 1
        else:
            x += 1


# Encode data into image
def encode():
    img = input("Enter image name(with extension) : ")
    image = Image.open(img, 'r')


    data = input("Enter data to be encoded : ")
    if (len(data) == 0):
        raise ValueError('Data is empty')


    newimg = image.copy()
    encode_enc(newimg, data)


    new_img_name = input("Enter the name of new image(with extension) : ")
    newimg.save(new_img_name, str(new_img_name.split(".")[1].upper()))


# Decode the data in the image
def decode():
    img = input("Enter image name(with extension) : ")
    image = Image.open(img, 'r')


    data = ''
    imgdata = iter(image.getdata())


    while (True):
        pixels = [value for value in imgdata.__next__()[:3] +
                                imgdata.__next__()[:3] +
                                imgdata.__next__()[:3]]


        # string of binary data
        binstr = ''


        for i in pixels[:8]:
            if (i % 2 == 0):
                binstr += '0'
            else:
                binstr += '1'


        data += chr(int(binstr, 2))
        if (pixels[-1] % 2 != 0):
            return data


# Main Function
def main():
    a = int(input(":: Welcome to Steganography ::\n"
                        "1. Encode\n2. Decode\n"))
    if (a == 1):
        encode()


    elif (a == 2):
        print("Decoded Word :  " + decode())
    else:
        raise Exception("Enter correct input")


# Driver Code
if __name__ == '__main__' :


    # Calling main function
    main()
The module used in the program is PIL which stands for Python Imaging Library. It gives us the capability to perform operations on images in Python.
程序中使用的模块是PIL 代表Python Imaging Library 。 它使我们能够在Python中对图像执行操作。
程序执行 (Program Execution)

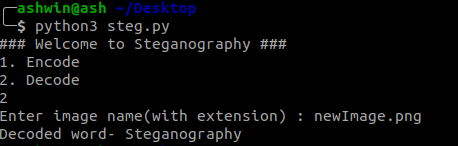
输入图像 (Input image)

输出图像 (Output image)

局限性 (Limitations)
This program might not work as expected with JPEG images because JPEG uses lossy compression which means that the pixels are modified to compress the image and reduce the quality, therefore data loss happens.
该程序可能无法与JPEG一起使用 图像,因为JPEG使用有损压缩 ,这意味着修改像素以压缩图像并降低质量,因此会发生数据丢失。
https://www.geeksforgeeks.org/program-decimal-binary-conversion/
https://www.geeksforgeeks.org/program-decimal-binary-conversion/
https://dev.to/erikwhiting88/let-s-hide-a-secret-message-in-an-image-with-python-and-opencv-1jf5
https://dev.to/erikwhiting88/let-s-hide-a-secret-message-in-an-image-with-python-and-opencv-1jf5
A GUI version of the program can be found here: https://github.com/goelashwin36/image-steganography
该程序的GUI版本可以在这里找到: https : //github.com/goelashwin36/image-steganography
翻译自: https://medium.com/better-programming/image-steganography-using-python-2250896e48b9
python实现图像隐写


 5632
5632

 被折叠的 条评论
为什么被折叠?
被折叠的 条评论
为什么被折叠?
 到【灌水乐园】发言


