


搭建ftp如何设置身份验证
Image by PublicDomainPictures from Pixabay
该图片由PublicDomainPictures在Pixabay上发布
介绍(Introduction)
In my previous blog entry we left off with a Web API project that doesn’t really do anything, and a UI that has been stripped of all non-essential features and is essentially bare bones. In this entry, we’ll start to add in more structural elements, namely the authentication components of the UI and Identity Model classes in our Web API. Fortunately, ASP.NET Core and Visual Studio do a lot of this work for us via scaffolding tools. Our main concern is to take this auto-generated code, modify it where needed, and move it into the appropriate layers of our Clean Architecture solution, namely the Infrastructure and Presentation layers.
在我以前的博客文章中,我们从一个Web API项目开始,该项目实际上并没有执行任何操作,而一个UI去除了所有不必要的功能,本质上是裸露的骨骼。 在此条目中,我们将开始添加更多结构性元素,即Web API中UI和Identity Model类的身份验证组件。 幸运的是,ASP.NET Core和Visual Studio通过脚手架工具为我们做了很多工作。 我们主要关心的是获取此自动生成的代码,在需要时对其进行修改,然后将其移入我们的Clean Architecture解决方案的适当层,即基础结构和表示层。
步骤1:重新定位和自定义身份模型类 (Step 1: Relocate and Customize the Identity Model Classes)
As you can see by looking at Solution Explorer, ASP.NET Core has generated a few different components automatically.
通过查看解决方案资源管理器可以看到,ASP.NET Core自动生成了一些不同的组件。
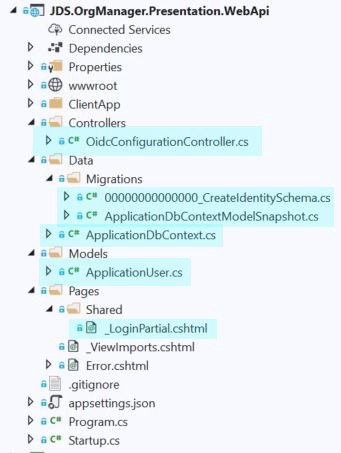
These include a login partial view, OIDC controller, and Entity Framework Core classes which represent the data model for Identity. As in previous versions of ASP.NET, an ApplicationUser class is also added which inherits from IdentityUser, but otherwise has no properties. This class is a hook, or extension point, from which we can provide additional properties for users of the application, and which will be persisted to the database which we will generate from our EF Core Identity model.
其中包括登录局部视图,OIDC控制器和Entity Framework Core类,它们代表Identity的数据模型。 与以前的ASP.NET版本一样,还添加了一个ApplicationUser类,该类继承自IdentityUser ,但没有任何属性。 此类是一个挂钩或扩展点,我们可以从该挂钩或扩展点为应用程序的用户提供其他属性,并将这些属性持久化到我们将从EF Core Identity模型生成的数据库中。
In keeping with our Clean DDD approach, it doesn’t make sense to keep the Identity Model classes in the Web API project, as that represents our Presentation layer, and Identity is not a Presentation concern. The next logical step, then, is to move these classes into the Infrastructure project. Obviously, we will change the namespaces of those classes along the way, and we will add in additional helper classes to integrate with Entity Framework Core.
与我们的Clean DDD方法保持一致,将Identity Model类保留在Web API项目中没有意义,因为这代表了我们的Presentation层,而Identity并不是Presentation的关注点。 然后,下一步的逻辑步骤是将这些类移入Infrastructure项目。 显然,我们将在此过程中更改这些类的名称空间,并添加其他帮助程序类以与Entity Framework Core集成。
As part of this transition, we’ll be adding in some more NuGet packages, as well, namely those having to do with ASP.NET Core Identity, though now is a good time to toss in MediatR as well.
作为此过渡的一部分,我们还将添加更多的NuGet程序包,即与ASP.NET Core Identity有关的程序包,尽管现在也是使用MediatR的好时机。
Rather than talk about each change in excruciating detail, I’d suggest you simply look at the code yourself on GitHub, which you can access here. By clicking on the link to the commit corresponding to this blog entry, you can see a nice diff of the code changes.
建议您不要只是在GitHub上亲自看一下代码,而不必在细节上谈论每一个变化,您可以在此处访问。 通过单击与该博客条目相对应的提交的链接,您可以看到代码更改的明显差异。
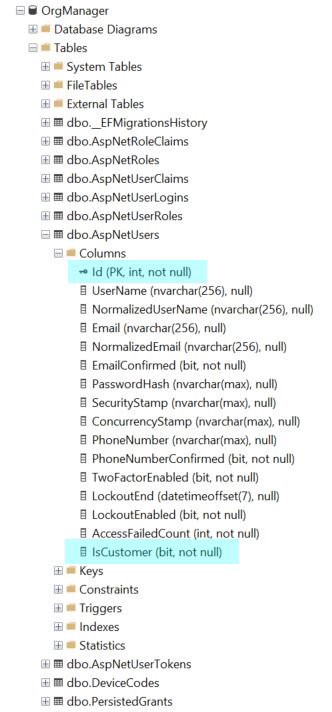
There is one design decision worth mentioning, however, which is changing the data type of the Id column of the AspNetUsers table. Without getting too deep into the weeds, this is the table which corresponds to the Identity model’s IdentityUser class, and which gets created by EF Core migrations.
但是,有一个设计决策值得一提,它正在更改AspNetUsers表的Id列的数据类型。 无需深入了解杂草,该表对应于Identity模型的IdentityUser类,并且是由EF Core迁移创建的。
Pay attention: this is important. By default, the ApplicationUser class inherits from IdentityUser, which itself is basically equivalent to IdentityUser<string>. That generic parameter specifies the data type of the primary key. By default, ASP.NET Core Identity uses a string (varchar(450)) and slams a GUID (Globally Unique Identifier) in there for each user that signs up. This doesn’t work for our use case, because we will be using the user ID as a member of a composite primary key on a number of tables (such as the TenantAspNetUsers table, once we get to that point), and there are hard restrictions imposed by SQL Server on the size of primary keys. For this and other reasons that will become clear as we evolve the solution, we must change the ID type from string to int.
注意:这很重要。 默认情况下, ApplicationUser类继承自IdentityUser ,而IdentityUser本质上等效于IdentityUser<string> 。 该通用参数指定主键的数据类型。 默认情况下,ASP.NET Core Identity使用string ( varchar(450) ),并在其中为注册的每个用户猛击一个GUID(全局唯一标识符)。 这不适用于我们的用例,因为我们将使用用户ID作为许多表(例如TenantAspNetUsers表,一旦到达这一点)上的复合主键的成员,并且很难SQL Server对主键大小施加的限制。 由于这个以及我们开发解决方案时将变得清楚的其他原因,我们必须将ID类型从string更改为int 。
We do this by changing the declaration of the ApplicationUser class from this:
为此,我们通过更改ApplicationUser类的声明来做到这一点:
public class ApplicationUser : IdentityUser
{
}
to this:
对此:
public class ApplicationUser : IdentityUser<int>
{
}
On the surface it seems like a trivial change, however, we have fundamentally changed the referential structure of our data schema going forward, and this has wide-reaching design implications for the architecture of the entire solution. As I stated at the very beginning, there is no silver bullet in software development. One downside to this decision is that it will make it harder to maintain data consistency across database boundaries (i.e. referencing the same ASP.NET Core user in multiple tenant databases). However, being able to use the user ID in composite primary keys is well worth that cost. Furthermore, there is nothing stopping us from adding a non-key GUID column alongside the integer user ID.
从表面上看,这似乎是微不足道的变化,但是,我们从根本上改变了未来数据模式的引用结构,这对整个解决方案的体系结构具有广泛的设计意义。 正如我在开始时所说的那样,软件开发中没有万灵丹。 该决定的一个缺点是,这将使得跨数据库边界维护数据一致性变得更加困难(即,在多个租户数据库中引用同一ASP.NET Core用户)。 但是,能够在复合主键中使用用户ID非常值得。 此外,没有什么阻止我们在整数用户ID旁边添加非键GUID列。
There’s another pain point associated with this change. Since the default Identity DbContext that ASP.NET Core scaffolds for us derives from ApiAuthorizationDbContext, it still expects IdentityUser types which have a string primary key for the ID column. We need to overhaul the AppIdentityDbContext (which we renamed from ApplicationDbContext) as well. Once again, I’m not going to go into great detail, but in a nutshell all I did was look at the source code for ASP.NET Core, which you can find on GitHub here, and I customized it to fit my needs.
与此变化相关的另一个痛苦点。 由于ASP.NET Core为我们提供的默认Identity DbContext是从ApiAuthorizationDbContext派生的,因此它仍希望IdentityUser类型具有ID列的字符串主键。 我们还需要全面检查AppIdentityDbContext (我们从ApplicationDbContext重命名)。 再一次,我不会进入非常详细,但简而言之,我所做的就是浏览一下ASP.NET的核心,你可以在GitHub上找到源代码在这里,我定制它适合我的需要。
The source for AppIdentityDbContext has now gone from this:
AppIdentityDbContext的来源现在已不再是这样:
public class AppIdentityDbContext : ApiAuthorizationDbContext<ApplicationUser>
{
    public AppIdentityDbContext(
        DbContextOptions options,
        IOptions<OperationalStoreOptions> operationalStoreOptions) : base(options, operationalStoreOptions)
    {
    }
}
to this:
对此:
public class AppIdentityDbContext : IdentityDbContext<ApplicationUser, IdentityRole<int>, int>, IPersistedGrantDbContext
{
    private readonly IOptions<OperationalStoreOptions> _operationalStoreOptions;    public DbSet<DeviceFlowCodes> DeviceFlowCodes { get; set; }    public DbSet<PersistedGrant> PersistedGrants { get; set; }    public AppIdentityDbContext(
        DbContextOptions options,
        IOptions<OperationalStoreOptions> operationalStoreOptions) : base(options)
    {
        _operationalStoreOptions = operationalStoreOptions;
    }    Task<int> IPersistedGrantDbContext.SaveChangesAsync() => base.SaveChangesAsync();    protected override void OnModelCreating(ModelBuilder builder)
    {
        base.OnModelCreating(builder);
        builder.ConfigurePersistedGrantContext(_operationalStoreOptions.Value);
    }
}
OK, great. Before moving forward, there’s one more change we’ll make, which is adding a boolean property to ApplicationUser called IsCustomer. This is the first application-specific change we’ll make to the Identity schema, but it’s important. As the application evolves, this will differentiate between paying users of our system—literally, our SaaS customers—and ordinary users of the system.
太好了。 在继续进行之前,我们将进行另一项更改, IsCustomer ApplicationUser添加一个名为IsCustomer的布尔属性。 这是我们将对Identity模式进行的第一个特定于应用程序的更改,但这很重要。 随着应用程序的发展,这将区分我们系统的付费用户(实际上是SaaS客户)和系统的普通用户。
The ApplicationUser class now looks like this:
现在, ApplicationUser类如下所示:
public class ApplicationUser : IdentityUser<int>
{
    public bool IsCustomer { get; set; }
}
However, our work isn’t done yet. If you look at the code from the demo solution, you’ll notice that I added some EF Core helper classes like AppIdentityDbContextFactory and so on. We will be blowing away the default EF migrations that got scaffolded with our project and then using those helper classes to create new migrations from the command line. Only then will we see the database changes that we implemented by altering the ApplicationUser class.
但是,我们的工作尚未完成。 如果看一下演示解决方案中的代码,您会注意到我添加了一些EF Core帮助器类,例如AppIdentityDbContextFactory等。 我们将废弃在项目中使用的默认EF迁移,然后使用这些帮助程序类从命令行创建新迁移。 只有这样,我们才能看到通过更改ApplicationUser类实现的数据库更改。
Delete these files.
删除这些文件。

For these next steps, you’ll likely need to drop the OrgManager database and then recreate it.
对于这些后续步骤,您可能需要删除OrgManager数据库,然后重新创建它。
Hit CTRL-B to make sure that the solution builds, then go to a developer command prompt. Inside the JDS.OrgManager.Infrastructure directory, type the following:
按CTRL-B以确保解决方案已生成,然后转到开发人员命令提示符。 在JDS.OrgManager.Infrastructure目录中,键入以下内容:
dotnet ef migrations add Initial
dotnet ef database update
If everything goes according to plan, you should see something like this:
如果一切按计划进行,您应该会看到类似以下内容的信息:

and this
和这个

If we look at the database, we can see that our customizations are now reflected in the schema of the Identity tables.
如果查看数据库,可以看到我们的自定义现在反映在Identity表的架构中。
Great, what’s next?
太好了,接下来要做什么?
步骤2:将身份验证/登录组件移回UI (Step 2: Move the Authentication/Login Components Back Into the UI)
Now that we’ve moved the Identity model classes into their proper place in the Infrastructure project and customized them to fit our needs, at least for the time being, we’re now ready to splice back in the authentication components that we set aside in the previous blog entry.
现在,我们已经将身份模型类移至基础结构项目中的适当位置,并自定义它们以适应我们的需求,至少暂时而言,现在,我们准备好将其放回到我们保留的身份验证组件中以前的博客条目。
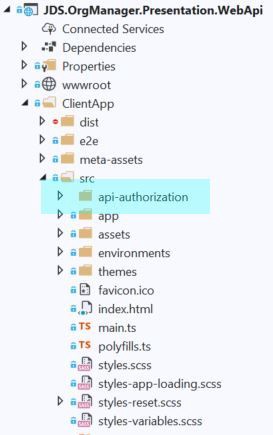
In the ClientApp-old folder that we set aside, which contains the SPA that Visual Studio created for us by default, we’ll take the api-authorization folder and copy it back in to our solution in ClientApp/src folder.
在我们保留的ClientApp旧文件夹中,该文件夹包含Visual Studio默认为我们创建的SPA,我们将获取api-authorization文件夹并将其复制回到ClientApp / src文件夹中的解决方案中。
Here it is:
这里是:
There are a couple more Angular-specific tweaks that are required to make this work, such as wiring these components into the core module, but I won’t go into too much detail here since these are basically just boilerplate changes. Rather, it’d be more intuitive to look at the GitHub tag that I’ve provided here so you can see a diff of those changes.
要完成此工作,还需要进行一些其他特定于Angular的调整,例如将这些组件连接到核心模块中,但是在这里我将不做过多介绍,因为这些基本上只是样板更改。 相反,查看我在此处提供的GitHub标记会更直观,因此您可以看到这些更改的差异。
One notable change that I’ll post here is the login buttons on the app.component template. Angular Ngrx Material Starter puts placeholders there by default that don’t really do anything. Since it’s a starter kit, the point of course is that we’re supposed to wire in our own authentication components. That’s exactly what we’ll do.
我将在此处发布的一项值得注意的更改是app.component模板上的登录按钮。 默认情况下,Angular Ngrx Material Starter会将占位符放在那里,但实际上并没有做任何事情。 由于它是入门工具包,因此,重点当然是我们应该连接自己的身份验证组件。 这正是我们要做的。
This will go away:
这将消失:
<button mat-button mat-stroked-button color="accent" *ngIf="!isAuthenticated" (click)="onLoginClick()">Login
  </button>  <button *ngIf="isAuthenticated"
	  mat-icon-button
	  [matMenuTriggerFor]="toolbarUserMenu">
<fa-icon icon="user-circle"></fa-icon>
  </button>
  <mat-menu #toolbarUserMenu="matMenu">
<button mat-menu-item (click)="onLogoutClick()">
  <mat-icon><fa-icon icon="power-off"></fa-icon></mat-icon>
  <span>Logout</span>
</button>
  </mat-menu>
and get replaced with this
并替换成这个
<span class="d-none d-md-inline" *ngIf="!isAuthenticated">
<button mat-button mat-stroked-button color="accent" [routerLink]='["/authentication/login"]'>
Sign in
</button>
</span> <span class="d-none d-md-inline" *ngIf="isAuthenticated">
<button mat-button mat-stroked-button color="accent" [routerLink]='["/authentication/profile"]'>
Profile
</button>
<button mat-button mat-stroked-button color="accent" [routerLink]='["/authentication/logout"]' [state]='{ local: true }'>
Logout
</button>
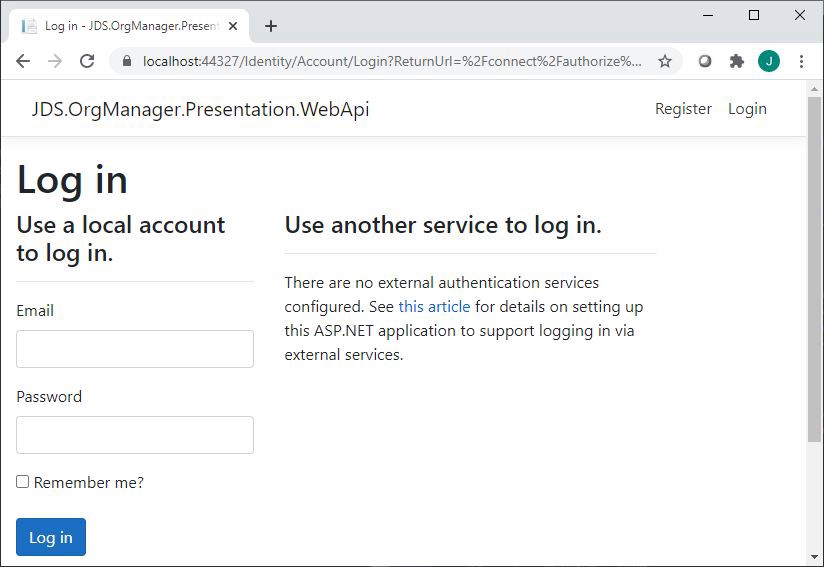
</span>Now when we click on the login button…
现在,当我们单击登录按钮时...

It should take us to the standard server-hosted login page that we get by default when using the ASP.NET Core project template, like you see here:
它应该带我们到使用ASP.NET Core项目模板时默认情况下获得的标准服务器托管登录页面,如您在此处看到的:
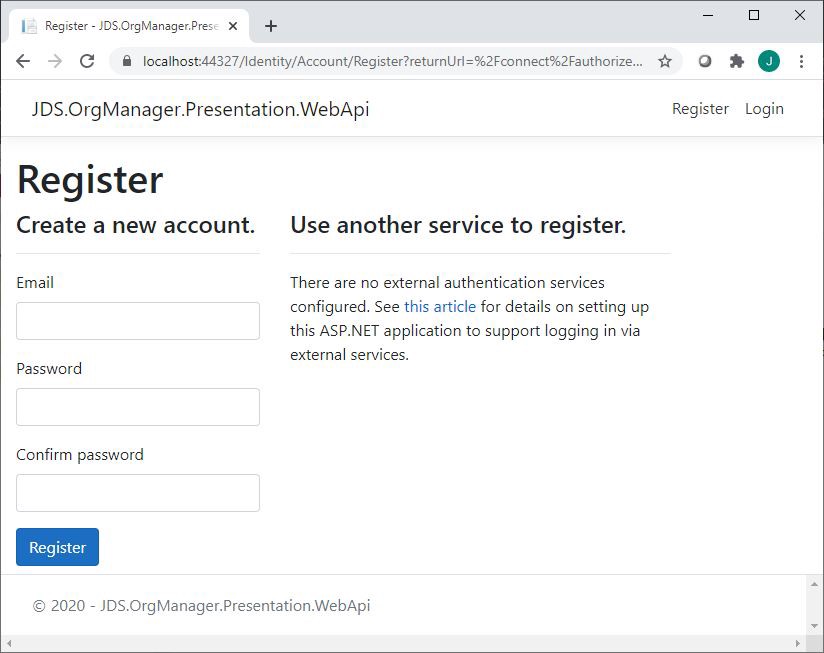
If we click on the Register link above, we should be able to navigate to the out-of-the-box ASP.NET Core registration page, like you see here:
如果单击上方的“注册”链接,我们应该能够导航到现成的ASP.NET Core注册页面,就像您在此处看到的那样:
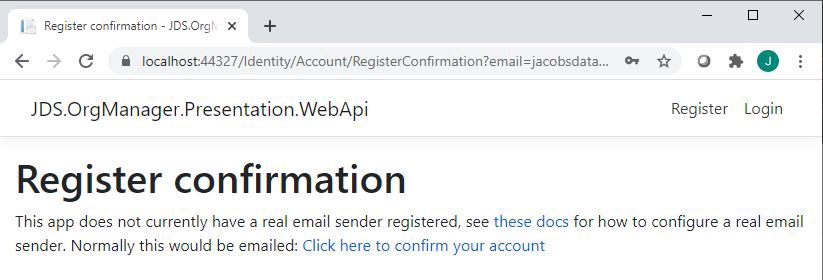
We should be able to sign up and do a fake email confirmation (since no email senders are hooked up to the solution at this point).
我们应该能够注册并进行伪造的电子邮件确认(因为此时没有电子邮件发件人挂接到该解决方案)。
Now we can go back to the login page and login with the email/password combination that we just entered. If everything goes well, then when we go back to the root path of our application, the login buttons will have changed to show us that we’re logged in.
现在,我们可以返回登录页面,并使用刚刚输入的电子邮件/密码组合进行登录。 如果一切顺利,那么当我们返回到应用程序的根路径时,登录按钮将发生变化,以向我们显示我们已登录。

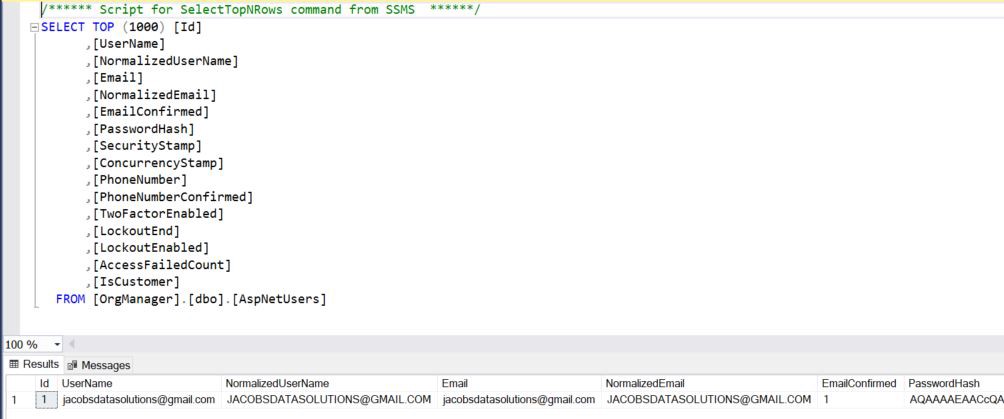
Congratulations! We have successfully spliced together two different UI starter kits and created a working web application that provides registration, login, and logout functionality. The look and feel still leaves a lot to be desired, but that’s okay. At this time, we’re only concerned with getting the basic functionality working. If we pay a visit to our database, we can see that, indeed, our test user was persisted and we are good to go.
恭喜你! 我们已经成功地将两个不同的UI入门工具包拼接在一起,并创建了一个可工作的Web应用程序,该应用程序提供注册,登录和注销功能。 外观和感觉仍然有很多不足之处,但这没关系。 目前,我们只关心使基本功能正常工作。 如果我们访问我们的数据库,我们可以看到,确实,我们的测试用户已经坚持下来,我们很高兴。
As stated earlier, there’s a lot going on under the hood in these OIDC components, and we don’t want to reinvent the wheel (and this is a wheel that you REALLY do not want to reinvent). So instead, we have put on our application architect hats and figured out a way to create a synthesis of two different UI starters so that we can leverage their respective features that we get “for free” right out of the box.
如前所述,这些OIDC组件的内部有很多事情要做,我们不想重新发明轮子(这是您真的不想重新发明的轮子)。 因此,相反,我们戴上了应用程序架构师的帽子,并找到了一种方法来创建两个不同的UI入门者的综合,以便我们可以利用它们各自的功能,这些功能可以立即“免费”获得。
Now, as always, this blog entry has run a little bit long. However, there’s one more trick I want to show you before we wrap up.
现在,与往常一样,此博客条目运行了一段时间。 但是,在结束之前,我想向您展示另一个技巧。
步骤3:覆盖默认身份视图/组件 (Step 3: Override Default Identity Views/Components)
As you’ve probably figured out, the login/OIDC views and boilerplate authentication logic are baked into the Microsoft.AspNetCore.Identity.* packages that get included in the Web API project when you click on “Change” under the authentication tab in the project setup wizard. But what if you want to change these views? Or customize the login behavior? Here’s how you do that.
您可能已经发现,登录名/ OIDC视图和样板身份验证逻辑包含在Microsoft.AspNetCore.Identity。*程序包中,当您在Web API项目中单击“身份验证”选项卡下的“更改”时,该程序包便包含在内。项目设置向导。 但是,如果您想更改这些视图怎么办? 还是自定义登录行为? 这是您的操作方式。
In a nutshell, we will be piggybacking off the instructions presented here.
简而言之,我们将piggy带此处提供的说明。
Visual Studio provides the capability for us to scaffold individual Identity views and components into our solution, effectively allowing us to override the default UI and functionality that are compiled into the package.
Visual Studio为我们提供了将各个“身份”视图和组件放入我们的解决方案中的功能,从而有效地使我们能够覆盖编译到程序包中的默认UI和功能。
绕道而行:当一切都没有按计划进行时(或现实世界中的墨菲定律) (Detour: When Everything Doesn’t Go as Planned (Or Murphy’s Law in the Real World))
Image by sdmacdonaldmiller from Pixabay
该图片由sdmacdonaldmiller在Pixabay上发布
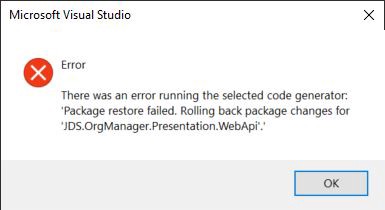
Now, just to be totally transparent with you, the steps I’m about the outline didn’t go smoothly when I was applying them to the demo application. I thought everything was pretty cut and dry, yet when I tried to scaffold the ASP.NET Identity components using Visual Studio I kept getting an uninformative error stating, “There was an error running the selected code generator: ‘Package restore failed. Rolling back package changes…’”
现在,为了与您完全透明,当我将其应用于演示应用程序时,关于大纲的步骤并不顺利。 我以为一切都干了,但是当我尝试使用Visual Studio架构ASP.NET Identity组件时,我不断收到一个无提示的错误,指出“运行所选代码生成器时出错:打包还原失败。 正在回滚软件包更改...'”
These sorts of situations happen all the time, even to senior developers and architects, and this is why our profession is so hard — we are frequently confronted with novel, challenging obstacles which test our problem-solving capabilities to the max and often require a markedly right-brained, or creative process to overcome them.
这类情况一直在发生,甚至对于高级开发人员和建筑师而言也是如此,这就是为什么我们的职业如此努力的原因-我们经常面临新颖的,具有挑战性的障碍,这些障碍最大程度地测试了我们的解决问题的能力,并且常常需要明显地解决问题。头脑清晰或创造性的过程来克服它们。
One approach we could take to solve this type of problem is to try to debug into Visual Studio itself, or dig through various error logs (if we’re lucky enough to have logged the error). However, that can be painful and may or may not be a good use of our time.
解决此类问题的一种方法是尝试调试到Visual Studio本身,或挖掘各种错误日志(如果我们很幸运地记录了该错误)。 但是,这可能会很痛苦,可能无法很好地利用我们的时间。
Words of wisdom: beware of time sinks, or fruitless activities that lead nowhere. Strive to develop an innate knowing of when to grind through to a workable solution to the problem, and when to cut losses and try something else.
智慧之言:提防时间浪费,或徒劳无益的活动。 力求与生俱来的知识是什么时候可以解决问题的可行解决方案,什么时候可以减少损失并尝试其他方法。
Another tool in our mental toolbox could be to use heuristics, or mental shortcuts, to arrive at an answer fast. This method of problem-solving is great as long as the potential impact to the system and your business is low (i.e. you aren’t making seat-of-your-pants changes to a system in production) and also if you’re not short-changing yourself the opportunity to learn a valuable lesson. After all, your goal is to learn software development at a deeper level and not just rely on Stack Overflow for all your answers, right?
我们的心理工具箱中的另一个工具可能是使用启发式方法或心理捷径,以快速找到答案。 只要对系统的潜在影响很小,并且您的业务影响很小(即您没有在生产系统中更改您的座位),并且如果您没有这样做,这种解决问题的方法就很有效。短途改变自己学习有价值的课程的机会。 毕竟,您的目标是更深入地学习软件开发,而不仅仅是依靠Stack Overflow来解决所有问题,对吗?
As implied above, one heuristic is to simply plug the error message into Google/Bing/Stack Overflow and see if there’s a simple solution to the problem. I tried this, and only wound up with answers that were vague, or otherwise didn’t apply to my specific scenario.
正如上面所暗示的,一种启发式方法是将错误消息简单地插入Google / Bing / Stack Overflow,看看是否有解决此问题的简单方法。 我尝试了此操作,但最后只得到了模糊的答案,否则不适用于我的特定情况。
Another heuristic is to make sure everything is up to date (NuGet packages, tools, everything). I tried this approach, and it did fix the problem for me. Rather than plow through and waste a bunch of time trying to figure out what the error message really meant, fully grok the root cause and all that, I simply updated all the NuGet packages in the solution to their latest versions and then I updated Visual Studio itself to the latest version. Guess what? It worked! I was able to start scaffolding components again, and all in all it took maybe 20–30 minutes to get back on track.
另一个试探法是确保所有内容都是最新的(NuGet软件包,工具,所有内容)。 我尝试了这种方法,但确实为我解决了问题。 与其花费大量时间试图弄清楚错误消息的真正含义,而不是彻底弄清根本原因以及所有这些,我只是将解决方案中的所有NuGet软件包更新为最新版本,然后更新了Visual Studio。本身为最新版本。 你猜怎么了? 有效! 我能够再次启动脚手架组件,总共花了20到30分钟才能回到正轨。

Pro tip: when something breaks or isn’t working that otherwise seems straightforward, the first question you should ask yourself is, “What changed?” In this case, the NuGet package versions apparently had been updated to a newer version and were out of sync with the version of Visual Studio I was using.
专家提示:当出现故障或无法正常工作时,否则看起来很简单,那么您应该问自己的第一个问题是“发生了什么变化?” 在这种情况下,NuGet软件包的版本显然已更新为较新的版本,并且与我使用的Visual Studio版本不同步。
If the above tactic didn’t work out for me, which is actually what I was expecting at first, then I was fully prepared to go back into the ASP.NET Core source code that I pulled off of GitHub and start copying in the necessary views and classes manually. As a matter of fact, you should be comfortable doing this yourself, because you’re likely to find yourself in situations in which you need to customize parts of the framework (like what I did with the ApiAuthorizationDbContext toward the beginning of this blog entry) and there may or may not be tools to help you with this. It’s not as hard as you think; just figure out the version numbers of the packages that you’re using in your solution and then look for the git tag corresponding to that version in the code repository, like what I’ve shown here. Check out that commit, find the code you’re looking for, and you’re good to go.
如果上述策略对我没有奏效,这实际上是我最初期望的,那么我已经准备好返回从GitHub提取的ASP.NET Core源代码,并开始复制必要的代码视图和类。 实际上,您应该自己进行此操作,因为您可能会遇到需要自定义框架各部分的情况(例如我在本博客条目开头使用ApiAuthorizationDbContext所做的ApiAuthorizationDbContext )并且可能有也可能没有工具可以帮助您。 这并不像您想的那么难。 只需找出您在解决方案中使用的软件包的版本号,然后在代码存储库中查找与该版本相对应的git标签,就像我在这里显示的那样。 查看该提交,找到所需的代码,一切顺利。

Pro tip: when confronted with a seemingly insurmountable obstacle, a proverbial brick wall, as it were, trying to go over it or through it may not be the best way. Sometimes you need to take a step back from the problem (“sleep on it”) and then ask yourself if there isn’t a way around it.
专家提示:当遇到似乎难以逾越的障碍时,一面众所周知的砖墙,试图越过它或穿过它可能不是最好的方法。 有时,您需要从问题中退后一步(“沉睡”),然后问自己是否没有解决方法。
回到正轨。 搭建注册页面 (Back on Track. Scaffolding the Registration Page)
Now that I’ve talked about what can go wrong, let’s focus on the workflow when everything is running smoothly. While there are a large number of components that you can scaffold into your solution, as you can see from the screenshot below, the only one that we’re concerned with right now is the Registration page. That’s because later on we will modify it in order to make it differentiate between two different types of users: customers (paying users of the system) and ordinary employees.
现在,我已经讨论了可能出错的地方,让我们集中讨论一切正常运行时的工作流。 正如您可以从下面的屏幕截图中看到的那样,尽管有很多组件可以放入解决方案中,但我们现在唯一关心的是“注册”页面。 这是因为稍后我们将对其进行修改,以使其区分两种不同类型的用户:客户(系统的付费用户)和普通员工。
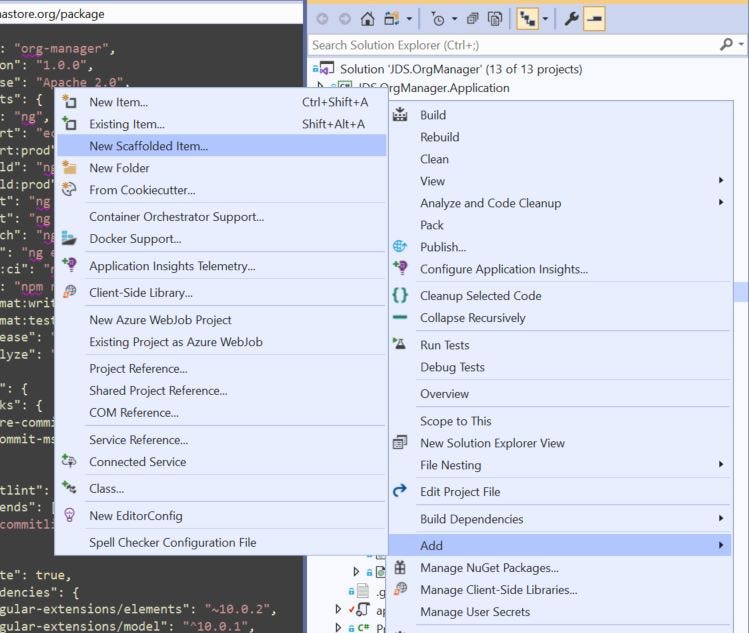
So, the first step is to right click on the Web Api project in the solution, and select “Add->New Scaffolded Item” from the context menu, like this:
因此,第一步是右键单击解决方案中的Web Api项目,然后从上下文菜单中选择“添加->新脚手架项目”,如下所示:
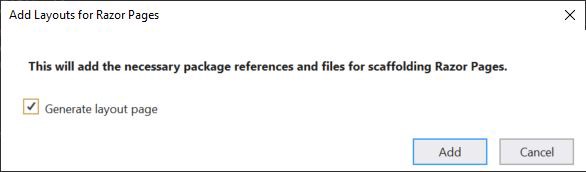
From there, we select “Add Layouts for Razor Pages” to add the standard shared partial views to the project. Note that we only need to do this once for our solution, and we won’t be repeating this step when we start scaffolding in additional components.
从那里,我们选择“为Razor页面添加布局”以将标准的共享部分视图添加到项目中。 请注意,对于我们的解决方案,我们只需要执行一次此操作,并且在开始安装其他组件的脚手架时,我们将不再重复此步骤。
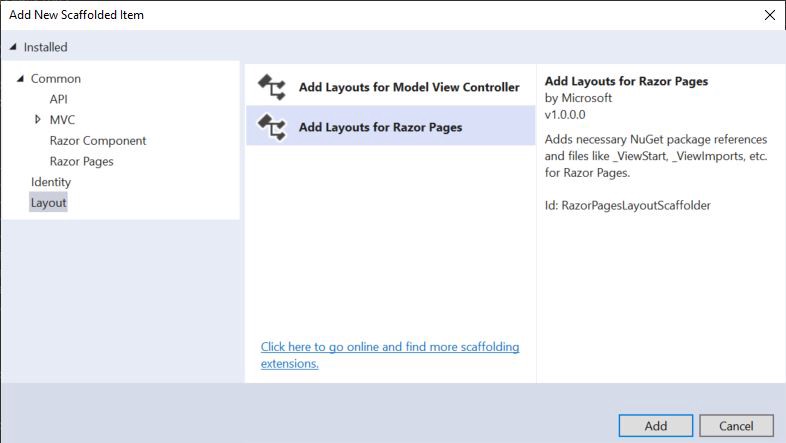
Keep the “Generate layout page” checkbox checked and click “Add.”
保持选中“生成布局页面”复选框,然后单击“添加”。
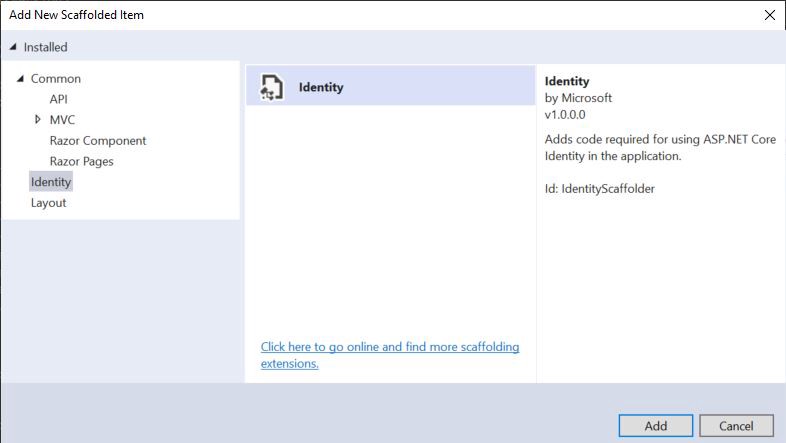
Next, right click on the project again and select “Add->New Scaffolded Item” from the context menu just like before. This time, however, select the Identity tab from the left, select “Identity” from the menu, and click “Add.”
接下来,再次右键单击该项目,然后像以前一样从上下文菜单中选择“添加->新脚手架项目”。 但是,这一次,请从左侧选择“身份”选项卡,从菜单中选择“身份”,然后单击“添加”。
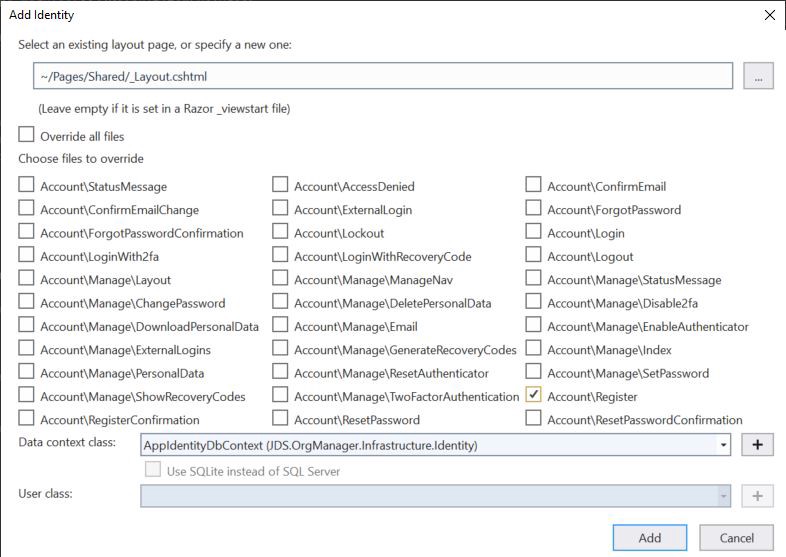
Select the proper layout page and EF Core Identity DB Context, as seen below, and click “Add.” Just to be clear, I moved around some of the views before doing this just as a matter of personal preference.
选择正确的布局页面和EF Core Identity DB上下文,如下所示,然后单击“添加”。 为了清楚起见,出于个人喜好,在进行此操作之前,我先提出了一些观点。
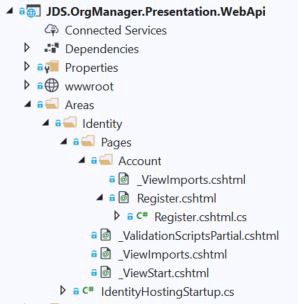
If everything has gone according to plan, then you should now have a new nested folder structure under “Areas” within the Web Api project, along with some Razor import files, partial views, and our now customizable Registration view.
如果一切都按计划进行,那么您现在应该在Web Api项目的“区域”下拥有一个新的嵌套文件夹结构,以及一些Razor导入文件,局部视图以及我们现在可自定义的注册视图。
All in a day’s work.
一整天的工作。
结论 (Conclusion)
In this blog entry I first showed how to move the auto-generated identity classes and EF Core database context out of the Web Api project, and into the Infrastructure project. I demonstrated how you can customize those pieces for your own solution, such as changing the AspNetUsers primary key type from string (varchar) to int. This is extremely important, because there is never a one-size-fits-all path in software development, and we are trying to prepare our solution for more complex use cases in the future, such as including the user ID as part of a composite primary key.
在此博客文章中,我首先展示了如何将自动生成的身份类和EF Core数据库上下文移出Web Api项目,并移入基础架构项目。 我演示了如何为自己的解决方案自定义这些片段,例如将AspNetUsers主键类型从string ( varchar )更改为int 。 这是非常重要的,因为在软件开发中永远不会有千篇一律的方法,并且我们正在努力为将来的更复杂的用例准备解决方案,例如将用户ID包含在组合中。首要的关键。
Next, I showed how to move the auto-generated api-authorization Angular components back into the UI and wire them up to the login/logout/register workflow of the user interface. This is an important step because, again, we don’t want to have to do tedious work that’s been done a million times before in other projects.
接下来,我展示了如何将自动生成的api-authorization Angular组件移回UI,并将它们连接到用户界面的登录/注销/注册工作流程。 这是重要的一步,因为同样,我们不想做以前在其他项目中已经完成一百万次的繁琐工作。
After that, I talked about what can go wrong when using automated scaffolding tools and attempted to impart some of my wisdom regarding how to go about solving software problems in general.
在那之后,我讨论了使用自动脚手架工具时可能出什么问题,并试图就如何解决软件问题发表自己的一些见识。
Finally, I went through the process of scaffolding the Registration page and associated Razor pages and components using the “Add New Scaffolded” Item wizard.
最后,我使用“添加新的脚手架”项目向导完成了“注册”页面以及相关的Razor页面和组件的脚手架过程。
That’s plenty for now, and hopefully the next few steps for building out our application will go a little more smoothly. Happy coding!
现在已经足够了,希望构建我们的应用程序的后续步骤会更加顺利。 编码愉快!
家政事务 (Housekeeping Matters)
I’m aware that I use a lot of expressions and mannerisms in my writing that are particular to native speakers of English, and especially Americans. Some of my readers, people from Germany, for example, may come across an expression like “no silver bullet” and immediately understand what I mean since that phrase comes from a common cultural heritage that we share (in this particular example, it refers to stories of mythological creatures called ‘werewolves’ that date as far back as the middle ages, or earlier). However, people from other parts of the world may read that phrase and have no idea what I’m talking about. You may wonder what the heck bullets made of silver have to do with software development. If this is the case, and if there’s any confusion in any section of these blog entries as to what I’m trying to say, please feel free to leave a polite comment in the comment section asking for clarity, or message me directly, and I’ll do my best to explain.
我知道我在写作中使用了很多表达和举止,这些表达和举止特别针对英语为母语的人,尤其是美国人。 我的一些读者(例如德国的人)可能遇到“没有灵丹妙药”之类的表达,并立即理解我的意思,因为该短语来自我们共享的共同文化遗产(在此示例中,它指的是被称为“狼人”的神话生物的故事可以追溯到中世纪或更早)。 但是,来自世界其他地区的人们可能读过该短语,却不知道我在说什么。 您可能想知道,用银制成的子弹与软件开发有什么关系。 如果是这种情况,并且如果这些博客条目的任何部分对我要说的内容有任何混淆,请随时在评论部分中留下有礼貌的评论,以求澄清,或直接给我发消息,以及我会尽力解释。
专家/权威/资源 (Experts / Authorities / Resources)
ASP.NET Core source code on GitHub
GitHub上的ASP.NET Core源代码
Werewolf (Wikipedia)
狼人(维基百科)
This is entry #2 in the Scaffold Your Clean DDD Web App Series
搭建ftp如何设置身份验证


 2230
2230

 被折叠的 条评论
为什么被折叠?
被折叠的 条评论
为什么被折叠?
 到【灌水乐园】发言


