


React as a library is often used for building single page applications (SPAs). SPAs tend to have multiple page views. When navigating from one-page view to another reloading entire page view is a tedious and not so resourceful task. In fact, it diminishes the use case of a SPA. To make it resourceful and fulfills its use case, a SPA must render parts of views when required instead of reloading the entire page.
作为库的React通常用于构建单页应用程序(SPA)。 SPA往往具有多个页面视图。 从一个页面视图导航到另一个页面时,重新加载整个页面视图是一项繁琐而又不那么明智的任务。 实际上,它减少了SPA的用例。 为了使其资源丰富并实现其用例,SPA必须在需要时呈现部分视图,而不是重新加载整个页面。
Routing comes into the picture when navigating from one page to another in a SPA app. Routing can be categorized in two ways. Static and dynamic. SPAs follow a dynamic approach. In this tutorial, we will be discussing and using a popular routing library used with React applications known as React Router.
在SPA应用程序中从一页导航到另一页时,会出现路由。 路由可以通过两种方式进行分类。 静态和动态。 SPA遵循动态方法。 在本教程中,我们将讨论和使用与React应用程序一起使用的流行路由库,称为 React Router 。
Tldr:
Tldr:
- Requirements 要求
- Getting Started 入门
- First Route with React Router 使用React Router的第一条路线
- What is BrowserRouter? 什么是BrowserRouter?
- The Link Component 链接组件
- Active Links with NavLink NavLink的活动链接
- Adding Parameters to the Routes 向路由添加参数
- Connecting Crowdbotics support to Your Github Repo 将Crowdbotics支持连接到您的Github存储库
- Conclusion 结论
要求 (Requirements)
In order to follow this tutorial, you must have the following installed on your dev machine:
为了遵循本教程,您必须在开发机器上安装以下软件:
NodeJS
v8.x.xor higher installed along with npm/yarn安装了
v8.xx或更高版本以及npm / yarncreate-react-appinstalled globally to on your local dev machine generate a new React project全局安装到本地开发机器上的
create-react-app生成一个新的React项目
Bonus: You can also, use npx to generate a new React project without installing create-react-app.
奖励:您也可以使用npx生成一个新的React项目,而无需安装create-react-app。
入门 (Getting Started)
To create a new React project run the following command at the desired location on your local machine.
要创建一个新的React项目,请在本地机器上的所需位置运行以下命令。
Once the project is generated, traverse inside the newly created directory. This strategy is the default way to generate a new React app.
生成项目后,遍历新创建的目录。 该策略是生成新React应用程序的默认方法。
React Router as a library contains three different npm packages:
React路由器 因为一个库包含三个不同的npm软件包:
react-routerreact-routerreact-router-domreact-router-domreact-router-nativereact-router-native
Each of the packages has a different use case. The first one react-router is the core package and is used with the next two packages listed above. The react-router-dom has to be used when building a web application. This is what we are going to use in this tutorial. The last one react-router-native tends to be used in a React Native application.
每个软件包都有不同的用例。 第一个react-router是核心软件包,与上面列出的后两个软件包一起使用。 在构建Web应用程序时必须使用react-router-dom 。 这就是我们将在本教程中使用的内容。 最后一个react-router-native倾向于在React Native中使用 应用。
To add React Router in the React app, execute the following command from a terminal window.
要在React应用程序中添加React Router,请在终端窗口中执行以下命令。
Please note that, for the rest of the tutorial, we will be using yarn as the JavaScript package manager to add or remove dependencies. If you wish to use npm, there is no one stopping you.
请注意,在本教程的其余部分中,我们将使用yarn作为JavaScript包管理器来添加或删除依赖项。 如果您想使用npm ,那么没有人会阻止您。
To run the React app, go to the terminal window and execute the command npm start. This will start the development server. You will be welcomed by the default boilerplate project screen in a web browser window on URL http://localhost:3000/.
要运行React应用程序,请转到终端窗口并执行命令npm start 。 这将启动开发服务器。 Web浏览器窗口中URL http://localhost:3000/上的默认样板项目屏幕将欢迎您。

使用React Router的第一条路线 (First Route with React Router)
To create the first route in the React app, let us import BrowserRouter from react-router library.
要在React应用中创建第一个路由,让我们从react-router库中导入BrowserRouter 。
To create a route, we use <Route> from the react-router-dom. This is where the logic of routing is placed. It renders the UI of a component. A <Route> has a prop called path which is always matched with the current location of the app. On the basis of this prop, the desired component gets rendered. When the component is not getting rendered, Route returns null. The component name is also passed as prop component. Look at the below snippet.
要创建路由,我们使用react-router-dom <Route> 。 这是放置路由逻辑的地方。 它呈现组件的UI。 <Route>具有一个称为path的道具,该道具始终与应用程序的当前位置匹配。 基于此道具,将渲染所需的组件。 当未渲染组件时, Route返回null。 组件名称也作为prop component传递。 请看下面的代码片段。
There is the functional App component that returns a BrowserRouter which holds the very first Route component. The path is currently pointing towards the Home component which has the following UI logic.
有一个实用的App组件,该组件返回一个BrowserRouter ,其中包含第一个Route组件。 该path当前指向具有以下UI逻辑的Home组件。
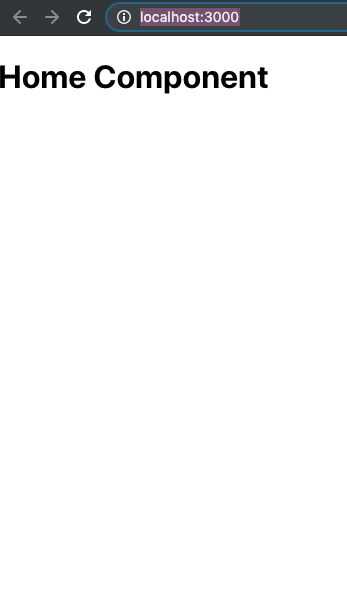
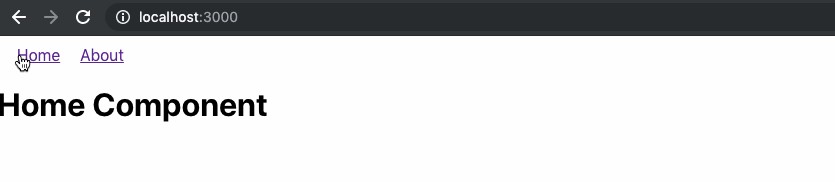
Now, visit the URL on port 3000 and you will see the Home component being rendered right now.
现在,访问端口3000上的URL,您将立即看到Home组件。
This is a bare minimum example. Now let us add another route with the same props as the Home. Call this route Aboutwith a similar rendering logic as Home.
这是一个最低限度的示例。 现在,让我们添加一条与Home具有相同道具的路线。 使用与Home类似的渲染逻辑将此路线称为About 。
Now add this functional component as the second route, below the Home route. Also, add both routes inside a divelement. A router component can hold a single child element and adding a div solves this problem and allows the router component to have as many children as we want.
现在,将此功能组件作为第二条路线添加到Home路线下。 另外,将两个路由都添加到div元素中。 路由器组件可以容纳单个子元素,而添加div可以解决此问题,并允许路由器组件具有所需的任意多个子元素。
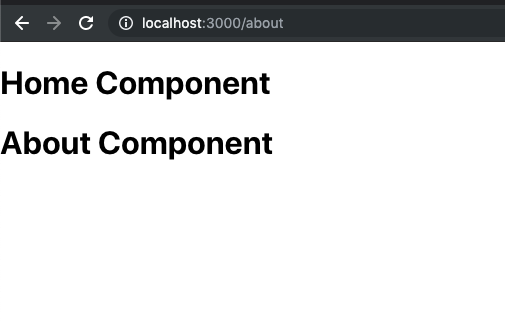
Try visiting the URL http://localhost:3000/about. You will notice that both the components are being rendered right now on the path /about.
尝试访问URL http://localhost:3000/about 。 您会注意到,这两个组件现在都在/about路径上呈现。
The reason for this is that regular expression engine that React Router uses internally considers both the routes that are being started with a forward slash / equal. To solve this issue, we can use another essential prop on the Home route called exact.
这是因为React Router在内部使用的正则表达式引擎会同时考虑以正斜杠/等号开始的两条路由。 为了解决这个问题,我们可以用另一种必不可少的道具拨通了家里的路线上exact 。
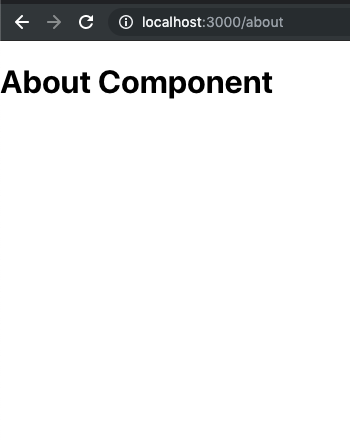
This exact is also known as a qualifier which states that the path must match the exactly the / and nothing after it, such as /about. Now, if you visit the browser window at the URL http://localhost:3000/about you will notice that only the about component is getting rendered this time.
此exact度也称为限定符,它指出路径必须与/完全匹配,且其后没有任何内容,例如/about 。 现在,如果您访问URL http://localhost:3000/about的浏览器窗口,则会注意到这次仅呈现about组件。
什么是BrowserRouter? (What is BrowserRouter?)
Do you remember reading earlier about that react-router-dom is used only in case of web applications? Well, react-router-dom library holds two types of routers API for a React application to use. One is called BrowserRouter that you have seen in action in the previous section. The other one is called HashRouter.
您还记得以前阅读过的有关 react-router-dom 仅在Web应用程序中使用的信息吗? 好了, react-router-dom库包含两种类型的路由器API,供React应用程序使用。 在上一节中您已经看到了一个叫做BrowserRouter 。 另一个称为HashRouter 。
A BrowserRouter will always listen to URLs like:http://localhost:3000/about whereas a HashRouter will have http://localhost:3000/#/about, as the name suggests, uses a hash # in between. So why did we use the BrowserRouter?
一个BrowserRouter总是会听喜欢的网址: http://localhost:3000/about而HashRouter将有http://localhost:3000/#/about ,顾名思义,使用哈希#之间。 那为什么要使用 BrowserRouter 呢?
BrowserRouter is a popular choice among modern day web applications. The main reason behind is that it uses HTML5 History API to keep track of the router history of your React app. The HashRouter has a use case for legacy browsers where window.location.hash is still being used to keep a track of routes in a SPA.
BrowserRouter是现代Web应用程序中的流行选择。 背后的主要原因是它使用HTML5历史记录API来跟踪React应用程序的路由器历史记录。 HashRouter有一个用于旧版浏览器的用例,其中window.location.hash仍用于跟踪SPA中的路由。
DIY练习👇 (DIY Exercise 👇)
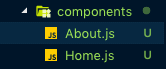
Here is a small task for you. Modify directory structure like below screenshot and separate the two functional components Home and about in their own component files such that, in future, if they grow with more JSX to render.
这对您来说是个小任务。 修改目录结构(如下面的屏幕截图所示),并将两个功能组件Home和about分开在其自己的组件文件中,以便将来随着更多的JSX一起呈现。
You can totally skip this if you want and move on to the next section. But performing this small task will benefit you to have an understanding of the above concepts.
如果愿意,可以完全跳过此步骤,然后继续进行下一部分。 但是执行此小任务将使您对上述概念有所了解。
链接组件 (The Link Component)
To navigate between to web pages in HTML, there is an <a href=""></a> anchor tag available. However, using this traditional approach will lead to a browser refresh. In order to overcome this, React Router API offers a Link component that can be used to navigate to a particular URL or a component.
要在HTML中浏览网页,可以使用<a href=""></a>锚标记。 但是,使用这种传统方法将导致浏览器刷新。 为了克服这个问题,React Router API提供了一个Link组件,可用于导航到特定的URL或组件。
Let us try to create a navigation menu with this new knowledge. Import Link from react-router-dom in App.js file. Here is the modified snippet of App component.
让我们尝试使用此新知识创建导航菜单。 从App.js文件中的react-router-dom导入Link 。 这是App组件的修改后的代码段。
In the above snippet, notice that all the Links are being added before all the Route components. The styling attributes inside style are optional for now. Start the development server and visit the browser window and you will notice a navigation menu pops up at the top. Try clicking links to navigate between different components.
在上面的代码段中,请注意,所有链接都在所有Route组件之前添加。 现在, style内部的样式属性是可选的。 启动开发服务器并访问浏览器窗口,您会注意到顶部弹出一个导航菜单。 尝试单击链接以在不同组件之间导航。
Wherever a Link is rendered in a React project, an anchor <a> will be rendered in the application's HTML.
无论在React项目中呈现Link何处,锚点<a>都将呈现在应用程序HTML中。
NavLink的活动链接 (Active Links with NavLink)
In React Router API, NavLink is the extended version of the Link component. You can say that is a special type of the Link that can style itself as to represent the active state when matches the current route.
在React Router API中, NavLink是Link组件的扩展版本。 您可以说这是Link一种特殊类型,当与当前路由匹配时,可以将自身样式化为代表活动状态。
To demonstrate this, first, let us replace all the Link tags with NavLink in App.js file.
为了证明这一点,首先,我们需要替换所有Link与标签NavLink在App.js文件。
At this point, each NavLink link is going to behave like an ordinary Link component which means there is no change so far. To make a link active, add an activeClassName prop to that. Such as below.
此时,每个NavLink链接的行为都将像普通的Link组件一样,这意味着到目前为止没有任何更改。 要使链接处于活动状态,请向其添加一个activeClassName 。 如下面。
To set up the corresponding CSS for this to work, open App.css file and add the below.
要为此设置相应CSS,请打开App.css文件并添加以下内容。
Do not forget to import this file inside App.js. Also, modify the about route to have an activeClassName.
不要忘记在App.js导入此文件。 另外,将about路由修改为具有activeClassName 。
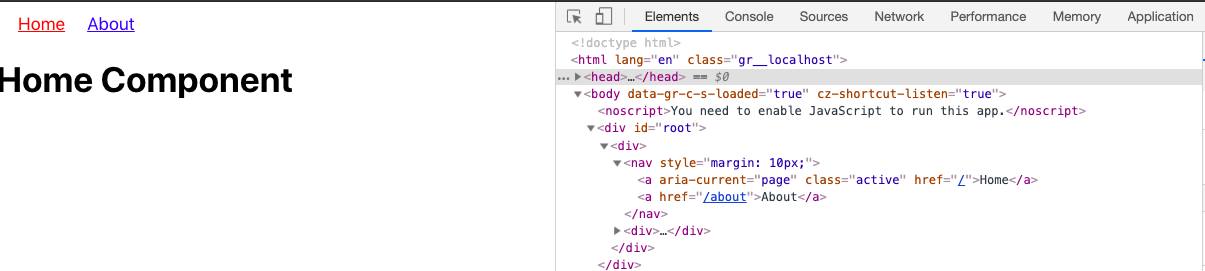
Go back to the browser, open develop tools like below and you will notice, at first, the Home route has a class name active.
返回浏览器,打开如下所示的开发工具,您会发现,首先, Home路由的类名称为active 。
Try navigating to the About route and see what happens.
尝试导航到“ About路线,看看会发生什么。

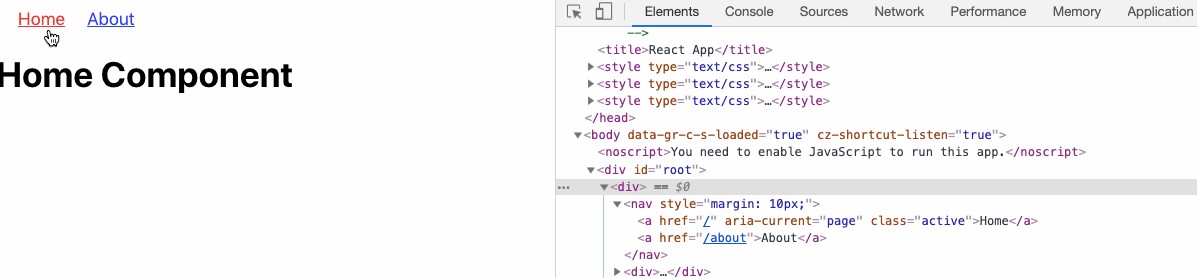
On navigating to About route did you notice that the active class name is also added to the corresponding route? However, the Home route still has the active class even though the URL matches the /about. Why?
在导航到About路线时,您是否注意到active类名称也已添加到相应的路线? 但是,即使URL匹配/about , Home路由仍然具有活动类。 为什么?
The way NavLink work is almost similar to Route component in React Router API. To make sure that only one route has the class active state, try modifying the home route in the navigation menu, as below.
NavLink工作方式几乎与React Router API中的Route组件相似。 要确保只有一条路线具有班级活动状态,请尝试在导航菜单中修改本地路线,如下所示。
You will get the desired output this time.
这次您将获得所需的输出。
向路由添加参数 (Adding Parameters to the Routes)
In this section, you will learn how to create and manage dynamic routes based on a URL parameter such as :id. We start by creating a static array in App.js file that will serve as the mock data.
在本节中,您将学习如何基于URL参数(例如:id创建和管理动态路由。 我们首先在App.js文件中创建一个静态数组,该数组将用作模拟数据。
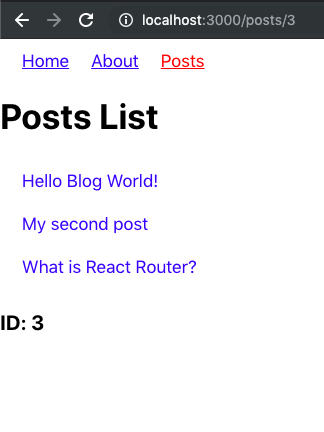
The idea is to demonstrate a route as /posts which displays all the posts that are coming from the array. However, each post in the array will be having an id or a unique identifier. Using that unique identifier, you will be approaching the concept of dynamic content rendering by writing the logic for URLs such as /posts/:id where :id will be represented by the specific id of a post.
想法是将路由展示为/posts ,以显示来自数组的所有帖子。 但是,数组中的每个帖子都会有一个id或唯一的标识符。 使用该唯一标识符,您将通过编写URL的逻辑(如/posts/:id来处理动态内容呈现的概念,其中:id将由/posts/:id的特定id表示。
To start, let us add a bunch of mock posts in the state inside a new component file called components/posts.js.
首先,让我们在状态为新的组件文件components/posts.js内添加一堆模拟帖子。
The corresponding styles to the above are added in App.css file for brevity.
为了简洁起见,在App.css文件中添加了与上述对应的样式。
Now, import the newly created component inside App.js where other routes already exist.
现在,将新创建的组件导入已经存在其他路由的App.js内。
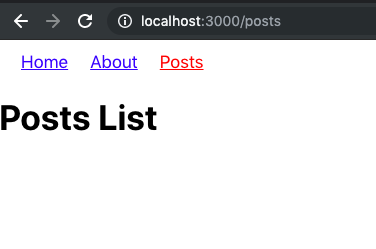
The existing navigation menu has a new route and its called Posts.
现有的导航菜单具有一条新路线,其名称为“帖子”。
Open Posts.js to render the list of Posts and display them as a list whenever the current location in the web browser matches /posts.
打开Posts.js以呈现“帖子”列表,并在Web浏览器中的当前位置与/posts匹配时将它们显示为列表。
Also, the Child component reads anything coming from the URL parameters, such as, in the above case, the id of each post. A match object contains information about how a <Route path> matched the URL, thus, in our case, the id of each post.
而且, Child组件读取来自URL参数的任何内容,例如,在上述情况下,是每个帖子的id 。 match对象包含有关<Route path>如何与URL匹配的信息,因此,在本例中为每个帖子的ID。
将Crowdbotics支持连接到您的Github存储库 (Connecting Crowdbotics support to Your Github Repo)
Once everything is working, now let us add git version to this React project and then, further add the support for Crowdbotics app building platform. Open a terminal window and execute:
一旦一切正常,现在让我们向该React项目添加git版本,然后进一步添加对Crowdbotics应用构建平台的支持。 打开一个终端窗口并执行:
Once all the files are committed, add this repository to your Github account. Crowdbotics app building platform now gives you an option to connect a Github repository directly using GitHub OAuth integration ( which means you need to have a Crowdbotics account or login into one using your Github account).
提交所有文件后,将该存储库添加到您的Github帐户。 Crowdbotics应用程序构建平台现在为您提供了一个使用GitHub OAuth集成直接连接Github存储库的选项(这意味着您需要拥有一个Crowdbotics帐户或使用Github帐户登录)。

More and in-detail information about this process can be found here.
有关此过程的更多详细信息,请参见此处 。
结论 (Conclusion)
Hopefully, by now, you are familiar with the basic concepts of how React Router library works. It is a powerful library that helps you build better React apps. If you want to learn more about React Router visit its official documentation here.
希望到目前为止,您已经熟悉了React Router库如何工作的基本概念。 它是一个功能强大的库,可帮助您构建更好的React应用程序。 如果您想了解更多有关React Router的信息,请在此处访问其官方文档 。
You can find the complete for the tutorial at the Github repo below.
您可以在下面的Github存储库中找到该教程的完整内容。


 343
343

 被折叠的 条评论
为什么被折叠?
被折叠的 条评论
为什么被折叠?
 到【灌水乐园】发言


