


spring react
Long gone are the days where you just wrap your components in ReactTransitionGroups and hope to dear life that your animations chain one after another to get that sweet buttery animation. But now we have the better butter, a buff butter that never buffers (your daily tongue twister from a lovely mister). I am, of course, talking about React Spring. It’s an animation library that emulates spring physics into our app so the animations appear smoother.
只是将组件包装在ReactTransitionGroups中的日子已经一去不复返了,希望亲爱的生活让您的动画一个接一个地链接以获得甜美的黄油动画。 但是现在我们有了更好的黄油,一种永不缓冲的牛油黄油(您每天从可爱的先生那里得到的绕口令)。 我当然是在谈论React Spring 。 这是一个动画库,可将弹簧物理特性模拟到我们的应用程序中,从而使动画看起来更流畅。
I’ve been working on a productivity app, and one thing I’ve wanted to emulate is my use of Post-it notes to keep track of things to do throughout the day. And if I want an app to recreate the experience of writing and maintaining those notes, then I need to emulate the material that makes those notes - Paper
我一直在开发一个生产力应用程序,而我想模仿的一件事是我使用便利贴来跟踪一天中要做的事情。 而且,如果我想让应用程序重现编写和维护这些便笺的体验,那么我需要模拟制作这些便笺的材料-纸
设置黄油 (Setting up the Butter)
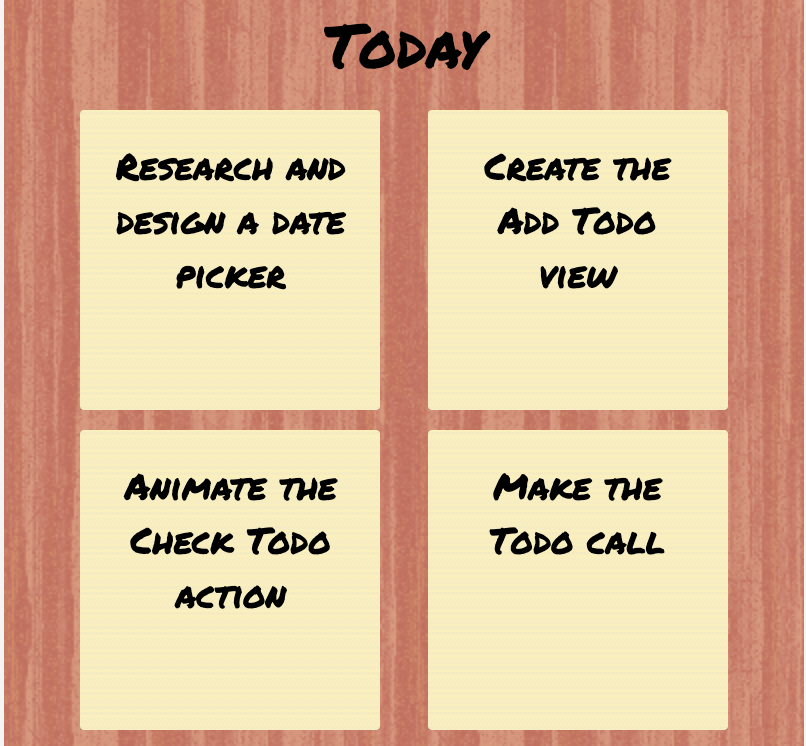
Let’s set up the foundations for our app. We’re going to need to recreate a wooden board, and then stick our bits of paper on that board. Along with their colors being consistent with the real world, we’d also want them to feel like real-world objects.
让我们为我们的应用程序奠定基础。 我们将需要重新创建木板,然后将纸片粘贴在该木板上。 除了它们的颜色与真实世界一致之外,我们还希望它们感觉像真实世界中的物体。
We’re going to use some lovely textures from the wonderful folks at TransparentTextures to accomplish this. This is what our Home component looks like
我们将使用TransparentTextures的出色人员提供的一些可爱的纹理来完成此任务。 这就是我们的Home组件的样子
export default function Home() {
return (
<div className={list}>
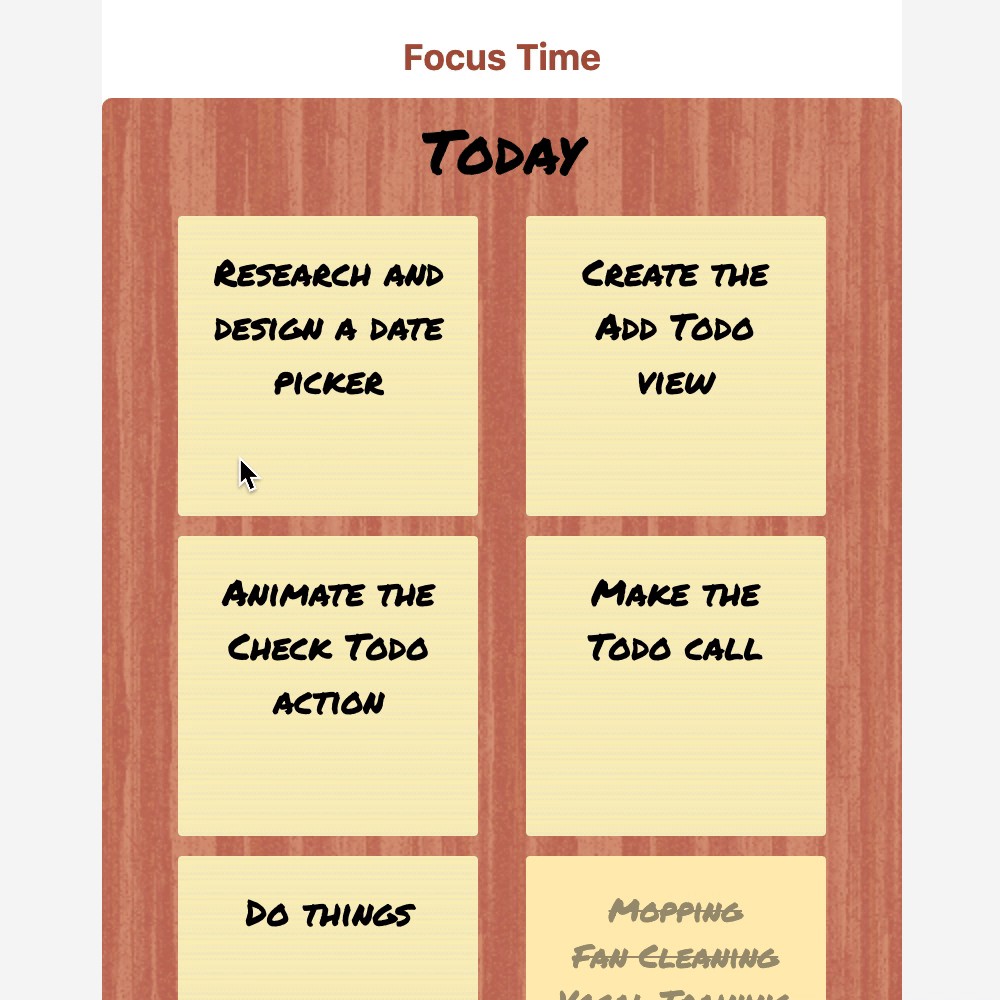
<div className={listHeader}>Today</div>
<TodoList />
</div>
)
}Here is our TodoList
这是我们的TodoList
import Todo from './Todo'
import { todolist } from './TodoList.module.scss'export default function TodoList (props) {

let todos = [{"id":"2bd7cbc716", "name":"Research and design a date picker","isChecked":false},
    {"id":"efc6e1edc4","name":"Create the Add Todo view","isChecked":false},
    {"id":"72bed57be0","name":"Animate the Check Todo action","isChecked":false},
    {"id":"0be851c06b","name":"Make the Todo call","isChecked":false},
    {"id":"72634b2dcf","name":"Do things","isChecked":false}]return (
    <div className={todolist}>
      {todos.map(action => {
        return <Todo key={action.id} action={action}></Todo>
      })}
    </div>
  )
}
And finally, our Todo
最后,我们的待办事项
import { todo, todoWrapper, name, isChecked } from './TodoList.module.scss'
import cn from 'classnames/bind'import SwipeTodo from '../SwipeableItem/SwipeTodo';let cx = cn.bind({todo, isChecked});export default function Todo({key, action}) {return (
    <div className={todoWrapper}>
      <SwipeTodo action={action}>
          <div className={cx({todo: true, isChecked: action.isChecked})}>
            <div className={name}>{action.name}</div>
          </div>
      </SwipeTodo>
    </div>
  )
}
Don’t worry about the SwipeTodo or the { } brackets around the className. I’m using CSS Modules, but how I declare my CSS still looks the same-
不必担心SwipeTodo或className周围的{}括号。 我正在使用CSS模块,但是声明CSS的方式仍然相同-
.list {
  padding: 5px 0px;
  height: 100%;
  overflow: auto;
  background: $primary;
  background-image: url("https://www.transparenttextures.com/patterns/wood-pattern.png");
  border-radius: 5px;
}.listHeader {
  color: $black;
  font-family: marker;
  text-align: center;
  font-size: 30px;
}.focusFooter {
  display: flex;
  justify-content: flex-end;
  margin-top: 10px;
  margin-right: 20px;
  margin-bottom: 20px;
}.todolist {
  display: block;
  margin: 10px 20px;
  border-radius: 5px;
  border: 0;
  box-shadow: 0px 3px 2px -1px rgba(0,0,0,0.2),
    0px 2px 2px 0px rgba(0,0,0,0.04)
    ;display: flex;
  flex-flow: row wrap;
  box-shadow: none;
  justify-content: space-evenly;
  margin: 5px 20px;}.todoWrapper {
  width: 150px;
  max-width: 150px;
  height: 150px;
  margin: 5px;
  flex-basis: 45%;
  font-family: Permanent Marker, Arial, Helvetica, sans-serif;
  user-select: none;
  position: relative;
}.todo {
  width: 150px;
  height: 150px;
  border-radius: 2px;
  justify-content: center;
  font-family: Permanent Marker, Arial, Helvetica, sans-serif;
  background: adjust-hue($secondary, 5%);
  background-image: url("https://www.transparenttextures.com/patterns/embossed-paper.png");
  border: none;
  box-shadow: 0px 3px 2px -1px rgba(0,0,0,0.2),
    0px 2px 2px 0px rgba(0,0,0,0.04) ;  position: absolute;
  left: 0;
}.name {
  font-size: 18px;
  text-align: center;
  color: black;
}
The font we use here is the Permanent Marker
我们在这里使用的字体是永久标记
搅动黄油 (Churning the Butter)
In case I’m getting too heavy-handed with the butter analogies do let me know, I’ll make a note of it in my diary.
万一我对黄油的类比举手投足,我一定会在日记中记下来。
In order to understand how our SwipeTodo component works, we need to understand how a paper actually tears from wood. The paper can be broken down into two major parts
为了了解SwipeTodo组件的工作原理,我们需要了解纸张实际上是如何从木头上撕下来的。 本文可以分为两个主要部分
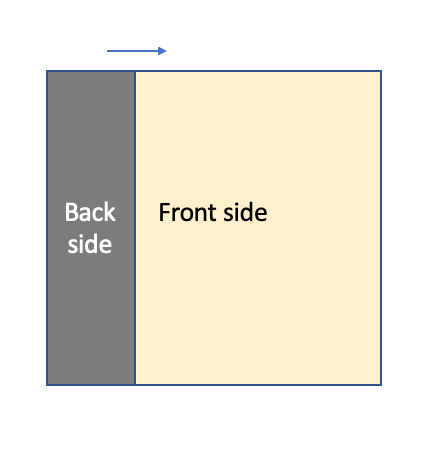
- At the start, the front side of the paper is shown 首先,显示纸张的正面
- As it is torn away, the backsides shows and increase in width, while we see less of the front of the paper 当它被撕掉时,背面会显示出来并增加宽度,而我们看到的纸张正面更少
- As more is peeled away, the backside moves to the right, so it seems like the front side is “turning itself” into the backside of the paper 当更多的东西被剥离时,背面向右移动,因此看起来正面正“转向自身”进入纸张的背面
Now that we understand the working of a real paper peel, let’s see how we can implement it in code. Firstly, we want to style the back paper different from the front. We do that by choosing a lighter color and a smooth texture (this is where our use of textures pays off) to differentiate it. And we give it a higher z-index and a box-shadow to make it look like it's over the front of the paper
现在我们了解了真正的纸皮的工作原理,让我们看看如何在代码中实现它。 首先,我们要设计与正面不同的背面纸。 我们通过选择较浅的颜色和平滑的纹理(这是我们对纹理的使用所带来的回报)来区分它们的方式。 我们给它一个更高的z索引和一个阴影,使其看起来像在纸的前面
.swiper {
  position: absolute;
  right: 0;
  height: 100%;
  overflow: hidden;
  width: 100%;
}.backPaper {
  height: 100%;
  position: absolute;
  left: 0;
  width: 10px;
  background: $secondary-lighter;
  z-index: 5;
  box-shadow: 4px 5px 15px -2px rgba(0,0,0,0.4);
}.frontPaper {
  width: 150px;
  height: 150px;
  position: absolute;
}
Another way to understand the positioning in this is that we are aligning the parent (.swiper) to the right of its parent (.todoWrapper), which we will be moving towards the right. So swiper makes sure our paper moves to the right, so .backPaper and .frontPaper only need to control their width and position with respect to .swiper.
了解此位置的另一种方法是,我们将父级(.swiper)对准其父级(.todoWrapper)的右侧,我们将向右移动。 因此,swiper确保我们的纸张向右移动,因此.backPaper和.frontPaper只需要控制它们相对于.swiper的宽度和位置。
Now let’s get into the code of SwipeTodo, and how we use React Spring to implement this motion so its smooth and buttery (I’m obsessed with that word aren’t I)
现在,让我们进入SwipeTodo的代码,以及如何使用React Spring来实现该动作,使其平滑而黄油(我不喜欢这个词)
import { useSpring, animated, interpolate } from 'react-spring';
import { useDrag } from 'react-use-gesture';
import { backPaper, frontPaper, swiper } from '../TodoList/TodoList.module.scss';export default function SwipeTodo({action, children}) {
  const [{x, y}, set] = useSpring(() => ({x: 0, y: 0}));
  const bindSwipe = useDrag(({down, movement: [mx, my], velocity}) => {
    let realisticX = mx * (1 + velocity);
    let realisticY = my;if (!down) {
      // either torn or back based on current position
      realisticX = realisticX > 150? window.innerWidth: 0;
    }set({x: realisticX, y: realisticY});
  });return (
    <animated.div key={action.id} {...bindSwipe()} className={swiper} style={{overflow: 'hidden', width: '100%', right: interpolate([x], (x) => `-${x}px`)}}>
      <animated.div className={backPaper} style={{width: interpolate([x], x=> `${x}px`)}}></animated.div>
      <animated.div className={frontPaper} style={{left: interpolate([x], x => `-${x}px`)}}>
        {children}
      </animated.div>
    </animated.div>)
}
Okay, that might be a lot of new code to understand in one go, so lets go through it line by line. Let’s go through the logic of calculating the x and y
好的,一次可能要理解很多新代码,所以让我们逐行阅读。 让我们看一下计算x和y的逻辑
  const [{x, y}, set] = useSpring(() => ({x: 0, y: 0}));
  const bindSwipe = useDrag(({down, movement: [mx, my], velocity}) => {
    let realisticX = mx * (1 + velocity);
    let realisticY = my;if (!down) {
      // either peels away or snaps back based on it's x value
      realisticX = realisticX > 150? window.innerWidth: 0;
    }set({x: realisticX, y: realisticY});
});- useSpring here just generates a new spring so our animations are smooth. Think of it this way - if our x and y change from 0 to a 100, we want it to slowly tick up to it, not in one go. Also the set function allows us to manually set the x and y values that the spring will act on useSpring在这里只是生成一个新的弹簧,因此我们的动画很流畅。 这样想吧-如果我们的x和y从0变为100,我们希望它缓慢地跳到它,而不是一in而就。 设置功能还允许我们手动设置弹簧将作用的x和y值
- useDrag is a function that we use to track the “drag” gesture of the user. It gives us the x-y coordinates, velocity of the swipe and when it ends useDrag是我们用来跟踪用户“拖动”手势的功能。 它为我们提供了xy坐标,滑动速度以及结束时间
- We use realisticX to set the value of x (y we will ignore). We want the velocity to have an impact on the x, so the paper moves faster if flicked 我们使用realisticX来设置x的值(y将被忽略)。 我们希望速度对x产生影响,因此纸张滑动时移动速度更快
- We also use a threshold when the user lets go of the paper. If they let go after 150px (it’s width) then we set the x to the ends of the window 当用户放开纸张时,我们也会使用阈值。 如果它们在150px(宽度)之后放开,则将x设置为窗口的末端
<animated.div key={action.id} {...bindSwipe()} className={swiper} style={{overflow: 'hidden', width: '100%', right: interpolate([x], (x) => `-${x}px`)}}>
      <animated.div className={backPaper} style={{width: interpolate([x], x=> `${x}px`)}}></animated.div>
      <animated.div className={frontPaper} style={{left: interpolate([x], x => `-${x}px`)}}>
        {children}
      </animated.div>
</animated.div>- animated.div is just a helper element that can read our changing x and y values and update the dom accordingly animation.div只是一个辅助元素,可以读取我们不断变化的x和y值并相应地更新dom
- We use the interpolate helper to read the x value and update the “right”, “left” and “width” values for our elements 我们使用插值助手来读取x值并更新元素的“ right”,“ left”和“ width”值
Voila! It’s time to enjoy some of that lactose-free goodness
瞧! 是时候享受一些无乳糖的好处了
涂黄油 (Spread the Butter)
Yes, before you ask, I had to show another gif of that animation. For science reasons.
是的,在您问之前,我必须显示该动画的另一幅gif。 出于科学原因。
Some might say my deep dive into paper physics might be overkill. And they might be right. My family is dying and I‘m missing a few limbs due to an unrelated black market paper acquisition deal. But it’s all worth it
有人可能说我深入研究纸物理学可能是过大的。 他们可能是正确的。 我的家人快死了,由于与黑市票据收购无关的交易,我错过了几条路。 但这都是值得的
我们从这里去哪里 (Where do we go from here)
To be honest there are a few improvements that can be made-
老实说,可以进行一些改进-
- Instead of the whole paper sticking to the board, we can have just the top half stick, like a post-it note. Though that is a little more complicated, involving triangles instead of rectangles for the peel off 而不是整个纸都粘在板上,我们可以只用顶部的一半纸,就像便签纸一样。 虽然有点复杂,但要剥离时要用三角形而不是矩形
- We ignored the y-axis during this implementation. We could incorporate a tearing off motion that works on both the axes 在此实施过程中,我们忽略了y轴。 我们可以合并一个在两个轴上都起作用的撕裂运动
Both these improvements are a little complicated, and I might make a follow-up blog post if I see interest in this pique up. In the meantime, I need to try to get back my organs from the black market. They will accept views on Medium as a currency, won’t they?
这些改进都有些复杂,如果我对这种激怒感兴趣,我可能会写一篇后续博客文章。 同时,我需要尝试从黑市取回器官。 他们会接受对Medium货币的看法,不是吗?
Note: No cows were harmed in the making of this butter
注意:这种牛油的制作过程中,没有母牛受到伤害
spring react


 252
252

 被折叠的 条评论
为什么被折叠?
被折叠的 条评论
为什么被折叠?
 到【灌水乐园】发言


