


 本文介绍如何构建一个Chrome扩展程序(CRX),该程序能够在编写时实时分析文本。通过学习此教程,你可以了解如何利用Chrome扩展技术来增强浏览器的功能。
chrome扩展crx构建
Build your own chrome extension to count words, characters, and price-per-word as you write
构建自己的chrome扩展程序,以在编写时计算单词,字符和单字价格
介绍 (Introduction)
Not long ago, I started writing on Medium as a part-time gig to alternate with my freelance work. Not being a native English speaker, I found using chrome extensions like Grammarly really helpful. (In case you don’t know it yet, it is a digital writing tool that uses artificial intelligence and natural language processing to help with grammar checking, spell checking, plagiarism detection and suggestions about clarity, formality, tone, and vocabulary). Anyway, I don’t use all of its features because it has different plans (Free, Premium for individuals and Premium for business) or at least I didn’t have the necessity of using those features yet. So I thought of developing my own chrome extension implementing only the features I need, in order to learn the possibilities this technology offers.
不久前,我开始在Medium上做兼职演出,以兼职兼职。 我不是母语为英语的人,我发现使用像Grammarly这样的Chrome扩展程序确实很有帮助。 (如果您还不知道,它是一种数字书写工具,使用人工智能和自然语言处理来帮助进行语法检查,拼写检查,窃检测以及有关清晰度,形式,语气和词汇的建议)。 无论如何,我没有使用它的所有功能,因为它有不同的计划(免费,针对个人的Premium和针对企业的Premium),或者至少我还没有必要使用这些功能。 因此,我想开发自己的Chrome扩展程序,使其仅实现所需的功能,以便了解该技术提供的可能性。
Extensions are not only for Google Chrome though. Other popular browsers like Microsoft Edge and Mozilla Firefox support extensions as well, but extensions are the same for everyone: they are small applications built using HTML, CSS, and JavaScript, packaged in a specific way along with configuration files. They need to follow the Web Extension API standard, which is supported by Chromium-based browsers such as Google Chrome, Microsoft Edge, Mozilla Firefox, and Microsoft Edge.
扩展程序不仅适用于Google Chrome浏览器。 其他流行的浏览器(例如Microsoft Edge和Mozilla Firefox)也支持扩展,但扩展对每个人都是相同的:它们是使用HTML,CSS和JavaScript构建的小型应用程序,以特定方式与配置文件打包在一起。 他们需要遵循Web扩展API标准 ,基于Chromium的浏览器(例如Google Chrome,Microsoft Edge,Mozilla Firefox和Microsoft Edge)支持该标准。
什么是Chrome扩展程序? (What’s a Chrome Extension for?)
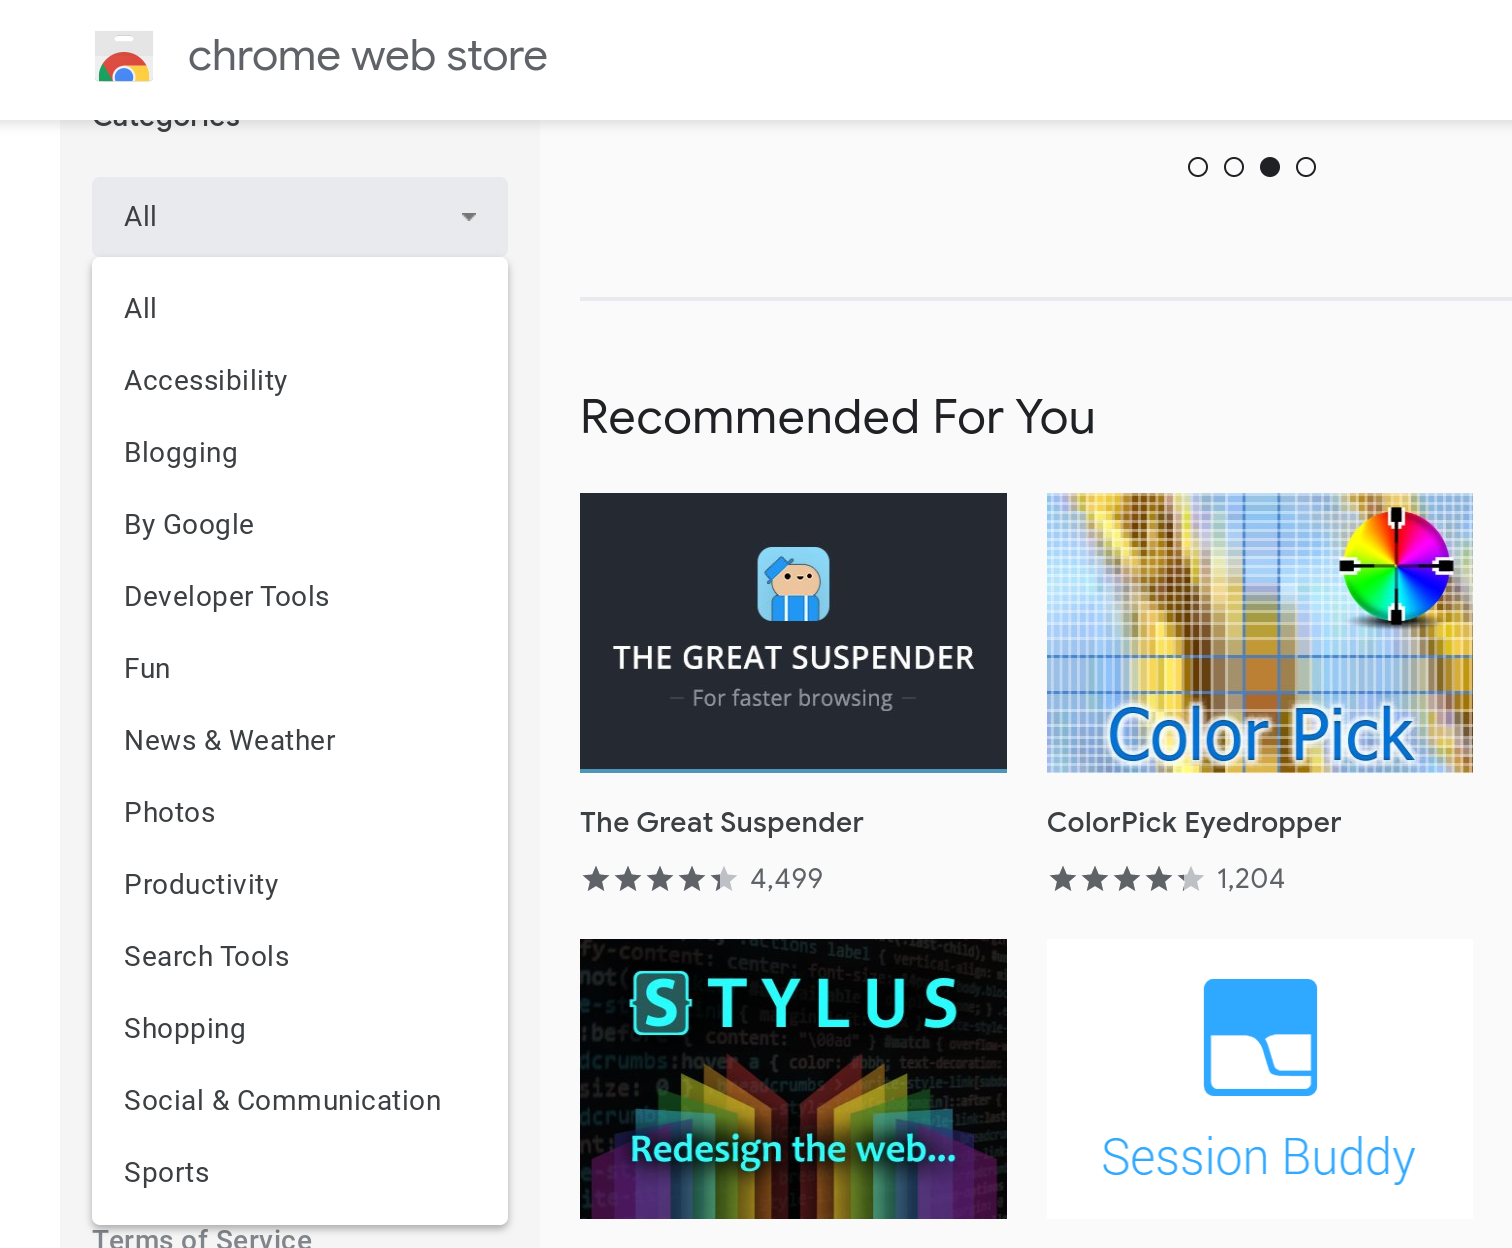
Chrome extensions are not only for text analysis. They can interact with the tabs of your Chrome browser using permissions, detect URL matches, inject code (HTML, JavaScript, CSS for example), do API calls, and so on. If we give a look to the Chrome Web Store, we can check all the different categories:
Chrome扩展程序不仅用于文本分析。 他们可以使用权限与您的Chrome浏览器的标签进行交互,检测URL匹配,注入代码(例如HTML,JavaScript,CSS),进行API调用等。 如果我们看一下Chrome网上应用店 ,我们可以检查所有不同的类别:
我们要建造什么? (What are we going to build?)
We will build an extension to count words and characters on a text field or input as we type, and to calculate the total of money you will gain (For freelance writers, for example) setting the price per word (PPW). We will call it ChETA, which stands for Chrome Extension for Text Analysis, which in my native Argentina means cool/awesome.
我们将构建扩展程序,以计算文本字段或输入时输入的单词和字符的数量,并计算您将获得的总收益(例如,对于自由作家而言),设置每字价格(PPW)。 我们将其称之为Cheta酒店 ,这为CH罗马éxtension为T外部一 nalysis,这在我的祖国阿根廷手段冷却/真棒。
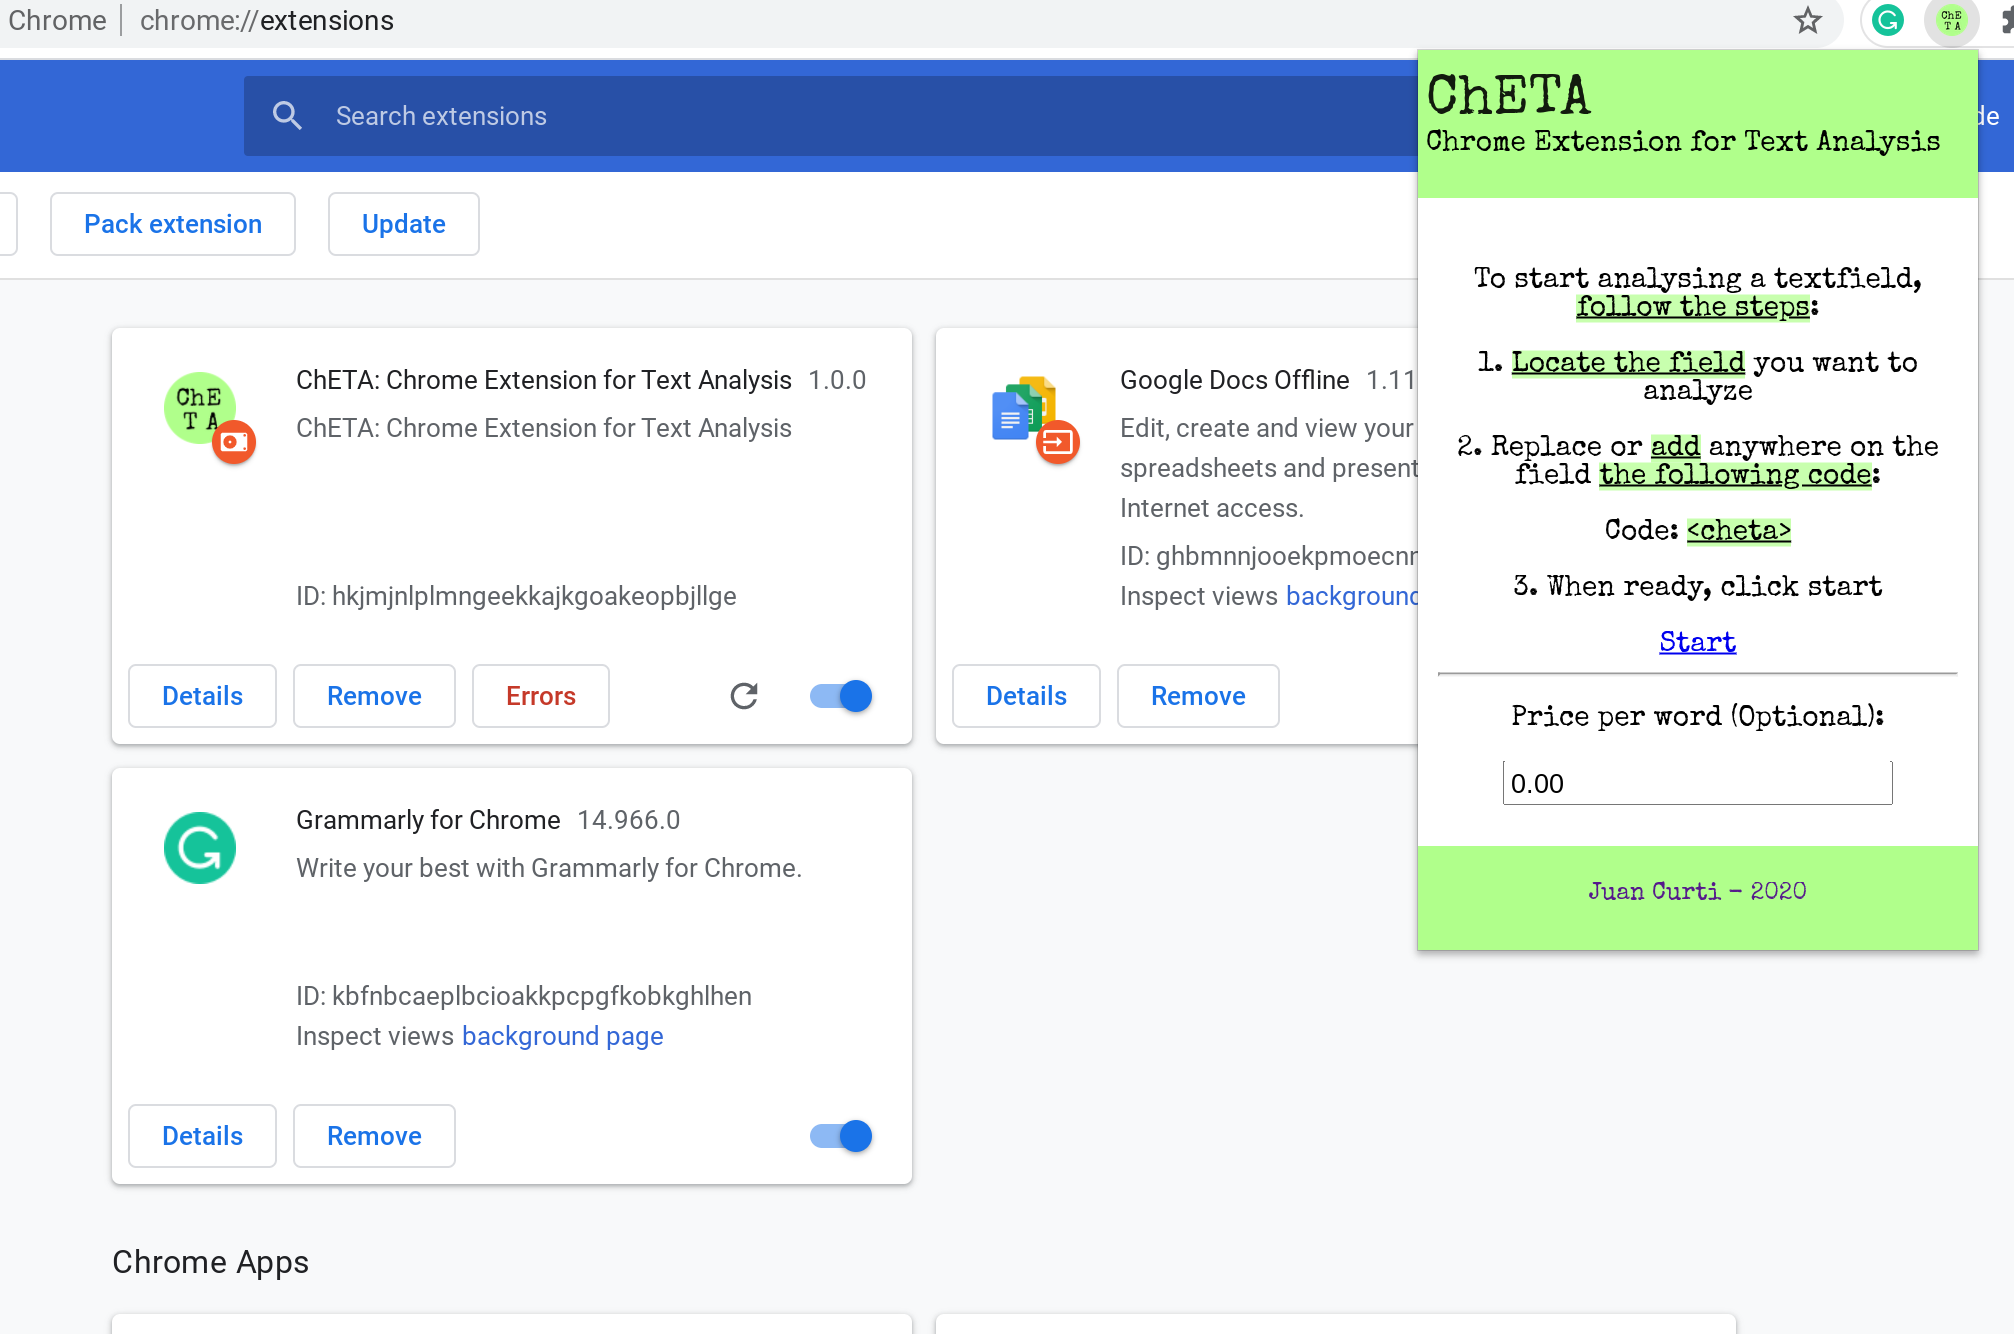
Our extension will look like the following, while opened from the Extensions tab:
从“扩展程序”选项卡打开后,我们的扩展程序如下所示:
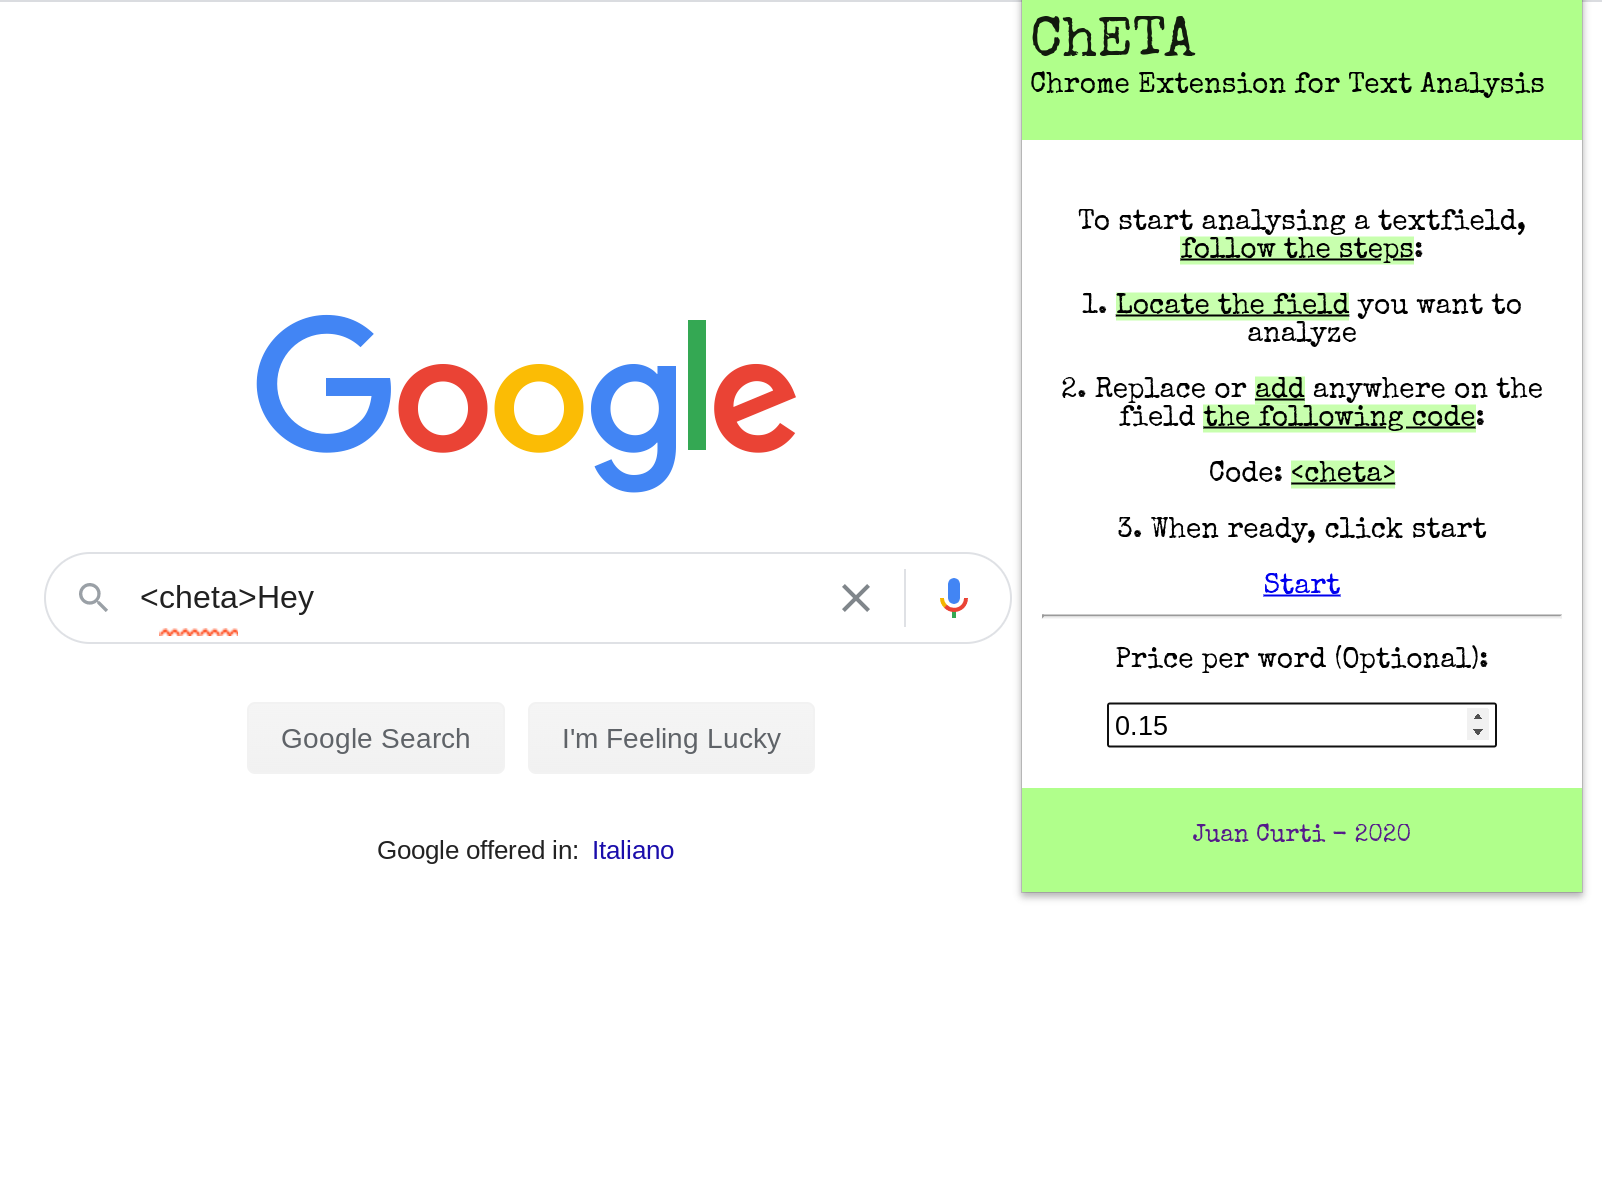
We will ask the user to locate the input he wants to use. Then, he will need to write <cheta> (add it anywhere on the input or replacing the content, it’s the same) on it and click Start. Optionally, he will be able to set a price per word (PPW from now on).
我们将要求用户找到他要使用的输入。 然后,他将需要在其上写<cheta> (将其添加到输入中的任何位置或替换内容,都是相同的),然后单击“开始”。 (可选)他可以设置每个字的价格(从现在开始为PPW )。
For example, on Google’s input:
例如,根据Google的输入:
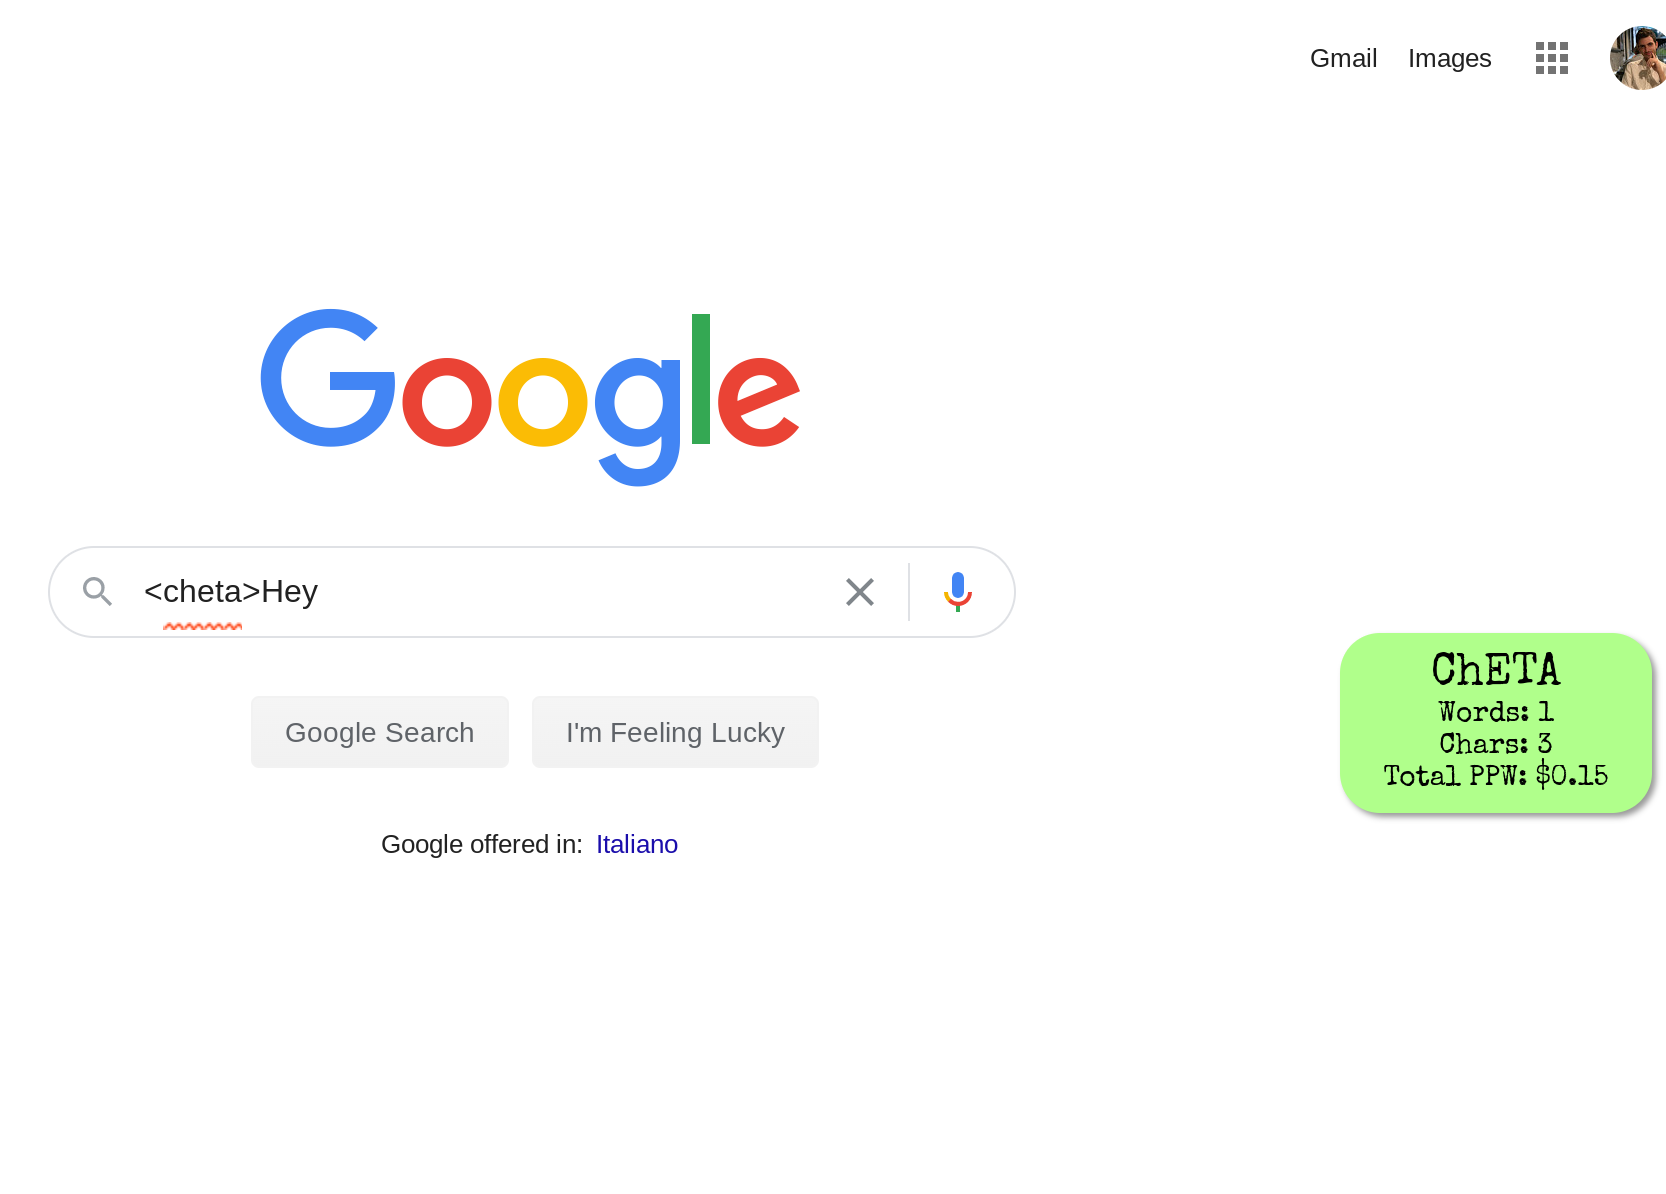
And when clicking Start, we will inject into the page HTML code the things we need to start listening inputs change using a floating container:
然后,单击“开始”时,我们将使用浮动容器将需要开始监听输入的内容注入HTML代码页面:
扩展架构 (Extension Architecture)
Extensions are made of different components that interacts with each other. Components can include background scripts, content scripts, an options page, UI elements, and various logic files. Extensions components are created with web development technologies: HTML, CSS, and JavaScript. An extension’s components will depend on its functionality and may not require every option.
扩展由相互交互的不同组件组成。 组件可以包括后台脚本 , 内容脚本 , 选项页 , UI元素和各种逻辑文件 。 扩展组件是使用Web开发技术创建的:HTML,CSS和JavaScript。 扩展的组件将取决于其功能,并且可能不需要所有选项。
- manifest.json: Describes what’s in the source package. It defines where the browser could find the background, content script, popup, and options pages. It also describes the permissions required by the extension (For example to allow the extension to check all tabs, only current tab, use storage, and so on) manifest.json:描述源程序包中的内容。 它定义了浏览器在哪里可以找到背景,内容脚本,弹出窗口和选项页面。 它还描述了扩展所需的权限(例如,允许扩展检查所有选项卡,仅当前选项卡,使用存储空间等)
- background.js: A script or piece of code that is launched when the extension starts, and won’t be terminated until the extension is removed or the browser shutdowns. This file has access to all chrome APIs, and other parts are limited to it. This script does not include a UI and does not have access to the DOM. background.js:扩展程序启动时启动的脚本或代码段,直到删除扩展程序或关闭浏览器后才会终止。 该文件可以访问所有chrome API,其他部分仅限于此文件。 该脚本不包括UI,并且无权访问DOM。
- popup.html: The UI which is displayed when the user clicks on ‘Browser Action’, which is the button right to the browser address bar where the extensions are located. Most extensions need a popup as entry, but they can also be developed to be called using right-click on pages. popup.html:用户单击“浏览器操作”时显示的用户界面,这是扩展程序所在的浏览器地址栏右侧的按钮。 大多数扩展都需要一个弹出窗口作为条目,但是也可以将其开发为使用页面上的右键单击来调用。
- options: It’s an optional part of the extension, which not all extensions include. It is used as a configuration UI for the extension, in order to enable multiple views. options:这是扩展程序的可选部分,并非所有扩展程序都包含。 它用作扩展的配置UI,以启用多个视图。
content script: A script or piece of code that runs in a tab with a specific URL pattern, defined in manifest.json. If the URL matches with the manifest description, the browser will launch the content script. It will be terminated when the URL changes or when the tab closes. It is needed to manipulate the DOM.
内容脚本:在清单中运行的脚本或一段代码,具有特定的URL模式,在manifest.json中定义。 如果URL与清单说明匹配,则浏览器将启动内容脚本。 URL更改或选项卡关闭时,它将终止。 需要操纵DOM。
URL matching can be useful when we need to launch our script on specific URLs or specific instances of a web flow.
当我们需要在特定URL或Web流的特定实例上启动脚本时,URL匹配会很有用。
For this tutorial, we will use React.js to build the extension. The source code is available on Github (https://github.com/juancurti/cheta-extension) to follow along.
在本教程中,我们将使用React.js来构建扩展。 可以在Github( https://github.com/juancurti/cheta-extension )上找到源代码。
让我们来构建扩展 (Let’s build the extension)
First, we will create the react app and remove unnecessary files we won’t use:
首先,我们将创建react应用并删除不需要的文件:
npx create-react-app cheta-extension
cd cheta-extension/
cd src/
rm -rf setupTests.js serviceWorker.js logo.svg index.css App.test.js App.js App.css
We will install node-sass, which is not mandatory but it will help us write quicker CSS code:
我们将安装node-sass,它不是强制性的,但是它将帮助我们更快地编写CSS代码:
npm i node-sass — saveNow we will replace the manifest.json located in the public/ folder, which is related to React.js, for the following code corresponding to the manifest.json concept explained above:
现在我们将替换与React.js相关的public /文件夹中的manifest.json,替换为与上面说明的manifest.json概念相对应的以下代码:
{
 “name”: “ChETA: Chrome Extension for Text Analysis”,
 “version”: “1.0.0”,
 “manifest_version”: 2,
 “description”: “ChETA: Chrome Extension for Text Analysis”,
 “icons”: {
 “512”: “logo512.png”
 },
 “permissions”: [“activeTab”],
 “browser_action”: {
 “default_icon”: “logo512.png”,
 “default_popup”: “popup.html”
 }
}
Note: The logo512.png file can be found on the repository: Link here
注意:logo512.png文件可以在存储库中找到: 链接到这里
As explained before, the initial point of a Chrome Extension should be a popup.html, so we will create a build script to rename our index.html generated by React build to popup.html. We will add a new file: script/build.sh, with the following content:
如前所述,Chrome扩展程序的起始点应该是popup.html,因此我们将创建一个构建脚本,以将由React build生成的index.html重命名为popup.html。 我们将添加一个新文件: script / build.sh ,其内容如下:
#!/bin/bashbuild() {
 echo ‘building react’rm -rf dist/*export INLINE_RUNTIME_CHUNK=false
 export GENERATE_SOURCEMAP=falsereact-scripts buildmkdir -p dist
 cp -r build/* distmv dist/index.html dist/popup.html
}build
重要提示! (Important to know!)
INLINE_RUNTIME_CHUNK is set to false in order to disable webpack inline JavaScript generation in HTML since normally it will put its own runtime into the script, which is not allowed by the browser extension standards.
为了禁用HTML中的webpack内联JavaScript生成,将INLINE_RUNTIME_CHUNK设置为false,因为通常它将自身的运行时放入脚本中,这是浏览器扩展标准所不允许的。
We need to add permissions to the script using the following command:
我们需要使用以下命令为脚本添加权限:
chmod +x script/build.shAnd finally, we need to modify our package.json file to start building with our script instead of react-scripts. Replace the build script for the following:
最后,我们需要修改package.json文件以开始使用脚本而不是react-scripts进行构建。 将构建脚本替换为以下内容:
"scripts": {
    "build": "./script/build.sh"
},
在UI上工作 (Working on the UI)
As stated before, we will use node-sass instead of simple CSS, just to write fewer lines for the sake of the tutorial.Create a new file src/styles/styles.scss with the following content:
如前所述,我们将使用node-sass而不是简单CSS,只是为了教程而编写更少的行。创建一个新文件src / styles / styles.scss ,内容如下:
@import url('https://fonts.googleapis.com/css2?family=Special+Elite&display=swap');
html{
  width:100%;
}
body{
  margin: 0px;
  height: 400px;
  width: 280px;
  font-family: 'Special Elite', sans-serif;
  background: white;.header {
    width: 280px;
    height: 50px;
    margin: 0px;
    background-color: #B0FF8B;
    padding: 12px 0px;h1 {
      font-family: 'Special Elite';
      font-size: 28px;
      opacity: 0.9;
      margin: 0px 4px 0px 4px;
      font-weight: 500;
    }p {
      margin: 0px 4px;
      font-family: 'Special Elite';
      font-weight: 400;
      font-size: 14px;
    }input, #priceperwordInput {
      text-align: center;
      font-family: 'Special Elite';
      font-weight: 400;
      font-size: 14px;
    }#priceperwordInput {
      width: 80px;
    }
  }.footer {
    width: 280px;
    height: 40px;
    margin: 0px;
    background-color: #B0FF8B;
    padding: 6px 0px;
    text-align: center;a {
      text-decoration: none;
    }
  }.contentBox {
    width: 280px;
    height: 310px;.resalted {
      background-color: rgba(176, 255, 139, 0.7);
      text-decoration: underline;
    }.no-tf-dtctd {
      margin: 0 10px;
      text-align: center;
      font-size: 14px;
      position: relative;
      top: 50%;
      transform: translateY(-50%);a {
        text-align: right;
      }
    }
  }
}
Now let’s clean our index.js file and set an entry point for our extension:
现在,让我们清理index.js文件,并为扩展名设置一个入口点:
import React from 'react';
import ReactDOM from 'react-dom';
import './styles/styles.scss';
import Home from './Home';ReactDOM.render(
  <React.StrictMode>
    <Home />
  </React.StrictMode>,
  document.getElementById('root')
);
Now let’s create our component. We will need to add /* global chrome*/ at the top of our file in order to prevent ESLint to detect it as an error. Create src/Home.js with the following format:
现在让我们创建我们的组件。 我们将需要在文件顶部添加/ * global chrome * /,以防止ESLint将其检测为错误。 使用以下格式创建src / Home.js :
/*global chrome*/
import React, { Component } from 'react';class Home extends Component {}export default Home;
We will add a constructor now. The variables we are going to use are basically two:
现在,我们将添加一个构造函数。 我们将使用的变量基本上是两个:
- uniqueCode: This is going to be the string the user will need to type in order to detect the working input. Having this variable in the state allows us to play with it according to our needs; for instance, if we want to make a paid version of this app, this code could be valid for a duration of 30 minutes and then the user would need to top up his account to continue using it. uniqueCode:这将是用户需要键入以检测有效输入的字符串。 使该变量处于状态可以使我们根据需要进行操作; 例如,如果我们要制作此应用程序的付费版本,则此代码的有效期为30分钟,然后用户需要充值自己的帐户才能继续使用。
- inputs: With this map, we will take care of the inputs of our React application. I’m using a map instead of a variable to be able to scale up in case other text fields are needed. 输入:使用此映射,我们将处理React应用程序的输入。 我正在使用地图而不是变量,以便在需要其他文本字段时可以进行缩放。
constructor(props){
    super(props);
    this.state = {
      uniqueCode: `<cheta>`,
      inputs: {
        priceperword: '0.05'
      }
    }
  }
Also, we need to add a helper function to detect input changes (In our chrome extension, not in the DOM) to update our price per word variable.
另外,我们需要添加一个辅助函数来检测输入更改(在我们的chrome扩展程序中,而不是在DOM中),以更新每个单词变量的价格。
handleInputChange = event => {
    const { name, value } = event.target;
    var inputs = this.state.inputs;
    inputs[name] = value;
    this.setState({
      inputs: inputs
    })
  }
Now we will add the render() method, which is mostly HTML. We already added the styles (With the .scss file), now we will add the structure as the following diagram:
现在,我们将添加render()方法,该方法主要是HTML。 我们已经添加了样式(带有.scss文件),现在我们将如下图所示添加结构:
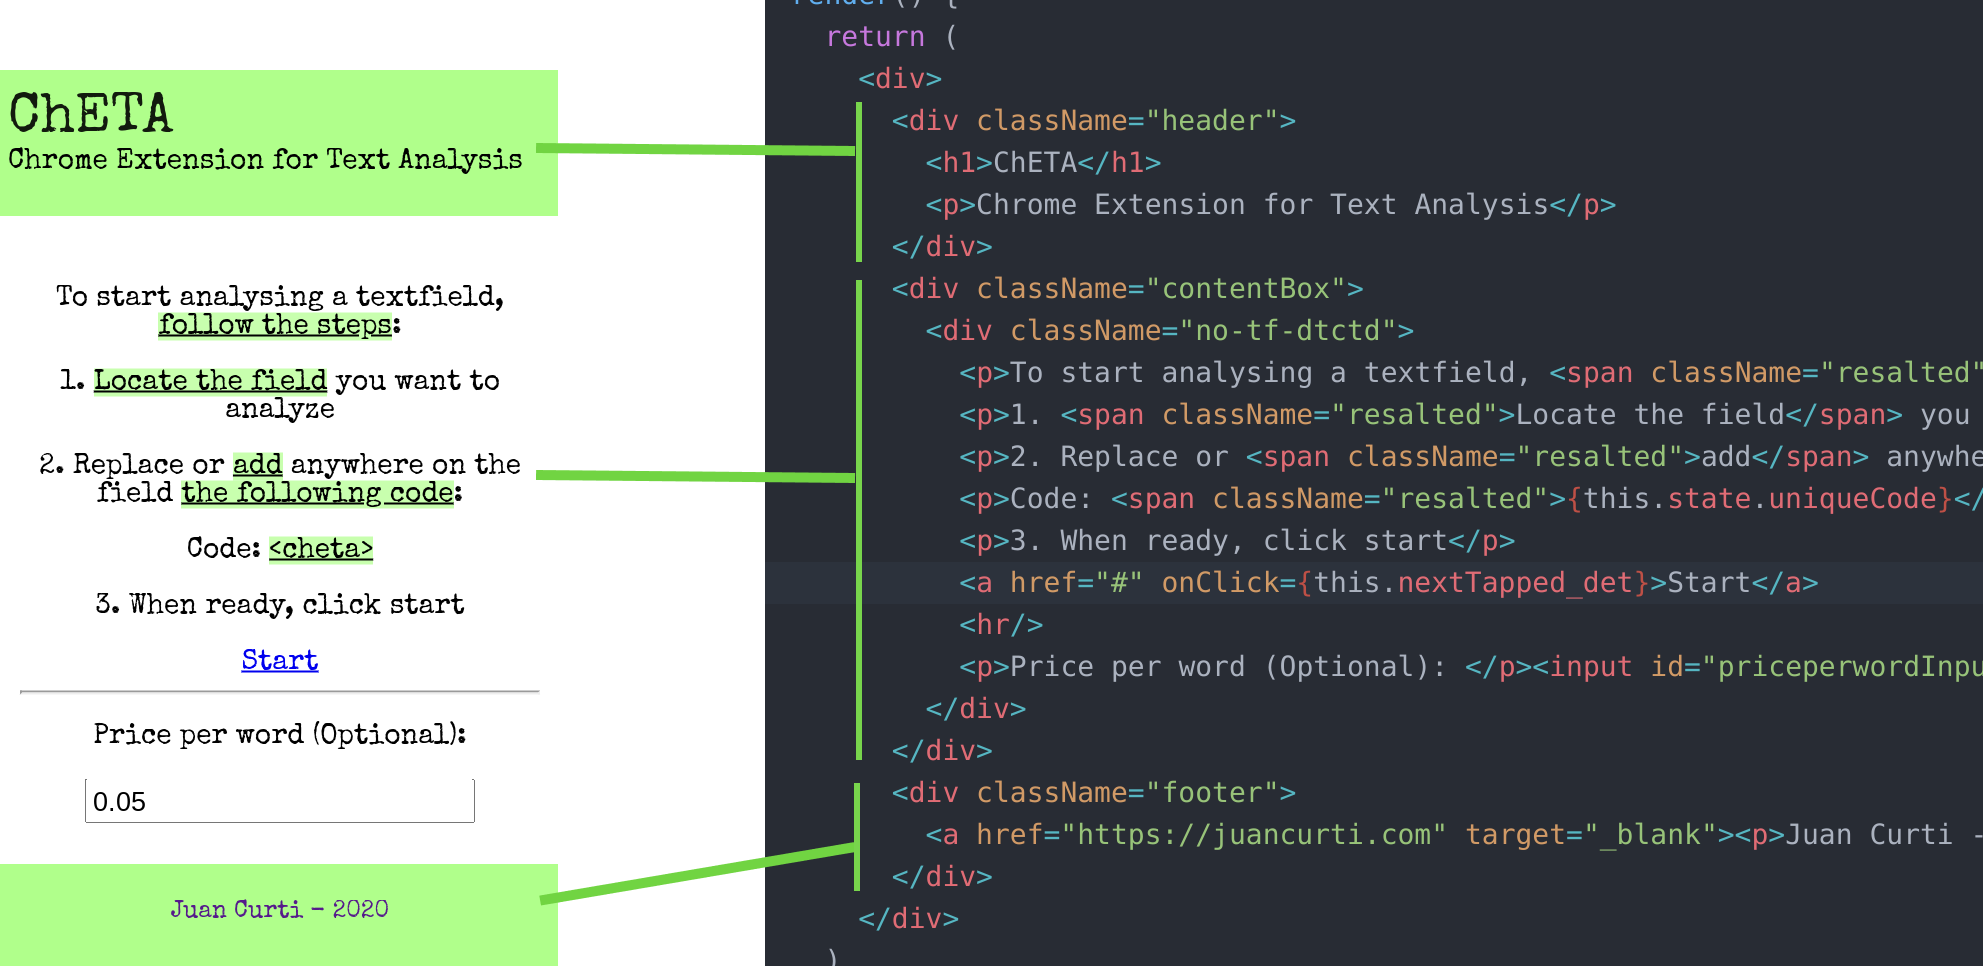
You can copy and paste it from here, which will be faster:
您可以从此处复制并粘贴它,这样会更快:
render() {
    return (
      <div>
        <div className="header">
          <h1>ChETA</h1>
          <p>Chrome Extension for Text Analysis</p>
        </div>
        <div className="contentBox">
          <div className="no-tf-dtctd">
            <p>To start analysing a textfield, <span className="resalted">follow the steps</span>:</p>
            <p>1. <span className="resalted">Locate the field</span> you want to analyze</p>
            <p>2. Replace or <span className="resalted">add</span> anywhere on the field <span className="resalted">the following code</span>:</p>
            <p>Code: <span className="resalted">{this.state.uniqueCode}</span></p>
            <p>3. When ready, click start</p>
            <a href="#" onClick={this.nextTapped_det}>Start</a>
            <hr/>
            <p>Price per word (Optional): </p><input id="priceperwordInput" name="priceperword" value={this.state.inputs.priceperword} onChange={this.handleInputChange} type="number" step="0.01"/>
          </div>
        </div>
        <div className="footer">
          <a href="https://juancurti.com" target="_blank"><p>Juan Curti - 2020</p></a>
        </div>
      </div>
    )
  };
Last thing here, we need to add our nextTapped_det method, which will be called when pressing the Start button. Here, we will do a few things:
这里的最后一件事,我们需要添加我们的nextTapped_det方法,当按下“开始”按钮时将调用该方法。 在这里,我们将做一些事情:
- Declare a config map, which will be sent to the targeted DOM. This is really important if we want to send dynamic data from our extension to the DOM. Into this map, we will add the unique code that our script will try to find and the price per word, only if it is higher than 0.00; if it’s not, then we won’t display the price per word counter since it will be always zero. 声明一个配置映射,它将被发送到目标DOM。 如果我们想将扩展中的动态数据发送到DOM,这真的很重要。 在此地图中,我们将添加脚本将尝试查找的唯一代码以及每个单词的价格(仅当其高于0.00时); 如果不是,那么我们将不显示每字计数器的价格,因为它将始终为零。
Then we declare a CSS file to inject. We are sending also a custom font using the @import method. Making use of the chrome API, we use the insertCSS method to inject it.
然后,我们声明要注入CSS文件。 我们还将使用@import方法发送自定义字体。 利用chrome API ,我们使用insertCSS方法注入它。
- Execute a custom script we will write later on, but only after declaring our config variable. 执行稍后将要编写的自定义脚本,但仅在声明我们的config变量之后。
The code for the nextTapped_det method is the following
nextTapped_det方法的代码如下
nextTapped_det = () => {
    var config = {
      code: this.state.uniqueCode
    };if(this.state.inputs.priceperword > 0) {
      config['priceperword'] = this.state.inputs.priceperword;
    }var css = "@import url('https://fonts.googleapis.com/css2?family=Special+Elite&display=swap'); #cheta-flt-dv { padding: 8px; z-index: 999; position: fixed; width: 140px; bottom: 40%; right: 40px; background-color: #B0FF8B; color: black; border-radius: 20px; text-align: center; box-shadow: 2px 2px 3px #999; } .cheta-flt-p { margin: 2px; font-family: 'Special Elite'; font-size: 22px; } .cheta-pfnt { margin: 2px; font-family: 'Special Elite'; font-size: 14px; }";
    chrome.tabs.insertCSS({code: css});chrome.tabs.executeScript({
      code: 'var config = ' + JSON.stringify(config)
    }, function() {
      chrome.tabs.executeScript({
        file: 'chetalib/chetalib.js'
      });
    })}
最后一步:实时分析 (Final step: Live Analysis)
Finally, we need to add the script we will use to detect the input, listen to changes, and start analyzing the text. In case there is no text field with the code we are looking for, we will terminate the script. Also, we will make use of a helper function to detect not only inputs but also text areas, which are the most common scenarios.
最后,我们需要添加用于检测输入,侦听更改并开始分析文本的脚本。 如果我们要查找的代码没有文本字段,我们将终止脚本。 另外,我们将使用辅助函数来不仅检测输入,而且还检测文本区域,这是最常见的情况。
Let’s create in our public folder chetalib/chetalib.js, outside of our src/, with the following content:
让我们在src /外部的公共文件夹chetalib / chetalib.js中创建以下内容:
function init() {
  console.log("Initializing ChETA");
  var link = document.createElement('link');
  link.setAttribute('rel', 'stylesheet');
  link.setAttribute('type', 'text/css');
  link.setAttribute('href', 'https://fonts.googleapis.com/css2?family=Special+Elite&display=swap');
  document.head.appendChild(link);if(!config.code) {
    console.log("Error loading ChETA: Unique code not found")
    return;
  }
  var inputs = getInputsByValue(config.code);
  if(inputs.length == 0) {
    console.log("Error loading ChETA: Input not found")
    return;
  }
  var text = inputs[0].value.split(config.code).reverse()[0];
  // alert(text)
  inputs[0].value = inputs[0].value;
  inputs[0].addEventListener('input', (e) => {
    var inputs = getInputsByValue(config.code);
    if(inputs.length == 0) {
      console.log("Error loading ChETA: Input not found");
      return;
    }
    var text = inputs[0].value.split(config.code).reverse()[0];
    var wordCountSpan = document.getElementById("cheta-data-wordcount");
    wordCountSpan.textContent = ""+text.split(" ").length;var charCountSpan = document.getElementById("cheta-data-charcount");
    charCountSpan.textContent = ""+text.length;if(config.priceperword) {
      var pricePerWord = document.getElementById("cheta-data-priceperword");
      var priceVal = text.split(" ").length * config.priceperword;
      pricePerWord.textContent = ""+priceVal.toFixed(2);
    }
  });
  const div = document.createElement('div');
  var finalHTML = '<div id="cheta-flt-dv"><p class="cheta-flt-p">ChETA</p>';
  finalHTML += '<p class="cheta-pfnt">Words: <span id="cheta-data-wordcount">'+text.split(" ").length+'</span></p>';
  finalHTML += '<p class="cheta-pfnt">Chars: <span id="cheta-data-charcount">'+text.length+'</span></p>';
  if(config.priceperword) {
    var priceVal = text.split(" ").length * config.priceperword;
    finalHTML += '<p class="cheta-pfnt">Total PPW: $<span id="cheta-data-priceperword">'+priceVal.toFixed(2)+'</span></p>';
  }
  finalHTML += '</div>';
  div.innerHTML = finalHTML;
  document.body.appendChild(div);
}function getInputsByValue(value)
{
    var allInputs = document.getElementsByTagName("input");
    var results = [];
    for(var x=0;x<allInputs.length;x++)
        if(allInputs[x].value.includes(value))
            results.push(allInputs[x]);var allTextArea = document.getElementsByTagName("textarea");
    for(var x=0;x<allTextArea.length;x++)
        if(allTextArea[x].value.includes(value))
            results.push(allTextArea[x]);return results;
}init();
测试您的新扩展 (Test your new extension)
Now that we’re done let’s test our extension. First, we need to build our project, we will generate the dist/ folder. To do this, let’s run on our project folder:
现在我们完成了,我们来测试扩展。 首先,我们需要构建我们的项目,我们将生成dist /文件夹。 为此,让我们在项目文件夹上运行:
npm run buildIf everything went good, we should see this message in our command line:
如果一切顺利,我们应该在命令行中看到以下消息:

Let’s open Google Chrome now and go to chrome://extensions. At the top right of you screen, you should see the option to enable Developer mode. Let’s activate it:
现在打开Google Chrome浏览器,然后转到chrome:// extensions。 在屏幕的右上角,您应该看到启用开发人员模式的选项。 让我们激活它:
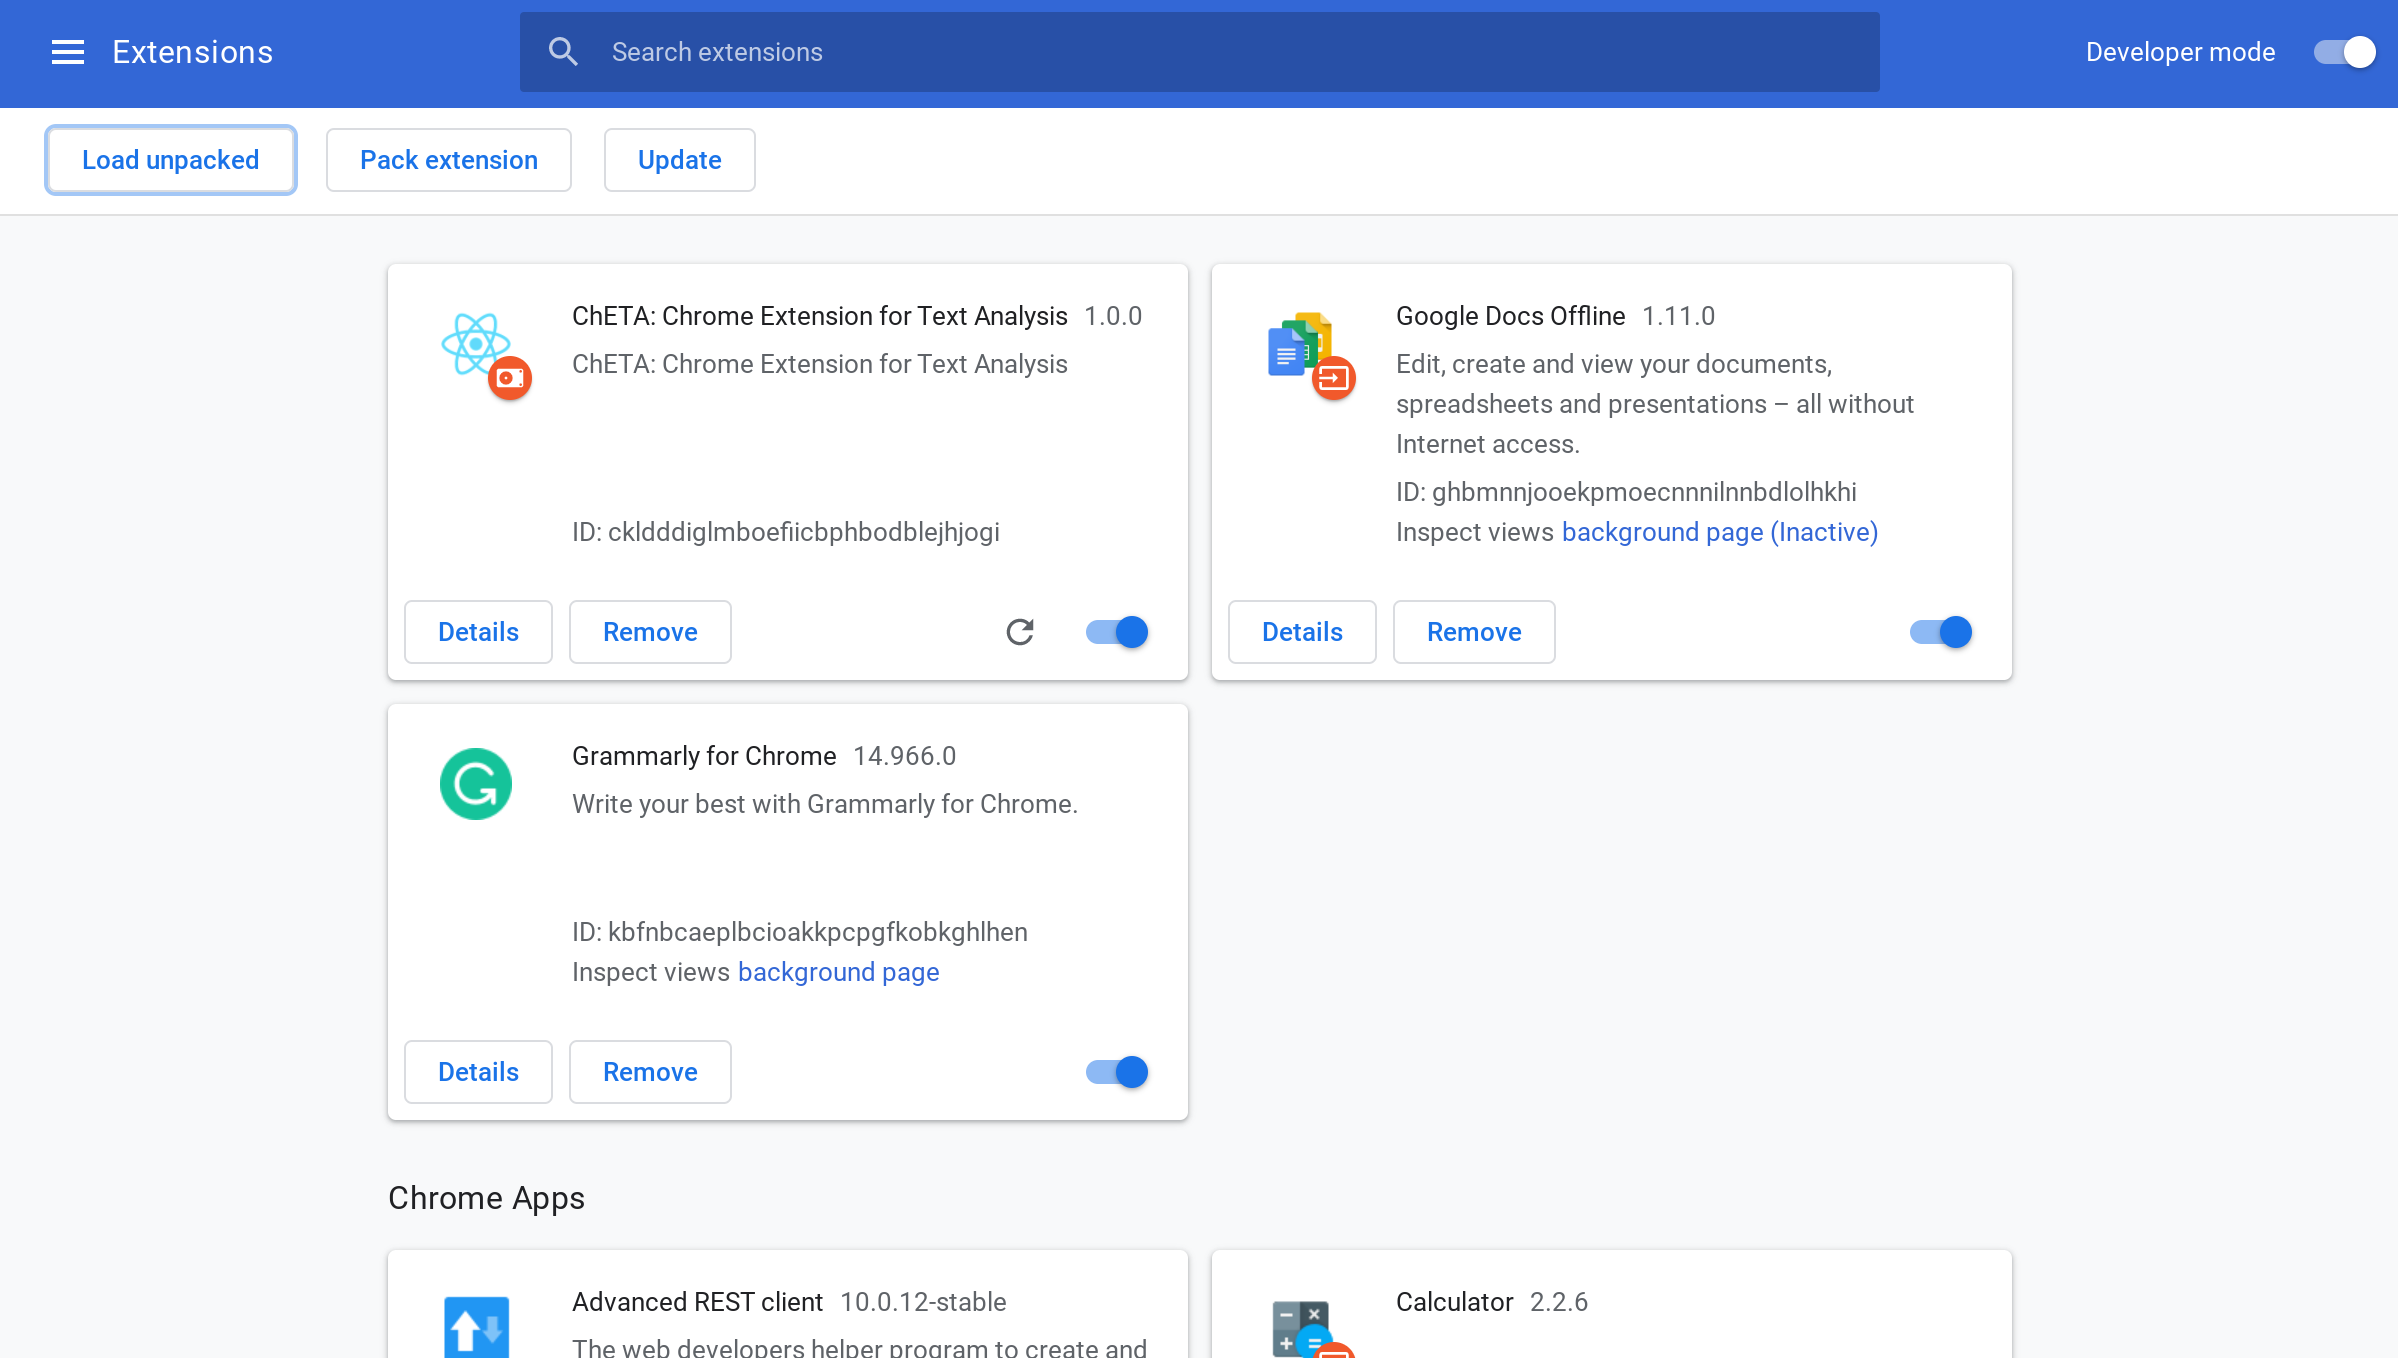
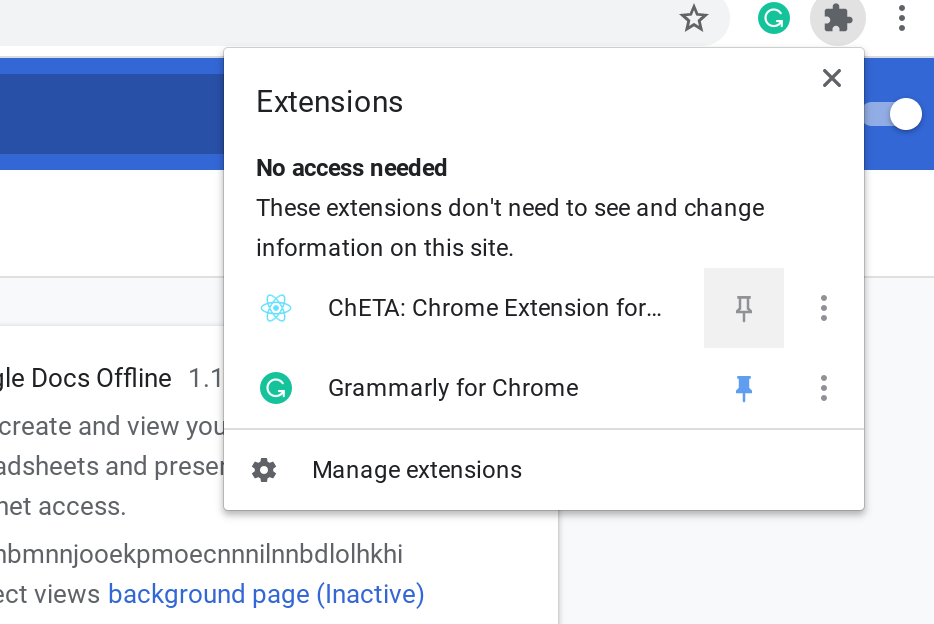
Now you’re ready to upload it! Click the Load unpacked button, look for your dist/ folder, and load it. Finally, as all extensions, you only need to make it visible clicking this little button:
现在您可以上传了! 单击“ 加载解压”按钮,查找dist /文件夹,然后加载它。 最后,与所有扩展一样,您只需单击以下小按钮即可使其可见:
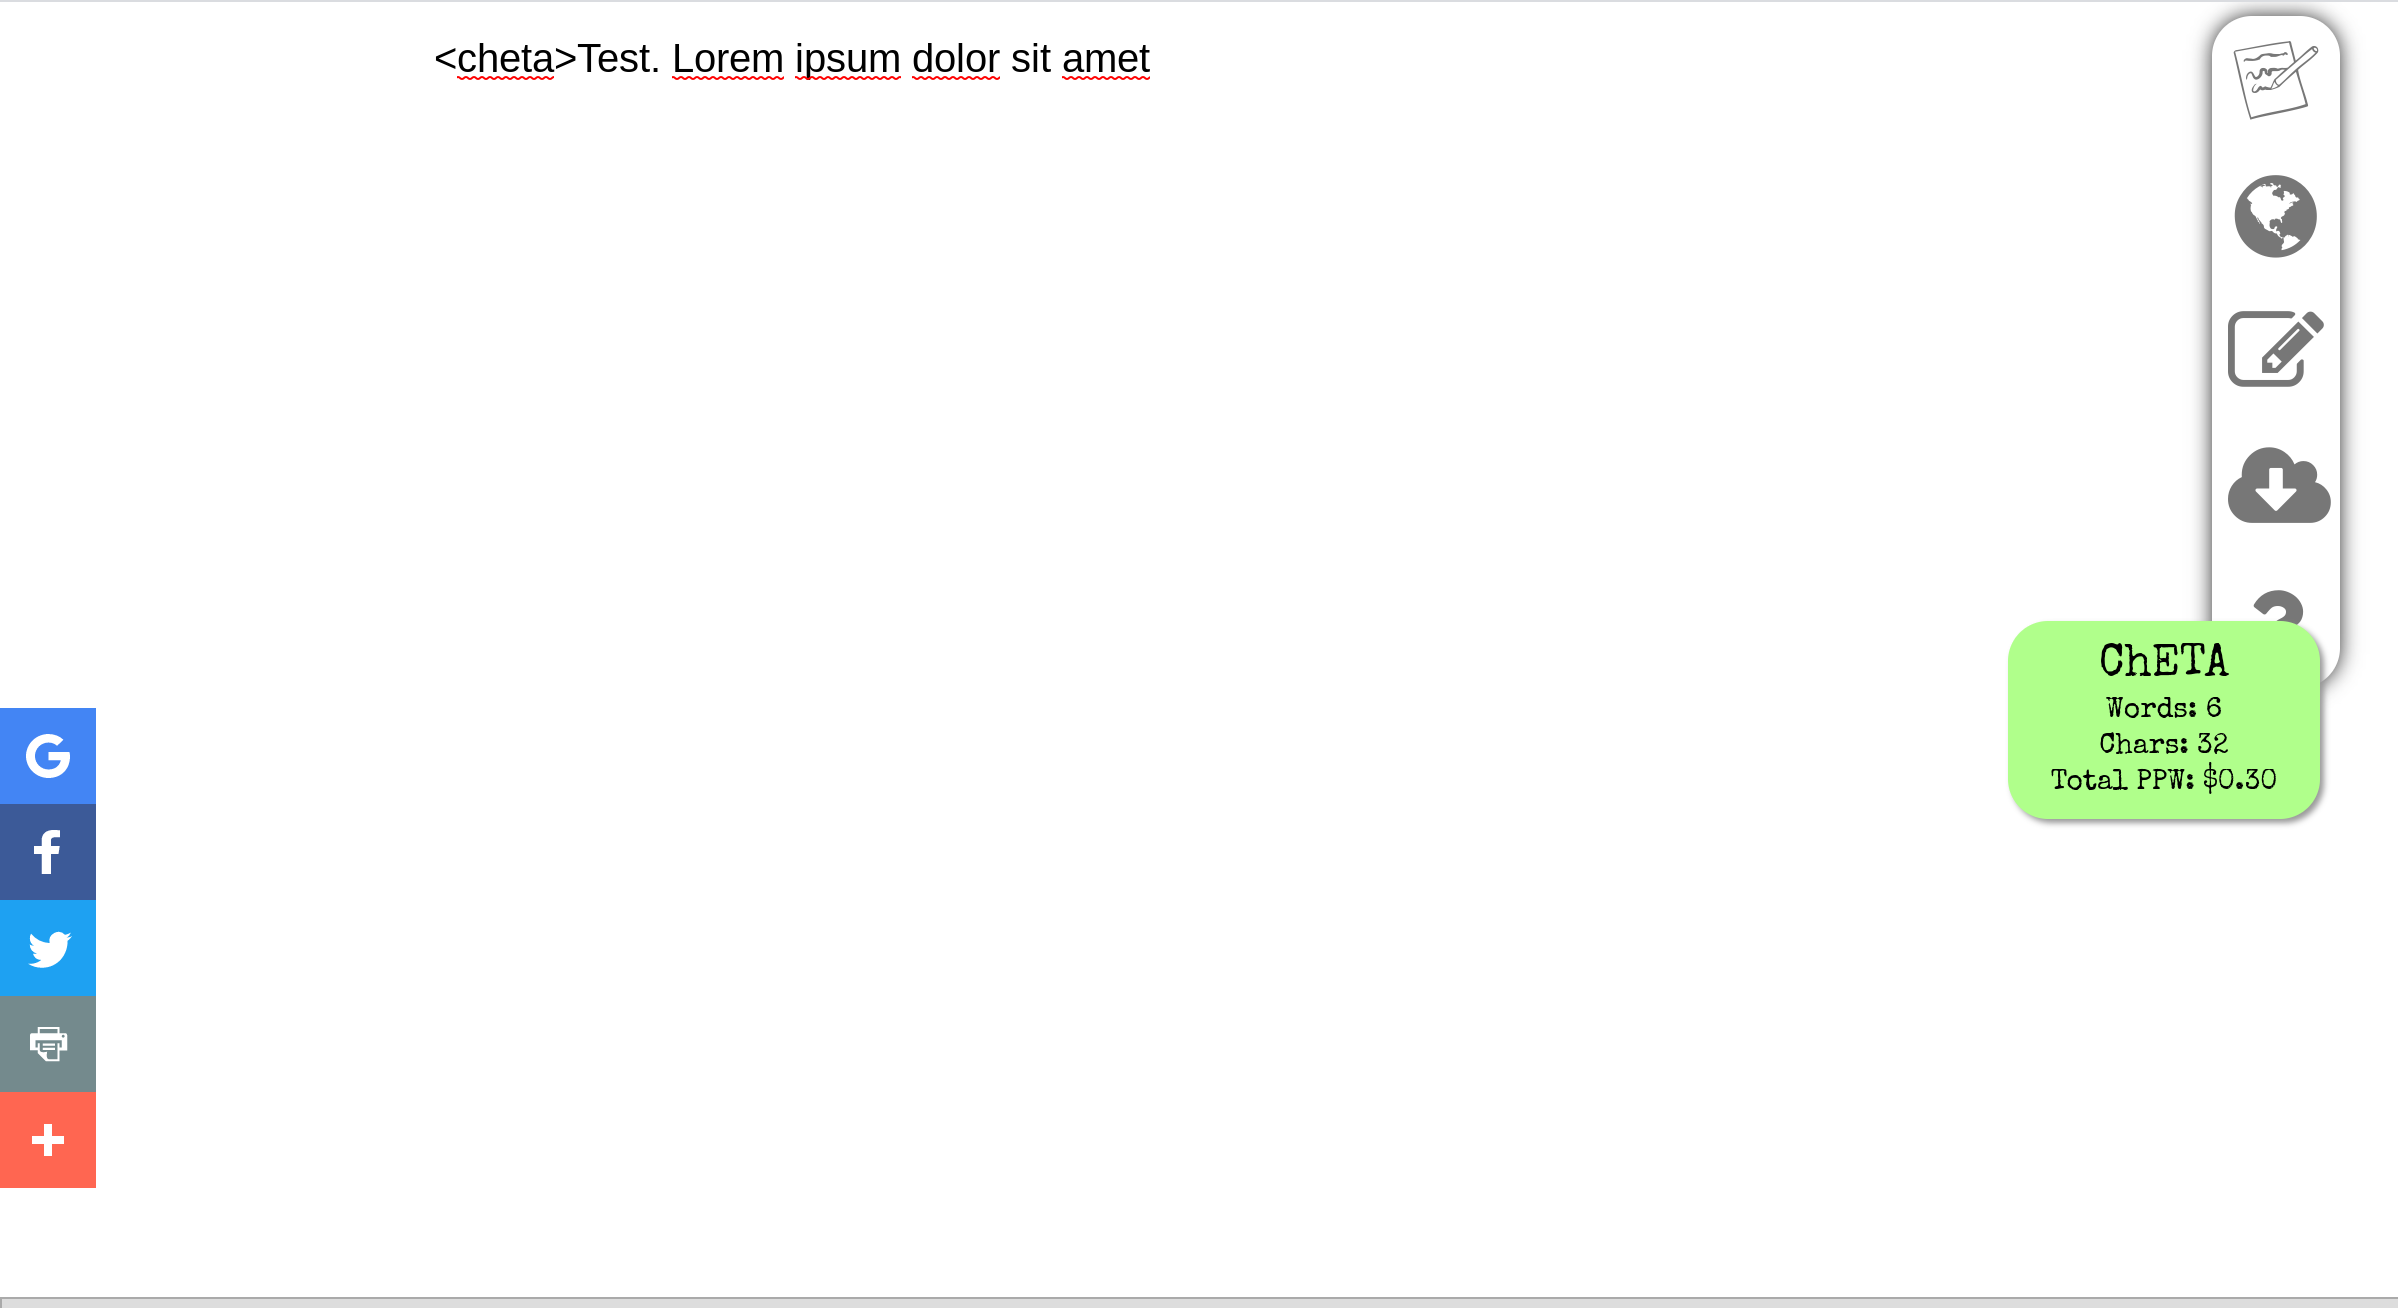
Finally, to test it we can go to shrib.com, activate our extension, and see the result:
最后,要测试它,我们可以转到shrib.com ,激活我们的扩展程序,然后查看结果:
结论 (Conclusion)
Developing a Chrome Extension is not as hard as people could think. And being in JavaScript, the possibilities are infinite.
开发Chrome扩展程序并不像人们想象的那么难。 在JavaScript中,可能性是无限的。
As homework, you can try implementing Sentiment Analysis (Explained in another of my tutorials, Link here) in order to detect the tone of the text (Positive — negative), or implementing Google Vision API to read text on images on a given webpage out loud for blind people (Explained here).
作为家庭作业,您可以尝试实施情感分析(在我的另一本教程中说明,请链接到此处 ),以便检测文本的色调(正面-否定),或者实施Google Vision API以读取给定网页上图像上的文本给盲人大声( 在这里解释 )。
翻译自: https://itnext.io/how-to-build-a-chrome-extension-to-analyze-text-as-you-write-a1c0ab1923f9
chrome扩展crx构建


 545
545

 被折叠的 条评论
为什么被折叠?
被折叠的 条评论
为什么被折叠?
 到【灌水乐园】发言


